Left panel
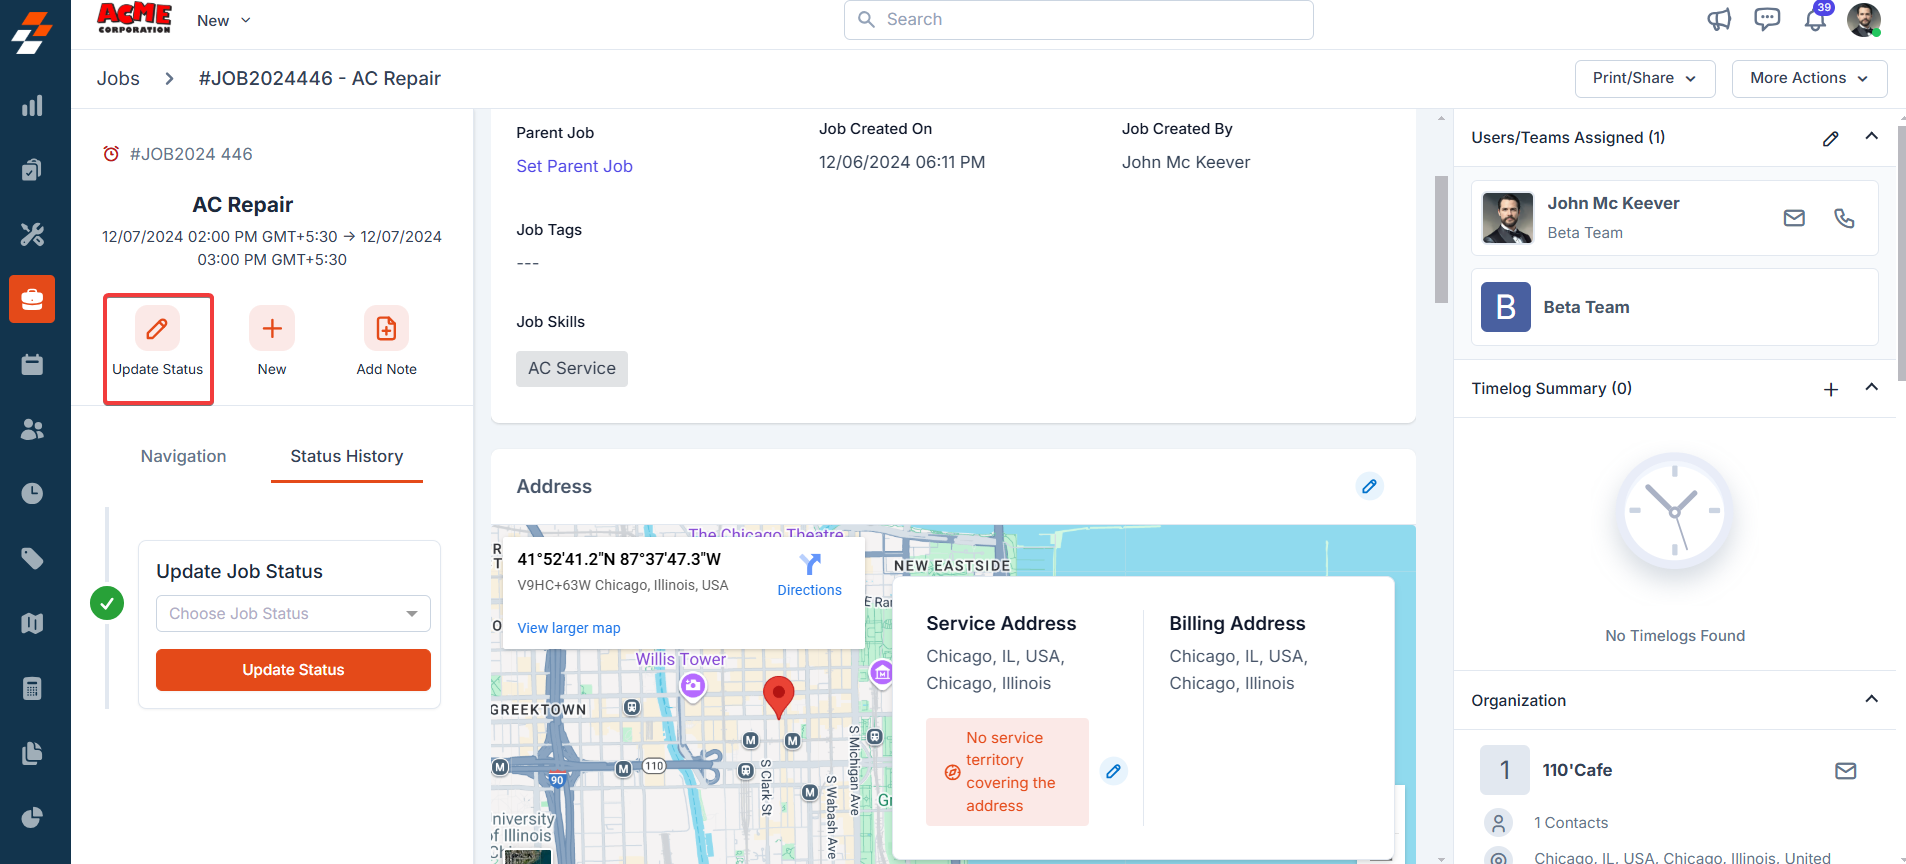
The left panel contains job-related details such as the job title, work order number, and scheduled time zone. Below this, the Quick Actions bar provides contextual action buttons that allow you to update the job status, create a new quote, proposal, invoice, or child job, and add notes. From this panel, you can also navigate to view job details, associated notes, activities, and chats.Update job status
Job statuses are stages/checkpoints within a job that field technicians and other back-office users, such as dispatchers and supervisors, can update.Note: Administrators can set up the master statuses, dependencies, and associated checklists from the Settings page.
- Click the “Update Status” button on the quick action bar.
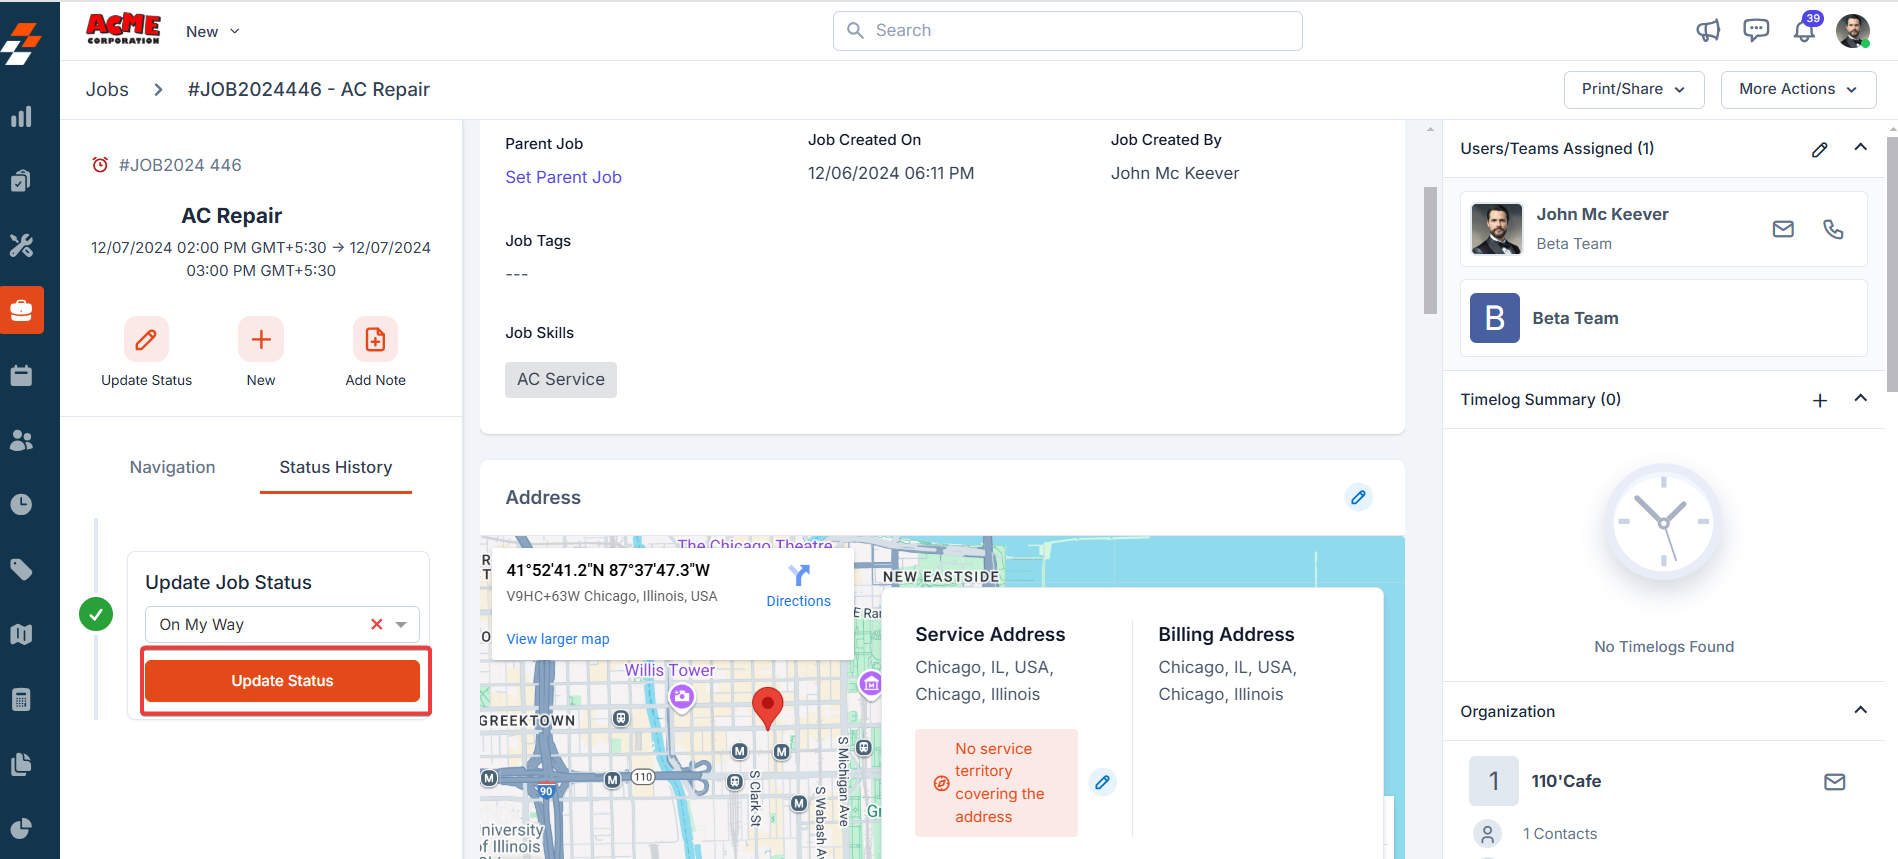
- Choose the status you want to update from the “Update Status” dropdown.
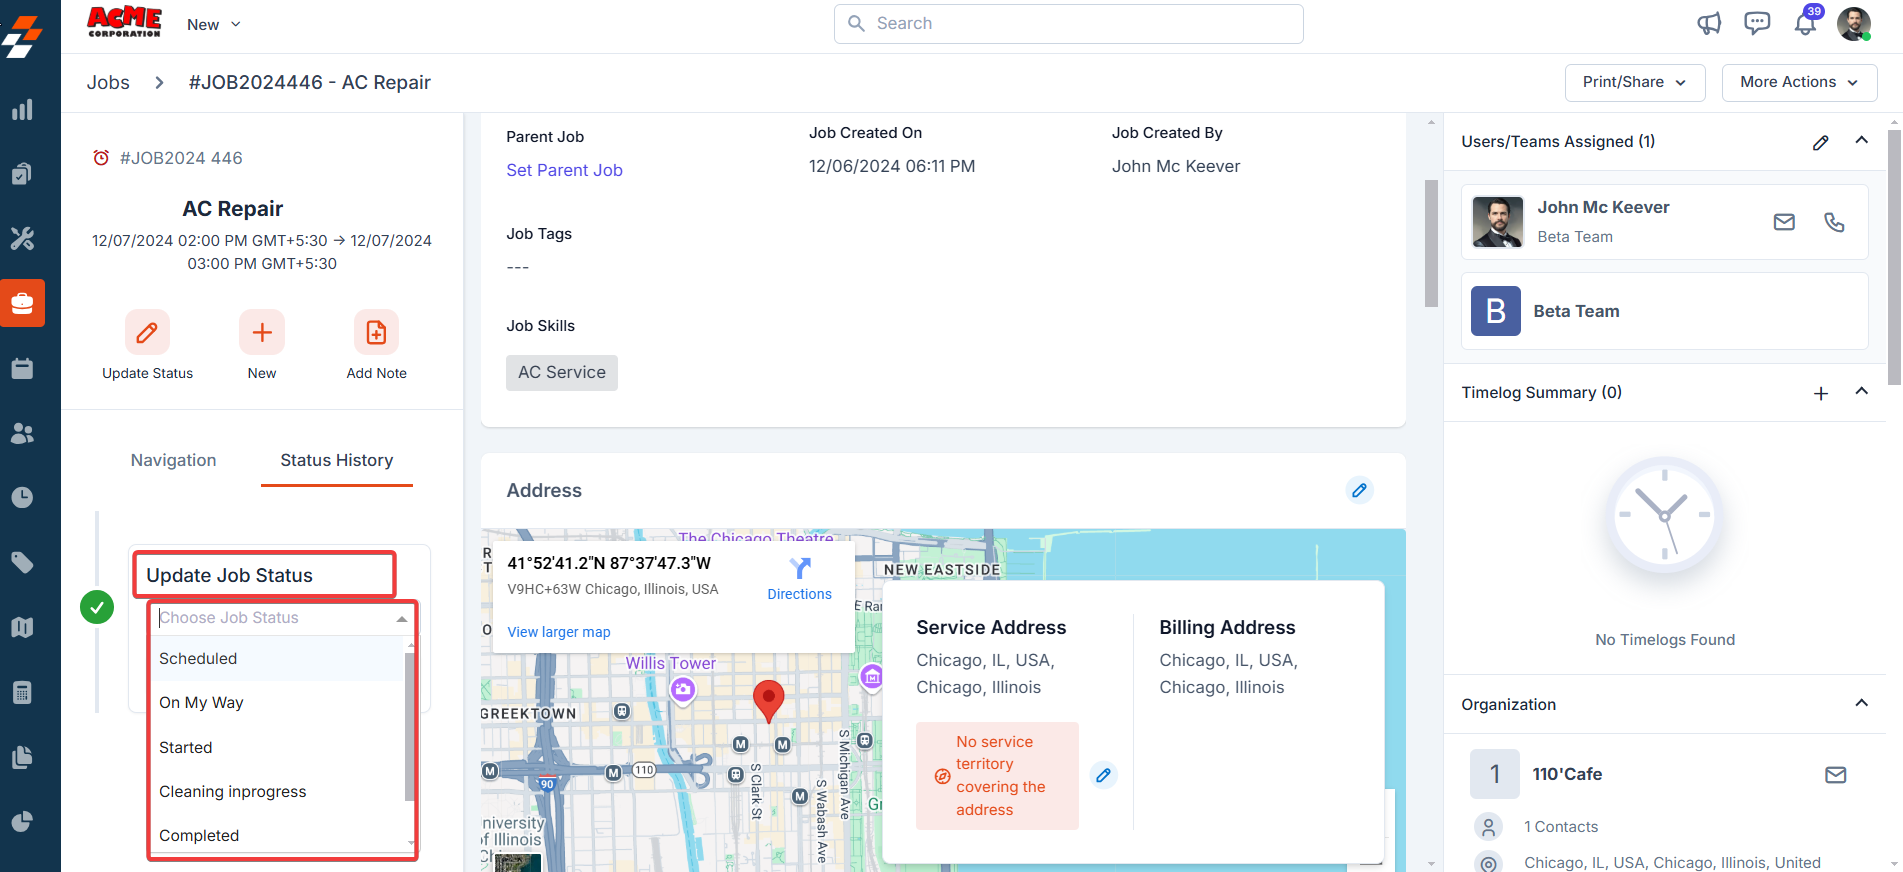
- Click the “Update Status” button after choosing the status. If the checklist is configured under settings, you may be prompted to fill it out.
- Click the “Update” button to confirm the status update change.
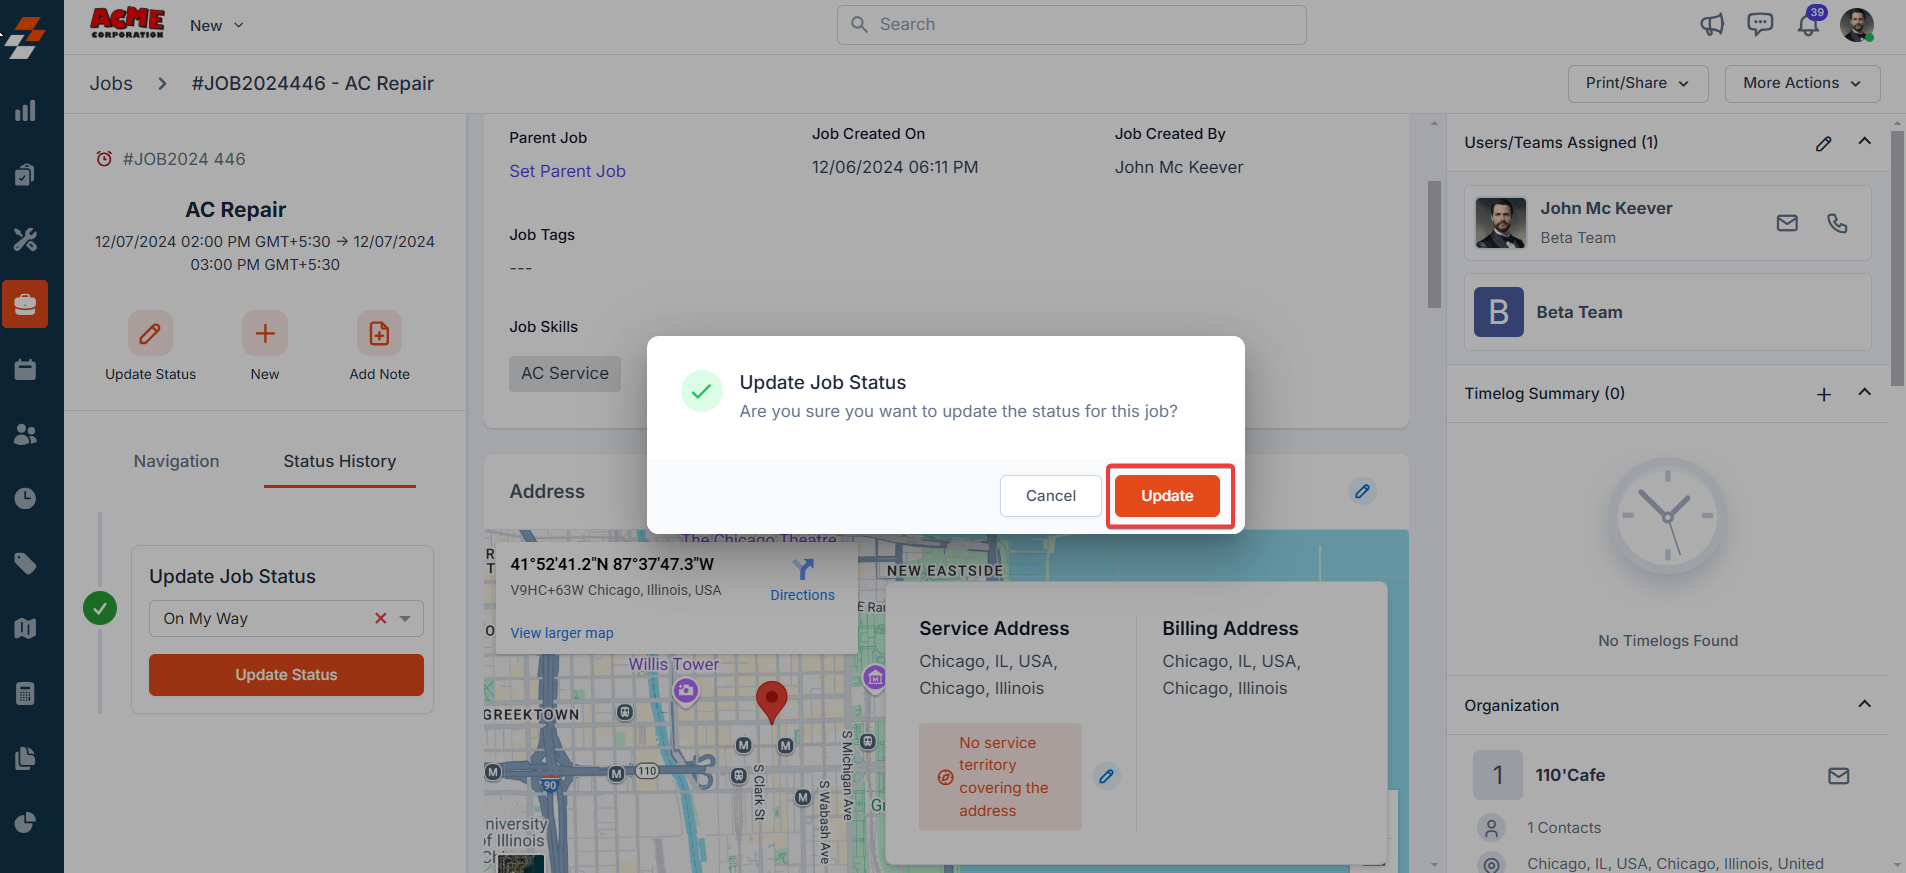
- The status is updated successfully.
Status History actions
Status History actions
After updating the status, you can edit or delete it using the kebab icon next to the status from the “Status History” tab. If a checklist is associated with the status, you can see it by clicking View Checklist.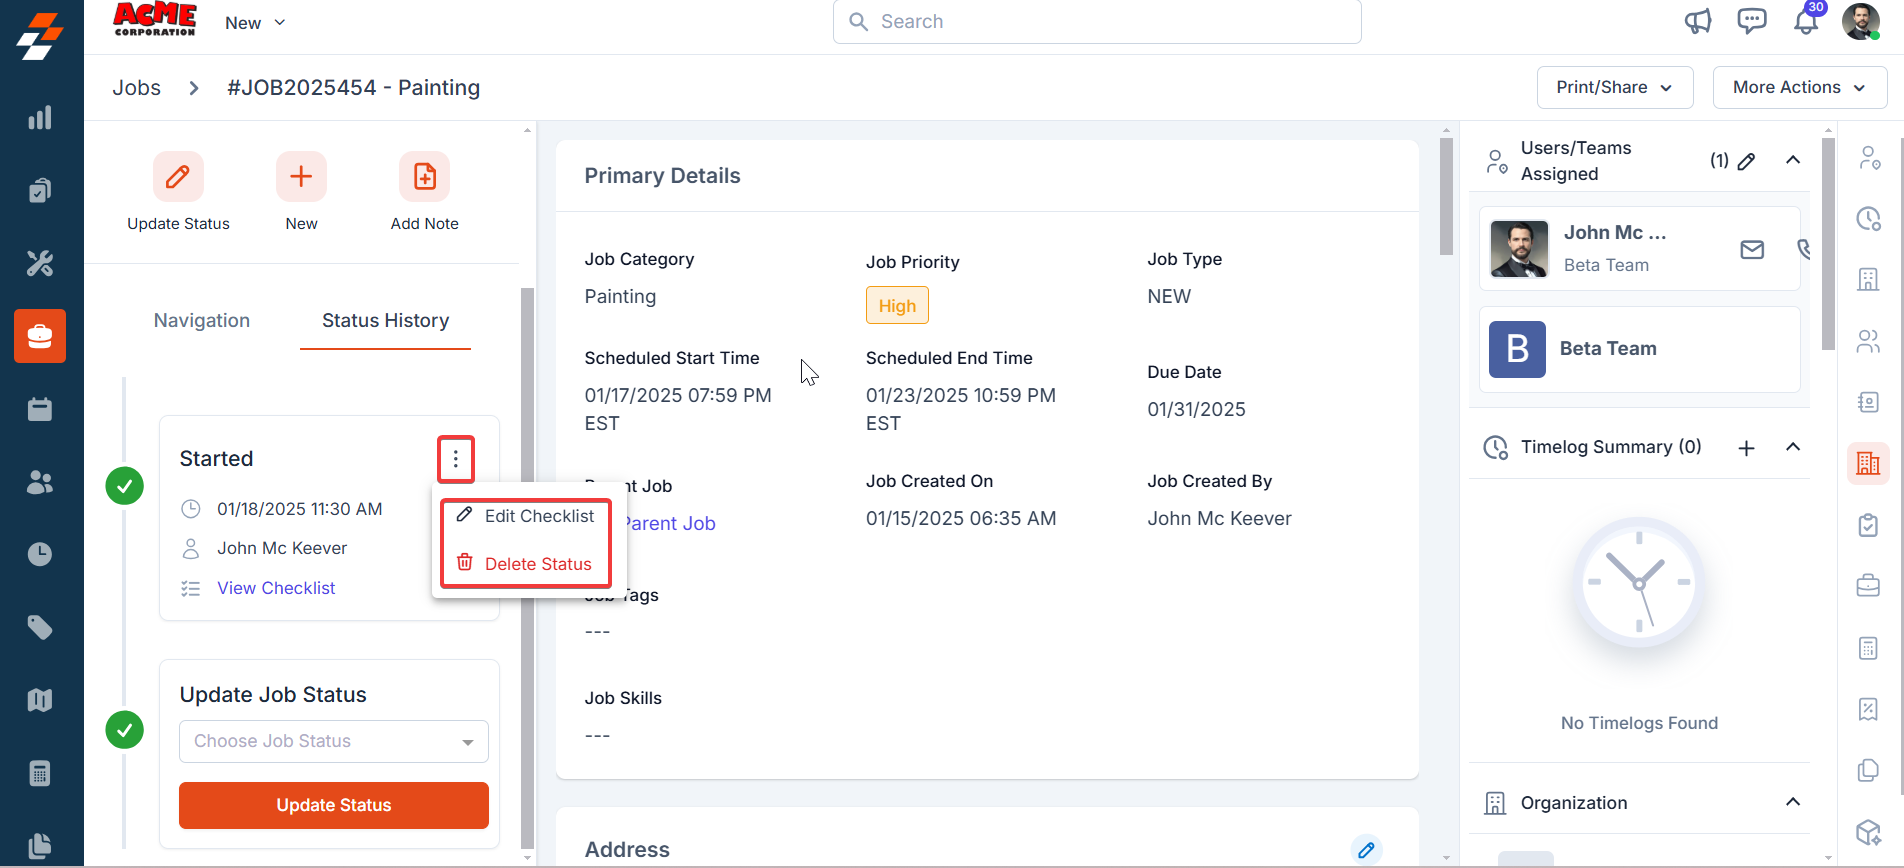
If your job has service tasks, you must resolve all tasks before you can move the job to Closed. Each task must have a status of Completed, Canceled, or Incomplete. If any task is still open, Zuper blocks the status update and displays an error. Go to the Service Tasks tab on the job details page to check progress and resolve any remaining tasks.
Managing Jobs Across Multiple Visits
Managing Jobs Across Multiple Visits
When work requires more than one visit to complete — such as phased installations, repair jobs awaiting parts, or multi-day service calls — keep a single job open throughout all visits rather than creating a new job for each return visit.
Create one job for the full scope of work
Create a single job covering the entire engagement. Set the initial Scheduled Start and End Dates for the first visit.
Place the job On Hold between visits
When the technician finishes for the day but more visits are needed, update the job status to On Hold. This keeps the job open and visible without marking it complete.
Update the schedule for the next visit
Before the return visit, update the Scheduled Start Date and Scheduled End Date on the job to reflect the new visit time. The job will reappear on the Job Calendar and Dispatch Board for the updated date.
- From the Calendar: Drag the job to the new time slot, or right-click and select Reschedule.
- From this page: Edit the job and update the schedule fields, then click Update.
Resume the job on the return visit
When the technician arrives, update the job status from On Hold to resume work. Time logging continues from this point.
Creating a separate job per visit causes fragmented job history, inaccurate reporting, and premature status syncs to integrated systems. The single-job approach keeps all time logs, notes, parts consumption, and history in one record from start to finish.
Schedule
You can schedule jobs using Manual Scheduling or Assisted Scheduling.
- Manual Scheduling allows you to pick the technician and time slot yourself, ideal for customer-preferred appointments.
- NewAssisted Scheduling recommends the best technician and available slot based on skills, availability, and service territory. Learn more about how recommendations work in the Assisted Scheduling article.
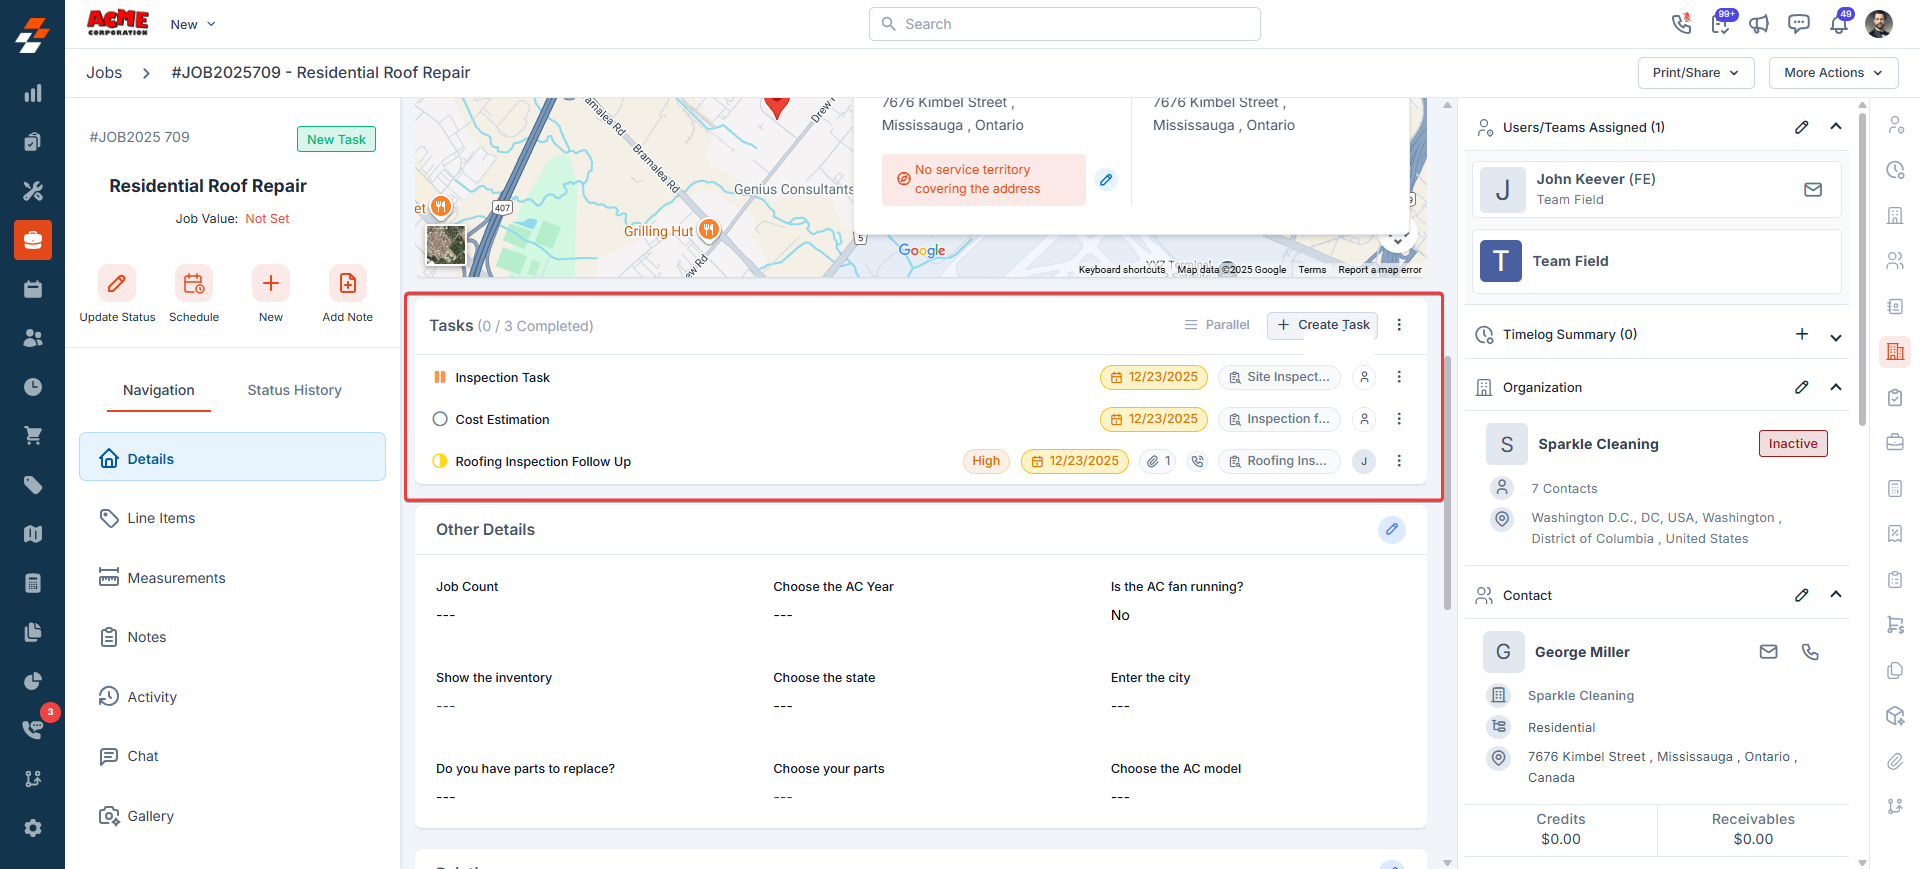
Associating tasks with a Job
You can create and manage tasks directly within a job to track actions or milestones.Each task helps divide complex job activities into smaller, trackable steps.
Tasks can be updated, reordered, or linked to inspection forms for progress tracking.
To learn how to create and manage them, see the Associating Tasks with Jobs and Projects section.
Line Items
The Line Items section on the details page displays a consolidated view of the Parts & Services and Expenses sections. This section allows you to add, edit, and track all parts & services and expenses used during job execution.
Measurements
The Measurements tab lets you order, sync, and review property measurement data directly from a job — without switching between platforms. When you connect a measurement provider such as Hover, aerial roof data and 3D models flow straight into the job record, giving your team accurate figures before work begins. To set up measurement providers and configure which data points appear here, see Measurements and estimations.Add Notes
Job notes are comments or information added to a job over its course. These job notes add more context to the job. Your notes can be anything ranging from a simple text reminder to an image of the item, service, and video, or document.
Info: To know more about how to add notes, see Notes and Chats
Documents
Job document engine
Job document engine
Job documents is the built-in document engine inside Zuper. Use it to create contracts, waivers, completion certificates, and brochures, then attach them directly to a job record. Because every document lives inside its job, your team always knows where the paperwork is — and your customers always receive a signed copy.You build reusable templates once in Settings, apply them to any job, customize for that customer, and send for e-signature without leaving Zuper.The Document Templates list shows every template in your workspace, with columns for Document Name, Status, Created By, and Created On. When you are starting out, the list is empty.
*Sign Now is available when the logged-in user is the document creator and the internal signer has not yet signed.
Before you begin
- Confirm you have admin access to your Zuper workspace.
- Prepare any existing PDF files you plan to upload, for example, waiver forms or legal contracts.
- Familiarize yourself with the Jobs module — documents are tied to individual job records.
Set up document templates
Before you can create documents inside jobs, you need at least one active template. Templates live in Settings and act as master copies — any edits you make at the job level never affect the original template.Navigation: Settings → Modules → Jobs → Document Templates
Create a new template
- Go to Settings.
- Select Modules, then Jobs, then Document Templates.
- Select + New Template.
- Enter a name for your template in the Template Name field.
- Select Create.
You can create up to 50 templates in the Document Templates list.
Add and configure pages
Select + Add Page at any time to insert a new page. A dialog offers three page types. You can mix and match all three within a single template.| Page type | When to use it |
|---|---|
| Text Page | Build custom content using the block editor — headers, paragraphs, tables, and formatted text. Add input fields and signature blocks directly onto the page. |
| Upload PDF | Import an existing PDF — a waiver form, legal contract, or safety checklist. Zuper converts each page into an editable canvas so you can overlay fields and signature blocks. |
| Job Gallery | Pull photos from the job’s image gallery into your document. Choose a layout style and set whether at least one image is required before the document can be sent. |
Text pages
Text pages use the same block editor as the Proposal Layout builder. Enter/ on the page to open the Block Tools menu — add headers, paragraphs, numbered lists, bullet lists, checkboxes, and tables.Select text to access Inline Tools for bold, italic, links, and other formatting. To move, convert, or delete a block, select the six-dot handle to its left and choose an option from Block Tunes.PDF pages
After you upload a PDF, Zuper converts each page into an individual canvas. A 10-page PDF becomes 10 separate, editable pages in the left panel. After Zuper creates the pages, you can:- Reorder pages by dragging them in the left panel.
- Show or hide individual pages.
- Lock a page to prevent editing at the job level — select the More icon on the page to access Page Settings. Locked pages cannot be renamed, hidden, or edited by any user.
- Drag and drop signature blocks, input fields, and dynamic variables onto any PDF page.
Zuper maps each element to exact coordinates on the PDF page, preserving the layout exactly when it generates the document. Position signature blocks and input fields carefully before sending.
Job gallery pages
Job gallery pages pull photos directly from the job’s image gallery — a natural fit for completion reports or damage assessments where photographic evidence matters. In the right panel you can:- Turn on the Mandatory Images toggle to require at least one image before the document can be sent.
- Select a Layout Style: Standard Grid (three-column), Wide Format (two-column), Side-by-Side (before and after), or Full Width (single column).
- Lock the page to prevent layout changes at the job level. The master template controls the photo selection toggle — users cannot enable or disable it.
Add input fields and signature blocks
Job documents lets you place fillable fields and e-signature blocks anywhere on a text page or a PDF page — for both your customer and your internal company authorization signer. Select the Fields icon on the right edge of the builder to open the Fields panel.Switch signer role
The Fields panel defaults to Customer. Select the signer dropdown to switch to Company authorization. Fields you place while a signer is active are assigned to that signer and color-coded — orange for Customer, blue for Company authorization.Available fields
| Field | Section | Configuration options |
|---|---|---|
| Signature | For Signing | Required toggle, Duplicate, Remove |
| Text field | For Filling | Pre-filled text, Read Only toggle, Required toggle, Font size |
| Checkbox | For Filling | Required toggle, Duplicate, Remove |
| Date | For Filling | Required toggle, Font size, Duplicate, Remove |
| Dropdown | For Filling | Add options, set a default value, Read Only toggle, Required toggle, Font size |
In the text editor, each field occupies its own block. You cannot place two fields side by side on the same line — the editor is block-based. On PDF pages, drag to position fields precisely.
Add dynamic variables
Select the Variables icon (curly braces) on the right edge of the builder to open the Variables panel. Variables pull live job data into your document at generation time — work order numbers, customer names, organization details, and property information. The panel groups variables into four categories:- Job Variables
- Customer Variables
- Organization Variables
- Property Variables
Manage templates
From the Document Templates list, select the three-dot actions menu on any template row to access the following options:| Action | What it does |
|---|---|
| Edit Document | Open the template builder and make changes. |
| Clone Document | Create a copy of the template with a new name. |
| Deactivate Document | Hide the template from the job-level template picker without deleting it. Deactivated templates remain in the list with an Inactive status. |
Create a document from a job
Once your templates are ready, apply one to a specific job and customize it for that customer. Every change you make at the job level stays with that document only — your master template in Settings remains untouched.- Open the job you are working on.
- Select Documents from the left-hand navigation panel inside the job.
- Select + New Document.
- The Choose Document Template picker opens. Select any template from the left panel to see a live preview on the right.
- Select Use this template.
Each job supports a maximum of 50 documents.
Send a document for signing
Select Send for Signing from the top-right corner of the document editor, or from the document’s action menu in the Documents list. The Send for Signing dialog opens.- Review the customer name and email in the Recipients section. These are pre-filled from the job record. Update them here if you need to route this document to a different contact — this does not change the customer details on the job record itself.
- If the template includes a Company Authorization signer, their details appear below the customer row. Confirm or update the internal signer.
- Add an optional Remark (up to 280 characters). This note appears in the body of the signing email your recipients receive.
- Select Send Document.
The Resend and Copy Link options appear when the document is in Awaiting Signature or Partially Signed status and you are the document creator.
Track document status
Every document moves through a defined lifecycle. Check the current status in the Documents list inside the job. A Pending indicator appears in the left navigation panel when action is required.Status definitions
| Status | What it means |
|---|---|
| Draft | The document exists but has not been sent yet. |
| Sent | The document was sent and contains no signature or input fields — no signing action is required from the recipient. |
| Awaiting Signature | The document was sent and contains at least one signature or input field that has not yet been completed. |
| Partially Signed | The document has multiple signers and at least one has signed, but not all. |
| Signed | All required parties have signed and the document is complete. |
| Void | The document has been manually voided and is no longer active. |
| Expired | The document was sent for signing but was not completed within 30 days. It expired automatically. |
Available actions by status
Actions available to you change as the document moves through its lifecycle. Once a document reaches Partially Signed or Signed status, it cannot be voided or deleted.| Status | List view actions | Document preview actions |
|---|---|---|
| Draft | Send for Signing, Edit Document, Rename, Clone, Download PDF, Delete | Download, Print, Edit Document, Send for Signing |
| Sent | Send Document, Edit Document, Rename, Clone, Download PDF, Delete | Download, Print, Edit Document |
| Awaiting Signature | Void Document, Edit Document, Rename, Clone, Download PDF | Download, Print, Edit Document, Sign Now* |
| Partially Signed | Void Document, Rename, Clone, Download PDF | Download, Print, Sign Now* |
| Signed | Rename, Clone, Download PDF | Download, Print |
| Void | Rename, Clone, Download PDF | Download, Print |
| Expired | Rename, Clone, Download PDF, Delete | Download, Print |
Activity timeline and audit trail
Every document has a built-in activity timeline. Expand any document row in the Documents list to see a time-ordered log of when the document was created, sent, viewed, and signed — and by whom.Upon signature, Zuper captures and stores the signer’s IP address and browser information. This audit trail supports legal compliance and gives you a clear record if a signature is ever disputed.Resend and copy signing links
For documents in Awaiting Signature or Partially Signed status, two quick actions are available from the expanded document row:| Action | What it does |
|---|---|
| Resend | Sends a new email with the signing link to the pending signer. |
| Copy Link | Copies the signer’s public link to your clipboard so you can share it manually. |
Automated reminders
Zuper automatically sends a follow-up email to signers who have not yet completed their step — three days after the document is sent.FAQs
What happens if a document is not signed within 30 days?
What happens if a document is not signed within 30 days?
The document automatically moves to Expired status. The signing link in the customer’s email stops working. You can clone the expired document, which creates a new draft, and send it again.
Can I edit a document after sending it?
Can I edit a document after sending it?
Yes, but with an important consequence. Editing a sent document moves it back to Draft status and the signing links stop working immediately. You need to send the document to all signers again from the beginning.
What is the difference between Sent and Awaiting Signature?
What is the difference between Sent and Awaiting Signature?
Sent means the document contains no signature or input fields — it is informational only, and no action is required from the recipient. Awaiting Signature means the document contains at least one field that must be completed before it is considered done.
Will editing this document change my master template in Settings?
Will editing this document change my master template in Settings?
No. Edits you make inside a job apply only to that specific document. Your master template in Settings stays exactly as you built it.
How many documents can I add to a single job?
How many documents can I add to a single job?
Each job supports up to 50 documents. If you reach this limit, download or delete documents you no longer need to free up space.
What if the customer did not receive their signing email?
What if the customer did not receive their signing email?
Expand the document row in the Documents list and select Resend to send a new email with the same link. You can also use Copy Link to share the link directly via another channel.If the issue continues, contact Support.
Related articles
Activity
The activity section on the details page displays a log or timeline of all actions and updates related to this job, helping you stay informed about recent changes and track the job’s progress.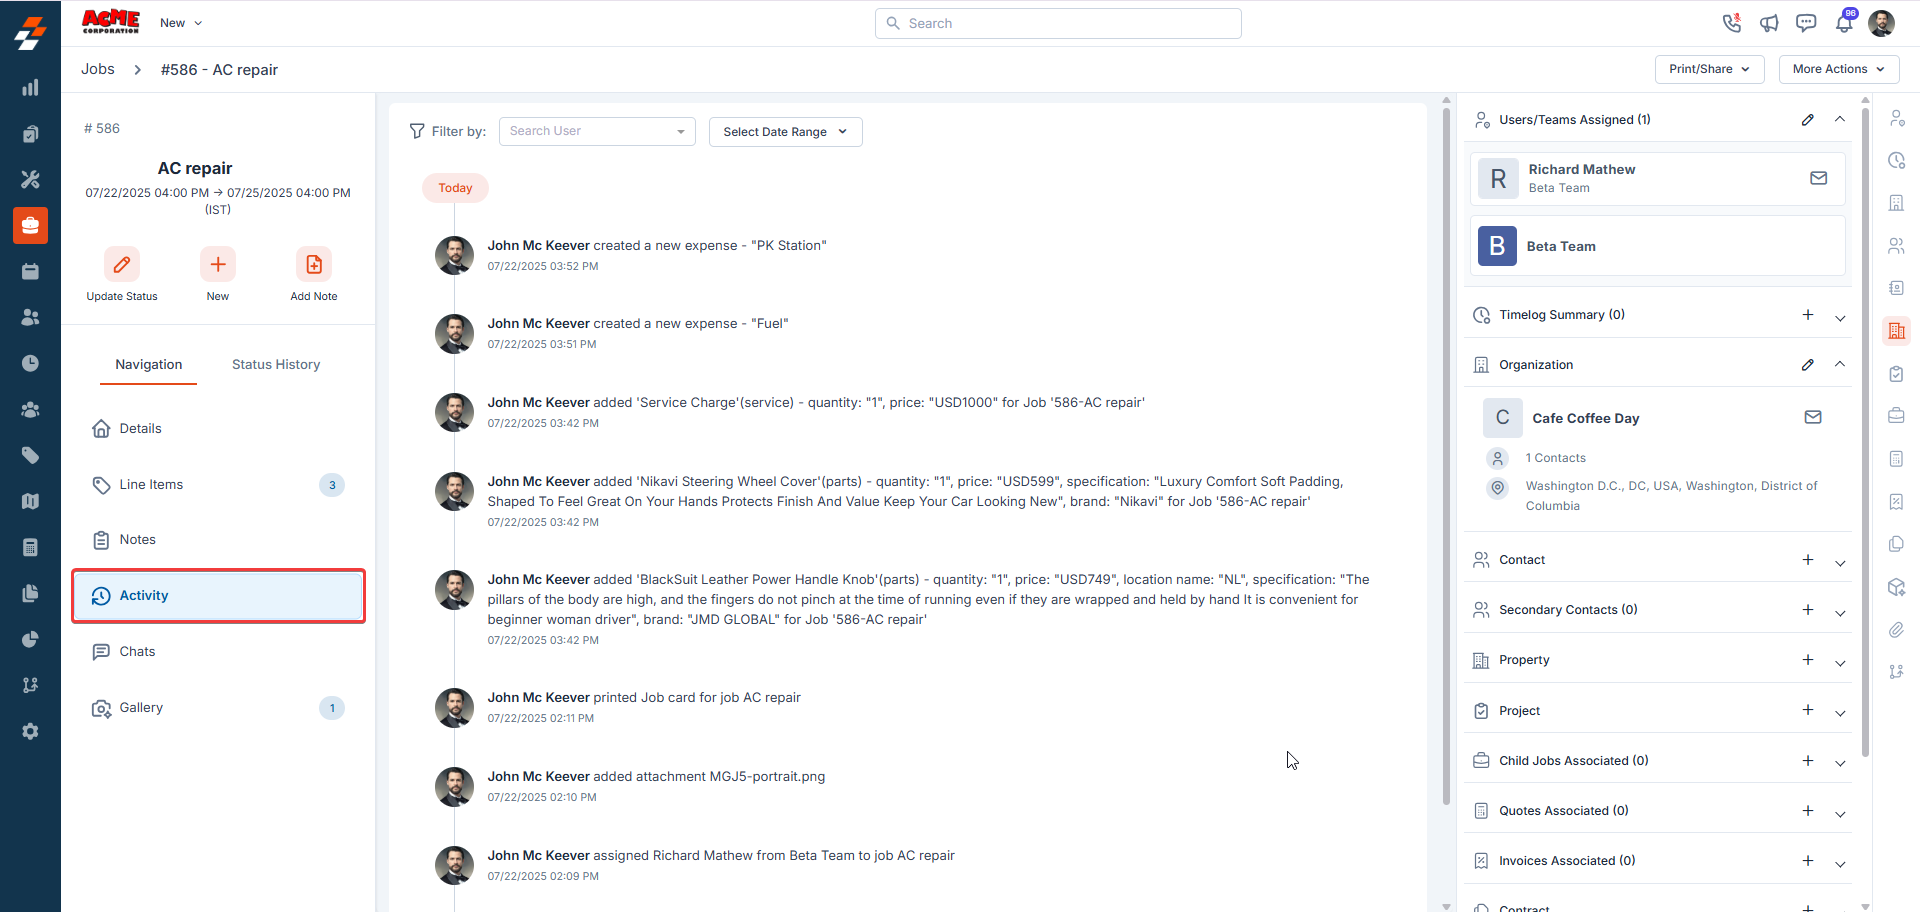
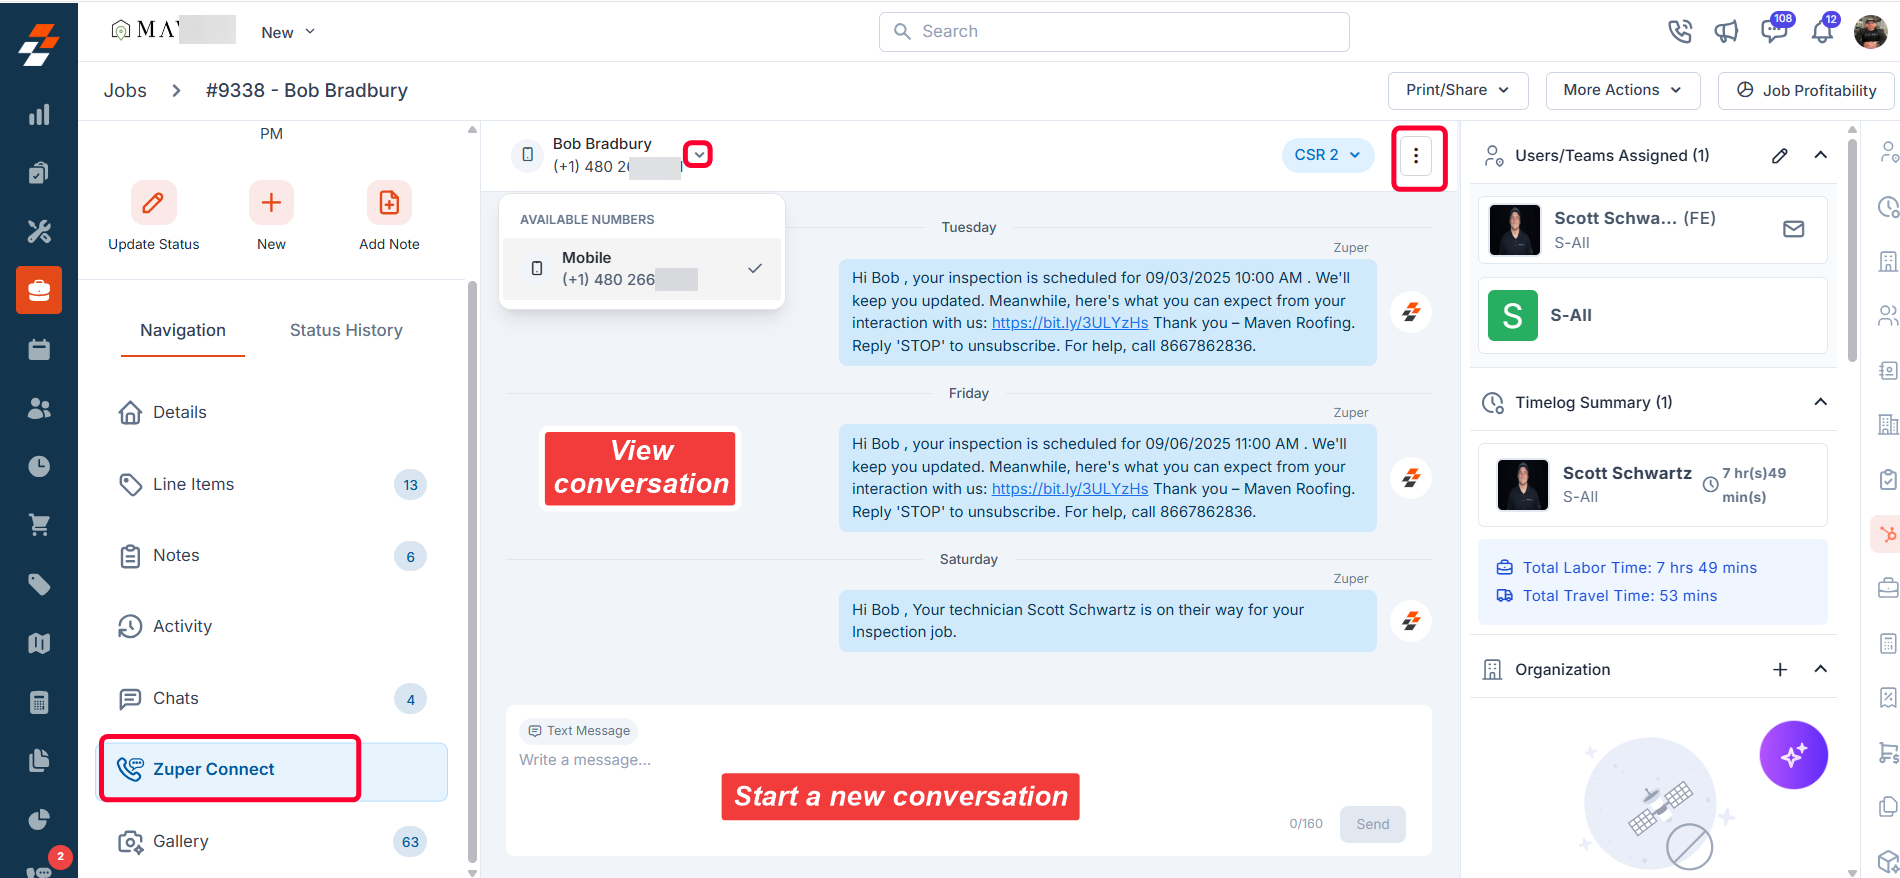
Zuper Connect
Zuper Connect is seamlessly integrated with the Jobs Module, enabling you to initiate conversations and connect with customers directly from the Job Details page. Every call and message is automatically linked to the specific job, providing complete communication context without the need to search through separate chat apps or call logs. Key Benefits:- Seamless workflow – Stay within the job record while communicating. No context switching means faster response times and fewer missed details.
- Organized communication – All calls and messages are tracked in one place, ensuring better visibility and more efficient collaboration.
Using Zuper Connect from a Job
- Navigate to the Job Details page.
- In the left pane, click Zuper Connect.
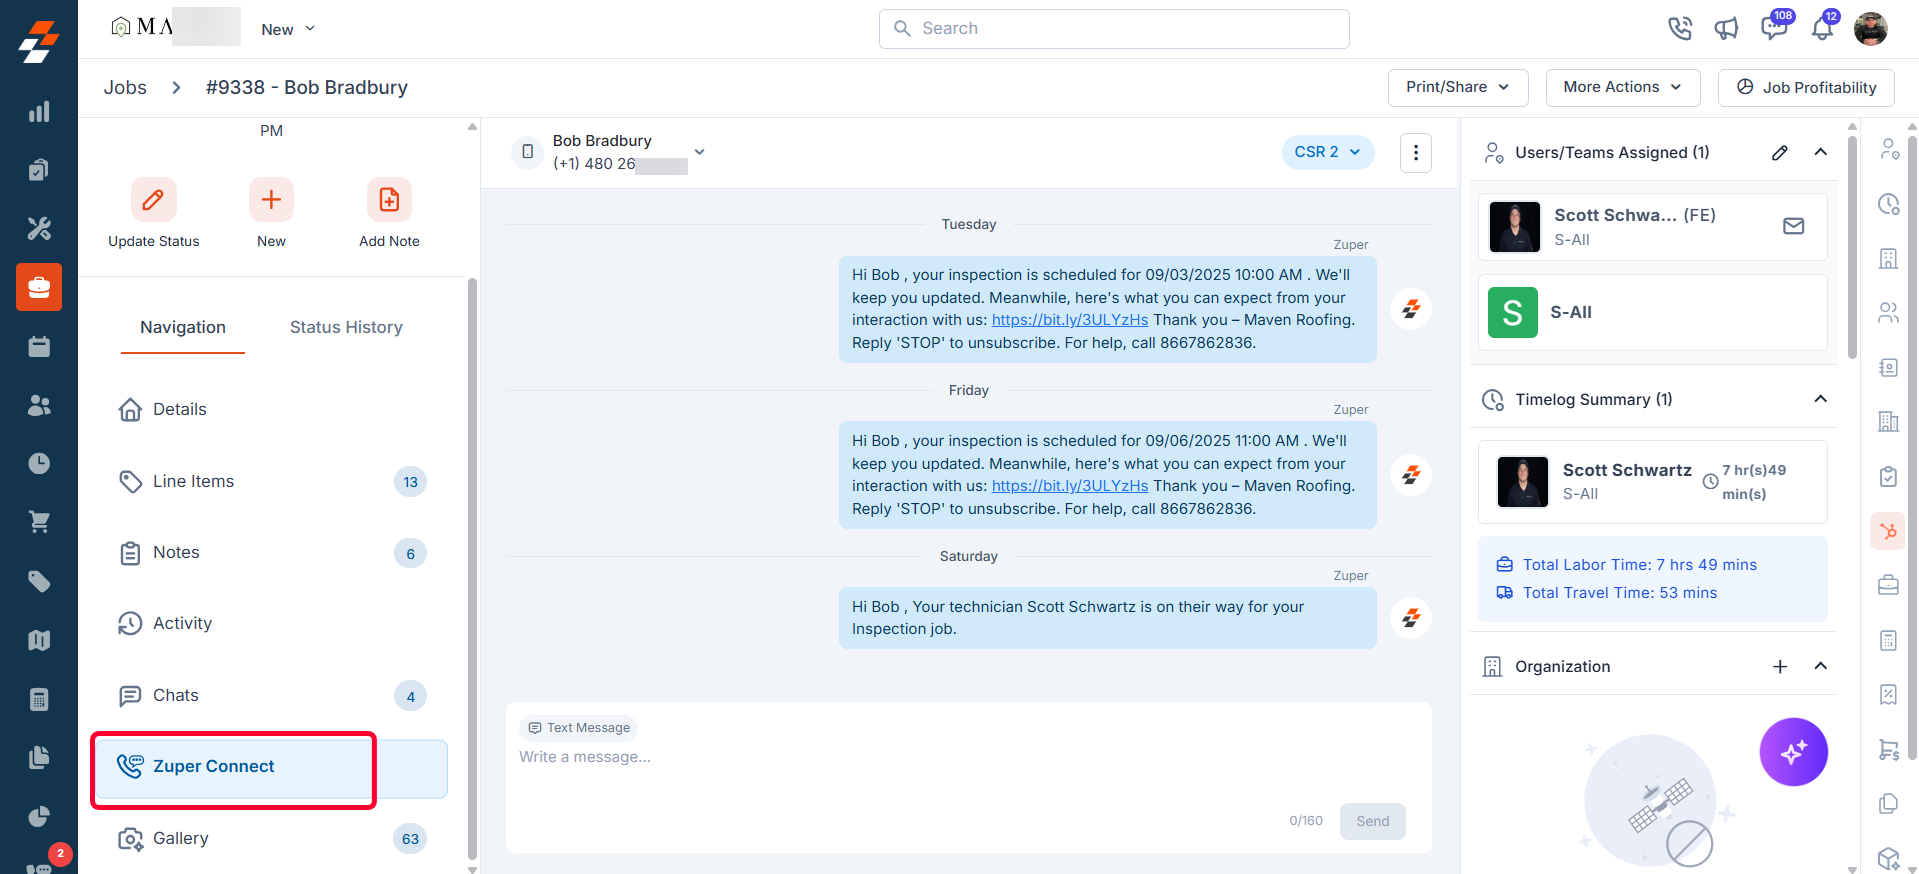
- Start a new conversation with the customer using your configured Zuper Connect numbers.
- View existing conversation history linked to the customer’s contact numbers (Work, Mobile, and Home), along with a complete timeline of all interactions associated with the job. This includes discussions, call details, and the team members involved, displayed in chronological order.
- Mark a conversation as read or unread by clicking the ellipsis (⋮) icon on the right.
Note: To view and manage conversations within the job details page, your organization must have Zuper Connect purchased and enabled.
Gallery
The Gallery tab brings every photo and video tied to a job into one organized, visual workspace. Instead of hunting through notes, checklists, or attachments, your team can find, filter, and download all job media from a single location — making documentation and quality reviews faster and easier. To learn how to upload media, apply tags, create albums, and manage visibility, see Jobs Gallery.Chats
The Chats tab gives your back-office team and field technicians a dedicated space to communicate directly within a job. Every message stays attached to the job record, so nothing gets lost in external apps or email threads, and everyone assigned to the job stays on the same page. To learn how to send messages, add attachments, and manage job chat channels, see Chat.Right panel
You can view or associate various modules with the job in the right panel. These include organizations, properties, projects, quotes, invoices, and contracts. To associate a module, click the “+” icon next to the desired module and follow the prompts to complete the association.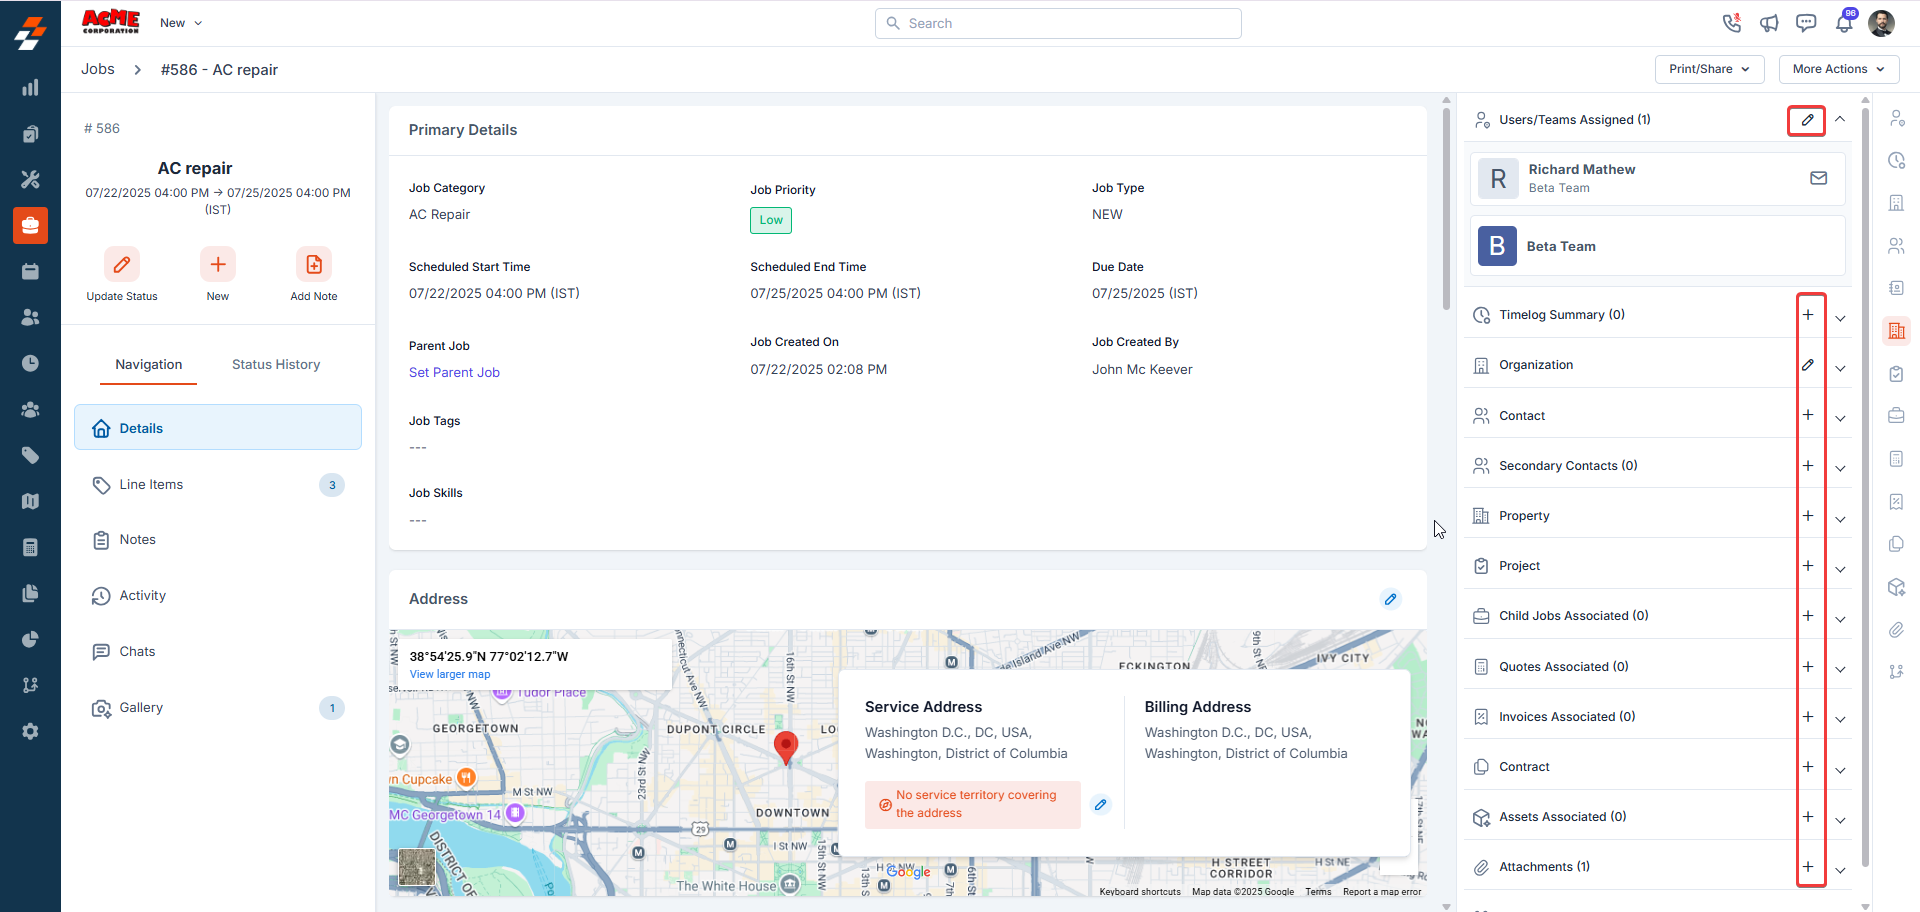
More Actions
On the details page, in addition to viewing and updating details, you can also perform various actions such as printing, sharing, editing, cloning, or assigning a route to the job as needed.Print and Share
To print or share the job via email, click the “Print/Share” option from the top right corner of the job details page and choose either “Print/Save as PDF” or “Share via email” option.Clone job
The clone option allows you to quickly create a replica of an existing job, saving you time. The current job details will be duplicated onto a new job creation page, where you can make any necessary edits before saving.Add New Child Job
This option allows you to create a new child job while keeping the current job as the parent job. This helps maintain the relationship between the parent job and its associated child job, ensuring clear task management and organization.Note: When a child job is associated with a parent job, parts and service line items from the parent job are automatically copied to the child job. There is currently no option to disable this behavior. If the copied line items are not applicable to the child job, they must be removed manually after the child job is created.
Update Description
This option allows you to update the job description. After updating the description, click the “Update” button to save the changes.Update Custom Fields
You can update custom fields for the job using the “Update Custom Fields” option.Assign to Route
The “Assign to Route” option allows you to associate the created job with an existing route, enabling users to complete the job along that route at the assigned date and time.- Choose the “Assign to Route” option from the dropdown menu under “More Actions”. A sidebar appears.
- Select the date and press Enter to fetch the route details. Choose the route and click the “Assign to Route” button.
- The job is successfully added to the route.
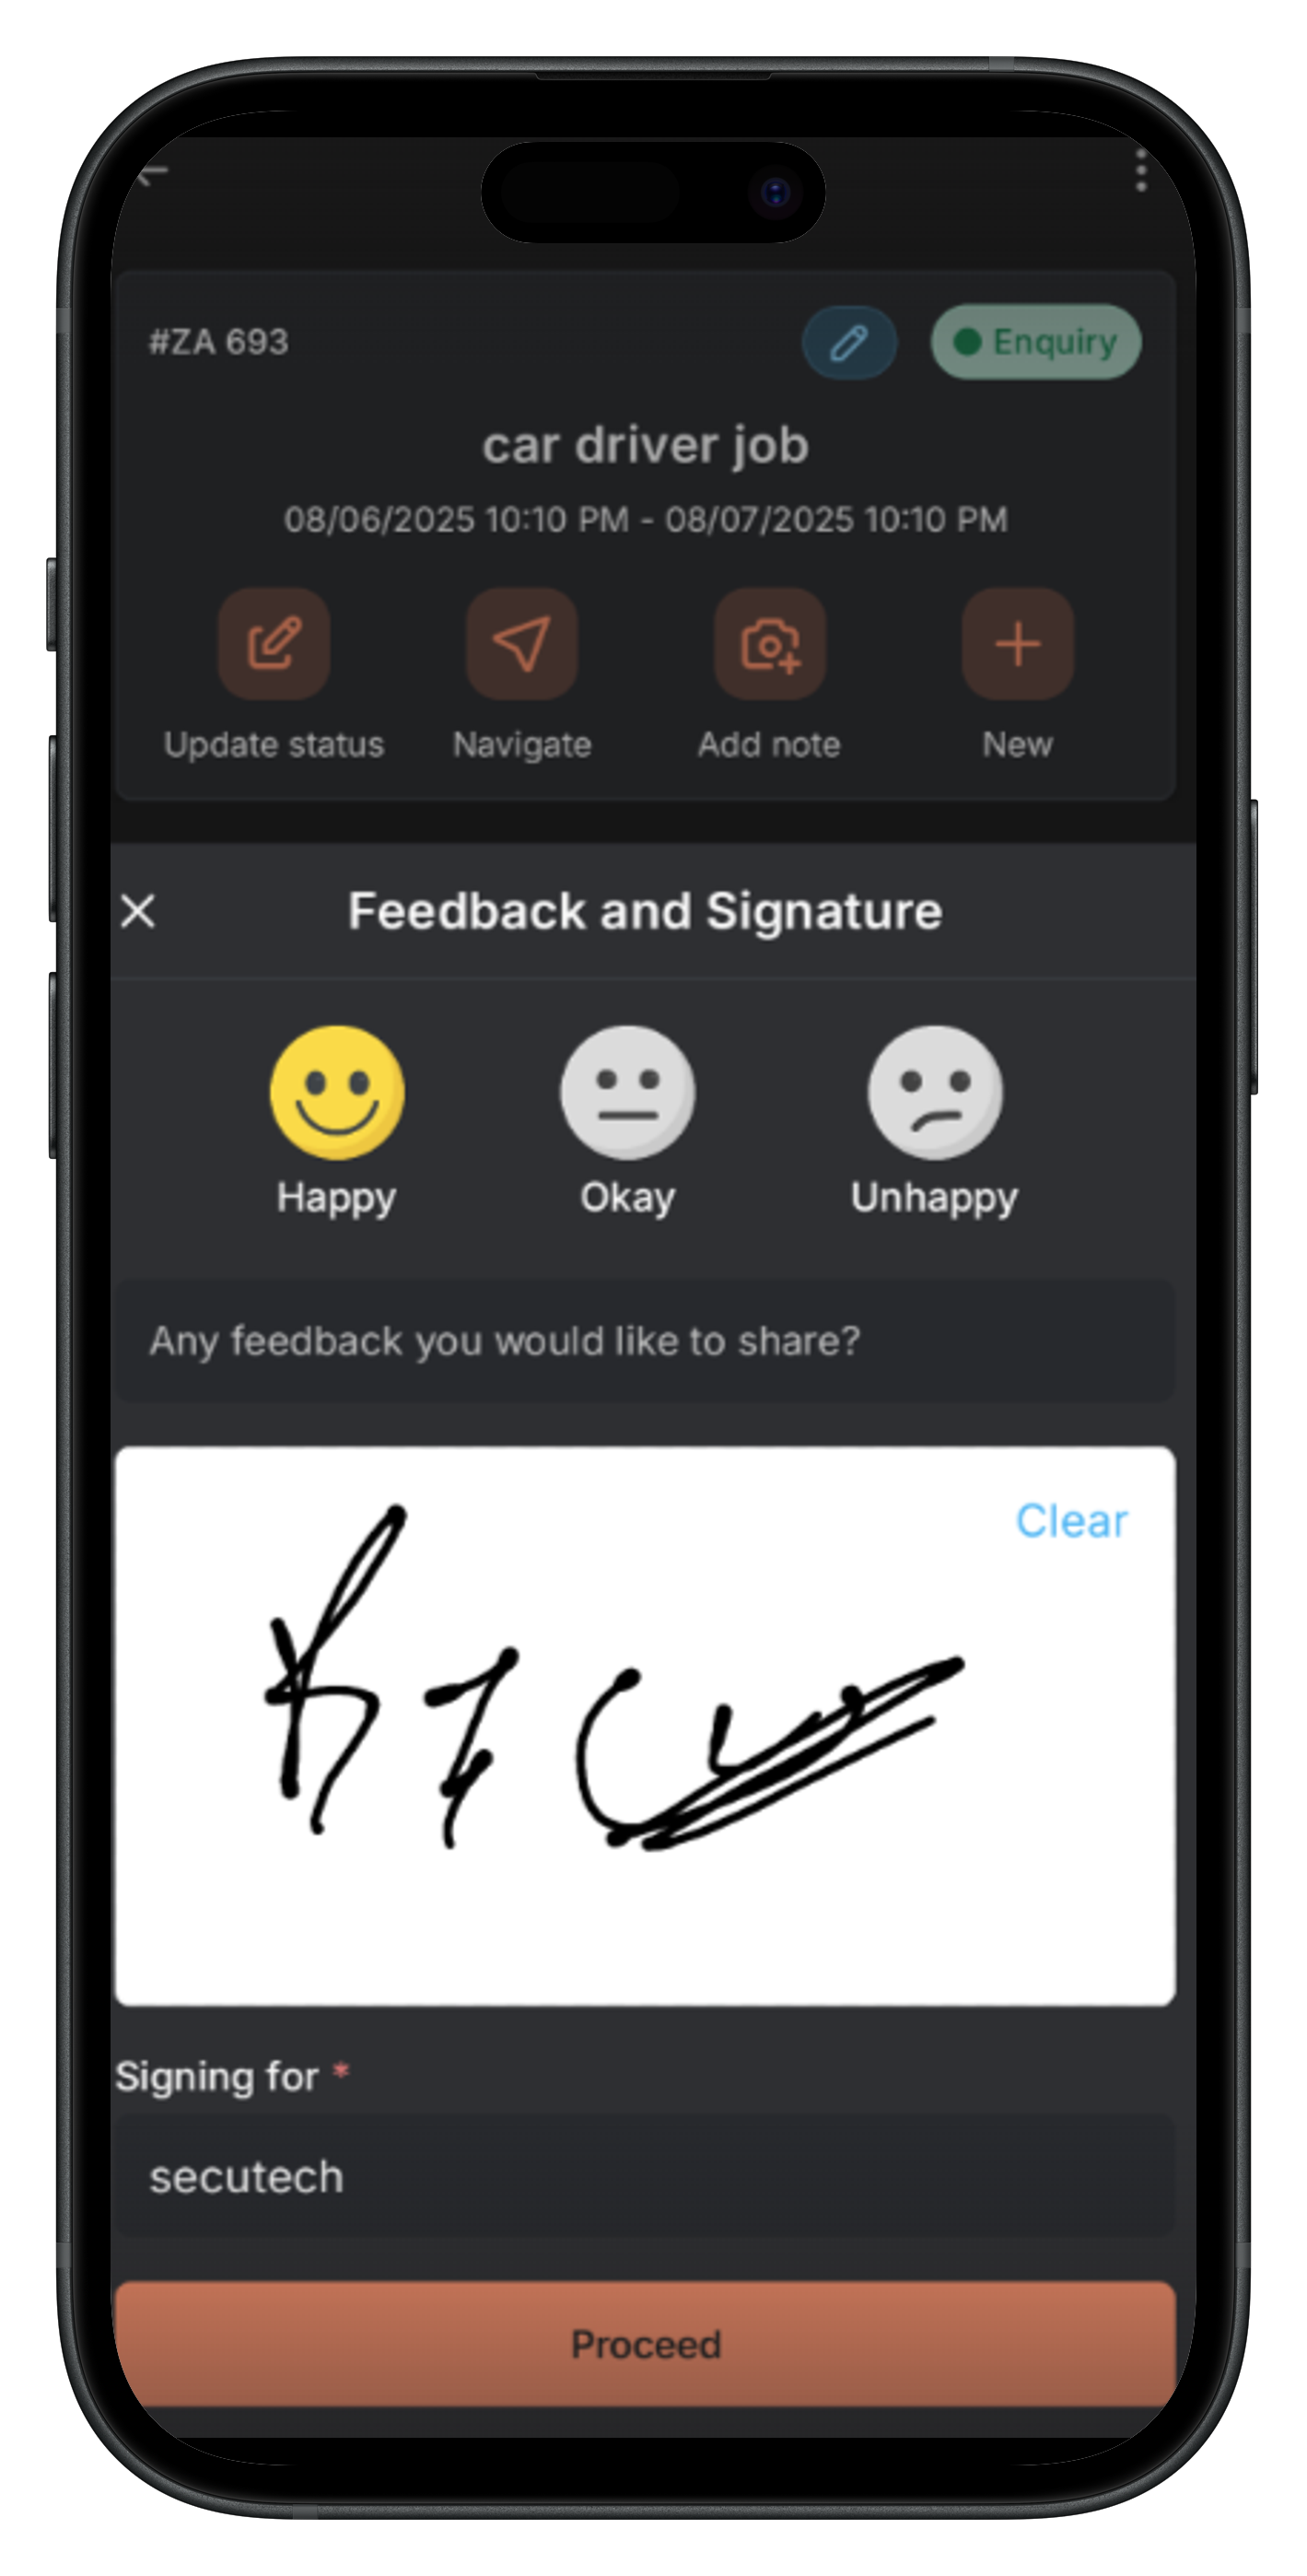
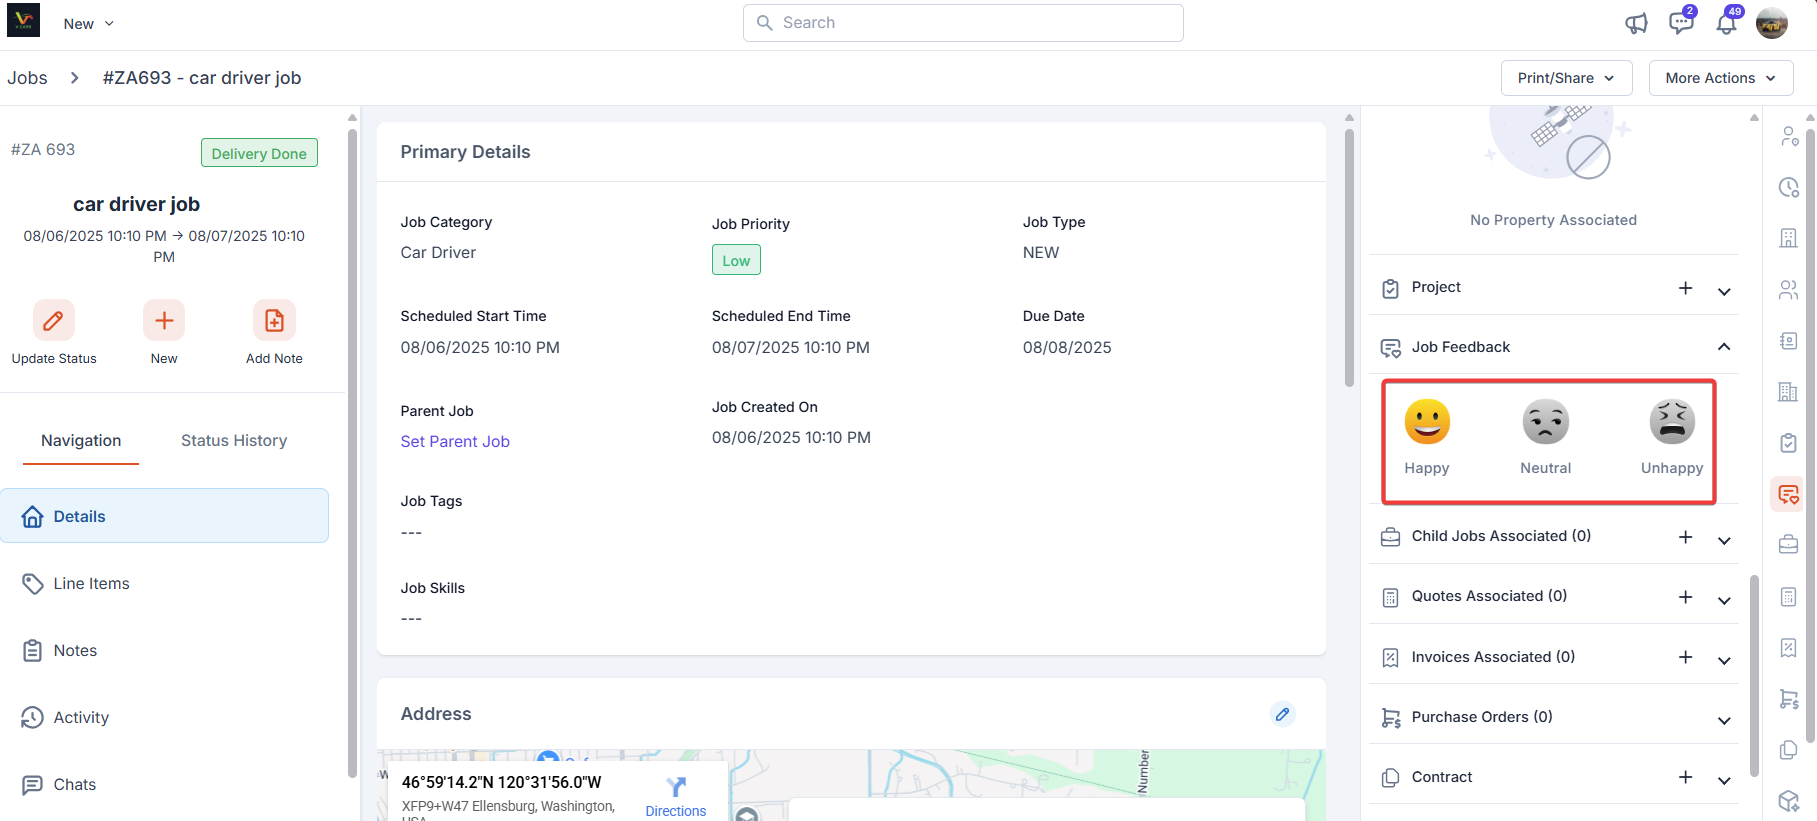
Job feedback
Job Feedback captures a customer’s quick sentiment at the end of a job and optionally a comment and signature. Ratings use a simple three-point scale:- Happy
- Neutral
- Unhappy
Collect feedback in the mobile app
- Open the job and tap “Update status.”
- After the status update is complete or closed, the Feedback and Signature screen opens.
- Tap a rating:
- Happy
- Neutral
- Unhappy
- Once the rating is given, tap Proceed to save and finish.
View feedback in the web app
- Open the job details page.
- In the right panel, expand Job Feedback to see the emoji rating. If a comment was captured, it appears with the job activity/notes.
Changing the Job Category on an Existing Job
When you edit an existing job and change the Job Category, Zuper displays the Update Description and Tasks dialog. This dialog lets you control what happens to the job’s current description and tasks. Choose one of the following options and click Proceed: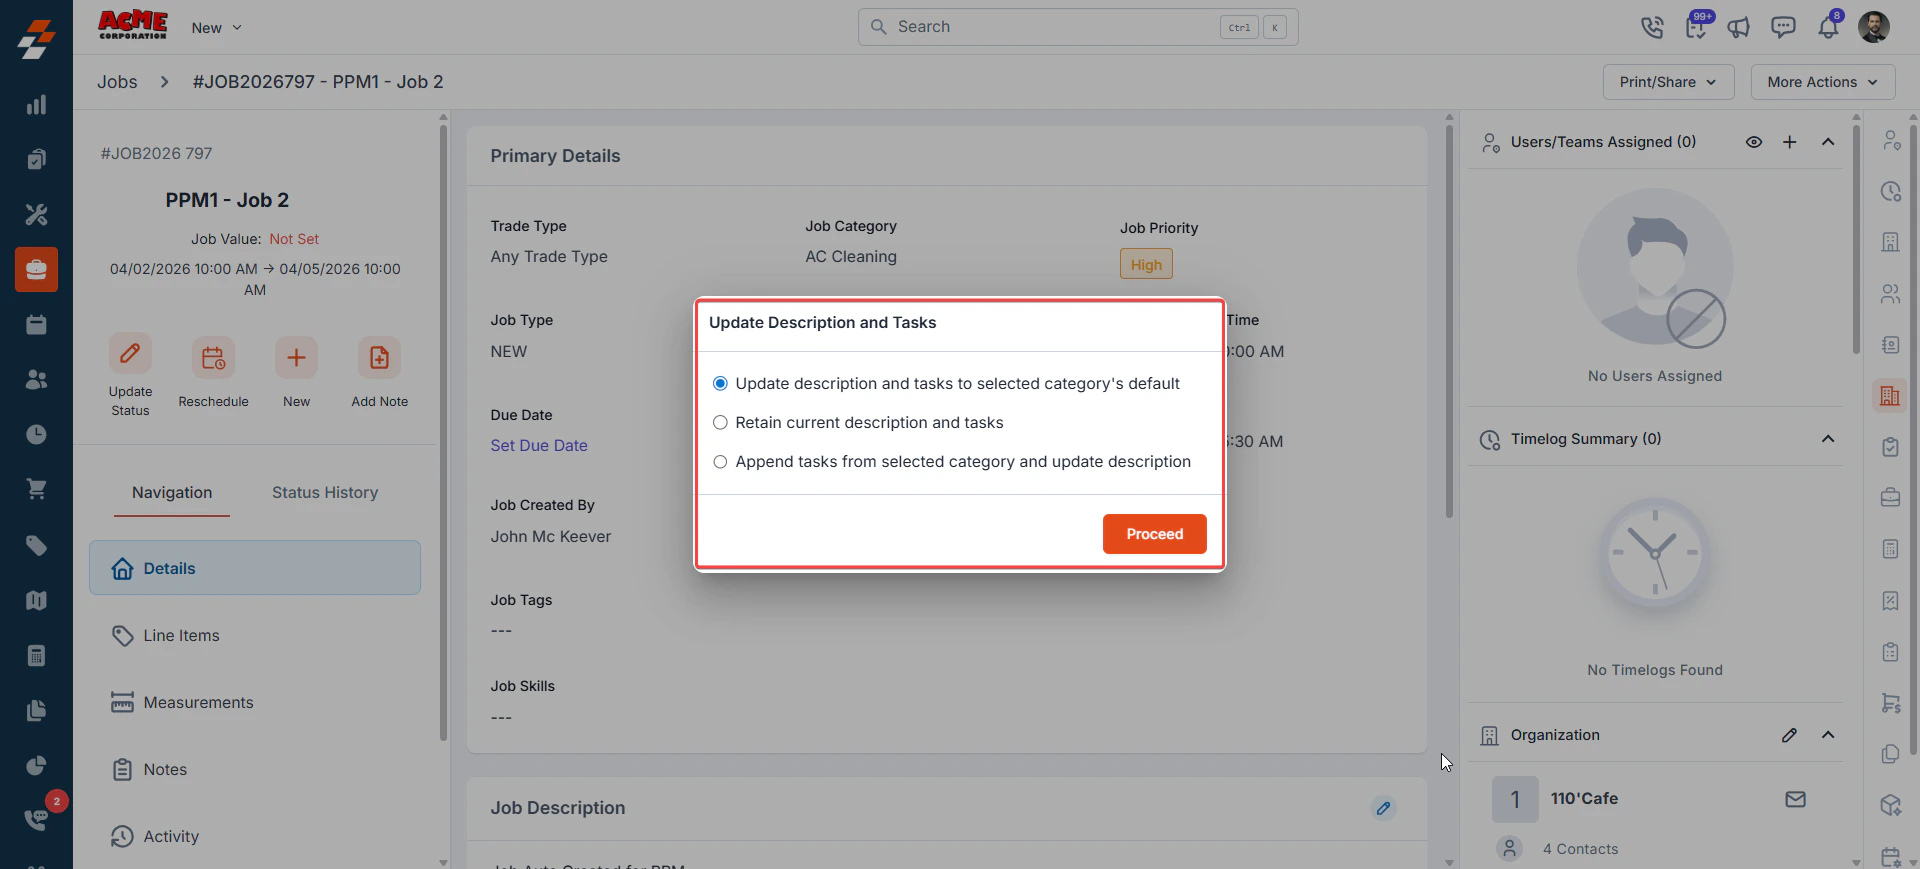
- Update description and tasks to selected category’s default — Replaces the job’s current description and tasks with the default description and tasks configured for the newly selected job category. Use this option when you want the job to fully reflect the new category’s standard setup.
Note: The deleted tasks can be reobtained.
- Retain current description and tasks — Keeps the job’s existing description and tasks exactly as they are. The job category is updated, but no changes are made to the description or task list. Use this option when your current tasks are still relevant and you do not want them overwritten.
- Append tasks from selected category and update description — Adds the default tasks from the newly selected category to the job’s existing task list, and updates the description to match the new category’s default. Existing tasks are preserved. Use this option when the new category introduces additional tasks that you want to track alongside your current ones.
Note: This dialog appears only when you change the Job Category on an existing job.
Delete
The “Delete” option is only available to admins by default. To enable Delete access for users with a Team Leader role, you can create a custom access role and turn on the “Delete Job” permission in the Jobs module. Once enabled, use the delete option under “More Actions” to delete the job.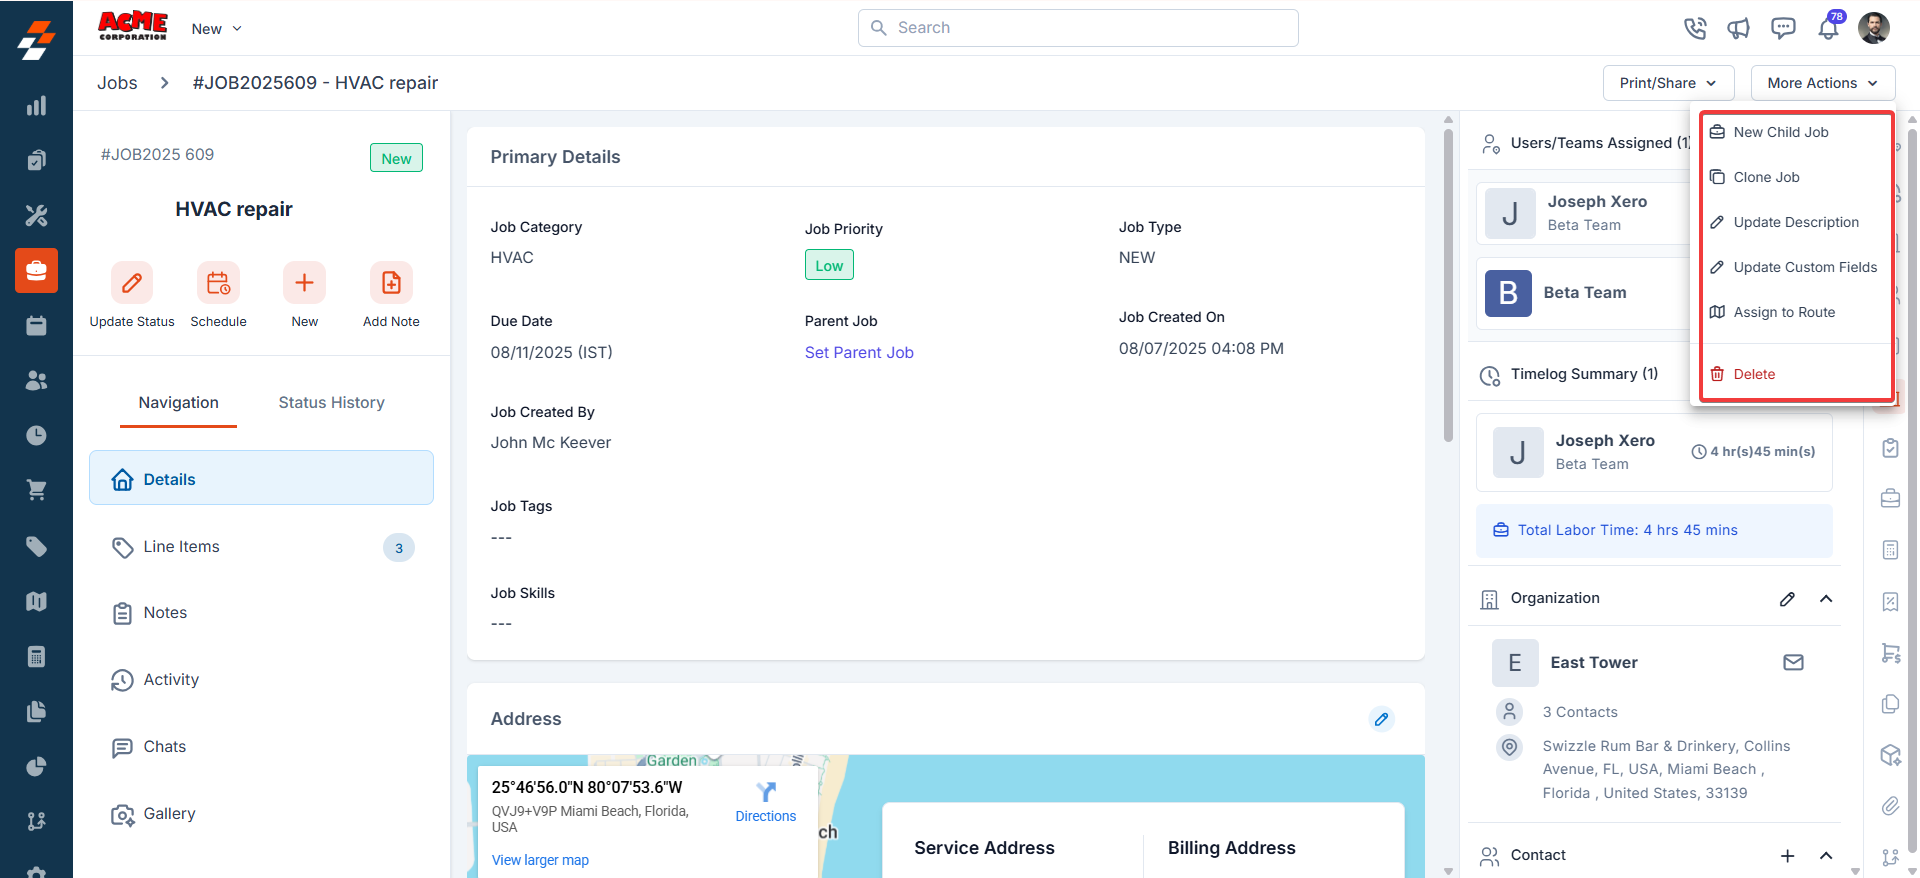
FAQ
Q: Can I complete a job without completing the associated tasks in the job? A: Yes. If the Allow managing tasks in completed jobs setting is turned on (Settings → Modules → Jobs → General Settings), you can mark a job as completed even if tasks are still open. You can continue to create, edit, assign, clone, and delete tasks even after Job completion. If the above setting is not enabled, then:If your job has service tasks, you must resolve all tasks before you can move the job to Completed or Closed. If any task is still open, Zuper blocks the status update and displays an error. Go to the Service Tasks tab on the job details page to check progress and resolve any remaining tasks.