Things to know
- Admins can access Zuper phone on the web, but must have permissions enabled in the settings. For detailed steps, refer to “How to Manage User Permissions.” Once you have the necessary permissions, you will:
- Receive browser notifications for incoming calls.
- Seamlessly answer calls directly from your browser.
- Have a 360-degree view of customer interactions, including messages, calls, voicemails, call recordings, and internal comments from the Zuper Connect Inbox/Conversation.
- Ensure your status and web app availability are set correctly to receive incoming call notifications.
Configuring Your Browser and Desktop Settings for Calls
To ensure a seamless experience while making and receiving calls through Zuper Phone, we recommend using Google Chrome. Follow the steps below to configure your browser and desktop settings for optimal performance.Setting Up Your Browser
Setting Up Your Browser
To configure Google Chrome for Zuper Phone:
- Open Google Chrome and click on the lock icon or site settings icon next to the URL bar.
- Select Site Settings from the dropdown menu.
- Ensure the following permissions are enabled:
- Microphone = Allow
- Notifications = Allow
- Pop-ups and Redirects = Allow
- Sound = Allow
- Refresh your Zuper window to apply the settings.
Setting Up Your Desktop (Mac)
Setting Up Your Desktop (Mac)
MacOS has additional settings that may block browser notifications. Follow these steps to ensure your settings are correctly configured:Enable Notifications:
- Open System Preferences and select Notifications from the left navigation panel.
- Choose your browser (Google Chrome) from the Application Notifications list.
- Ensure that notifications are enabled for the selected browser.
- Open System Settings and navigate to Sound from the left-side menu.
- Under Output, select your preferred speaker.
- Under Input, choose the correct microphone.
Setting Up Your Desktop (Windows)
Setting Up Your Desktop (Windows)
Configure Output (Speaker):
- Right-click the volume icon in the system tray and select Sound settings.
- Click the arrow icon next to your preferred speaker.
- In the Properties section, select your preferred speakers and set them as the default sound device.
- Right-click the volume icon in the system tray and select Sound settings.
- Scroll down to the Advanced section and click More Sound Settings.
- Go to the Recording tab and view the list of available microphones.
- Right-click your preferred microphone and select Set as Default Device.
Using Zuper Phone
Accessing the Dialer
- Click the icon at the top of the Zuper web app.
- The dialer will open in a floating window.
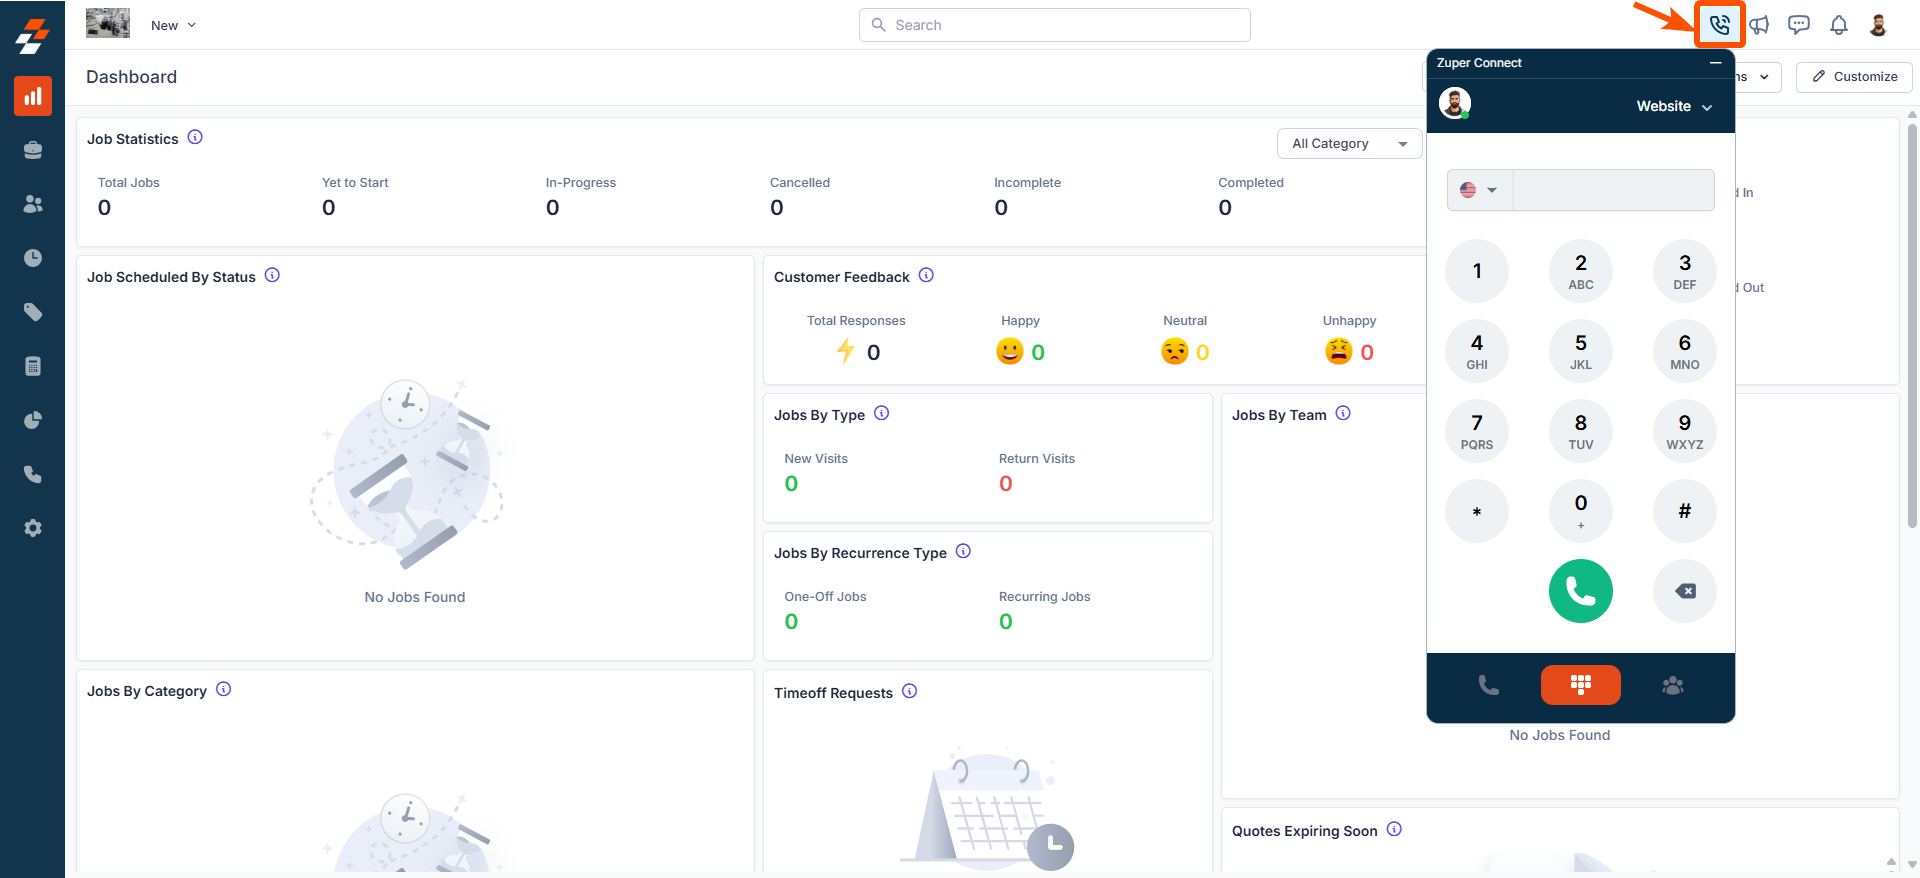
Note: If you have missed calls, the call icon will display a notification badge indicating the number of missed calls. Clicking it will take you to the Call Log page, where you can review missed calls.
Answering an Incoming Call
To receive incoming calls, your availability status must be set to “Available.” If your status is “Unavailable,” you will not receive calls.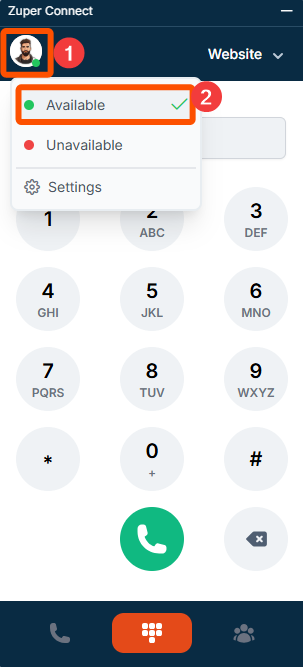
- Click “Accept” to answer the call.
- Click “Ignore” to reject the call.
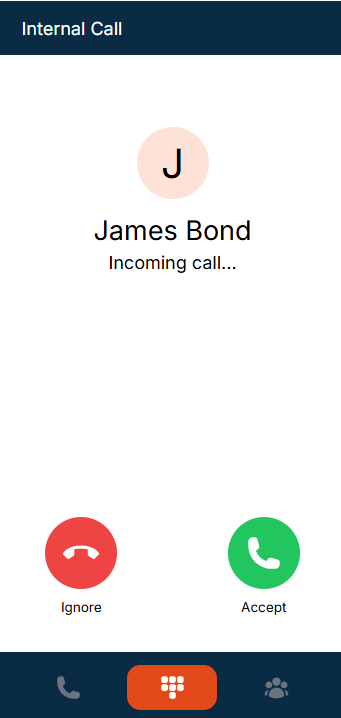
Note: If it is an existing customer, you will see the customer name and number. If it is an unknown customer, you will see only the phone number.
Active Call Capabilities
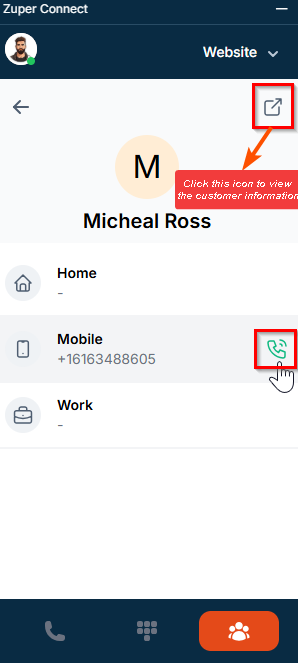
During an active call, Zuper Phone provides advanced functionalities to enhance communication efficiency. This includes:- Viewing Customer Information – If the customer already exists, click the icon to navigate to the Customer Details page.
- Adding a New Job/Customer– If the customer already exists, click the icon and select “Add Job” to create a job for them. If the number is unknown, select “Add Customer” to instantly create a new customer profile. Once the customer is added, you can proceed to create a job for them.
- Adding Notes – Take important notes during the call to capture key details.
- Tracking Call Duration – View the live call duration in real-time.
Call Management Options
On Hold – Place the call on hold while you manage other tasks. Start/Stop Call Recording – If recording is enabled for the phone number, you can start or pause recording during an active call.Note: Paused recordings cannot be resumed for the same call. All recordings are securely stored and accessible based on your Zuper license.
Note: Avoid refreshing the dialer while you are on the call. This may result in a loss of connection to your customer.
Making Outgoing Calls
Zuper Phone allows you to connect with customers and team members through multiple methods, including:- Call from the Dialer
- Call from the Contacts Tab
- Call from Call History / Recent Calls
Steps to place a call from the dialer
Steps to place a call from the dialer
The Zuper Phone Dialer provides a quick and efficient way to place outbound calls directly from the platform. Whether you need to contact a customer or a team member, the dialer ensures a smooth calling experience without switching between different apps.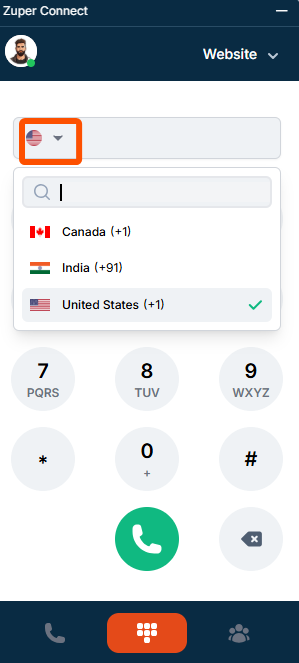
- Open the Zuper Phone Dialer.
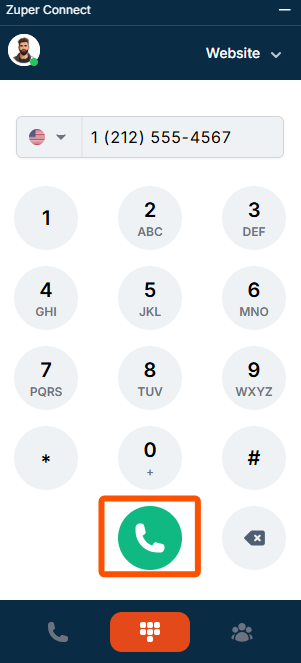
- Select the appropriate country code from the dropdown menu and enter the phone number.
Note: Supported countries include Canada, India, and the United States. However, the default country code is set based on your account region
- Click the Phone icon to initiate the call.
Tip: If you have multiple Zuper Phone numbers, select the one before calling from the top of the Zuper Phone interface. The chosen number will appear as the caller ID during the call, ensuring professional and seamless communication.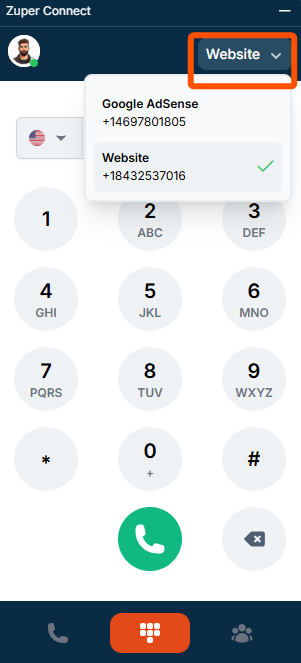
Steps to place a call from recent calls/ call history
Steps to place a call from recent calls/ call history
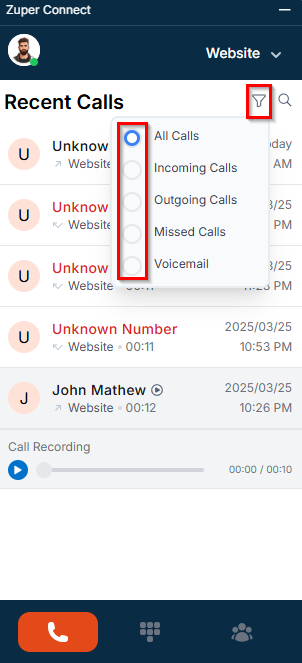
The Recent Calls section in the Zuper Phone displays a detailed list of all calls (voicemails, incoming, outgoing, and missed), including their duration, date, time, and the associated Zuper Phone number. Here, you can view call history for up to 7 days. For a more extended history, refer to Web Call Logs.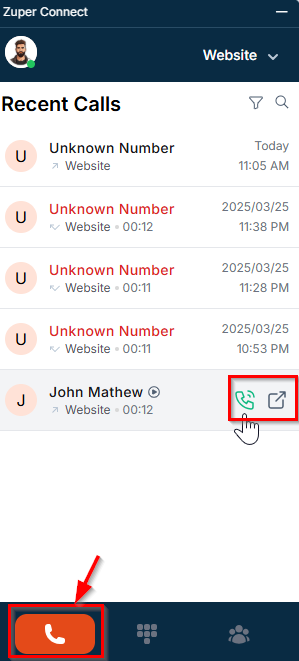
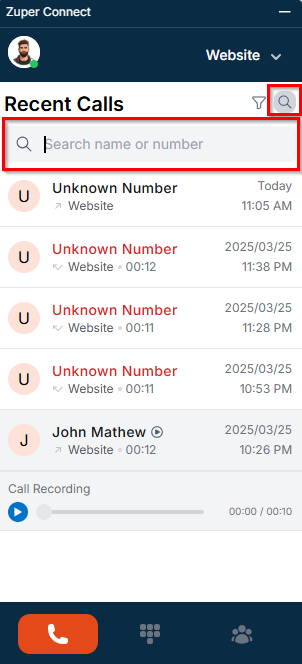
Note: To access call recordings & voicemails (if available), click the Play icon next to a contact.
- Navigate to the Recent Calls tab on the left side of the Zuper Phone interface.
- Locate the user or customer you wish to call.
- Hover over the entry to view the Phone and Call Logs icon.
- Click the Phone icon to initiate a call.
- Click the Call Logs icon to view the call details.
- Filter calls by type (All, Incoming, Outgoing, Missed, Voicemail) using the Filter icon at the top right.
- Search for a specific contact or number using the Search icon to quickly find and place a call.
Steps to place a call from contacts
Steps to place a call from contacts
The Contacts section in Zuper Phone provides a centralized directory of customers and internal users who have access to Zuper Phone. This feature allows you to quickly search for and connect with the right person without navigating through multiple screens.Accessing Contacts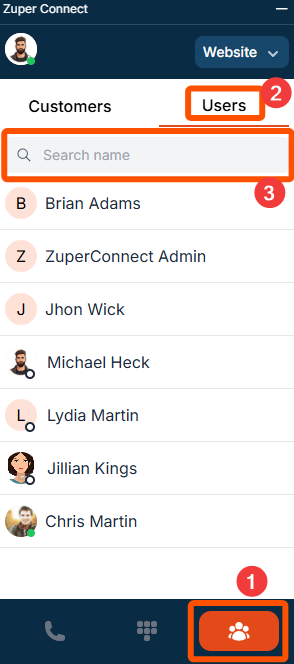
- Navigate to Contacts on the right side of the Zuper Phone interface.
- Click the Customers tab to view the list of customers.
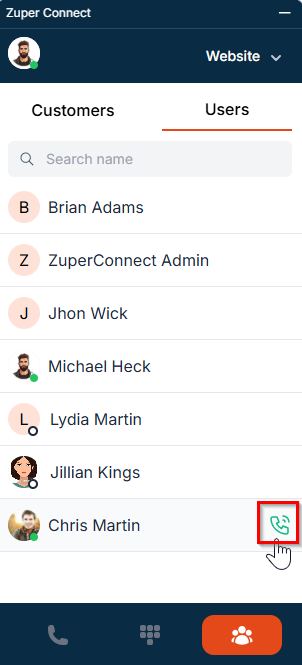
- Click the Users tab to view internal team members who have access to Zuper Phone. To search for a user, enter their name in the search bar.
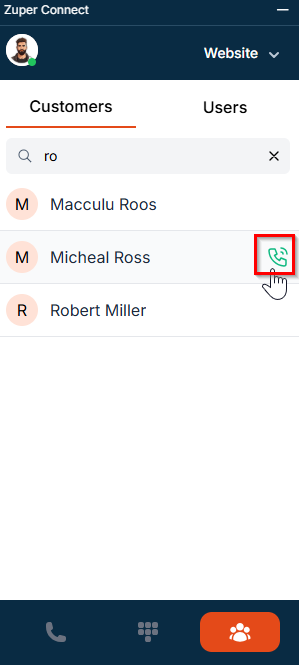
- Select the preferred phone number (home, mobile, or work).
-
Hover over the number and click the Phone icon to initiate the call.
-
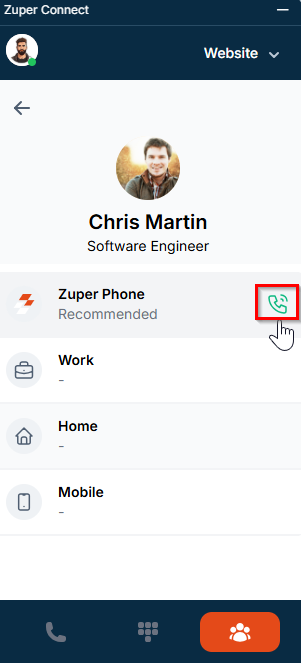
Hover over the user or click on the user’s name to view their details.
- You can see their Zuper Phone, work, home, and mobile number.
-
Select the desired number and click the Phone icon to place the call.
 Note: To view and manage recorded call logs, we highly recommend using the Zuper phone.
Zuper Phone Settings
The Settings section in Zuper Phone allows you to personalize your calling experience by configuring audio settings, adjusting themes, and accessing support resources. Proper setup ensures seamless communication with customers and team members.Accessing Settings
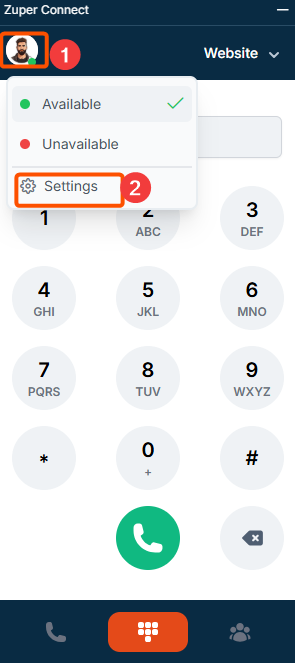
To access the settings:- Click your profile icon at the top left of the Zuper Phone interface.
- Select “Settings” from the dropdown menu.
- Configure audio settings to ensure clear communication.
- Switch between dark and light themes based on your preference.
- Access help and support articles for troubleshooting and assistance.
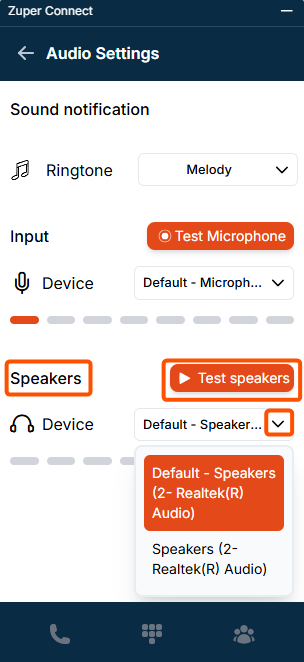
Configuring Audio Settings
Configuring Audio Settings
To optimize sound quality and notifications, follow these steps: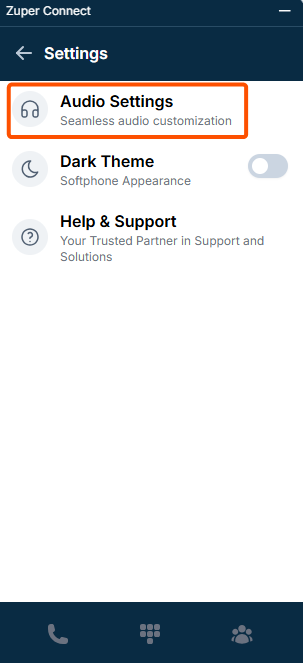
- Under Settings, select “Audio Settings” to customize your sound preferences.
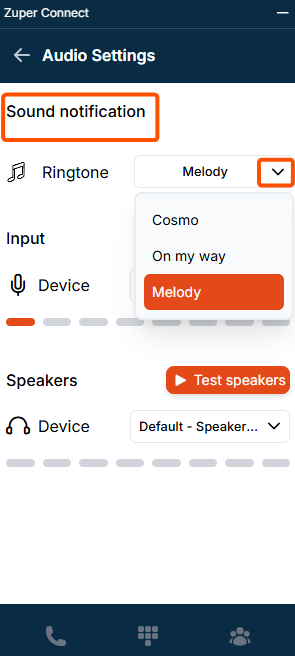
Customize Notification Sounds
Customize Notification Sounds
- Choose a ringtone for incoming calls from the available list of tones.
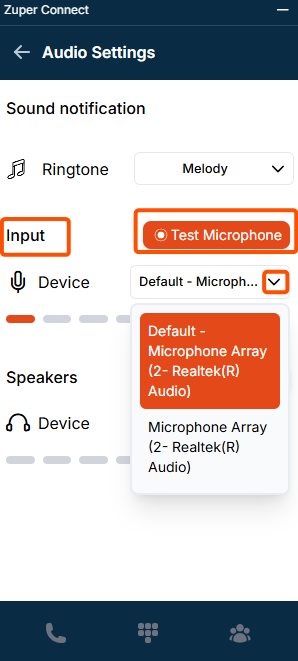
Set Input Devices (Microphone)
Set Input Devices (Microphone)
- Select your preferred input device (e.g., microphone) from the dropdown list.
- Click “Test Microphone” to test your microphone.
-
Click Stop Recording to check if it’s working correctly.
Set Output Devices (Speakers)
Set Output Devices (Speakers)
- Select your preferred speaker device for audio output from the Speakers dropdown.
- Click “Test Speakers” to play a test sound and ensure clarity.