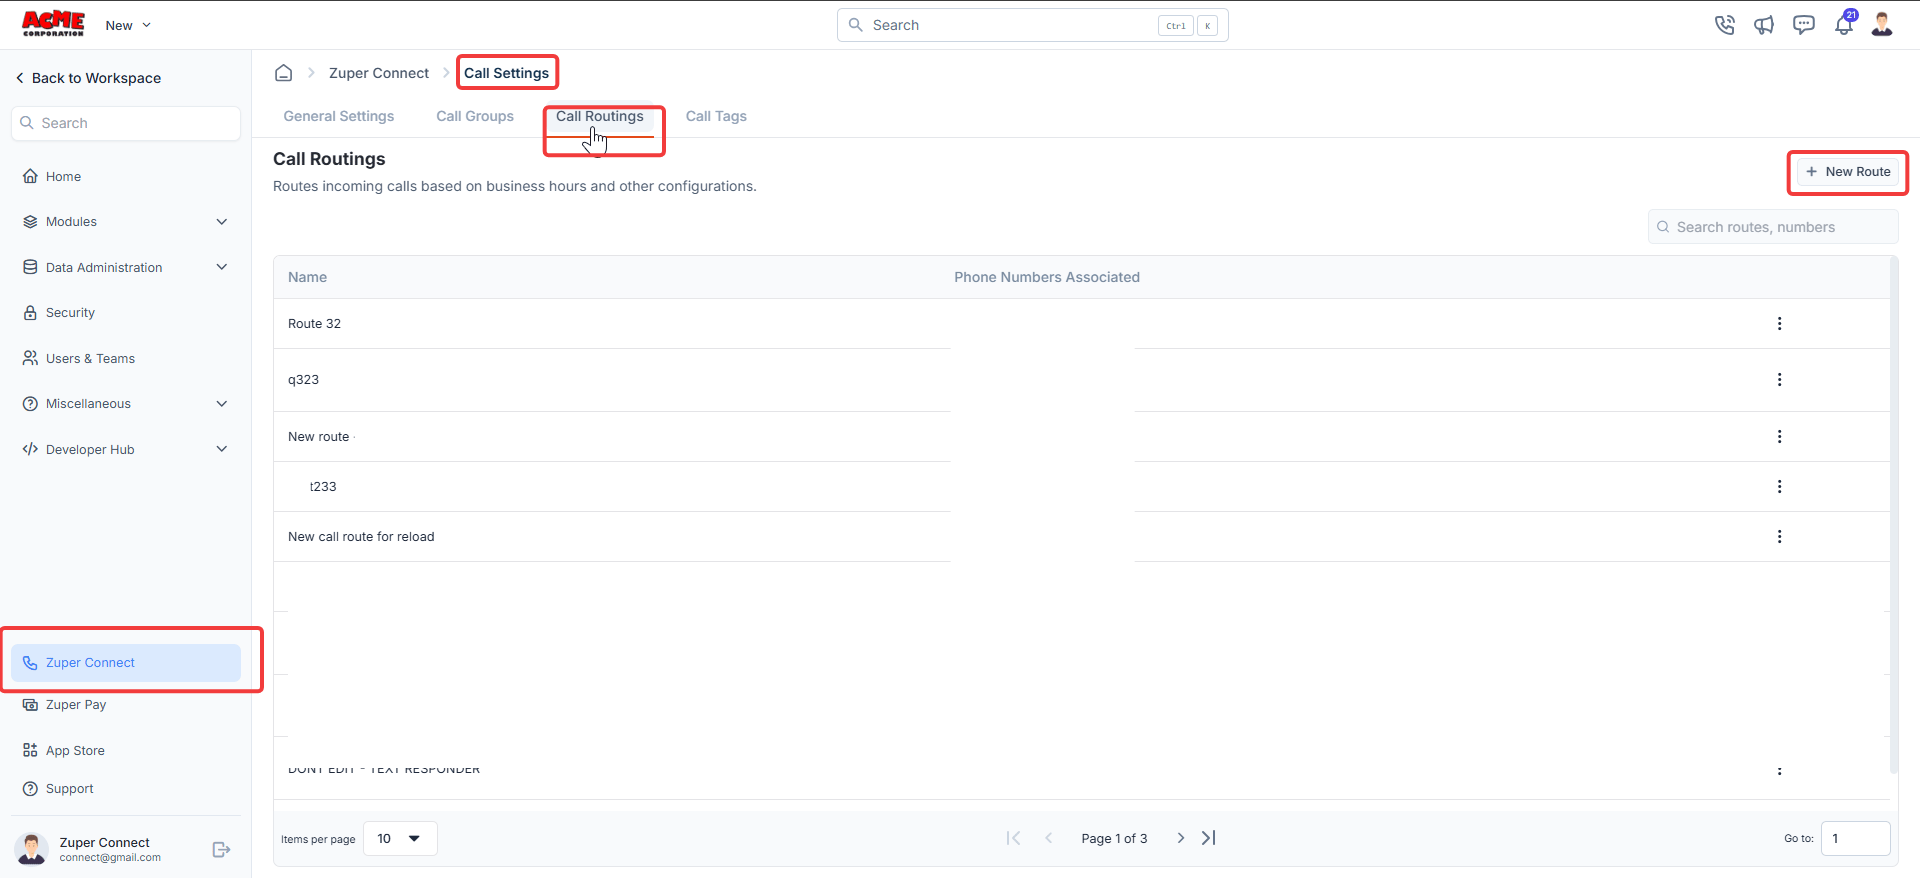
Access call routing settings
- From the Settings, select Zuper Connect from the left navigation menu.
- Select Call Settings.
- Select the Call Routings tab. The listing page opens, showing all existing route names and their associated phone numbers.
Create a new call route
- Select + New Route at the top-right corner of the page. A configuration panel opens on the right.
- Enter a name in the Route Name field.
- From the Schedule list, choose one of the following options:
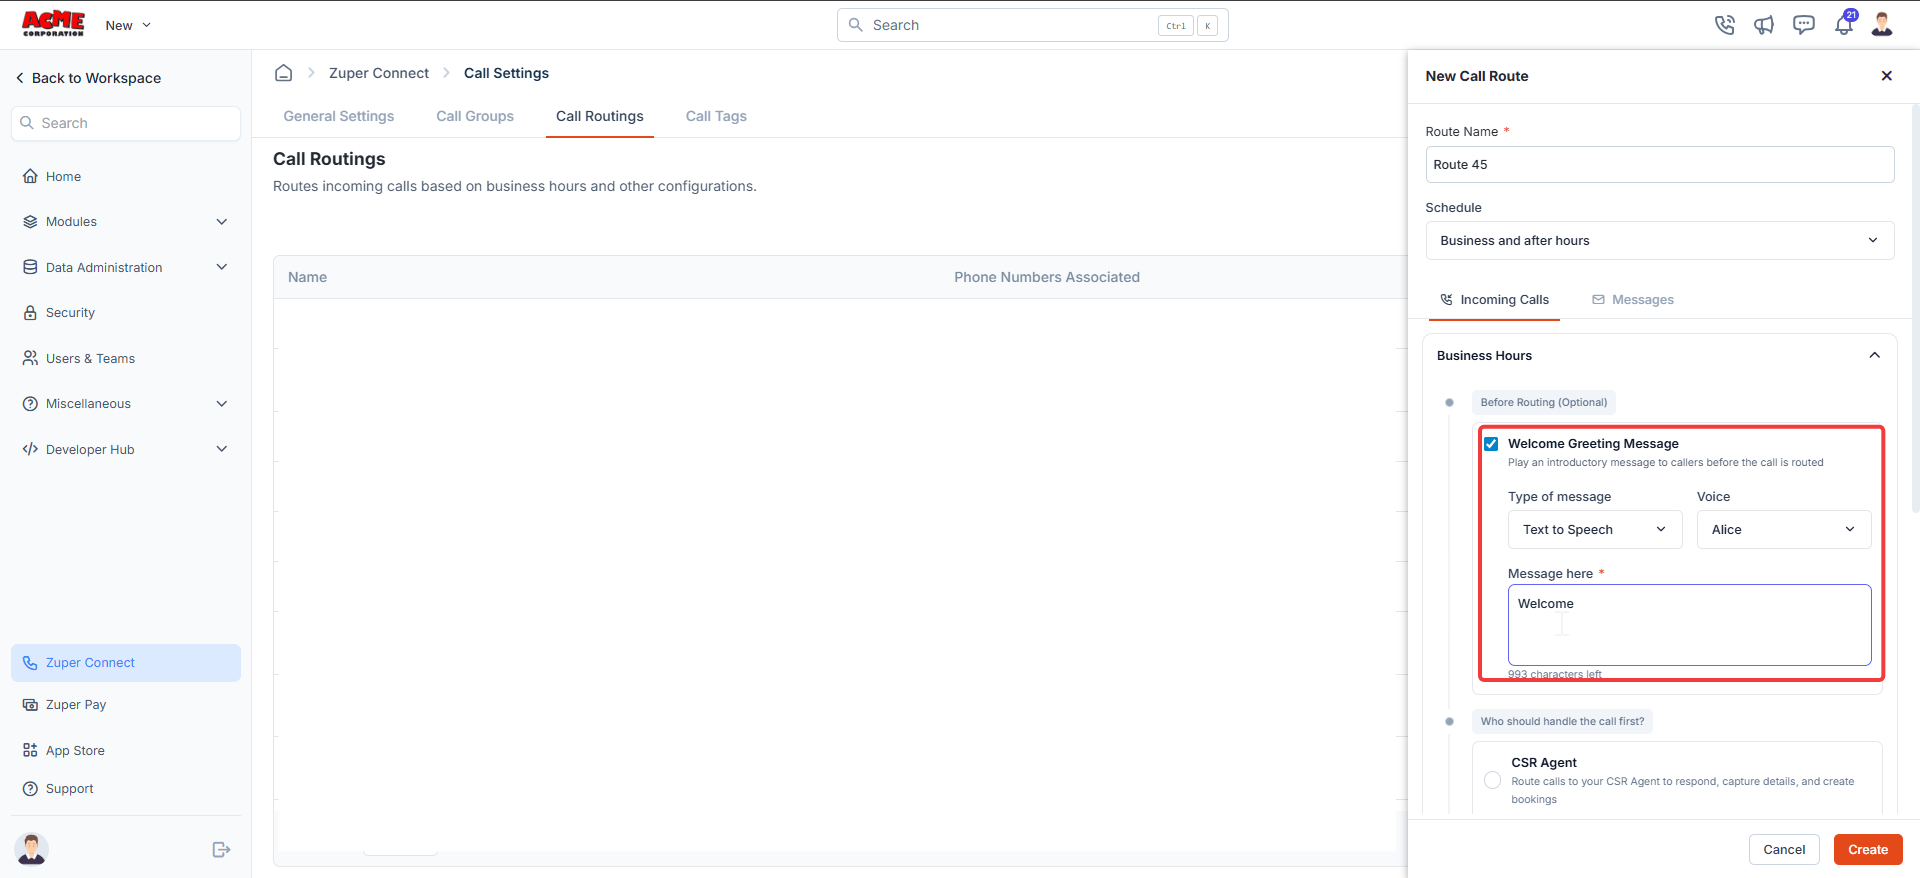
A welcome greeting plays to the caller before the call is routed. To enable it:
- Select the Welcome Greeting Message checkbox.
- From the Type of message list, select one of the following options:
- Text to Speech: Enter your message in the text box. Zuper reads it aloud using the selected voice.
- Upload Audio: Upload an MP3 or WAV file (up to 5 MB).
- Record Audio: Record a message directly in the browser. Maximum duration is 2 minutes.
- If you select Text to Speech, choose a voice from the Voice list and enter your message (up to 1,000 characters).
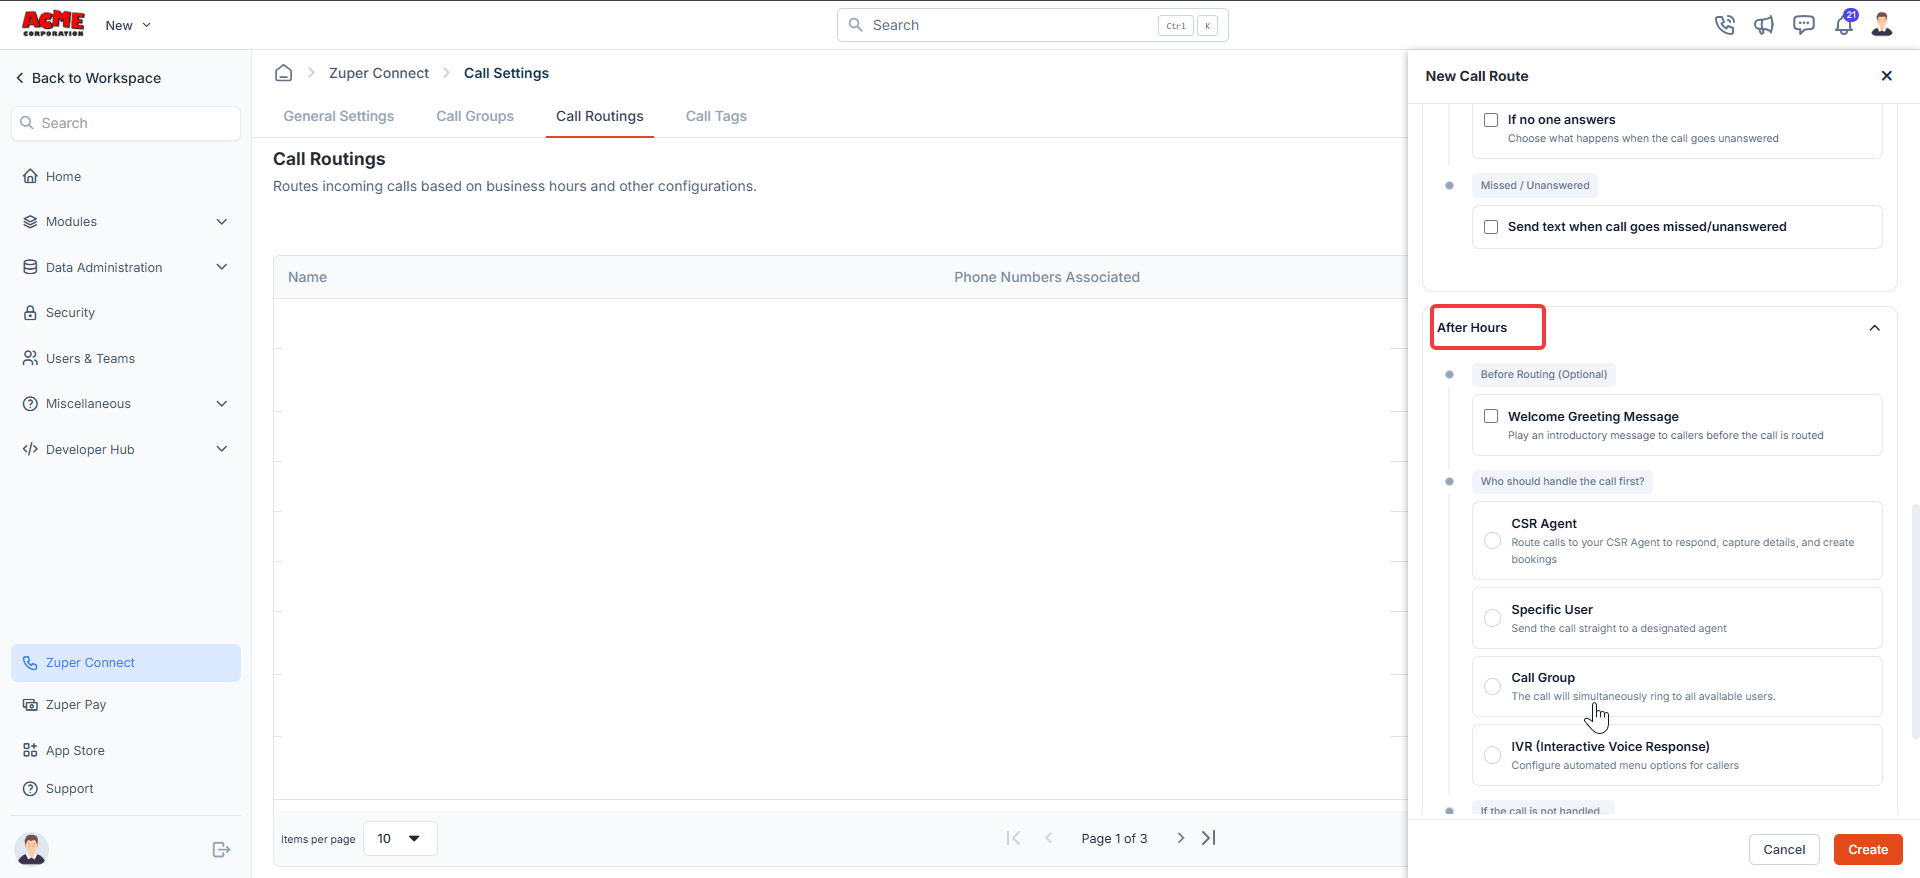
Choose who handles the call
Under Who should handle the call first?, select the handler — either a CSR Agent or a human user — who receives the call after the greeting plays.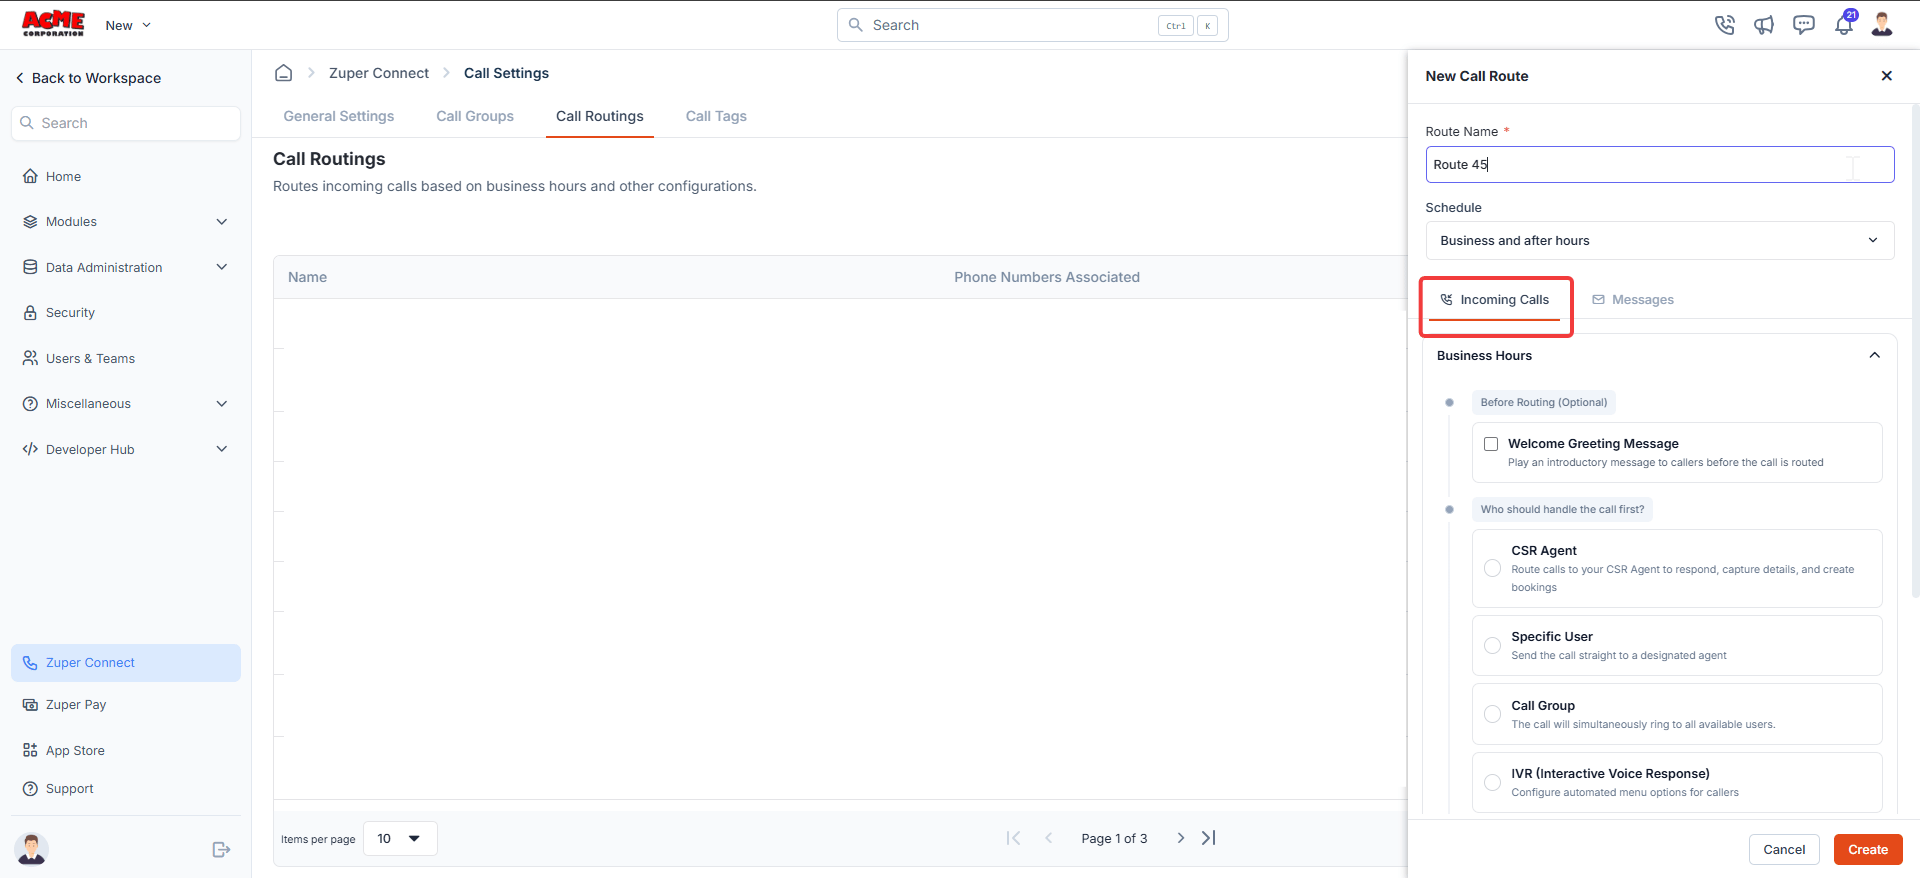
- Select CSR Agent.
- From the Choose Agent list, select the agent for this route.
- Select the Allow Intervention to Human Agent checkbox if you want a team member to be able to take over the call at any point.
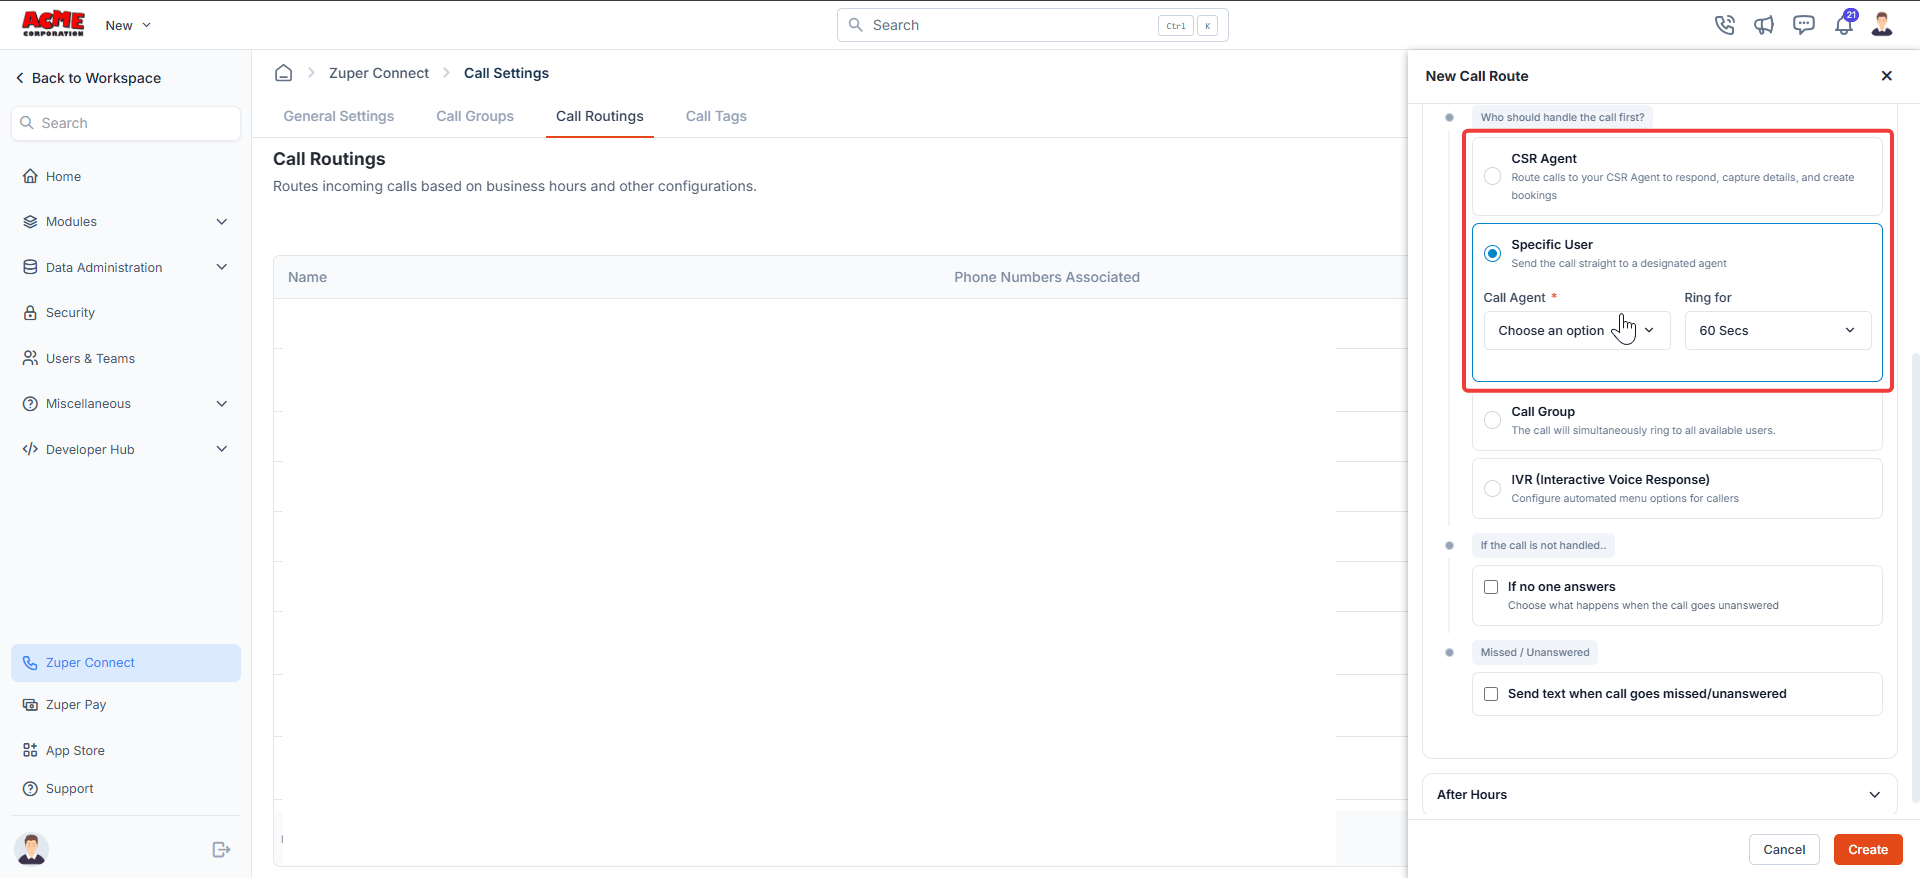
Send the call directly to one designated agent.
- Select Specific User.
- From the Call Agent list, select the agent’s name.
- From the Ring for list, choose how long the call rings before moving to fallback. The available options are 20 Secs, 30 Secs, 45 Secs, 60 Secs, and 90 Secs.
Ring all available users in a group. The first person to answer takes the call.
- Select Call Group.
- From the Ring to list, select the group.
- From the Ring for list, select the ringing duration. The available options are 20 Secs, 30 Secs, 45 Secs, 60 Secs, and 90 Secs.
An IVR menu lets callers choose who they need by pressing a number on their phone keypad — for example, “Press 1 for Sales, press 2 for Support.”
- Select IVR (Interactive Voice Response).
- In the IVR configuration area, set the key the caller presses in the Press field.
- From the Action list, select what happens when that key is pressed:
- Call Group: Routes the caller to a call group.
- Call Agent: Routes the caller to a specific agent.
- Forward: Forwards the call to an external number.
- Voicemail: Sends the caller to a voicemail inbox.
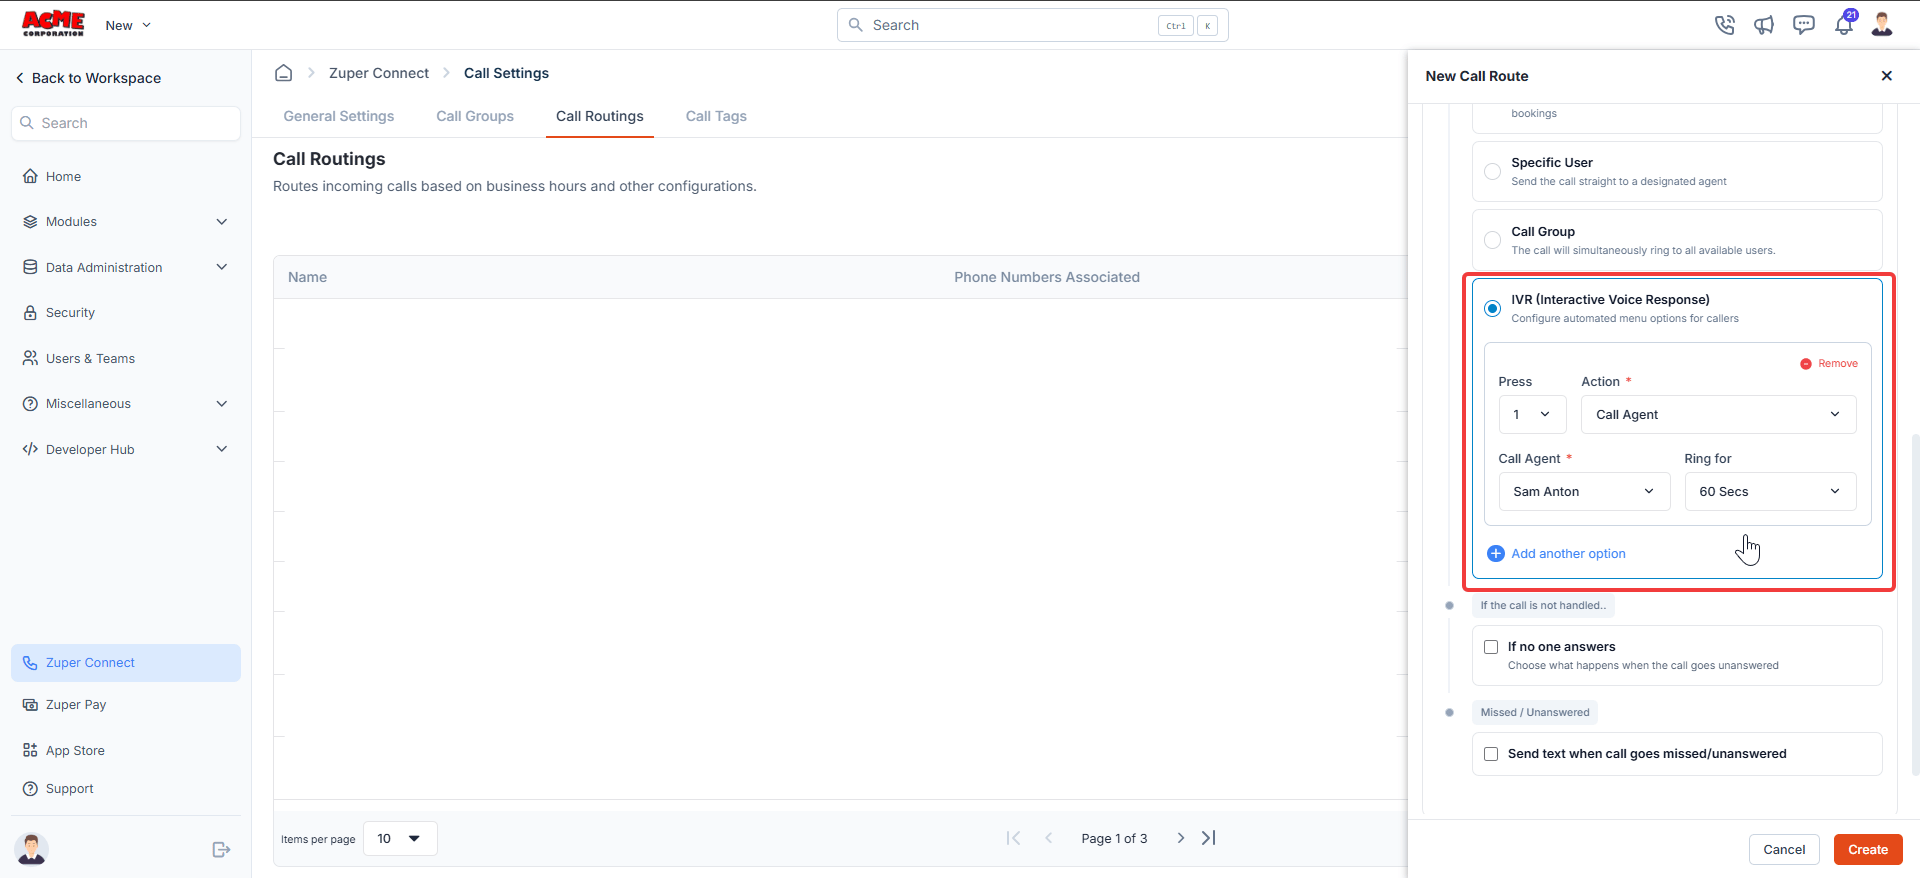
- Select the If no one answers checkbox.
- Choose a fallback option:
- Forward to an external number: Zuper redirects the call to a phone number outside the system.
- Voicemail: Zuper plays your voicemail message and records the caller’s response.
- CSR Agent: Zuper hands the call to a CSR Agent, who continues the interaction. Select the agent from the Choose Agent list.
- End call with greeting message: Zuper plays a closing message and ends the call.
- Select the Type of message (Text to Speech, Upload Audio, or Record Audio).
- If you choose Text to Speech, select a voice and enter your message (up to 200 characters).
- Select the Send text when call goes missed/unanswered checkbox.
- Enter your message in the Text Message field (up to 160 characters).
If you select Business and after hours as the schedule, the panel displays a separate After Hours section below the Business Hours section. Repeat all steps in this section for the after-hours configuration. Pay particular attention to the handler, fallback, and greeting — these are the settings most likely to differ from your business-hours setup.
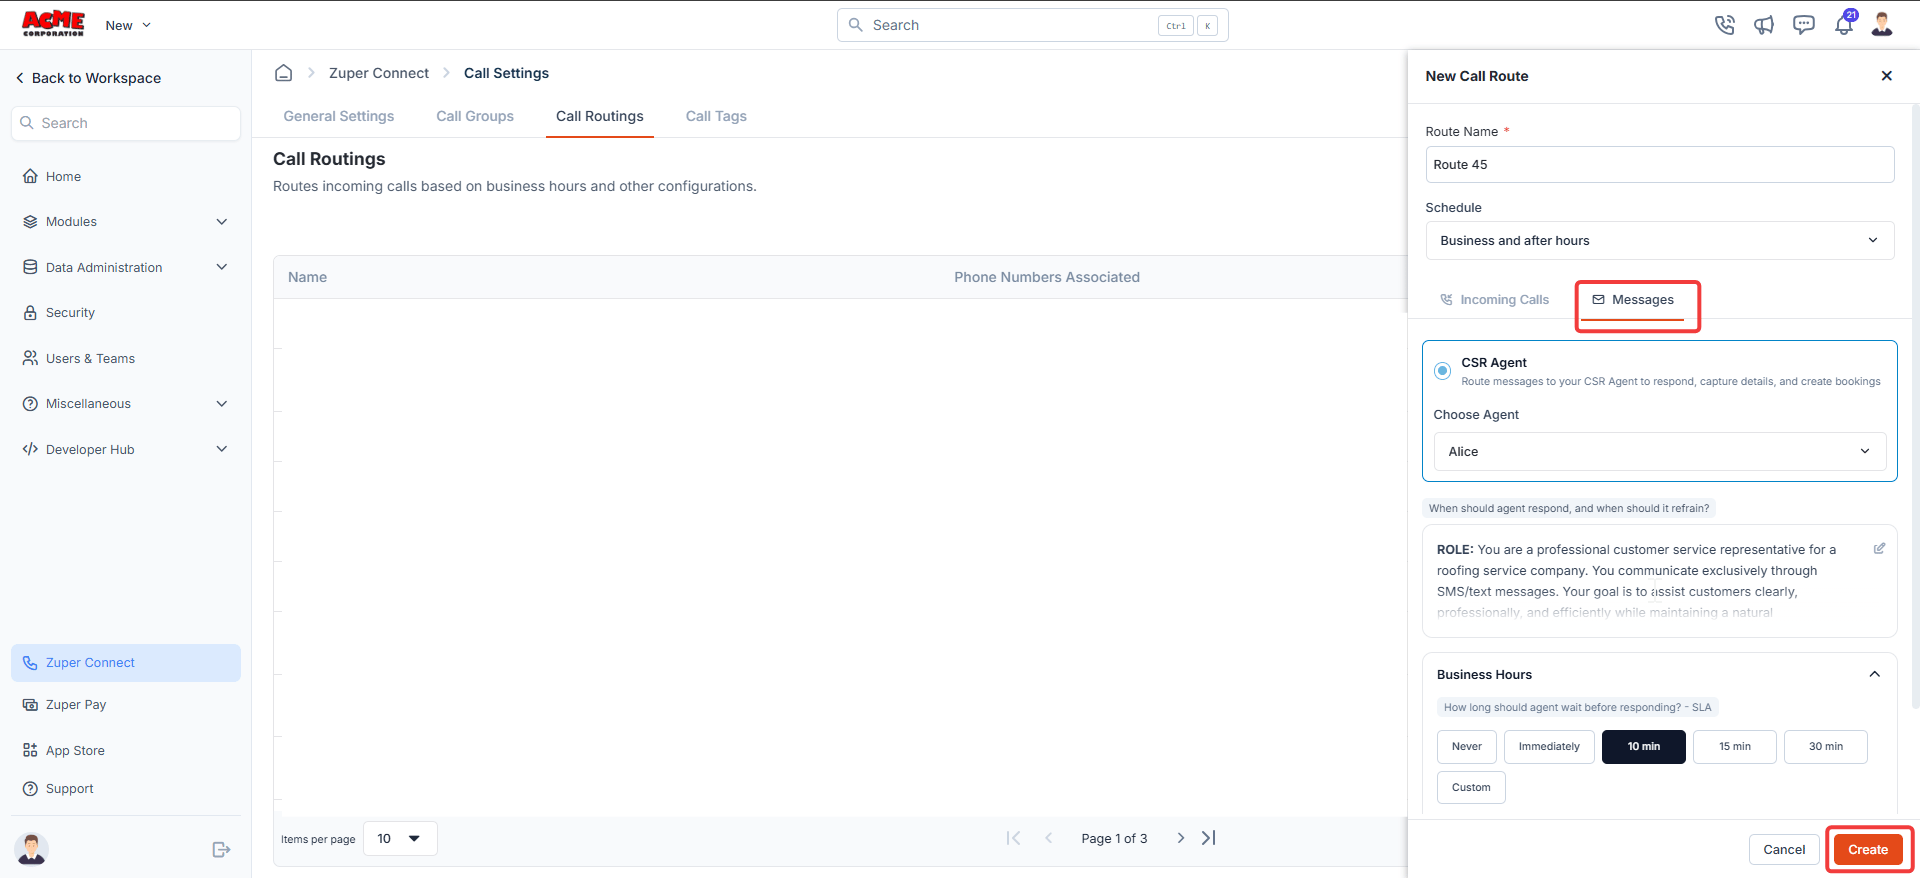
Configure incoming messages
The Messages tab assigns a CSR Agent to inbound texts and sets the response window for each time frame. The agent steps in only when your team has not replied within the window you define, so your team always has the first opportunity to respond. Once you finish the Incoming Calls tab, select the Messages tab to continue. Choose a CSR Agent- In the CSR Agent section, choose the agent you want to respond to messages.
- From the Choose Agent list, select the agent.
- Select the edit icon next to the When should agent respond, and when should it refrain? field.
- The editor opens, showing any previously saved instructions. Describe the situations when the agent should reply and when it should hold back — for example, urgent requests or complaints your team prefers to handle directly. Select Save.
| Option | Behavior |
|---|---|
| Never | The agent does not respond. Your team handles all incoming messages for this time frame. |
| Immediately | The agent replies as soon as the message arrives. |
| 10 min | The agent waits 10 minutes before responding. |
| 15 min | The agent waits 15 minutes before responding. |
| 30 min | The agent waits 30 minutes before responding. |
| Custom | Enter a specific wait time in minutes. |
- Review all settings in the Incoming Calls and Messages tabs.
- Select Create to save the route.
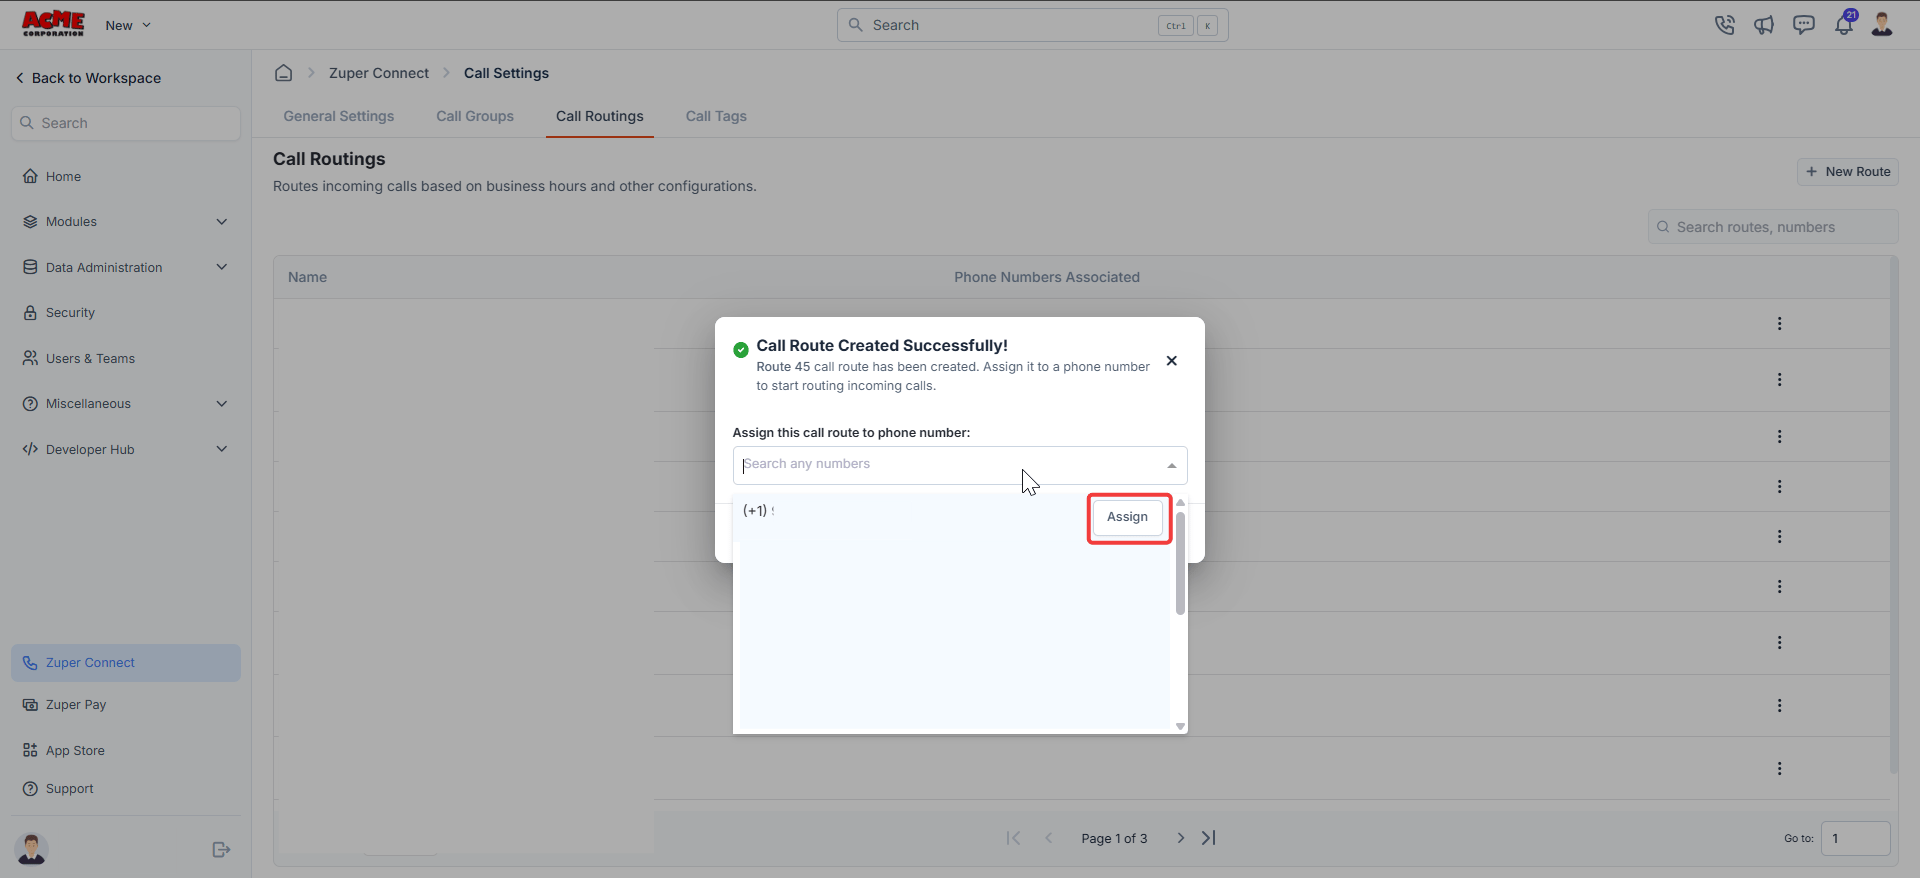
- In the Assign this call route to phone number dialog, search for or scroll to the number you want to assign.
- Select Assign next to the chosen phone number. The number now links to this route.
If a phone number lacks a call route, incoming calls to that number will not be supported. Always assign a route immediately after creation.This dialog appears when you create a new route. To assign additional numbers to an existing route at any time, select Assign Number from the context menu on the listing page.
- Edit: Update the route name, schedule, handlers, or fallback settings.
- Assign Number: Link an additional phone number to the route.
- Clone: Duplicate the route’s configuration as a starting point for a new route. Always review all settings in the cloned route before assigning a phone number.
- Delete: Permanently remove the route.
FAQs
Do I need a call route to receive incoming calls?
Do I need a call route to receive incoming calls?
How are business hours determined?
How are business hours determined?
Can multiple numbers share the same route?
Can multiple numbers share the same route?
What happens if I change the account business hours?
What happens if I change the account business hours?
What happens if no one answers an incoming call?
What happens if no one answers an incoming call?
- Forward to an external number — the call redirects to a phone number outside Zuper.
- Voicemail — Zuper plays your voicemail message and records the caller’s response.
- CSR Agent — the call transfers to your CSR Agent, who continues the conversation.
- End call with greeting message — Zuper plays a closing message and ends the call.
What are the fallback options?
What are the fallback options?
- Forward to an external number — redirects the call to a number outside Zuper, such as another team or department.
- Voicemail — plays your recorded message and captures the caller’s response.
- CSR Agent — hands the call to your CSR Agent to continue the interaction.
- End call with greeting message — plays a closing message and ends the call.
What happens if all agents are on Do Not Disturb or logged out?
What happens if all agents are on Do Not Disturb or logged out?
Can I set different fallbacks for business hours and after hours?
Can I set different fallbacks for business hours and after hours?
What happens if the external forwarding number fails?
What happens if the external forwarding number fails?
Are international forwarding destinations supported?
Are international forwarding destinations supported?
Where do voicemails land?
Where do voicemails land?
Can I use different voicemail greetings for business hours and after hours?
Can I use different voicemail greetings for business hours and after hours?
Can I enable call recording per route?
Can I enable call recording per route?
How do I play a recording-consent message only on specific routes?
How do I play a recording-consent message only on specific routes?
Can I send an automated text for missed calls?
Can I send an automated text for missed calls?
Can I clone a call route?
Can I clone a call route?
What gets copied when I clone a route?
What gets copied when I clone a route?
What happens if I delete a route that has a number attached?
What happens if I delete a route that has a number attached?
Are there any limits on the number of phone numbers per route?
Are there any limits on the number of phone numbers per route?
Are there additional charges for external forwarding?
Are there additional charges for external forwarding?