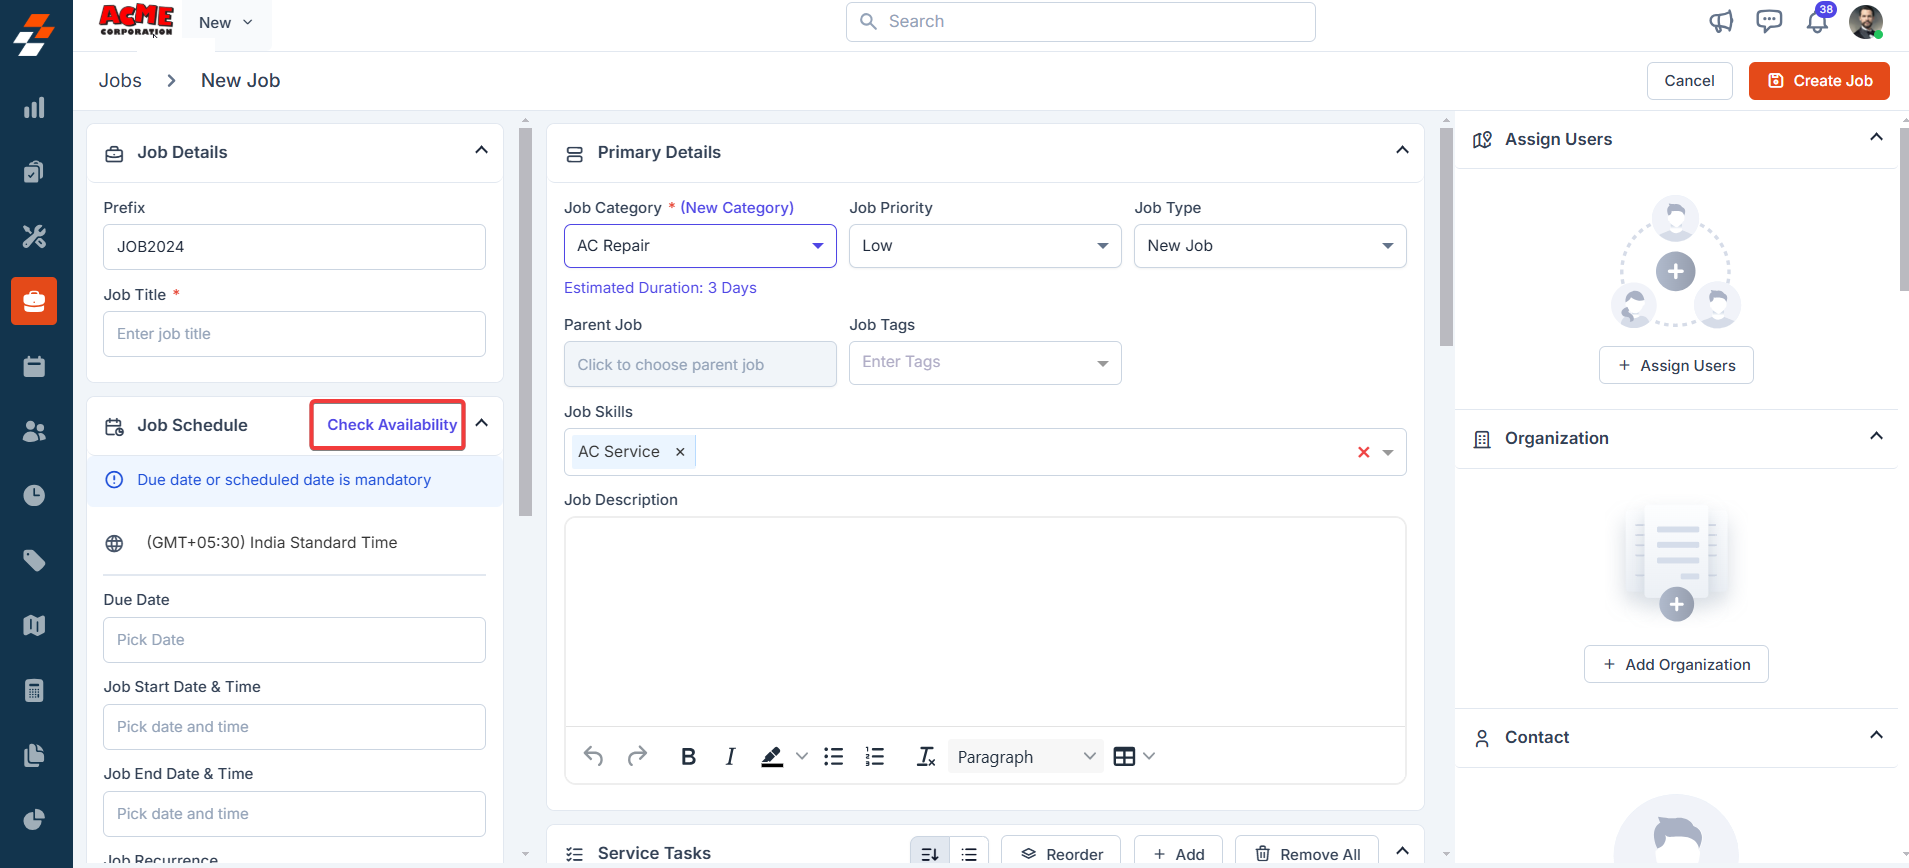
Navigation: Jobs -> + New Job
To create a new job
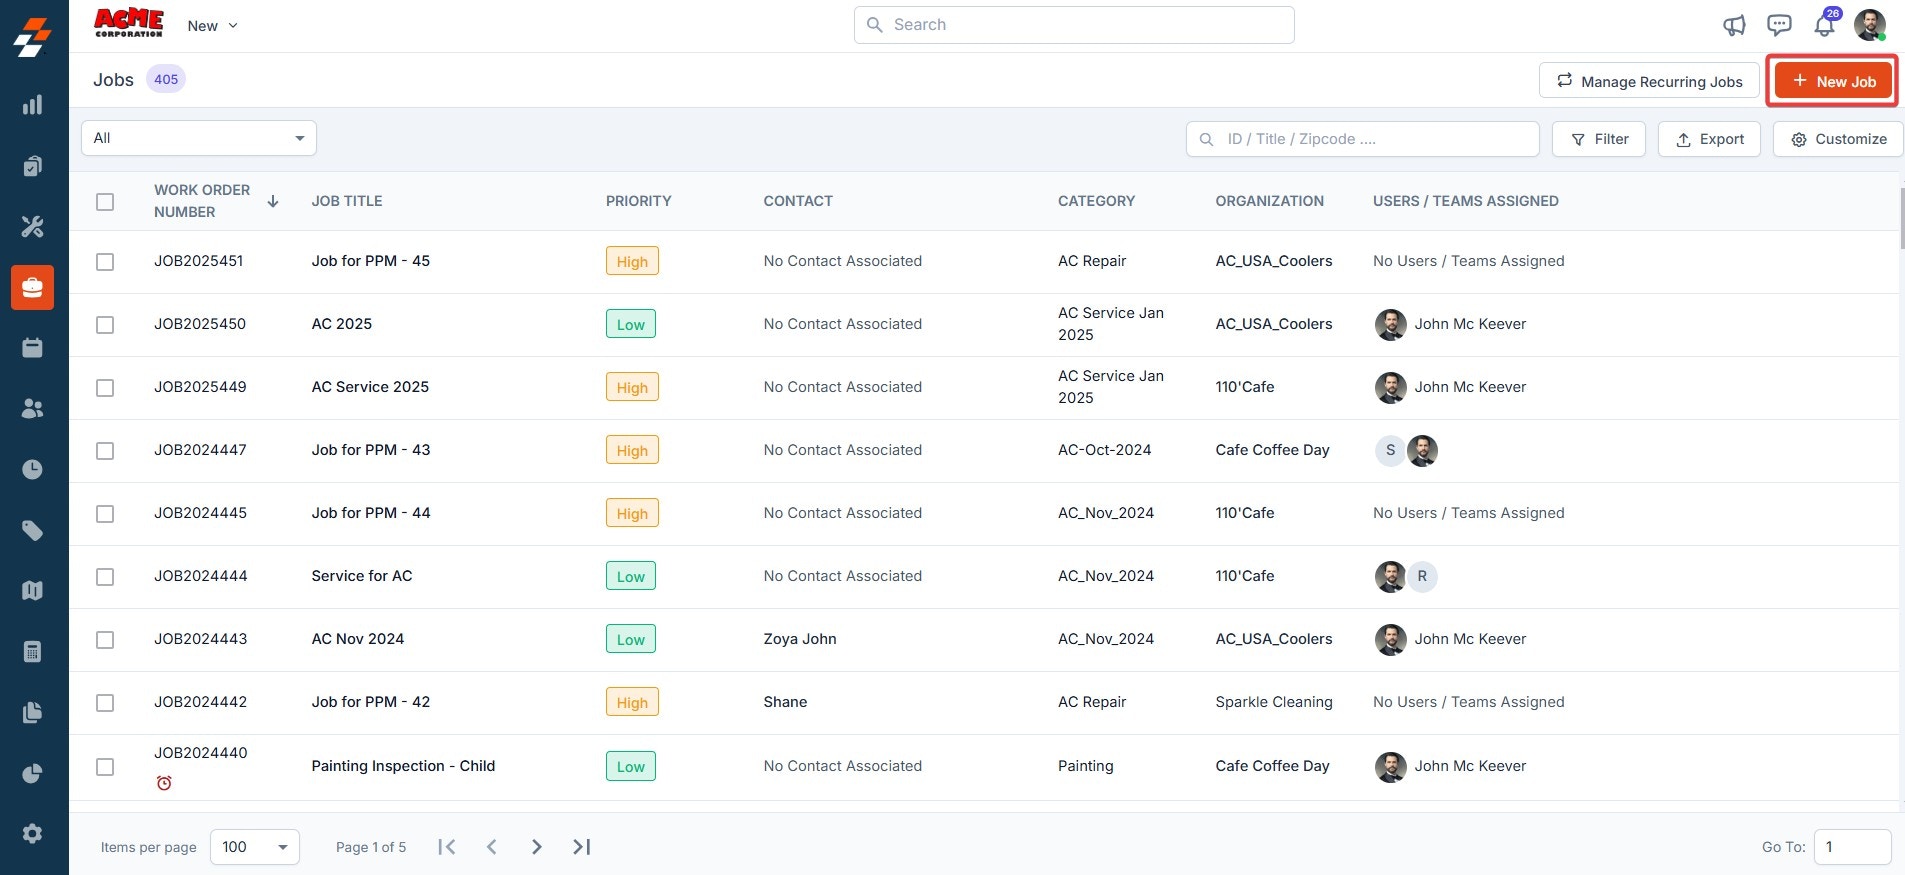
- On the jobs listing page, you will see an overview of existing jobs, including work order numbers, categories, statuses, and more.
- Click the “+ New Job” button at the top right corner of the page to begin creating a new job.
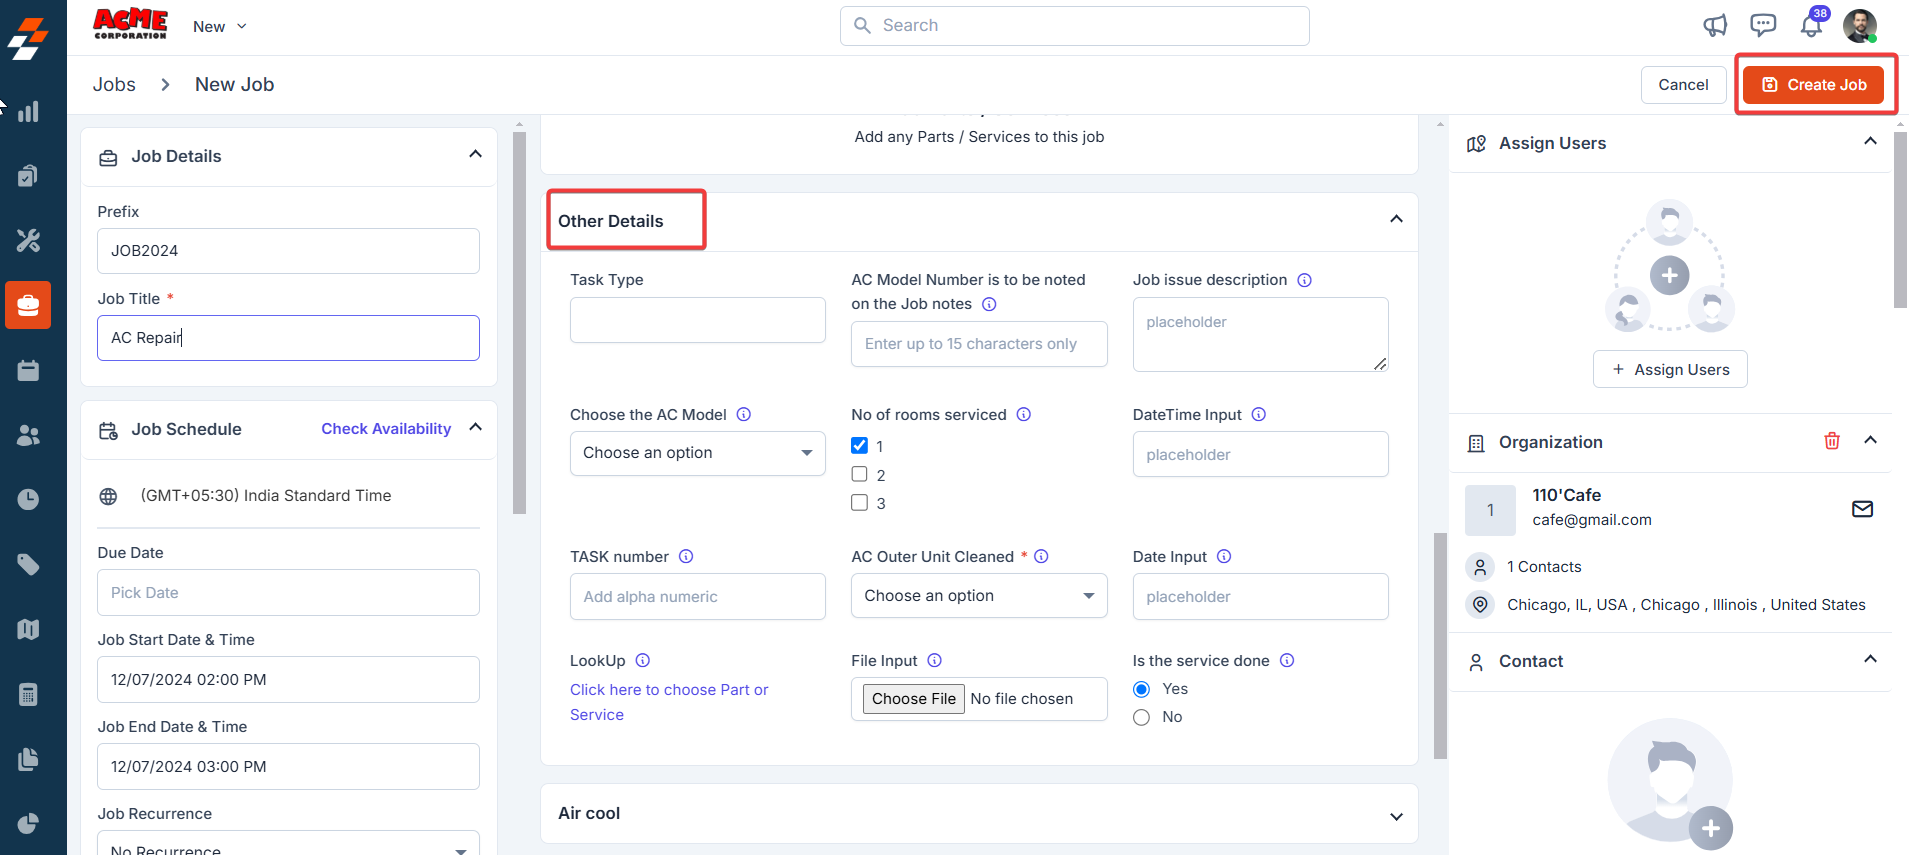
- The left panel lets you enter the job title, schedule, and address.
- The center panel lets you enter other necessary information about the job.
- The right panel enables you to associate related records, such as customers, properties, assets, and more.
A. Job details
- Job Title (Mandatory)- Enter the title of the job.
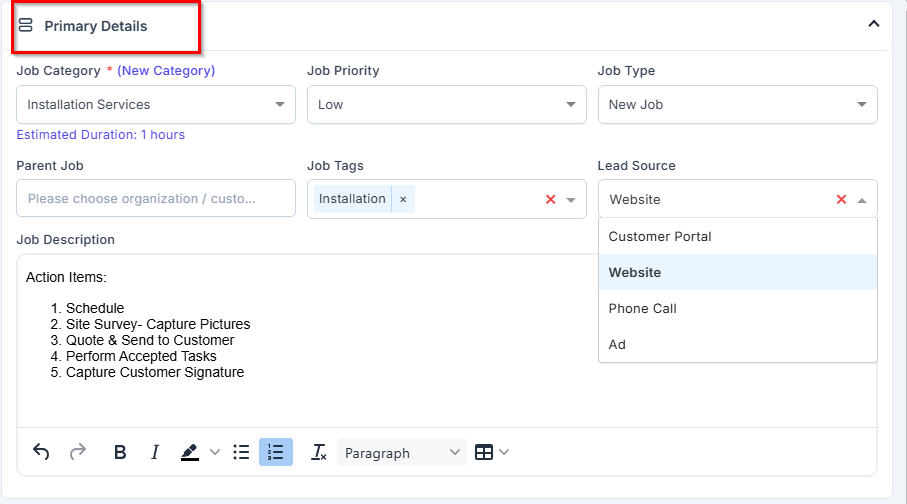
B. Primary details
- Job Category (Mandatory): Select the appropriate job category from the drop-down menu. Once selected, the Check Availability option becomes available in the Job Schedule section, and the default description and service tasks associated with the chosen category will be automatically displayed.
- Other Fields (optional): Choose/enter in the Job Priority, Job Type, Parent Job (in case of revisit job), Job Tags, Lead Source (identify how the job was created or where the request originated, e.g., Customer Portal, Website, Phone Call, or Ad), job skills, and Job Description.
C. Job schedule
Choose the start and end dates to schedule the job based on the contact’s preferences. Either the due date or the start and end dates are mandatory to create a job. If the job is a one-off, choose “Non-Recurrence; ” if it has recurring schedules, choose “Recurrence.”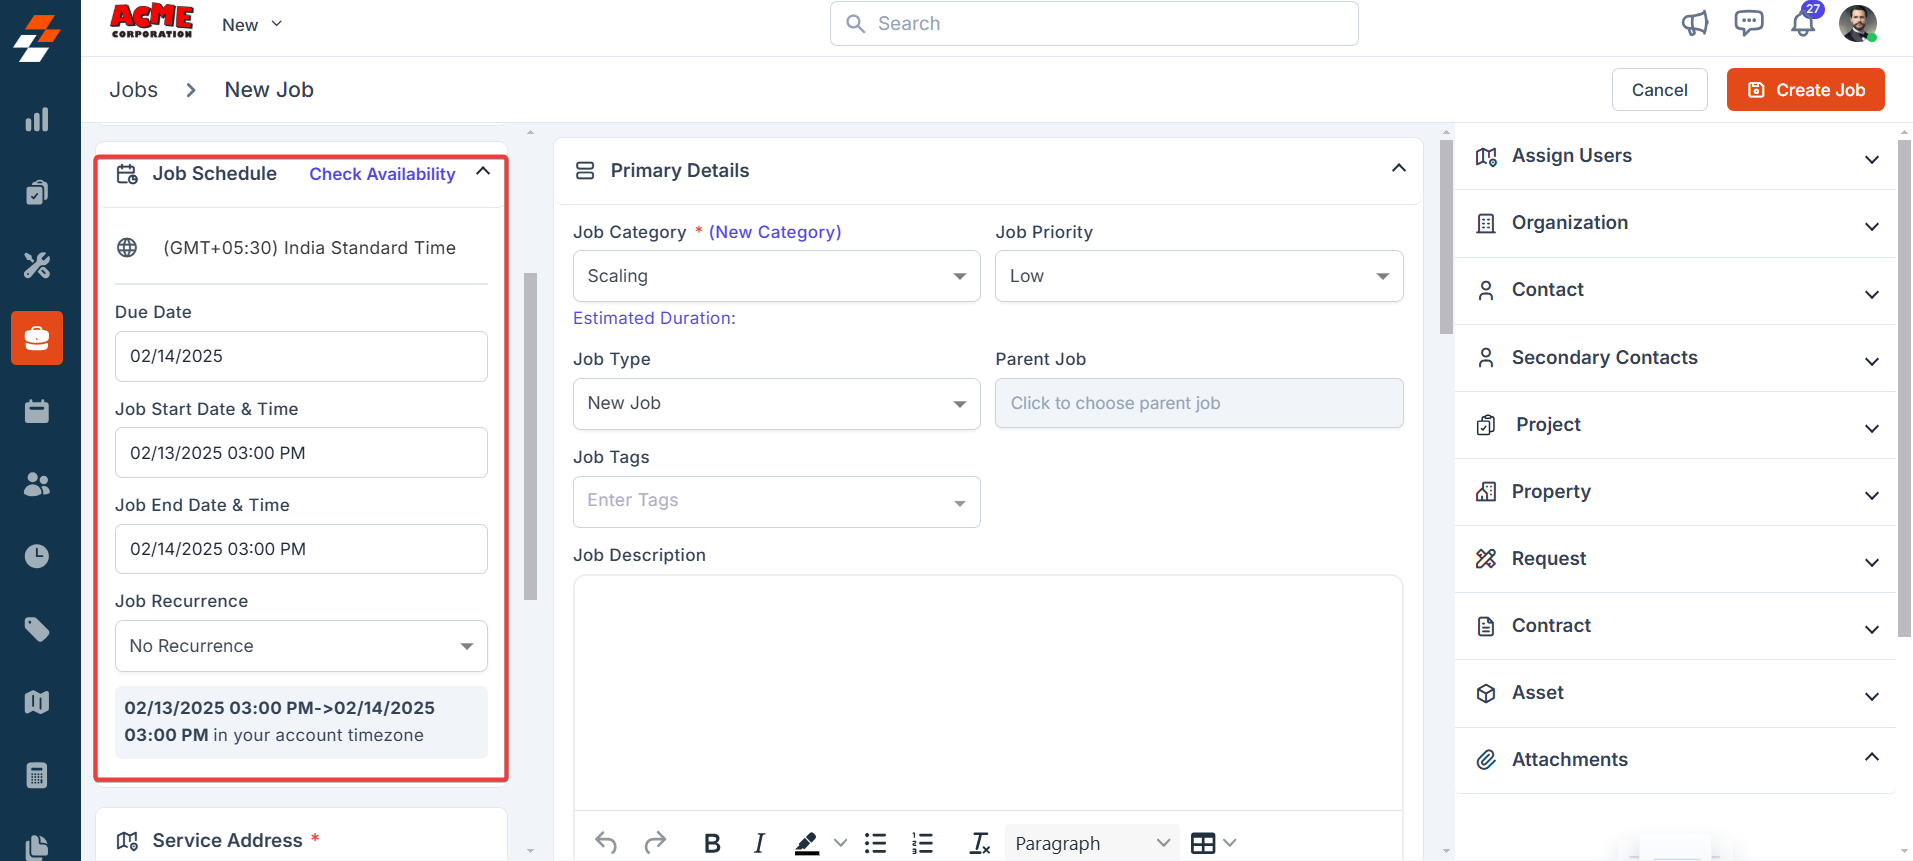
Recurring Jobs
Recurring Jobs
If the job is a recurring job, select Recurring Job from the Job Recurrence dropdown. A Choose Job Recurrence dialog box will appear where you can configure the recurrence pattern using the following fields:
Select the start date for the recurrence using the date picker.• Recurrence Duration (Mandatory):
Enter the duration and choose the unit from the dropdown (Days, Weeks, Months, or Years). This defines how long the recurrence should continue.• Job Start Time (Mandatory):
Enter the start time for each occurrence of the job.• Job End Time (Mandatory):
Enter the end time for each occurrence of the job.• Choose Frequency:
Select the recurrence frequency—Daily, Weekly, Monthly, or Yearly.
(As shown in the UI, Weekly is selected.)• Repeat Every:
Enter how often the job should repeat based on the chosen frequency (e.g., every 2 weeks).• Choose days of the week to repeat:
For weekly recurrence, select the specific days on which the job should repeat (e.g., Sunday and Monday).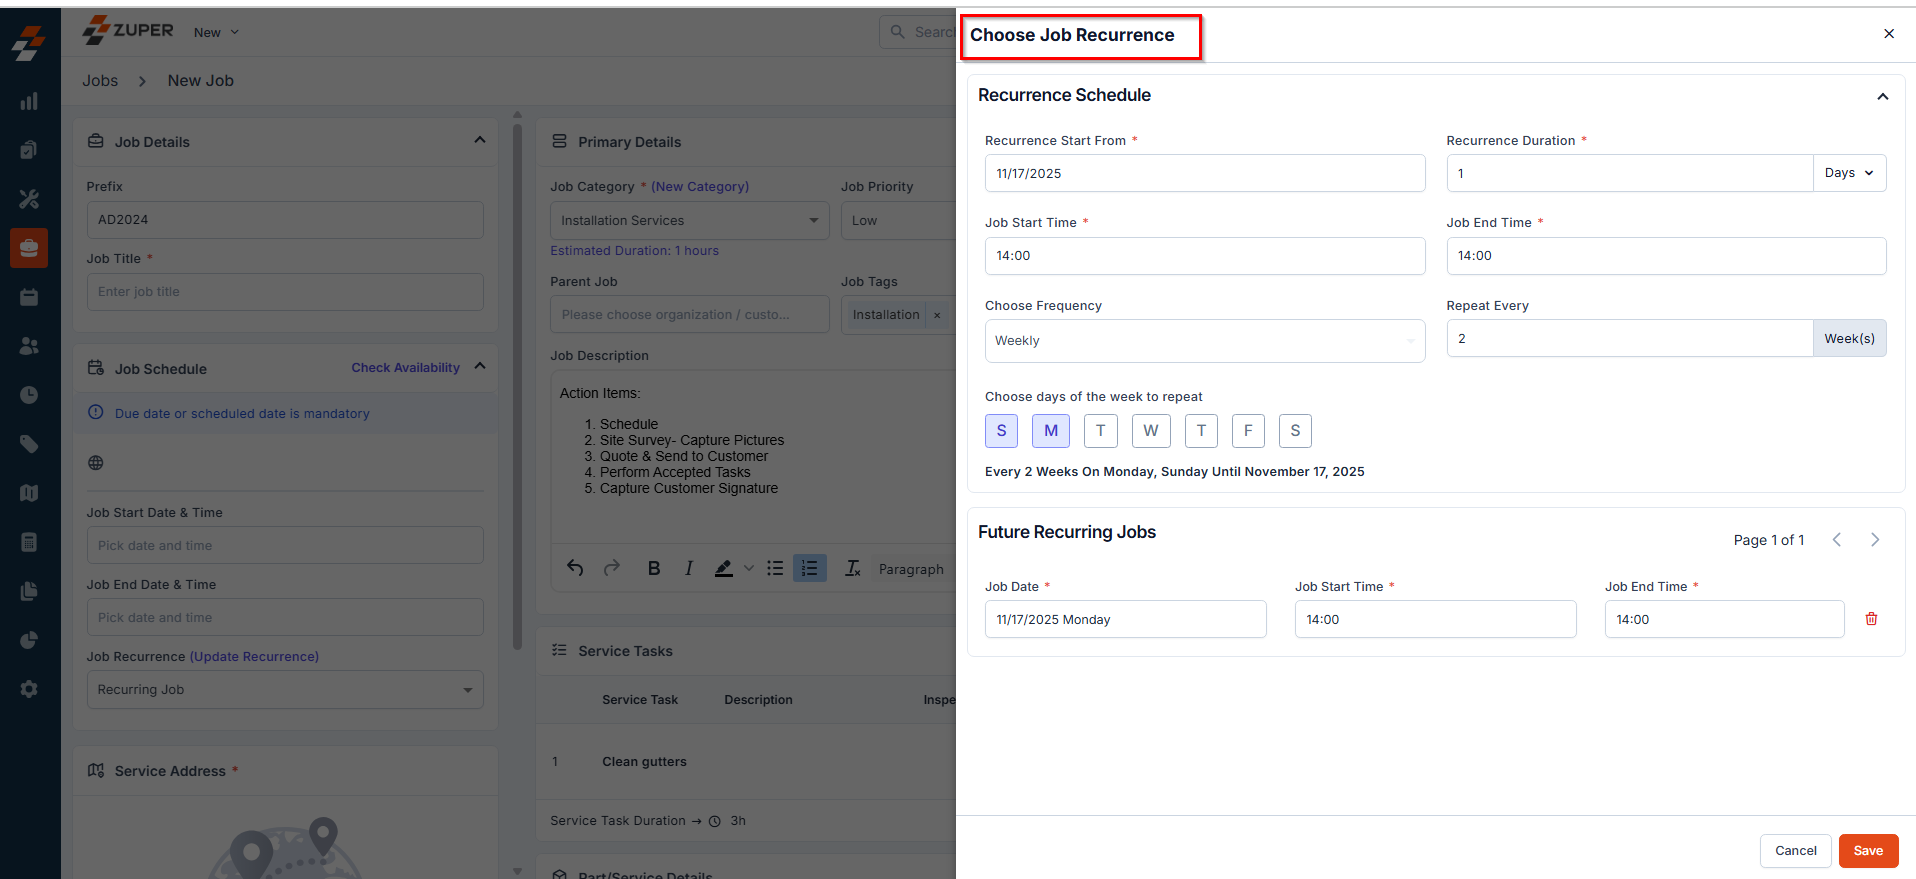
Recurrence Schedule
• Recurrence Start From (Mandatory):Select the start date for the recurrence using the date picker.• Recurrence Duration (Mandatory):
Enter the duration and choose the unit from the dropdown (Days, Weeks, Months, or Years). This defines how long the recurrence should continue.• Job Start Time (Mandatory):
Enter the start time for each occurrence of the job.• Job End Time (Mandatory):
Enter the end time for each occurrence of the job.• Choose Frequency:
Select the recurrence frequency—Daily, Weekly, Monthly, or Yearly.
(As shown in the UI, Weekly is selected.)• Repeat Every:
Enter how often the job should repeat based on the chosen frequency (e.g., every 2 weeks).• Choose days of the week to repeat:
For weekly recurrence, select the specific days on which the job should repeat (e.g., Sunday and Monday).
Future Recurring Jobs
Based on your selections, the Future Recurring Jobs section displays a preview of upcoming job entries, including the Job Date, Job Start Time, and Job End Time. These entries are auto-generated according to the recurrence pattern.Assisted Scheduling
Assisted Scheduling
Assisted Scheduling in Zuper is a game-changer for businesses looking to optimize their workforce management. Combining real-time data on availability, skills, shifts, and territories into an easy-to-use interface removes the guesswork of scheduling. Whether juggling multiple jobs or ensuring the right technician is assigned at the right time, this feature empowers you to make informed decisions quickly and efficiently.Pre-Requisites:Ensure Business hours and work hours are configured correctly.For teams working across multiple time zones, ensure “Enable Switching Timezones” is set to “Yes” under Organization settings > General settings. Additionally, ensure that teams are assigned to the appropriate time zones.Slots and usage:To use Assisted Scheduling, start by selecting a preferred date from the calendar on the left-hand side of the interface. You can use “Resource View” or “Slot View.”Slot View: Displays all available time slots for the selected date.Resource View: Displays available slots by individual users in the chosen time zone grouped by teams.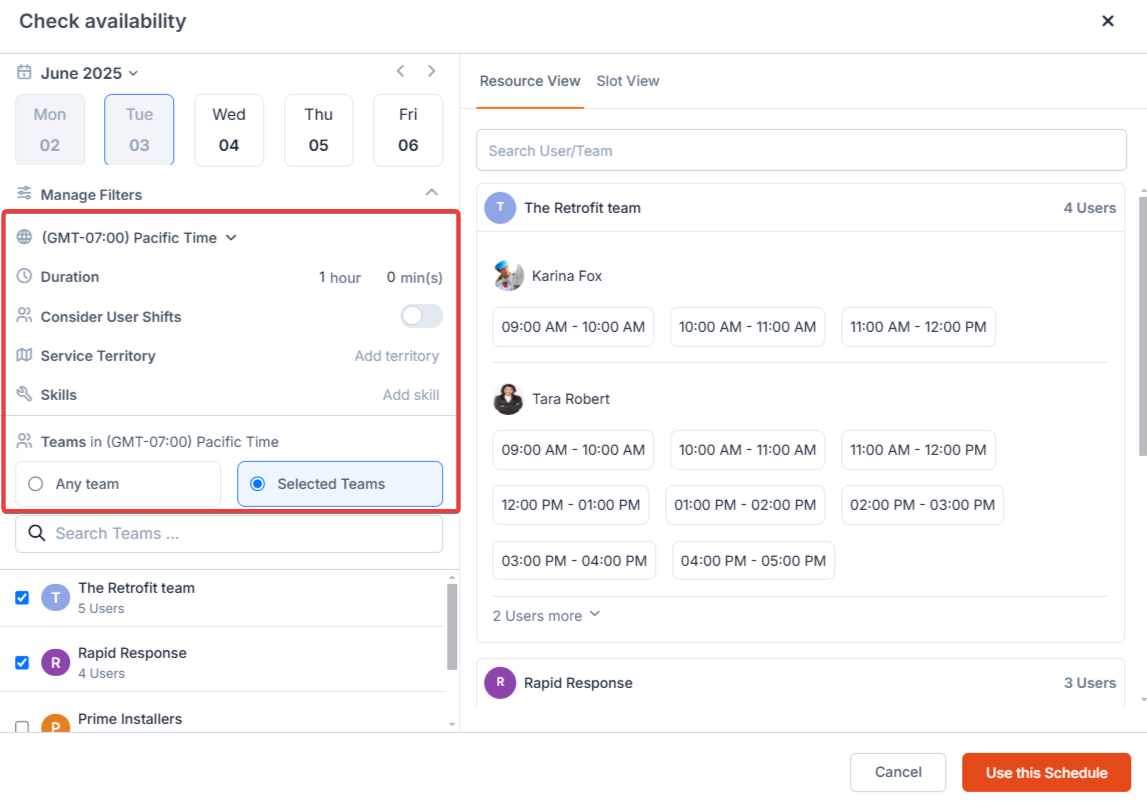
Fire & Ice is an HVAC service company with business hours between 9 AM to 5 PM. John is a field technician at Fire & Ice, working from 8 AM to 4 PM on all days of the week. On November 20, 2024, John had to work a shift from 7 AM to 3 PM EST.
When “Consider User Shifts” is toggled off:
i. If the user has a shift created during this period, slots overlapping with business and shift hours are displayed. In the above scenario, John’s slots would be displayed from 9 AM to 3 PM PST on November 20 since these slots are within business hours, and John has a shift created till 3 PM on that date.
- When a user is assigned to a job or a non-job event (with availability set to ‘Busy’ for the non-job event), the corresponding time slot is blocked in the Resource view.
- If all users are occupied at a specific time, that slot is also blocked in the Slot view.
- However, a slot remains available if the assigned job is ‘Completed,’ ‘Closed,’ or ‘Cancelled.’
- When users are on time off, their slots won’t be displayed in the Resource view.
- If all users are on time off during a specific slot, it won’t be shown in the Slot view.
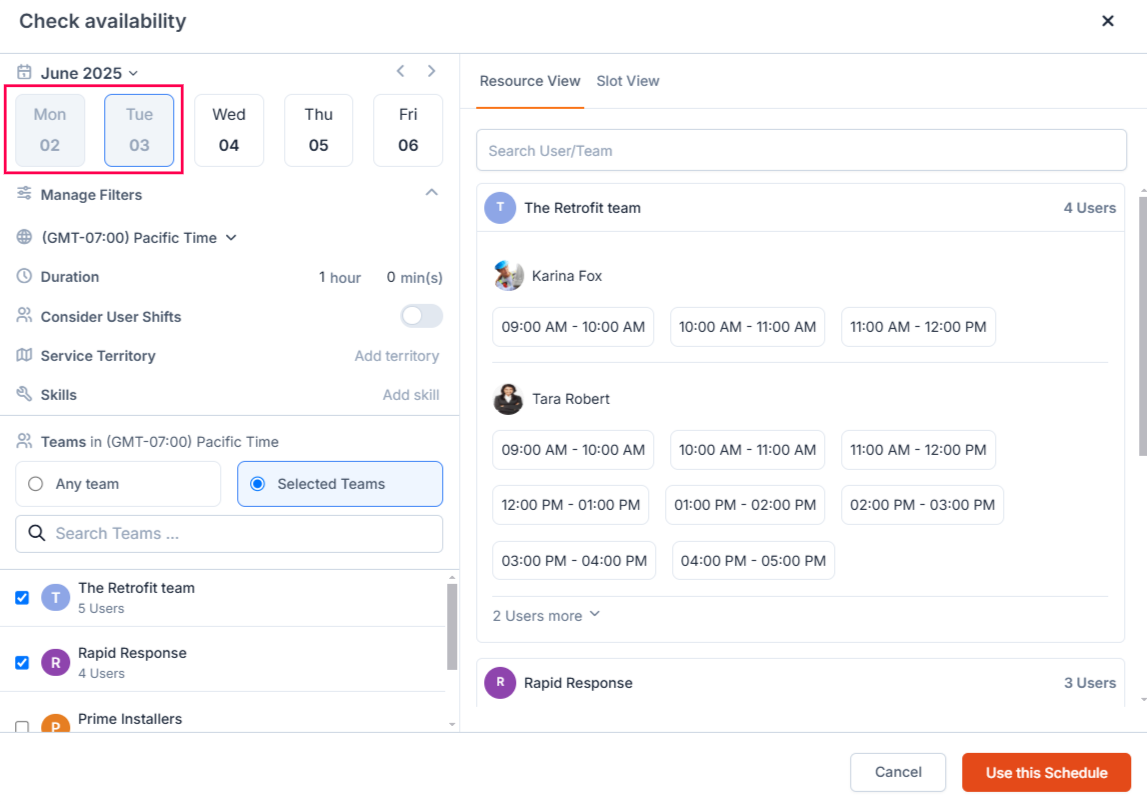
- Holiday for All Users – Jobs Allowed
- The holiday is marked in the date picker.
- Users can select the date for scheduling jobs.
- Holiday for All Users – Jobs Not Allowed
- The holiday is marked in the date picker.
- Users cannot select the date for scheduling jobs.
- June 3 (Wednesday) can be selected, as jobs are allowed.
- June 2 (Tuesday) cannot be selected, as job scheduling is restricted.
-
Holiday for a Specific Team – Jobs Allowed
- The holiday is indicated next to the team’s name.
- Users can select the team to schedule jobs.
-
Holiday for a Specific Team – Jobs Not Allowed
- The holiday is indicated next to the team’s name.
- Users cannot select the team to schedule jobs.
- Time Zone: Available slots are listed only for teams in the selected time zone. As mentioned, business and work hours are considered in the selected time zone.
- Duration: Slots are displayed in the selected duration; the maximum duration allowed is 8 hours. If a category is selected, the category duration will be pre-filled (if the category duration exceeds 8 hours, 8 hours will be pre-filled). If no category is selected, the duration will be pre-filled to 1 hour.
- Consider User Shifts: Adjust based on shift settings (as detailed above).
- Service Territory: Limit slots to users in a specific geographic area.
- Skills: Show slots for users with the required skills.
- Double-check the “Consider User Shifts” setting to ensure it aligns with your scheduling preferences.
- Use filters to narrow down options when scheduling for specific teams, skills, or territories.
- Adjust time zones carefully to match customer or operational needs.
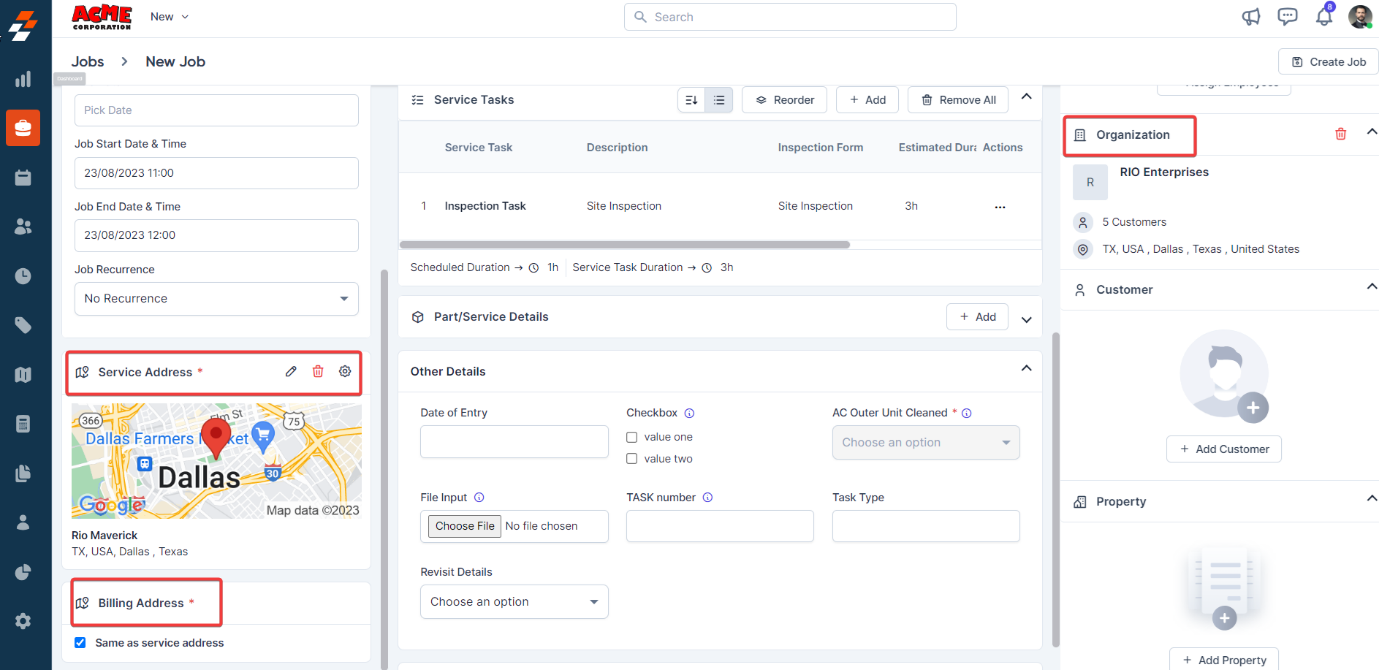
- Click the “+ Add Organization/Contact” button at the right of the page to add an organization or contact.
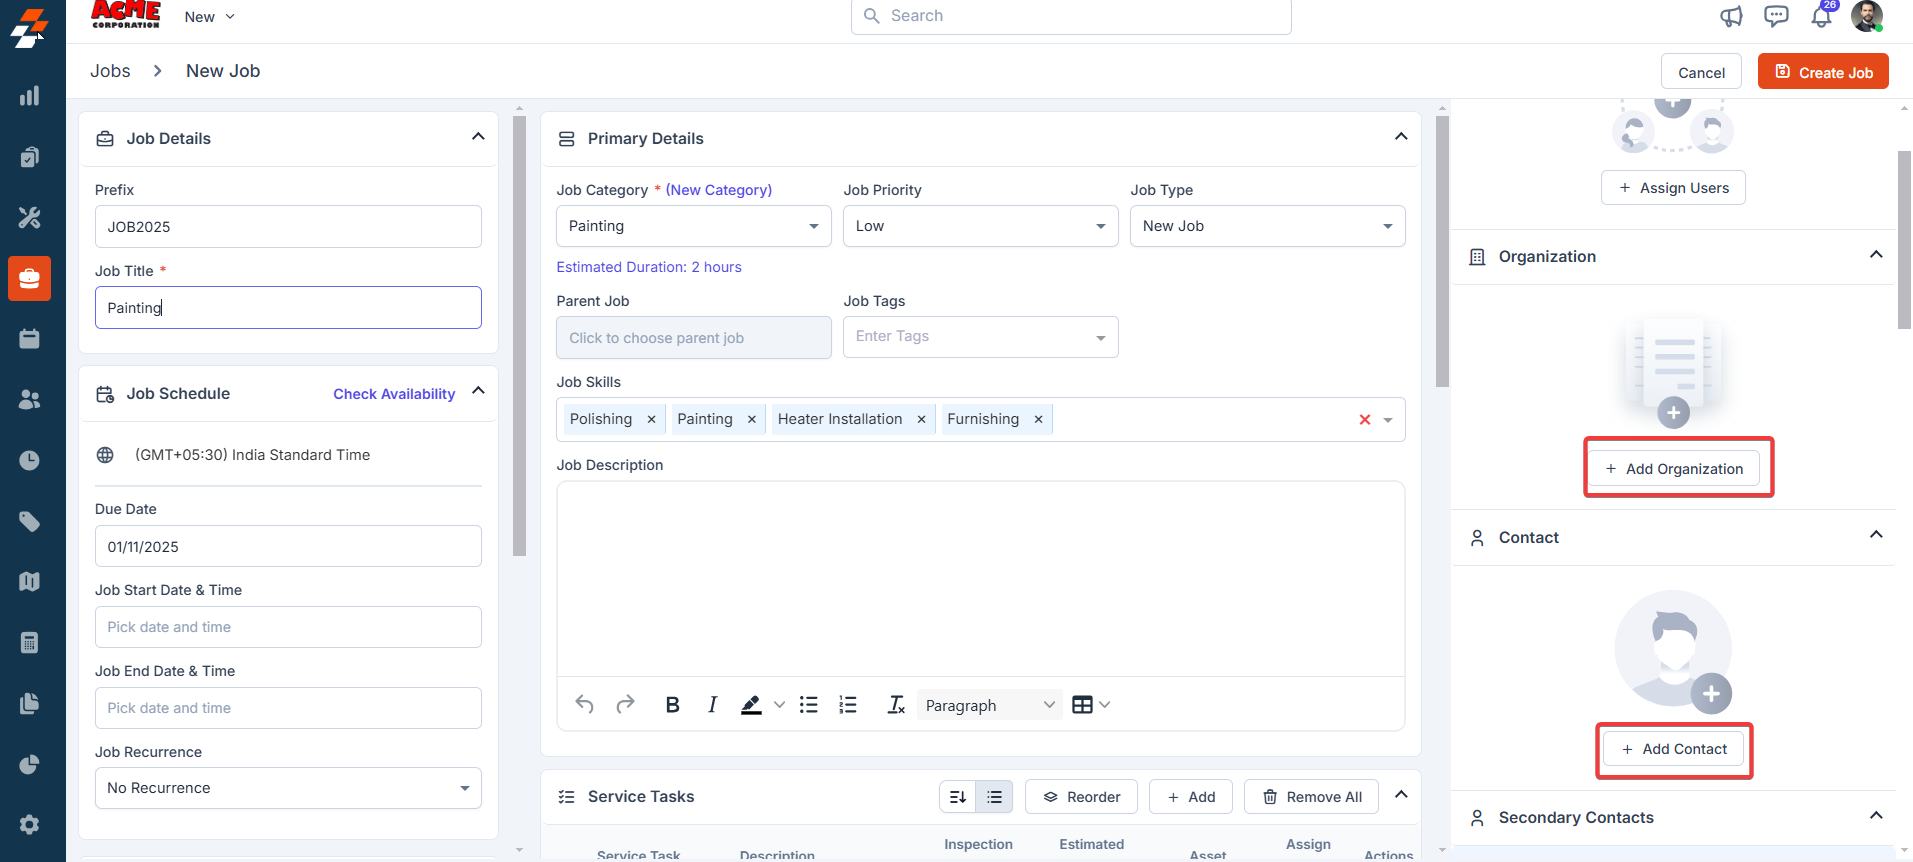
- The “Service Address” will be automatically pre-filled based on the selected organization or customer. You can use the same or a different one for the billing address.
Note: To modify the service address, click the edit icon. Make sure you select either the address or the geo-coordinates.
Service Territory
Service Territory
The Service Territory is auto-populated if the selected organization or contact service address falls within the geo-radius, geo-fence, and zip Code defined for that service territory.
D. Service tasks
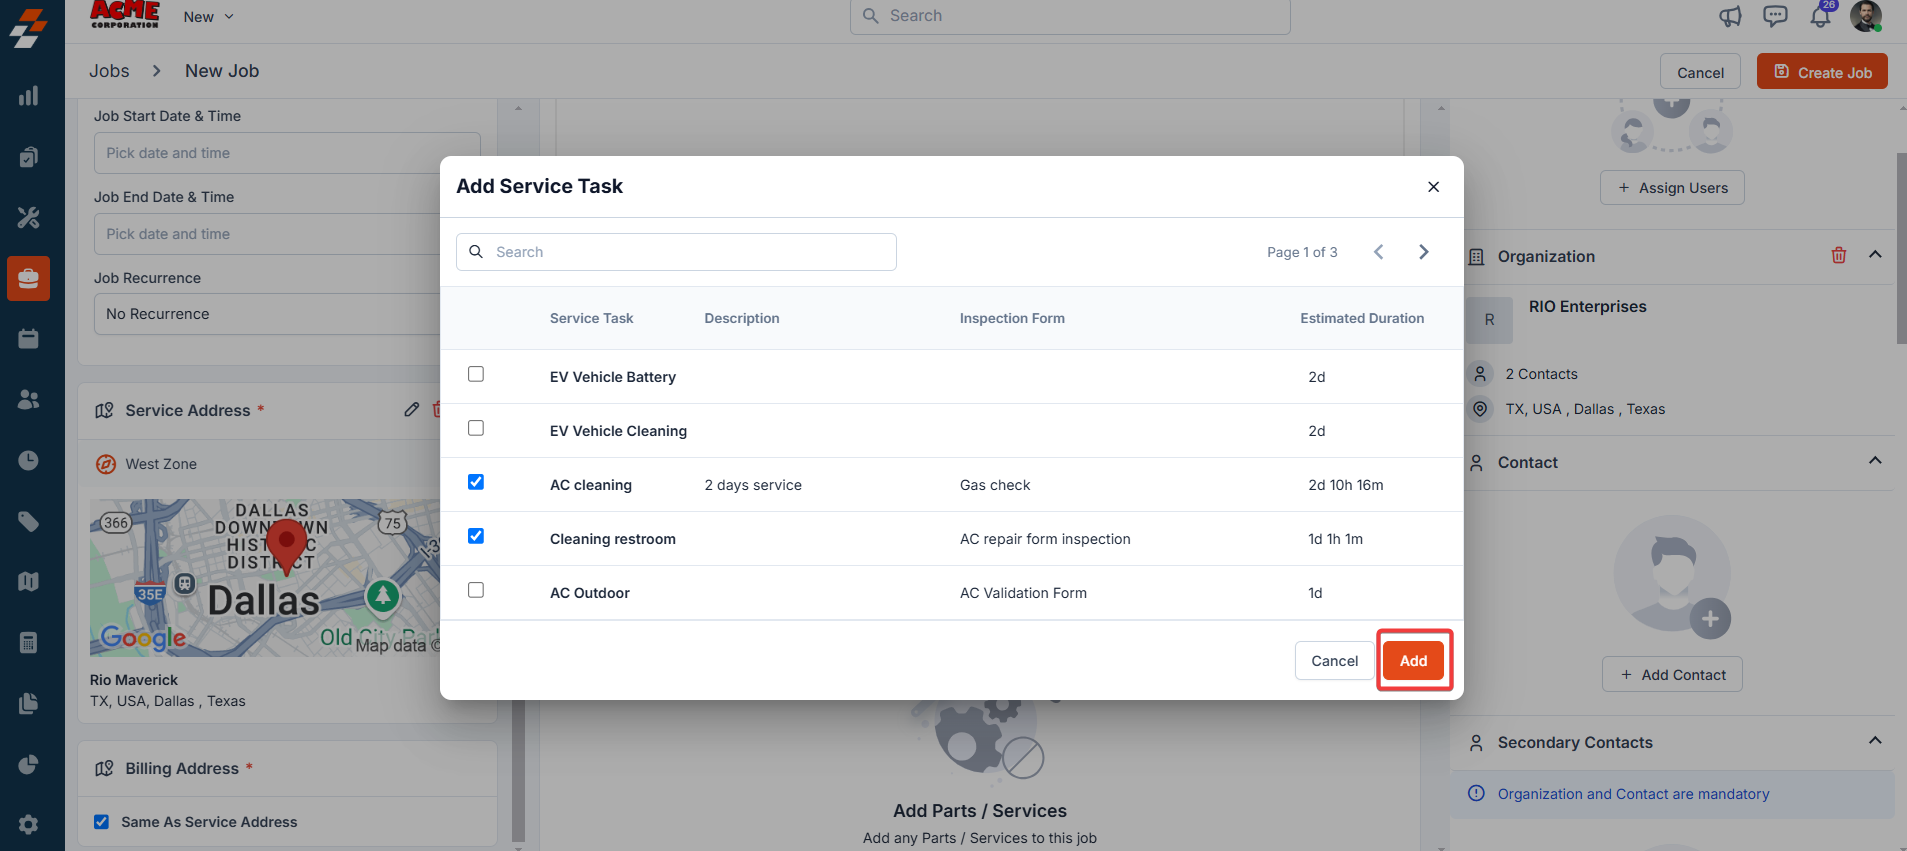
Service tasks define the step-by-step actions, procedures, or checklists that field technicians must follow while completing a job or work order. These tasks help ensure consistency, accuracy, and compliance with your organization’s workflow standards. By default, service tasks are pre-filled based on the selected job category. If not, add them manually.- Click the “+ Add” button from the Service Tasks tab. You can select existing service tasks or create a custom task.
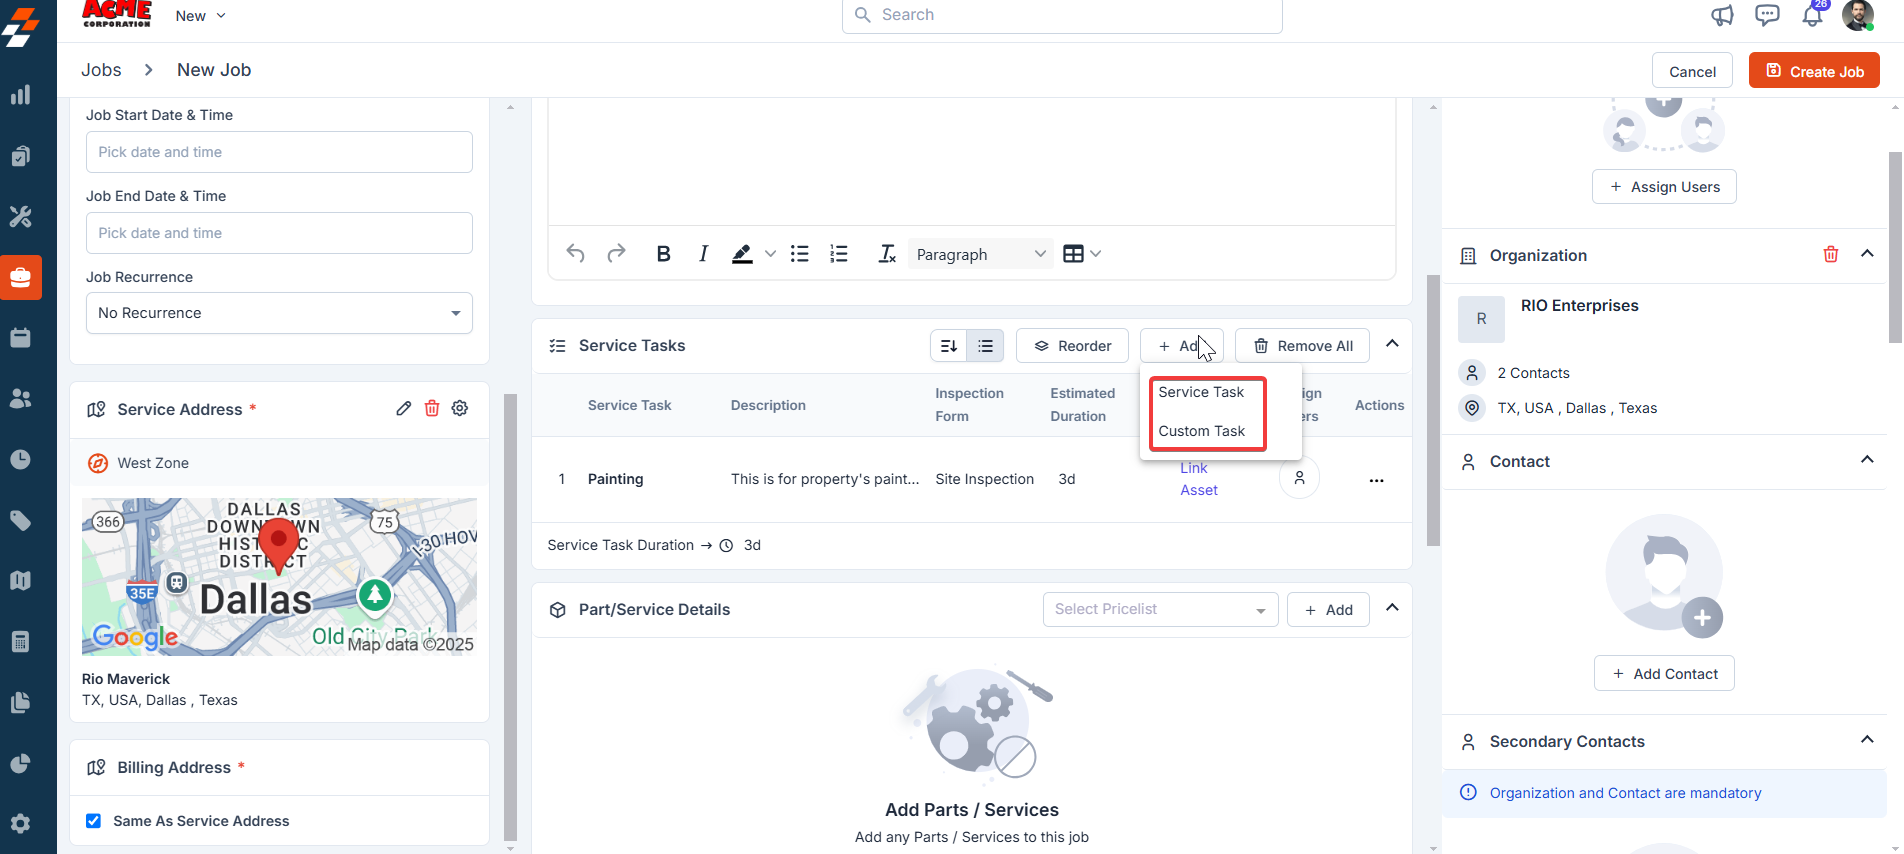
- Select the tasks and click the “Add” button to include them in the job. Once added, the service tasks will appear in the Service Tasks section of the job, which the technician should follow while performing the job.
For step-by-step instructions on how to configure service tasks, refer to this article.
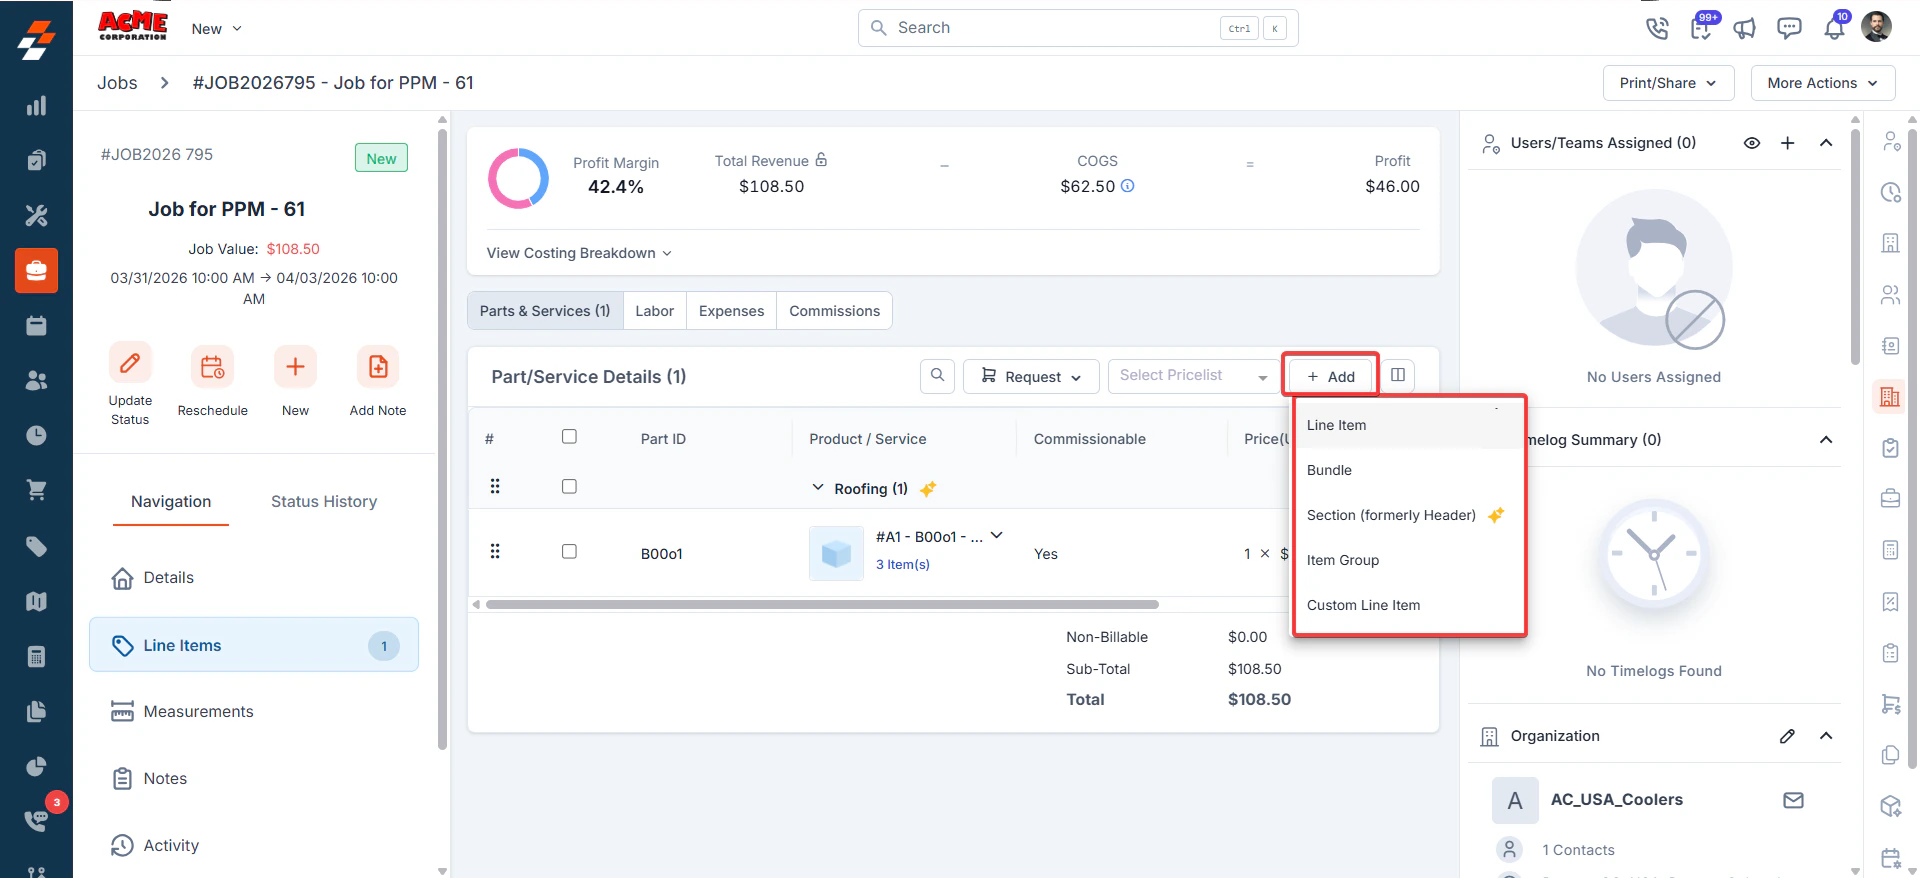
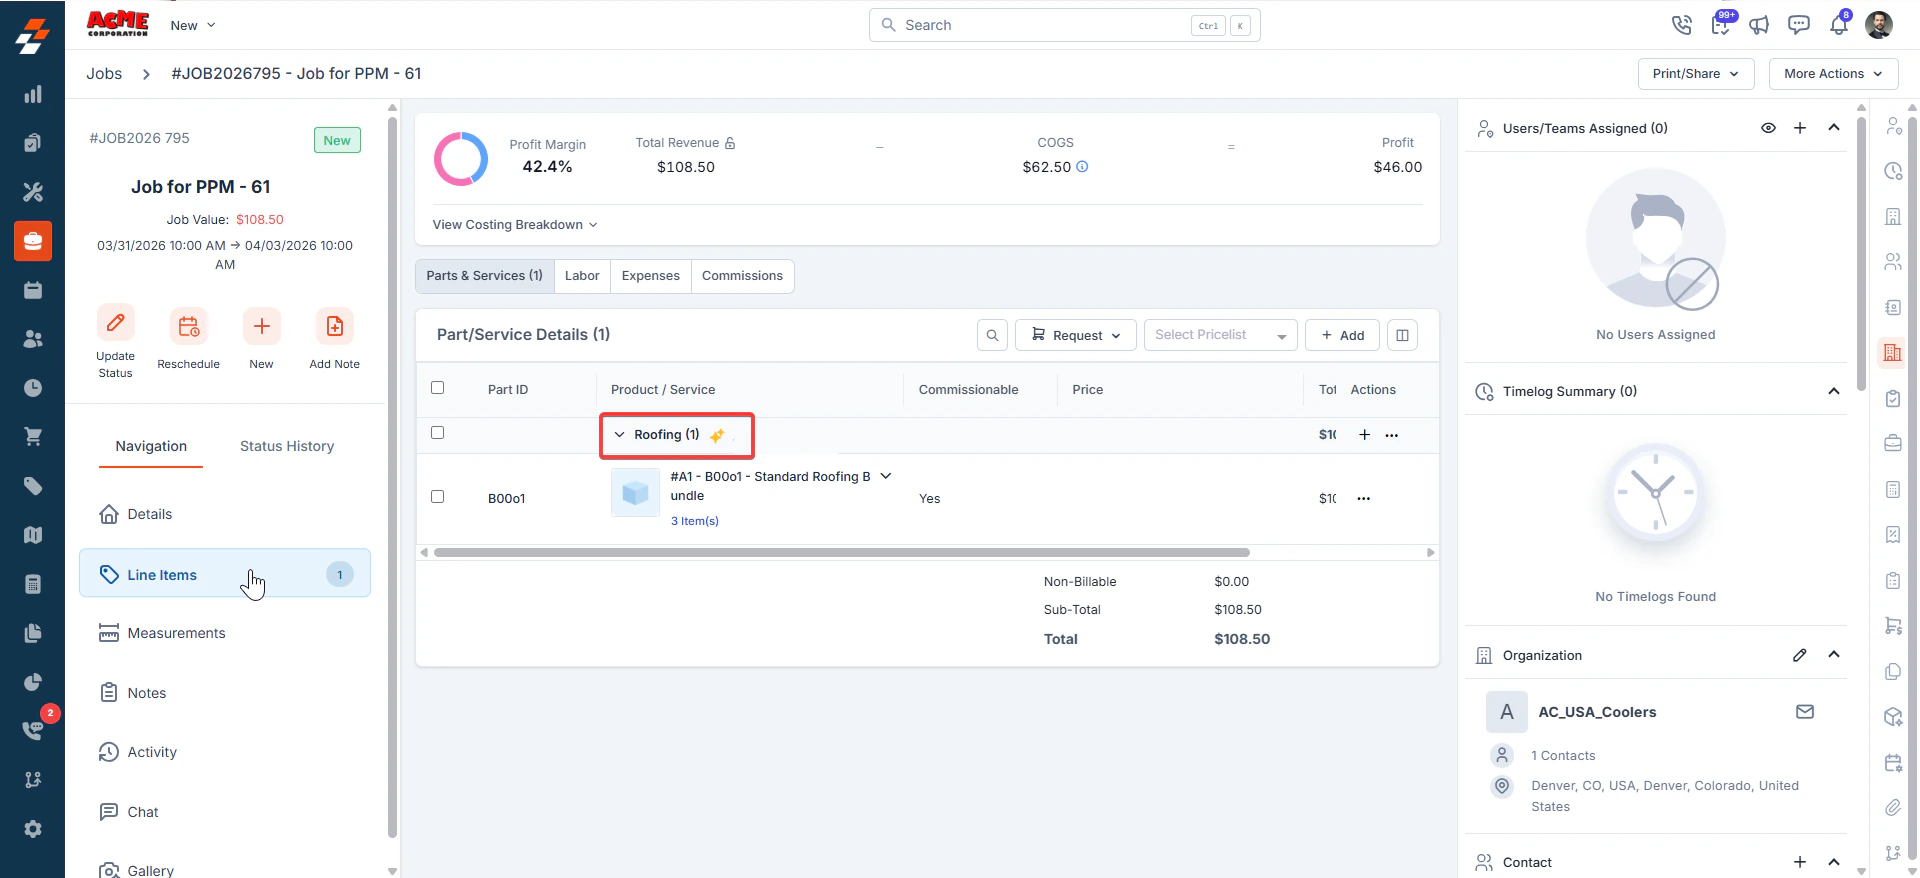
E. Part/Service details
This section displays the list of parts and services required to complete the job. It helps ensure that technicians have all the necessary materials and service items available before starting the work. You can add items directly from the inventory as needed.Note: When adding a new group, if any parts within the group have already been added, the system will not create a new line item; instead, it will simply increase the quantity of the existing item.
- Click the “+ Add” button in the Part/Service Details section. A drop-down menu will appear, prompting you to choose the parts & services:
- Add from “Line Item,” “Bundle,” “Section,” “Item Group,” or “Custom Line Item.”
Note: Custom line items will only be added to the specific job, not to your inventory.
- Select the required part from the pop-up that appears, fill in the details, and click the “+ Add Product” button. For step-by-step instructions on how to create a new part/product or service, refer to this article.
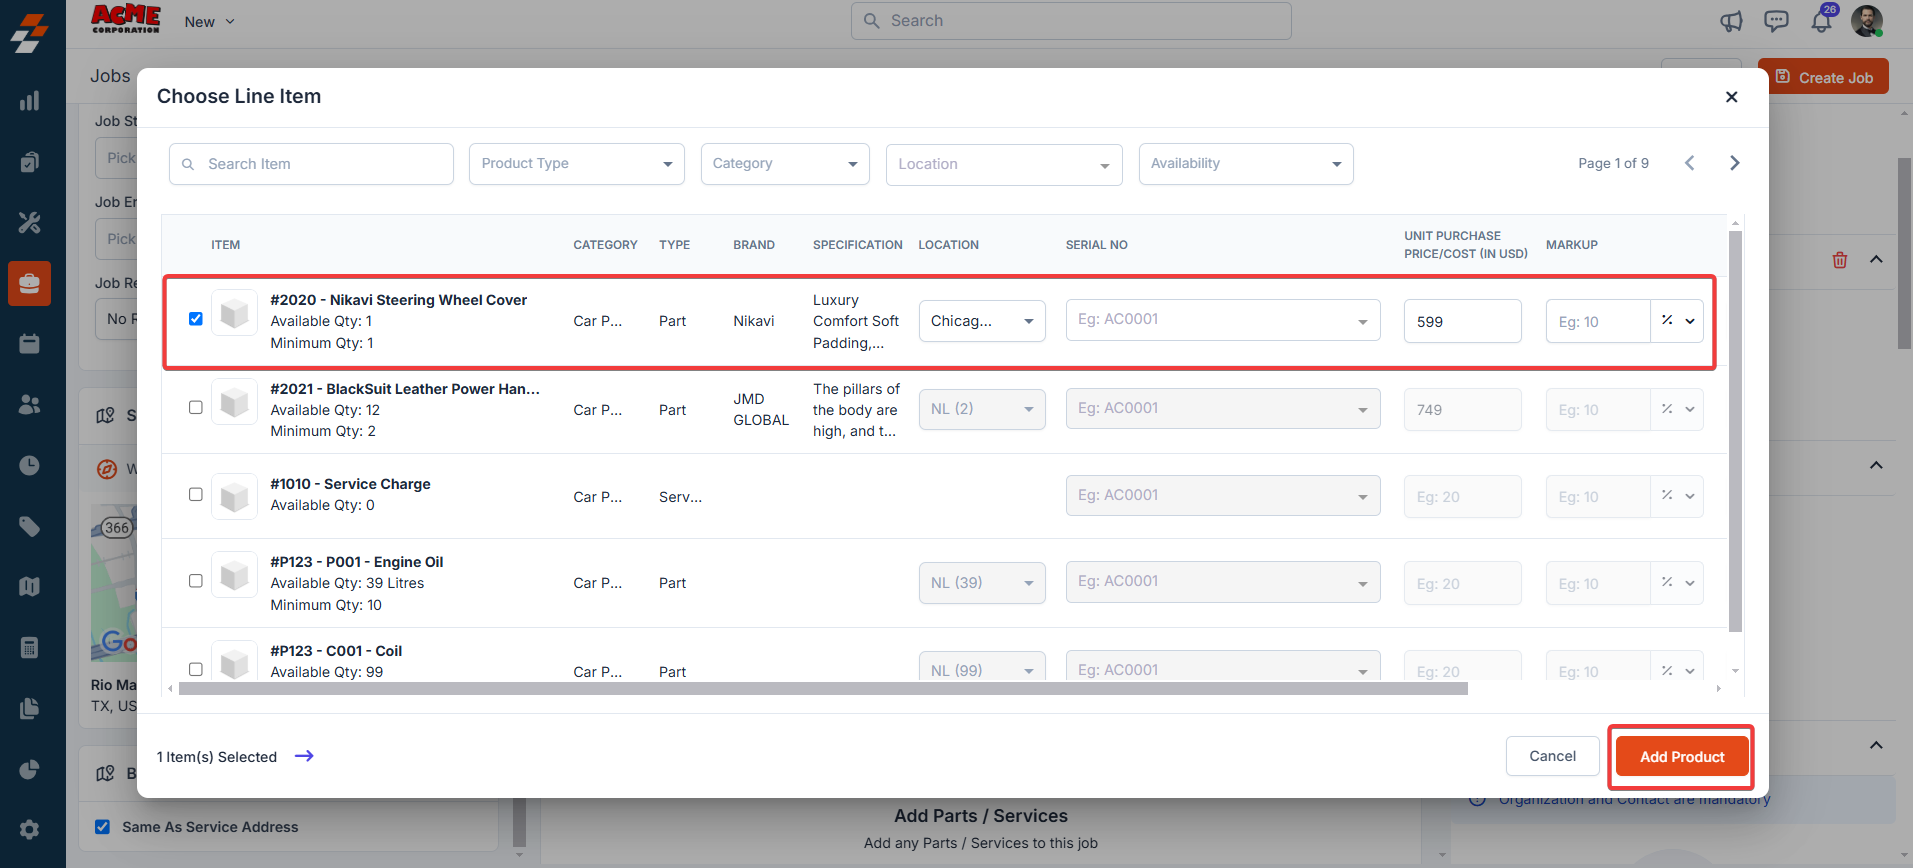
- If Track Serial Number is enabled and Mandate Serial No is turned on in Settings, you must need to enter a serial number before proceeding.
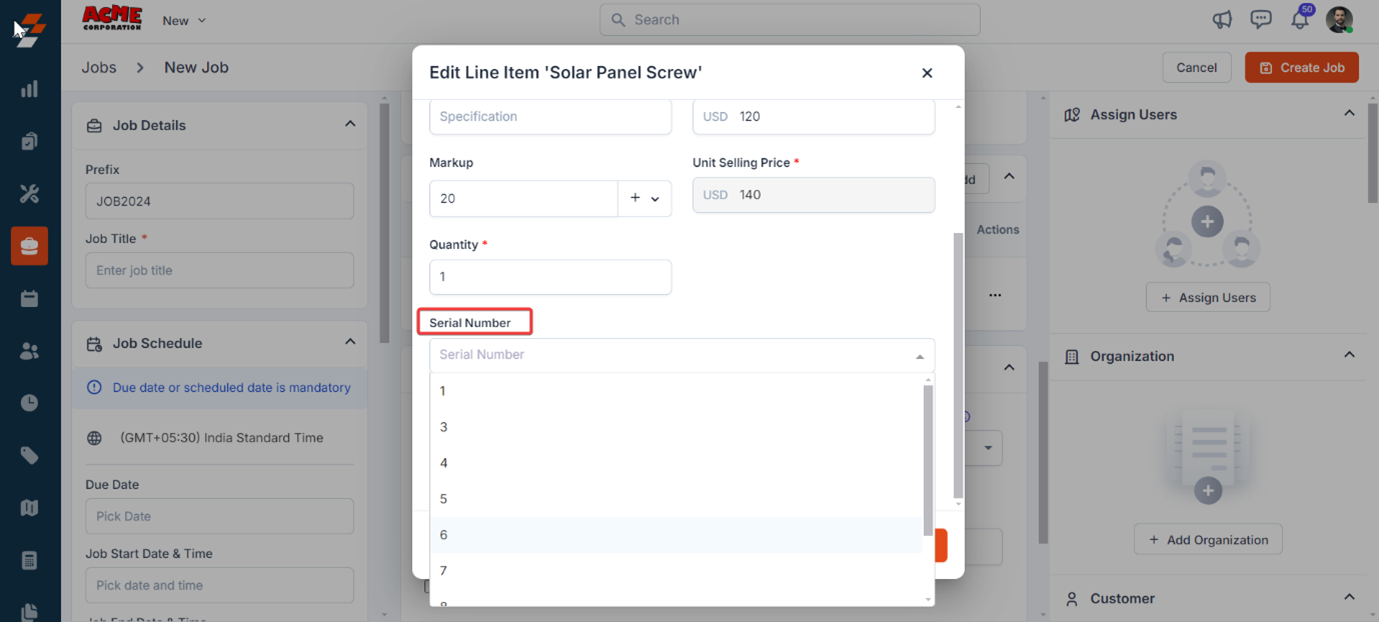
- Once the product is added, click the “Ellipsis” icon next to the part and choose “Edit.”
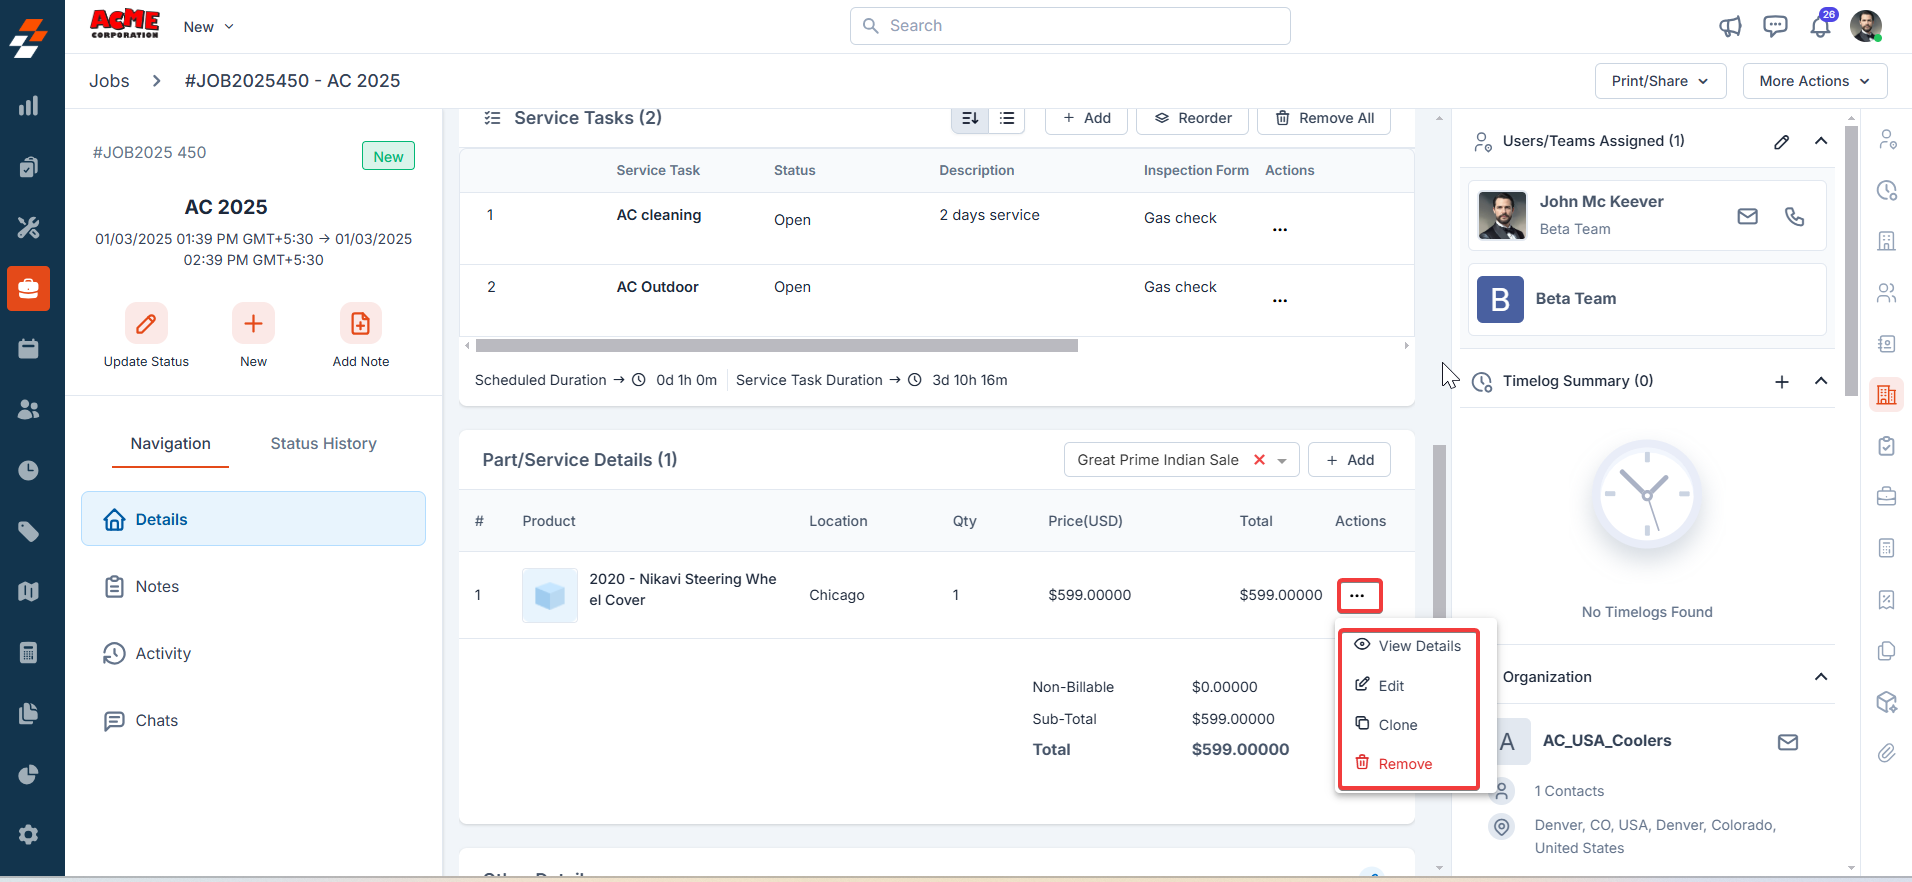
- A dialog box will appear. Under the serial number section, select the required “Serial Number” from the drop-down list and click the “Update Line Item” button to save the changes.
Options
When adding /editing a new part or product to a job, you can select the available Options configured for that specific item. This allows you to quickly select the required attributes when adding the part/product, ensuring the job reflects the customer’s selection.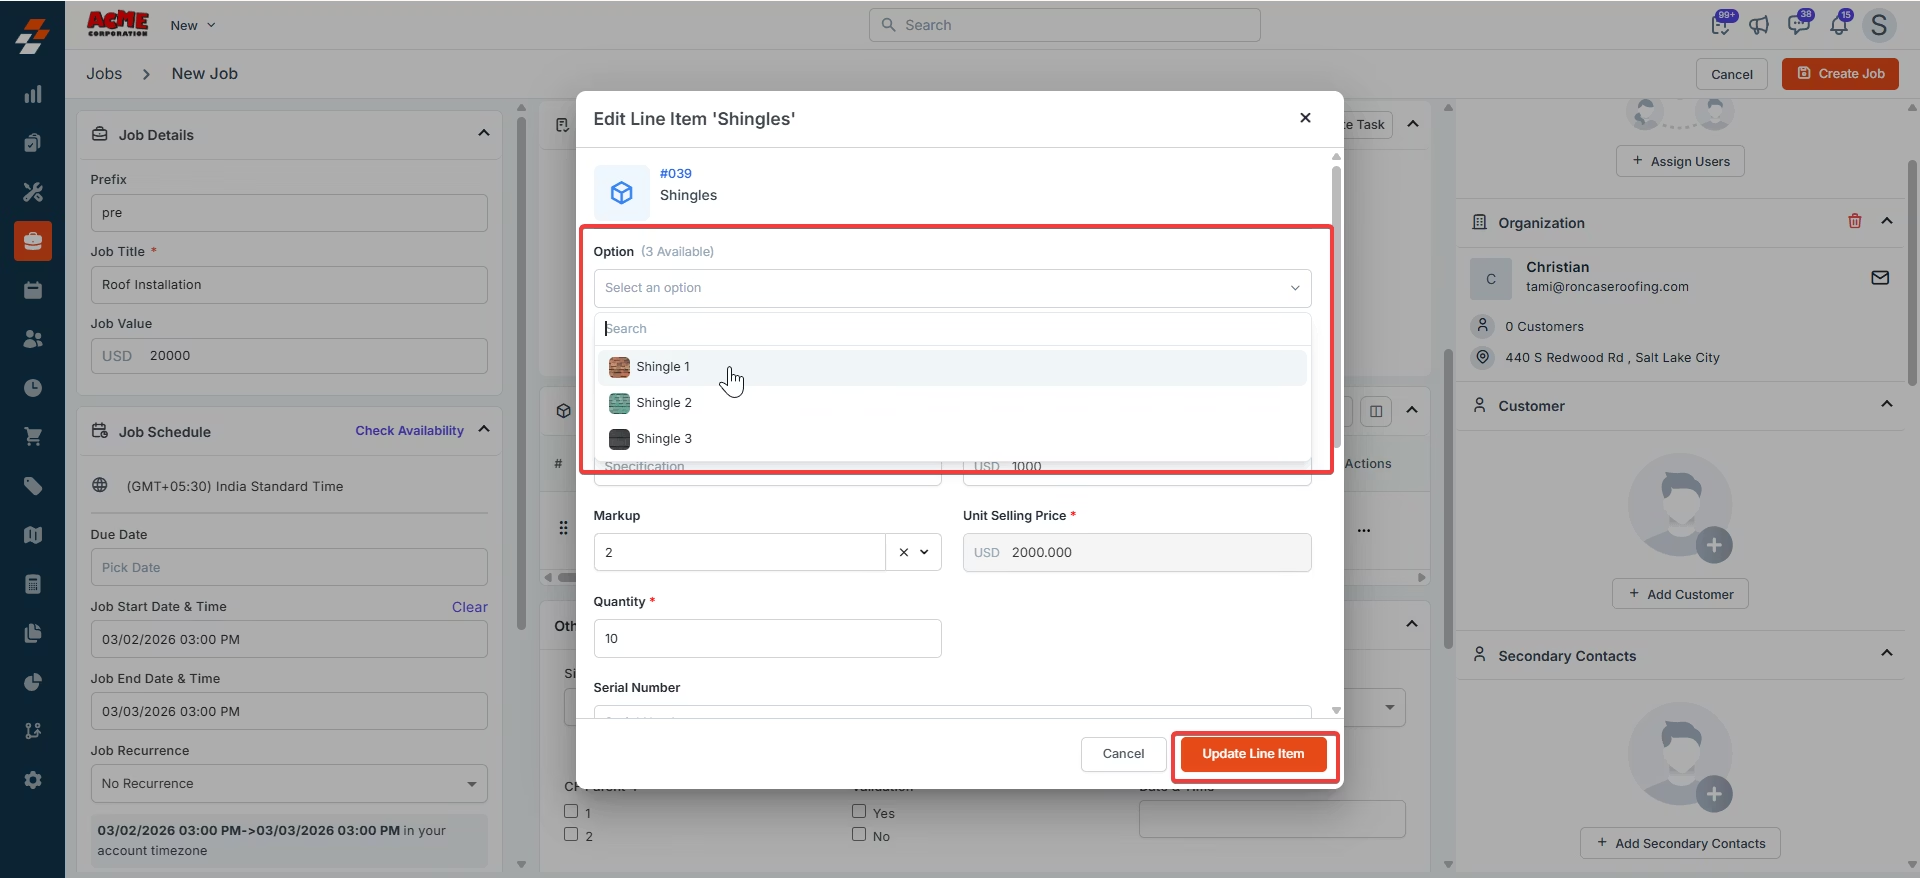
Add one product at a time to avoid duplicate service tasks.Adding multiple products in quick succession can cause duplicate service tasks to appear on the job. To prevent this, wait for each product to finish saving before you add the next one.If the same line item is added manually more than once, it will appear as separate entries in the list. Always verify the item list before saving the job to avoid unintentional duplicates. The system does not automatically merge duplicate standalone line items added at different times.
Sections
Sections replace Headers across Service Packages, Proposals, Quotes, Invoices, and Job line items. With Sections, you can control what customers see, from individual line-item details to whether a section appears at all.F. Associations
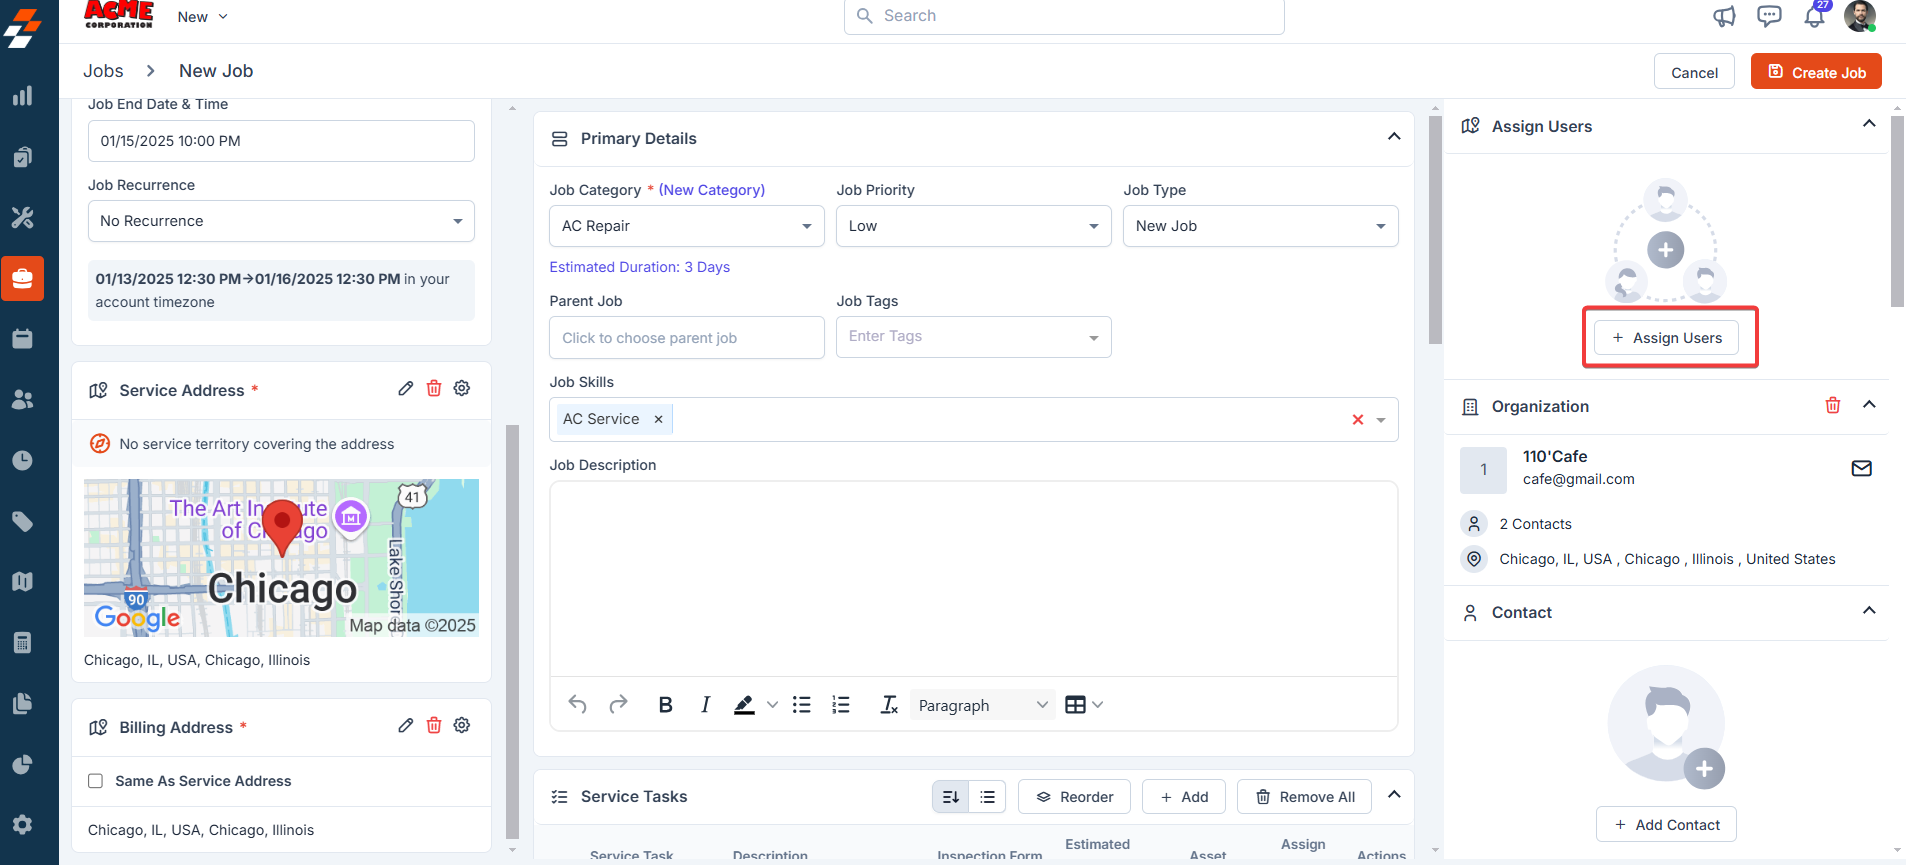
When creating a job, you can associate various modules with the job as needed to streamline field service operations and maintain a centralized record of all relevant information related to the job. These associations help ensure seamless contract execution and tracking. Click the “+” icon next to each section to associate the modules, further enhancing the contract management process and keeping all pertinent information in one easily accessible location.Assign Users
Assign Users
To complete the job, you need to assign it to users/field technicians. The available “Teams” and “Users” are listed based on the job address and associated Service Territory.Follow the steps below to assign a user to the job: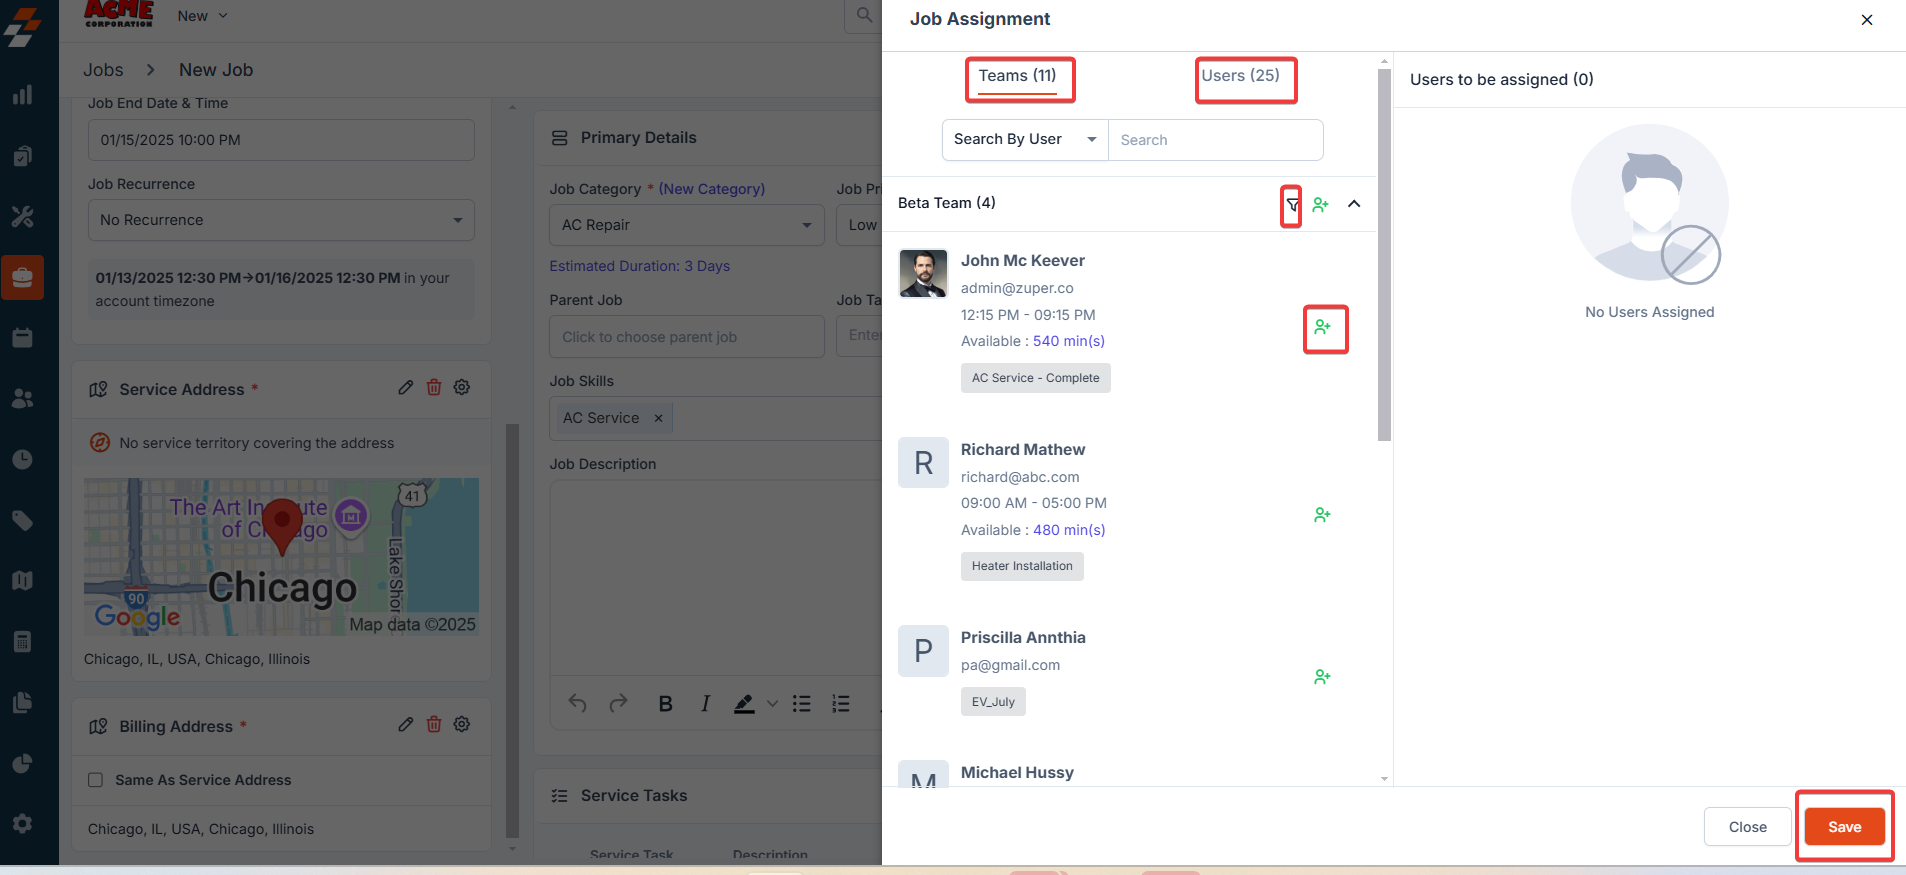
Note: If you want to view all teams and users’ Service Territory, uncheck the “Filter by Territory” checkbox.
Important: Teams and users are filtered and displayed based on the Service Territory only if you have enabled the “Enable Service Territory” option in Settings > Modules> Jobs>>General Settings.
-
Click “+ Assign Users” under the “Assign Users” section on the right.
- Choose user(s) from either the “Teams” or “Users” tab and click the “Assign” icon next to the user.
Secondary Contacts
Secondary Contacts
Click the “+ Add Secondary Contacts” button at the right of the page to add secondary contacts who are part of that same organization. You can select up to 10 secondary contacts.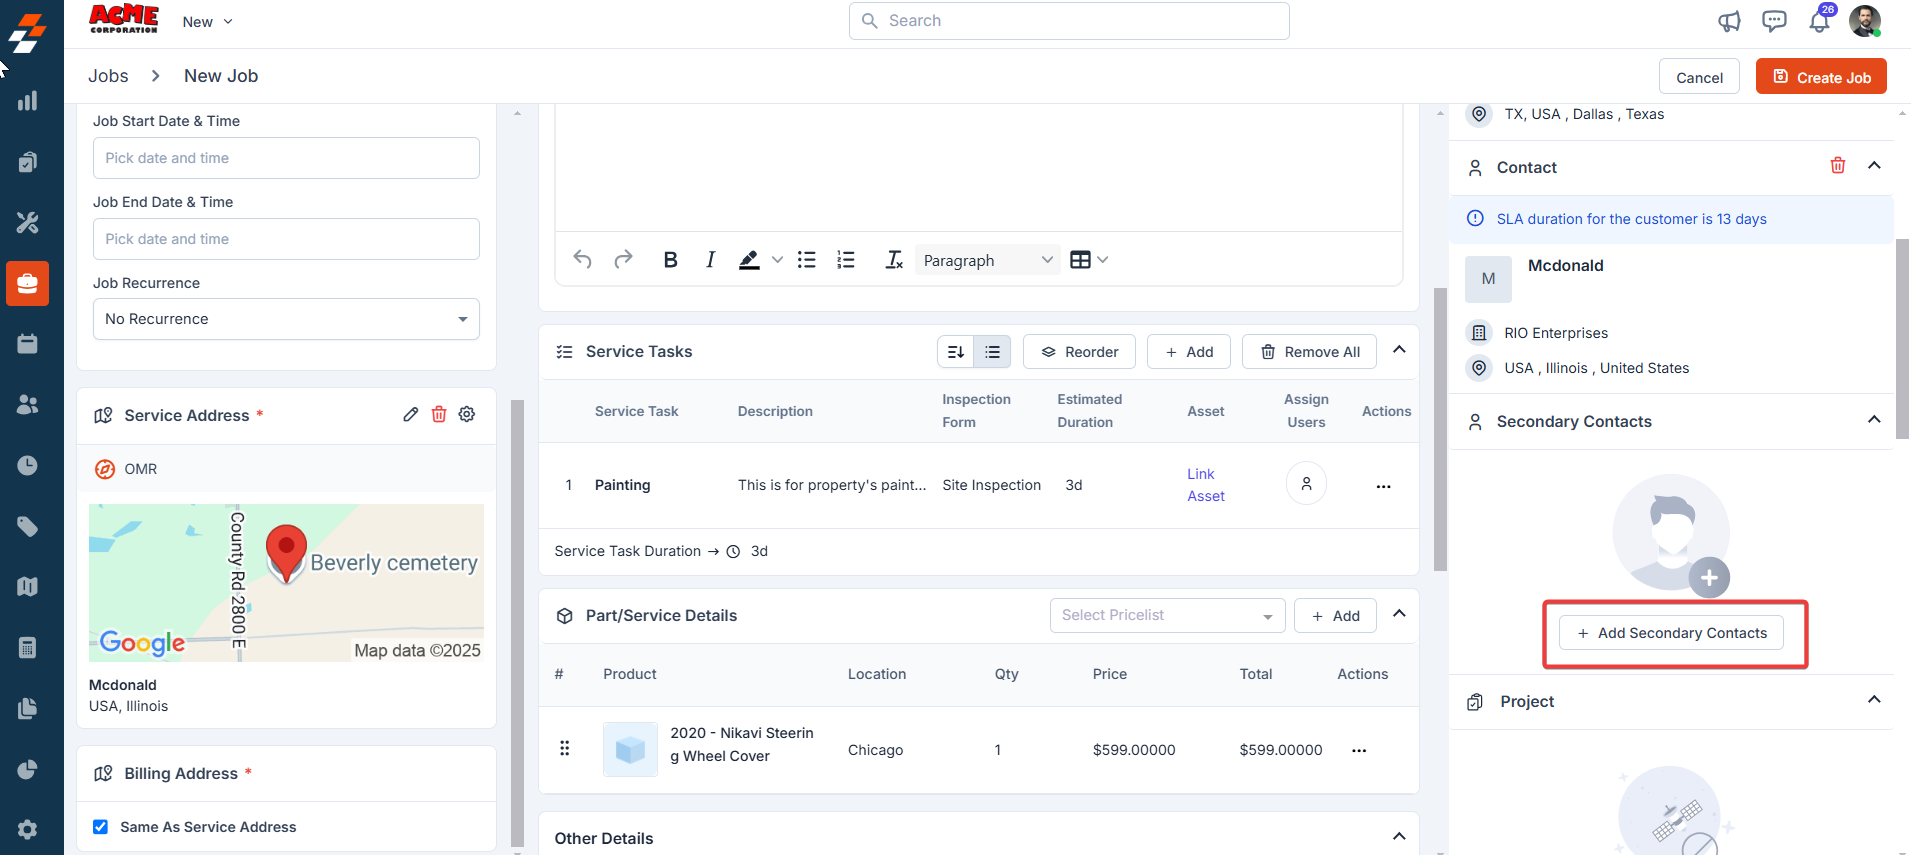
Note: To add secondary contacts, make sure “Enable Secondary Contacts” is set to “Yes” in Organization Settings > Job Settings, as shown below.
Projects
Projects
Associating a project allows field service providers to plan and manage undertakings that span over longer periods of time and involve multiple jobs, people, and materials
Property
Property
A property represents the customer’s physical space where field technicians perform their services. Associating property with the job helps streamline scheduling and dispatching, ensuring technicians are assigned to the correct locations.
Request
Request
The request module enables administrators (back-office Admins) and customers to create and manage service requests. You can associate the existing request with the jobs module.
Contracts
Contracts
Service contracts are signed with customers to offer services for a continuous period. Therefore, the agreement can be constantly renewed or terminated after the period is over. Associating the contract with the job helps to manage the service period efficiently.
Assets
Assets
Associating assets with the job enables you to track specific assets covered, ensuring that they receive the necessary maintenance and servicing. This helps manage the lifecycle of the assets and maintain optimal operational performance.
Contract
Contract
Service contracts are signed with customers to offer services for a continuous period. Therefore, the agreement can be constantly renewed or terminated after the period is over. Associating the contract with the job helps to manage the service period and list down the services that are offered efficiently.
Adding attachments
Adding attachments
Adding attachments with the job allows you to store and manage important documents such as agreements, service reports, or manuals. This ensures easy access to vital information whenever needed, keeping all job-related documentation organized and readily available.
- Complete the “Other Details” section (any custom job fields configured by your organization will be displayed here).
- Once all the mandatory fields are complete, click the “Create Job” button at the top right corner of the job creation page to finalize the job.
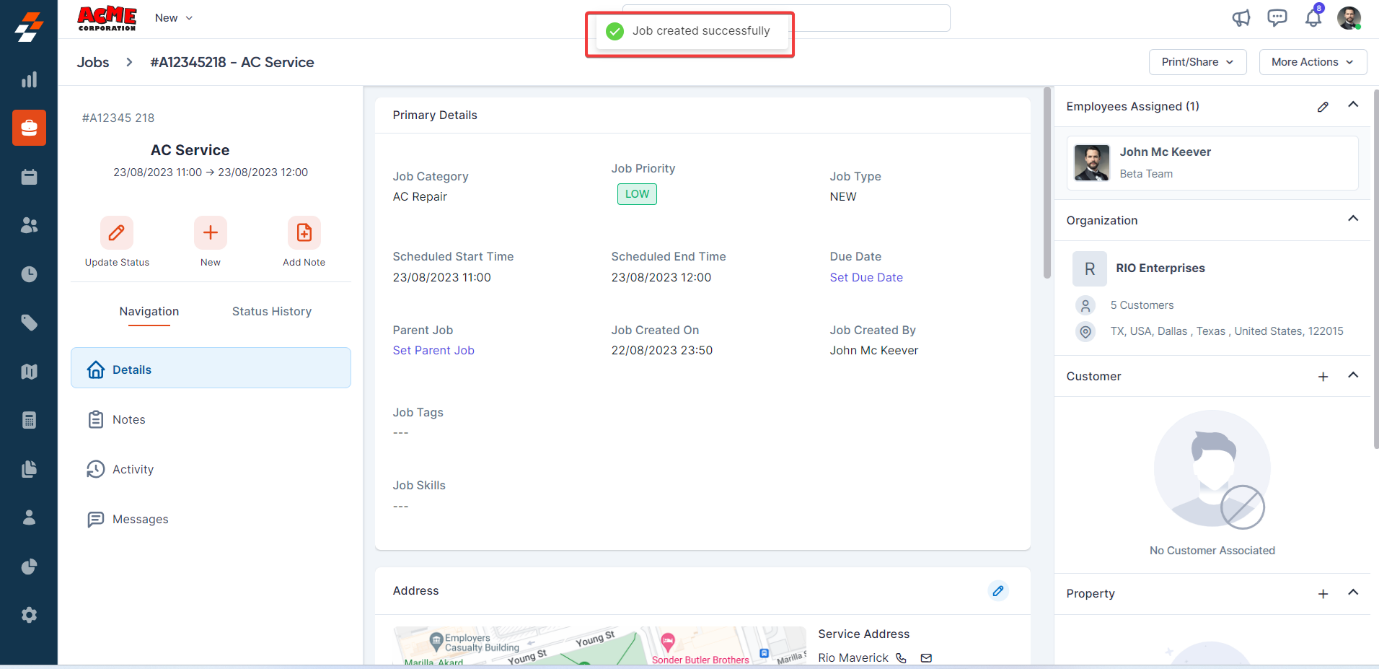
- A new job is created successfully.
Note: Once a job is marked as Completed, certain fields — including the associated property, cannot be edited.
How job custom fields are prefilled on creationWhen creating a job from the Jobs module, custom fields are automatically prefilled from matching Customer or Organization custom fields only. Fields from other entities such as Assets are not used in this flow.To prefill job custom fields from an Asset, create the job directly from the Asset record instead. Alternatively, use the Workflow Builder’s Copy Custom Fields node to copy matching field values automatically after job creation.Prefill applies only when the field label matches exactly across both entities.
FAQs
Why do existing jobs still show the old email after I updated the customer profile?
Why do existing jobs still show the old email after I updated the customer profile?
Zuper saves the new email to the customer or contact profile only. It does not apply the change to jobs that were created before the update. Each existing job stores its own copy of the service contact details from the time the job was created.To update the email on an existing job, open the job and edit the service contact details directly. You must do this for each affected job individually. If the issue continues, contact Support.
The customer, organization, or property on a recurring job series has changed — what do I do?
The customer, organization, or property on a recurring job series has changed — what do I do?
There is no in-app way to update the customer, organization, or property on an existing recurring job series. For example, if a contact has moved to a new organization or a job needs to move to a different site, you need to delete the existing series and recreate it with the correct details.Before you delete, note the recurrence schedule, assigned technician, job category, and any other details you will need to recreate the series. To replace the series:
- Go to Jobs, then select Recurring Jobs, and locate the series you want to replace.
- Select the Delete icon on the series.
- Check Delete Associated Recurring Jobs if you want to remove all future unstarted occurrences. Jobs that are already completed are not affected.
- Create a new recurring job with the correct customer, organization, or property details. Reapply the same schedule and assignment configuration.