Navigation: Inventory & Pricebook-> Parts & Services
Accessing the parts & services page
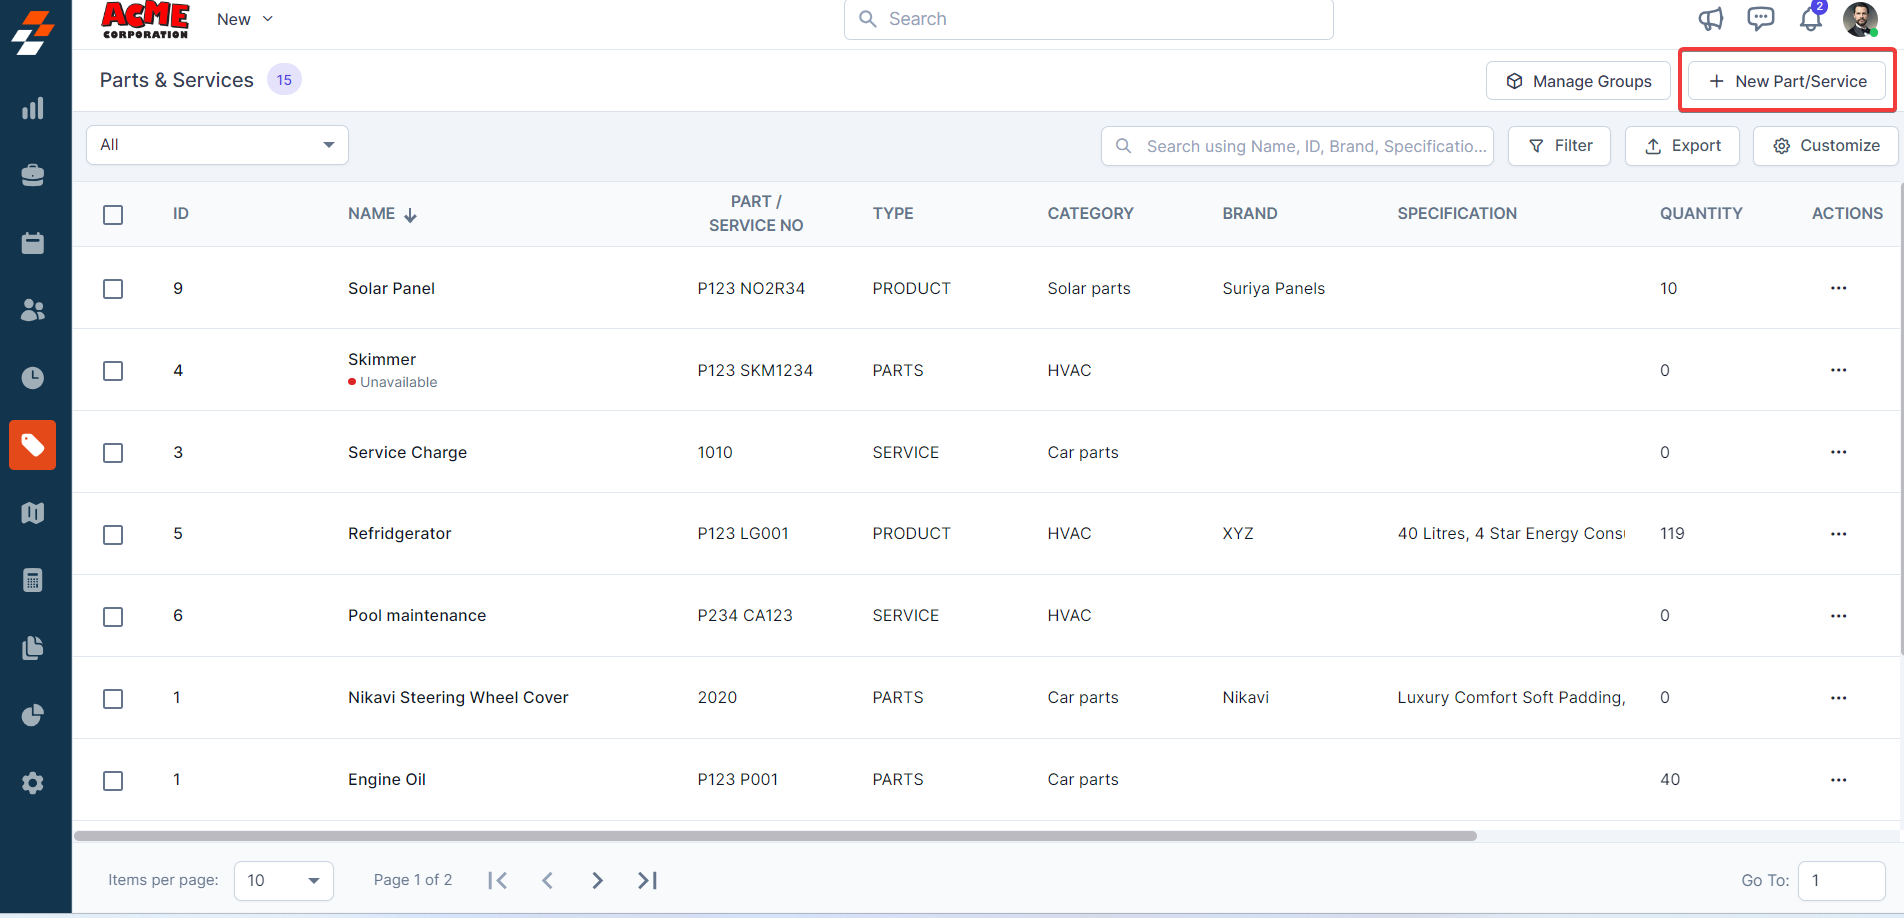
- Select the “Inventory & Pricebook” module from the left navigation menu and choose “Part & Service.”
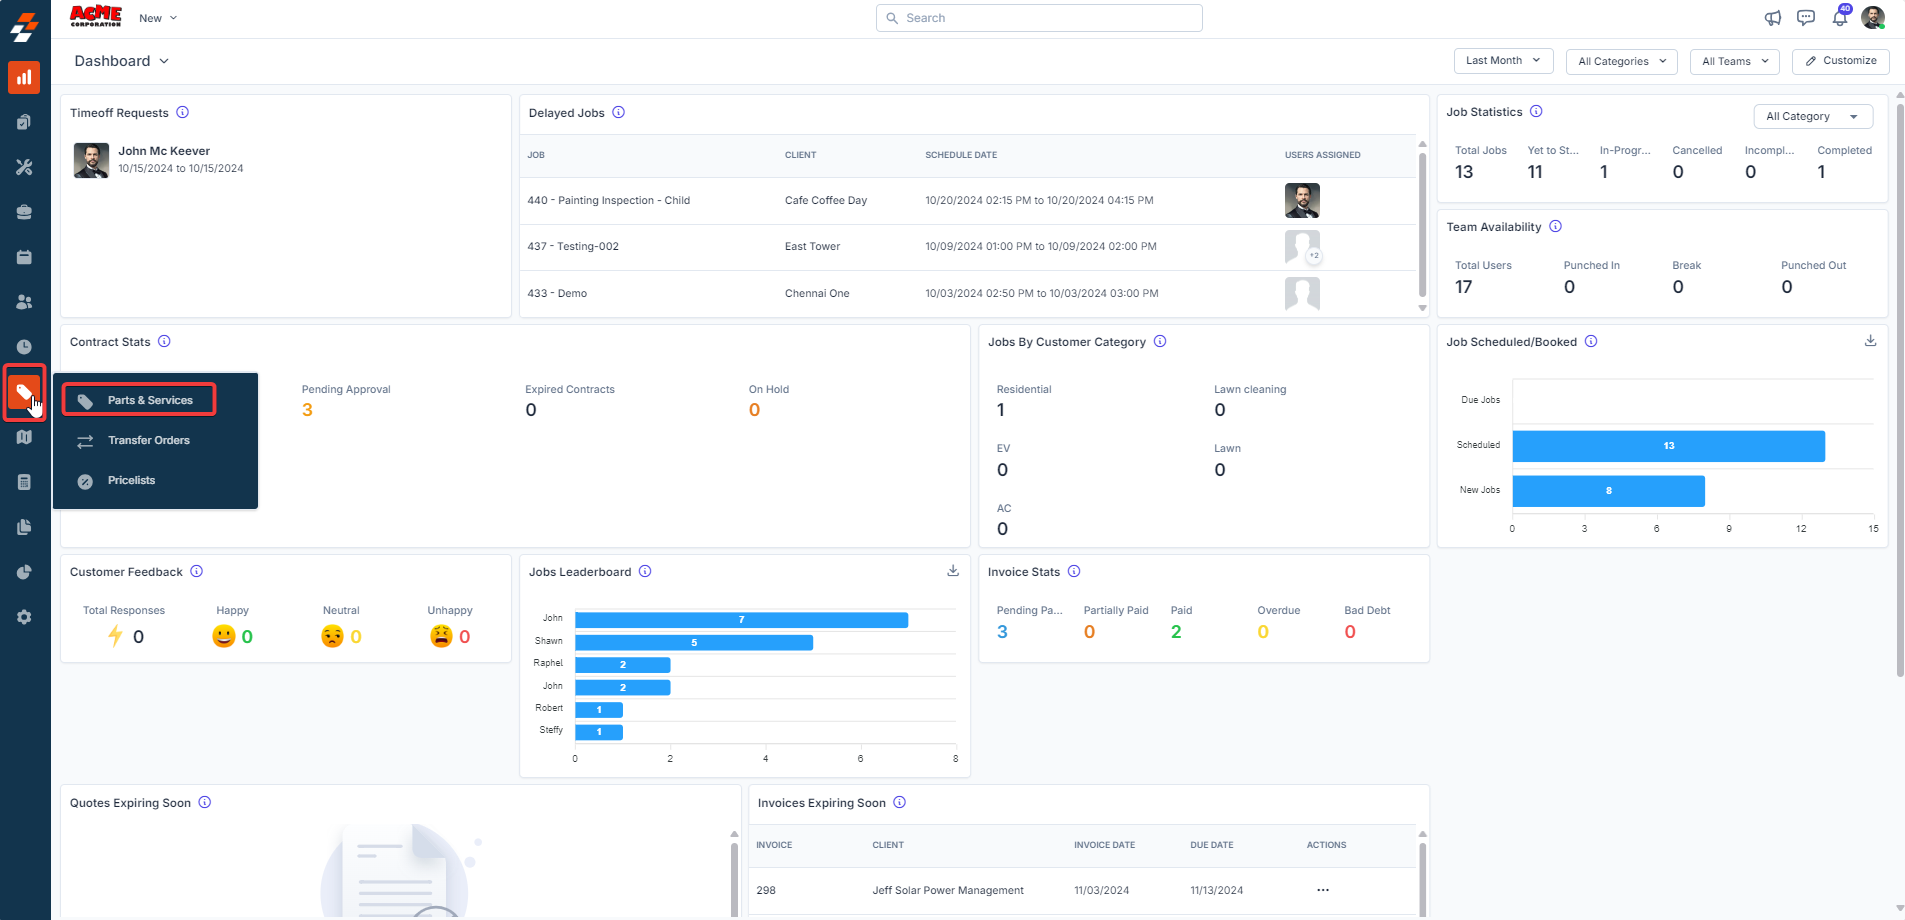
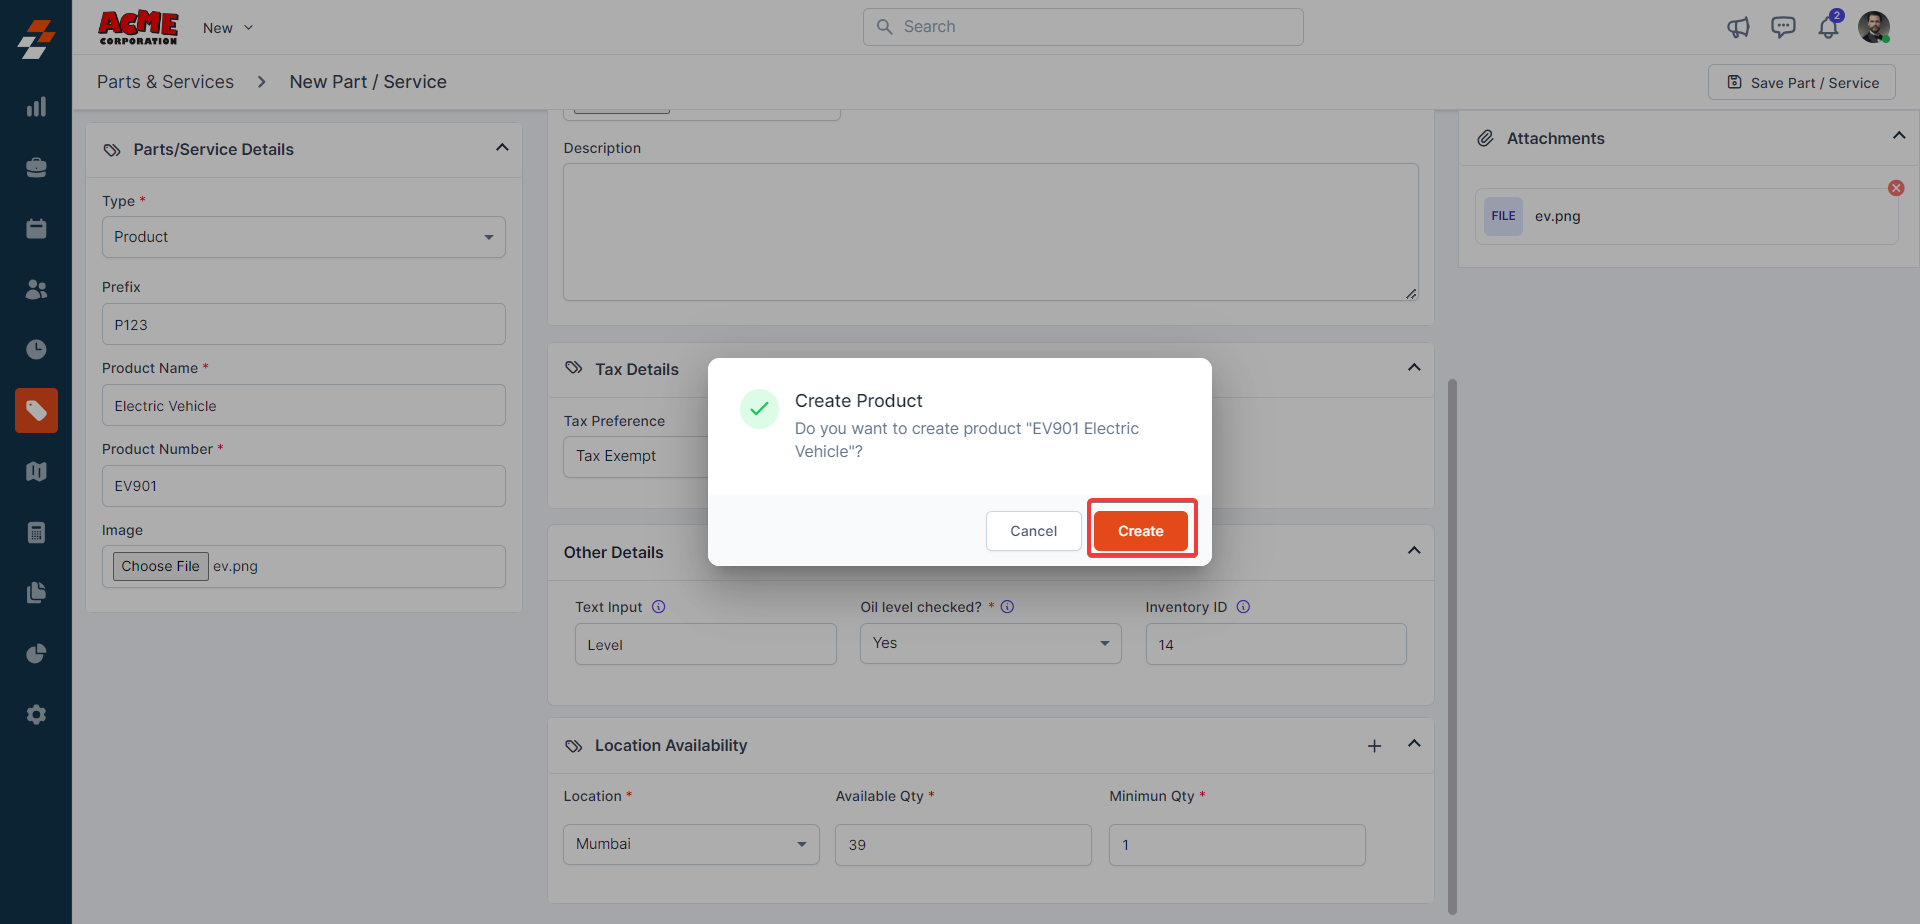
- Click ”+ New Part/Service”.
Parts and Service Details Pane
The left pane is the Parts & Services Details section, where you must fill in the required details.- Select the Type from the drop-down list. Available options include: Product, Part, Service, or Bundle.
- Based on the selected type, the fields will be displayed dynamically.
- Enter the Name and unique Number for the part.
- Specify whether it’s Billable or not. You can now define whether a part, service, product, or bundle is billable or non-billable directly on the master page.
- Billable: The cost of the part/service/product/bundle will be included in the transaction document.
- Non-Billable: The part/service/product/bundle will be displayed as a non-billable line item, excluded from the billable total but still tracked for reference.
Note: If you haven’t set the Part/Service/Product/Bundle as Billable in the master level, when you use it in transactions (e.g., a Job or Quote), the “Non-Billable” status will be reflected in all subsequent transaction documents. However, you can choose to edit it in the transaction, allowing you to modify the status on a case-by-case basis.
- Define whether this part should be Consider for Profitability or not.
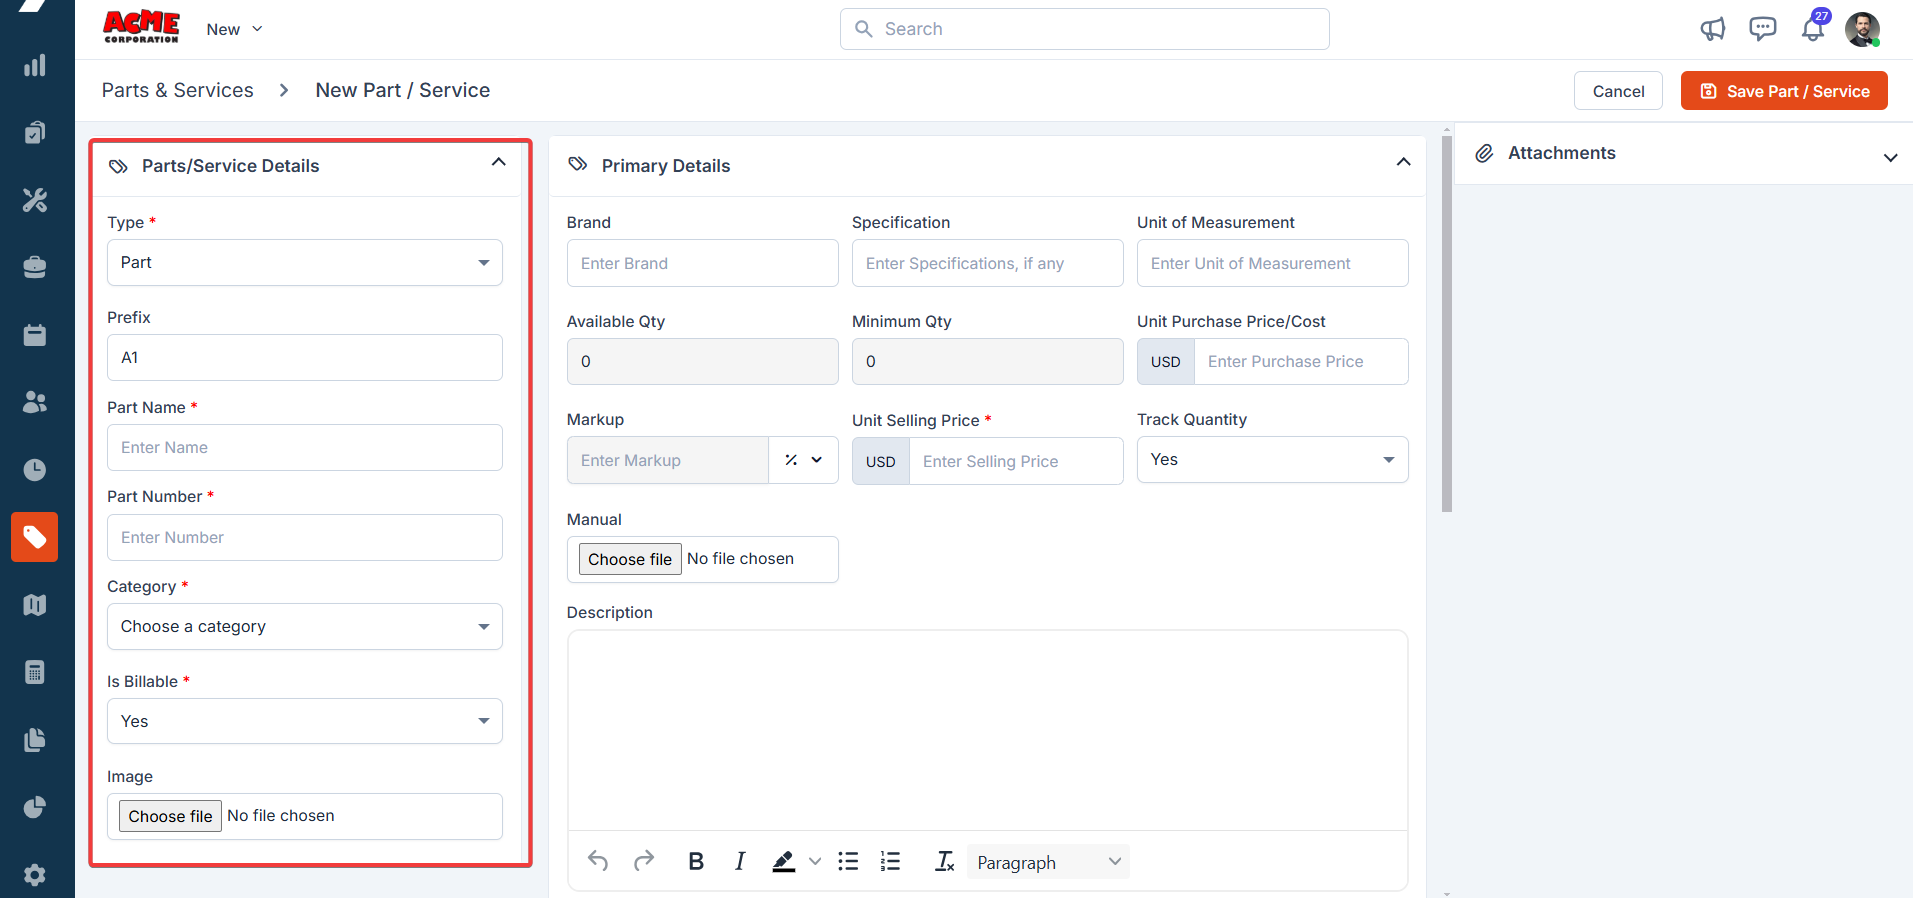
1. Primary Details
The primary details section helps you to manage all the core inventory-related information. If you’ve enabled Markup, you can also view the “markup” option between the Unit Purchase Price/Cost and Unit Selling Price.Minimum unit purchase costZuper enforces a minimum unit purchase cost of 0.00 is not supported, as products with zero purchase cost cannot be processed in the inventory system.If your actual vendor cost is below 0.07 per unit),
enter a nominal value of $0.10 to complete the record. This is a known
platform limitation and cannot be bypassed.If accurate sub-cent vendor cost tracking is required for job costing or Profitability reporting, contact your Customer Success Manager to discuss your needs.
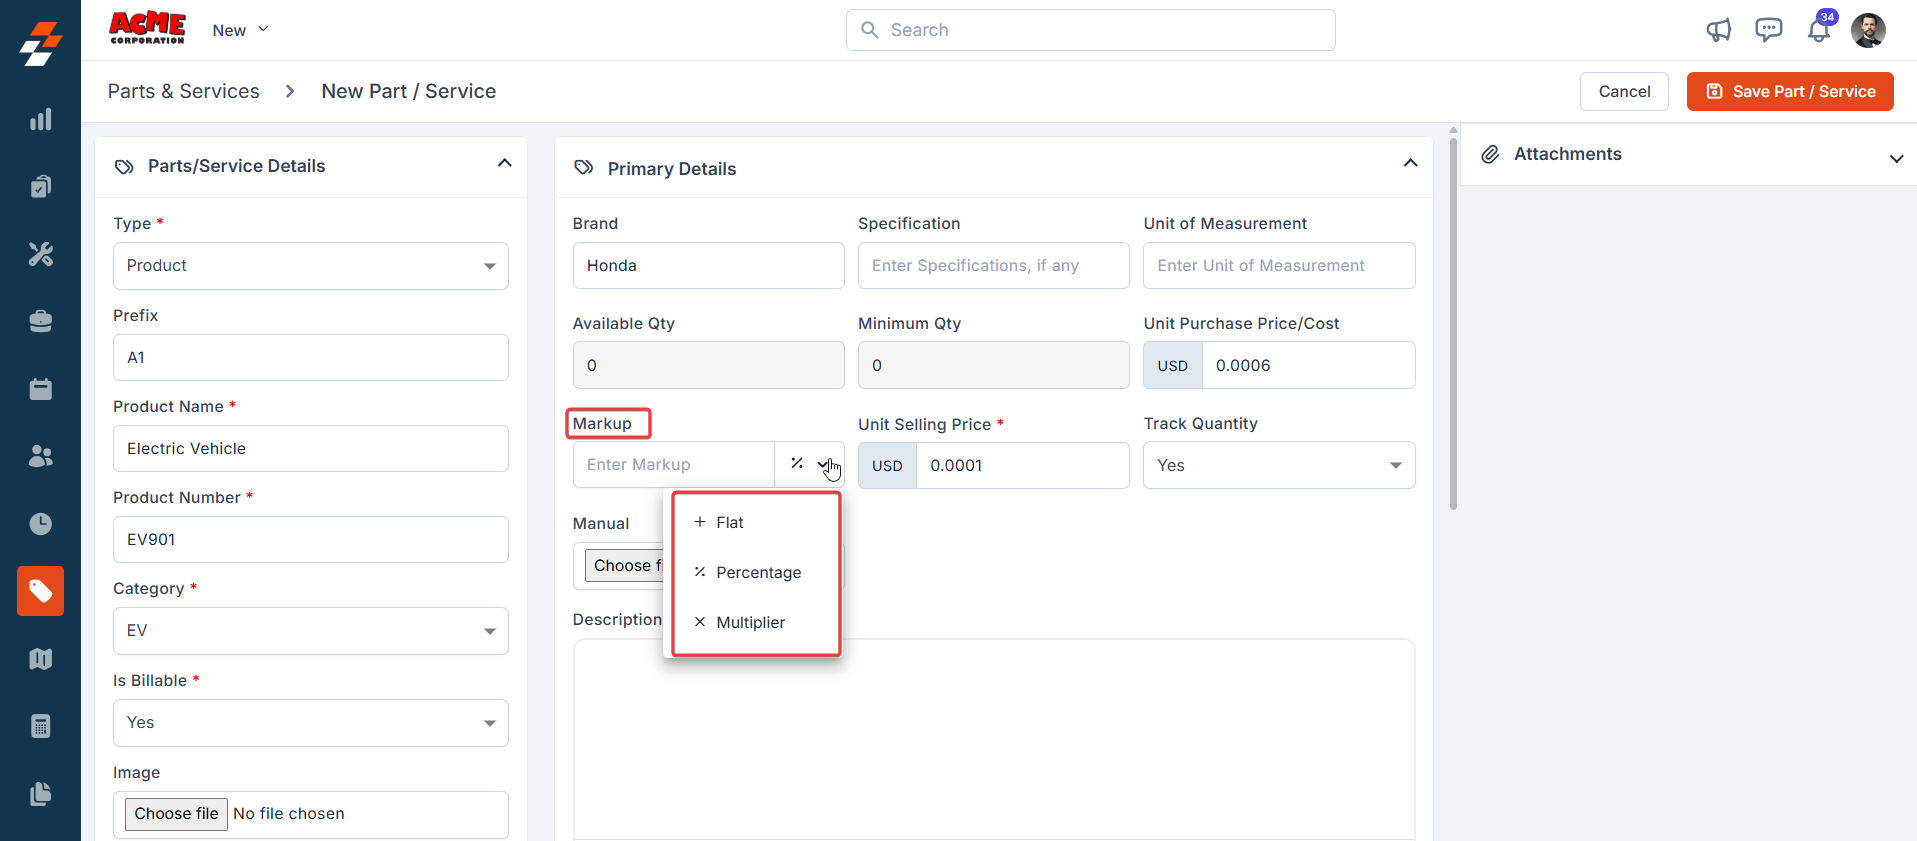
Markup Configuration
Markup Configuration
Markup is a percentage or fixed amount added to the purchase price of parts and services to determine the selling price. It represents the profit added on top of the cost. Once a markup is specified, the system automatically calculates the selling price for the respective part or service.
Enabling Markup in Organization Settings
To use the markup feature effectively in Parts & Services, you must enable it in the Organization Settings.- Select the ” Settings ” module from the left navigation menu, and under General Settings, click “Organization Settings.”
- In the Organization Settings page, select “Part and Services Settings ” under configuration, set “Yes” to Enable Markup, and click “Save Settings.”
- Trade Type(s): Select the trade type from the list.
- Category: Select either a Category or a Sub-Category (Sub-categories are displayed nested under their respective parent category for better clarity and choice).
Once selected, this part/service will be associated with that specific classification.
- Minimum Quantity- Specify the minimum quantity that must be maintained before triggering a low-stock alert. This value is auto-filled based on the “Minimum Quantity” set in the Availability By Location section.
- Unit Selling Price- The selling price of the individual product. It is automatically determined based on the markup applied to the purchase price of parts and services. Markup has the following conditions.
- Flat (+): With the flat markup condition, a predetermined fixed amount is added to the unit purchase price to determine the unit selling price.
- Percentage (%): Under the percentage markup condition, a specified percentage of the unit purchase price is added to calculate the unit selling price.
- Multiplier (x): With the multiplier markup condition, the unit purchase price is multiplied by a specified amount to obtain the unit selling price.
- Track Quantity: Enable inventory tracking for this part or product. If ‘Yes’ is selected, the system tracks part consumption based on the module chosen in the Choose Module to Track Part Consumption field under Settings > Organization Settings > Part and Service Settings. If ‘No’ is selected, the system does not track the part’s consumption in inventory.
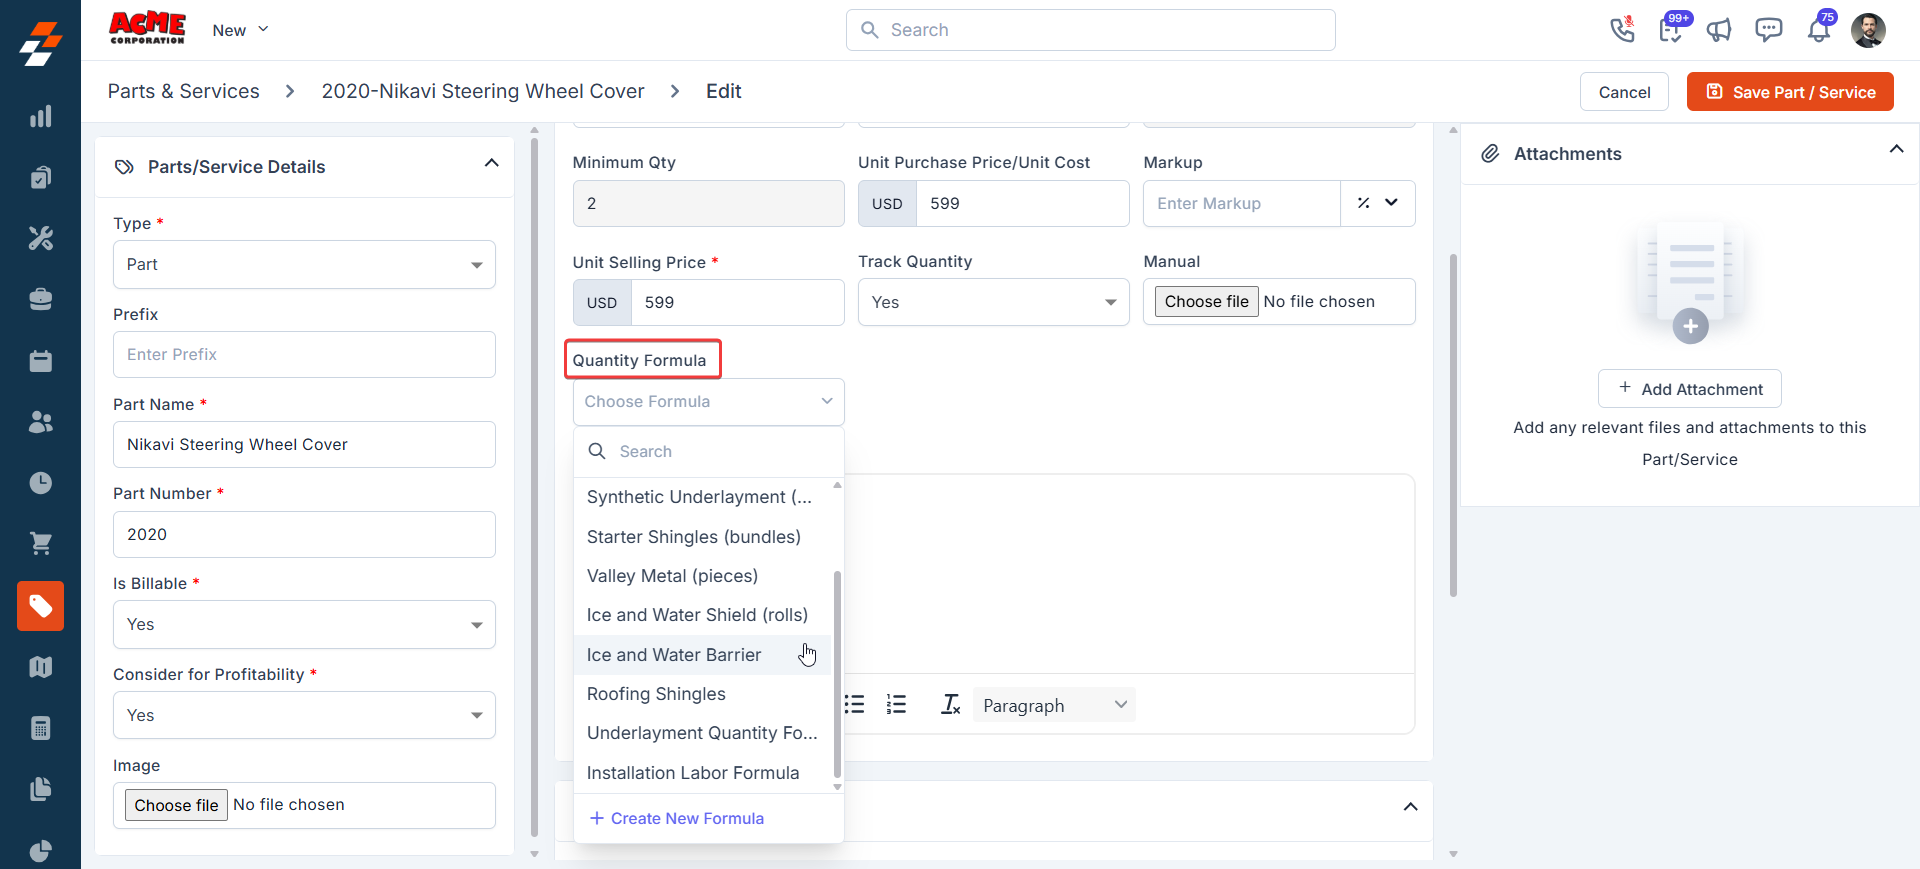
- Quantity Formula: Select an existing formula or create a new one to automatically calculate the correct quantity or pricing for this part or product. When the item is added to a CPQ proposal or quote, the formula defined in the product master is applied to the line item, and the quantity is calculated automatically based on the job’s measurements and checklist answers.
2. Tax Details
In this section, you can configure and manage the tax preferences. Choose whether the tax applies to your transactions or if it’s tax-exempt.Taxable
Taxable
Enter the following details:
- Tax Name (Required): Enter the name of the tax.
- Tax Rate (Required): Enter the tax rate.
Tax exempt
Tax exempt
Tax Exempt Reason (Optional): Enter the reason for the exemption.
3. Options
Zuper’s Options feature lets you offer choices directly to your customers on the Proposal Authorization page. For example, customers can select material colors, styles, or designs before approving the proposal.- In the Option section, click + Add to create attributes:
- Upload an image for visual reference.
- Set Name, Label, and toggle Available to “Yes”.
- ·For proposal behavior, select any one of the options from the list:
- Internal Only - The option is visible only to your internal team. Customers do not see it on the authorization page. Your back-office team can mark this option for the line item directly.
- Mandatory Customer Selection - The option appears on the authorization page. The customer must select it for the line item before they can sign and accept the proposal.
- Non-Mandatory Customer Selection - The option appears on the authorization page. The customer can select it for the line item, but it is not required to sign and accept the proposal.
Note: How does this help?Use selection options to decide how much control your customer has over each line item. Mark high-priority items as mandatory to secure financial commitment, and leave lower-priority items as optional to give your customer time to think and decide.
- The customer-facing label entered here will appear as a subheading for the line item on the proposal presentation page.

- A product can have up to 20 options.
- Each option name can be up to 200 characters long.

4. Other Details
The other details section will display all the custom fields you define under the Settings.
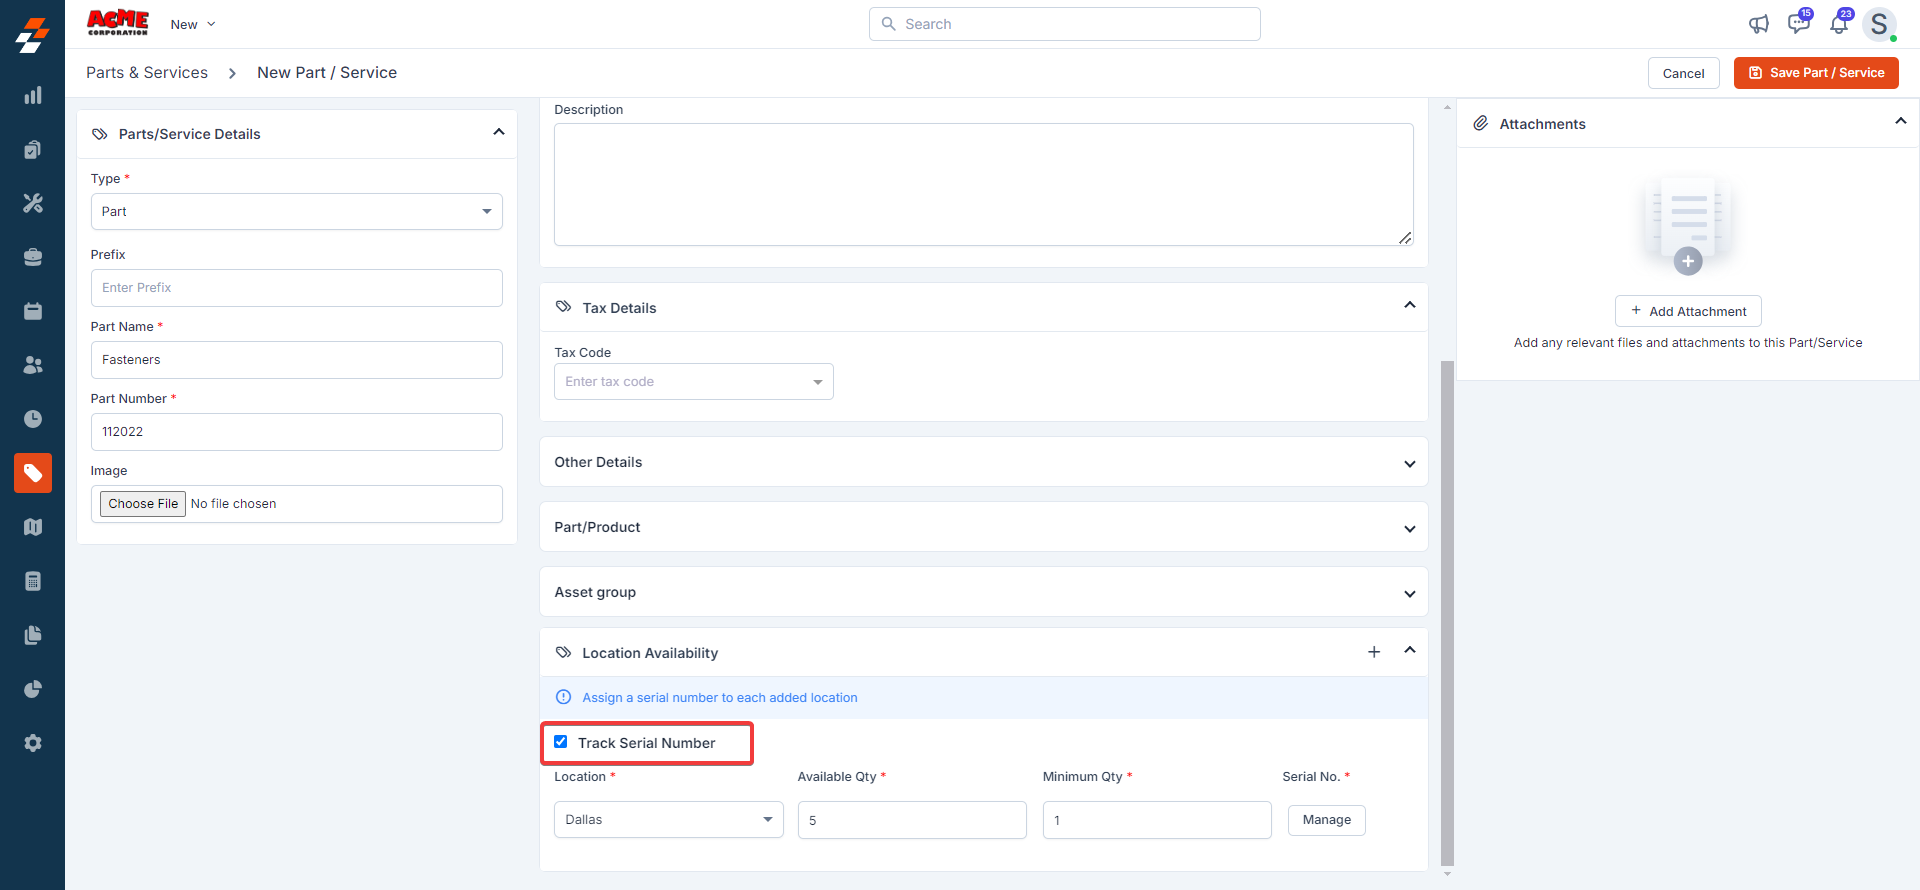
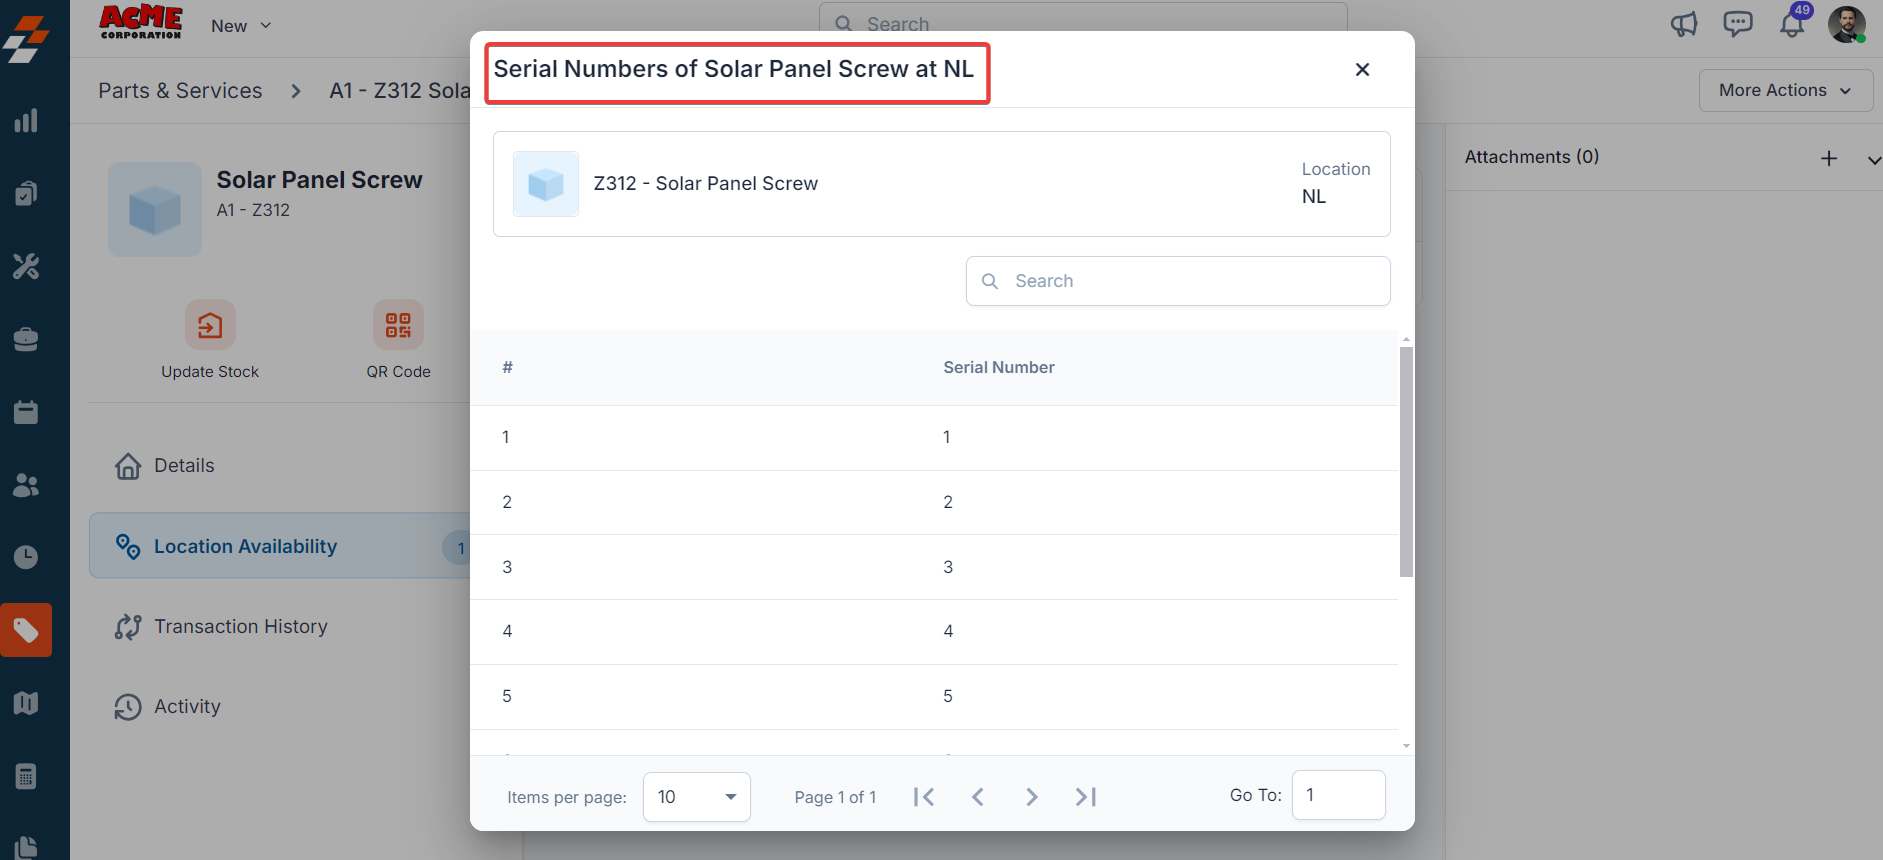
5. Location Availability
The location availability helps to manage the inventory items based on the warehouse location with available and minimum quantity.- Enable “Track Serial Number” to assign unique serial numbers to individual inventory items.
- Add the serial numbers required for the parts. You need to enter the serial numbers individually and press the “Enter” key to save the serial number.
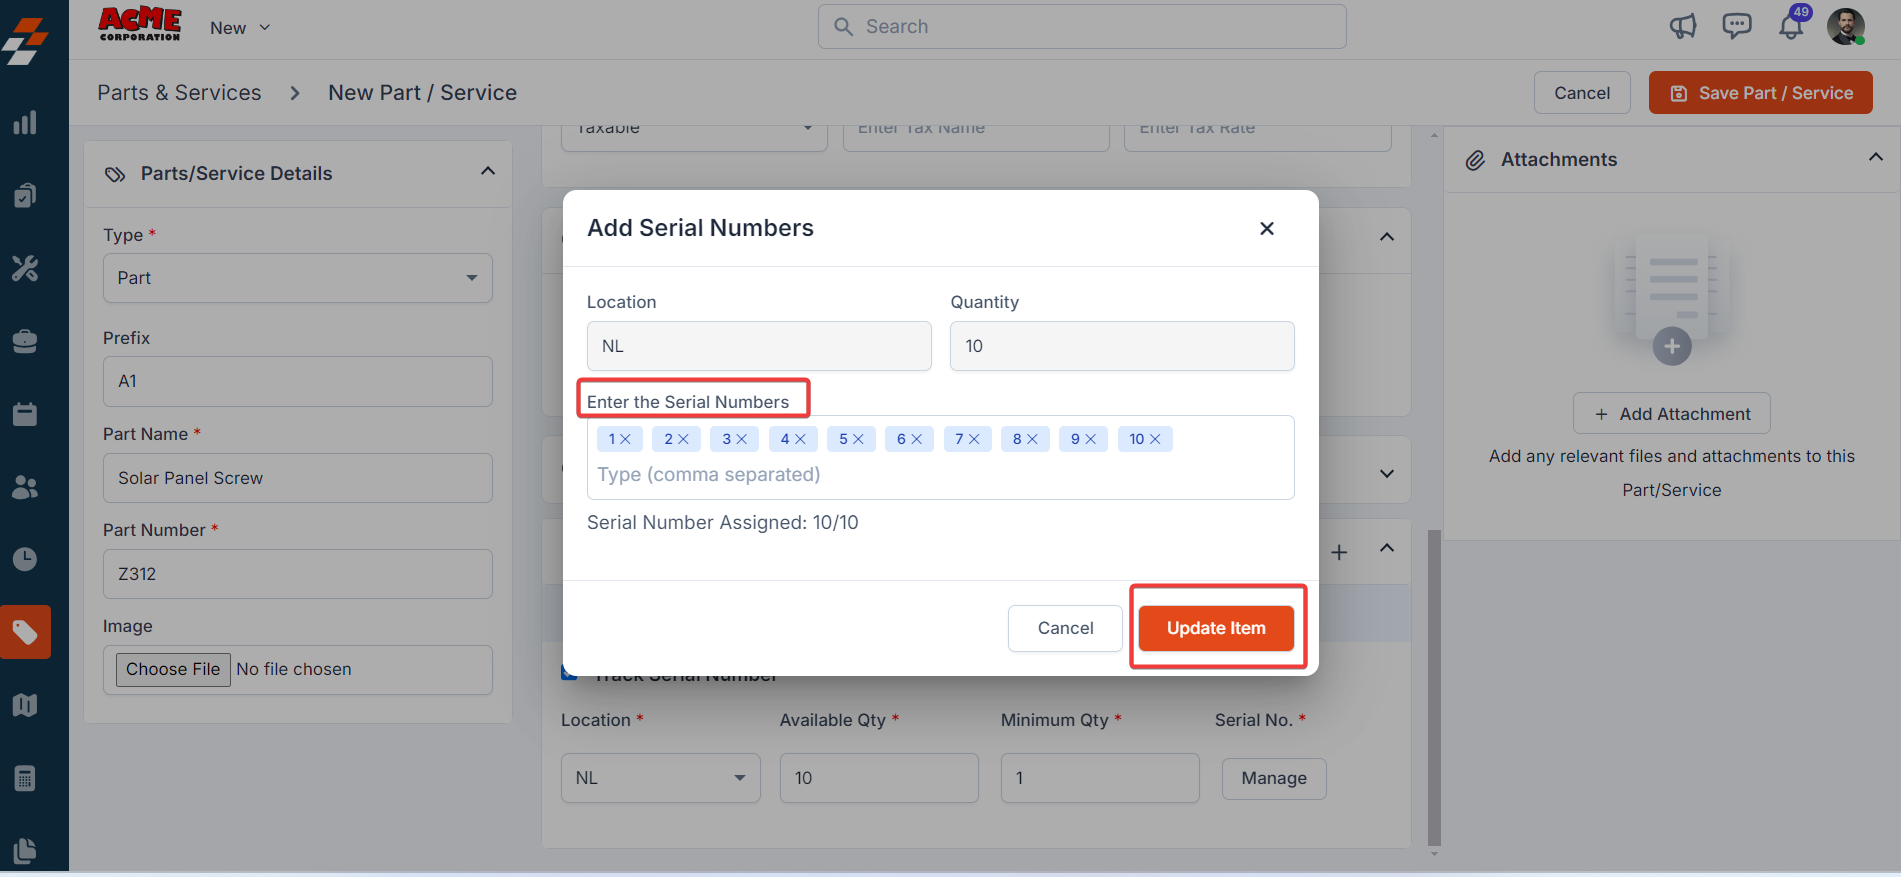
- Click the “Update Item” button.
Important: The location assigned to a part/product at creation cannot be changedafter the record is saved. If an incorrect location was set, use the workaround below.
6. Add Attachments
You can add attachments related to the product by following these steps: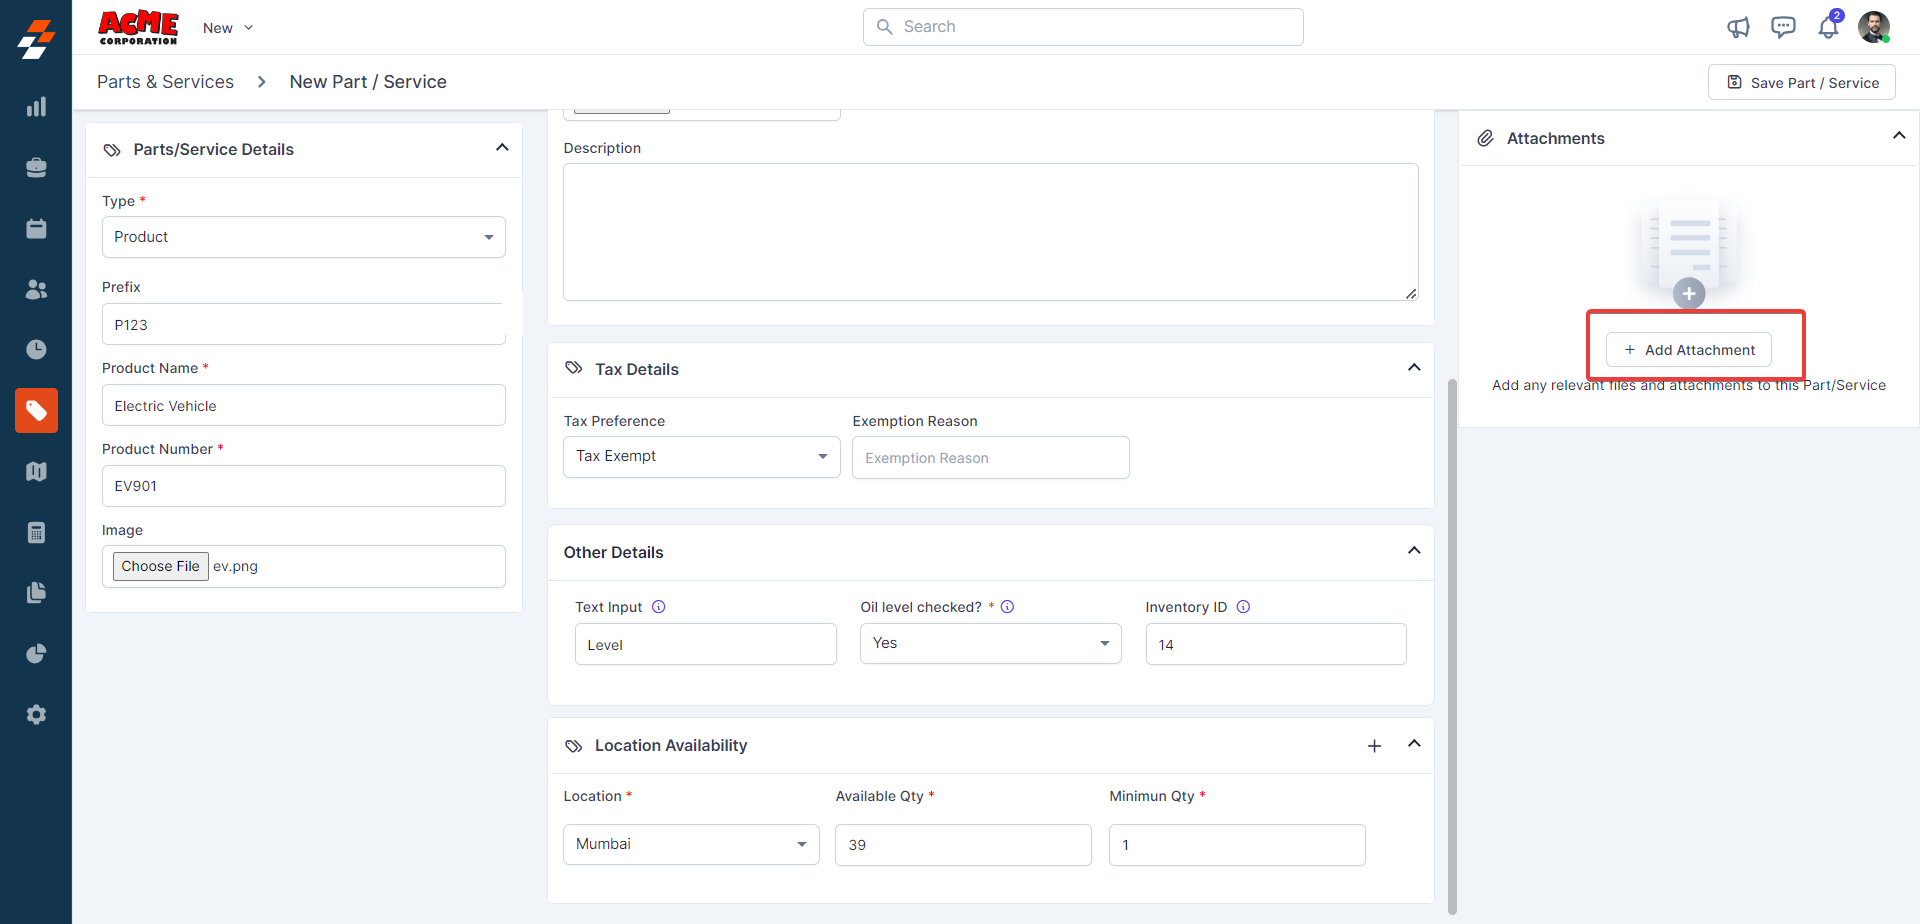
- Click to open the attachments dialog box.
- Upload your files.
- Once uploaded, the attachments will be added successfully.
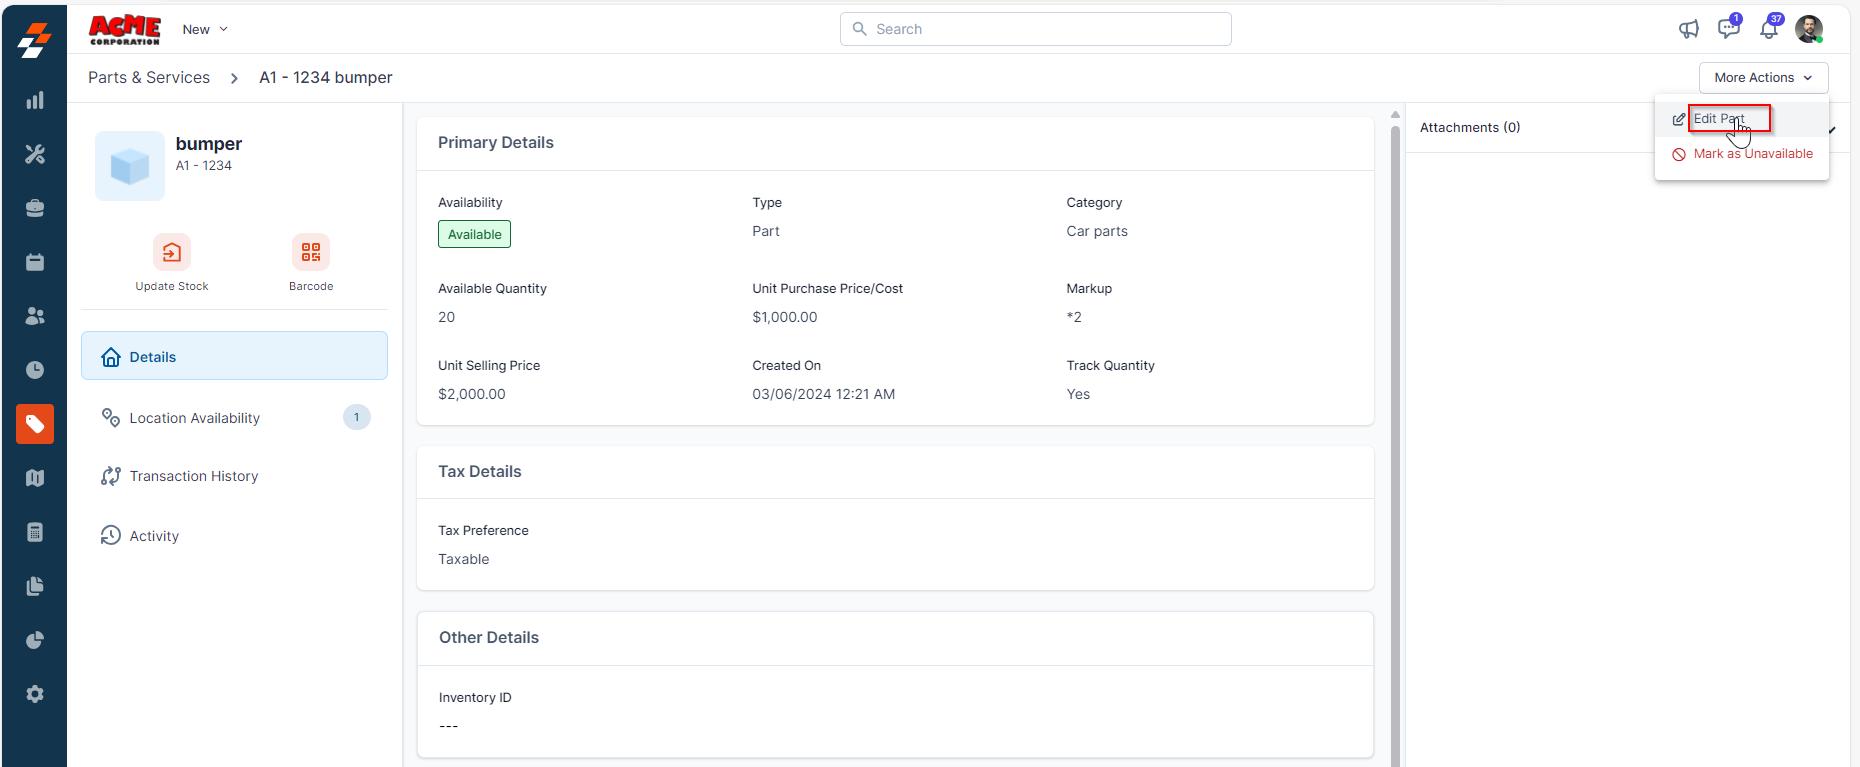
Editing Part/Service
You can edit a part/service detail in the following areas:- From the Parts/services listing page
- From job, quote, and invoices.
- Click the “Parts & Services” from the left navigation menu, then select the desired part or service from the list.
- Once in the respective part or service, click “More Actions” at the top right corner and select “Edit Part.” From there, you can make the necessary changes.
- After you have made the edits, the part or service will be updated in the mastery. You can add the updated part/service when creating a job, quote, or invoice.
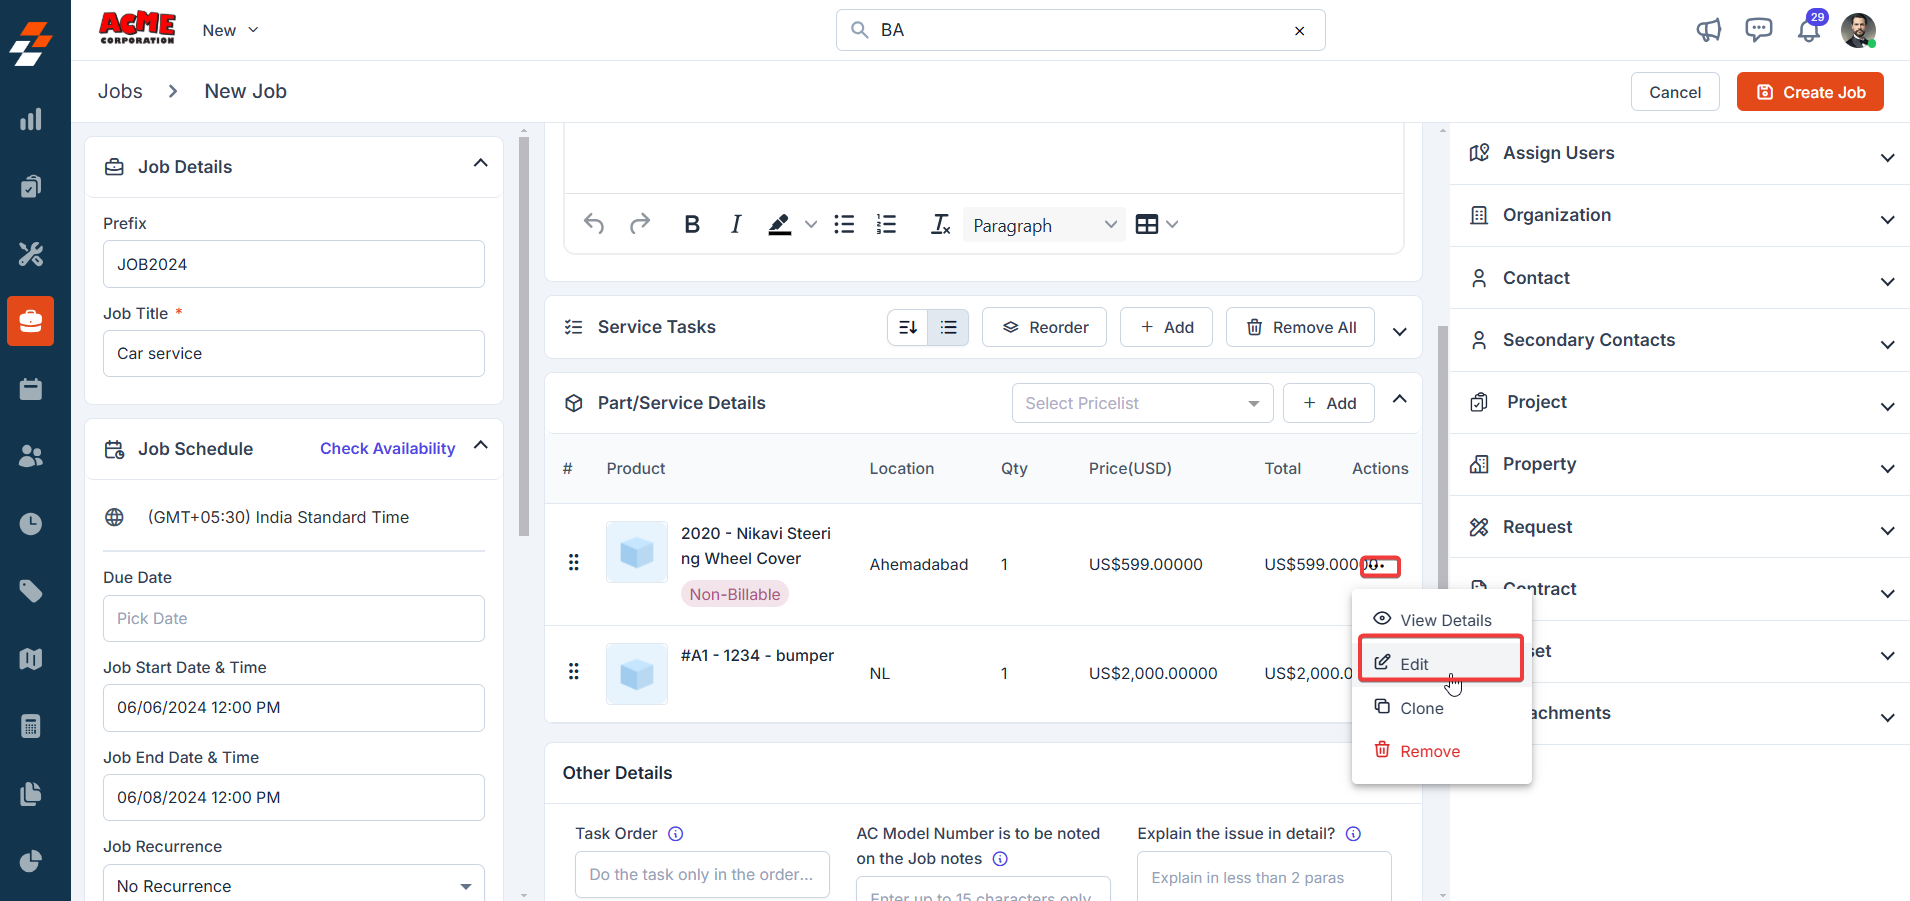
- Navigate to the “Jobs” module from the left navigation menu and select ” Jobs.”
- In the Jobs listing page, locate and select the relevant job where you want to edit the part, service, or product.
- In the Parts & Services section, find the respective part or service:
- Click the three-dot icon next to the item.
- Select “Edit” from the dropdown menu.
- Make the necessary changes, such as editing the markup for the selected part or service.
- Click the “Update Line Item” button to save your changes.
Note: If you are logged in with Admin access or your role permits, you can update the billable status of a part, product, or service directly on the Update Line Item page. If you are experiencing issues updating the expense policies, please reach out to us at support@zuper.co.
Listing Views
Customize the Parts & Services listing by adding/removing or reordering columns, then Update View to overwrite or save it as a new view.- Update View: Click Update View to modify the current view after changes.
- Save as new view: Use the dropdown beside Update View → Save as new view.
- In the Create View dialog, enter the View Name (mandatory), choose Share with (User/Team) and add users, toggle the Visibility to all users, and click Create.
- Reset View: Click Reset View to restore the current view to the default.
- Permissions:
- Edit: Add/remove/reorder columns; save as new or overwrite existing views.
- View-only: Apply views but can’t edit; can Save as new view to copy without altering the original.
- Manage view: Rename, adjust Visibility (Only Me/User/Team or global toggle), Duplicate, or Delete (creator only; reverts to default/another saved view).
- Open item details: After filtering, click a Product name to view and manage details.

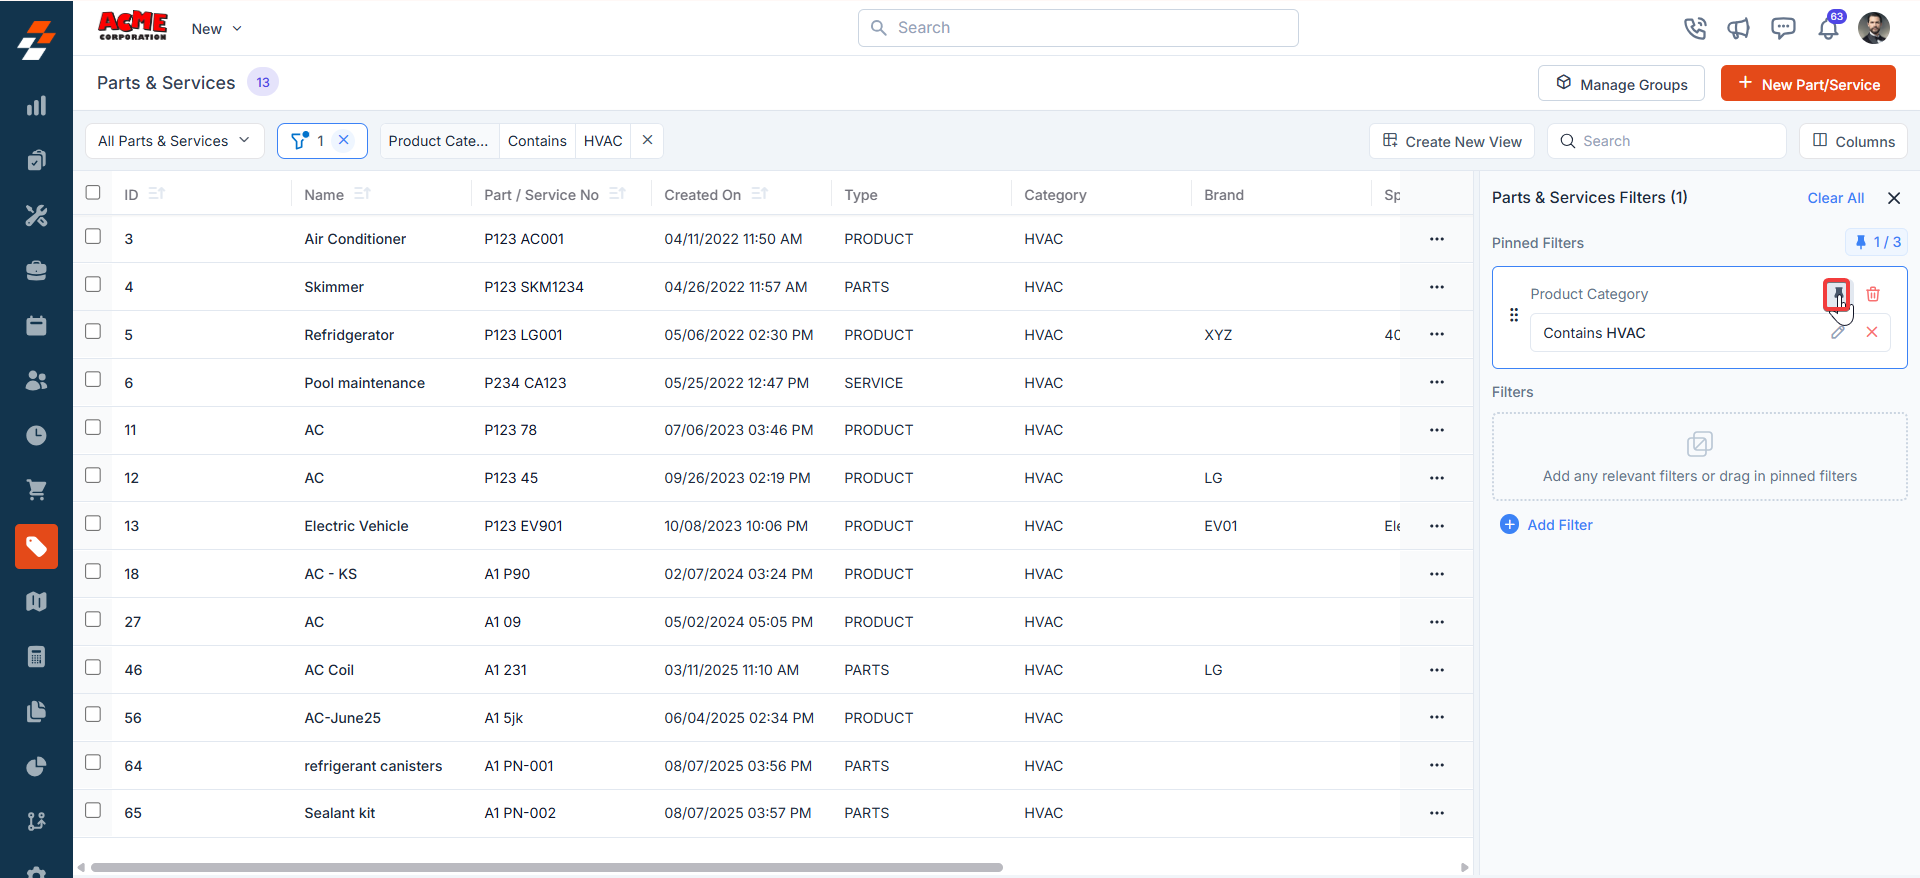
Pin Filters for Quick Access
Once your filters are set, click the Pin Filters button in the filters panel as pinned. Pinned filter appears on the listing page, allowing you to apply it with one click in future sessions.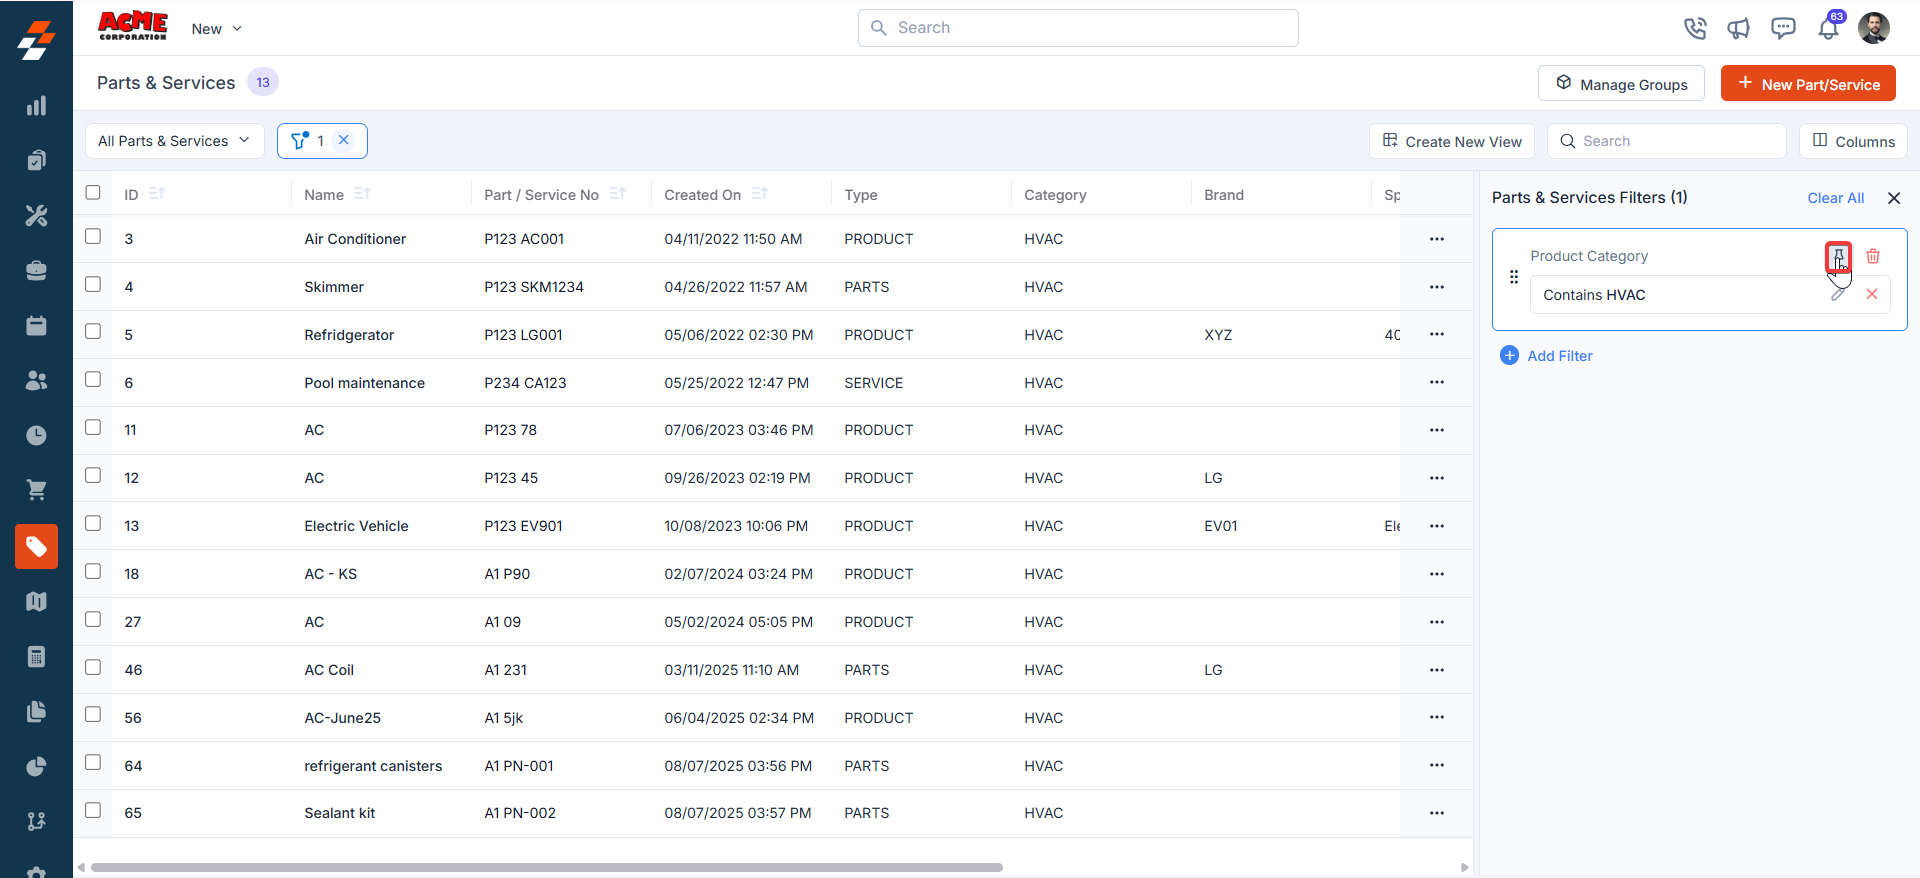
FAQ
Where can I find Parts & Services and Expenses now, and why was this change made? How does it affect my workflow? The Parts & Services and Expenses sections have been moved to the Line Items navigation tab on the Job Details page, effective July 23, 2025, 02:45 PM IST. This change shifted from a vertical scrolling layout, where you had to scroll up and down to view details, to a connected view that organizes product, service, and expense details for a clearer, more streamlined experience. The update enhances your workflow by consolidating related data into a single place, making management and review more efficient.