Navigation: Job Categories Listing → Select a Job Category → Job Category Statuses page → Checklist section → +Create
Accessing Job Checklists
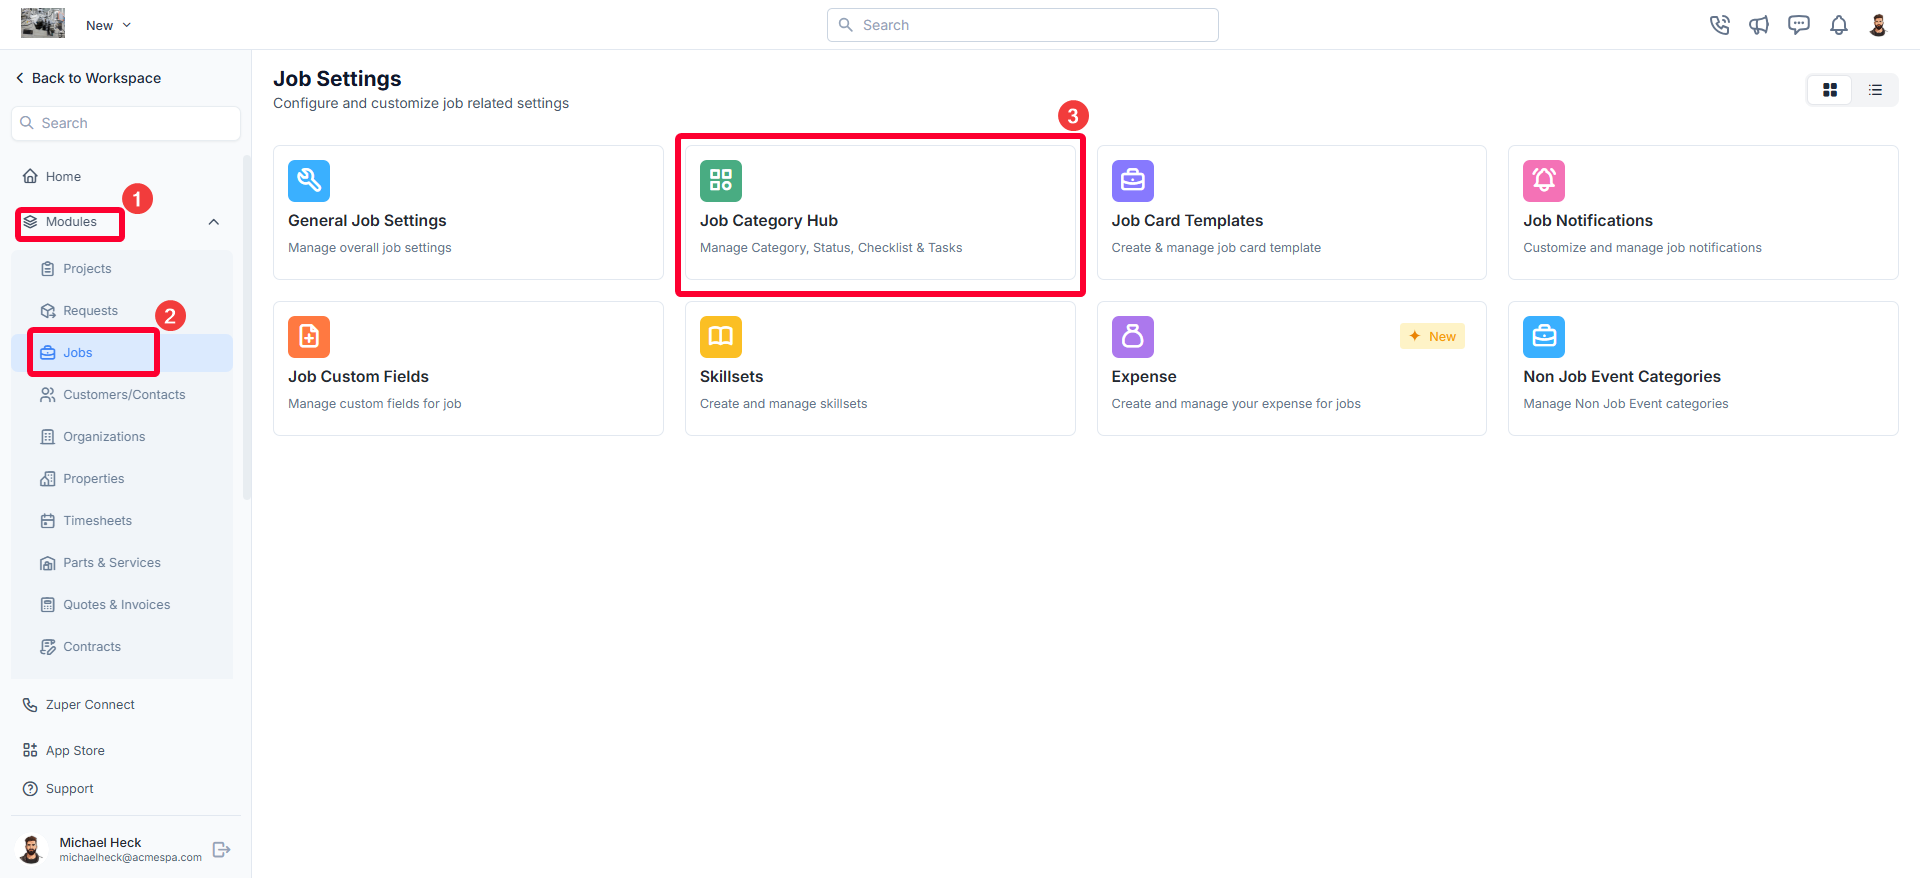
To create or manage job checklists, follow these steps:- Select the “Settings” module from the left navigation menu.
- Click “Modules” and choose “Jobs” to open the Job Settings page.
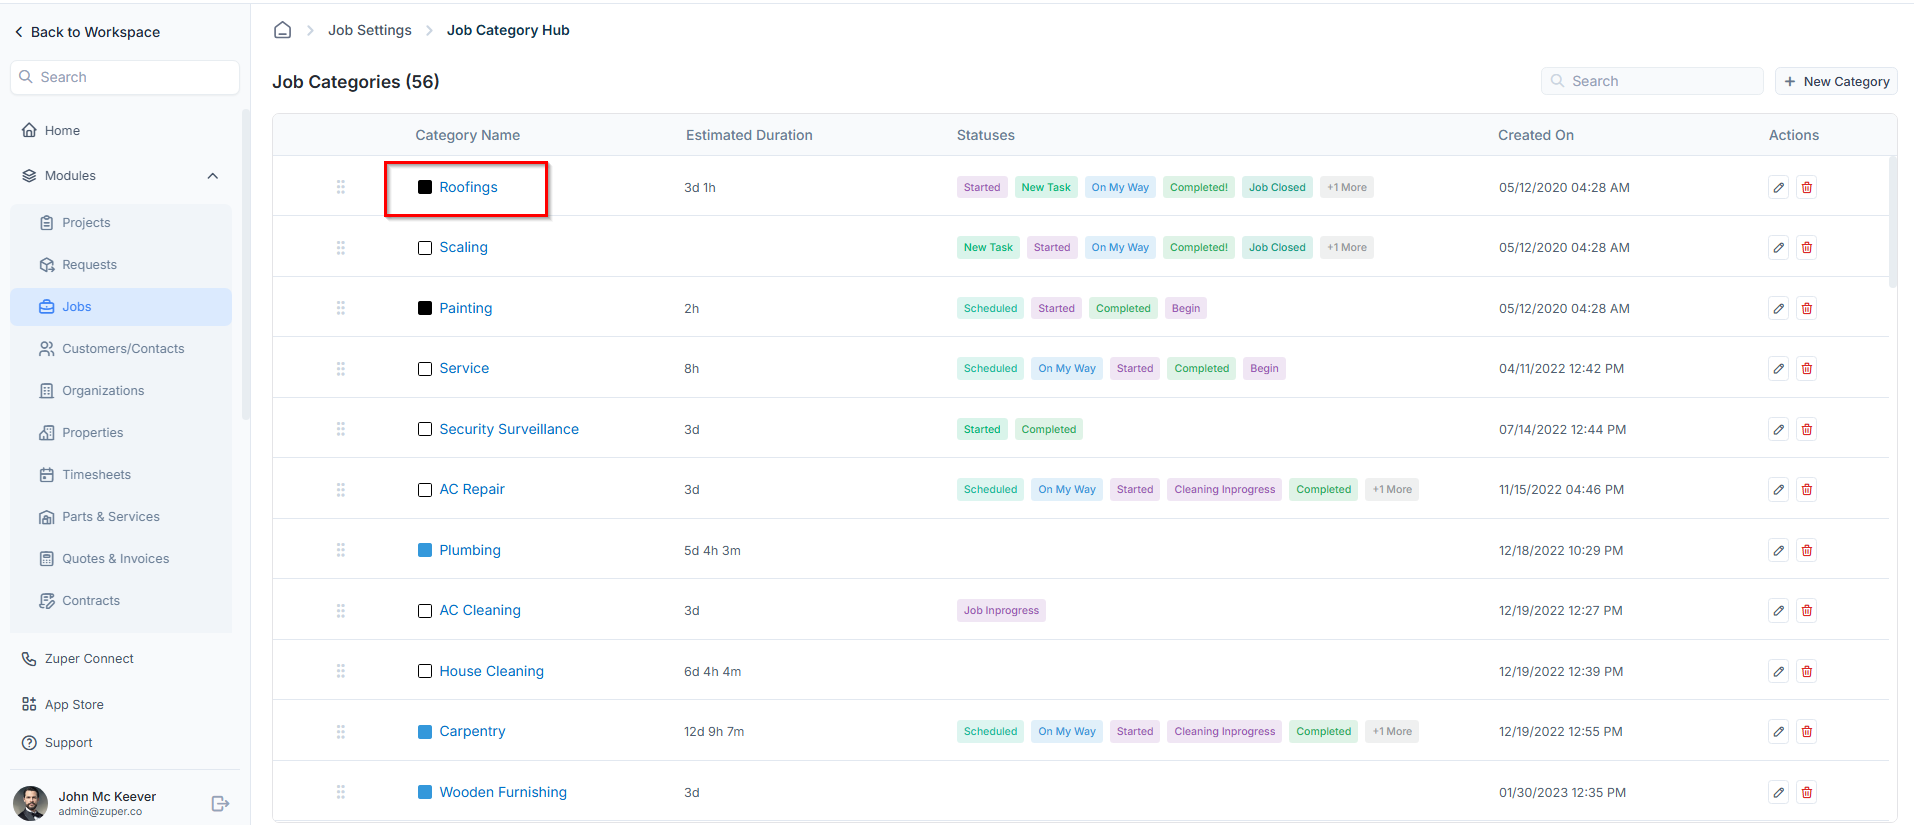
- Click Job Category Hub to view all configured job categories.
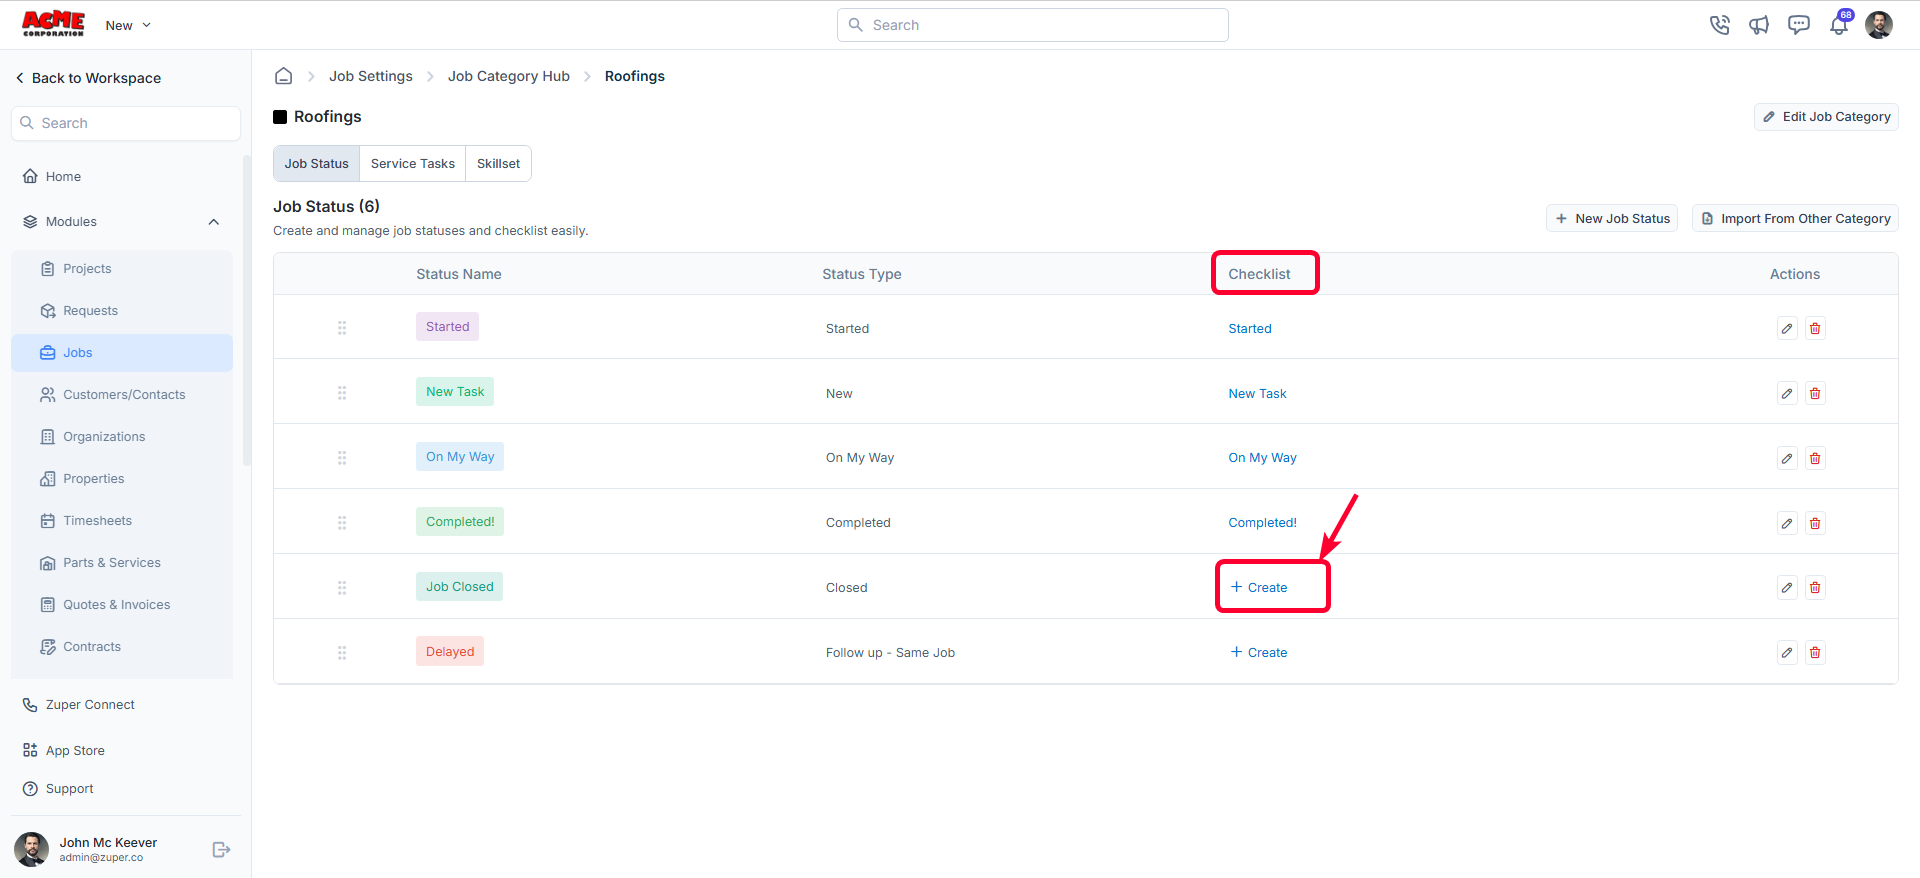
- Choose the job category for which you want to create or manage a checklist. This opens the Job Category Statuses page.
- In the Checklist section, click +Create to add a new job checklist.
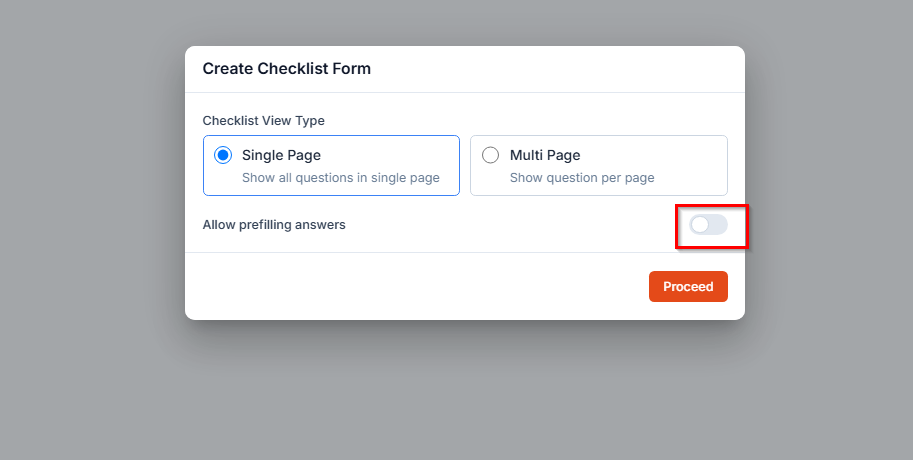
Create Checklist
When creating a checklist, you can choose how it should appear to best suit your workflow. This determines how fields are displayed to technicians and ensures efficient data capture in the field. Once the checklist view type is selected, you can proceed to add and configure the required fields.- Single-Page View: Displays all checklist fields on a single screen.
- Multi-Page View: Displays fields in separate pages for better organization.
Adding Fields to the Checklist
After selecting the checklist type, the Checklist Builder opens. You can add fields by dragging them from the right panel and dropping them into the left panel.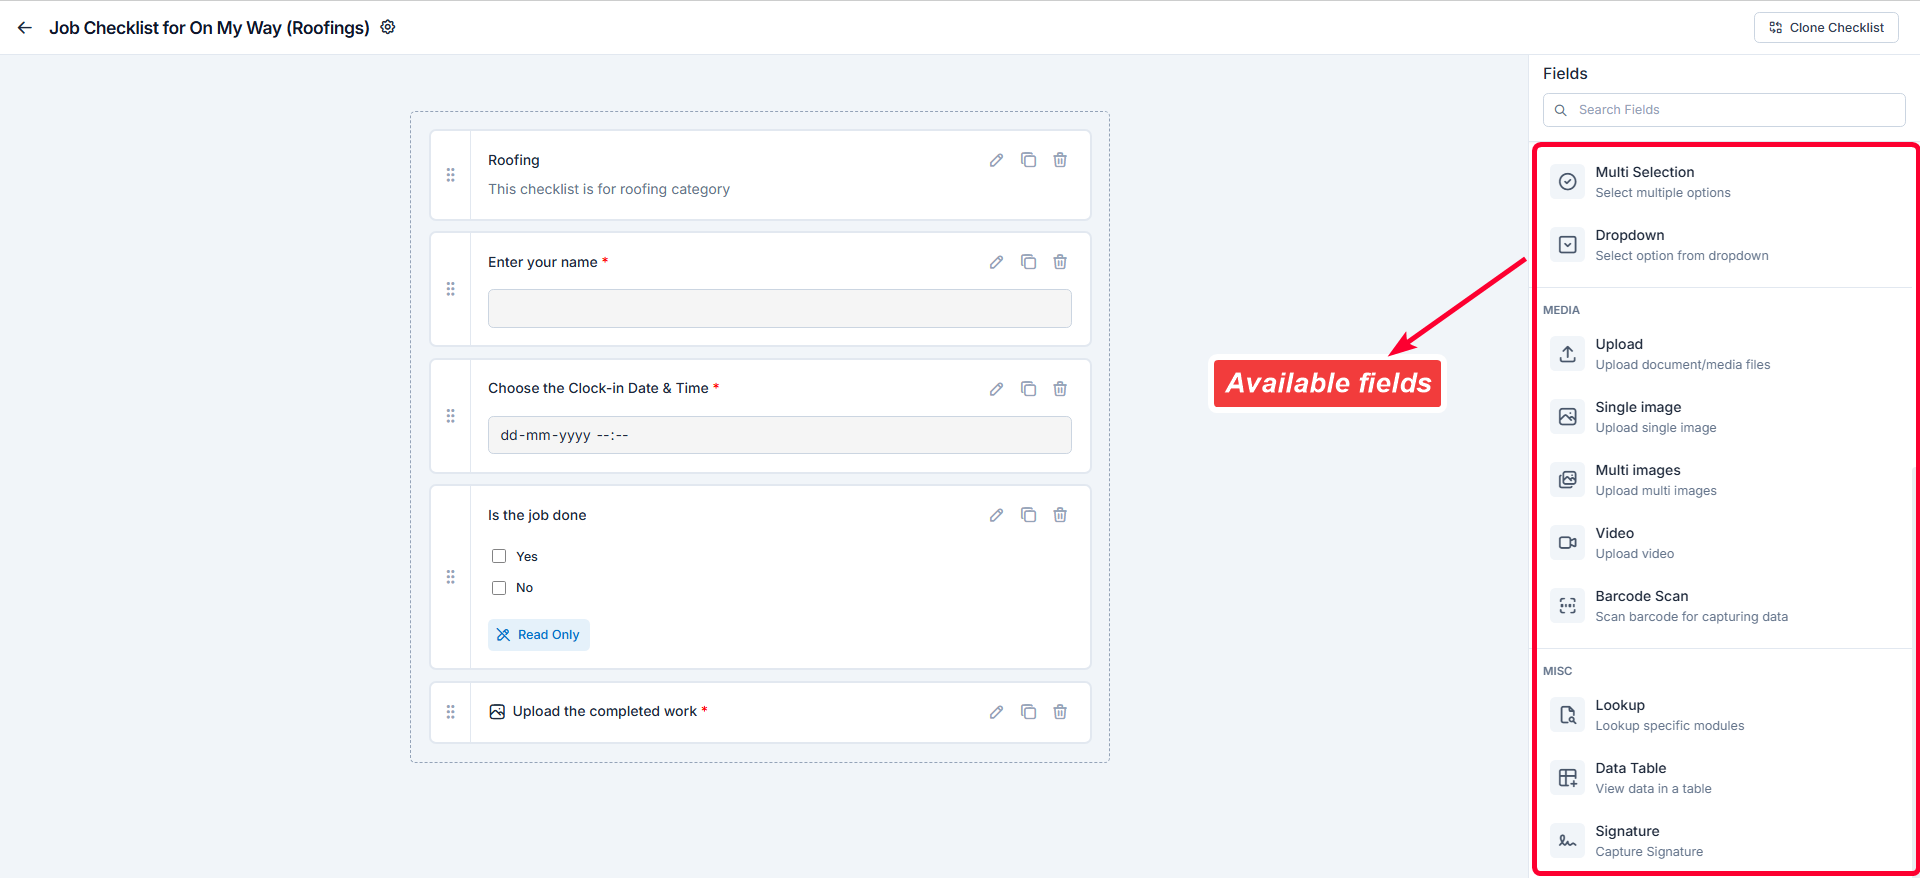
| Category | Field Type | Description |
|---|---|---|
| Section Header | Adds a heading within the checklist to group related fields and organize the layout. | |
| Text | Single-Line Text | Allows users to enter short, free-form text (e.g., customer name, part number). |
| Multi-Line Text | Enables users to enter longer paragraphs or notes (e.g., issue description, comments). | |
| Date | Date | Provides a calendar picker to select a specific date (e.g., inspection date). |
| Time | Provides a clock input to select time (e.g., job start time). | |
| Date & Time | Combines date and time inputs for timestamped entries (e.g., check-in/out time). | |
| Selection | Single Selection | Lets users choose one option from multiple predefined values (e.g., Yes/No). |
| Multi Selection | Allows users to select more than one option (e.g., services performed: cleaning, repair). | |
| Dropdown | Displays a dropdown list of predefined options to select from. | |
| Media | Upload | Lets users upload files such as PDFs, images, or documents. |
| Single Image | Allows capturing or uploading one image related to the job. | |
| Multiple Images | Enables capturing or uploading multiple images (e.g., before and after photos). | |
| Video | Allows users to upload or capture a video clip for visual verification. | |
| Barcode Scan | Enables scanning barcodes or QR codes for assets or parts. | |
| AI Walkthrough Video | Lets technicians record a guided video walkthrough of the job site directly from the checklist. Zuper AI transcribes the audio and produces a written summary alongside the video and any photos captured. Available on the mobile app only. | |
| Miscellaneous (Misc) | Lookup | References data from other Zuper modules such as Products, Users, or Assets. |
| Data Table | Creates a structured table with rows and columns to record multiple related data entries. | |
| Signature | Captures a digital signature from a technician or customer to confirm acknowledgment. |
Set the time interval
The Time Interval setting appears in the Edit Time panel under the Configuration section. For Time and Date & Time field:- Open the Edit Time panel for the time field. To do this, select the edit icon next to the field name in the checklist builder.
- Scroll to the Time Interval dropdown under Configuration.
- Select the interval you want from the list — for example, 15, 30, or 60.
The default value is 30 minutes. This means the time picker shows options in 30-minute increments, such as 9:00, 9:30, 10:00.
- Select Save to apply the change.

Configuring a Field New
When you drag and drop a field into the checklist, an Edit Field panel appears on the right side.You can define the field’s information, configuration, and visibility preferences. Once configured, click Save to add the field to the checklist.
Information
- Field Name: Enter the display name for the field.
- Description: Add helpful instructions or notes for the technician.
Configuration
Define how the field behaves during checklist completion:- Mark as Required Field
Technicians cannot submit the checklist until the required field is filled in. To configure:
- Toggle Mark as Required Field ON.
- Click Save to apply.
Example: For a “Customer Signature” field, enabling this ensures that technicians must collect a signature before job completion.
- Mark as Read Only
Useful when you want to display reference data without allowing modification. To configure:
- Toggle Mark as Read Only ON.
- Click Save to apply.
Example: Use for auto-populated fields like “Job ID” or “Customer Name.”
- Update Field
This eliminates duplicate data entry and ensures synchronization between modules. To configure:
- Toggle Update Field ON.
- Choose the custom field /standard field you want to link.
- You can choose the module as “Job” or “Customer / Contact.”
- Pre-fill: The Pre-fill answer capability automatically populates checklist questions with values from mapped standard or custom fields. This reduces manual data entry and ensures consistency between checklist responses and system records..
- Click Save to apply.
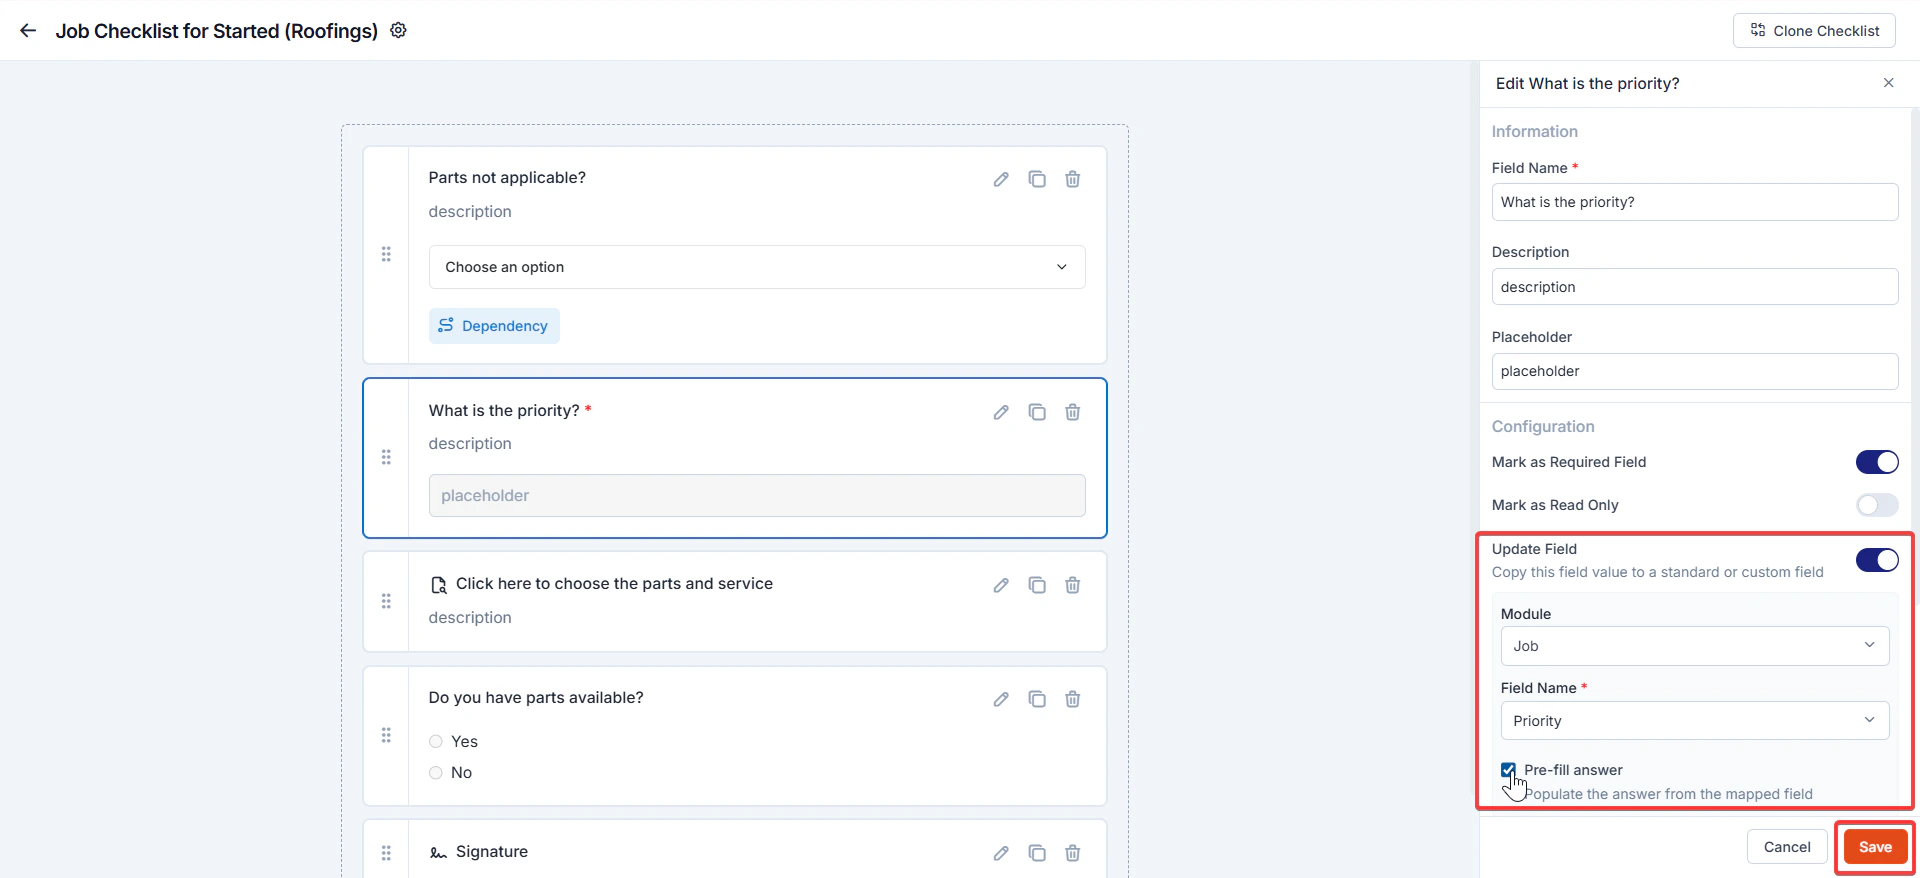
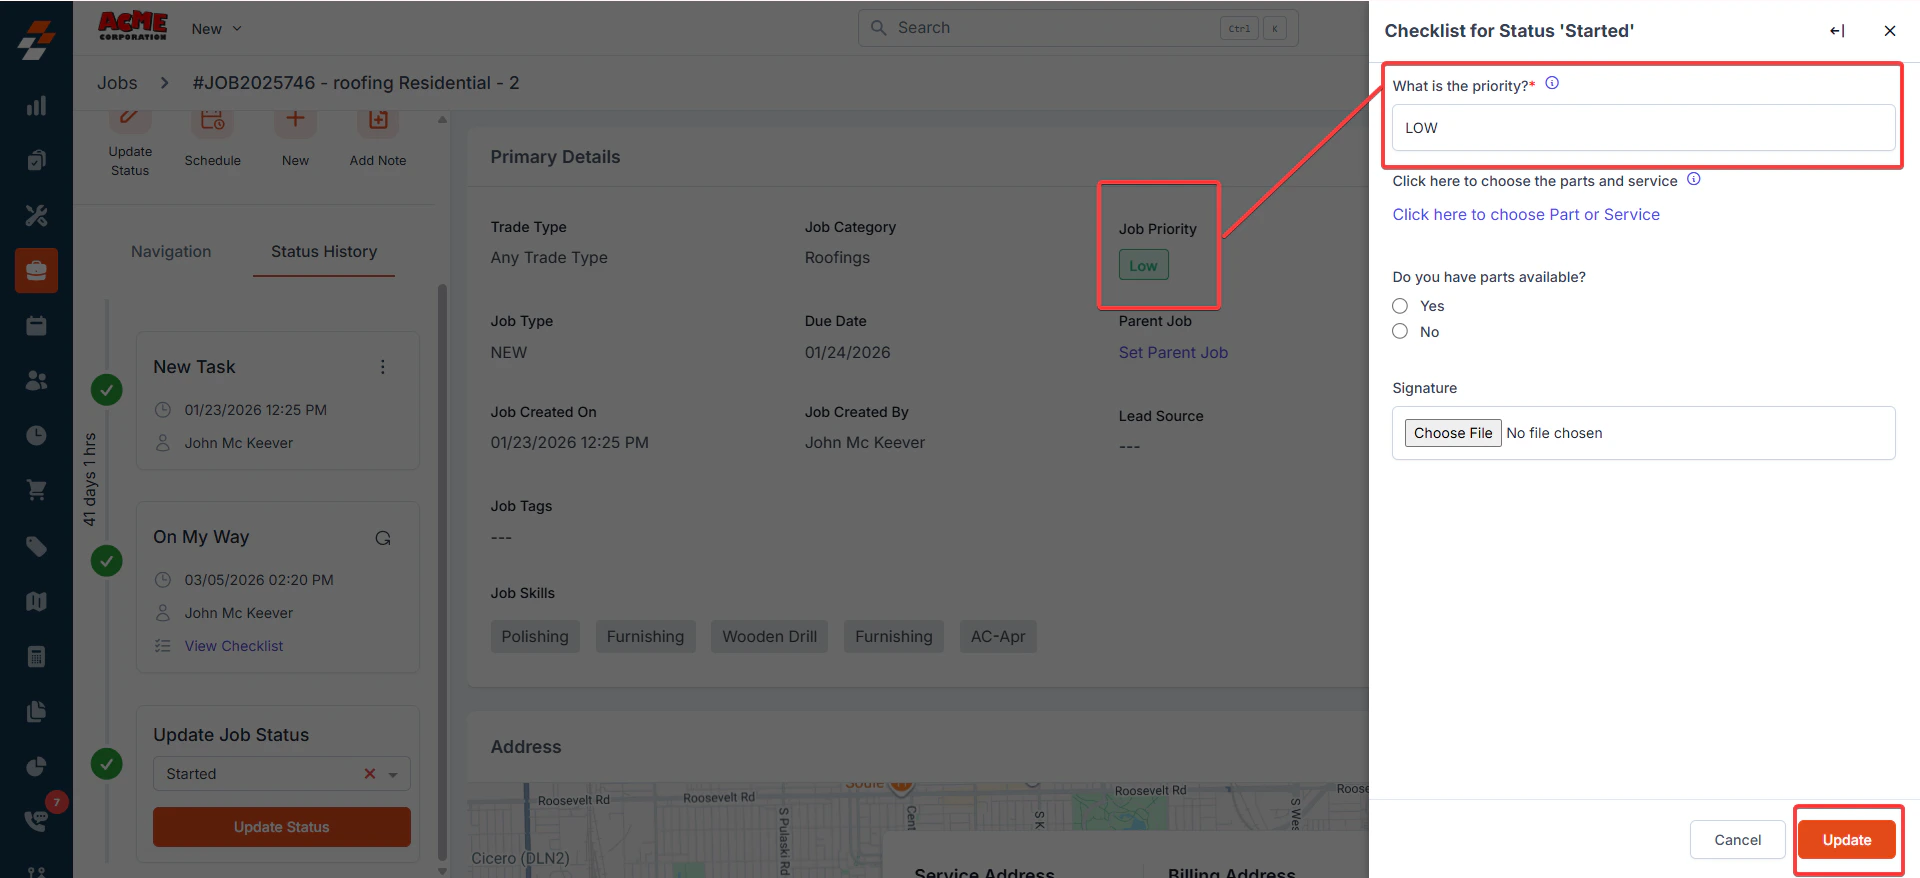
Example: Prefill: A “Priority” field from the Jobs Module is prefilled automatically in the checklist.Priority order when determining what value to show:
- Existing checklist answer (always takes precedence).
- Field-based pre-fill (from mapped Job/Contact field).
- Default value (fallback if no mapped value exists).
- Impact after filling the checklist
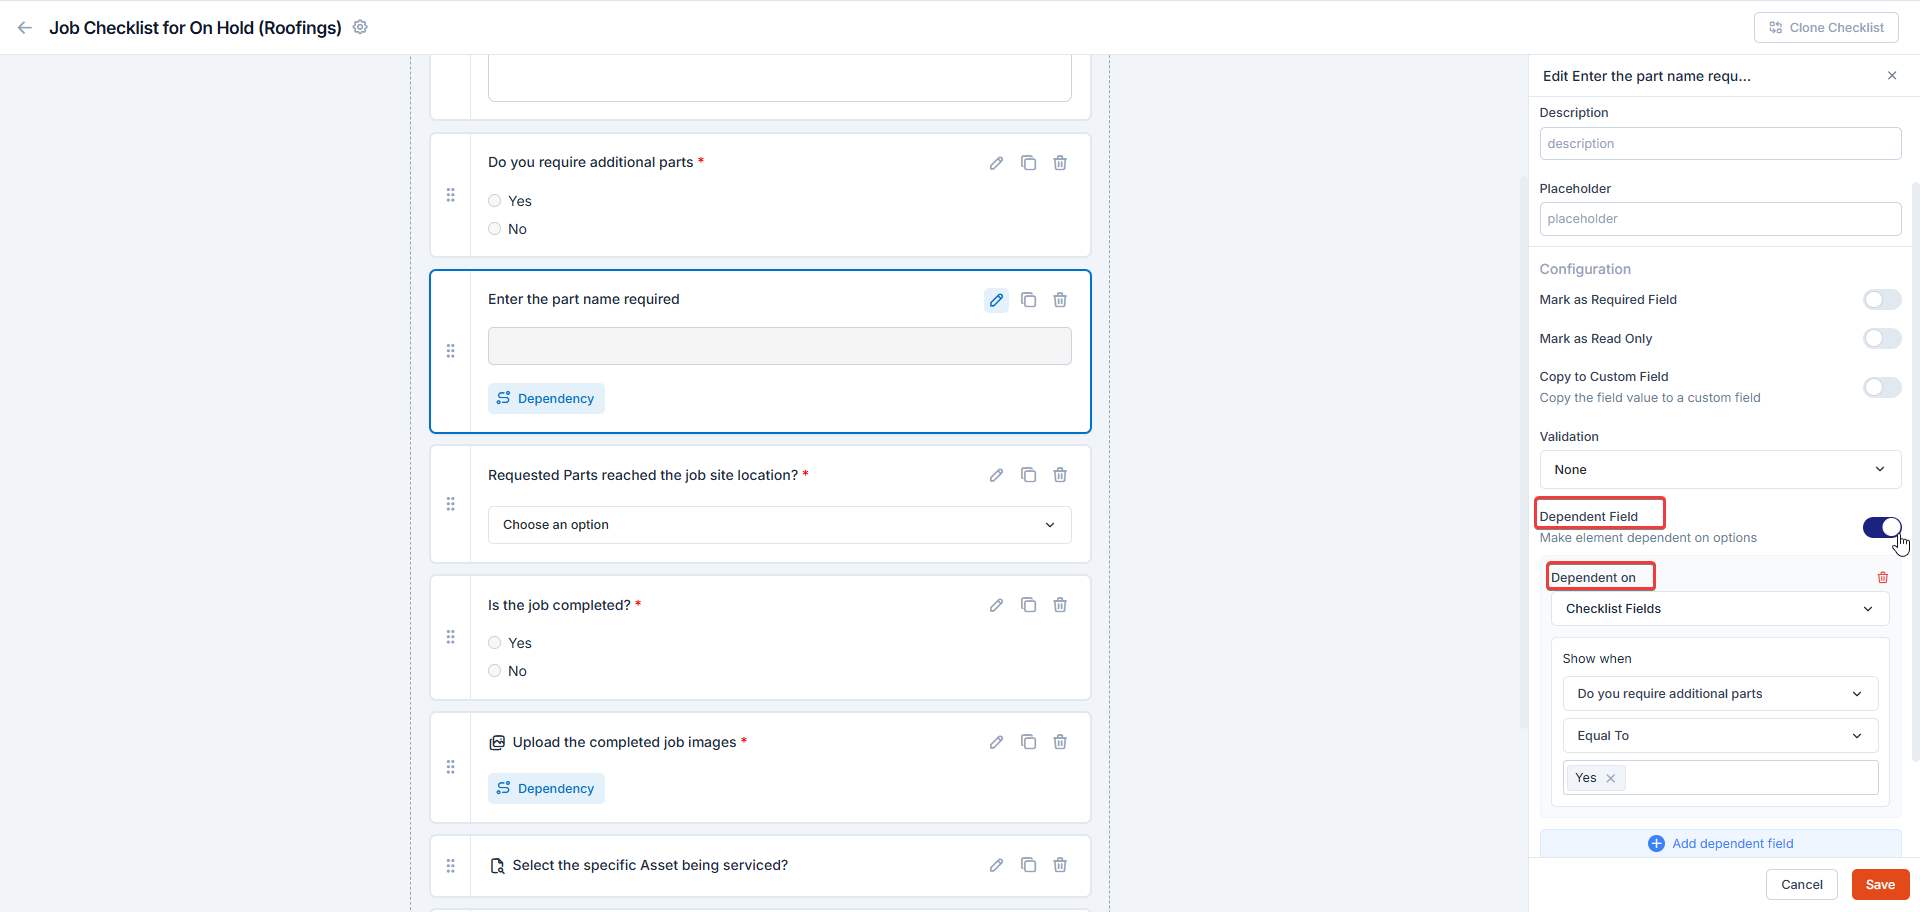
- Dependent Field (Make Element Dependent on Options)
Note: The Dependent Field option appears only when a Selection Field (Single Selection, Multi Selection, or Dropdown) with configured options is present in the checklist.
- Select the field you want to set as dependent (e.g., Enter Part Name (Single Line Text)), then click the Edit icon.
- Toggle Dependent Field to ON.
- Under Dependent On, choose whether the dependency is based on Checklist Fields or Custom Fields.
- In Show when:
- Trigger Field: Choose the parent field (e.g., Do you require additional parts (Single Selection).
Zuper automatically displays only the fields linked to the same Job Category as the checklist. This ensures that you can select only the relevant checklist fields or custom fields associated with that category. - Condition Operator: Choose the operator (Equal To, Contains, Not Equal To, etc.).
- Value(s): Pick one or more values that will make the dependent field appear.
For example, if a technician selects Yes under Do you require additional parts?, the fields Enter Part Name and Enter Description appear automatically.Note: For a Multi Selection parent field, you can choose one or more values. If the user selects any one of these values, the dependent (child) field will appear.Under Show When, select the controlling field (e.g., Do you require additional parts?).
- Trigger Field: Choose the parent field (e.g., Do you require additional parts (Single Selection).
- To add another dependency, click Add dependent field, and choose whether conditions should use AND (all conditions must be true) or OR (any condition may be true). Define the condition (e.g., is equal to Yes).
- Click Save to apply the configuration.
Visibility
Control who can view or edit a field:- Mark as Hidden Field: Hide the field from all users.
- Hide to FE/Technician: Hide the field only from field technicians on the mobile app.
Advanced Field Configurations
In addition to the general field settings, Zuper allows you to configure advanced options for specific field types.These configurations help ensure accurate data capture, enforce validation, and maintain the authenticity of field submissions.
Depending on the field category you select (Selection or Media), the available configuration options may vary.
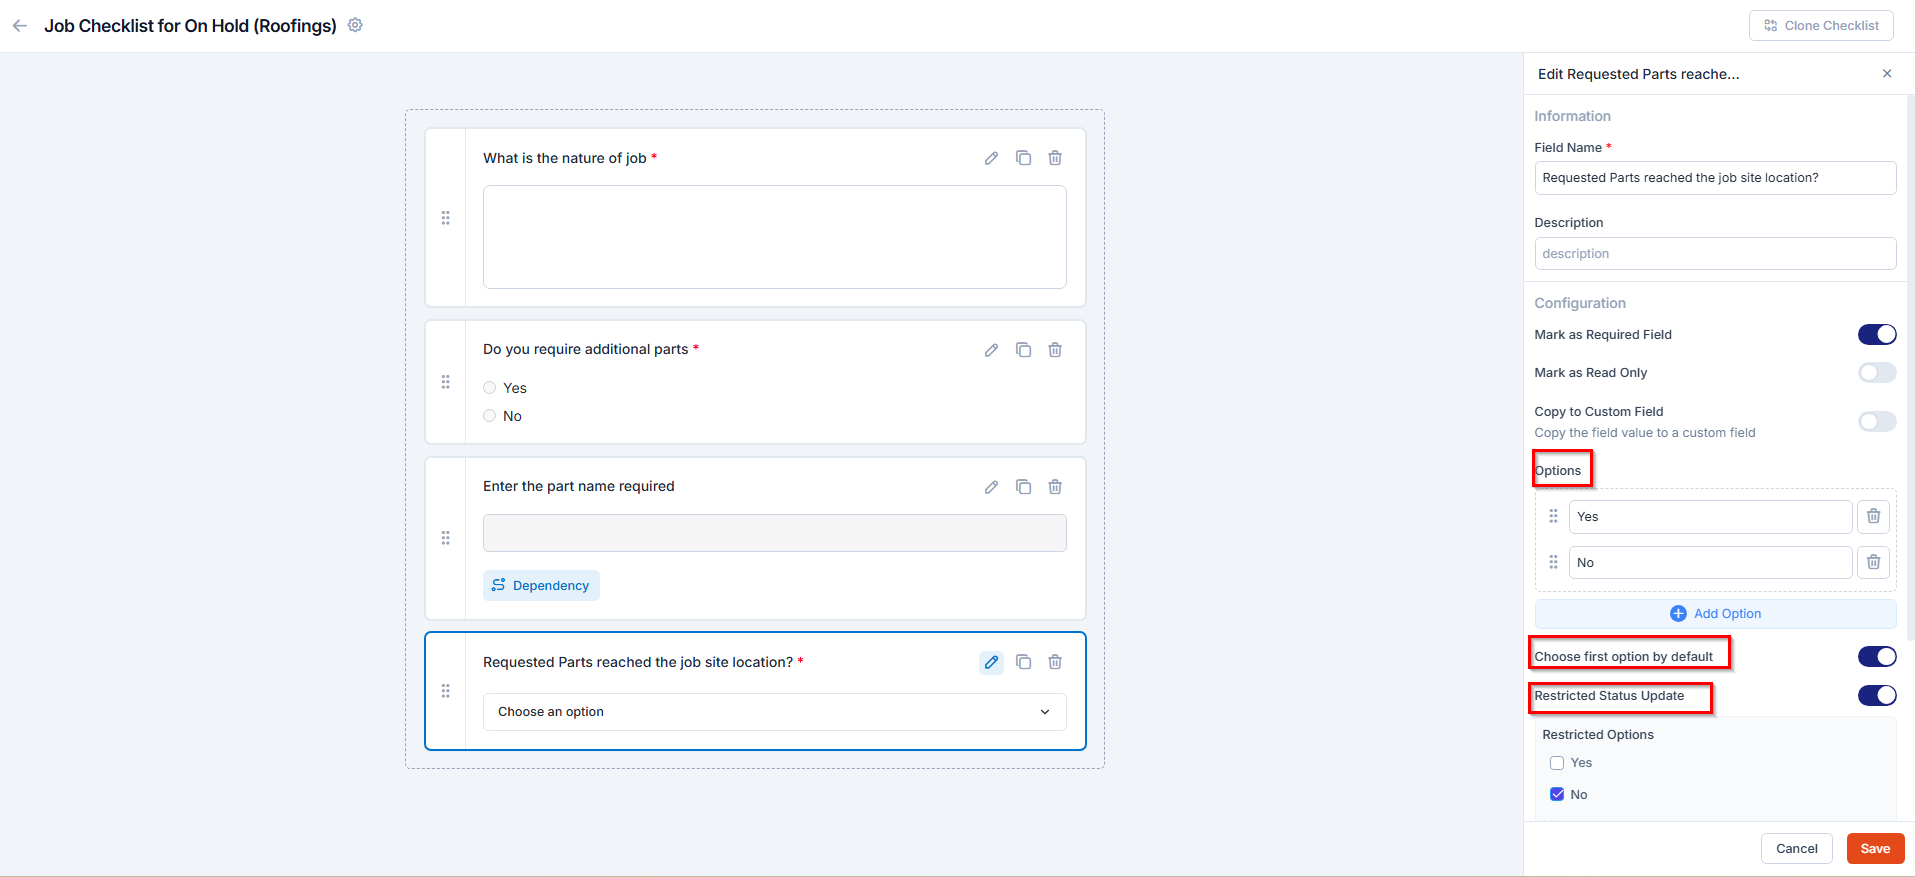
A. Selection Field Configurations
For Selection fields (Dropdown, Single Selection, and Multi Selection), you can configure options, apply restrictions, and set dependencies to control how technicians interact with the checklist.Navigation: Go to the Selection field category and choose either Single Selection, Multi Selection, or Dropdown to configure the field.
- In the Options section, click Add Option to create new choices.
- Enter the option names (e.g., Accurate, Not Accurate, Requested).
- Use the trash icon to delete any unwanted option.
- Drag and drop options to reorder them.
- Click Save to apply the changes.
Example: A dropdown field titled Parts Condition can include options such as Good, Damaged, and Replaced.2. Choose First Option by Default (Dropdown Only) Automatically selects the first dropdown value when the checklist loads. This helps standardize default responses. To configure:
- Toggle Choose First Option by Default ON.
- Ensure your preferred value is listed first in the options.
- Click Save to apply.
Example: In a field titled Inspection Type, setting Routine Check as the first option makes it the default selection.3. Restricted Status Update Restricts technicians from changing the job status if certain checklist conditions are not satisfied. To configure:
- Toggle Restricted Status Update ON.
- Define the field condition that should block the job status update.
- Click Save to apply.
Example: If the technician selects No for “Are all parts delivered?”, the system can prevent the job from moving to In Progress until all parts are confirmed.
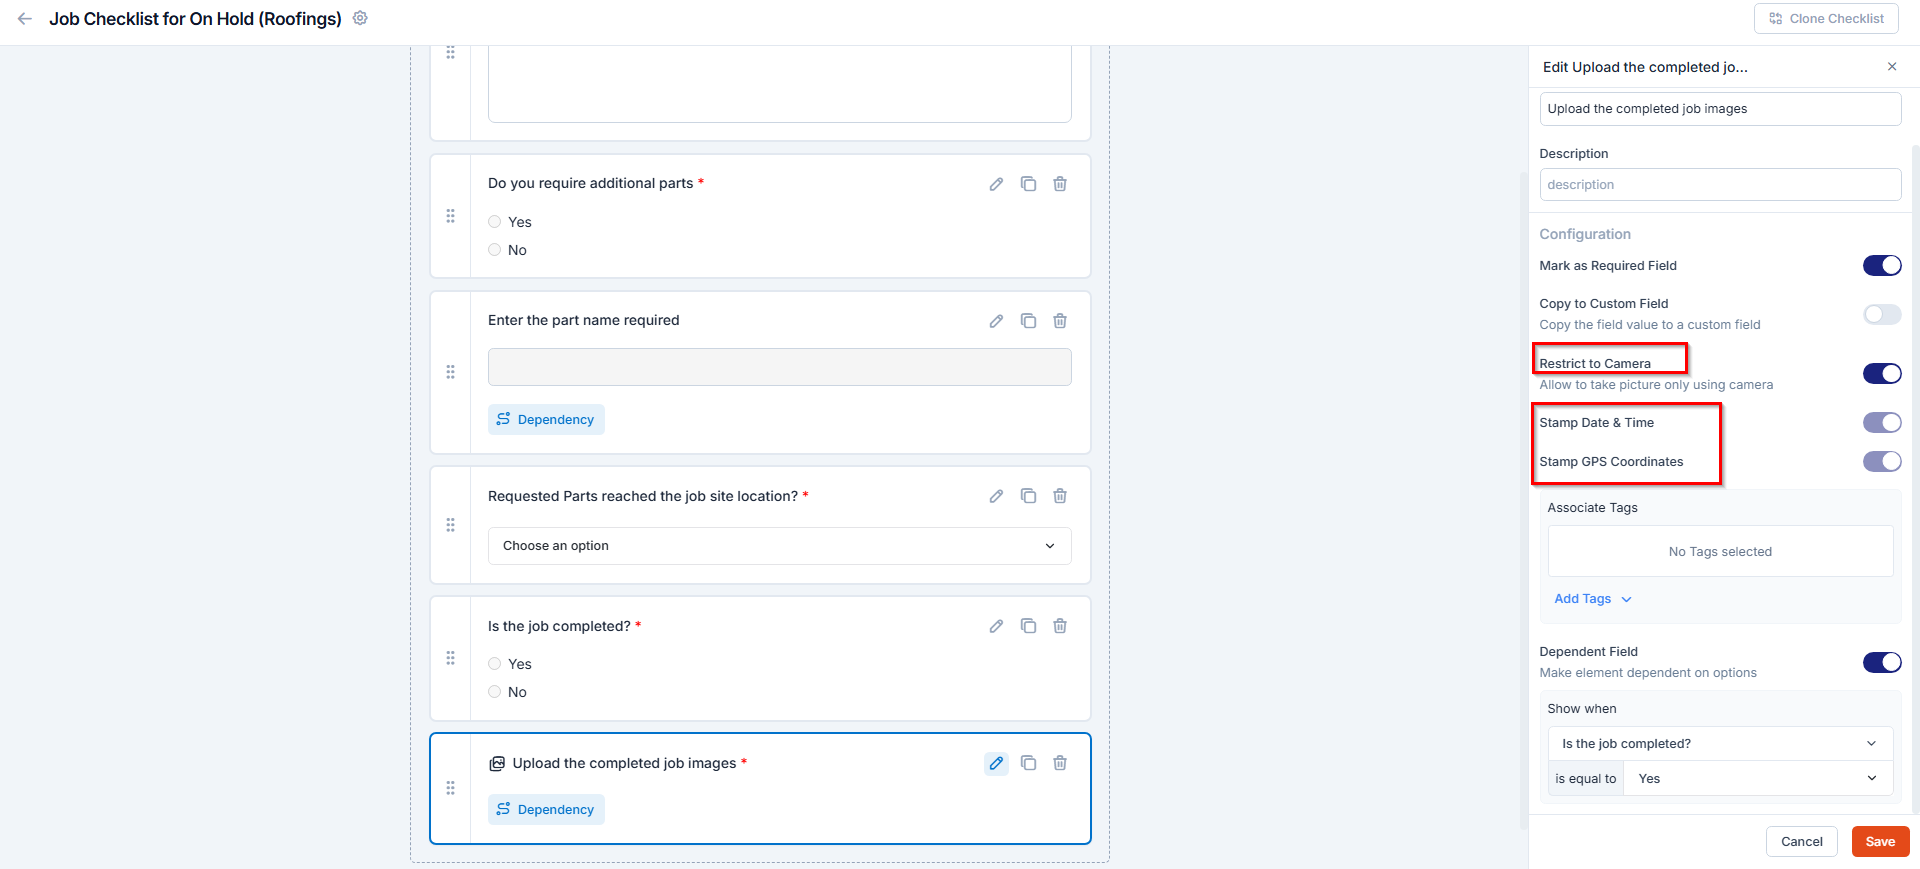
B. Media Field Configurations
For Media fields (Single Image and Multi Images), you can apply additional validation settings to ensure the authenticity and reliability of the photos submitted from the field.Navigation: Go to the Media field category and select Single Image or Multi Images to configure the field.
- Drag and drop a Single Image or Multi Images field.
- In the Configuration section, toggle Restrict to Camera ON.
- Click Save to apply.
Example: When a technician must upload an image of an installed part, Restrict to Camera ensures it’s captured live from the site.2. Stamp Date & Time and Stamp GPS Coordinates These options automatically capture the date, time, and GPS coordinates when an image is taken or uploaded.
They help verify when and where the photo was captured, ensuring data authenticity and audit accuracy. By default, both Stamp Date & Time and Stamp GPS Coordinates are enabled.
You can also associate tags with the image using the +Add Tags button to help categorize or identify photos more efficiently.
Example:
When a technician captures an installation photo, the system automatically records the timestamp and GPS coordinates, confirming that the image was taken at the customer’s site during the job.
C. Misc Field Configurations
For Miscellaneous fields (Lookup, Data Table, and Signature), Zuper provides additional configuration options to help capture reference data, structured records, and approvals efficiently. These settings ensure that field data is validated, traceable, and linked to other Zuper entities when needed.Navigation: Go to the Misc field category and select Lookup, Data Table, or Signature to configure the field.
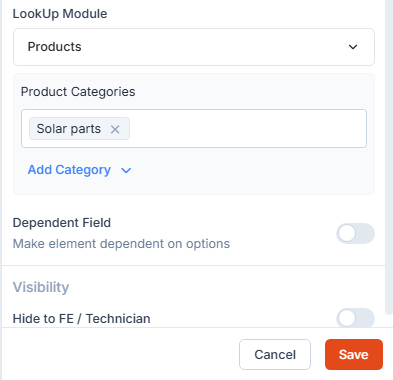
- Lookup Field
This helps technicians quickly link related entities without switching modules. To configure:
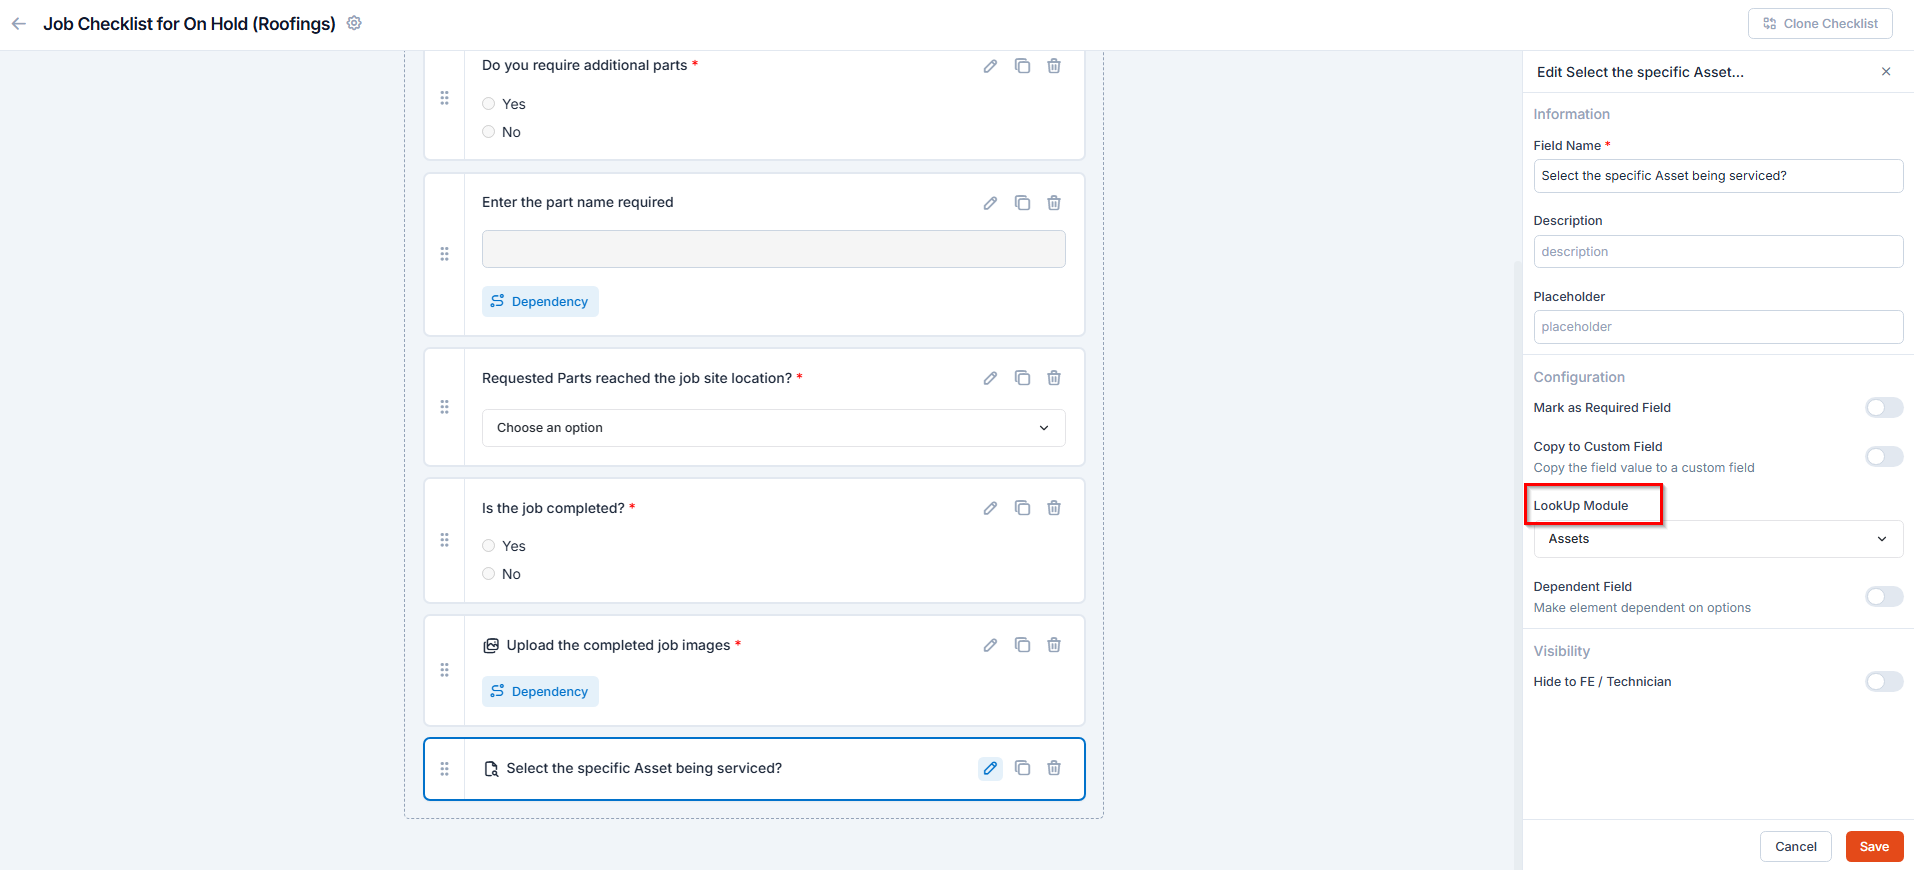
- Drag and drop the Lookup field into the checklist.
- Under the Lookup module, choose the module you want to reference (e.g., Products, Products added in job, Users, Assets).
- Click Save to apply.
When configuring lookup
When configuring lookup
- For Products: Enables selection from existing product categories.
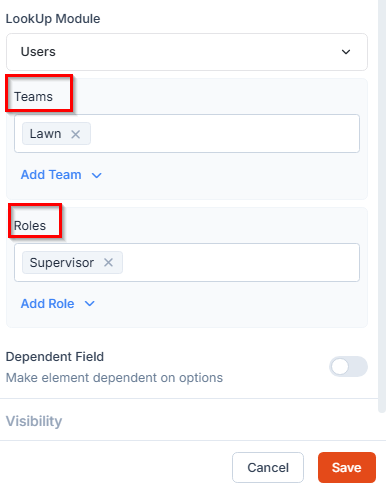
- For Users: You can filter results by Teams or Roles for targeted user selection.
- For Assets: Allows linking existing assets related to the job or customer.
Example: In an equipment maintenance checklist, a technician can use the Lookup field to select the specific Asset being serviced, ensuring accurate tracking of maintenance history.
- Data table Field
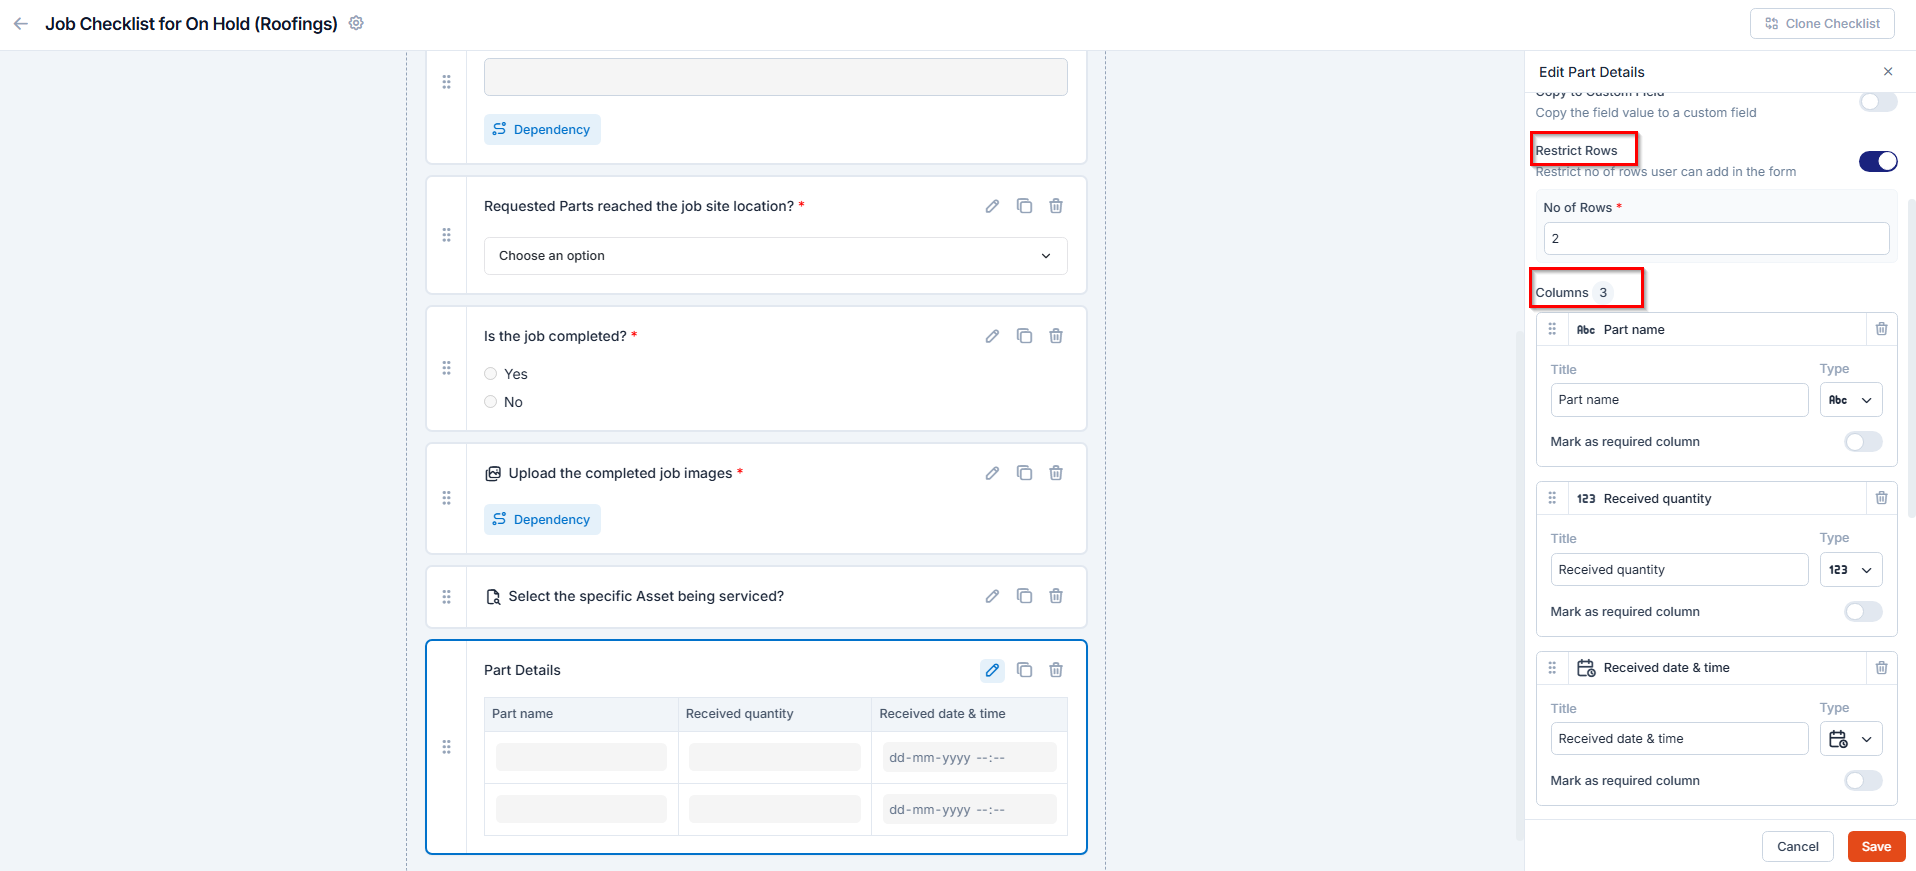
- Drag and drop the Data Table field into the checklist.
- Toggle ON Restrict Rows to limit the number of rows users can add.
- Under Columns, define each column header (for example, Part Name, Quantity, Unit Price).
- Select the appropriate data type for each column, such as Text, Number, Date, or Multi-Line, based on the type of information you want to capture.
- You can also enable or disable the “Mark as Required Column” option for each column as needed.
- Under Default Rows, add or delete rows as required.
- Click Save to apply.
- Signature Field
This ensures compliance and provides a verifiable audit trail for field submissions. To configure:
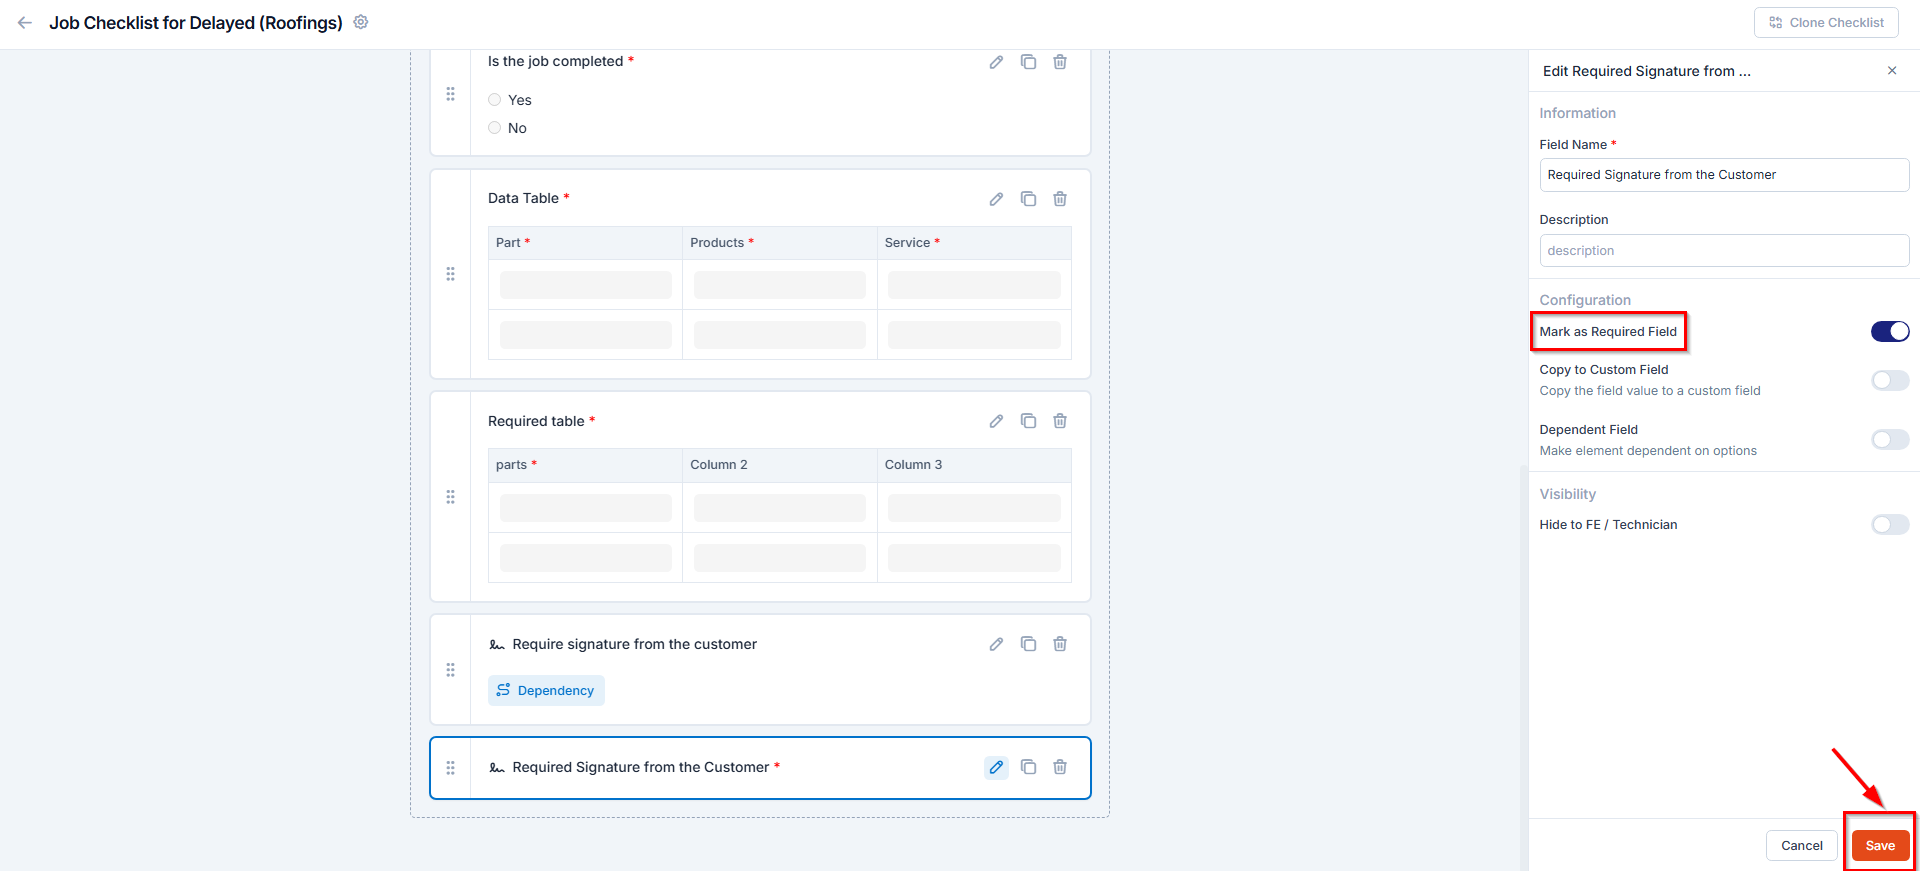
- Drag and drop the Signature field into the checklist.
- Specify whether the signature is required from the Technician or Customer.
- Toggle Mark as Required Field ON if the signature must be provided before job completion.
- Click Save to apply.
Example: Adding a Customer Signature field at the end of a checklist ensures that the customer has reviewed and approved the completed work before closing the job.
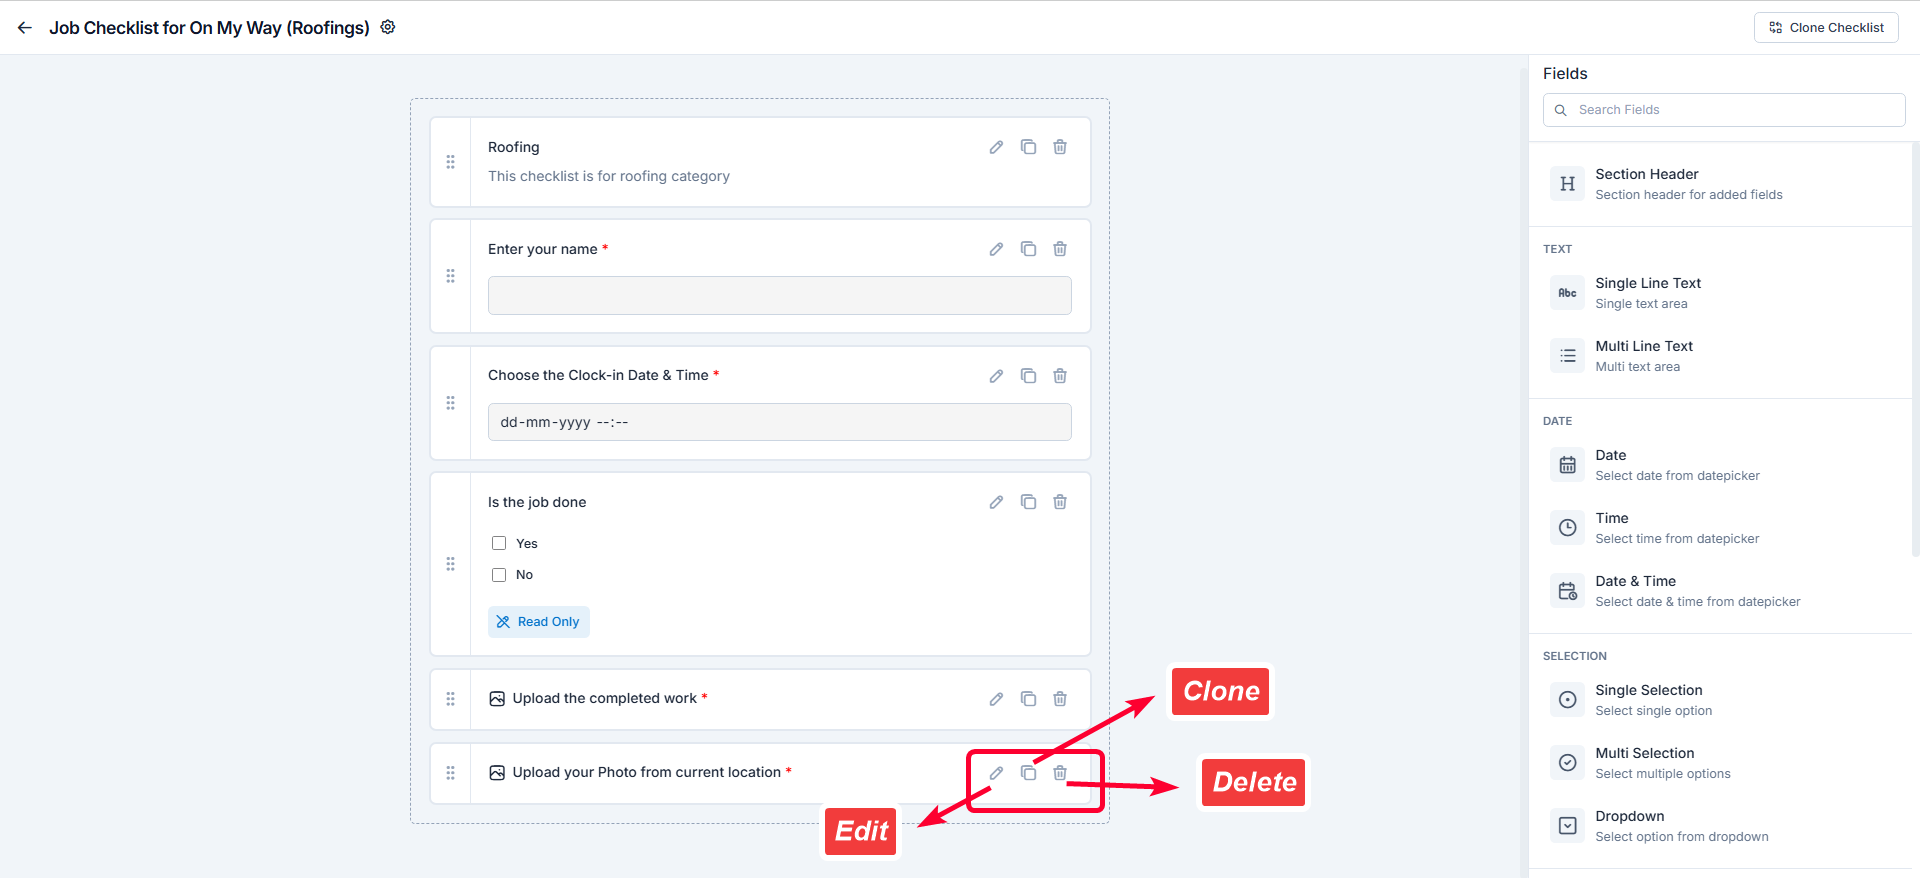
Managing Checklists
Once the job checklist has been created, you can edit, duplicate, or delete job checklists as needed.- Edit a Checklist:
Click the Edit icon next to the checklist to modify its fields or settings. - Duplicate a Checklist:
Click the Clone icon to create a copy of an existing checklist. Rename and edit it as required. - Delete a Checklist:
Click the Delete icon to remove a checklist that is no longer needed.
If a field technician reports a data parsing error when tapping Update Status on the mobile app, the checklist linked to that status has a stale configuration. To fix this, open the affected checklist in the Checklist Builder, make no changes, and select Save. Ask the technician to close the app fully, reopen it, and retry the status update.