This article explains how to access, manage, and update purchase orders at every stage of their lifecycle to support a streamlined and transparent procurement process.
Accessing the Purchase Orders Listing Page
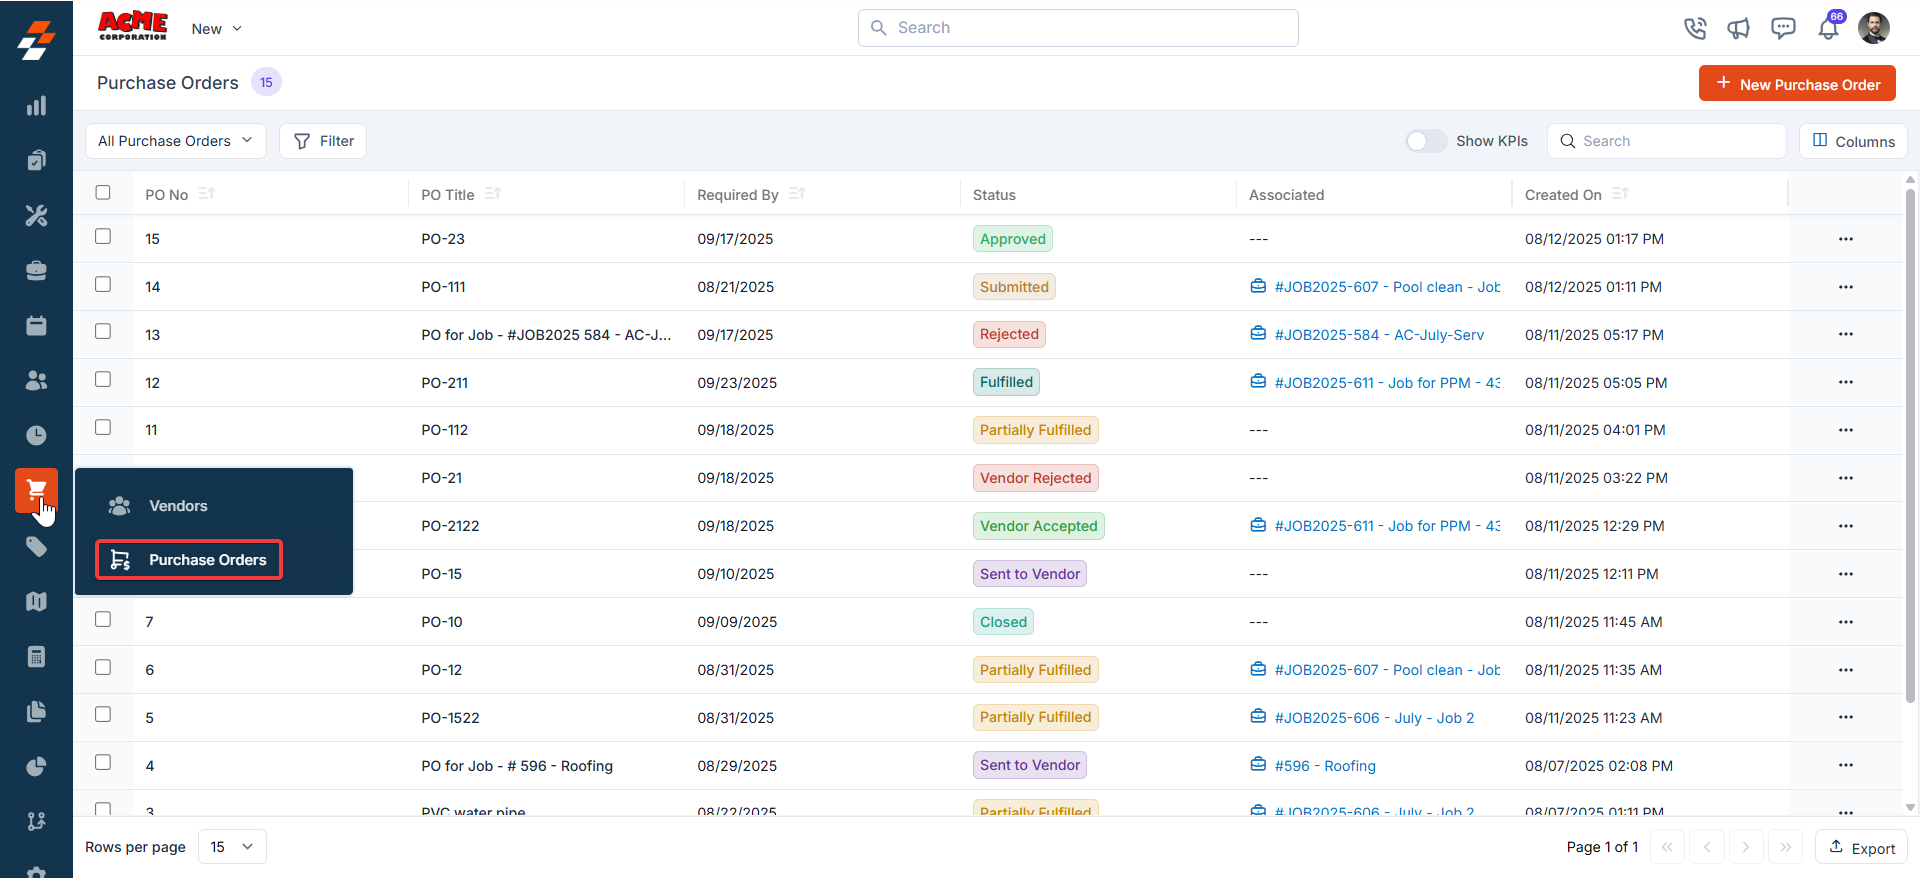
To view all purchase orders:- Click the Purchasing module from the left navigation menu and select Purchase Orders.
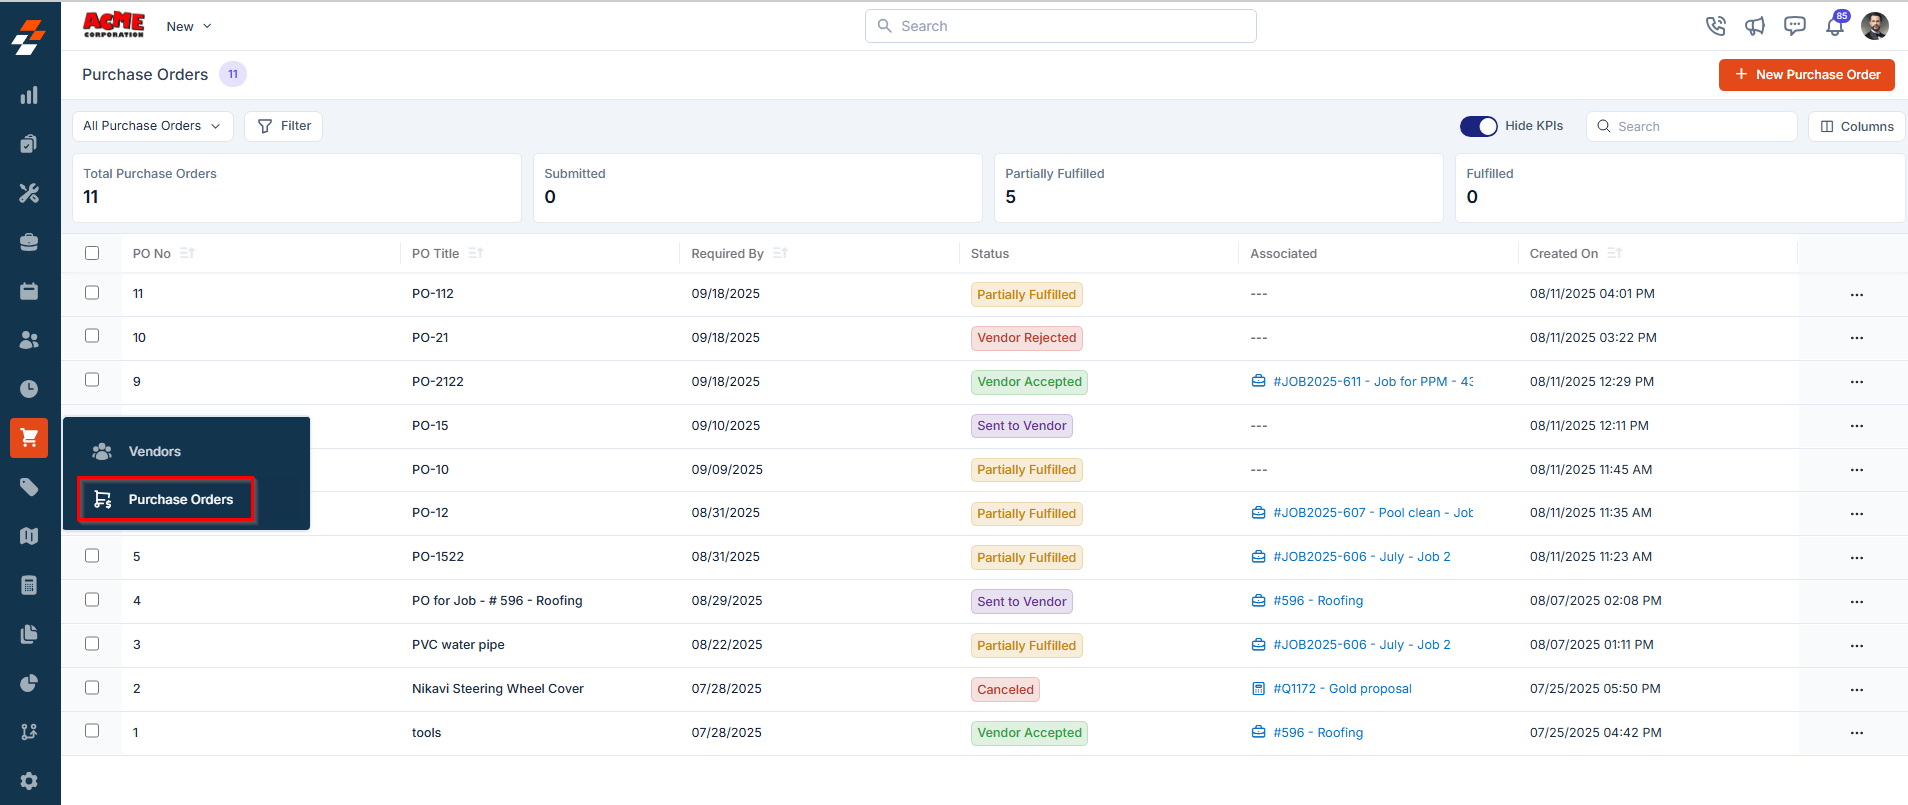
- You’ll see a list of purchase orders for the selected date range with key details, including:
- Purchase Order No. – This is the system-generated unique number assigned to each purchase order for easy identification.
- Purchase Order Title – This is the name given to the purchase order, often auto-filled if created from a job or quote.
- Required By: Indicates the target date by when the requested purchase order is expected to be fulfiled.
- Status – Indicates the current stage of the purchase order. Statuses include:
- Draft – The PO is being prepared and not yet submitted for approval.
- Submitted – The PO has been submitted and is awaiting internal approval.
- Approved – The PO has received internal approval and is ready to be sent to the vendor.
- Rejected – The PO has been declined during the internal approval process.
- Sent to Vendor – The approved PO has been sent to the vendor for processing.
- Vendor Accepted – The vendor has accepted the PO.
- Vendor Rejected – The vendor has rejected the PO, possibly with comments.
- Partially Fulfilled – Only some items have been received; pending items remain.
- Fulfilled – All items in the PO have been delivered by the vendor.
- Invoiced- The vendor has issued an invoice for the items delivered, and the invoice has been recorded against the Purchase Order. This status indicates that the PO has moved into the billing stage and is awaiting payment.
- Paid-The payment for the vendor invoice has been completed. This status confirms that all financial obligations related to the Purchase Order have been settled.
- Cancelled – The PO has been cancelled and will not be processed further.
- Closed – The PO has been completed and closed after fulfillment.
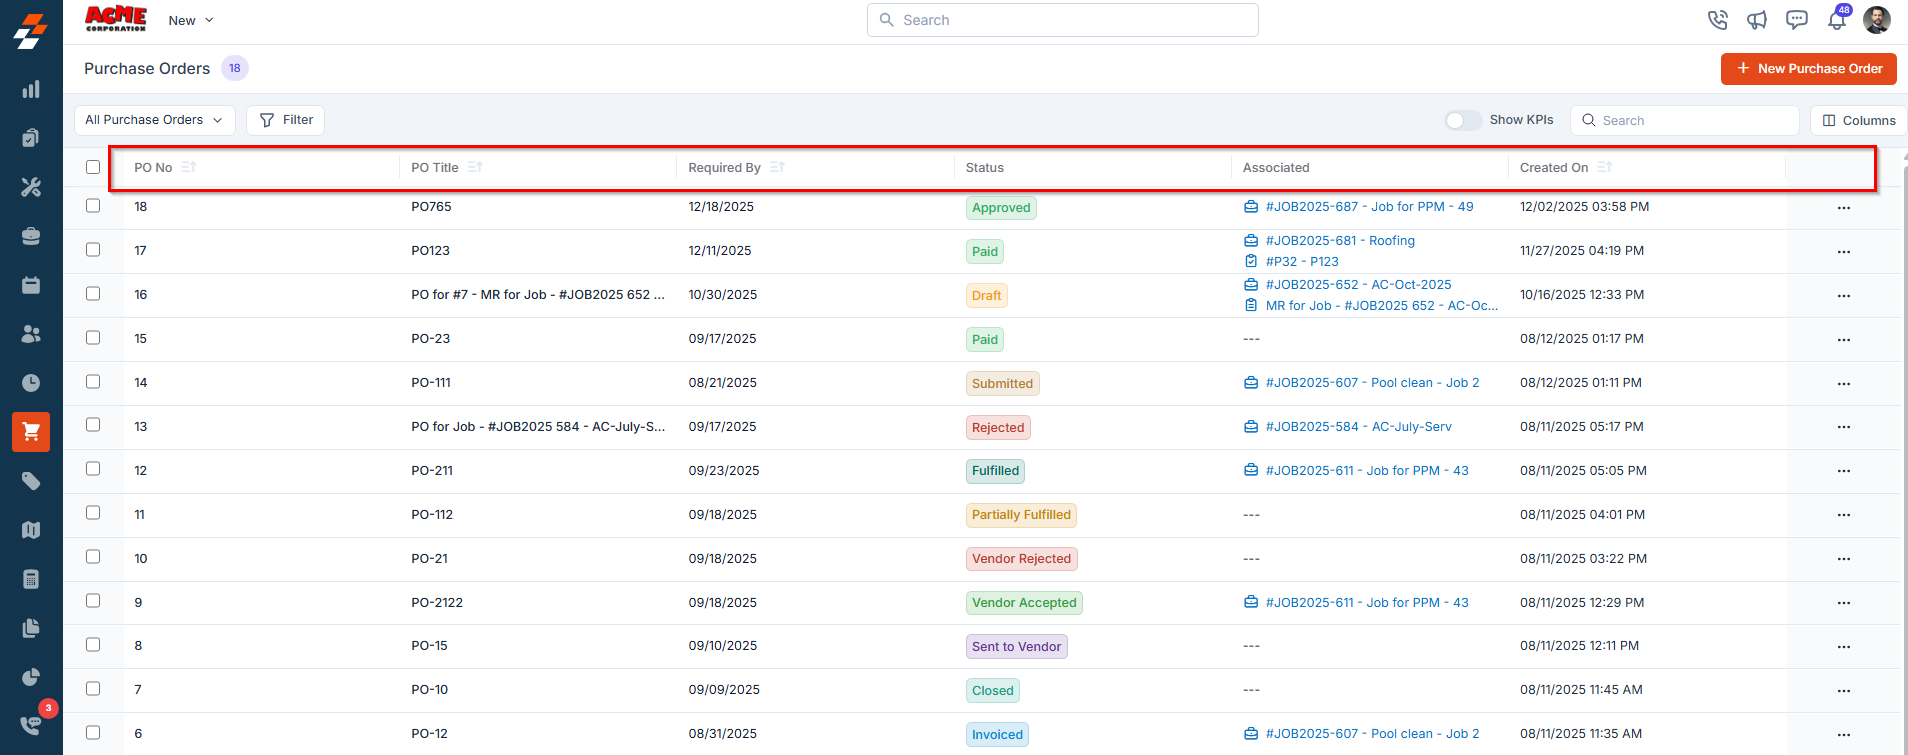
- Associated – Displays the job/project or quote linked to the purchase order, providing context on where or why the order originated.
- Created on – Shows the date on which the purchase order was generated, making it easier to track order timelines and monitor processing efficiency.
How costs are calculated on a roll-up
When you roll up a partially fulfilled PO, Zuper recalculates costs automatically so your records stay accurate with no manual adjustment needed.- The original PO updates its total to reflect only the quantity already fulfilled — not the full ordered amount.
- The roll-up PO carries only the unfulfilled remainder, so no items or costs are counted twice across the two POs.
If you need to audit a roll-up after the fact, go to the Activity tab on either PO. The log shows who initiated the roll-up, when it occurred, and which items moved to the new PO.
Identifying a rolled-up PO
Note: Rolled-up POs are marked with a dedicated icon next to the PO number on the listing page. Hover over the icon to see the parent PO number and select the link to open the parent PO in a new tab. This helps you trace the relationship between a rolled-up PO and its origin at a glance. The same indicator appears on the Vendor PO page and on associated Jobs and Quotes. For more details, see Understanding Purchase Order Status.

Exploring the Listing Page
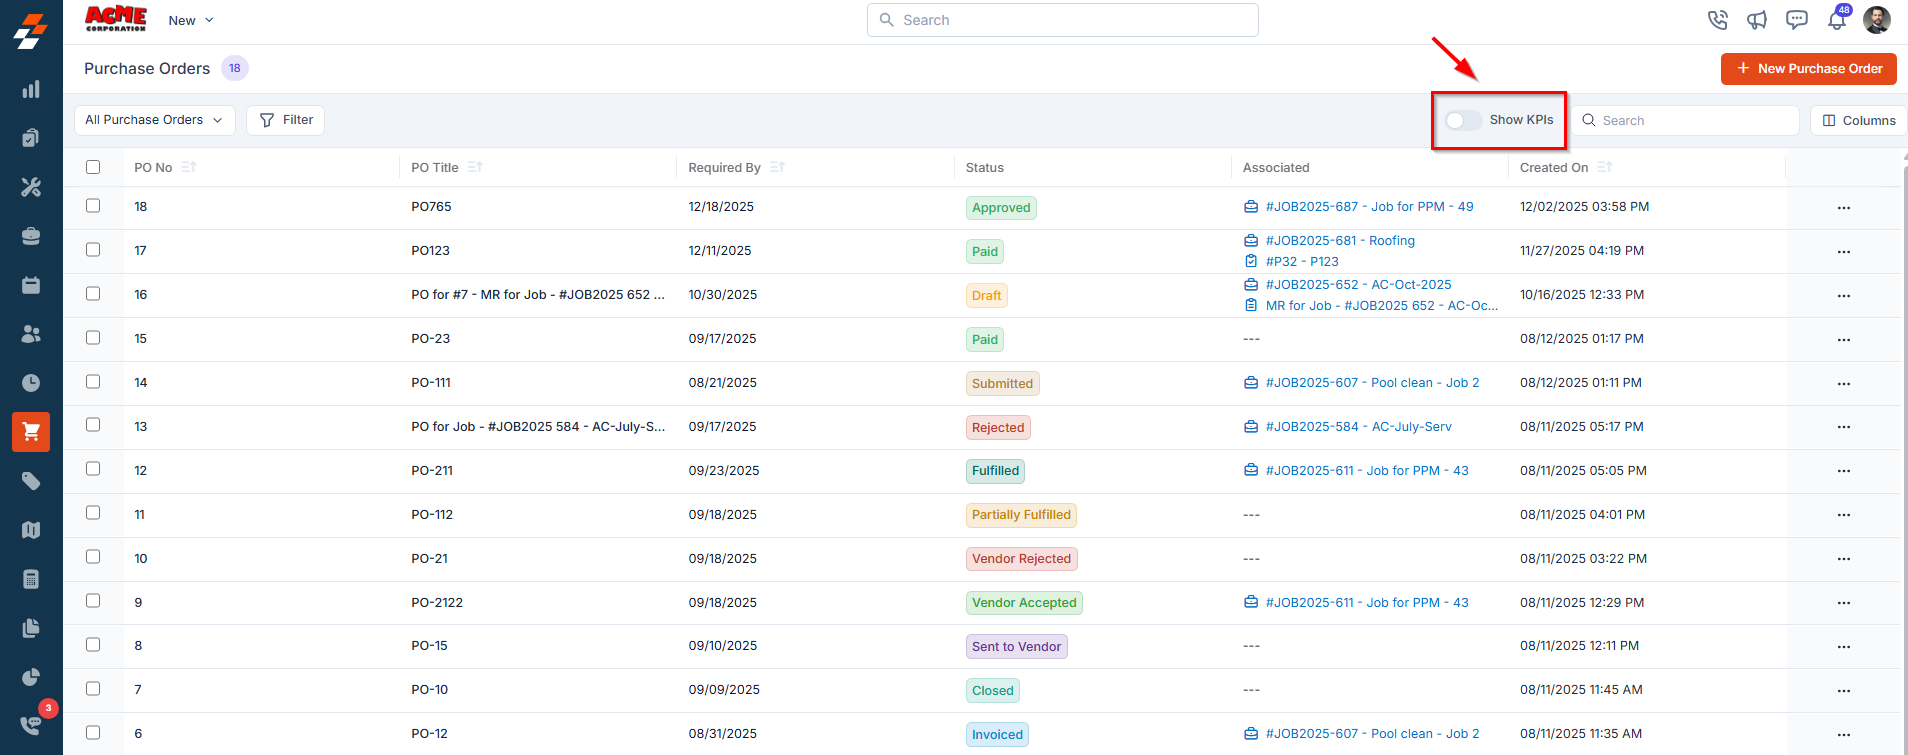
The listing page is designed to provide a structured view of purchase orders, making it easier to track and manage them efficiently.1. Summary Cards
Enable Show KPIs to display the summary cards at the top of the listing page. These cards provide a quick snapshot of your purchase order pipeline. The status cards are arranged in chronological order, following the PO workflow from Draft through to Fulfilled.Note: Each summary card includes:
- Total Amount – The combined value of all POs under that status.
- PO Count – The number displayed in the small badge indicates how many POs fall under that status.
- Total Purchase Orders – Displays the total value of all purchase orders, along with the total count of POs created.
- Submitted – Shows the total value and count of purchase orders that have been submitted for approval.
- Vendor Accepted – Indicates the value and count of purchase orders accepted by the vendor.
- Partially Fulfilled – Represents the value and count of purchase orders where only some items have been received, and others are pending.
- Fulfilled – Shows the value and count of purchase orders for which all items have been successfully received.
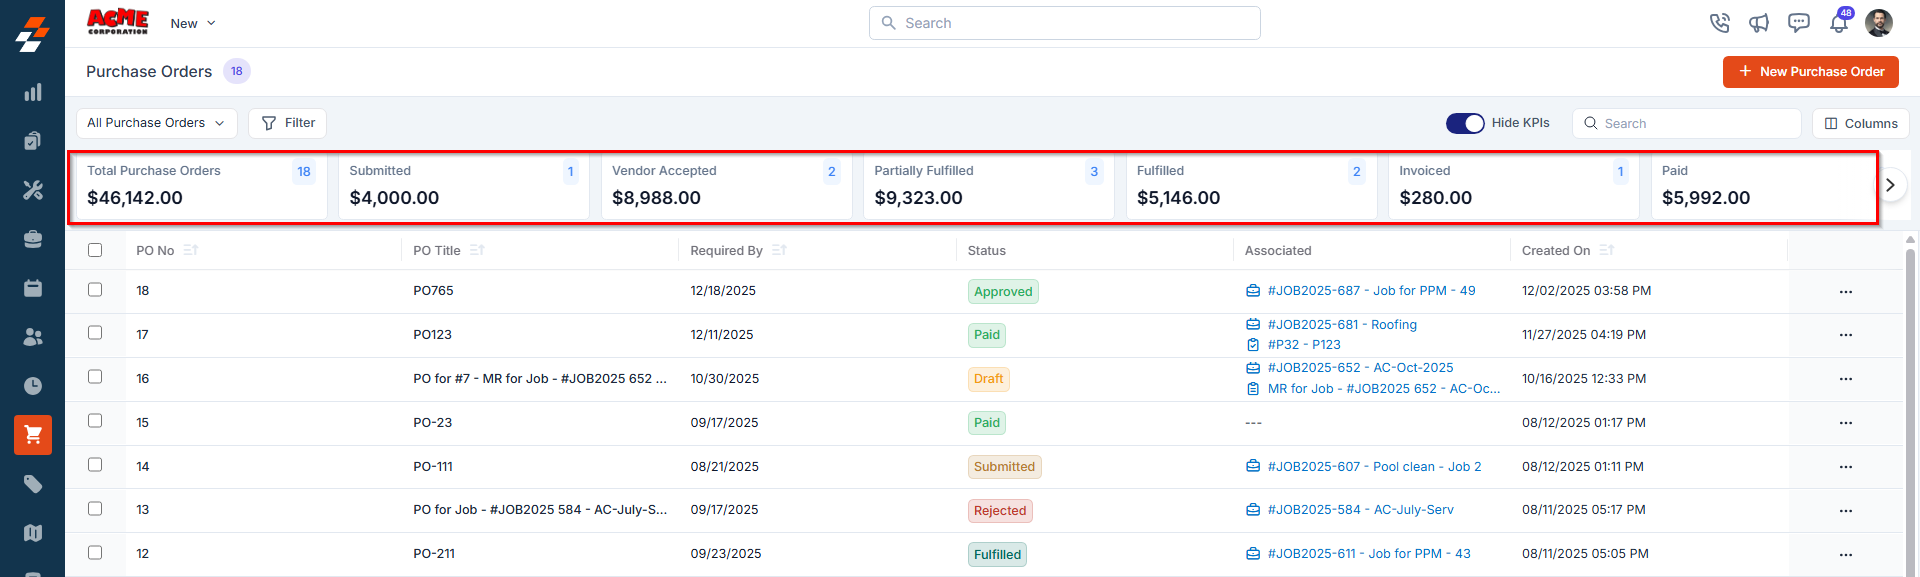
- Invoiced- Displays the value and count of purchase orders for which the vendor has issued an invoice, and it has been recorded in the system.
- Paid- Shows the value and count of purchase orders for which the vendor invoice has been fully paid.
- Rejected – Displays the total value and count of purchase orders that were declined during the internal approval process.
Note: The Vendor Accepted/Rejected KPI will be displayed only when an approval hierarchy is configured in settings. Also, clicking a summary card filters the list to show only purchase orders with that status.
2. Customization Options
Tailor the listing view to match your workflow:- Click the Columns button at the top-right corner of the screen to open a panel with Displayed Columns and Available Columns.
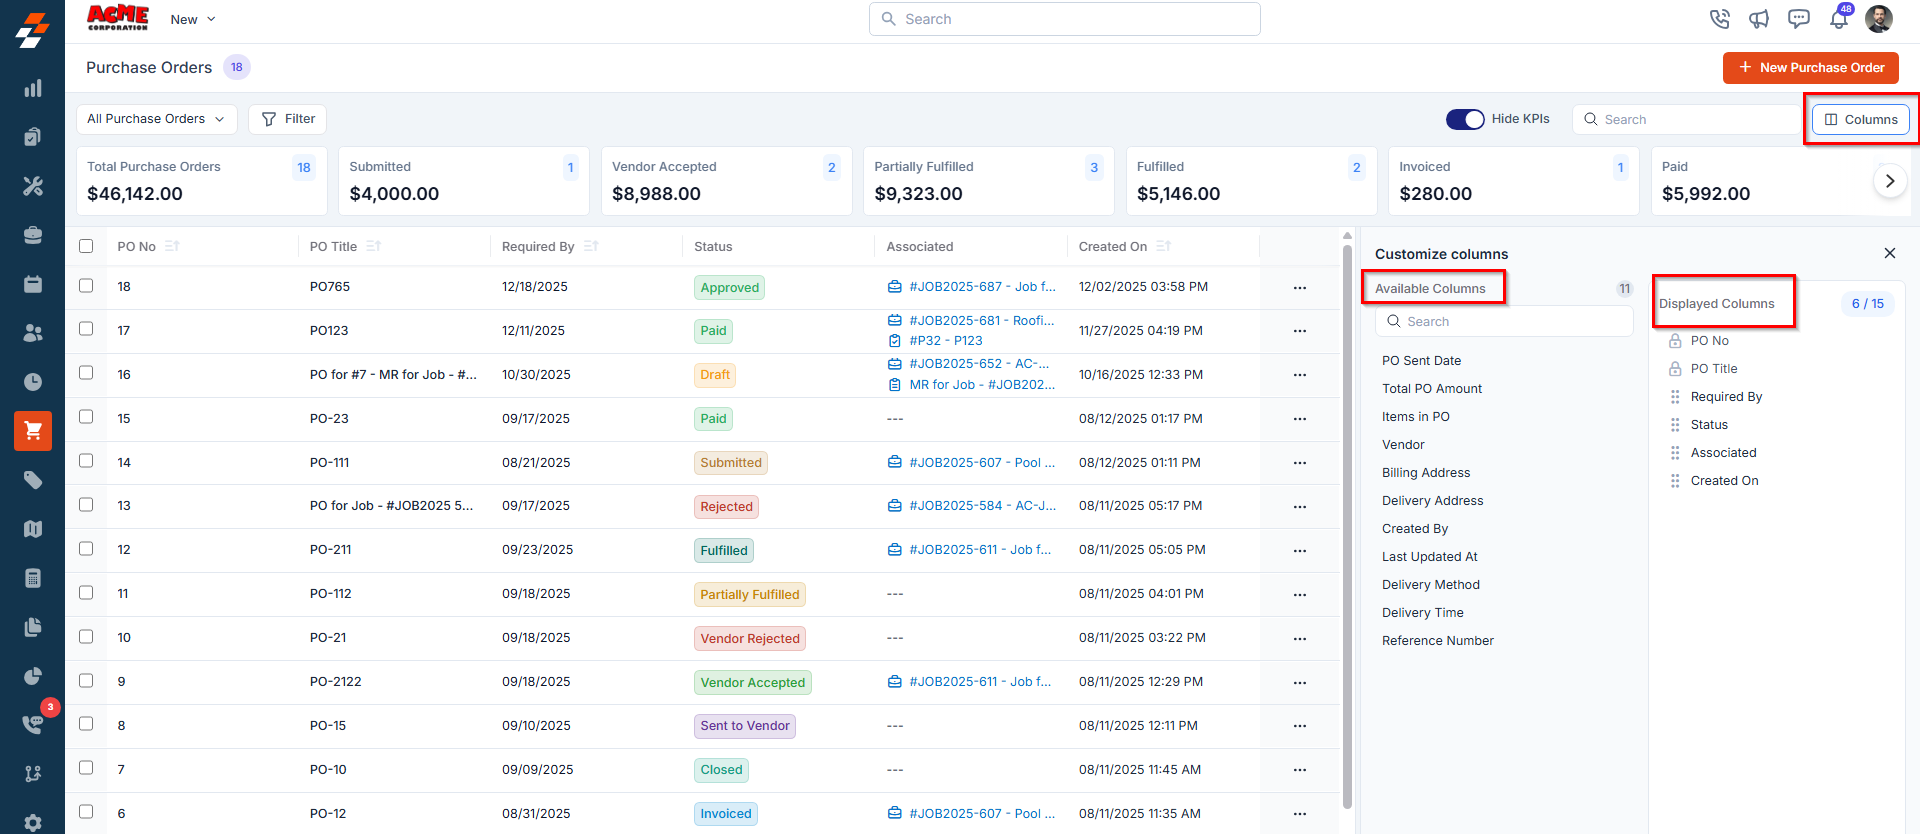
- Hover over any column under Available Columns to reveal the option to add it, or drag and drop it into the Displayed Columns section.
- Reorder fields by simply dragging and dropping columns within the Displayed Columns list.
3. Search & Filtering
Quickly locate specific purchase orders using search and filter tools:- Use the Search Bar to look up purchase orders by title or PO number.
- Apply filters to narrow down results based on:
- PO Status (e.g., Draft, Submitted, Approved)
- Vendor Name
- Associated Project, Job
- PO Title, and more.
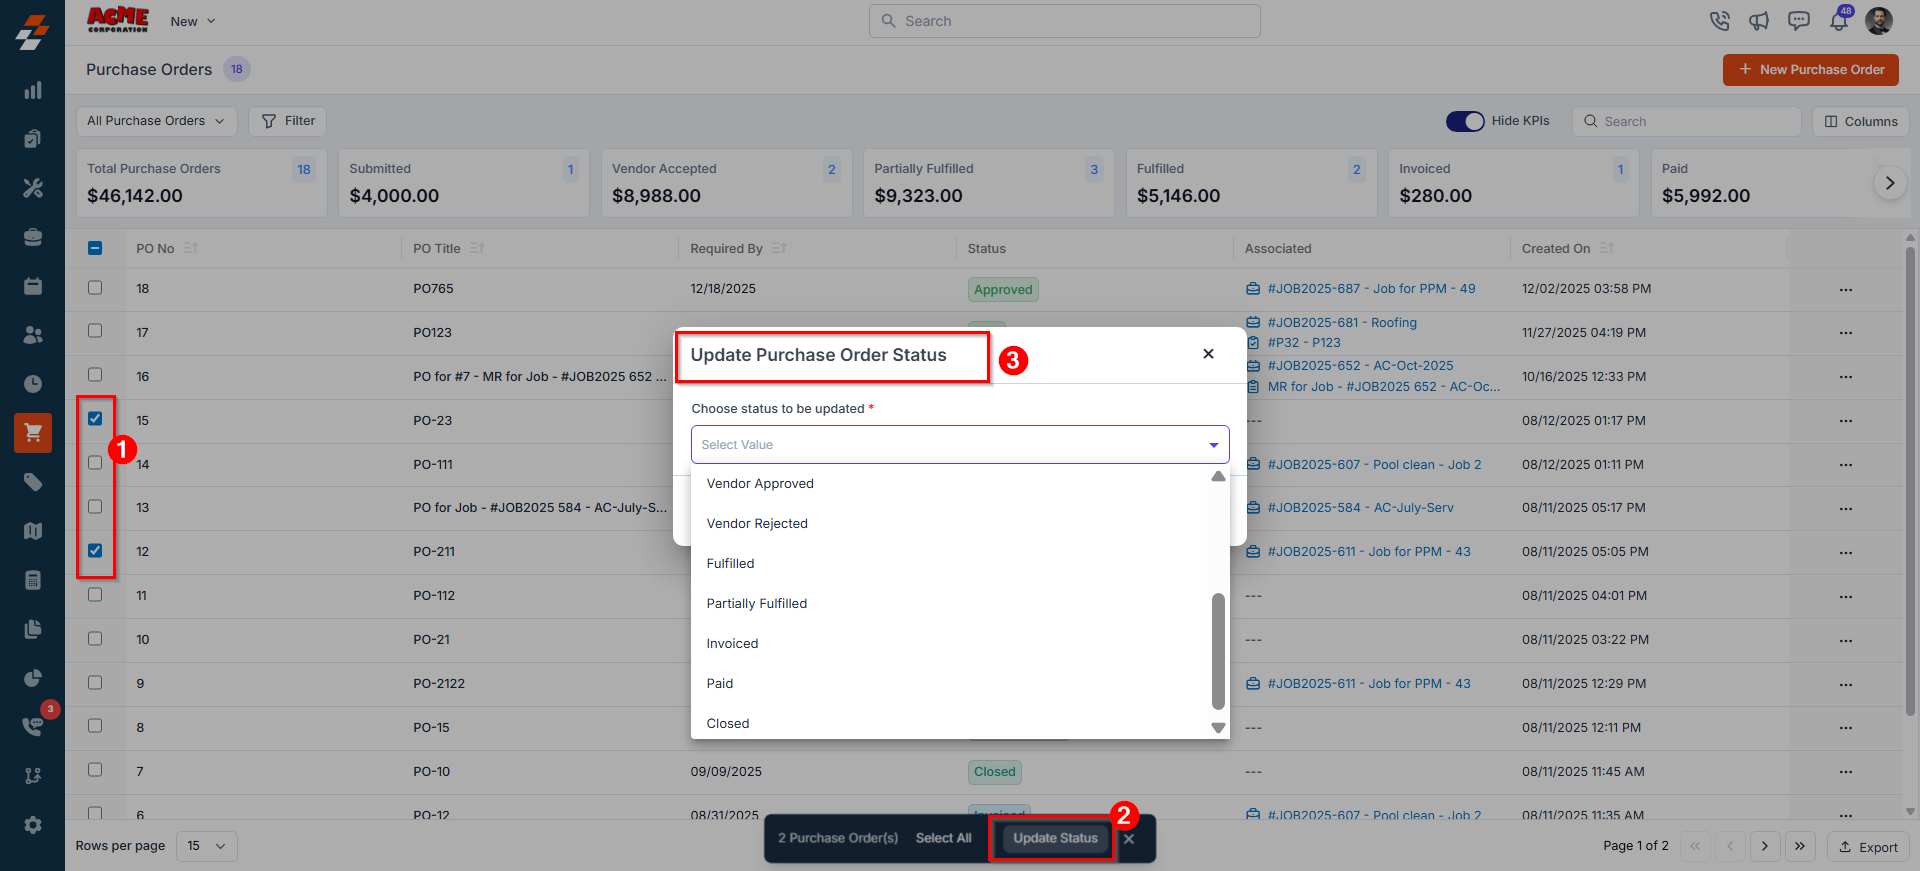
4. Bulk Actions
Easily manage multiple purchase orders in one go:- Select the checkboxes next to the purchase orders you want to update.
- Click “Update Status” to update the status of the selected purchase orders in bulk.
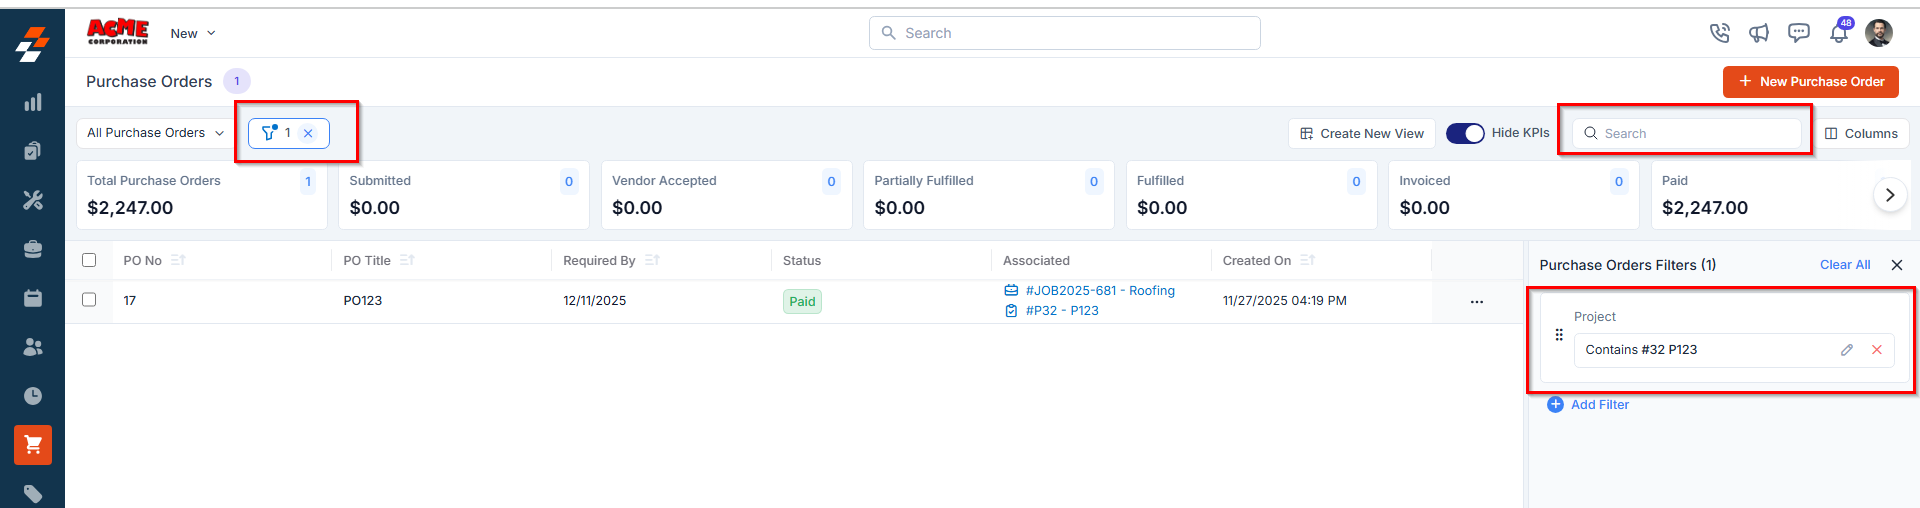
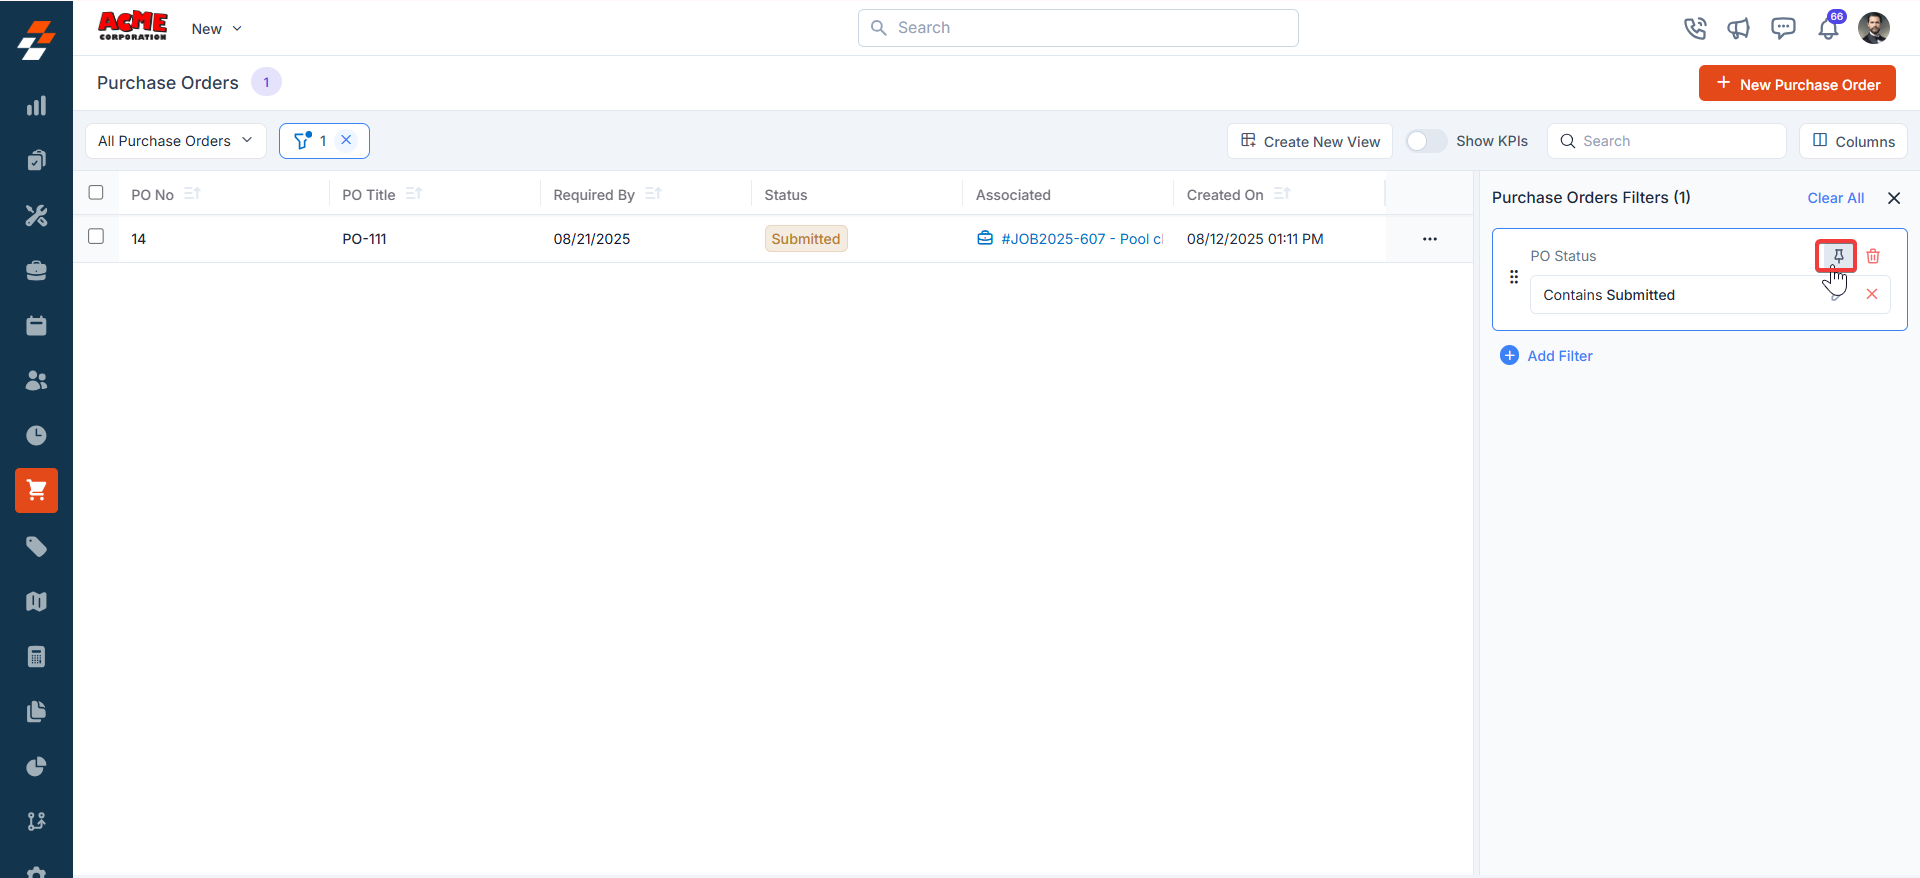
5. Pinned filters
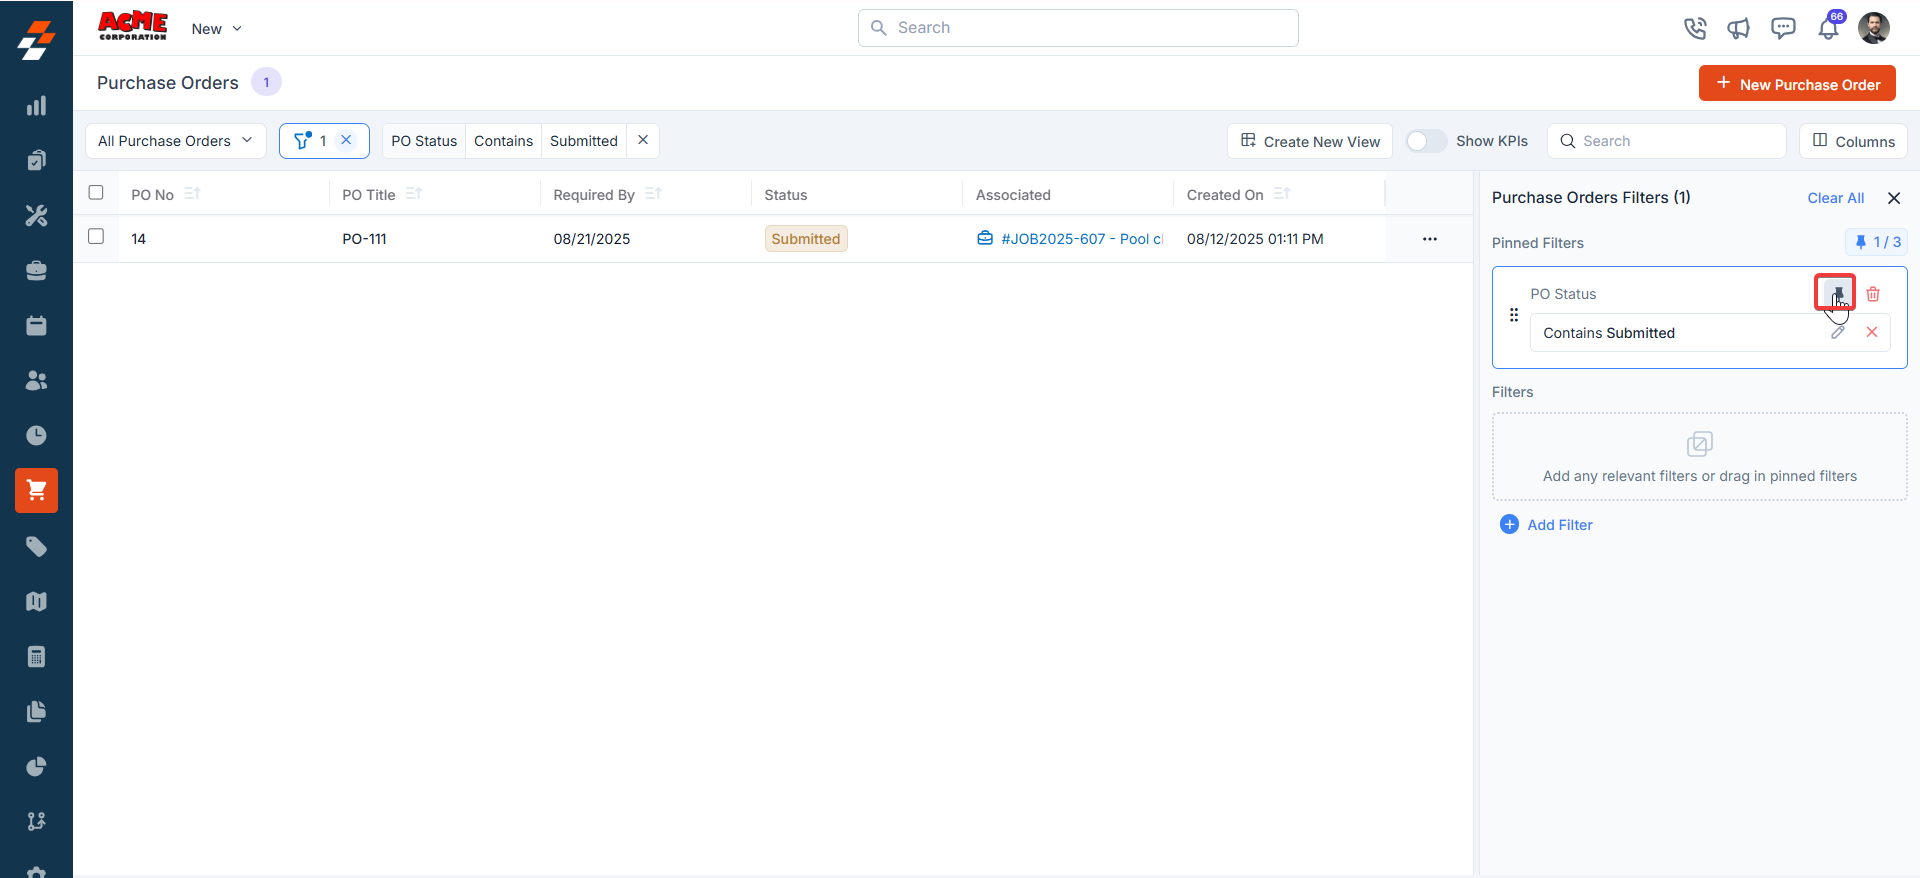
Zuper’s Purchase Orders module lets you use pinned filters to streamline your filter experience. Pinned filters keep your most-used criteria readily accessible for quick application. Pin up to 3 filters in any module.Navigation: Purchase Orders -> Filters -> Pinned Filter
- Select the “Purchase Orders” module from the left navigation menu.
- Pin Filters for Quick Access
- Once your filters are set, click the Pin Filters button in the dialog box to save them as pinned.
- Pinned filters appear in the dialog box’s “Pinned Filters” section, allowing you to apply them with one click in future sessions.
- To Unpin the filter:
- To unpin, select a pinned filter and click Remove.
- To apply pinned or default filters, open the dialog box and select them.
- Use Clear All to remove active filters.
6. Notes quick action
You can add or view notes on a purchase order directly from the listing page — without opening the full PO record. This saves time when you need to leave a quick update or check a note while reviewing multiple POs. The same quick action is available from the: • Purchase Orders listing page • Vendor listing page • Material Requests listing page7. Creating a new Purchase Order
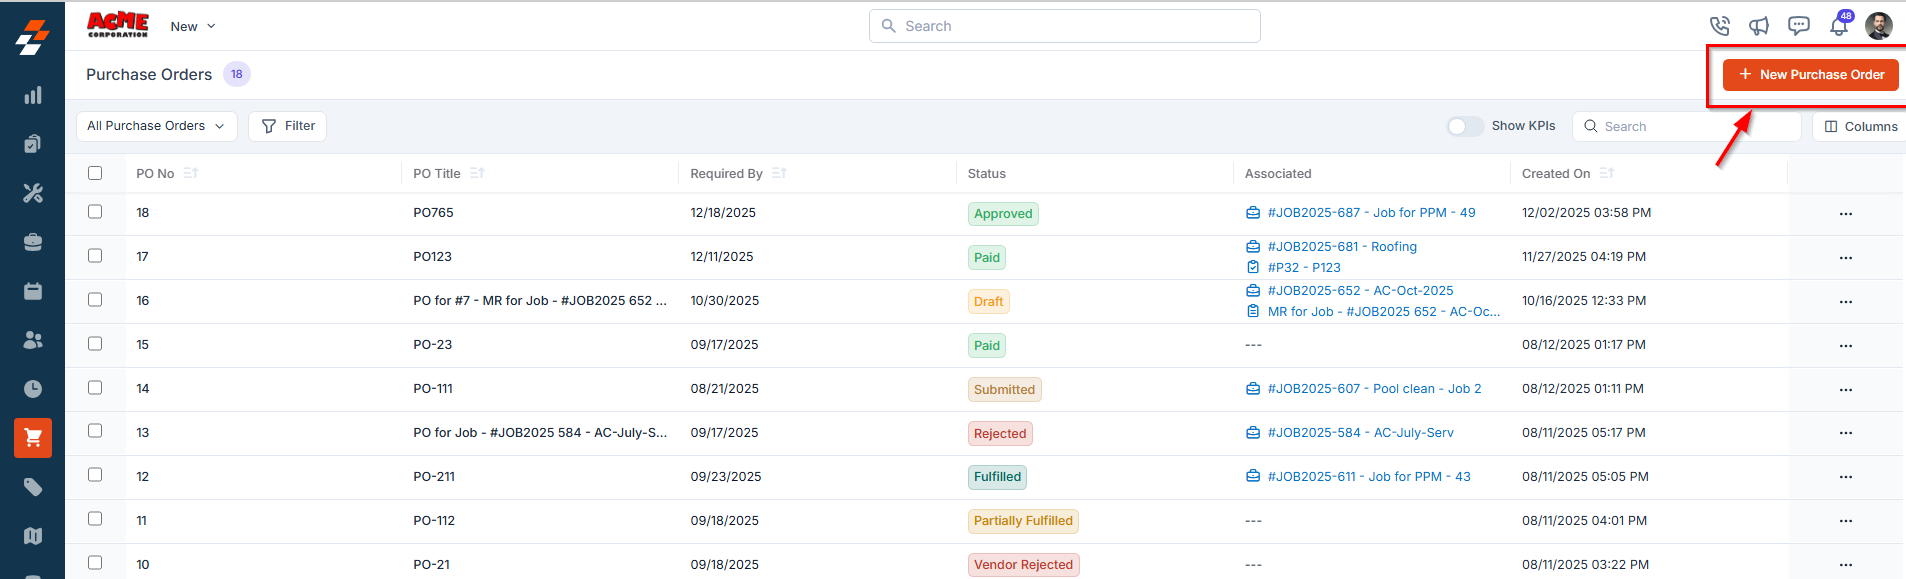
To create a new purchase order from the listing page:- Click the + New Purchase Order button in the top-right corner.
8. Customize Your View
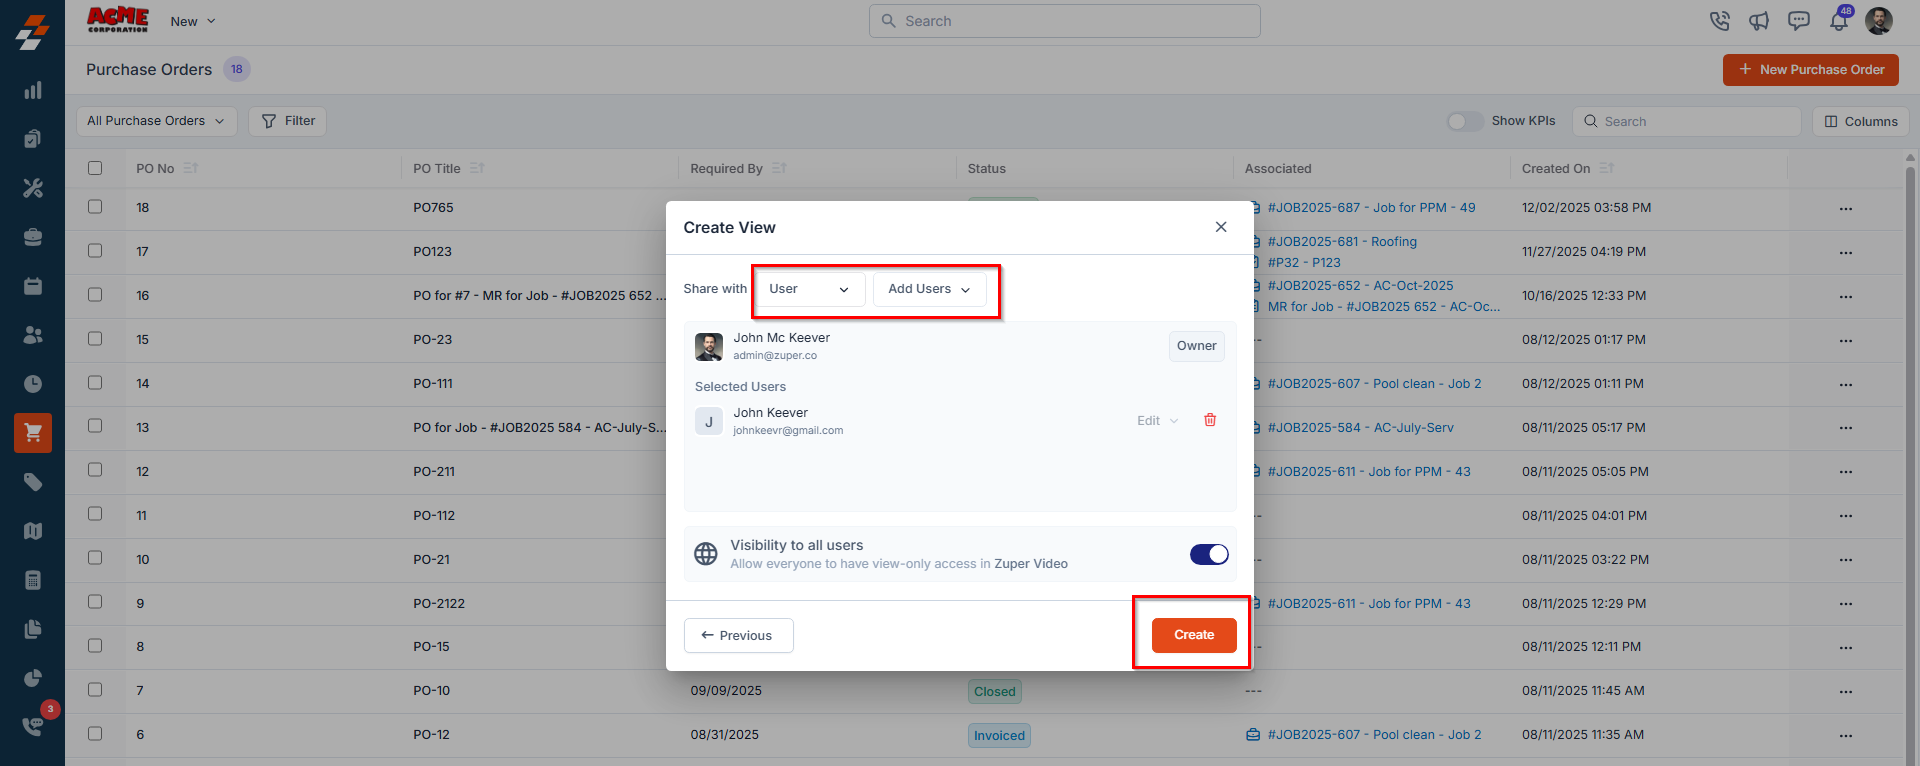
You can further refine how your purchase orders are displayed:- Create and save personalized views based on your preferences.
- Set view-specific permissions to ensure the right team members have appropriate access.
Managing Purchase Order Details
Once a purchase order is created, the Purchase Order Details Page serves as the central hub for tracking and managing all aspects of the purchase order. The page features a three-column layout, providing quick access to relevant information and actions within each panel.- Click on any purchase order from the listing page to open its details page.
Left Panel
The left panel displays key purchase order information—such as the PO title, vendor name, and current status—along with quick action buttons for calling, emailing, or adding notes. It also provides easy navigation to view PO details, items, notes, and activity history.Call
Call
Click the Call icon to view the vendor’s contact number and initiate a phone call (available only if contact details are provided).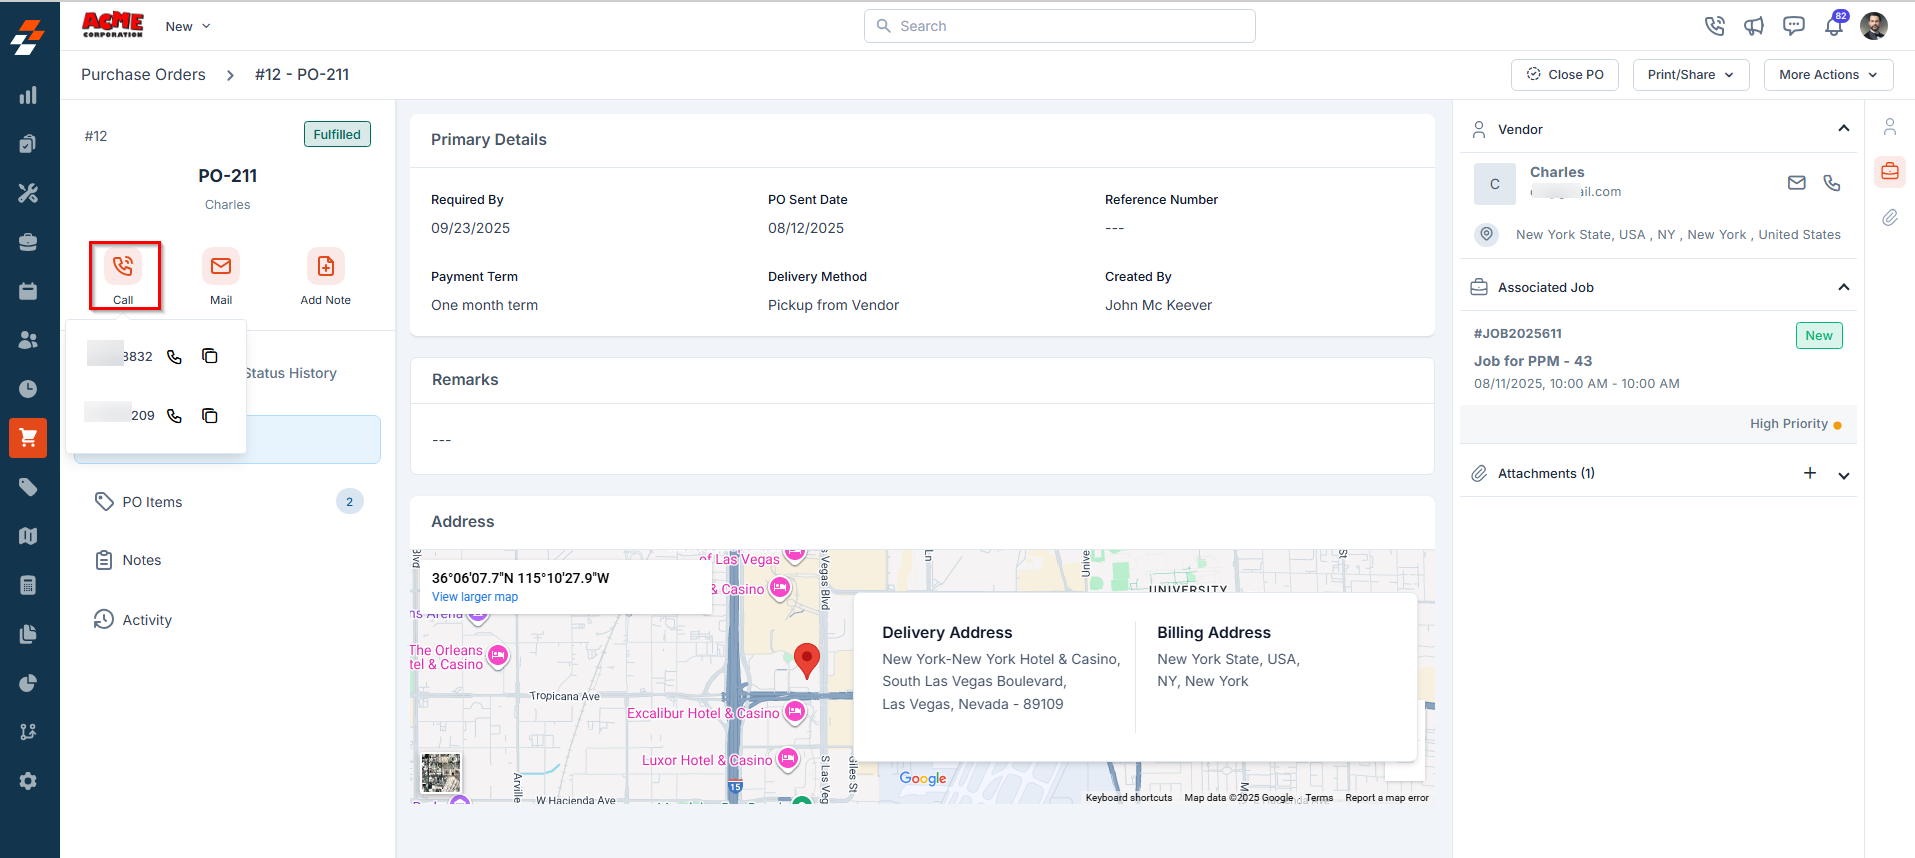
Mail
Click the Mail icon to view the vendor’s email address and send them an email regarding the purchase order.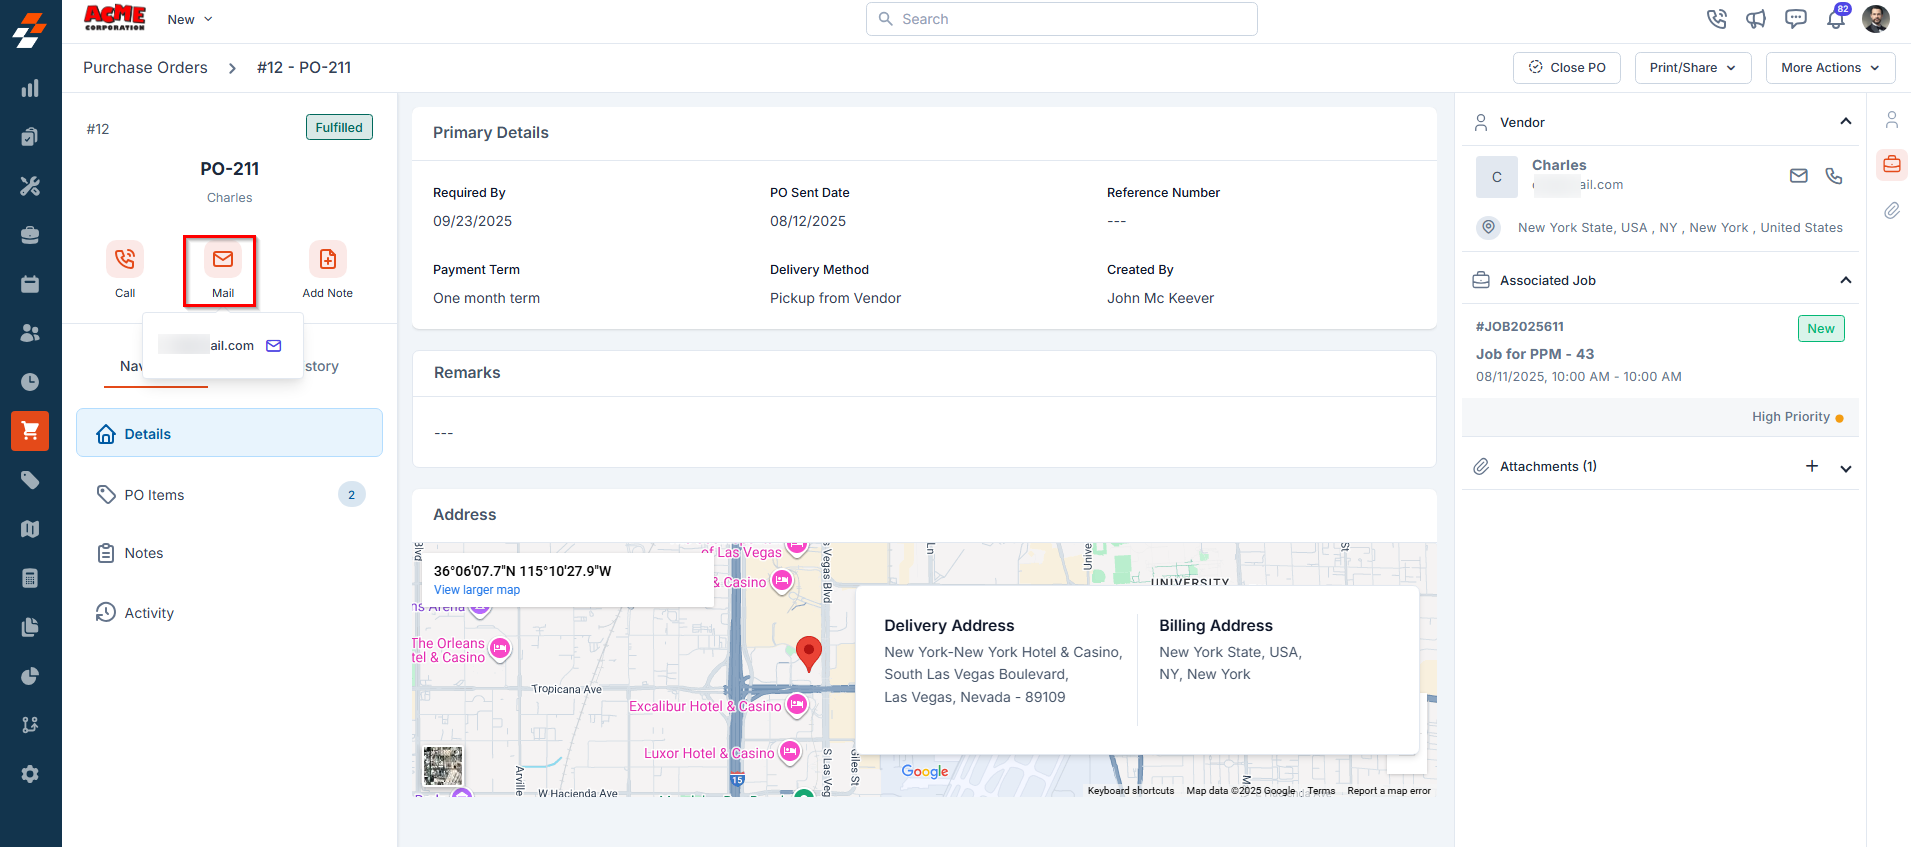
Add Note
Add Note
Click “Add Note” to add comments or additional information to a purchase order throughout its lifecycle. Notes can provide extra context and may include anything from a simple text reminder to an image of parts/products, or even a video or document.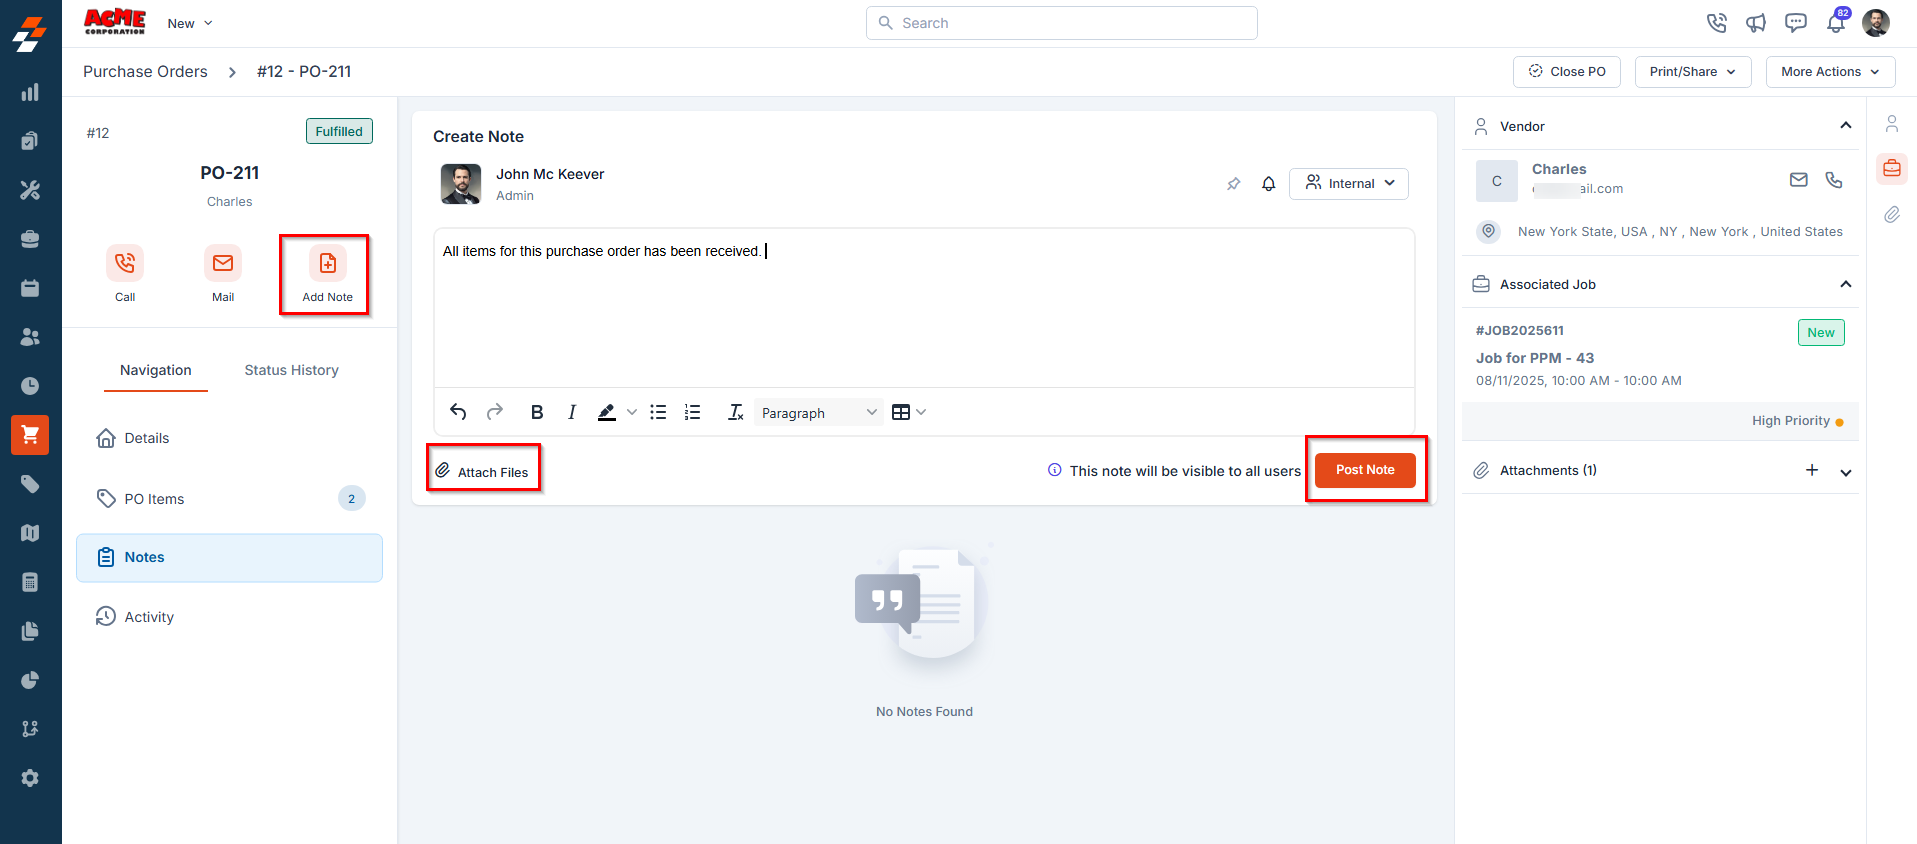
For more information on how to use the notes feature, refer Notes and chats article.
For more information on how to use the notes feature, refer Notes and chats article.
Details
Details
The purchase order details section provides an overview of the purchase order, including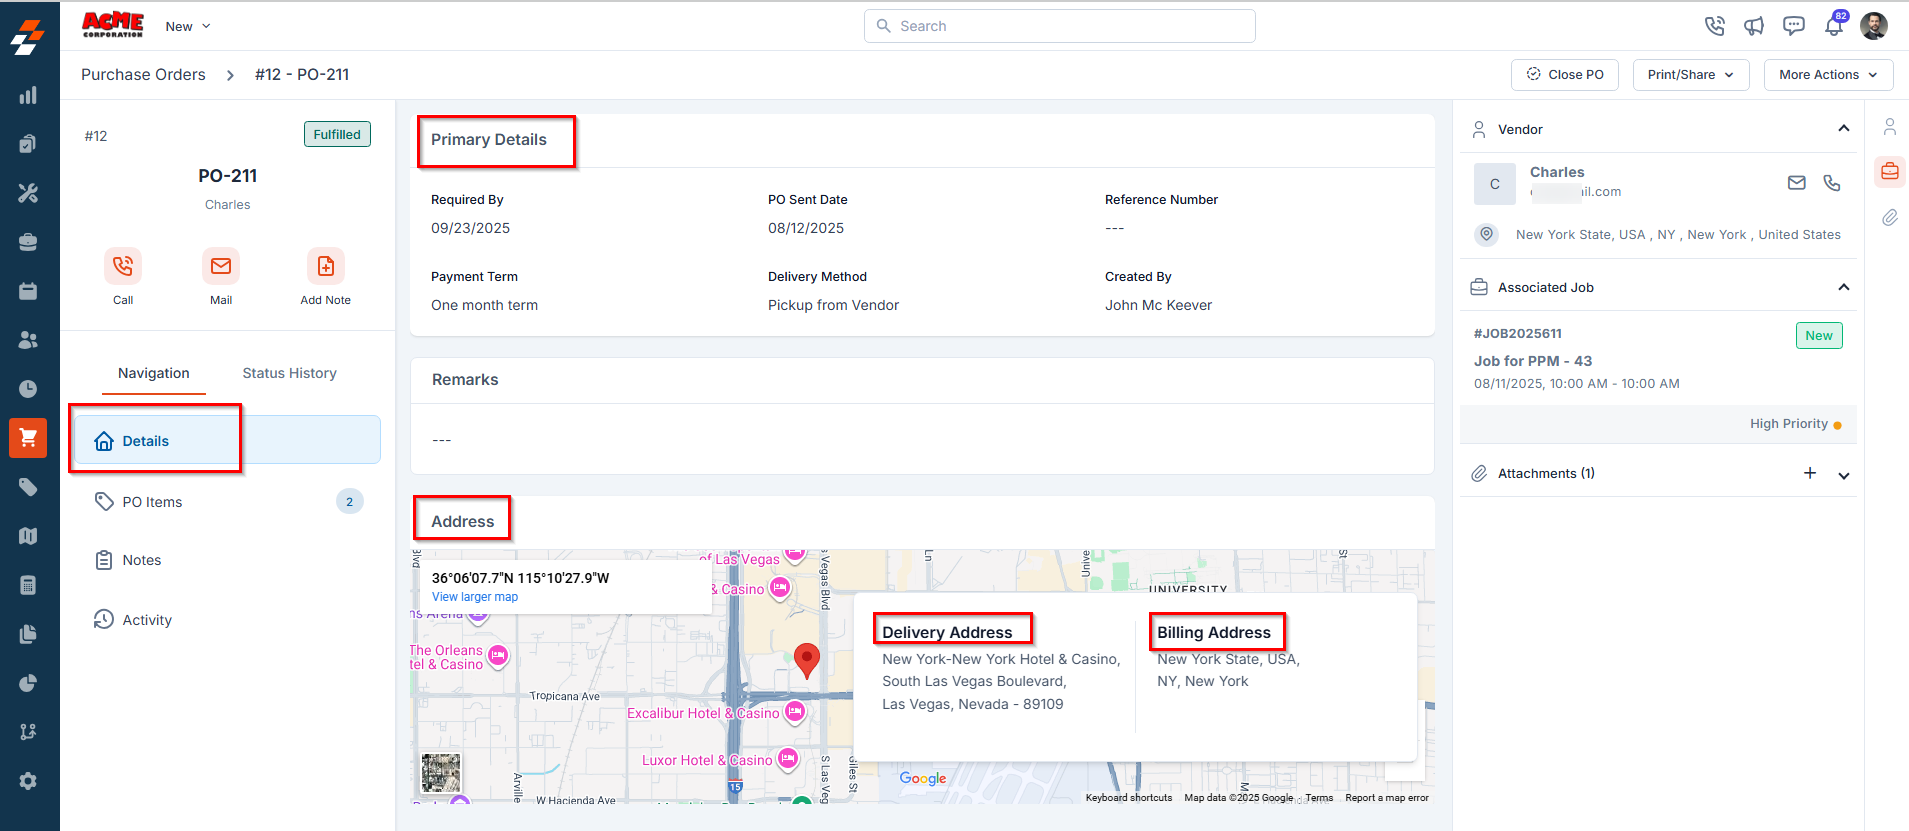
| Details | Description |
|---|---|
| Required By | The date on which the order needs to be fulfilled. |
| PO sent date | The date on which the purchase order was officially sent to the vendor. |
| Reference No. | An internal or external reference ID used for tracking or cross-referencing purposes. |
| Payment Term | Indicates the agreed-upon payment terms between your organization and the vendor |
| Delivery Method | Specifies how the goods will be delivered by the vendor. (e.g., Direct shipment to Job’s site, Deliver to Warehouse, pickup from vendor). |
| Created By | Displays the name of the user who created the purchase order. |
| Remarks | Additional comments or notes entered while creating the PO, offering further context. |
| Vendor Address | Displays two key address types associated with the purchase order: • Billing Address: Automatically populated with the vendor’s registered billing address from their profile. This is where invoices and payment-related documents are directed. • Delivery Address: Determined by the selected delivery method: o If Direct shipment to Job’s site is chosen, the delivery address will be the job’s service location. o If Pickup from Vendor is selected, the vendor’s pickup address will be shown. o If Deliver to Warehouse is selected, your organization’s default warehouse address will be used. |
PO items
PO items
This section displays the requested items in a clear, tabular format, making it easy to review and verify purchase order details. Each row contains the following information: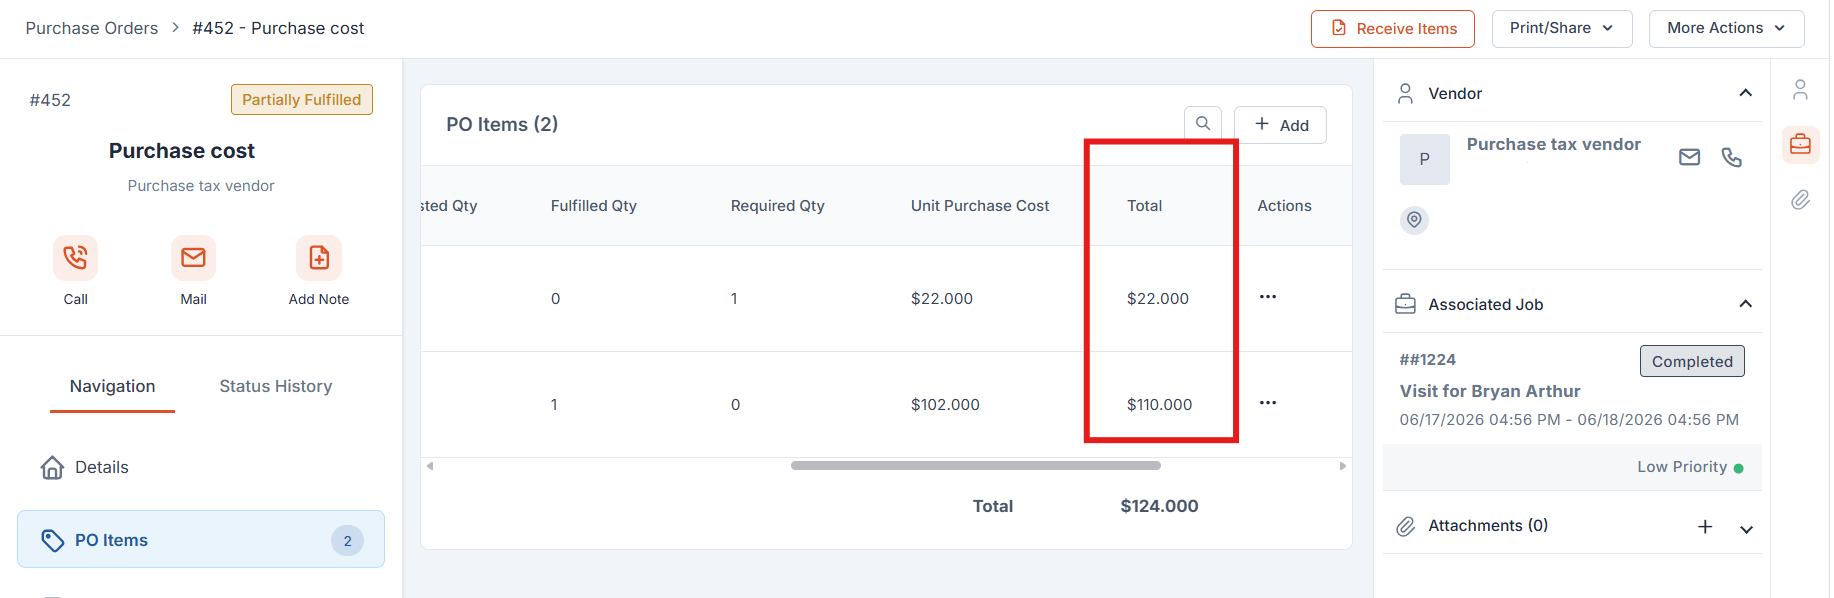
- Item shows the name of the part or product to be purchased.
- Vendor SKU/ID shows the unique identifier or stock-keeping unit assigned to the item by the vendor.
- Requested Quantity shows the total number of items initially requested.
- Fulfilled Quantity shows the number of items that have already been supplied or delivered.
- Required Quantity shows the remaining number of items that still need to be purchased. This field is not available when the status is Fulfilled.
- Unit Purchase Cost shows the price per unit charged by the vendor.
- Total shows the line item total, calculated as Required Quantity × Unit Purchase Cost. This column appears across all PO statuses, from Draft through Paid.
- Remarks shows any specific notes, instructions, or clarifications related to the individual line item.
Note: The Total column shows the calculated amount for each line item. The overall PO total shown at the bottom of the table is the sum of all line item totals, ensuring transparency, accuracy in vendor billing, and better internal budgeting control.
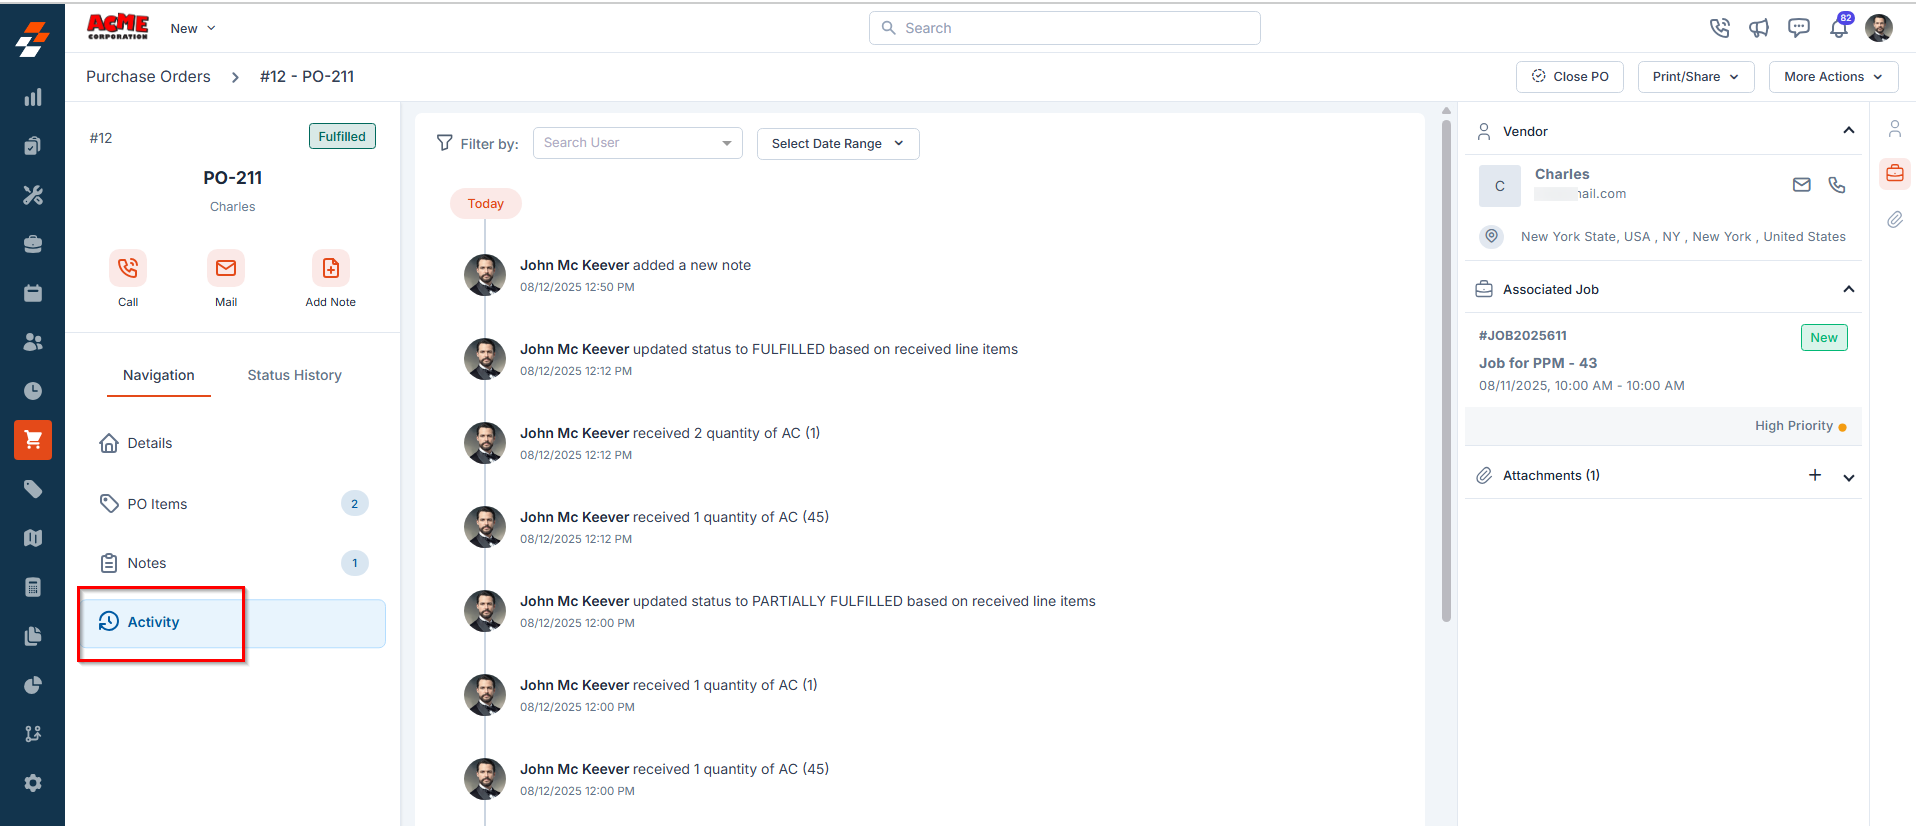
Activity
Activity
This section captures the log of all activities performed on the purchase order, such as:
- Notes added
- Status changes
- Attachments uploaded
-
Comments or approvals
Status history
Status history
Displays the complete status lifecycle of the purchase order in chronological order, helping you view each status update along with the timestamp and the user who made the change.This helps in tracking the PO’s progress from creation to fulfillment.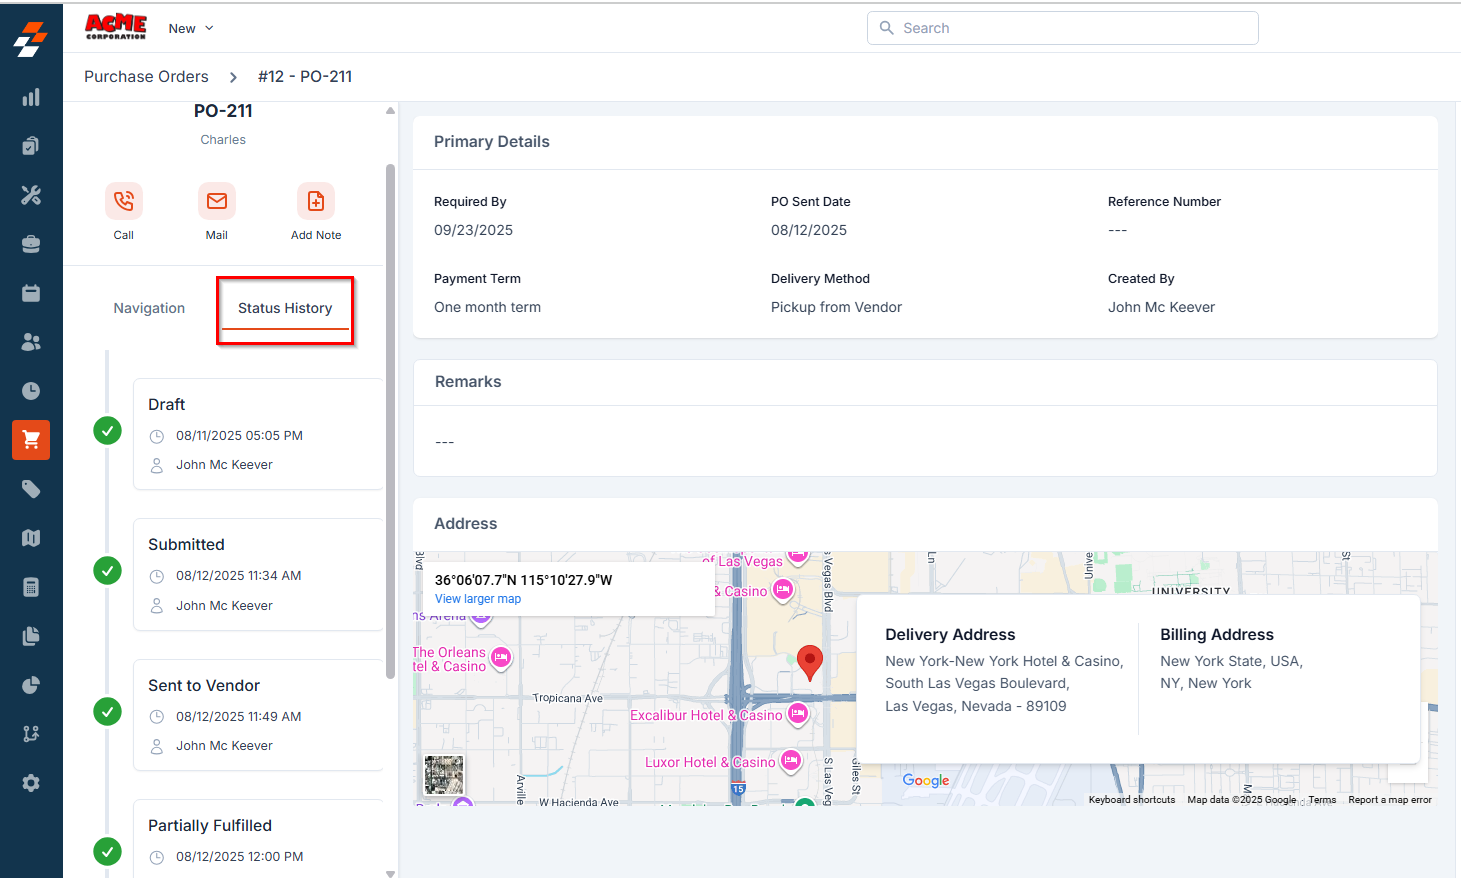
Every time you send a PO to a vendor in PDF or XLS format, Zuper saves a copy of the document in the PO’s Status History section. This gives you a permanent record of exactly what was shared with the vendor and when. What you can do from document history• View the document inline.• Open it in a new browser tab.• Download it directly to your device.
Note: For a detailed explanation of the statuses a PO goes through, refer to the Purchase Order Status article.
| Scenario | What is saved |
|---|---|
| You manually send the PO as separate attachments in PDF and XLS formats, or as either a PDF or an XLS file. | The attachment is saved in document history |
| Auto-send is enabled in your settings | Documents are captured as PDF automatically on each auto send |
| You send only a hyperlink (no attachment) | A PDF is still generated and saved so you can verify what was shared |
| You clone a PO | The cloned PO starts with a fresh document history — previous sends are not carried over |
Right Panel
The Right Panel provides additional contextual information and quick-access links related to the selected Purchase Order (PO). This panel enhances visibility and traceability by consolidating related data in one place.Vendor Details
Vendor Details
Displays key information about the vendor, including:
- Vendor name
- Contact information (if available)
-
Address
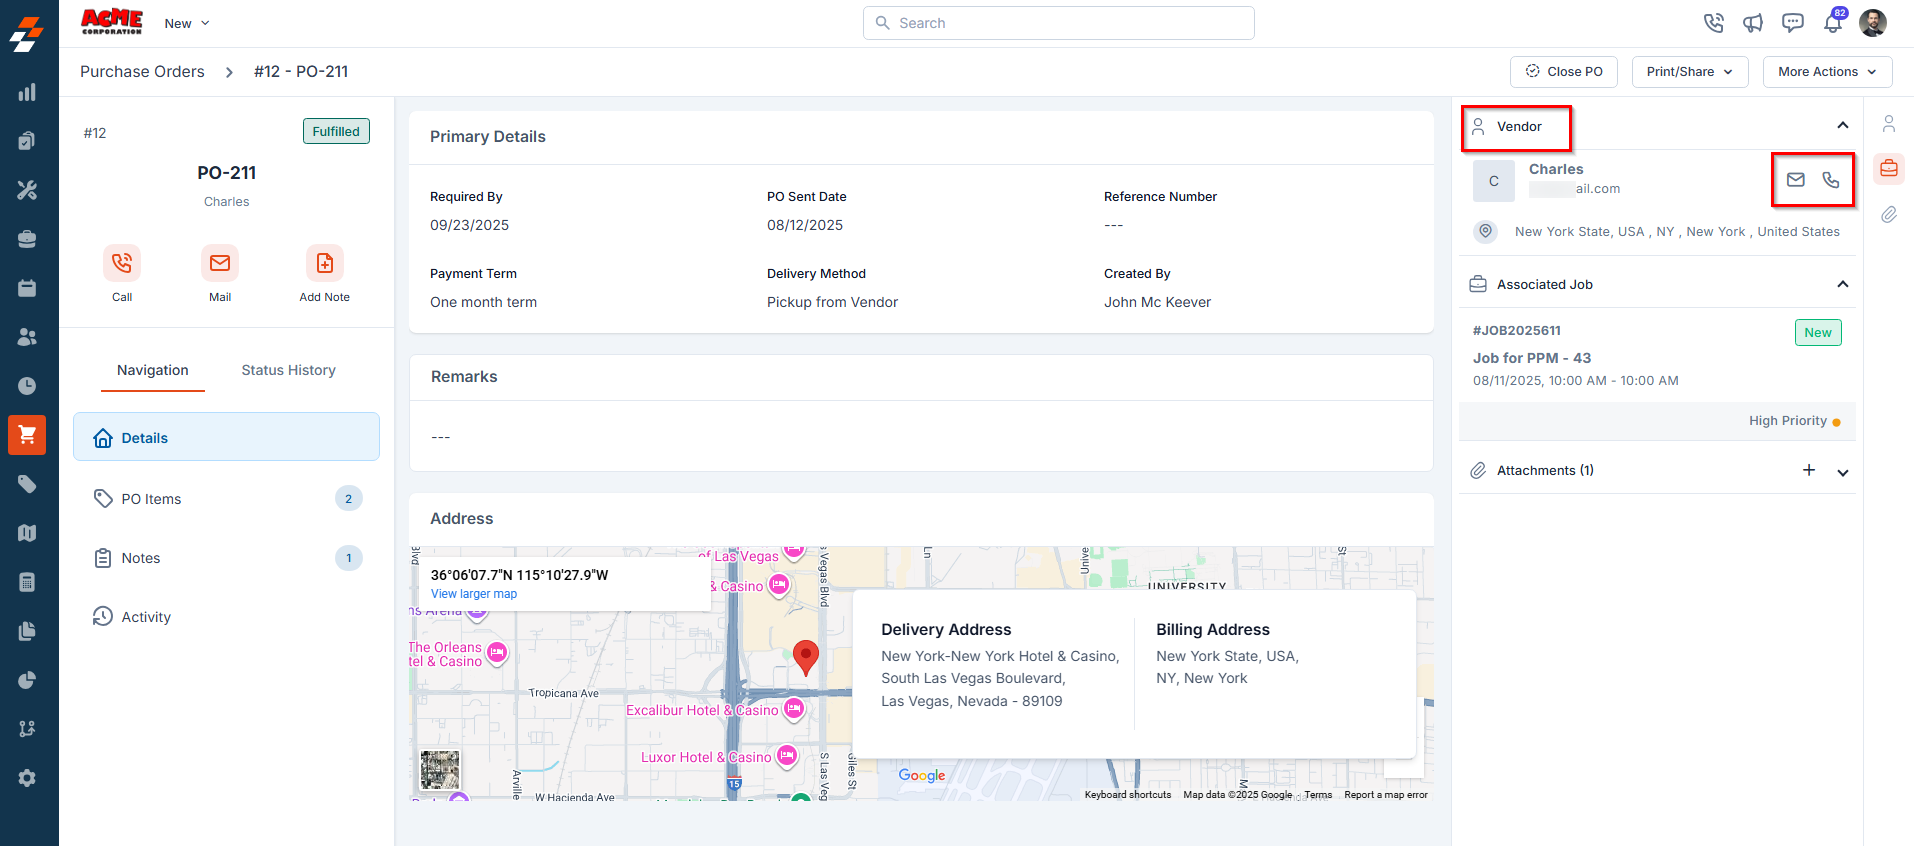
Associated Job/Quote
Associated Job/Quote
This section displays any job or quote associated with the current purchase order. It allows quick navigation to the corresponding Job or Quote details, offering clear visibility into which job or customer quote the PO supports.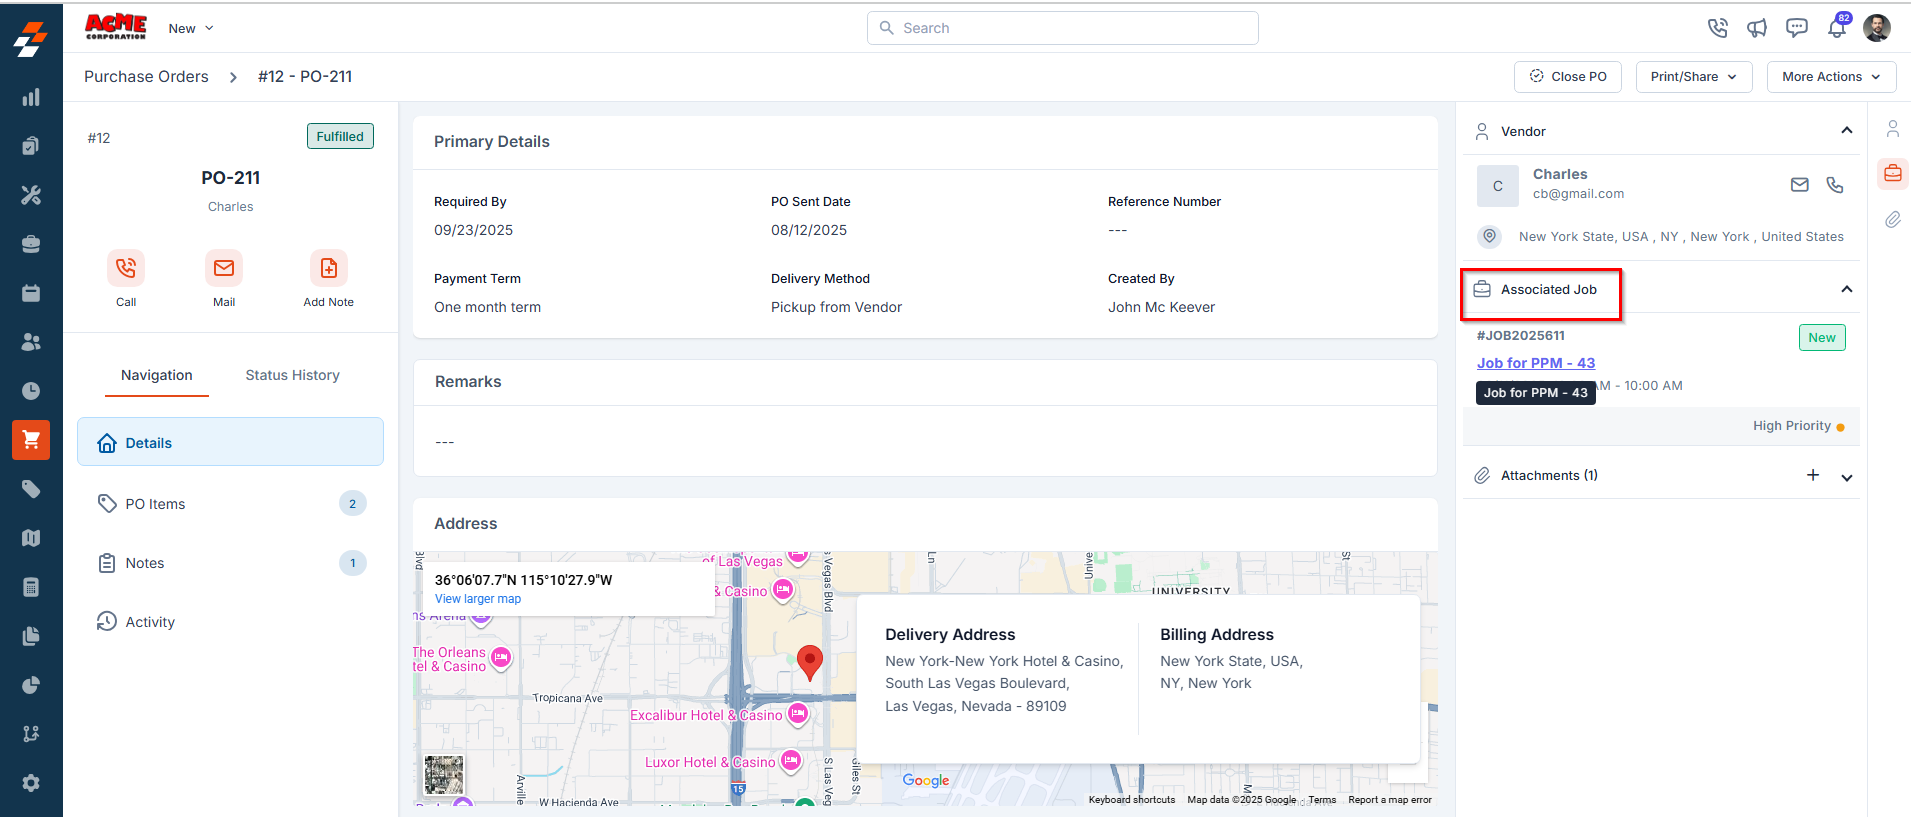
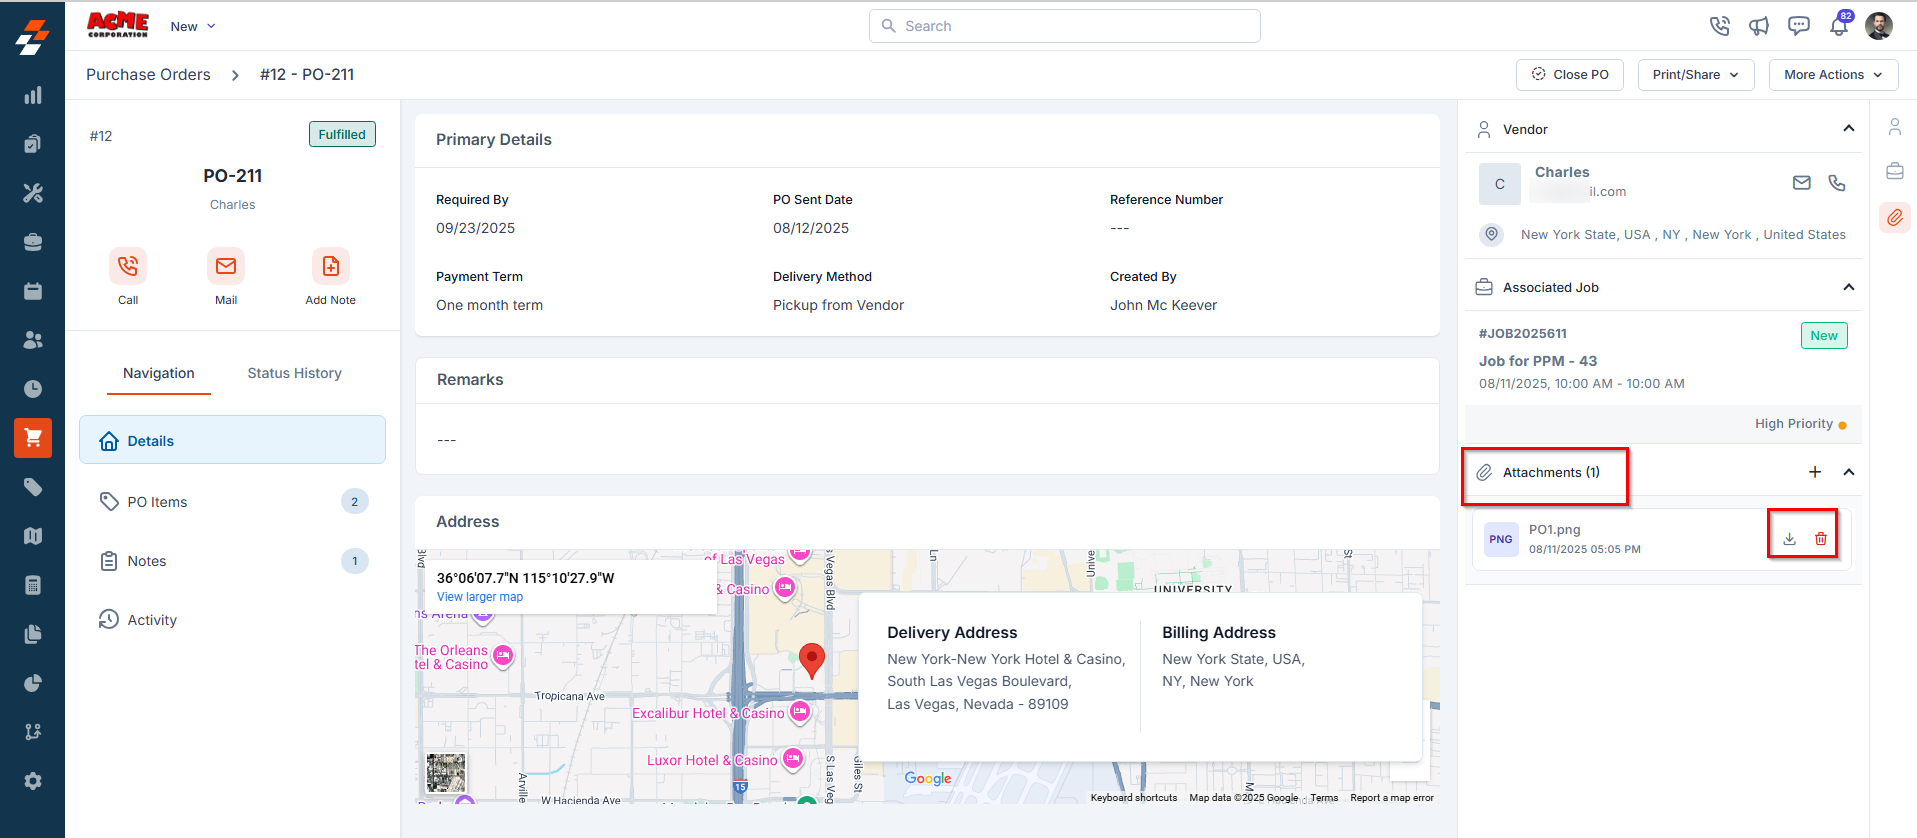
Attachments
Attachments
This section allows you to upload and manage documents related to the purchase order. It displays all files added, such as:
- Vendor quotes
- Product images
- Delivery slips
-
Invoices or other supporting documents
More Actions
More Actions
- Modify Status - You can modify the existing PO status.
- Edit PO - Modify the purchase order. You can edit the purchase order for the following statuses: Draft, Submitted, Approved, Sent to Vendor, Vendor Accepted, Vendor Rejected, Partially Fulfilled, and Fulfilled.
Note: If a PO is edited while in the Vendor Accepted state, the new PDF sent to the vendor is recorded as a new version in the Status History section.
- Clone PO - Make a new copy of your existing PO.
- Cancel PO - Cancel your current PO.
- Delete PO - Delete your current PO.

| Status | Edit PO? | Other key actions under More Actions |
|---|---|---|
| Draft | ✓ Yes | Clone, Cancel, Delete |
| Submitted | ✓ Yes | Send to Vendor, Clone, Cancel, Delete |
| Approved | ✓ Yes | Clone, Cancel, Delete |
| Sent to Vendor | ✓ Yes | Clone, Cancel, Delete |
| Vendor Accepted | ✓ Yes | Clone, Cancel, Delete |
| Vendor Rejected | ✓ Yes | Clone, Cancel, Delete |
| Partially Fulfilled | ✓ Yes | Clone, Roll-up as New PO, Delete |
| Fulfilled | ✓ Yes | Clone, Close PO, Delete |
| Invoiced | ✗ No | Clone, Close PO, Delete |
| Paid | ✗ No | Clone, Delete PO |
| Closed PO | ✗ No | Clone, Delete |
- Select the “Purchase Orders” module from the left navigation menu.
- Pin Filters for Quick Access
- Once your filters are set, click the Pin Filters button in the dialog box to save them as pinned.
- Pinned filters appear in the dialog box’s “Pinned Filters” section, allowing you to apply them with one click in future sessions.
- To Unpin the filter:
- To unpin, select a pinned filter and click Remove.
- To apply pinned or default filters, open the dialog box and select them.
- Use Clear All to remove active filters.