Zuper - QuickBooks Online integration plans
- Simple Start (US/Global) and Essentials (US) Plans: Most integration features are available.
- Features Requiring Higher Plans:
- Inventory Sync (bi-directional): Requires Plus or Advanced plan.
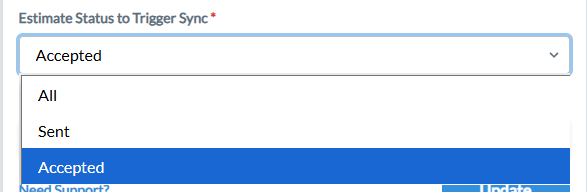
- Class Tracking: Requires Plus or Advanced plan.
- Multicurrency Support: Requires Essentials or higher (Essentials, Plus, or Advanced).
- Custom Fields:
- Depending on the plan, the number of custom fields that can be added to a transaction or synced from Zuper may vary.
Before you get started
- You must have an active account with QuickBooks Online.
- You cannot connect multiple QuickBooks Online organizations to your Zuper account and vice versa.
- Ensure that the base currency of both these organizations is the same.
- Ensure that the Zuper account used for API key generation and the one used for syncing invoices with QuickBooks Online are separate.
Set up QuickBooks Online integration with Zuper
Integrating Zuper with QuickBooks Online is a simple and streamlined process.- Log in to your Zuper account. Navigate to the App Store on the sidebar.
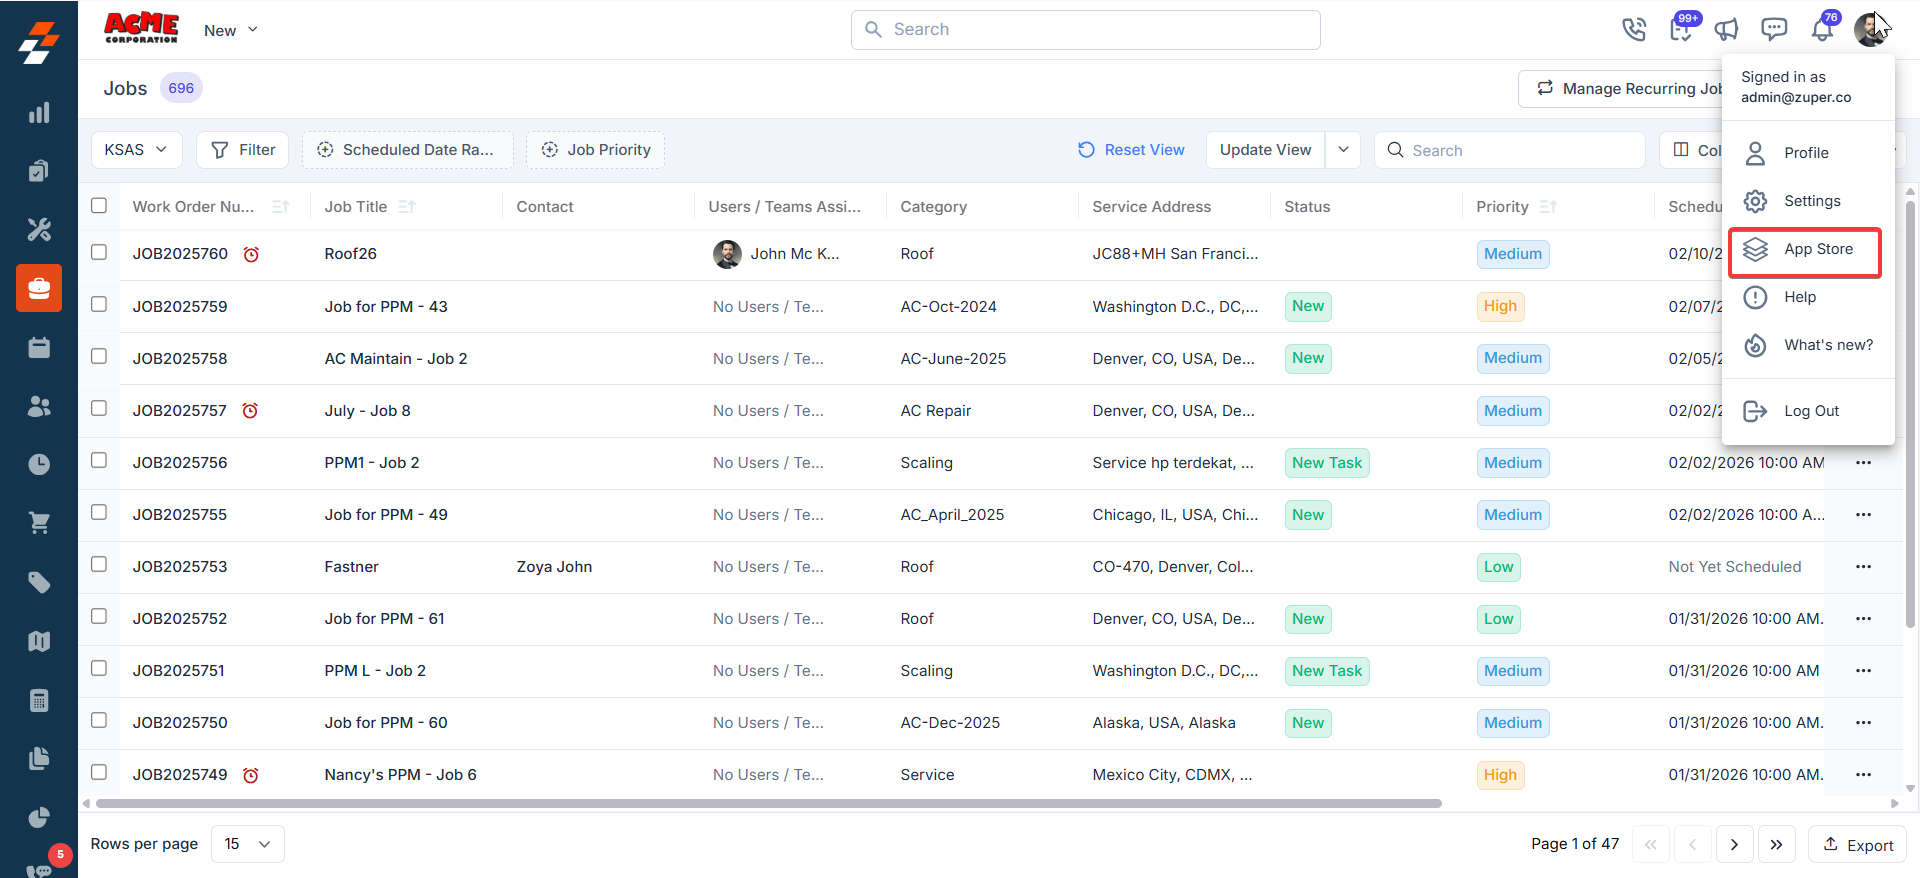
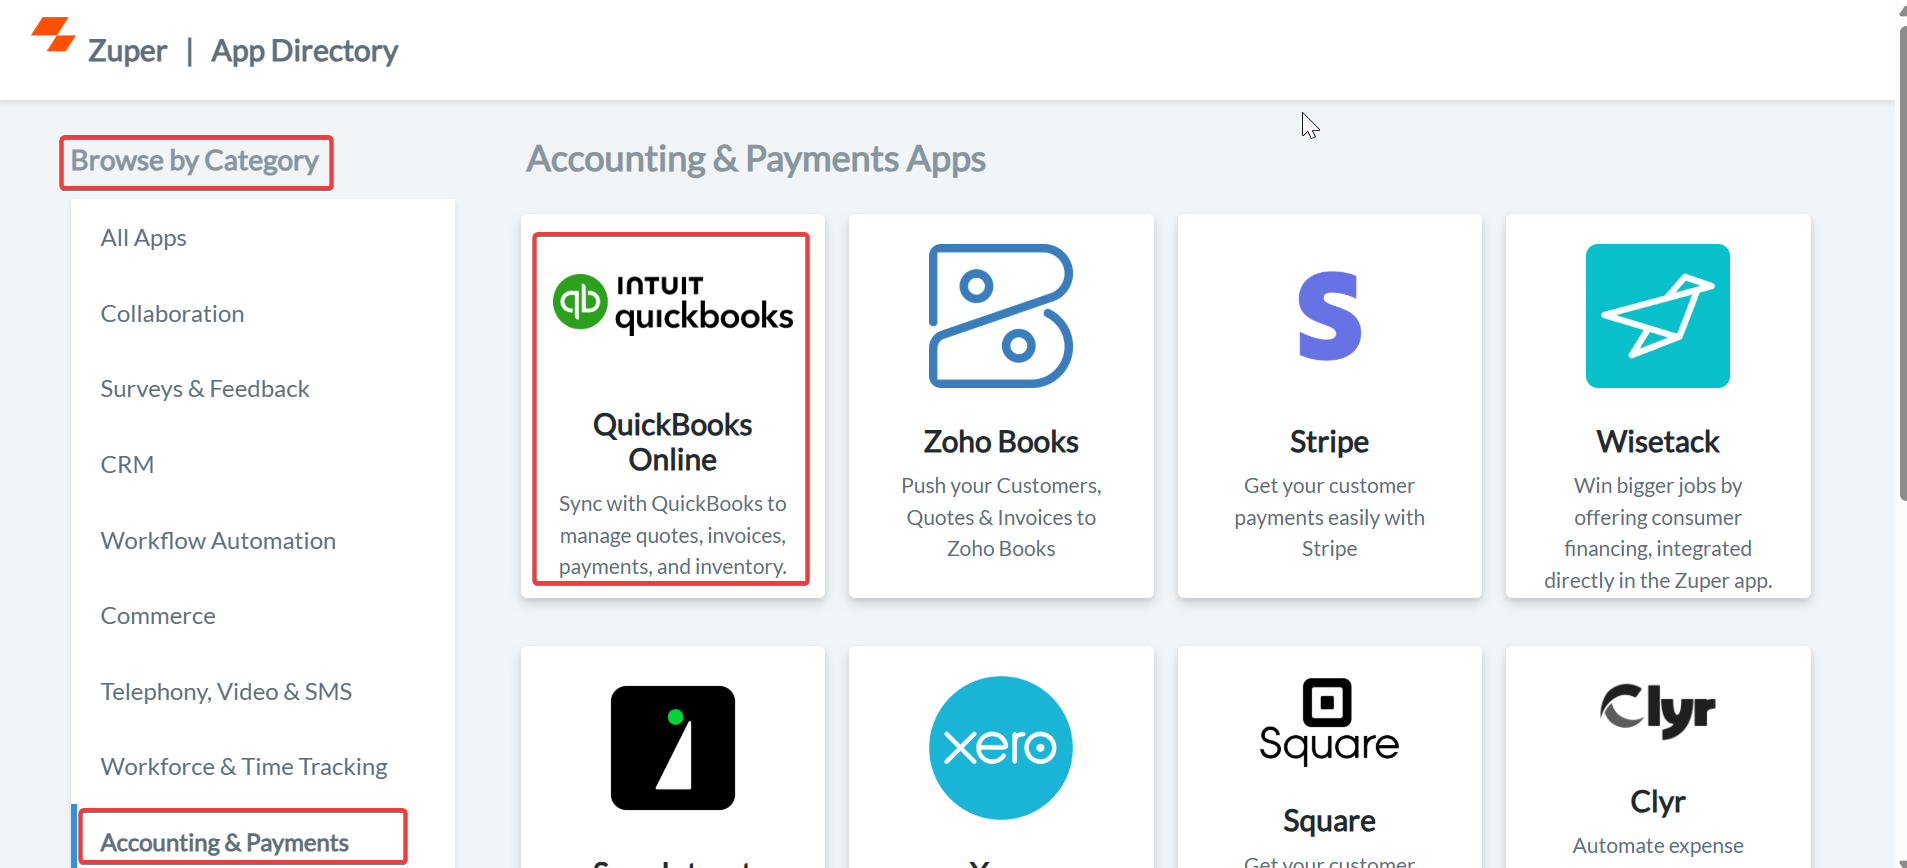
- Choose Accounting & Payments from the side menu. Select QuickBooks Online.
- Click “Connect to QuickBooks Online”.
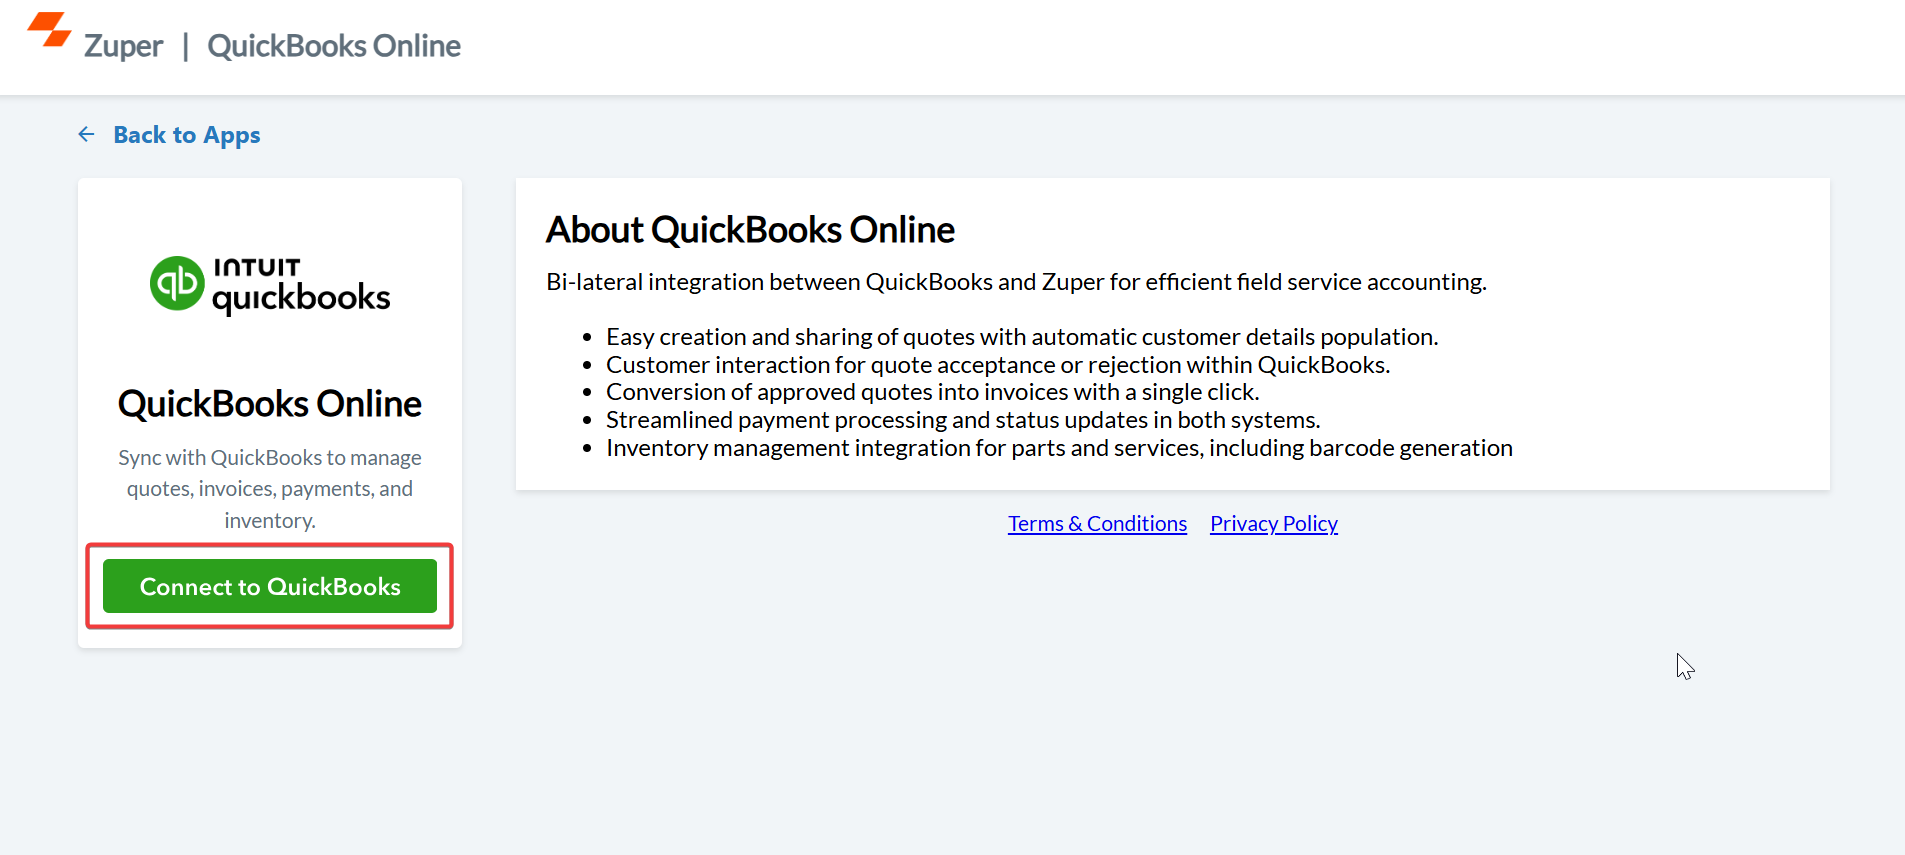
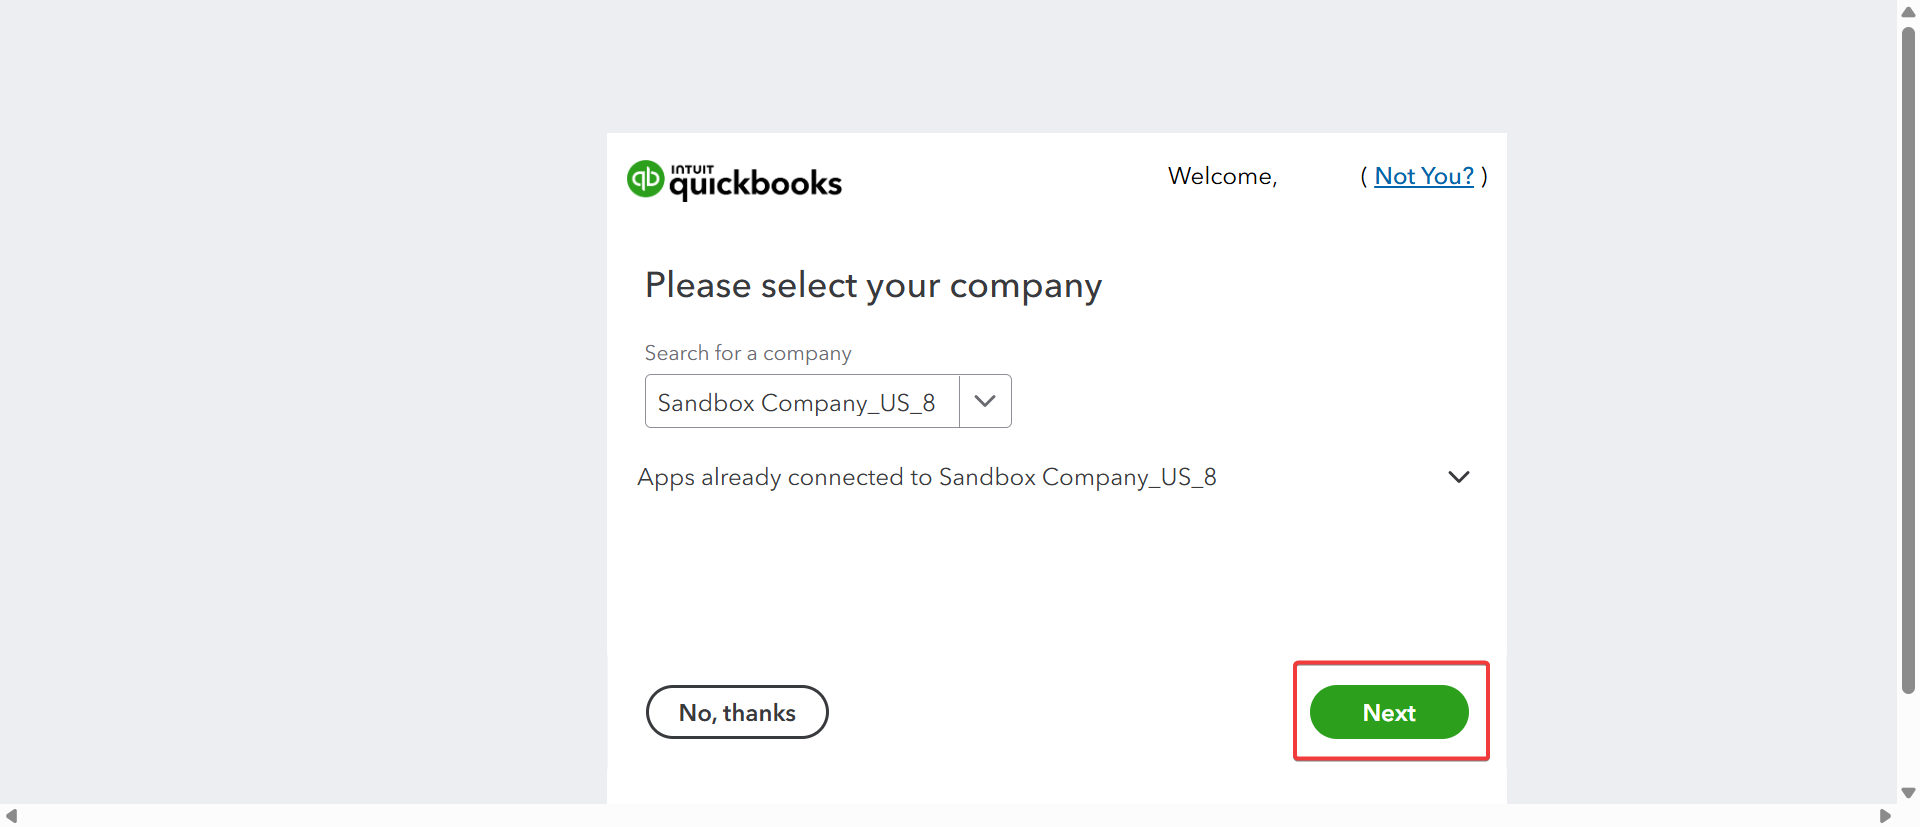
- You will be redirected to the QuickBooks Online sign-in page. Enter your credentials to proceed with the integration.
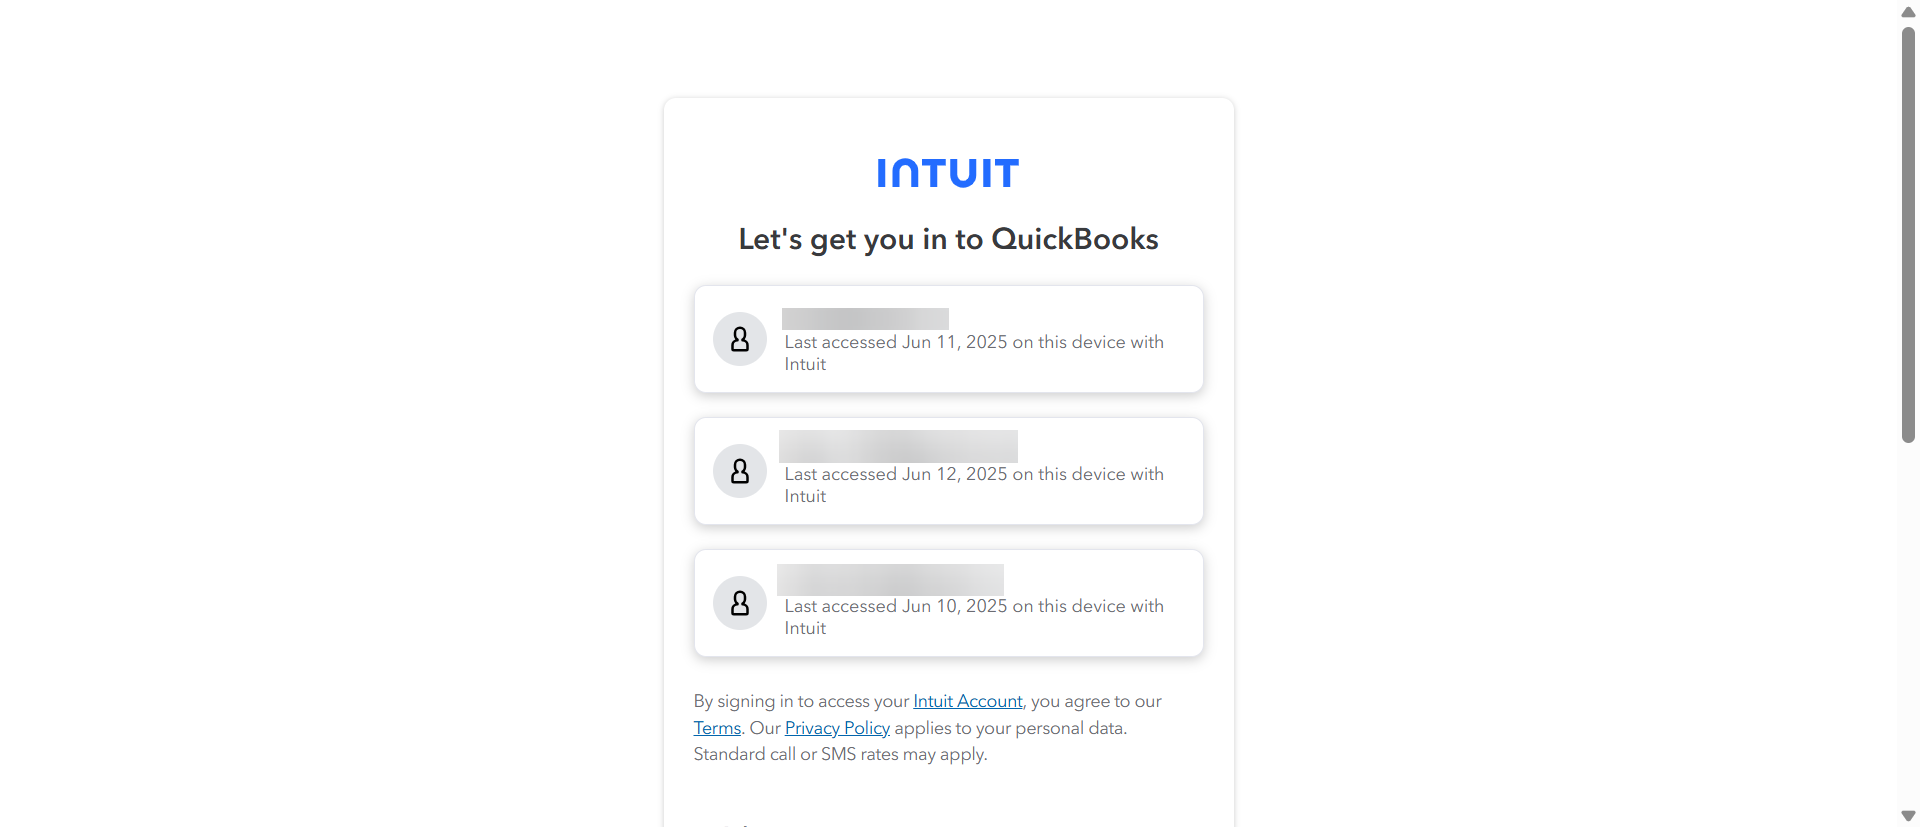
- Once you sign in to QuickBooks Online, select the organization you want to connect with inventory if you have multiple organizations. After choosing an organization, click Next to complete the integration.
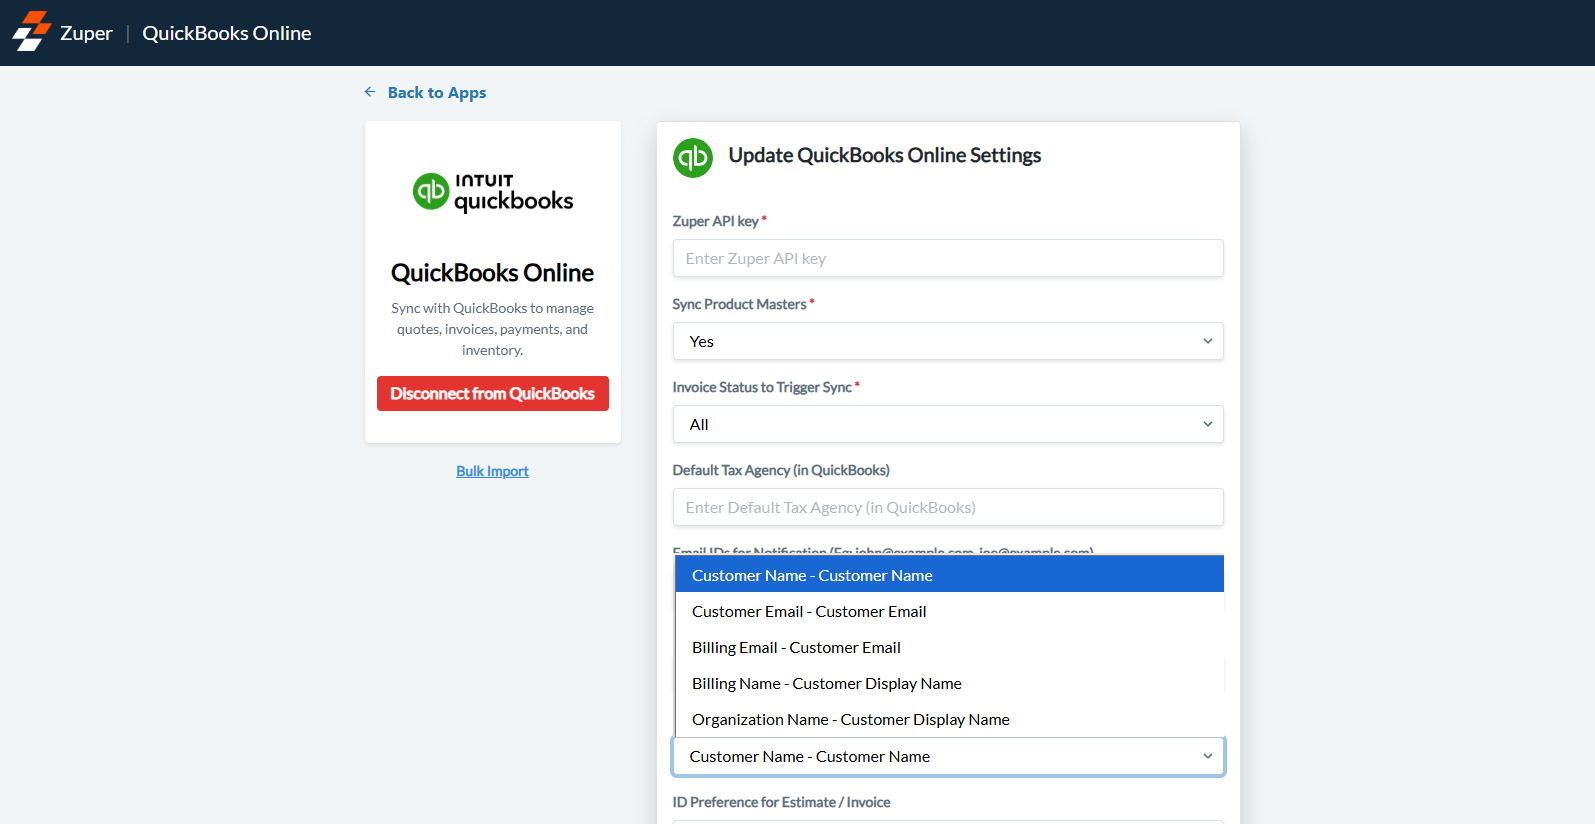
Zuper App Configuration
- Once you have connected with QuickBooks Online, you will be redirected to your Zuper account to configure the integration.
- You must configure the settings to sync the Zuper modules with QuickBooks Online.

- To create the Zuper API (Mandatory), refer to the section below:
API Key Creation
API Key Creation
- Log in to Zuper with an admin account.
- Scroll down the menu bar on the left and select the “Settings” icon key.
- Under the “General Settings” category, select “Account Settings.”
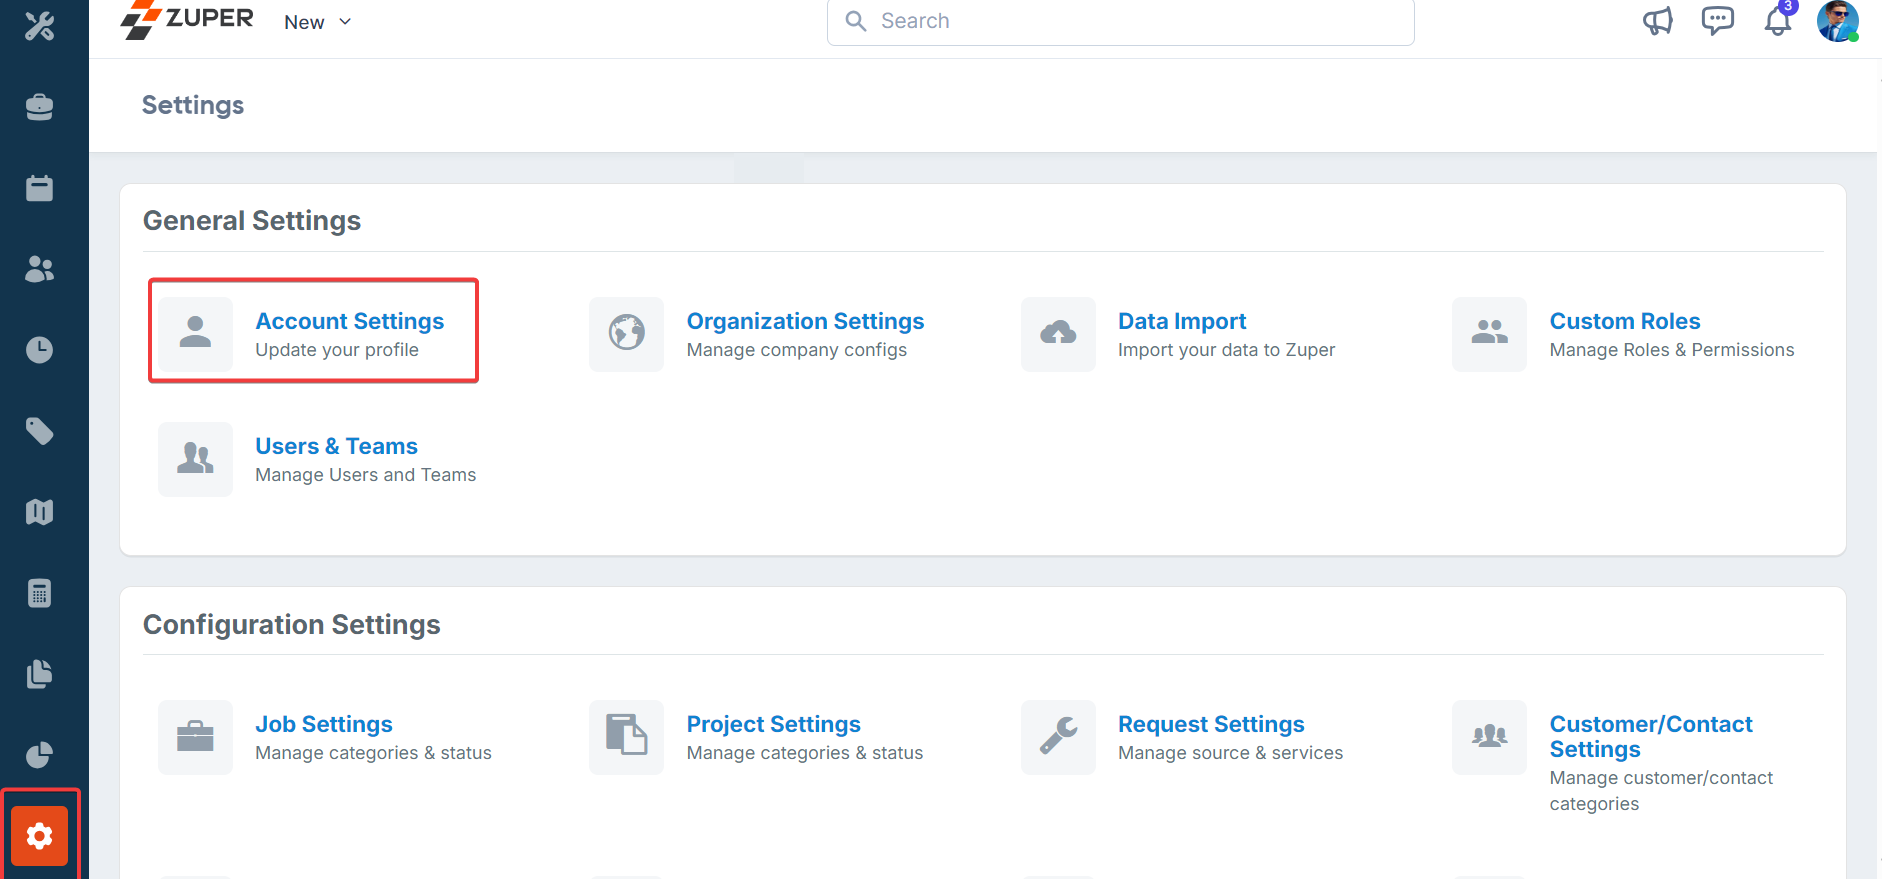
- On the account settings page, select “API Keys.”
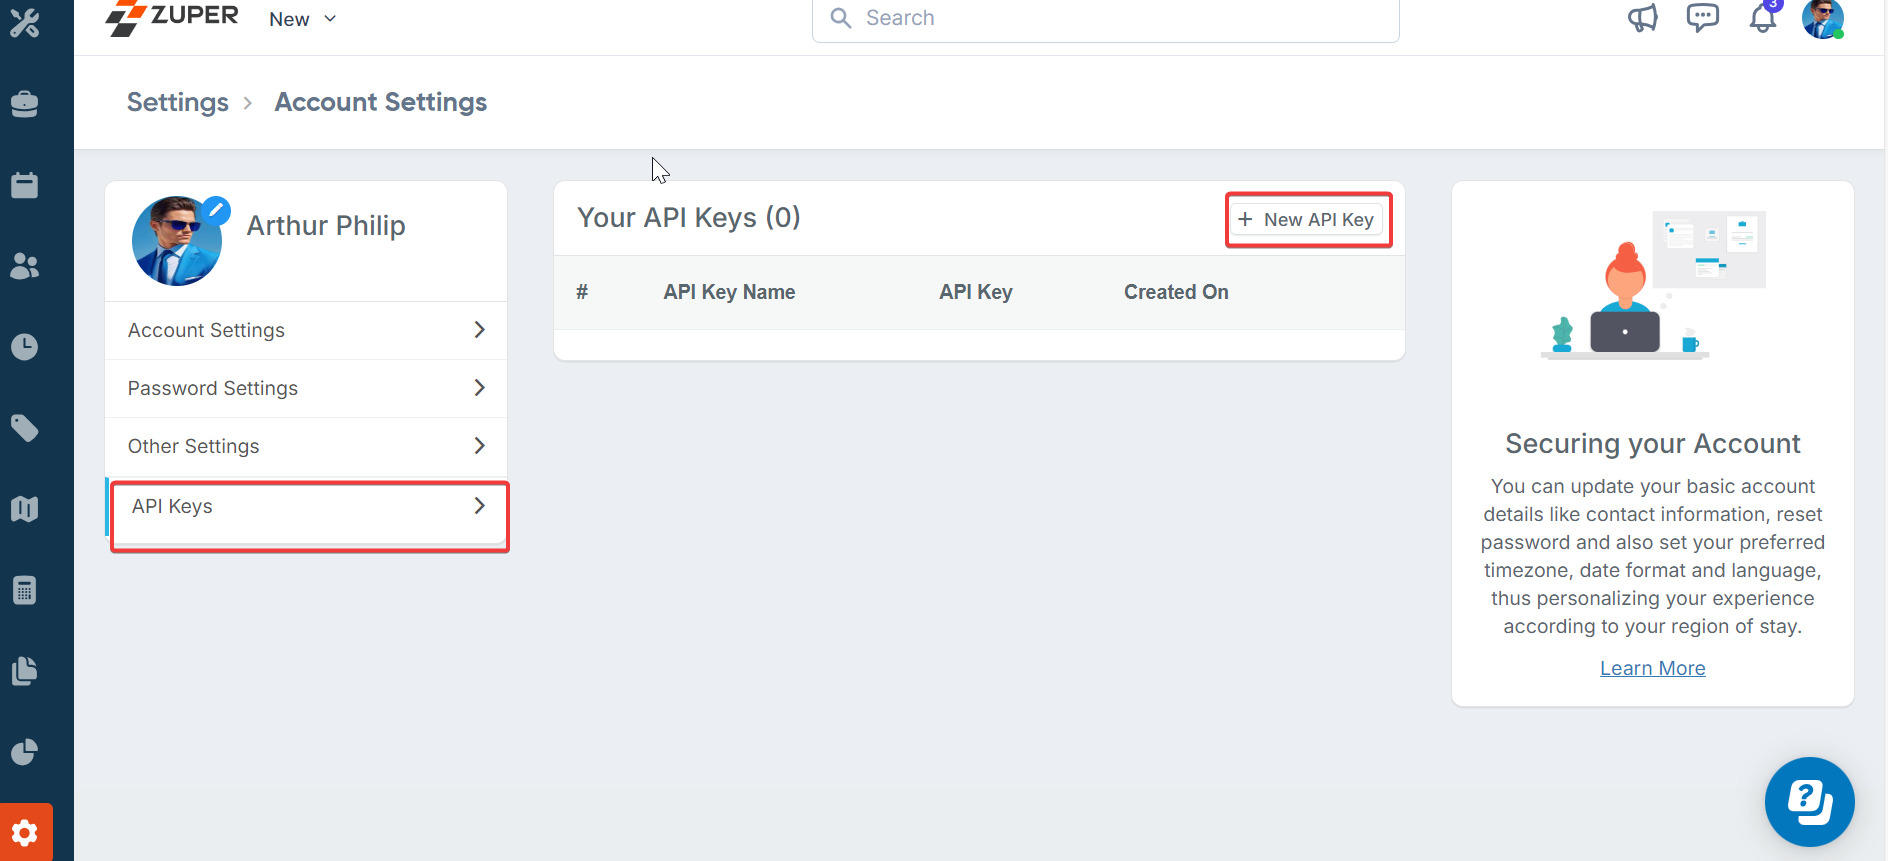
- Click on “New API Key” and enter the name of the API key in the pop-up windows.
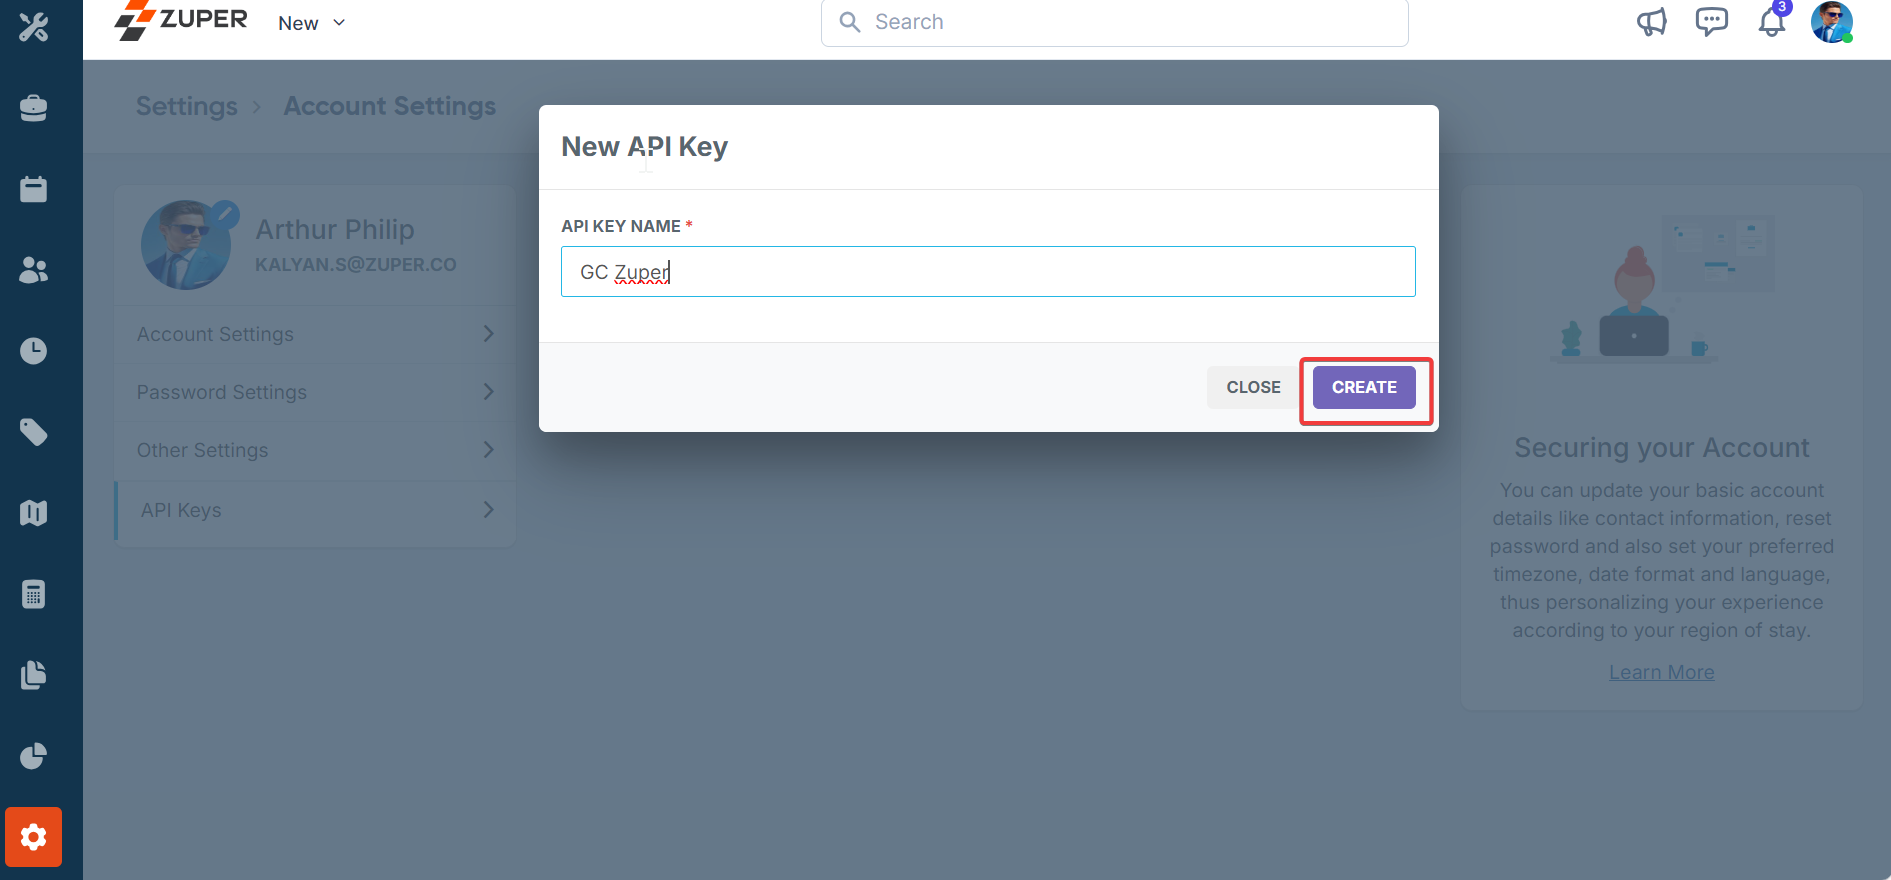
- Click on “Create” to generate the API key. (Once created, the API key can be viewed by clicking on the “View API Key” hyperlink.)
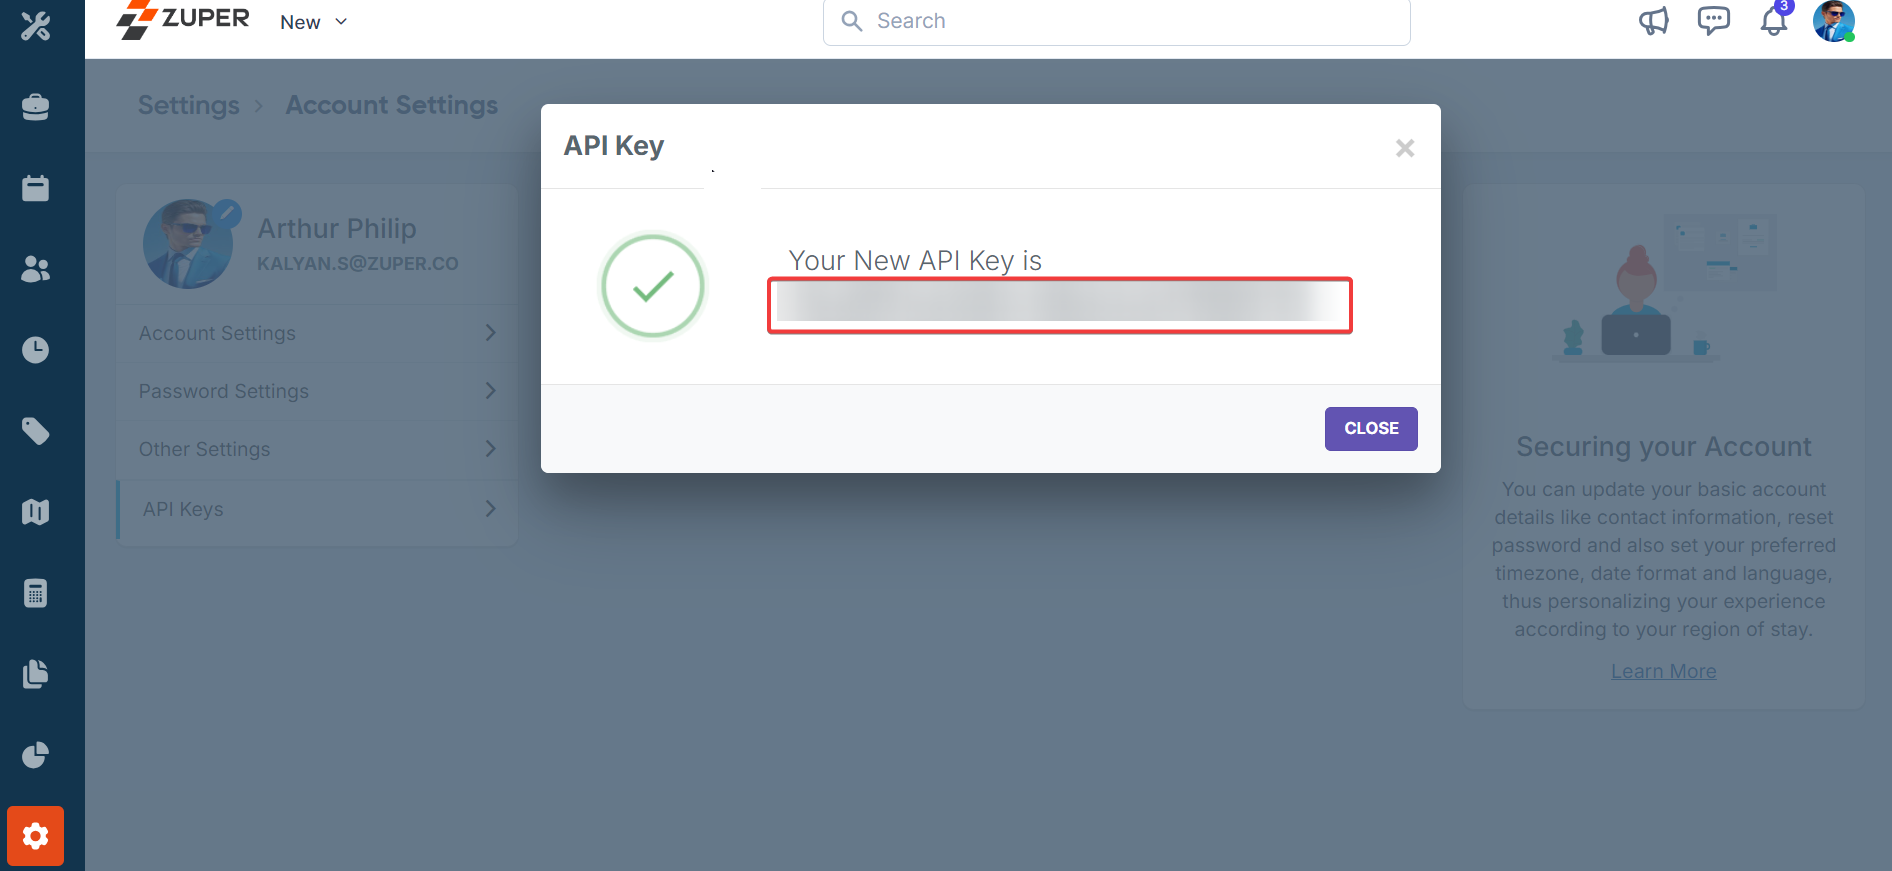
- To delete/deactivate an existing API, click on the “Delete API Key” (x) next to the respective API.

- Sync Customers (Mandatory) - If you select “Yes,” whenever a new customer is created in Zuper, it will automatically synchronize with the QuickBooks Online customer module. If you choose “No,” customer sync between Zuper and QuickBooks Online will not be executed.
- Sync Estimates (Mandatory) - If you select “Yes,” whenever a new quote is created in Zuper, it will automatically synchronize with the QuickBooks Online estimate module. If you choose “No,” a quote sync between Zuper and QuickBooks Online will not be executed.
- Sync Deposits to Customer - If you select “Yes,” whenever a deposit is created in Zuper, it will automatically synchronize with the QuickBooks Online customer module. If you choose “No,” the deposit will not be synced to the customer on QuickBooks Online.
- Sync Services and Products (Mandatory) - By selecting “Yes,” inventory will synchronize two ways from Zuper to QuickBooks Online and vice versa. If “No” is selected, Zuper and QuickBooks Online do not synchronize inventory items.
- Master Product System (Mandatory) - By selecting “Zuper,” the master product system will be Zuper. If “QuickBooks Online” is selected, the master product is QuickBooks Online.
- Master Product Location- Enter the Master product location to which the inventory line is synced from Zuper to QuickBooks Online.
- Non-Inventory Product Quantity - Enter the non-inventory product quantity synced from Zuper to QuickBooks Online.
- Product Minimum Quantity - Enter the product minimum quantity of Zuper to which QuickBooks Online is synced.
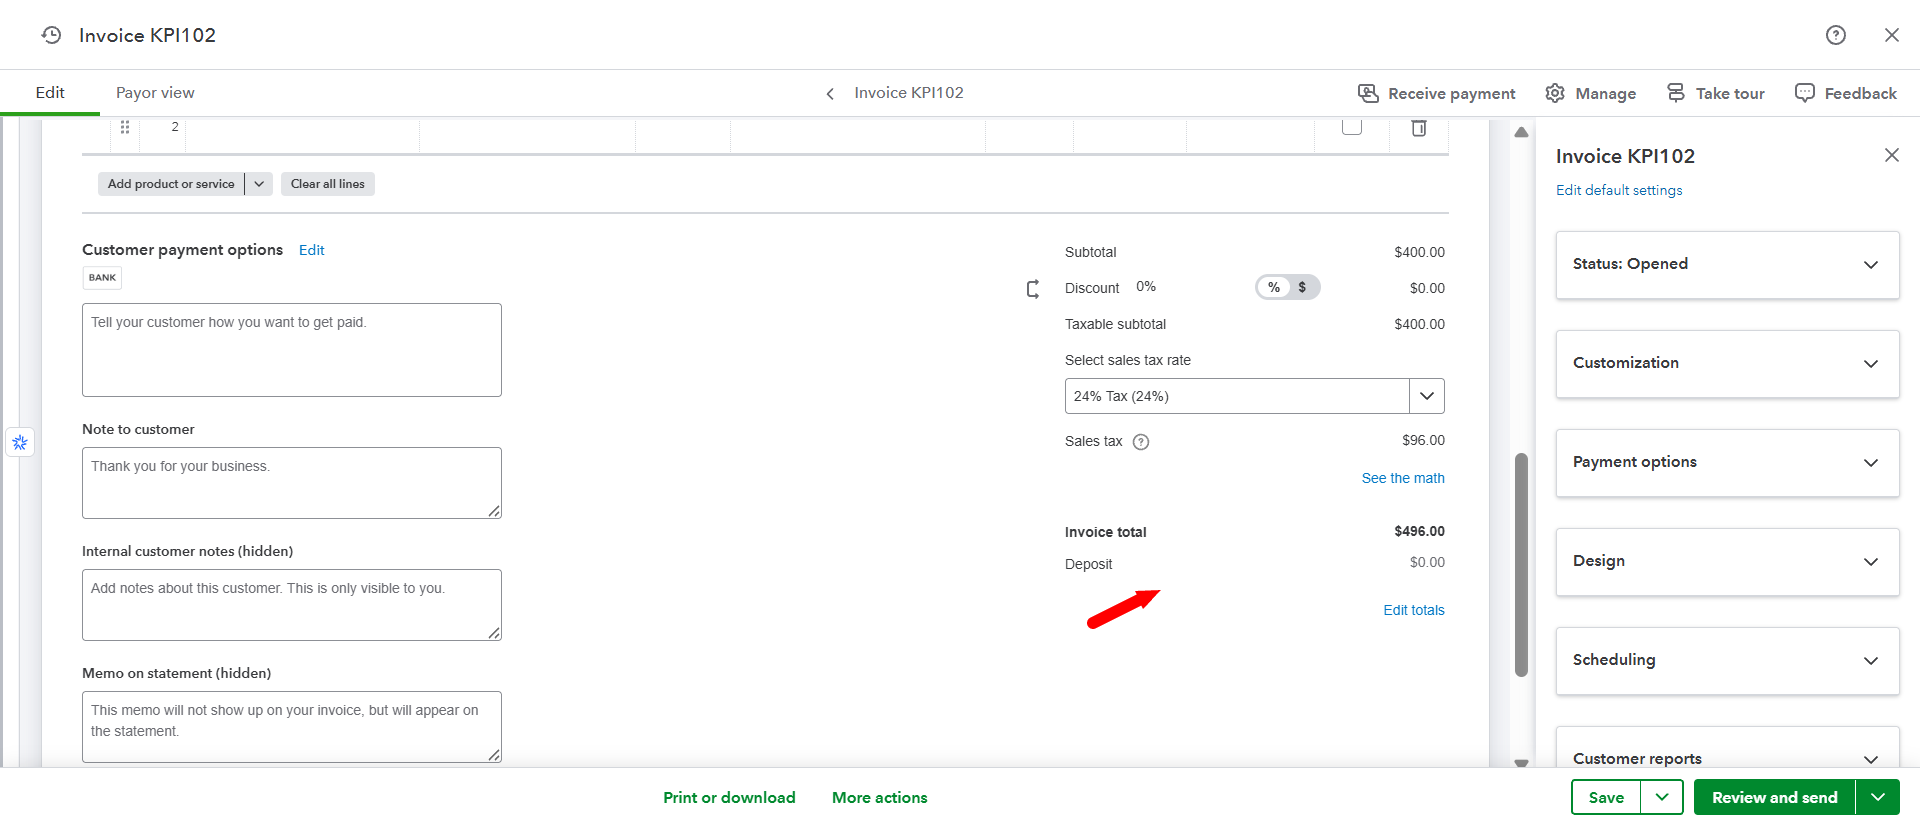
- Invoice Status (Mandatory) - Upon selecting the status for the Invoice in Zuper, we trigger the sync to create a similar invoice in QuickBooks Online without any duplication. If the status is selected as “All” upon creating the Invoice in Zuper, sync will be triggered immediately, and the invoice will be made in QuickBooks Online.
- Default Tax Agency (In QuickBooks) - Copy and paste the “Default tax Agency” from QuickBooks Online, if available.
- Sync Failure Emails - A failed error message will be emailed to the given IDs upon sync.
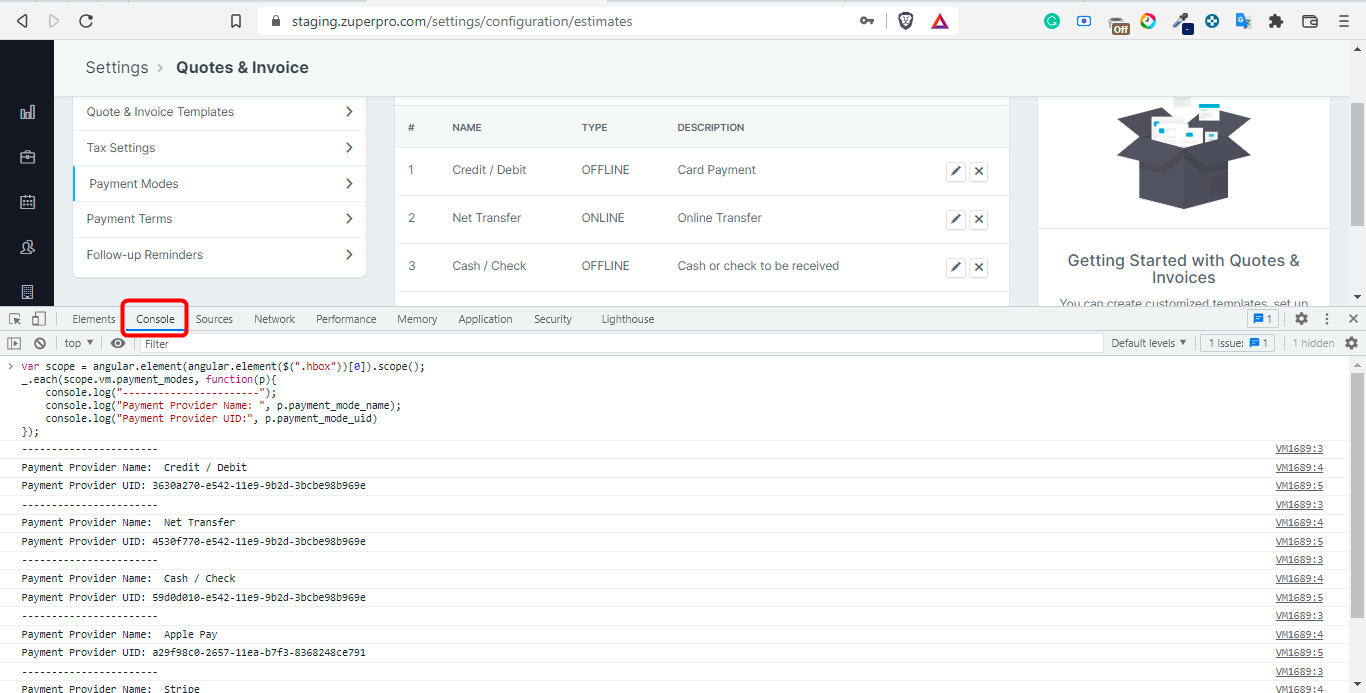
- Default Payment Mode UID (Mandatory) - To sync with QuickBooks Online, enter the default Zuper payment mode UID.
- Auto Enable invoice payment methods - If you select “Yes,” the invoice payment method created in Zuper will automatically sync with the QuickBooks Online invoice module. If you choose “No,” the invoice sync between Zuper and QuickBooks Online will not be executed.
- Default Payment Mode UID (To get the “Payment UID,” click “CTRL+Shift+J” and copy and paste the payment mode code).
- Estimate or Invoice ID (Mandatory)- After selecting the “Zuper ID or QuickBooks Online ID,” This will be updated in QuickBooks online under the field name “Estimate or Invoice No.”
- Identify Customers in Zuper-QuickBooks - When selecting the option below and syncing the invoice or estimate with QuickBooks Online, it checks and creates the invoice for the right customer.
| Zuper Fields | QuickBooks Online Fields |
|---|---|
| Customer Email | Customer Email |
| Customer Name | Customer Name |
| Billing Email | Customer Email |
| Billing Name | Customer Display Name |
| Organization Name | Customer Display Name |
- QuickBooks Plan (Mandatory) - The product type is allowed as “Service” only for the Essentials plan in QuickBooks Online. If not the Essentials plan, the product type can be “Inventory or Non-Inventory.”
- Custom Field Mapping - The data flows from Zuper Custom fields to QuickBooks Online Custom fields from the invoice. The sync is limited to custom fields from the Invoice module.
- Display Name Format - From Zuper account for the invoices and estimates, the customer name sync to QuickBooks Online happens based on the dropdown options:
- Account Name to deposit Payments – Enter the account name to which the payment needs to be allocated. The payment amount will be recorded in the chosen account, ensuring accurate financial tracking and allocation.
- For example, if the deposit payment is for rent, you might enter “Rent Expense account” in this field to ensure the payment amount is recorded under the Rent Expense account in QuickBooks Online.
- Delete action in Zuper to Void in QuickBooks – Upon selecting “Yes,” whenever any invoice is deleted in Zuper, it will also be voided in QuickBooks Online. If “No” is selected, deleting an invoice in Zuper will only remove it from Zuper, leaving the corresponding invoice unaffected in QuickBooks Online.
- Invoice Cancel in Zuper to Void in QuickBooks – If you select “Yes,” the invoice voided in Zuper will be invalid in QuickBooks Online. If you select “No,” the invoice voided in Zuper will not be invalid in QuickBooks Online.
- Use QuickBooks as Tax Master – Upon selecting “Yes,” QuickBooks Online will be the primary source for tax-related information, such as tax rates and codes. If “No” is selected, Zuper will be the primary source for Tax.
- Push Email Field for Customer in QuickBooks – Enter the Zuper customers’ email to sync with them on QuickBooks Online.
- Use Different Discount Accounts in QuickBooks – If “Yes,” the different discount accounts will be used in QuickBooks Online; the discount account is specified in the Discount Name. If “No” is selected, the default discount account will be used in QuickBooks Online.
- Class Tracking - Enabling Class Tracking for Invoices, Quotes, and Products in QuickBooks Online.
- If it is set as “Invoice Level”, we look for the custom field ‘QuickBooks Online Class’, if a value is found, we sync that to QuickBooks Online as part of the invoice sync
- If it is set as “Item Level”, then we iterate through each line item in the invoice & each item’s custom field “QuickBooks Online Class” and use that for itemitem-level level class sync with QuickBooks Online.
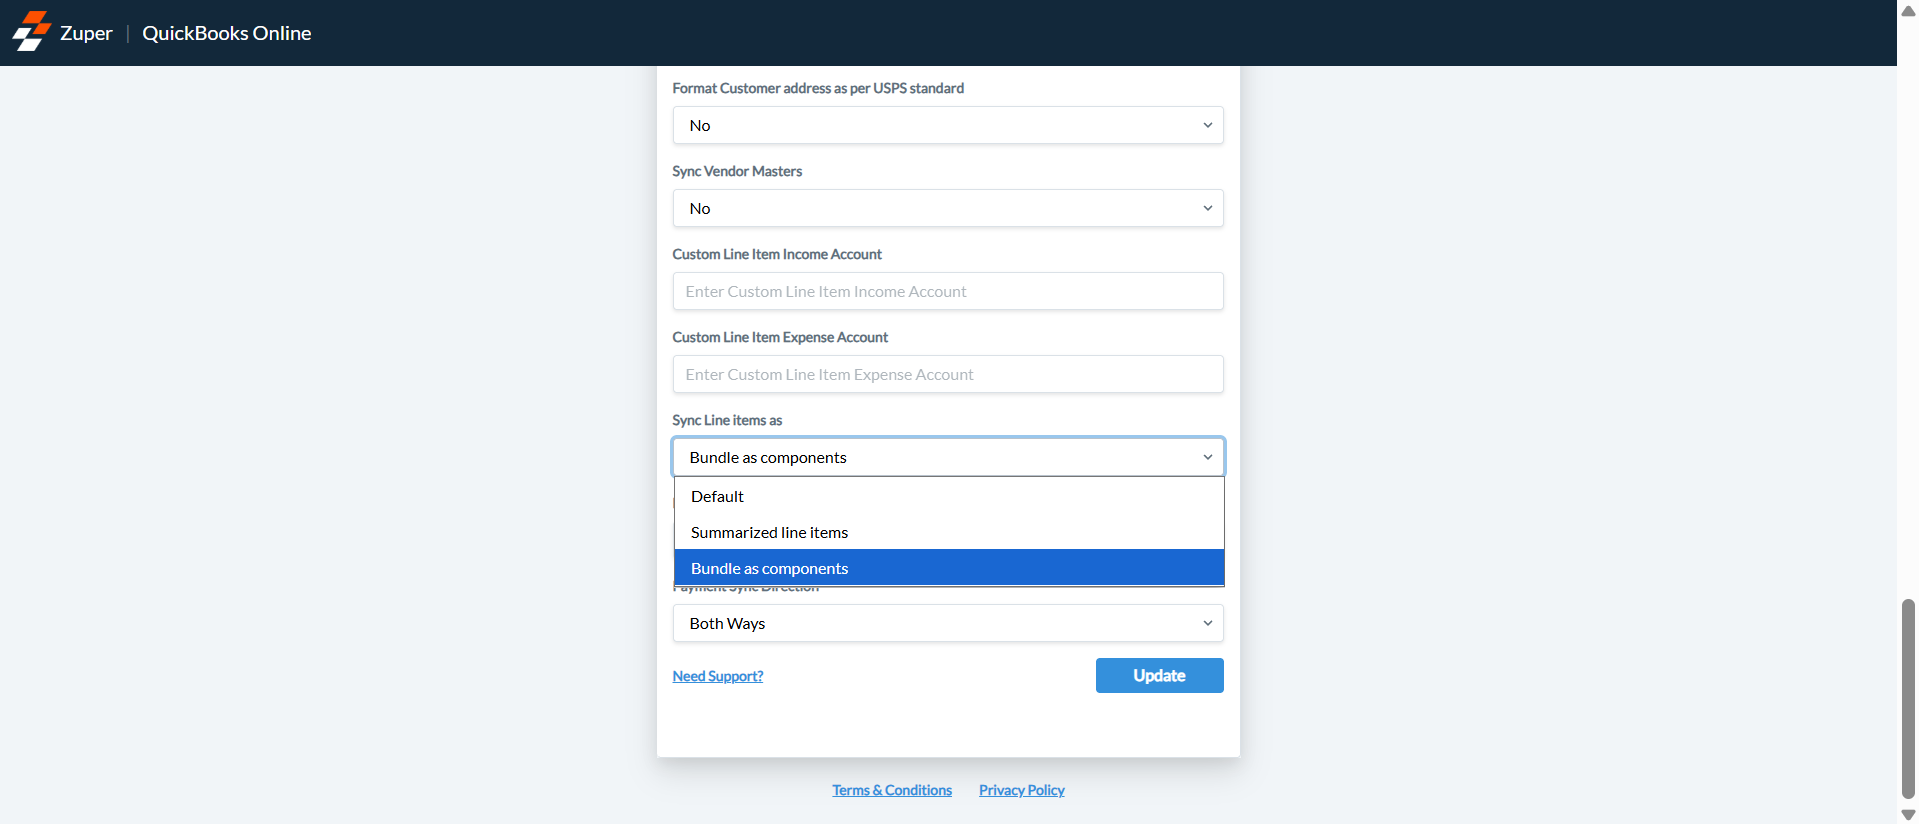
- Summarized Line Items: : Syncs each product line item individually. With this option, bundles are not split into components and may fail to sync if not already present in QuickBooks Online.
- Bundle as components: Roll-up bundles sync to QuickBooks Online as their individual component Products/Services, preserving each component’s quantity, price, discount, and tax as defined by the bundle. Non-bundle items continue syncing using the standard/default behavior.
- Both Ways: Payments sync bidirectionally.
- Zuper to QuickBooks Online: Syncs payments only from Zuper to QuickBooks Online.
- QuickBooks Online to Zuper: Syncs payments only from QuickBooks Online to Zuper.
- No Sync: Disables payment synchronization.
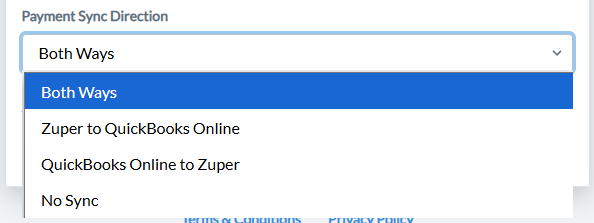
- All: : Sync is triggered for any new estimate created in Zuper in the “Draft” status.
- Sent: Sync is triggered only when the estimate status changes to “Sent.”
- Accepted: Sync is triggered only when the estimate status changes to “Accepted”.
QuickBooks Online Field mapping
Module - Invoices| Zuper Field | QuickBooks Online Field | Notes |
|---|---|---|
| Prefix | Doc No. | Prefix and Invoice No. are joined to create Doc No. (when ID preference is Zuper) |
| Invoice No. | Doc No. | |
| Reference No. | Doc No. | When ID preference is set to QuickBooks Online. Doc No. syncs from QuickBooks Online to Zuper Reference No. |
| Invoice Date | Transaction Date | |
| Payment Term | Sales Term | |
| Invoice Due Date | Due Date | |
| Invoice Template | NA | |
| Invoice Tags | NA | |
| Invoice Description | NA | |
| Invoice Total | Total Amount | |
| Invoice Remarks | Customer Memo | “Note to Customer” in the UI |
| Invoice CC Email | Secondary Contacts Email (From Job) | The associated jobs’ secondary contact emails are synced to the CC fields in the invoice. |
| Billing Address | Billing Address | |
| Service Address | Shipping Address | |
| Notes | Private Note | “Memo on Statement” in the UI |
| QuickBooks Online Field | Zuper Field | Notes |
|---|---|---|
| Name | Product Name | |
| SKU | Product No. | |
| Product Image | Product Image | |
| Category | Product Category | |
| Initial Quantity on hand | Available Quantity | |
| As of date | NA | |
| Reorder Point | Min. Quantity | |
| Description | Description | |
| Sales Price/Rate | Unit Selling Price | |
| Income Account | Custom Field | |
| Sales Tax | NA | Info not directly available in API |
| Purchasing Information | ||
| Cost | ||
| Expense Account | Custom Field | |
| Asset Account | Custom Field | |
| Preferred vendor | ||
| NA | Minimum Quantity | Configured Value |
| NA | Location | Configured Location |
| QuickBooks OnlineField | Zuper Field | Notes |
|---|---|---|
| Name | Part Name | |
| SKU | Part No. | |
| Category | Product Category | |
| Description | Description | |
| Sales Price/Rate | Unit Selling Price | |
| Income Account | Custom Field | |
| Sales Tax | NA | Info not directly available in API |
| Purchasing Information | ||
| NA | Available Quantity | Configured Value |
| NA | Minimum Quantity | Configured Value |
| NA | Location | Configured Location |
| QuickBooks Online Field | Zuper Field | Notes |
|---|---|---|
| Name | Service Name | |
| SKU | Service No. | |
| Category | Category | |
| Description | Description | |
| Sales Price/Rate | Unit Selling price | |
| Income Account | Custom Field | |
| Sales Tax | NA | Info not directly available in API |
| Purchasing information | NA |
| Zuper Field | QuickBooks Online Field | Notes |
|---|---|---|
| First Name | First, Last, Display Name | Combined to create Display Name |
| Last Name | ||
| Organization | NA | Not synced to QuickBooks Online “Company” |
| Category | NA | |
| Billing Street | Street Address 1 | |
| Billing City | City | |
| Billing State | State | Mapped using SubdivisionCode |
| Billing Country | Country | |
| Billing Zip Code | Zip Code | |
| Mobile Number | Mobile Number | If the Mobile Number is empty in Zuper, it will be empty in QBO. |
| Home / Work Number | Primary Phone Number | The priority order is Home > Work. |
| Description | Notes | |
| Service Address | Shipping Address | |
| Tags | NA | |
| SLA | NA | |
| Accessible to Everyone | NA | |
| Preferred Time Zone | NA |
| Zuper Field | QuickBooks Online Field | Notes |
|---|---|---|
| NA | Vendor Currency | Mandatory for Vendor Creation when multicurrency is turned on |
| Vendor Name | Company Name | Changed from Company Name. Backend Key is changed |
| Vendor Display Name | Display Name | Auto Populated by QuickBooks. Mandatory field for Vendor Creation. |
| Vendor Contact Name | First Name, Last Name | |
| Name to print on checks | Auto-populated | |
| Vendor Description/Plaintext Description | NA | |
| Street Address | Street Address | |
| Landmark | NA | |
| City | City | |
| State/Province | State | |
| Country | Country | |
| Zip Code | Zip Code | |
| Latitude and Longitude | NA | |
| Contact First Name | NA | |
| Contact Last Name | NA | |
| Phone Number | Phone Number | |
| Email Address | ||
| Default Delivery Method | NA | |
| Additional Email Recipients | NA | |
| Default Tax Rate | ||
| Vendor Payment Terms | Payment - Terms | “Terms” field under payment section. |
| Bank Name | ||
| Bank A/C no. | Bank Account Number | |
| NA | Routing Number | |
| Opening Balance | ||
| Default Expense Category | ||
| Billing Rate (per hr) | ||
| Business ID no./SSN | NA | |
| Custom Fields |
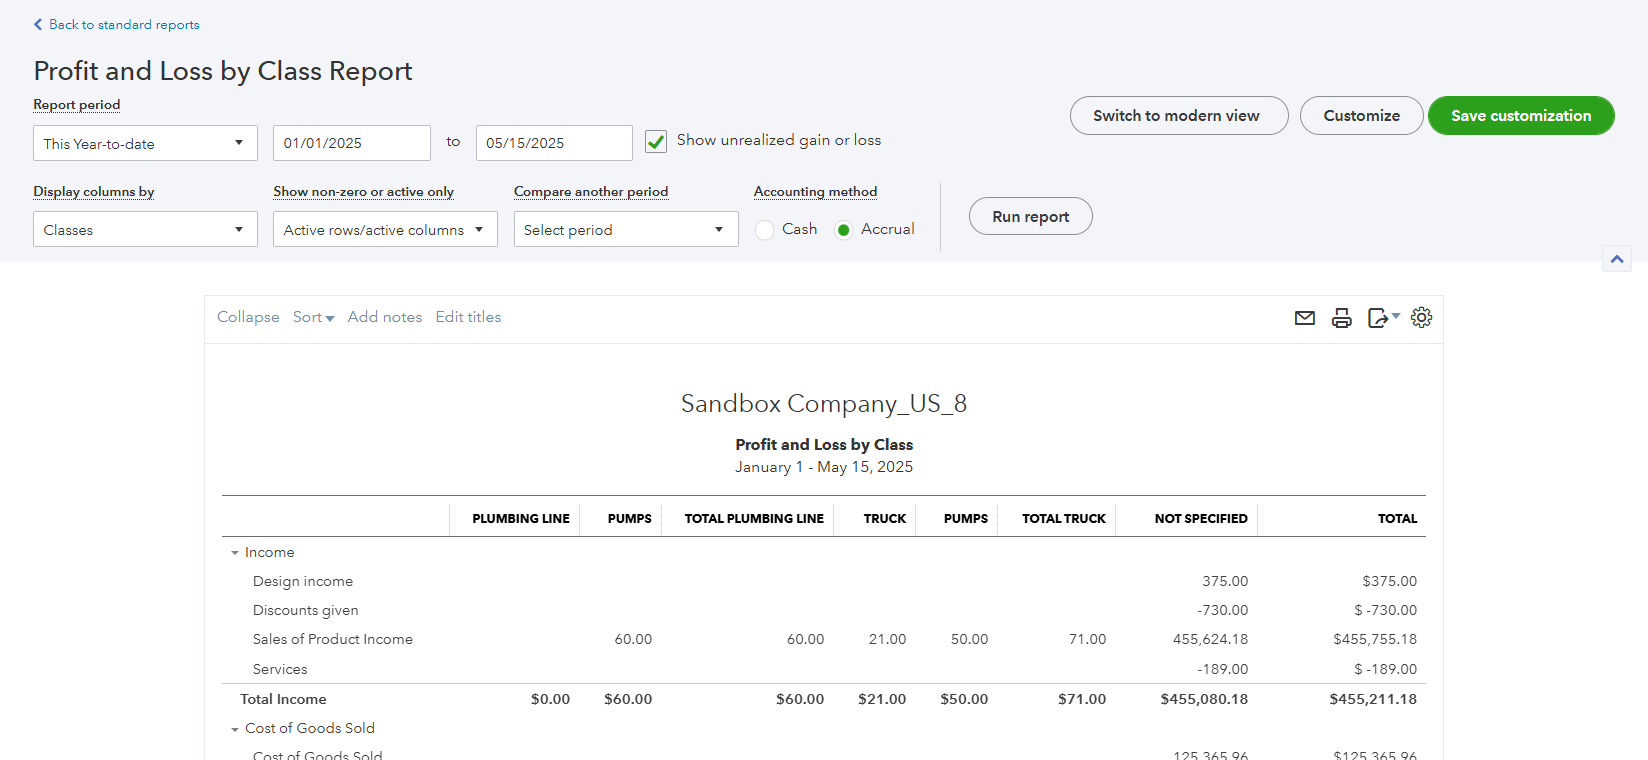
Class-Tracking in QuickBooks Online(QuickBooks Online plus or advanced)
In QuickBooks Online, classes can be used to track transactions and group them according to different classifications, such as business units within a company or by product lines. Classes appear are tracked at the invoice level when the class assignment is chosen as “one to each transaction”. When the assignment is chosen as “one to each row in transaction,” the class is tracked at the line item level.

Account tracking: We work with two types of accounts in GL - Income Account & Expense Account
- Businesses can set an Account on the item level. By default, we map it to ‘Sales of Product Income’ for the Income account and “Cost of Goods Sold” for the Expense Account
- But if they would like to override, we can set up a custom field called ‘QuickBooks Online Income Account’ and ‘QuickBooks Online Expense Account ’ on the item level to override the above default account while syncing to QuickBooks Online.
- In the QuickBooks Online configuration screen, based on what you’ve specified in QuickBooks Online, select whether class tracking is to be done and if it is to be done for the entire transaction or each line item in the transaction.
- Go to Settings > Custom Fields & Checklist Settings > Invoice Fields, Product Fields, Part Fields, streamlined and straightforward or Quotation Fields.
- Create a custom field with the label “QuickBooks Online Class.”
- While creating the invoice, ensure that the value for the custom field is present.
QuickBooks Online Account Configure
- Sign in to the QuickBooks Online account and click the link below based on the signed-in account. Then click the “Switch Now” button.
- QuickBooks Online Live Account
- QuickBooks Online Staging Account
- Go to Accounting -> Chart of Accounts and make the following changes to the below 3 accounts:
| Name | Account Type | |
|---|---|---|
| Inventory Asset | Account Type: Other Current Details | Details Type: Inventory |
| Cost of Goods Sold | Account Type: Cost of Goods Sold | Details Type: Supplies and Materials - COGS |
| Sales of Product Name | Account Type: Income | Details Type: Sale of Product Income |
Pushing Customers to QuickBooks Online
With the Zuper-QuickBooks Online integration, you can sync Customer master data from Zuper to QuickBooks. You can control this through a setting that is available in the configuration. The customer records can be created or updated in QuickBooks Online based on changes in Zuper. If the Zuper customer is present in QuickBooks Online, then they are identified using:- Customer QuickBooks ID.
- Email ID.
- Customer Name. (First Name Last Name)
- Org QuickBooks ID
- Org name
- Billing name
- Billing email
- The Customer Description mapped as Customer Notes in Zuper.
- The Customer’s Address is mapped as a Billing Address in Zuper.
Push Products and Services to QuickBooks Online
- Depending on the configuration for Products Master, products and services are synced from Zuper to QuickBooks Online and vice versa.
- If the QuickBooks Online product is present in Zuper, the validation is done based on the following criteria: a. Product QuickBooks ID. b. Product Name.
- Products and Parts of Zuper are captured as Inventory in QuickBooks Online. (Track Quantity means inventory).
- Service is captured as Service in QuickBooks Online (If the track quantity is not present, this is captured as non-Inventory).
- Before a product or part or service is created in Quickbooks Online, the category must be in QuickBooks Online. Once identified, the item will be created.
- Inventory Start Date – Company created date or Current day –1 (if company date is absent).
- Description – Product Description.
- Purchase Cost – Unit Selling Price.
- SKU – Unique ID identifying the product.
Push Quotes to QuickBooks Online:
With the Zuper-QuickBooks Online integration, you can sync quotes from Zuper to Quickbooks Online. You can control this through a setting in the configuration.- The data push will happen from QuickBooks Online to Zuper.
- If the Estimate settings are enabled in the integration settings, we will fetch the Estimate UID.
- If the QuickBooks Online Estimate is present in Zuper, the validation is done based on the following criteria:
- List of matching criteria is listed
- The billing address in Zuper is captured as a Customer Address in QuickBooks Online.
- Service and Billing customers of Zuper are considered Billing customers in QuickBooks Online only.
- If the customer already exists, then the customer will have a QuickBooks Online ID; if not, a new customer will be created in QuickBooks Online based on the billing address of the Zuper details.
- Estimate’s expiration date – QuickBooks Online’s expiry date
- Notes - QuickBooks Online’s Customer Memo
- Await Payment – Email sent (Payment collection pending)
- Customer, Customer ID – Verify that if a new customer is absent, the customer ID will be created in Zuper.
- The status names will be synchronized from Zuper to QuickBooks Online (This transaction status verification is to be done).
- US tax rule – The tax rule structure is to be followed; for the rest of the world, different taxes are calculated straightforwardly.
- The Quote number in Zuper is captured as a document number in QuickBooks Online.
Push Invoices to QuickBooks Online
Zuper-QuickBooks Online integration syncs invoices. You automatically synchronize Invoices according to the pre-defined settings and quote conversion. You can take three significant actions: Invoice Create Sync, Invoice Update Sync, Invoice Payment Sync, and Invoice Note Addition Sync.- The data push will happen from QuickBooks Online to Zuper.
- We will fetch the invoice if the invoice settings are enabled in the integration settings.
- If the QuickBooks Online Estimate is present in Zuper, the validation is done based on the following criteria:
- List of matching criteria listed in Zuper.
- Customer Address in QuickBooks Online is captured as a Billing address in Zuper.
- Service and Billing customers of Zuper are considered Billing customers in QuickBooks Online only.
- If the customer already exists, then the customer will have a QuickBooks Online ID; if not, a new customer will be created in QuickBooks Online based on the billing address of the Zuper details.
- Invoice’s due date – QuickBooks Online’s due date
- Remarks - QuickBooks Online’s Customer Memo
- Customer, Customer ID – Verify that if not present, a new Customer customer ID is to be created in Zuper.
- Await Payment – Email sent (Payment collection pending)
- The status names will be synchronized from Zuper to QuickBooks Online (This transaction status verification is to be done).
- US tax rule – The tax rule structure is to be followed; for the rest of the world, different taxes are calculated straightforwardly.
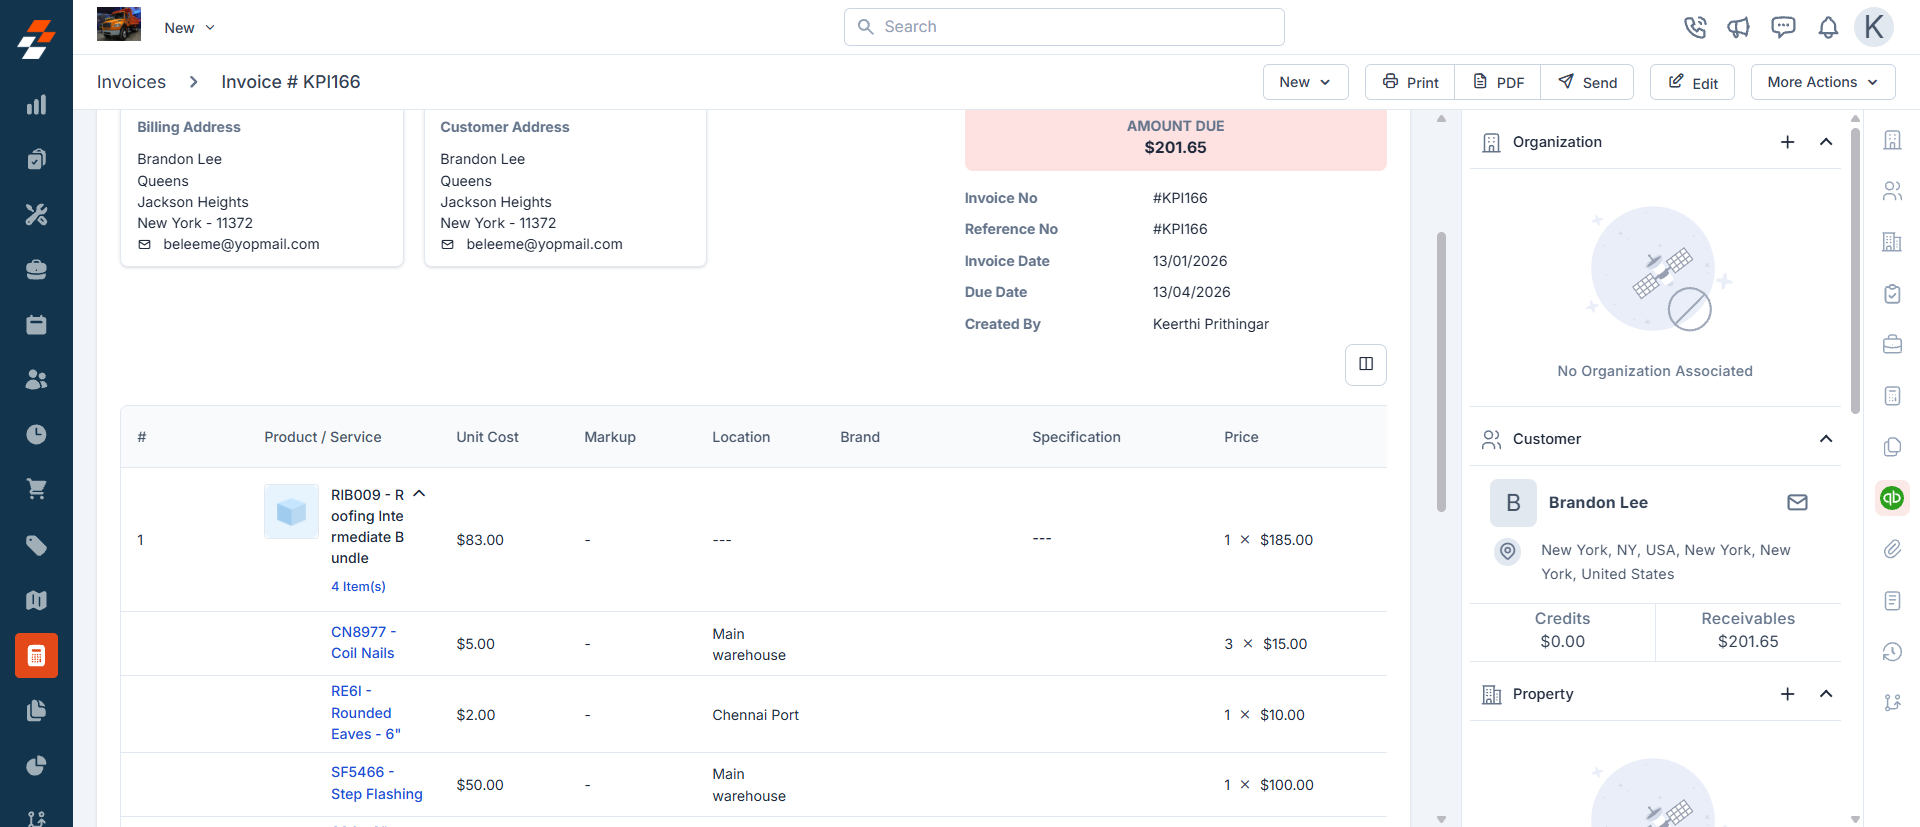
- Item Description of Zuper is captured as a Sale Item Line Item in QuickBooks Online.
- You can convert an estimate into an invoice or create an invoice directly in both Zuper and QuickBooks Online. The converted estimate is captured as a linked transaction.
- Private Note – This is visible to a few users based on the settings.
- Job – Invoice creation – This is done based on the Job’s prefix.
- For the existing invoice sync – An update operation will happen if the new invoice creation means a new invoice is created.
- The full payment done in Zuper gets synchronized with QuickBooks Online as the total invoice payment, along with the mode of payment.
- The partial payment made in Zuper is recorded in QuickBooks Online. The invoice ID created in QuickBooks Online is stored as a Custom field in Zuper.
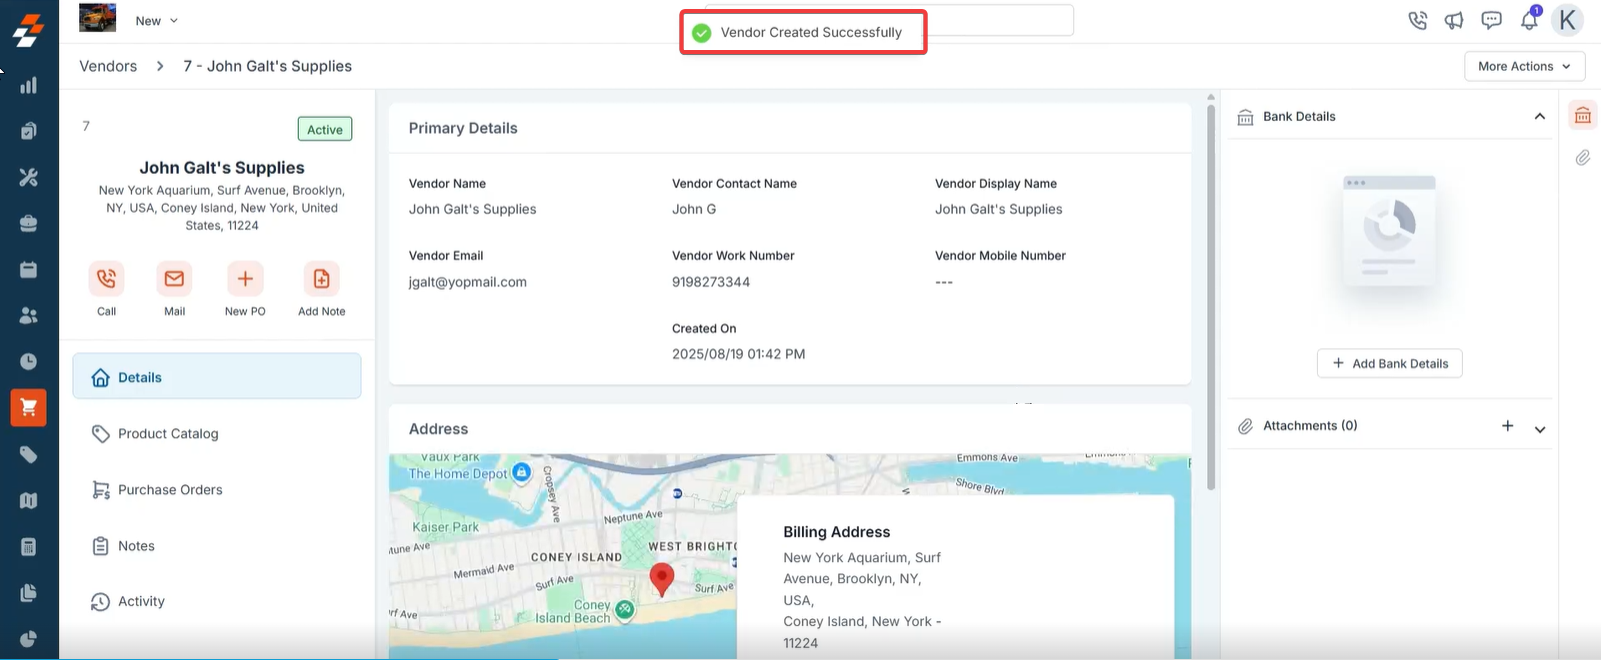
Push Vendors to QuickBooks Online
Zuper–QuickBooks Online integration syncs Vendor master records and related Purchase Orders (POs). You automatically synchronize Vendors according to the pre-defined settings. You can take significant actions: Vendor Create Sync, Vendor Update Sync, Vendor Status Sync (Active/Inactive), Vendor Attachment Sync (active vendors only). The data push will happen from Zuper to QuickBooks Online. We will push the vendor if the vendor settings are enabled in the integration settings. The options available are Yes or No. If the QuickBooks Online Vendor is present in Zuper, the validation is done based on the following criteria:- Match the stored QuickBooks Online Vendor ID in Zuper.
- If no ID is present, match by the QuickBooks Online unique Display Name.
- If no match is found, a new Vendor will be created in QuickBooks Online.
- Zuper is the master system; this is a one-way sync. Changes made directly in QuickBooks Online do not flow back to Zuper.
- When the configuration is set to Yes, new Vendors created in Zuper are pushed to QuickBooks Online immediately. When set to Yes during PO sync, the Vendor is created in QuickBooks Online at the time the first PO is synced.
- Editing a Vendor record in Zuper will sync the changes to QuickBooks Online.
- Handling Vendor Status:
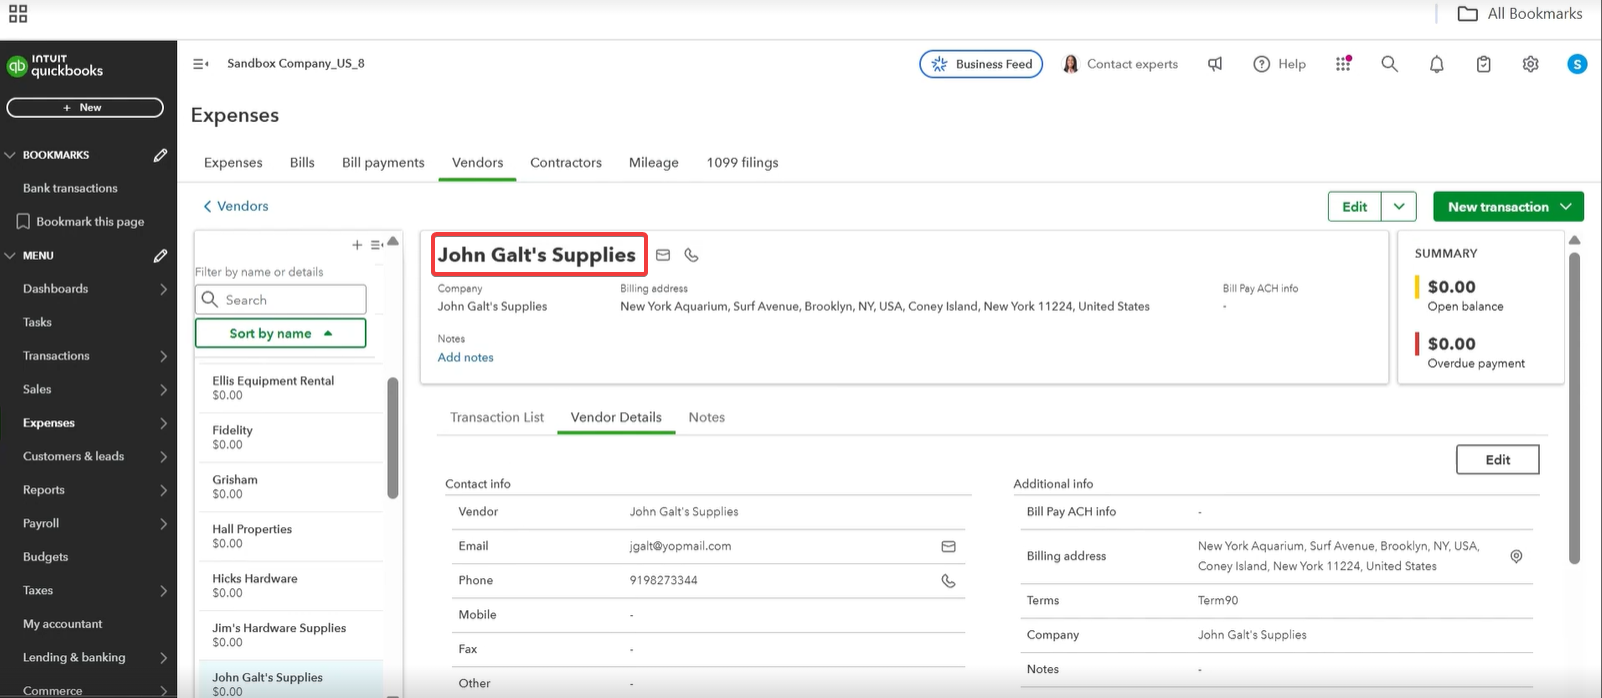
- Marking a Vendor Inactive in Zuper marks the Vendor Inactive in QuickBooks Online (shown as deleted).
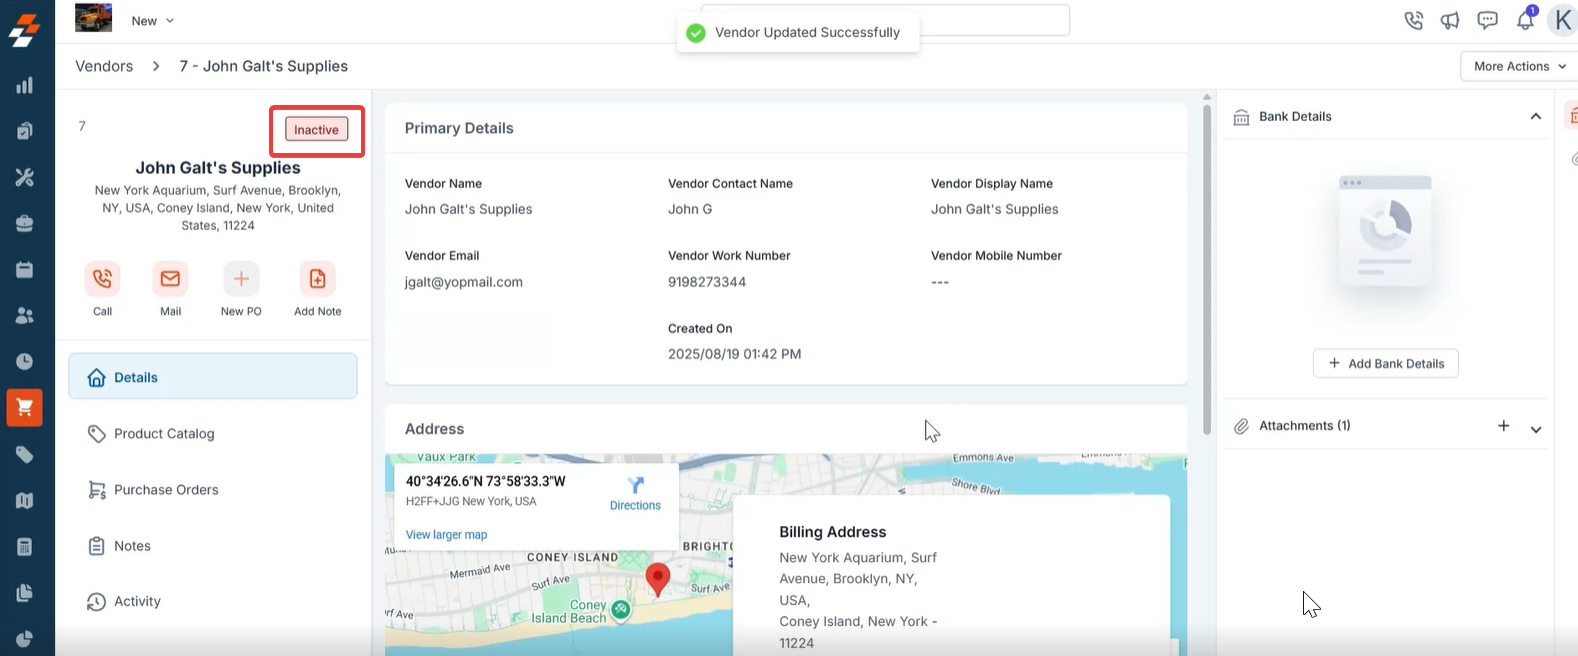
- Marking a Vendor Active in Zuper reactivates the Vendor in QuickBooks Online.
- While a Vendor is Inactive in Zuper, edits and attachments are allowed in Zuper, but QuickBooks Online does not accept updates/attachments for inactive Vendors. Once the Vendor is marked Active again, the latest Vendor details are synced; attachments added while inactive are not synced.
- Marking a Vendor Inactive in Zuper marks the Vendor Inactive in QuickBooks Online (shown as deleted).
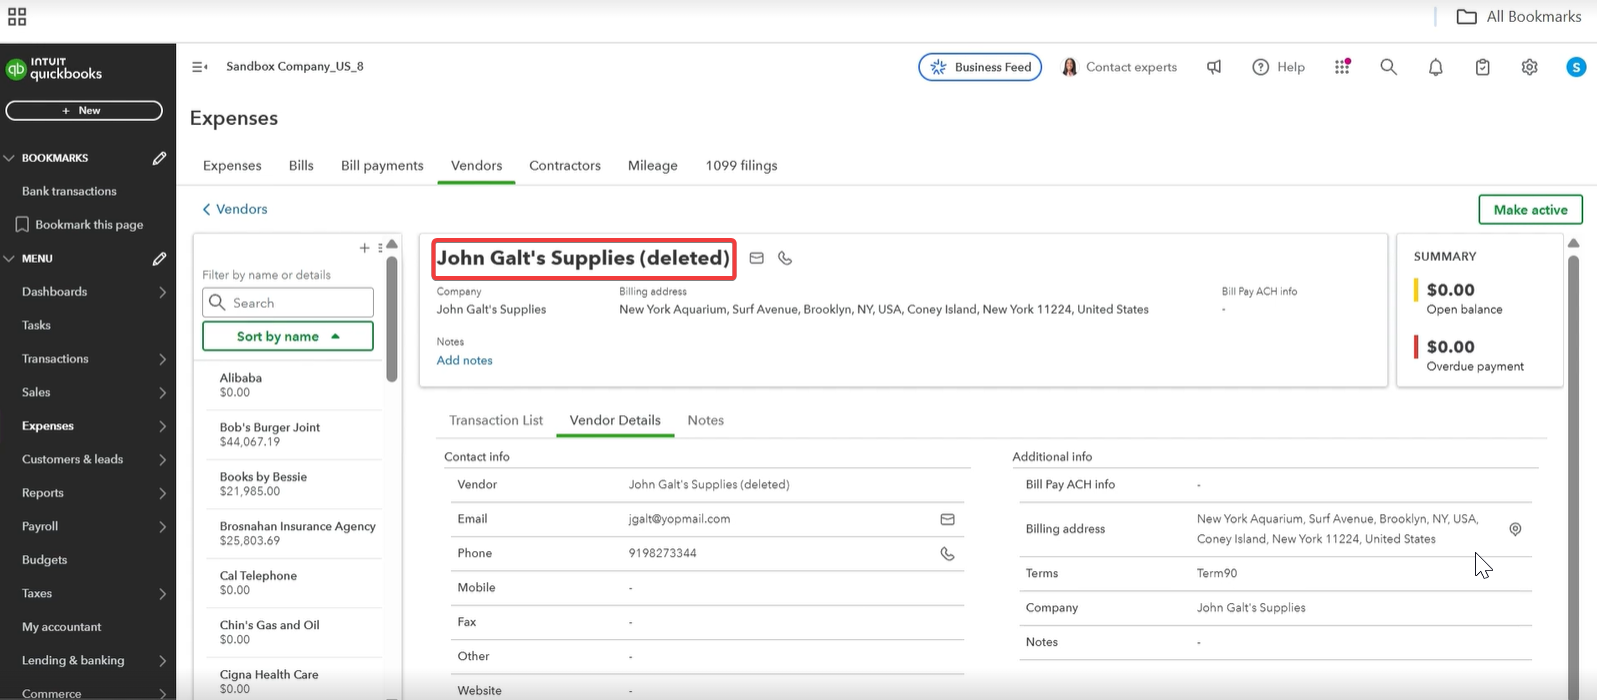
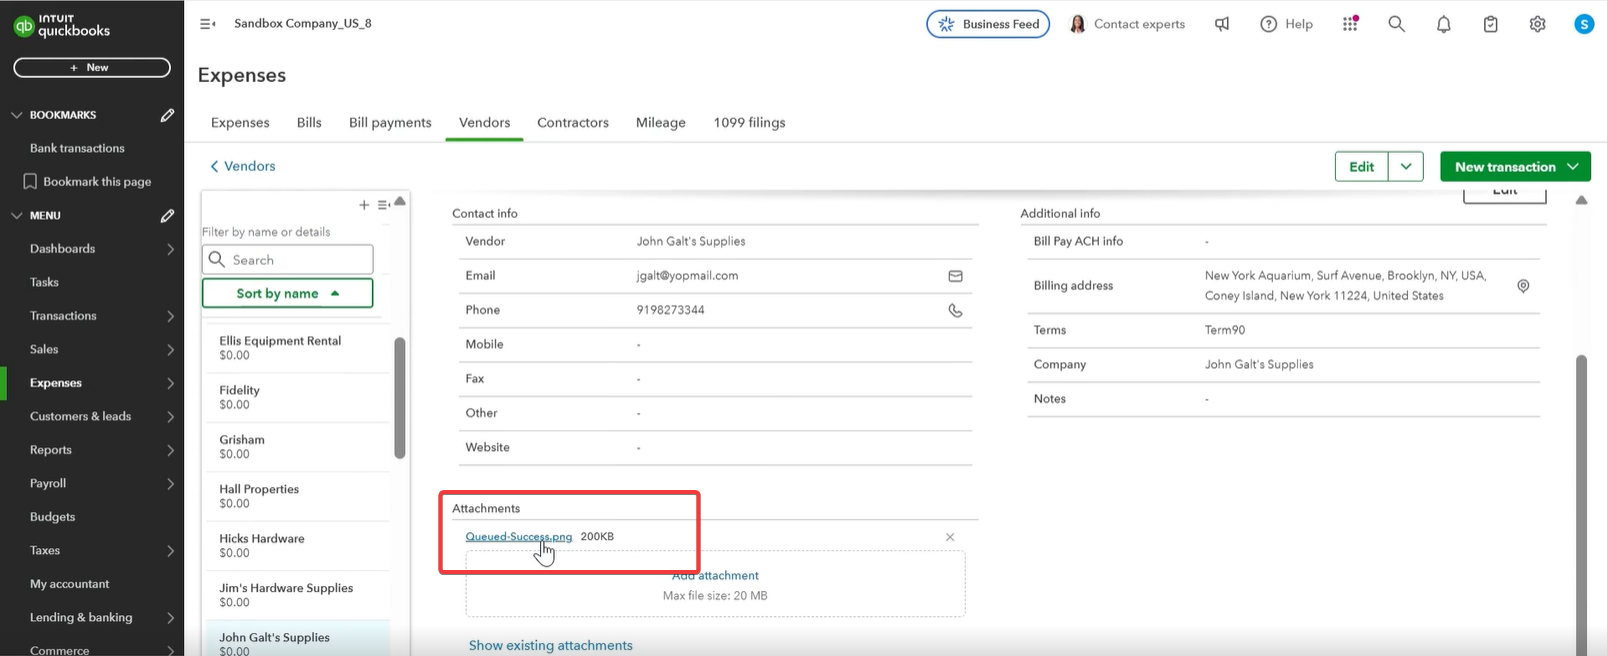
- Attachments:
- Vendor attachments added while the Vendor is Active in Zuper are synced one-way to QuickBooks Online.
- The maximum file size for attachments in QuickBooks Online is 20 MB.
- Multicurrency:
- If multicurrency is enabled in QuickBooks Online, a Vendor Currency custom field must be added to the Vendor module in Zuper and populated for each Vendor. This currency is mandatory for creating vendors in QuickBooks Online.
- Vendor custom fields in Zuper are not synced to QuickBooks Online.
- QuickBooks Online requires a unique Display Name for each Vendor.
- Vendor email is pulled from the vendor record in Zuper and carried over to QBO.
Push purchase orders to QuickBooks Online
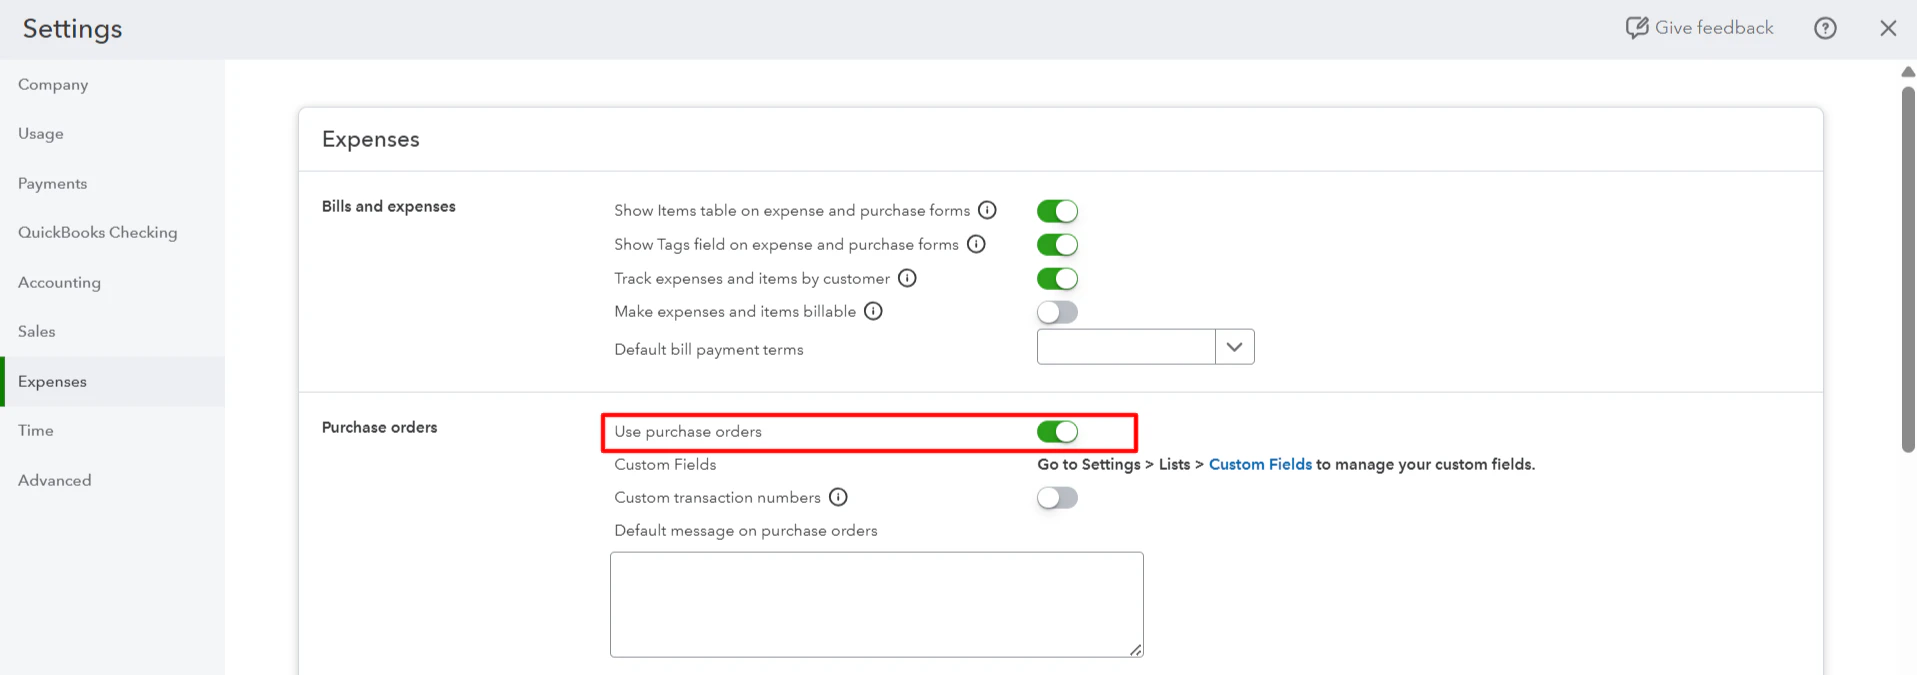
Purchase order (PO) sync lets you send purchase orders created in Zuper directly to QuickBooks Online (QBO). When a PO is created or updated in Zuper, those changes flow to QBO automatically, so your procurement records stay consistent across both systems without manual re-entry. Status updates that reach a terminal state in QBO such as Closed flow back to Zuper, keeping both systems aligned throughout the order lifecycle.- Confirm your QBO account is on the Plus or Advanced plan. PO sync requires inventory tracking, which is available only on these plans.
- In QBO, go to Settings, then select Account and Settings.
- Select Expenses.
- Under Purchase orders, turn on Show Items table on expense and purchase forms. This setting is required for line items from Zuper POs to appear on QBO POs.
- If you plan to map custom fields, enable custom fields for purchase orders in QBO. A maximum of three custom fields can be mapped across invoices, estimates, and purchase orders combined.
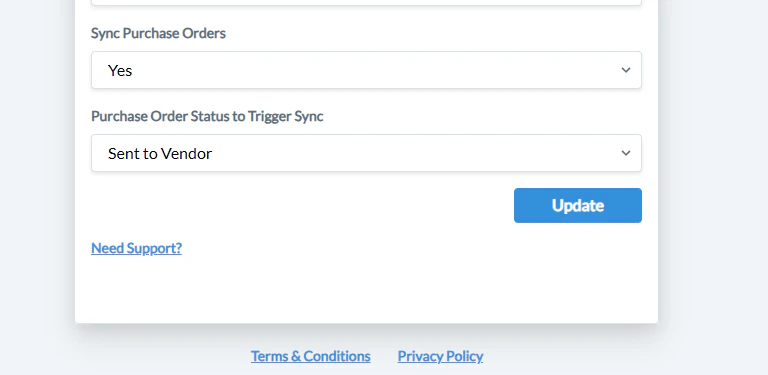
Enable PO sync in Zuper
Once your QBO account is ready, configure PO sync in Zuper.- Go to Settings, then select Integrations.
- Select QuickBooks Online.
- In the Zuper App Configuration panel, locate Sync Purchase Orders.
- Select Yes to turn on PO sync.
- Locate Purchase Order Status to Trigger Sync.
- Select the PO status at which Zuper should send the PO to QBO. The available options are: • Submitted • Approved • Sent to Vendor • Vendor Accepted
- Select Save to apply the configuration.
How vendors sync
When a PO syncs to QBO, Zuper checks whether the associated vendor already exists in QBO.- If the vendor exists in QBO, Zuper links the vendor to the PO automatically.
- If the vendor does not exist in QBO, Zuper creates the vendor in QBO first, then links them to the PO.
What syncs from Zuper to QBO
PO fields The table below shows how PO fields in Zuper map to fields in QBO.| Zuper field | QBO field |
|---|---|
| PO number | PO number |
| Vendor | Vendor |
| Vendor email | |
| Required by date | Due date |
| Order date | Purchase order date |
| Delivery address | Shipping address |
| Billing address | Mailing address |
| Remarks | Your message to vendor |
| Status | PO status |
| Zuper field | QBO field |
|---|---|
| Item name | Product/Service name |
| Part number | SKU |
| Unit purchase cost | Rate |
| Required quantity | Quantity |
| Total | Amount |
| Remarks | Description |
| Option or variant | Description |
| Vendor SKU | Description |
Notes and attachments
Notes and files attached to a PO in Zuper sync to the corresponding PO in QBO — notes as internal memo content and files as attachmentsCustom fields
Custom field mapping follows the same configuration used for Zuper invoice and estimate sync to QBO. If you have already mapped custom fields for invoices or estimates, those mappings apply to POs as well — provided the custom fields are enabled for purchase forms in QBO. A maximum of three custom fields can be mapped in total across invoices, estimates, and purchase orders. After a successful sync, Zuper updates two custom fields on the PO record —QBO PO Number and QBO Purchase Order ID — with the corresponding values from QBO. You can use these fields to cross-reference the record in either system.Checking sync status
Once a PO syncs to QBO, you can verify the result under Sync History in Zuper. The page shows a success message for the PO sync. It also displays the sync status for each line item inside the PO, so you can confirm that all items transferred correctly.Purchase order status mapping
Zuper and QBO use different status labels for purchase orders. The table below shows how statuses correspond between the two systems.| Zuper status | QBO PO state |
|---|---|
| Draft | Open |
| Submitted | Open |
| Approved | Open |
| Rejected | Closed |
| Sent to vendor | Open |
| Vendor accepted | Open |
| Vendor rejected | Closed |
| Partially fulfilled | Open |
| Fulfilled | Closed |
| Closed | Closed |
| Cancelled | Closed |
What purchase order data does not sync
Not all purchase order data flows to QuickBooks Online. The following are excluded from the integration:- PO deletions — Deleting a PO in Zuper does not remove it from QuickBooks Online.
- Attachment removals — Removing a file in Zuper does not remove it from QuickBooks Online.
- Job, project, asset, and material request associations — Links to these records are not included in the sync.
- Variant details — Variant information does not appear in a dedicated line item field in QuickBooks Online. It appears in the Description field only.
Chart of Accounts in QuickBooks Online
In QuickBooks Online, the chart of accounts needs to be set up for Accounting and tracking financial transactions. The major type of accounts are:- Balance Sheet Accounts
- Profit and Loss Accounts
- Invoice a customer - increases AR account balance by the invoice amount.
- Receive Payment (partially or in full). - decreases AR account balance by the payment amount
- Deposit the payment to a bank account.
- AR accounts are Asset accounts.
- Enter a Bill from a vendor - increases AP account balance by the Bill amount.
- Pay Bill (fully or partially). - decreases AP account balance by the payment amount.
- Payment is recorded from the chosen account (bank, credit card, etc.).
- AP accounts are Liability accounts.
| QuickBooks Online Feature | AR (Accounts Receivable) | AP (Accounts Payable) |
|---|---|---|
| Chart of Accounts | Uses the Accounts Receivable (asset) account | Uses the Accounts Payable (liability) account |
| Transactions | Invoice, Receive Payment, Sales Receipt | Bill, Pay Bills, Expense |
Updating newly created Income or Expense Accounts in Product Custom Fields
When creating new income or expense accounts in QuickBooks Online for accurate tracking and categorizing financial transactions, it’s essential to ensure seamless integration and data consistency between Zuper and QuickBooks Online. Follow these steps to add the newly created account name in the Product Custom Fields.- Go to Settings -> Custom Fields & Checklist Settings -> Product or Part Fields. The Product Custom Fields page opens.
- In the QuickBooks Online Income Account field, add the names of the newly created income accounts as values.
- In the QuickBooks Online Expense Account field, add the names of the newly created expense accounts as values.
Updating newly created invoice custom fields
When creating a new Invoice in QuickBooks Online, it’s essential to ensure seamless integration and data consistency between Zuper and QuickBooks Online to track and categorize financial transactions accurately. Follow these steps to add the newly created invoice to the Product Custom Fields.- Go to Settings -> Custom Fields & Checklist Settings -> Invoice Fields. The Product Custom Fields page opens.
- In the QuickBooks Online Invoice field, add the newly created invoice date names as values.
- In the QuickBooks Online Invoice field, add the names of the newly created due dates as values.
Limitations
- QuickBooks Online limits a customer’s First Name or Last Name to 25 characters and a Company Name to 50 characters. If a customer is created in Zuper with a name that is over 25 characters long, there will be an error when creating the Customer in QuickBooks Online.
- If a customer is deleted in Zuper, the record will still be available in QuickBooks Online.
- Customers should subscribe to QuickBooks Online Plus or Advanced for inventory tracking.
- The Zuper account holder should have a dedicated account to generate the API Key, and the user should be in the administrator role. This account should be different from the one connecting to QuickBooks Online.
- For the B2B scenario cases, to push the Organization to QuickBooks Online, the value for the fields “Identify Customers in Zuper – QuickBooks Online” should be specified as:
- Billing Name – Customer Display Name.
- QuickBooks Online allows a maximum of three custom fields for Quotes and Invoices. Irrespective of the status of the custom field in QuickBooks Online, more than three custom fields will replace the current custom field values. Regardless of the custom field’s status
Credits and Refunds
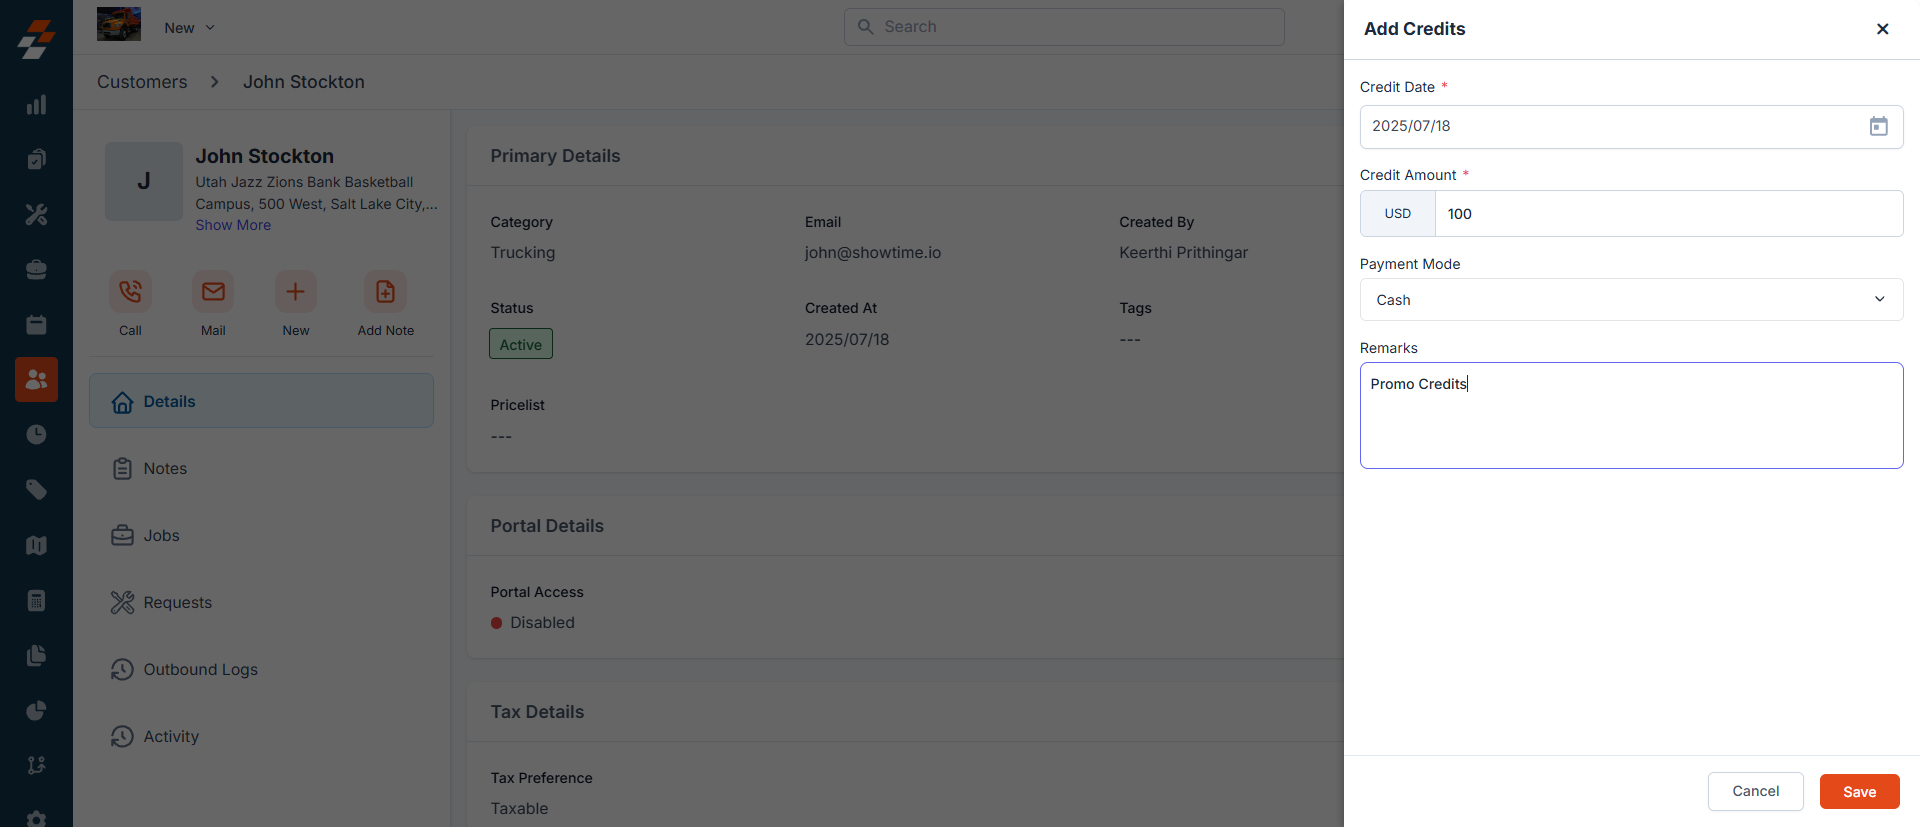
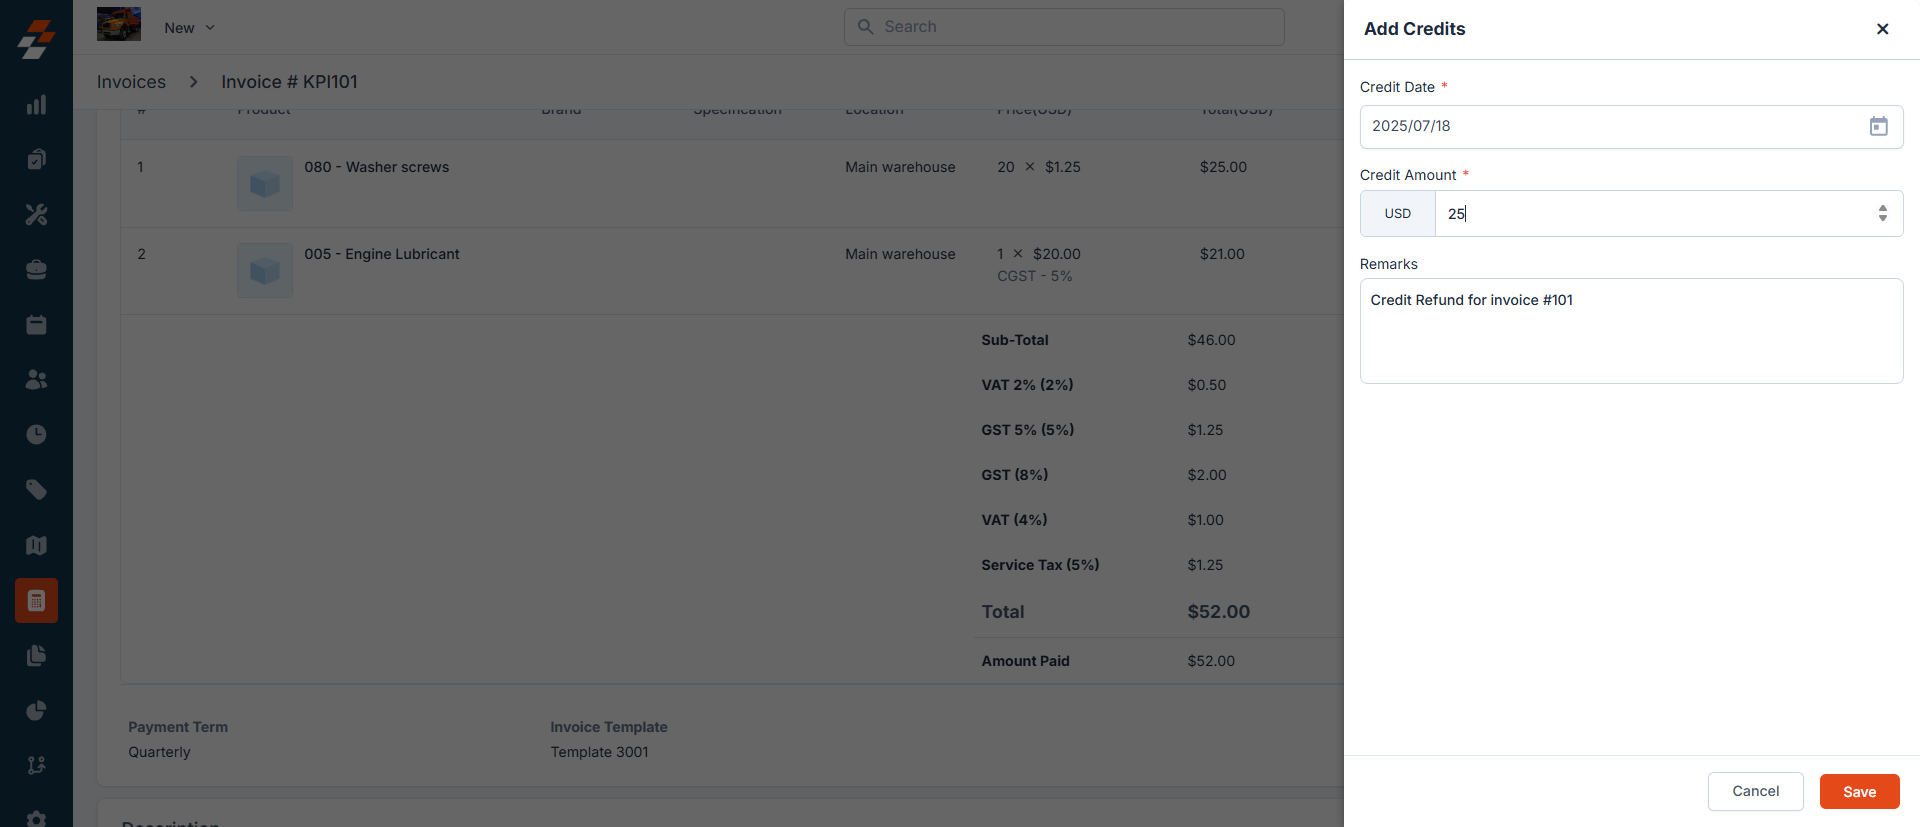
Zuper’s revamped credits and refunds feature allows you to manage customer credits, process refunds (full or partial), and void payments efficiently. These actions sync seamlessly with QuickBooks Online, ensuring accurate financial records. Credits can be applied to invoices, stored as credit memos, or refunded via the original payment method, depending on the transaction type (Zuper Pay or non-Zuper Pay, online or offline). Creating a Credit Memo Credit memos in the Zuper store credit against a customer, which can later be applied to invoices. These can be done either directly in the customer module or while refunding a payment in a transaction.- Log in to Zuper: Navigate to the Invoice or Payments module.
- Select Customer: Choose the customer you want to create a credit with.
- Create Credit Memo:
- Click New Credit Memo or equivalent.
- Enter the credit amount and add a memo/note (e.g., reason for credit, such as overpayment or service issue).
- A default line item of type “SubTotal” with the credit amount is automatically added (required for QuickBooks Online API).
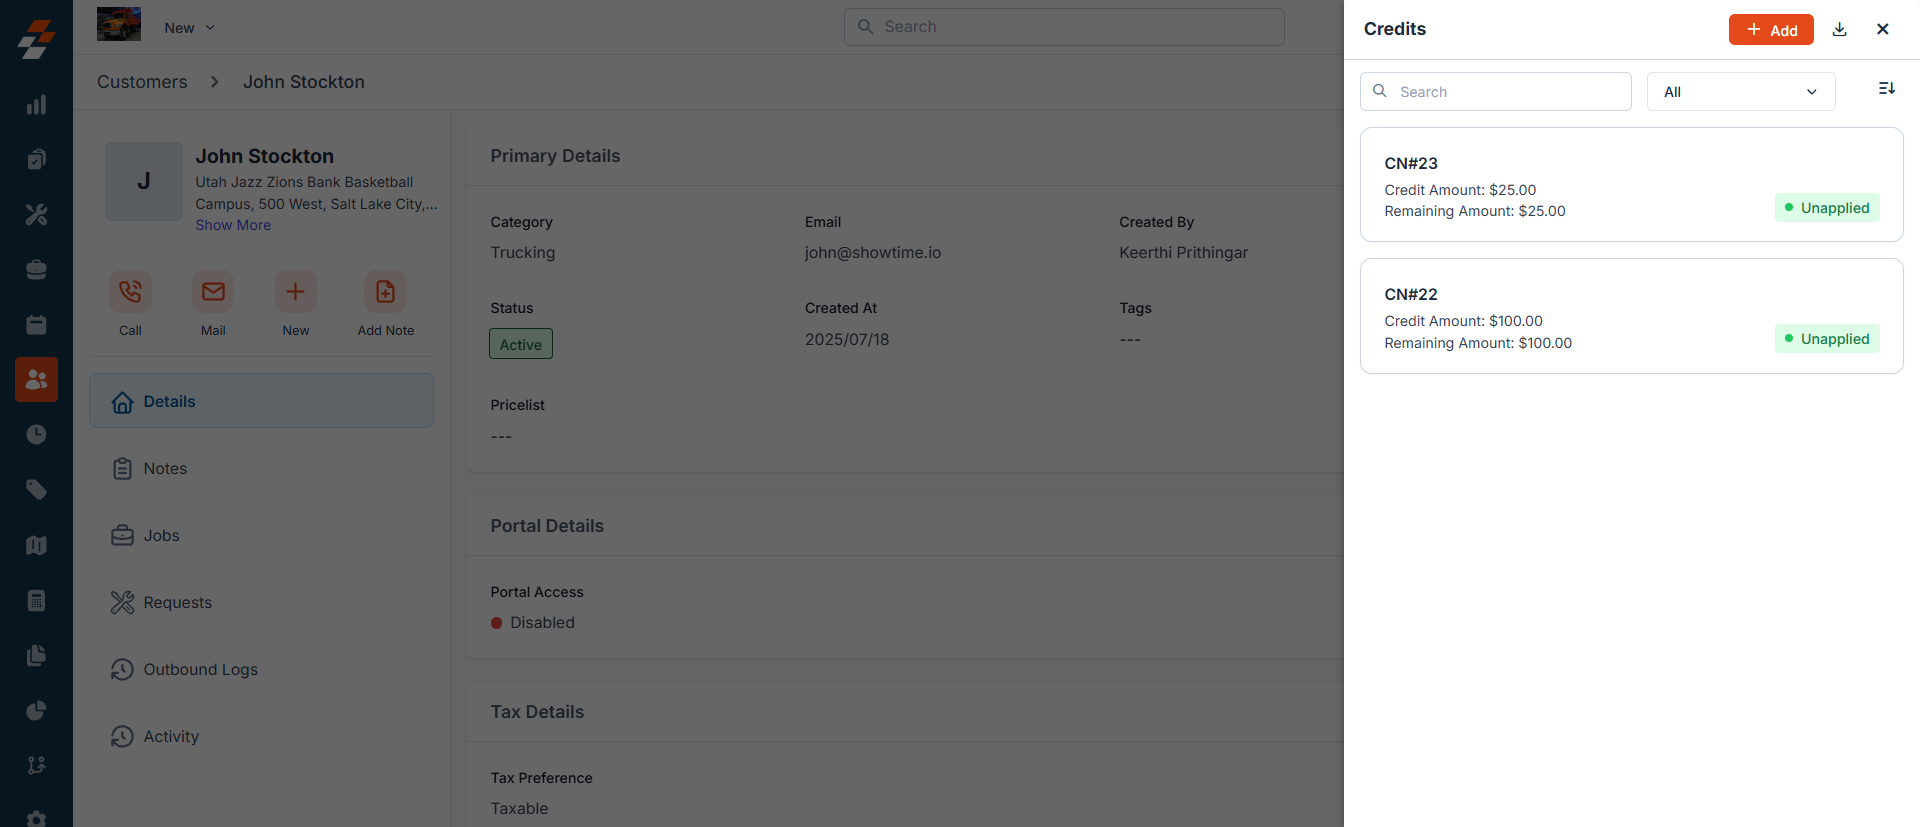
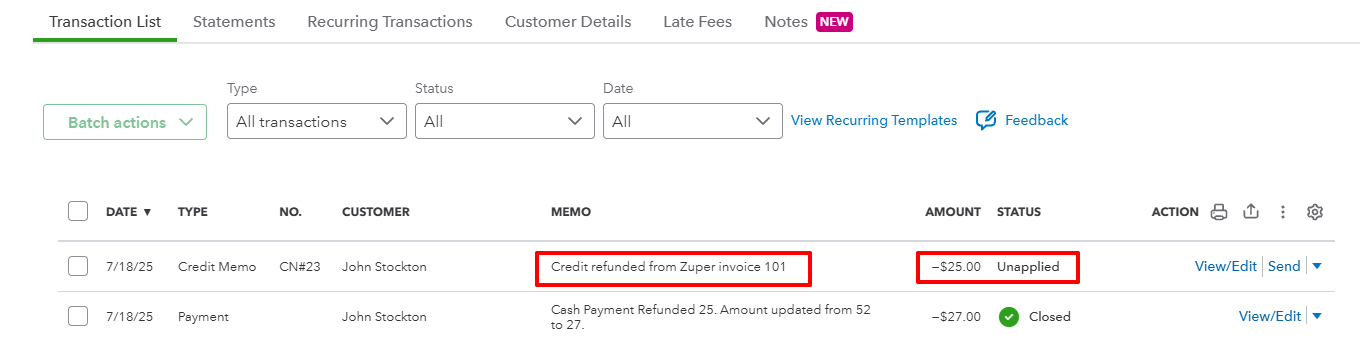
- Save the credit memo. It will sync to QuickBooks Online as a credit memo linked to the customer.
- Verify in QuickBooks Online:
- In QuickBooks Online, go to Sales > Customers to confirm the credit memo is listed under the customer’s account.
- Note: If a credit memo is deleted in Zuper, it will also be deleted in QuickBooks Online.
- Create or Select an Invoice:
- Navigate to the Billing module and create a new invoice or select an existing one for the customer.
- Apply Credit:
- Choose Record Payment or Apply Credit.
- Select the credit memo and specify a custom amount (up to the total credit available).
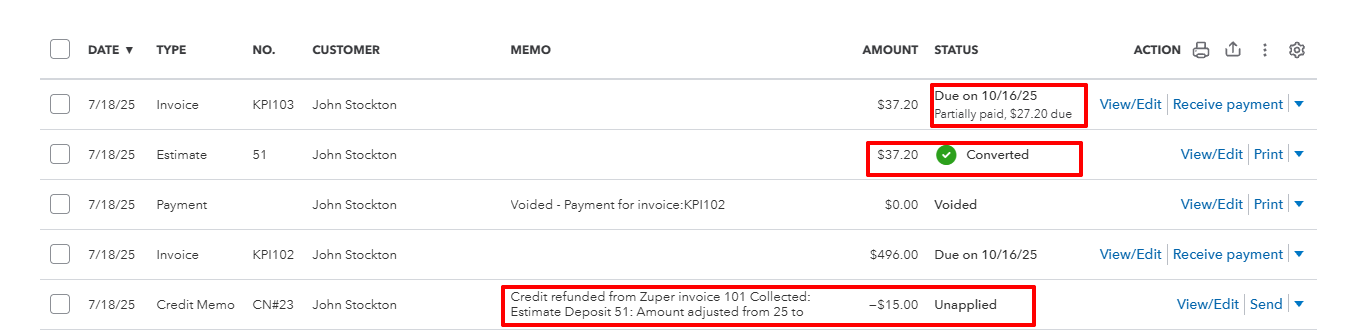
- Save the action. The invoice status updates to Partially Paid or Paid in Zuper.
- Sync with QuickBooks Online:
- The applied credit is recorded as a payment in Zuper and synced as a payment in QuickBooks Online against the invoice.
- The applied amount reduces the customer’s credit balance in QuickBooks Online.
- Verify in QuickBooks Online:
- In QuickBooks Online, go to Sales > Customers or Transactions > Payments to confirm the payment and updated invoice status.
- Offline Transactions:
- Navigate to the Billing or Payments section in Zuper.
- Select the customer and the payment to refund.
- Choose Refund and specify the amount (full or partial).
- Select whether to store the refund as a credit memo or return it to the original payment method.
- Save the refund. The payment in Zuper has been updated, and the invoice status has changed to Partially Paid or Sent.
- Sync with QuickBooks Online:
- The payment in QuickBooks Online is cleared (set to 0) for full refunds or modified for partial refunds.
- If stored as a credit memo, the customer’s corresponding credit is added in QuickBooks Online.
- Online Transactions:
- Follow the same steps as offline transactions, but the refund must be manually added as a credit memo in Zuper.
- The refund is processed and synced to QuickBooks Online as described above.
- Offline and Online Transactions:
- Navigate to the Billing or Payments section.
- Select the payment to refund and choose Refund.
- Specify the amount (full or partial) and store it as a credit memo.
- Save the refund. The invoice status updates to Partially Paid or Sent.
- Sync with QuickBooks Online:
- The payment in QuickBooks Online is cleared (full refund) or modified (partial refund).
- A credit memo is added to the customer’s account in QuickBooks Online.
- Refund receipts are not created in QuickBooks Online as part of this process.
- Deposits collected against quotes in Zuper cannot be refunded.
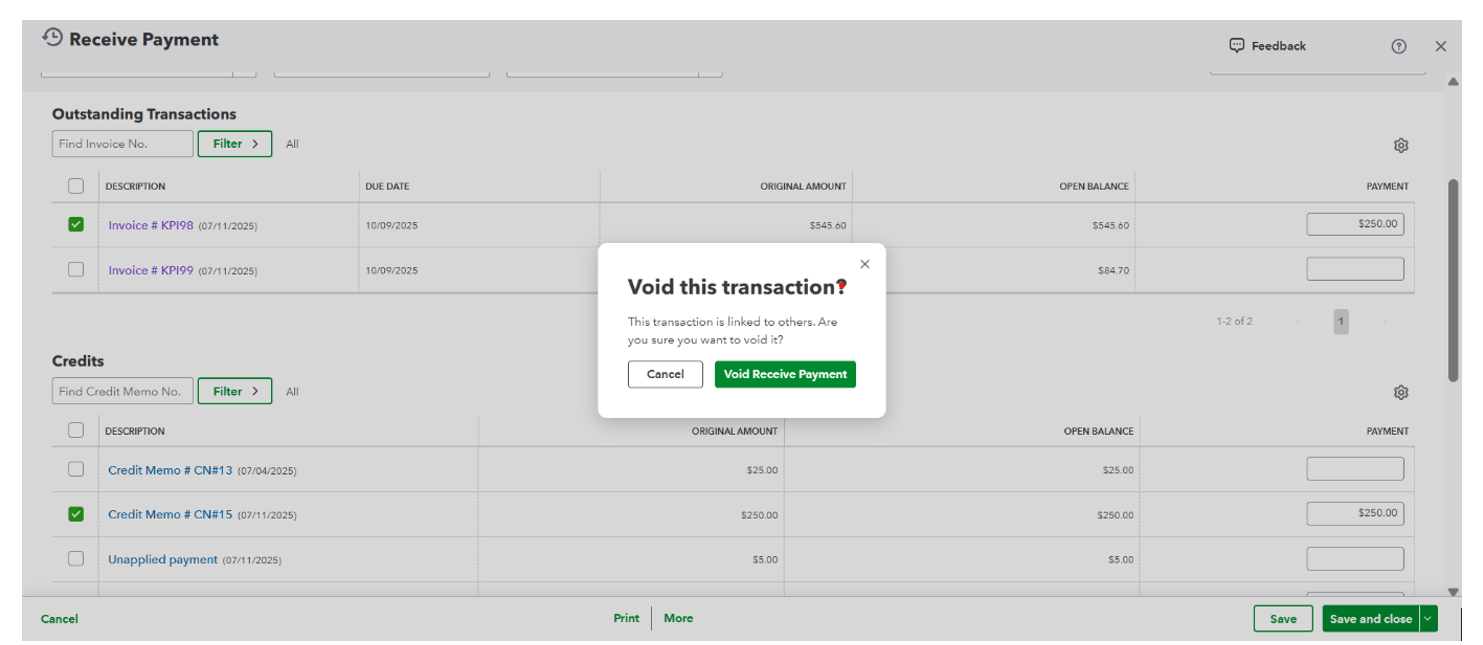
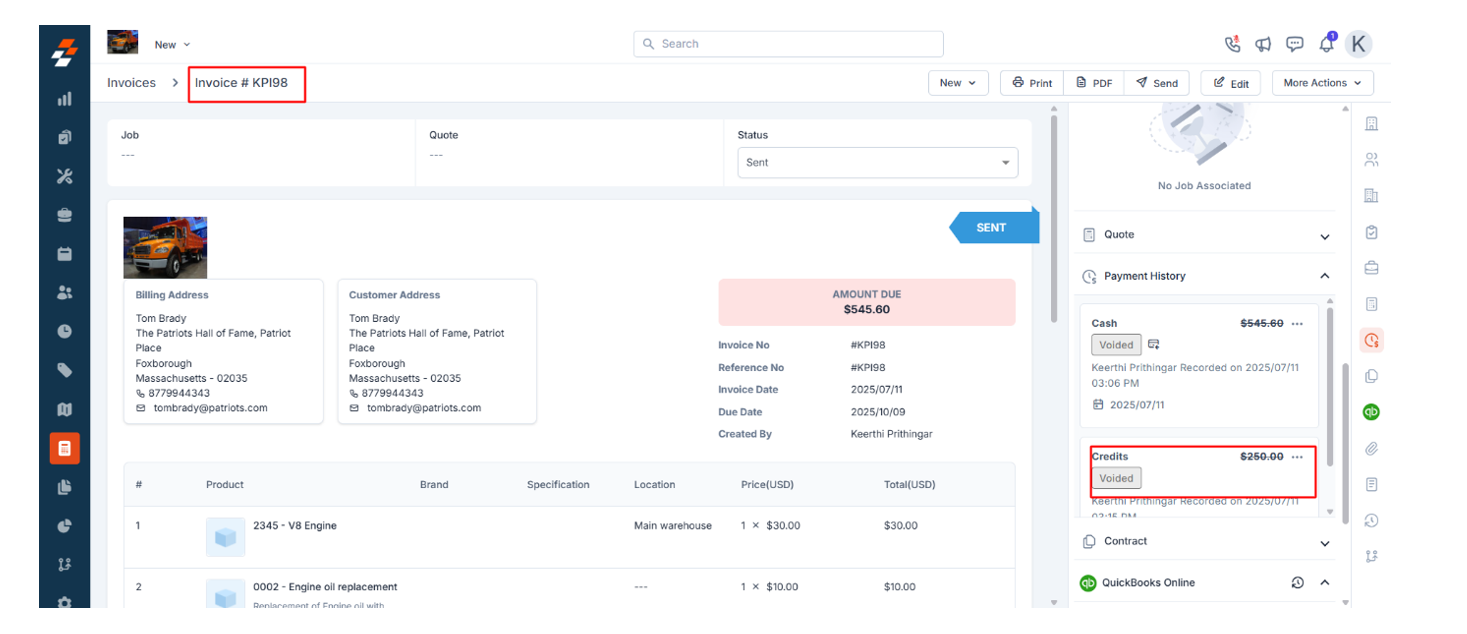
- Void a Payment in Zuper:
- Navigate to the Billing or Payments section.
- Select the payment and choose Void.
- Confirm the action. The payment is voided, and the invoice status changes to Partially Paid or Sent.
- Sync with QuickBooks Online:
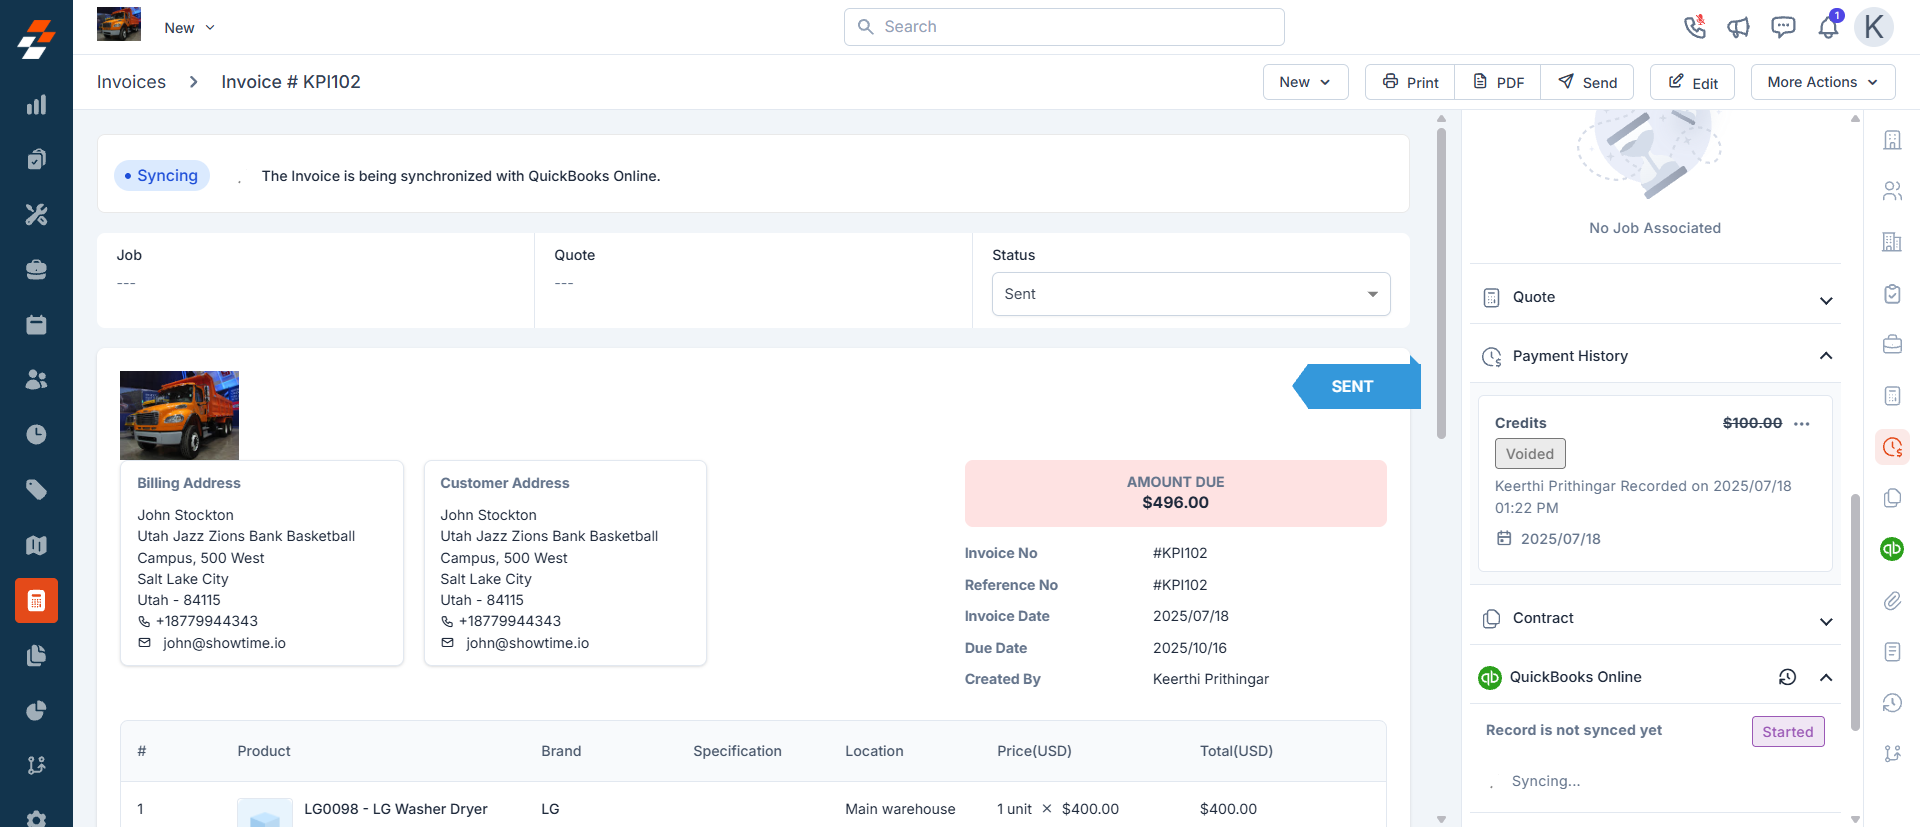
- The corresponding payment in QuickBooks Online is voided.
- Note: Voiding does not automatically add credits to the customer in Zuper or QuickBooks Online. Credits must be manually added if needed.
- Verify in QuickBooks Online:
- In QuickBooks Online, go to Transactions > Payments to confirm the payment is voided.
- For non-Zuper Pay transactions, voiding a payment acts as a refund but does not offer a “refund” option.
- Zuper does not allow voiding or canceling invoices with active payments, unlike QuickBooks Online. Ensure payments are cleared in Zuper before voiding an invoice in QuickBooks Online to avoid discrepancies.
- In QuickBooks Online, voiding an invoice may push payments to customer credits. Since Zuper clears payments before voiding, this should not occur during sync.
- Sync Errors: If credits, refunds, or voids do not reflect in QuickBooks Online, check the integration settings in Zuper. Ensure the QuickBooks Online connection is active and retry the sync.
- Incorrect Invoice Status: Verify that the invoice status in Zuber (Partially Paid or Sent) matches QuickBooks Online after refunds or voids. Correct any discrepancies in Zuper.
- Credit Application Issues: Ensure QuickBooks Online’s “Automatically apply credits” setting is turned off to prevent unintended credit application.
- Credit Memo Line-Item Errors: If a credit memo fails to sync to QuickBooks Online, confirm that a default “SubTotal” line item is included, as the QuickBooks Online API requires.
- Disable QuickBooks Online Auto-Apply Credits: Turn off QuickBooks Online’s “Automatically apply credits” setting to ensure manual control over credit application.
- Regular Syncing: Sync Zuper with QuickBooks Online daily to maintain accurate financial records.
- Clear Memo Notes: Add detailed notes to credit memos and refunds for audit purposes (e.g., “Refund for overpayment on Invoice #123”).
- Review Reports: Use Zuper and QuickBooks Online reports (e.g., Customer Balance Summary, Payment Reports) to track credits and refunds.
- Customer Invoices
- Payments
- Credits
- Refunds
- Voids (offline and online transactions)
Credits Sync
Creating Credits
- Credits can be generated manually against a customer in Zuper.
- Credits are automatically refunded when a refund is processed on a paid invoice (partial or full).
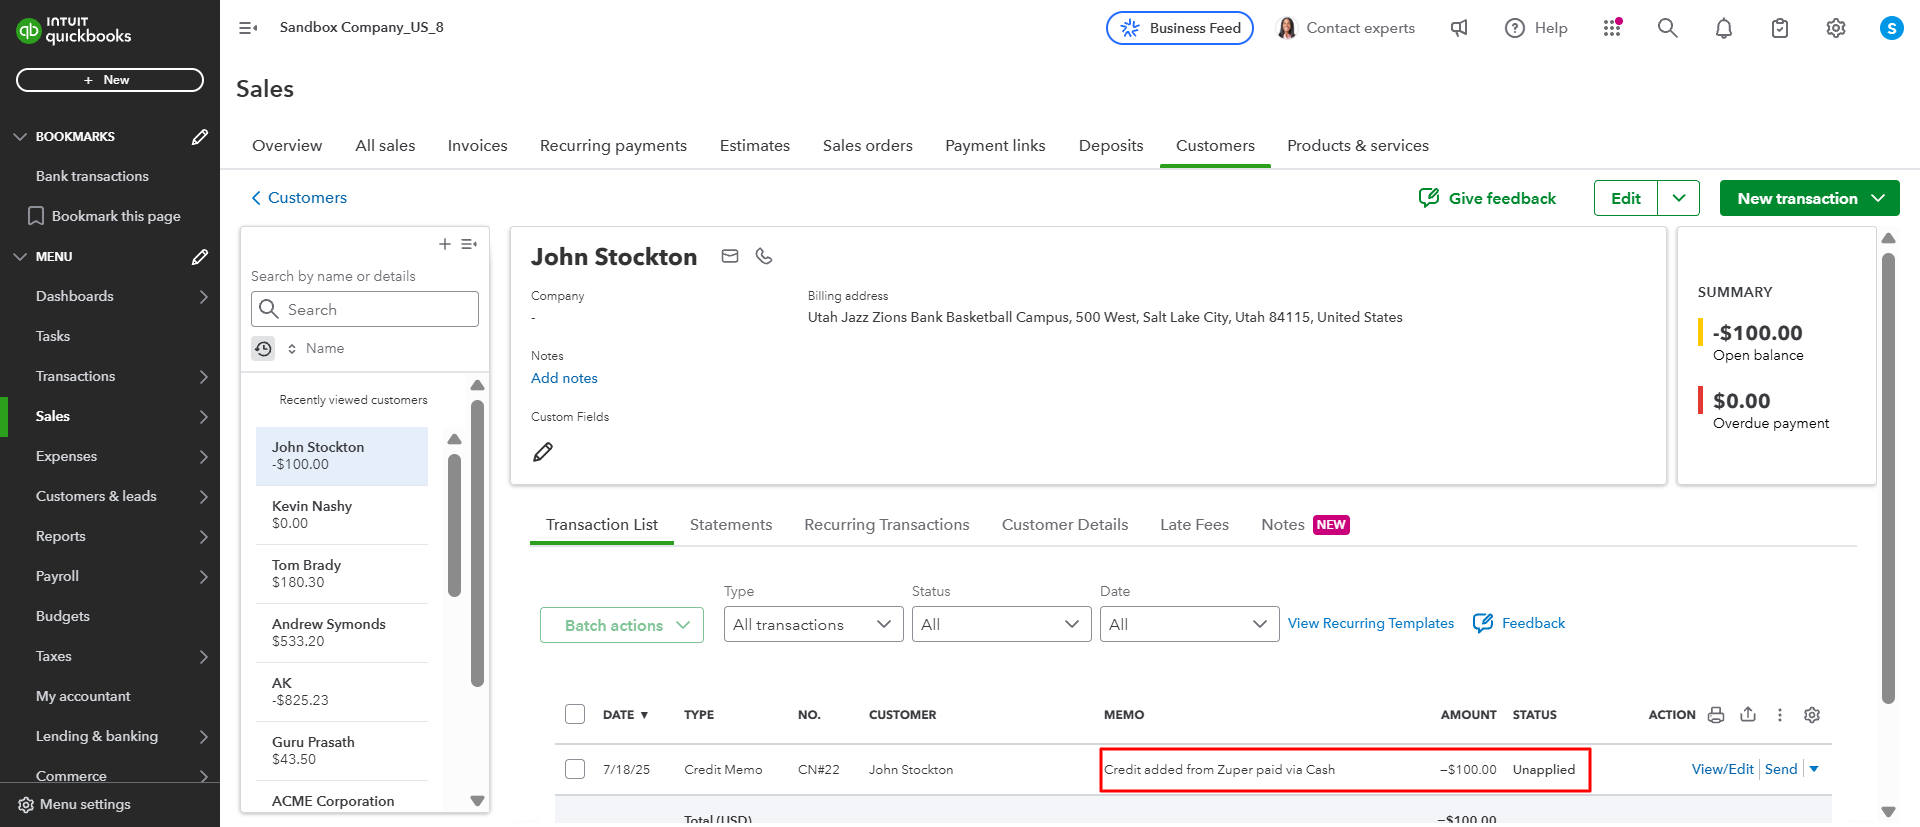
- All such credits are synced to Credit Memos in QuickBooks Online against the same customer in Unapplied Status.
Applying Credits
When credits are applied to an outstanding invoice in Zuper, the corresponding Credit Memo in QuickBooks Online is now applied.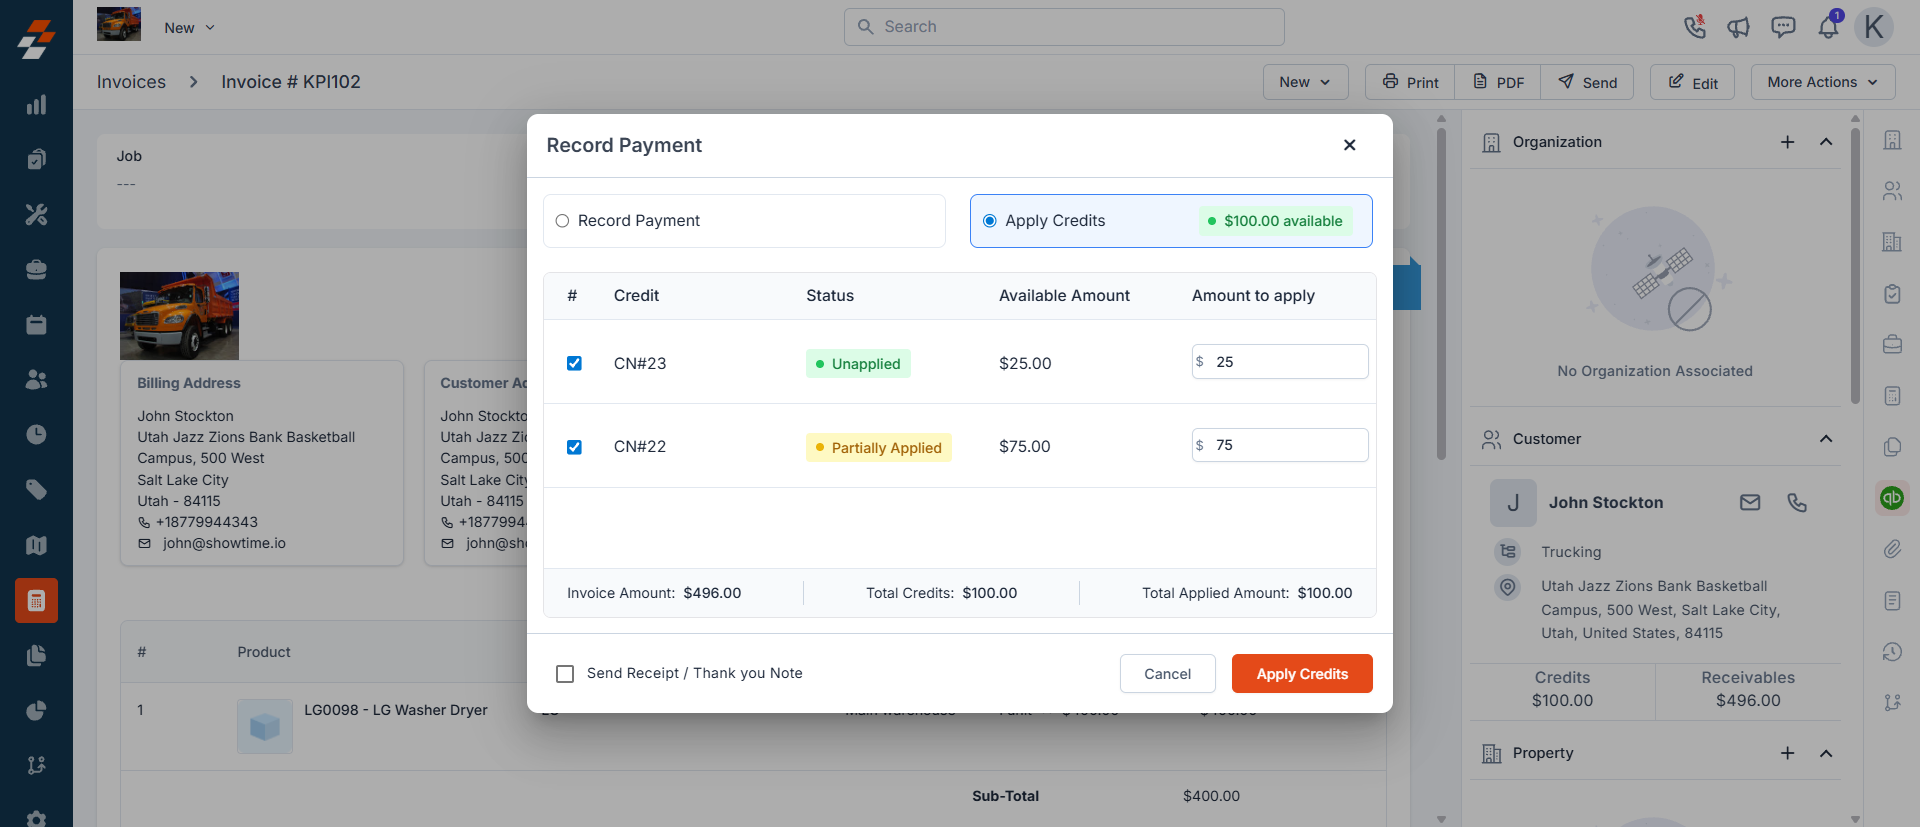


Payment Modes
Refunds and credits may be handled via:- Zuper Pay (online/offline) or
- Standard payment methods (cash, bank transfers, etc.).
Zuper ensures proper reflection of the refund source and amount in QuickBooks Online, irrespective of the payment mode.
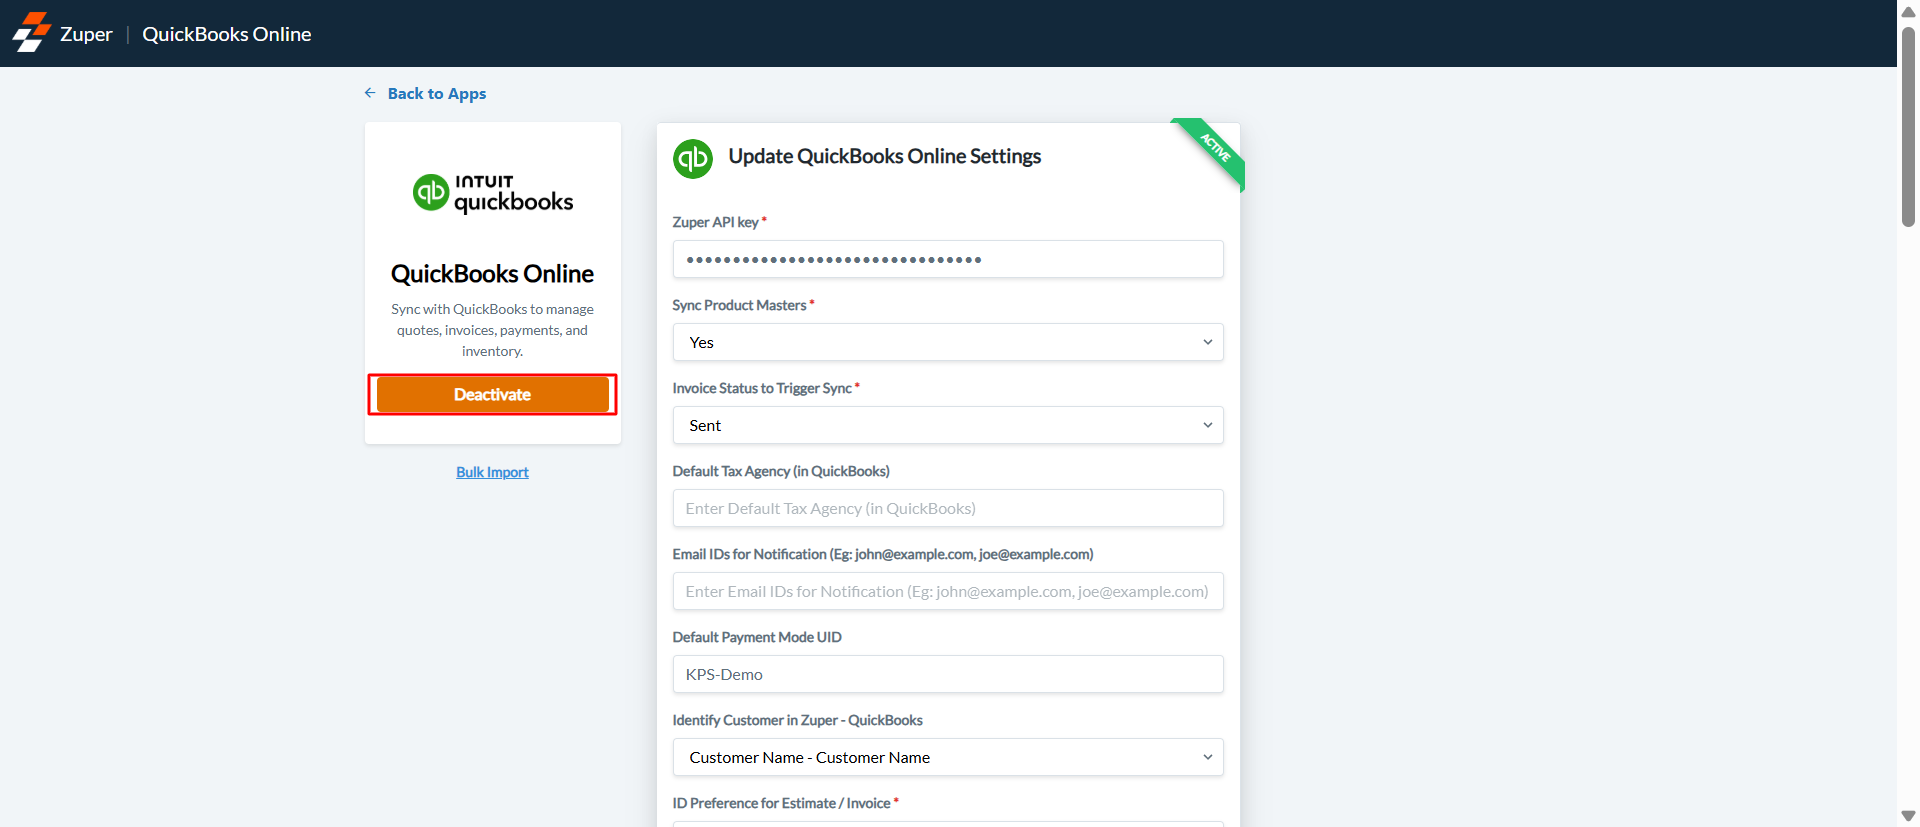
Uninstall QuickBooks Online
- Log in to your Zuper account. Click your Profile Picture at the top right corner of the screen and select “App Store.”
- Under “Browse by Category,” select the “Accounting” option and choose “QuickBooks Online.”
- Click “Configure Settings.
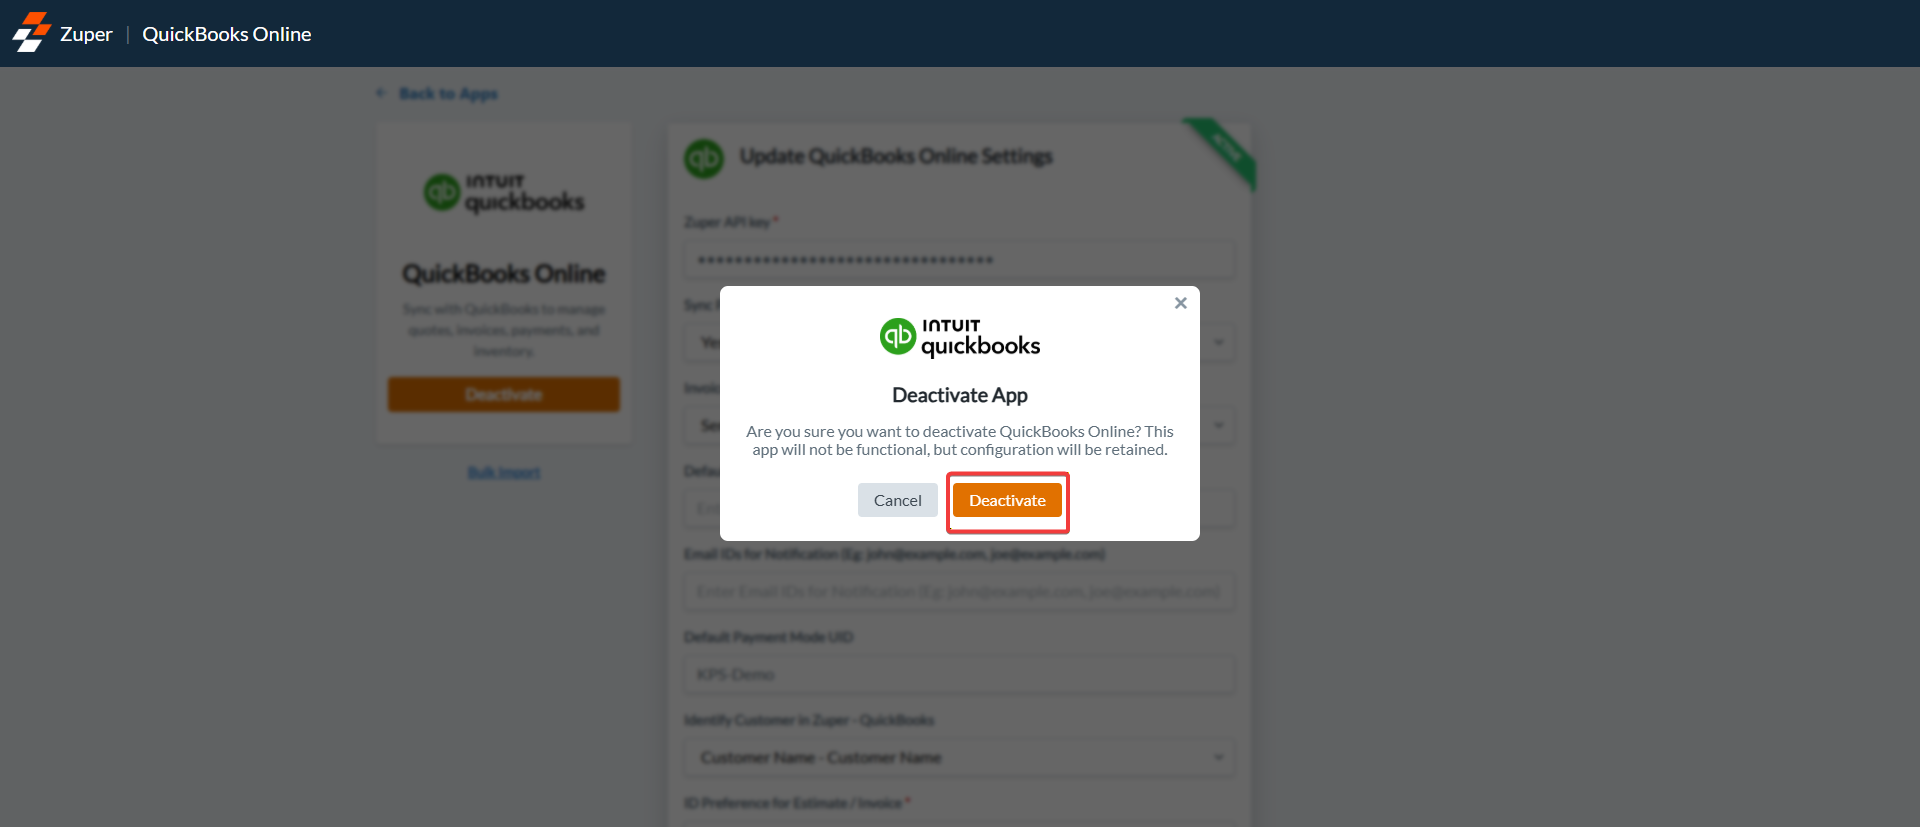
- Click the “Deactivate” button and confirm deactivation to temporarily pause the integration.
- Saving configuration with paused sync: Your integration settings (e.g., field mappings, API connections, and preferences) will be preserved for future use. However, any new or updated data flowing from Zuper to QuickBooks Online (such as new invoices, customer updates, or inventory changes) will be temporarily halted. This lets you pause outgoing syncs without losing your setup, which is useful for troubleshooting, maintenance, or temporary holds.
- Impact on existing synced invoices and payments: For invoices that were already successfully synced from Zuper to QuickBooks Online before the pause, any payments collected directly in QuickBooks Online (e.g., via customer payments or bank feeds) will continue to sync back to Zuper. This reverse sync occurs only if your app configuration explicitly enables it (e.g., via payment reconciliation or bi-directional update settings). It prevents discrepancies in your records for completed transactions, ensuring payments are reflected in both systems. Recommendation for Payments - Zuper recommends setting the payment sync direction to “No Sync” to ensure payments collected in QuickBooks Online are not synced back to Zuper when the integration is inactive.
- Disables all payment synchronization between Zuper and QBO. No data is exchanged in either direction, which helps maintain data isolation—especially when the integration is temporarily inactive. Zuper recommends this setting in such cases to prevent unintended back-sync of QBO payments into Zuper.
Inventory items created in QuickBooks Online will continue to sync to Zuper when QuickBooks is configured as the product master. Product consumption and replenishment updates will also continue to sync from QuickBooks to Zuper. Recommendation
To avoid inventory-related impacts, turn off product master synchronization.
- After pausing sync or deactivating the integration, navigate to Zuper → QuickBooks Online configuration and disable Sync Product Masters.
This prevents QuickBooks from creating or updating Products and Services in Zuper when QuickBooks is set as the product master. As a result: - No new products will be synced from QuickBooks Online to Zuper during the paused or deactivated period.
- Product quantity consumption and replenishment will not sync from QuickBooks Online to Zuper.
- Existing product master’s that were synced before this setting was turned off will remain unchanged in both systems.
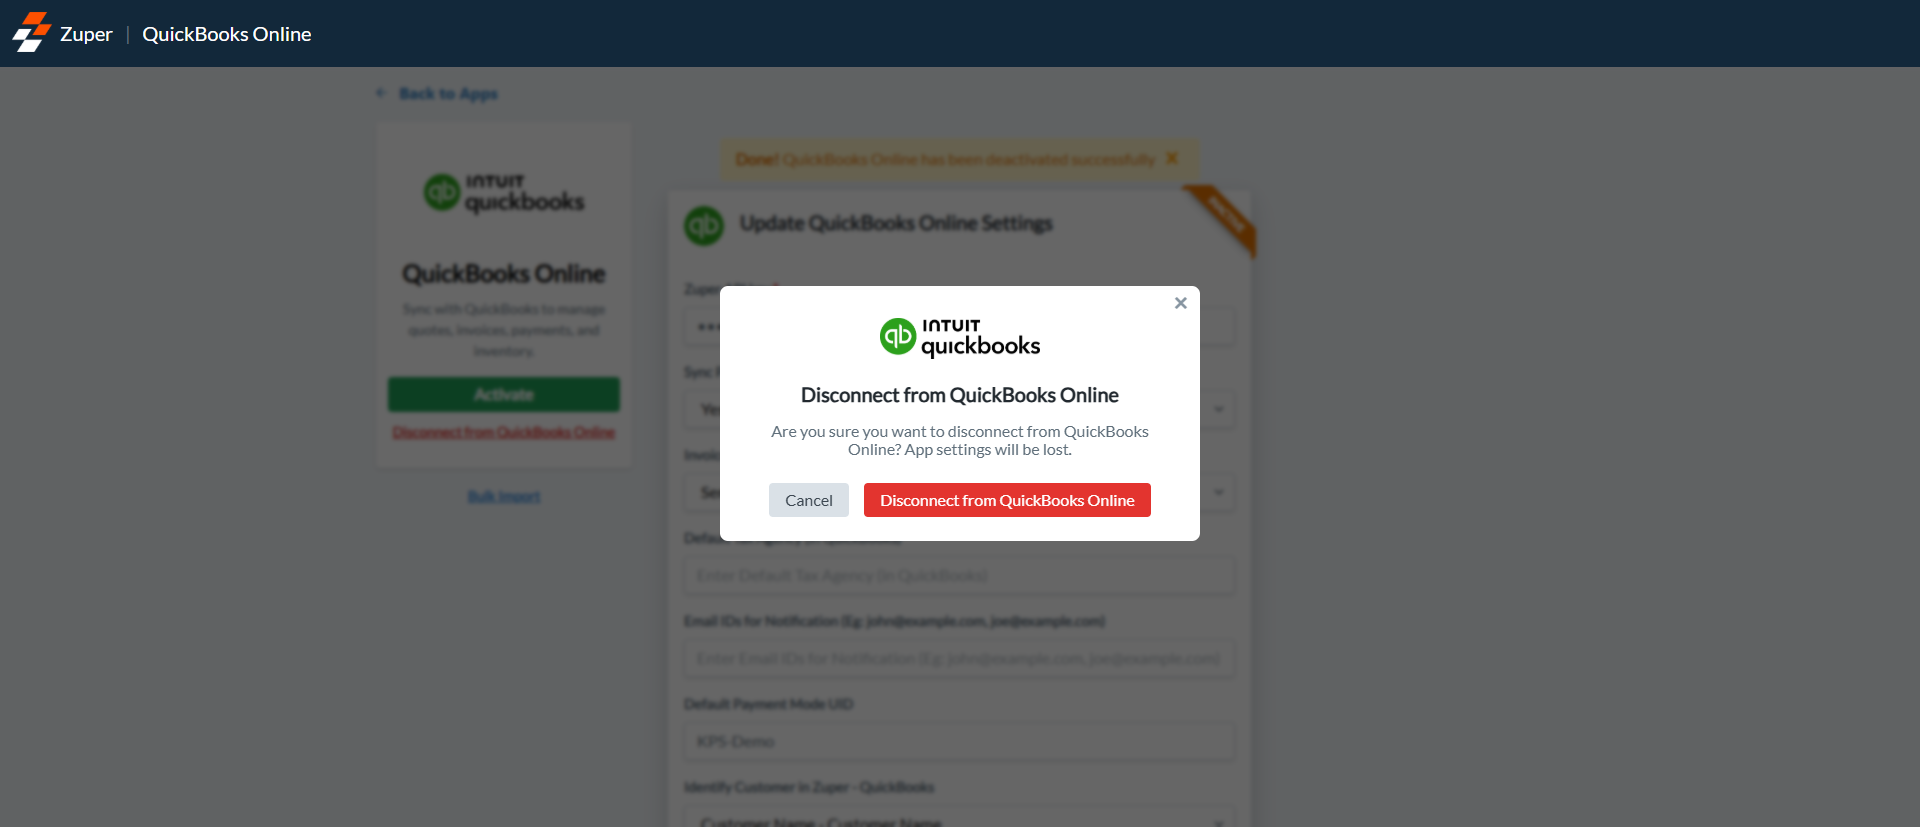
- Click the “Disconnect from QuickBooks Online” button (it will appear in red text below the “Activate” button if the app is inactive).

- In the confirmation dialog box, review the warning (“Are you sure you want to disconnect from QuickBooks Online? App settings will be lost.”) and click “Disconnect from QuickBooks Online” to confirm. Your app is now successfully uninstalled.
Frequently asked questions
What QBO plan do I need to sync purchase orders?
What QBO plan do I need to sync purchase orders?
What happens if the vendor on my Zuper PO does not exist in QBO?
What happens if the vendor on my Zuper PO does not exist in QBO?
Can I sync POs that were created before I turned on the setting?
Can I sync POs that were created before I turned on the setting?
I updated a PO in Zuper after it synced. Will the changes appear in QBO?
I updated a PO in Zuper after it synced. Will the changes appear in QBO?
A PO was closed in QBO. Why did the status not update in Zuper?
A PO was closed in QBO. Why did the status not update in Zuper?
Does the QuickBooks Online integration automatically map product descriptions to product names or SKUs in Zuper?
Does the QuickBooks Online integration automatically map product descriptions to product names or SKUs in Zuper?
What does the integration sync, and in which direction?
What does the integration sync, and in which direction?
If I update a product SKU or name in QuickBooks Online, will it update in Zuper automatically?
If I update a product SKU or name in QuickBooks Online, will it update in Zuper automatically?
Is the Description field on a quote or invoice line item editable in Zuper?
Is the Description field on a quote or invoice line item editable in Zuper?
What should I do if I need to update descriptions or SKUs across many products at once?
What should I do if I need to update descriptions or SKUs across many products at once?