Navigation: Dispatch Board -> Users | Scheduler | Maps
Users
The user layout on the Dispatch Board enables you to shortlist technicians based on teams and schedule dates. This helps you track and plan routes/jobs more effectively by focusing on specific teams and daily schedules.To select a team, view the technicians in that team (along with their assigned jobs/routes on the selected date in the Scheduler view), and optimize your planning, follow these steps:
- Select the team name from the drop-down menu. All technicians in the selected team will appear in the Scheduler, along with any assigned jobs or routes for the chosen date. If jobs are assigned on that date, their locations are also visible on the Map.
Note: The team picker on the Dispatch Board only shows dispatchable teams. If you cannot find a team in the list, it may have been marked as non-dispatchable in Settings -> Users & Teams -> Team Management. To make the team available again, uncheck the Non-Dispatchable checkbox for that team.
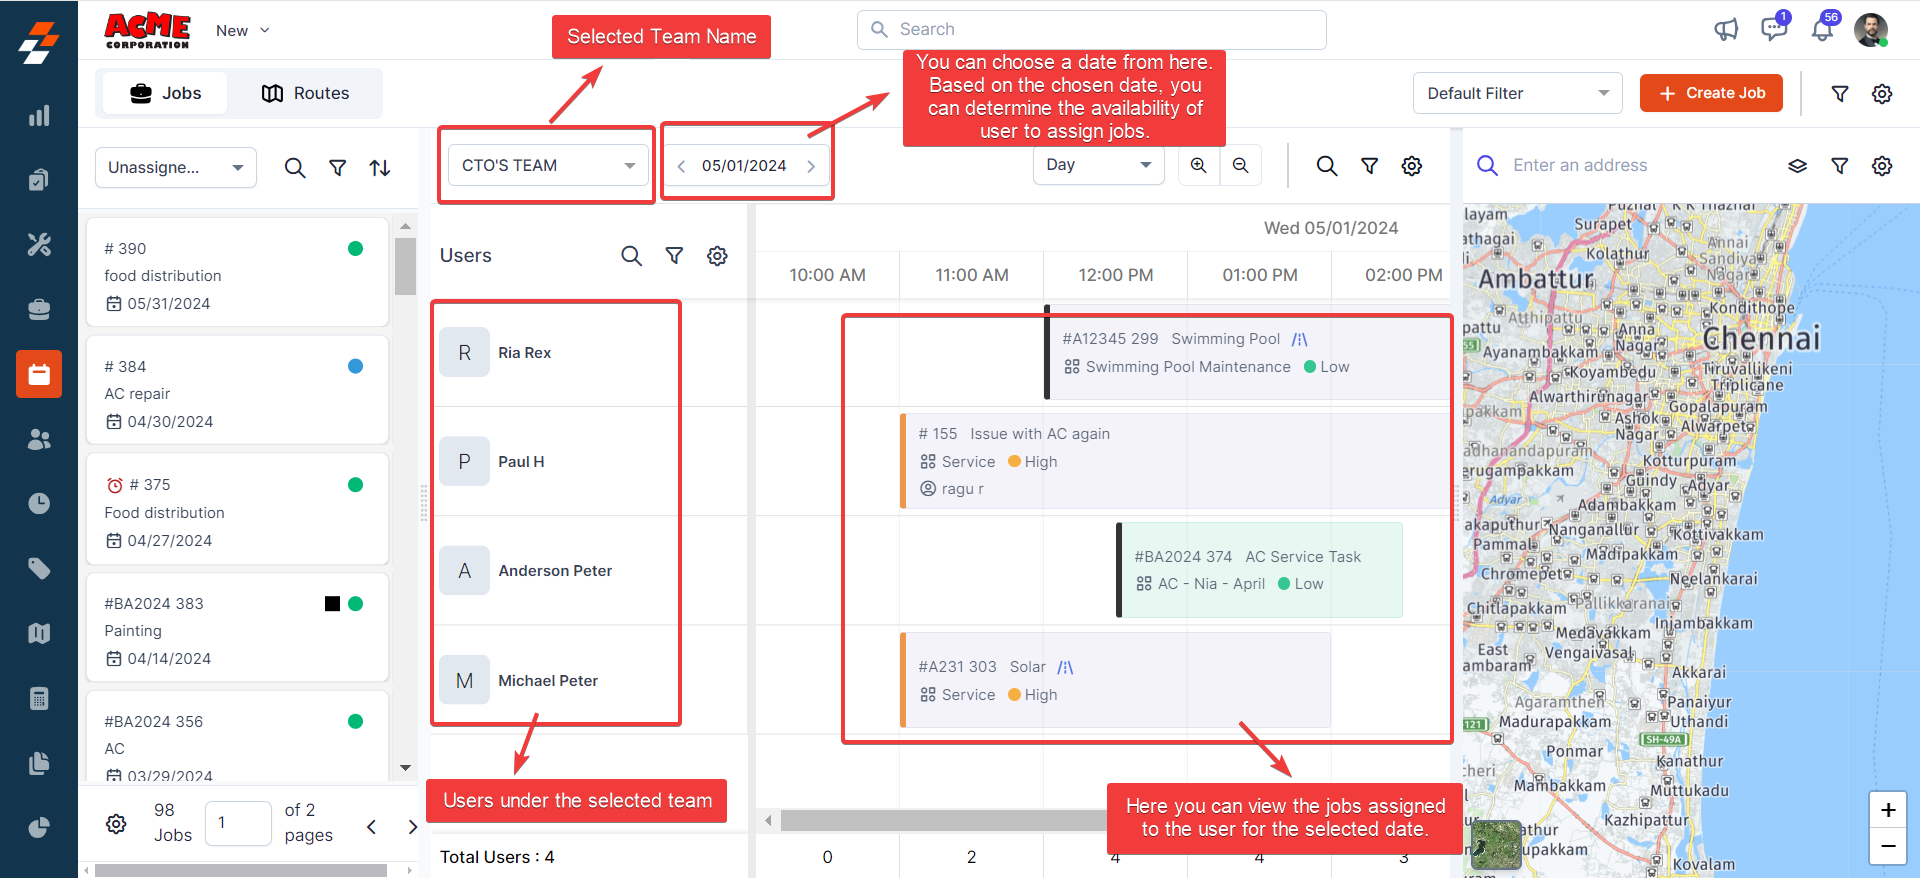
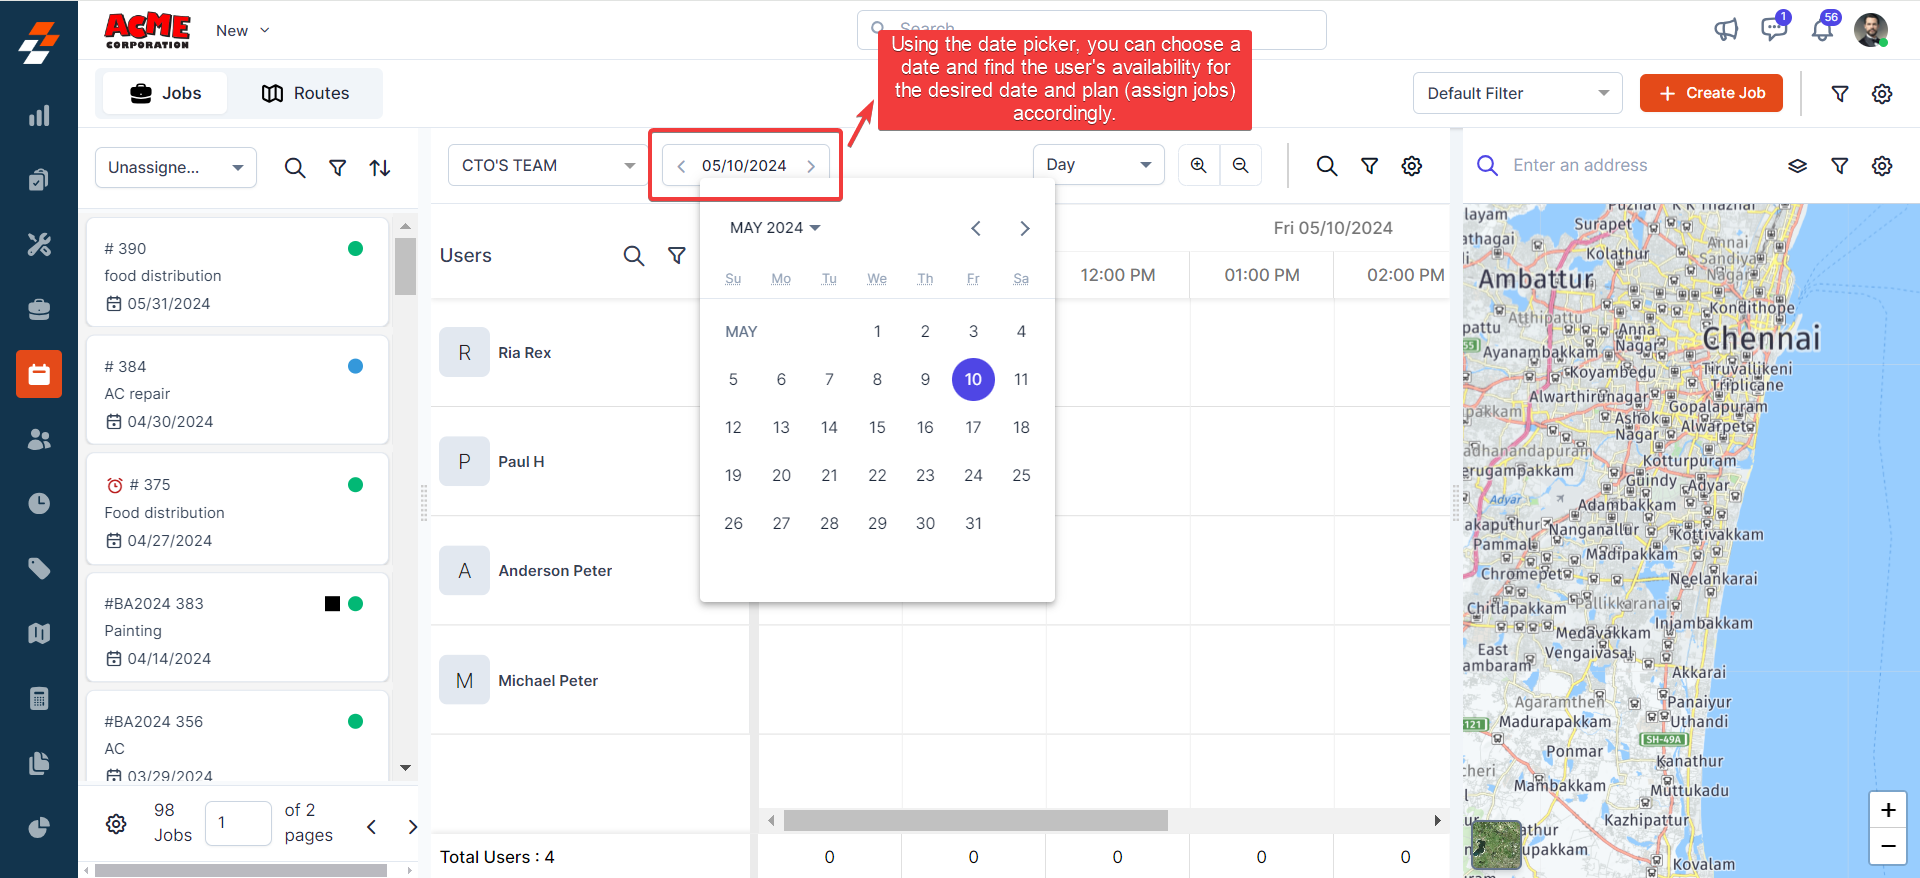
- Change the date using the date picker. This lets you quickly view a technician’s schedule for any specific date and plan assignments accordingly.
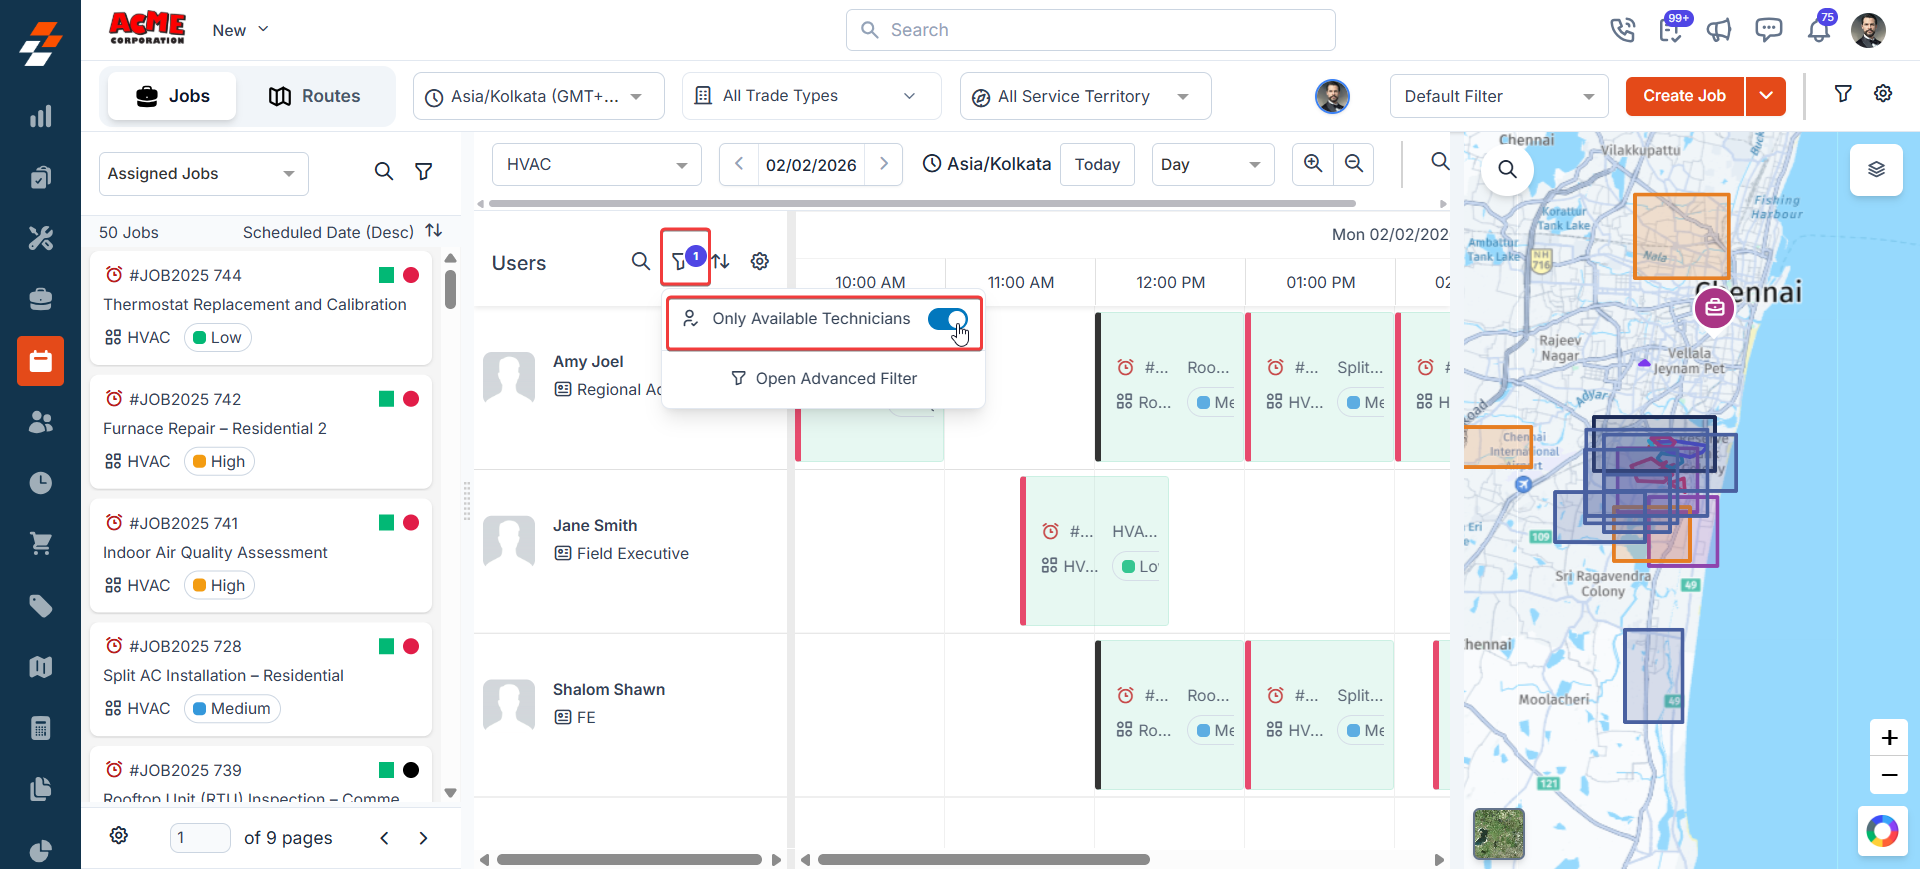
- You can also refine the only available technicians using the new quick filter:
- Toggle on the “Only Available Technicians” in the Users filters area.
- When enabled, the Users panel automatically hides technicians who are unavailable for the entire selected day due to:
- An All-Day Time-Off entry, or
- An All-Day Non-Job Event marked as Busy.
- Partial-day time-offs or non-job events do not hide technicians; they remain visible with their open time slots shown. This reduces clutter, prevents accidental assignments to fully unavailable technicians, and helps you focus faster on those with real availability.
- Once the team, date, and filtered list are set, review each technician’s load and availability:
- Hover over a technician to see their current job count (load).
- Check the Scheduler slots for any planned time blocks on the selected date. Based on this, drag and drop the job or route from the Dispatcher Queue directly onto an available technician in the Scheduler. You’ll be prompted to confirm the start and end times.
Scheduler
As dispatcher queue, the Scheduler is also one of the essential layouts in the dispatch board that helps you perform the following activities.- Schedule a job/route for the user at a specific date/time and view the scheduled/assigned jobs/routes to the user.
- Create a Job and New Time-Off.
Schedule/View Assigned Jobs/Routes in the Scheduler
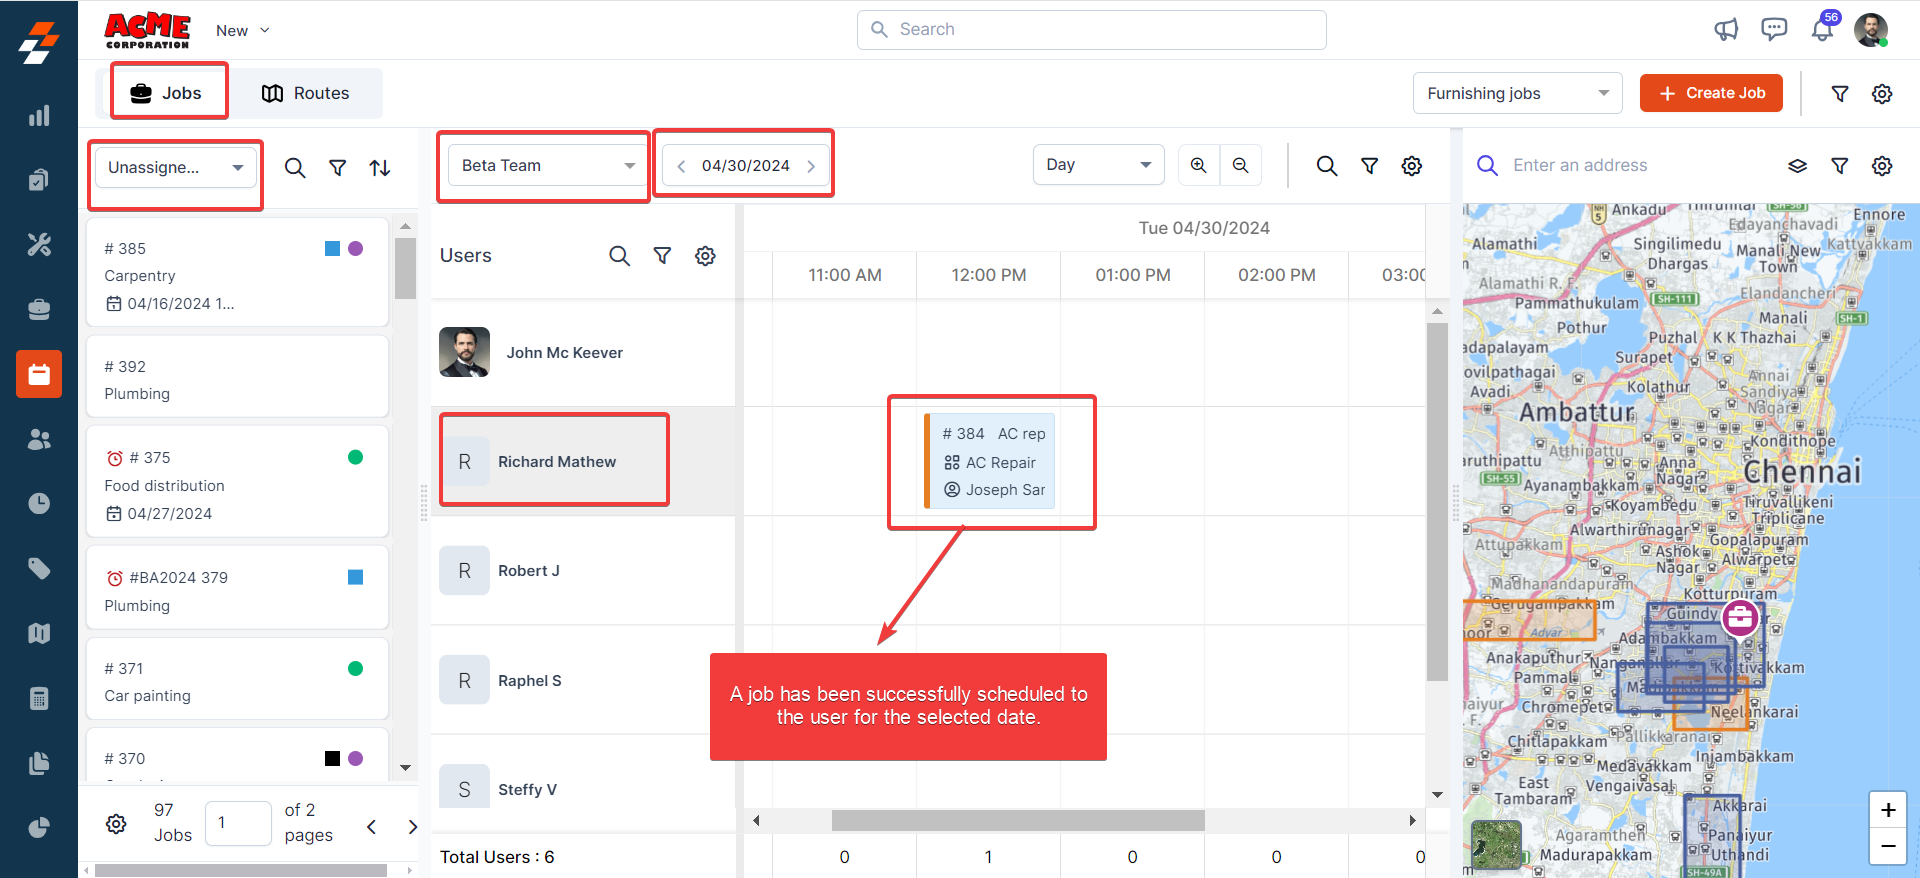
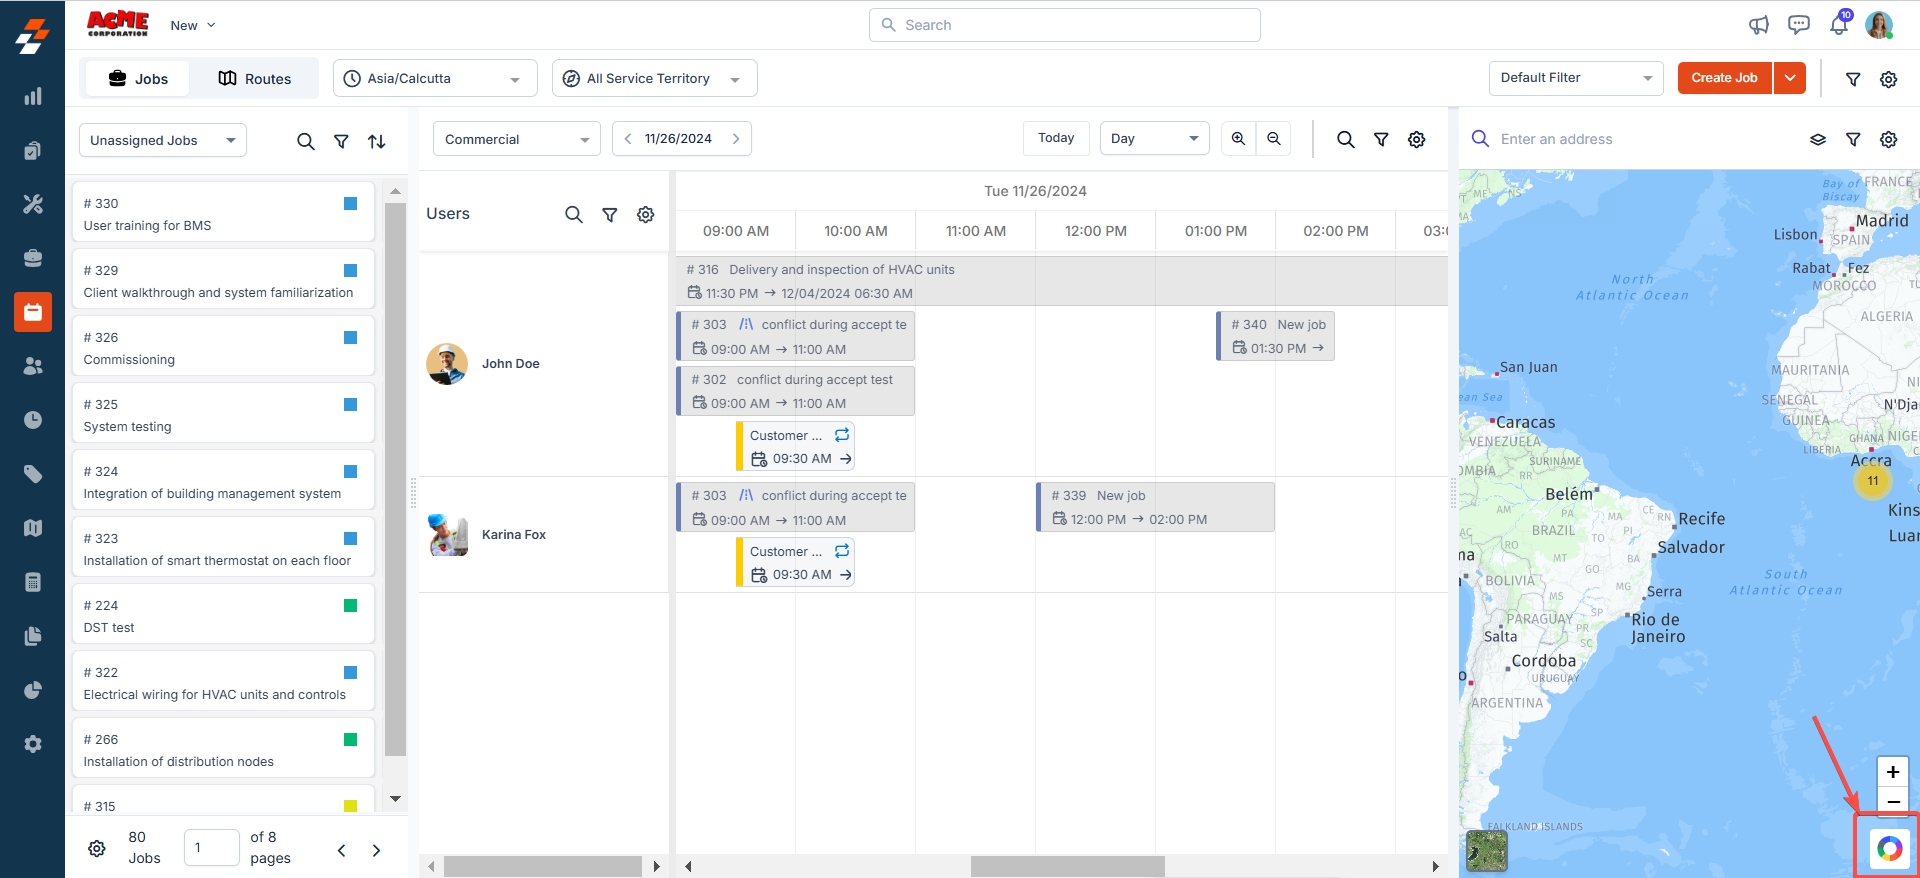
In the scheduler, you can schedule and view all the jobs and routes that have been assigned to technicians. This view provides a detailed overview of each technician’s schedule and helps you manage and optimize technicians’ workload effectively. To schedule and view jobs/routes in the scheduler, you need to go to the dispatcher queue and select either the “Jobs” or “Routes” stream. Once selected, you can assign/schedule Jobs/Routes in the Scheduler. For example, if you have selected the Jobs stream and shortlisted “Unassigned Jobs” from the dropdown menu, you can view all the unassigned jobs that have not been assigned to any user (field technician) in the dispatcher queue. To assign/schedule the shortlisted job in the scheduler, follow these steps:- Select the “team name” and “date” when you need to schedule the job. Based on the team selected, you can review user’s availability and proximity to current jobs for the selected date in the scheduler.

- Depending on the user availability, simply drag and drop the shortlisted job from the dispatcher queue onto an available technician (from a selected team) in the scheduler, where you’ll be asked to provide the start and end date and time to schedule/reschedule the pending jobs.
Create a New Job or Time-Off
You can create a new job or time-off for a user directly from the scheduler. This quickly enables you to manage the technician’s workload and availability efficiently, ensuring seamless operations and optimal resource utilization.Scheduler – Creating New Job
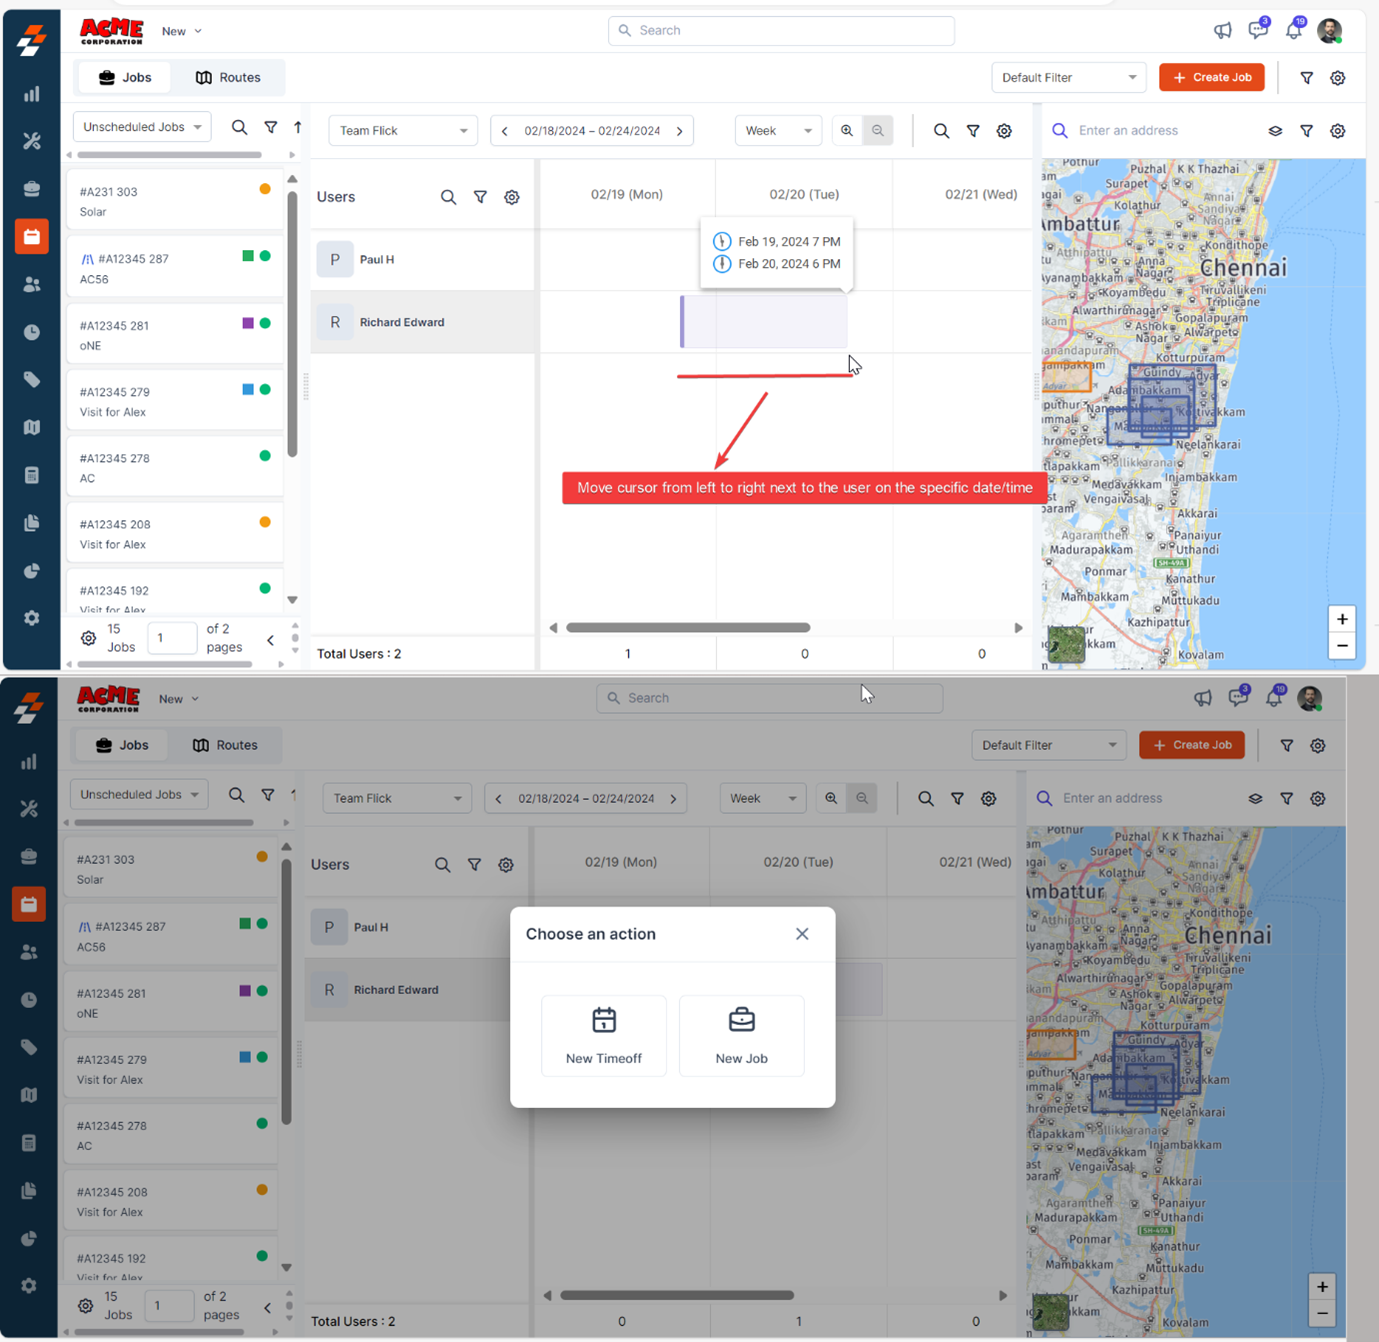
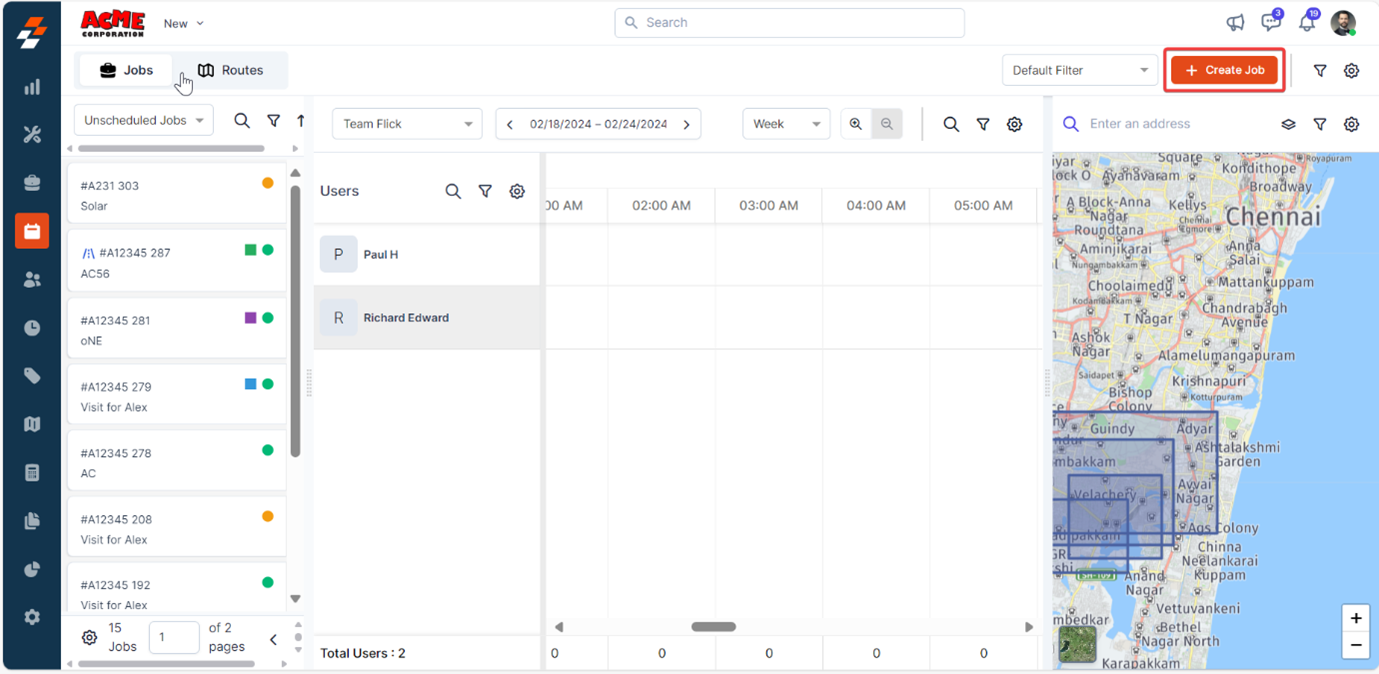
To create a new job from the scheduler, follow these steps:- Simply click & swipe the cursor from left to right next to the user at a specific date/time in the scheduler.
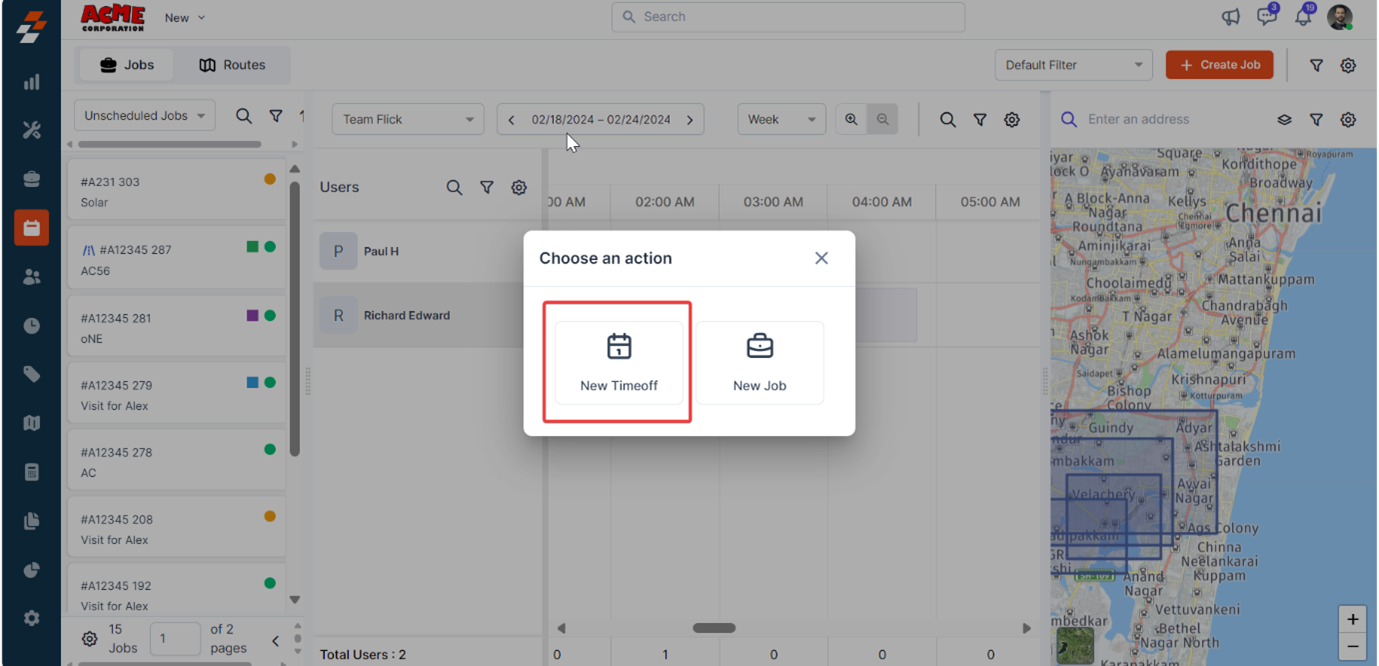
- A pop-up appears, prompting you to choose an action: “New Time-Off” or “New Job.”
- In the pop-up, click “New Job.” A sidebar will appear with the prefilled details such as user’s name and scheduled date/time to create a new job.
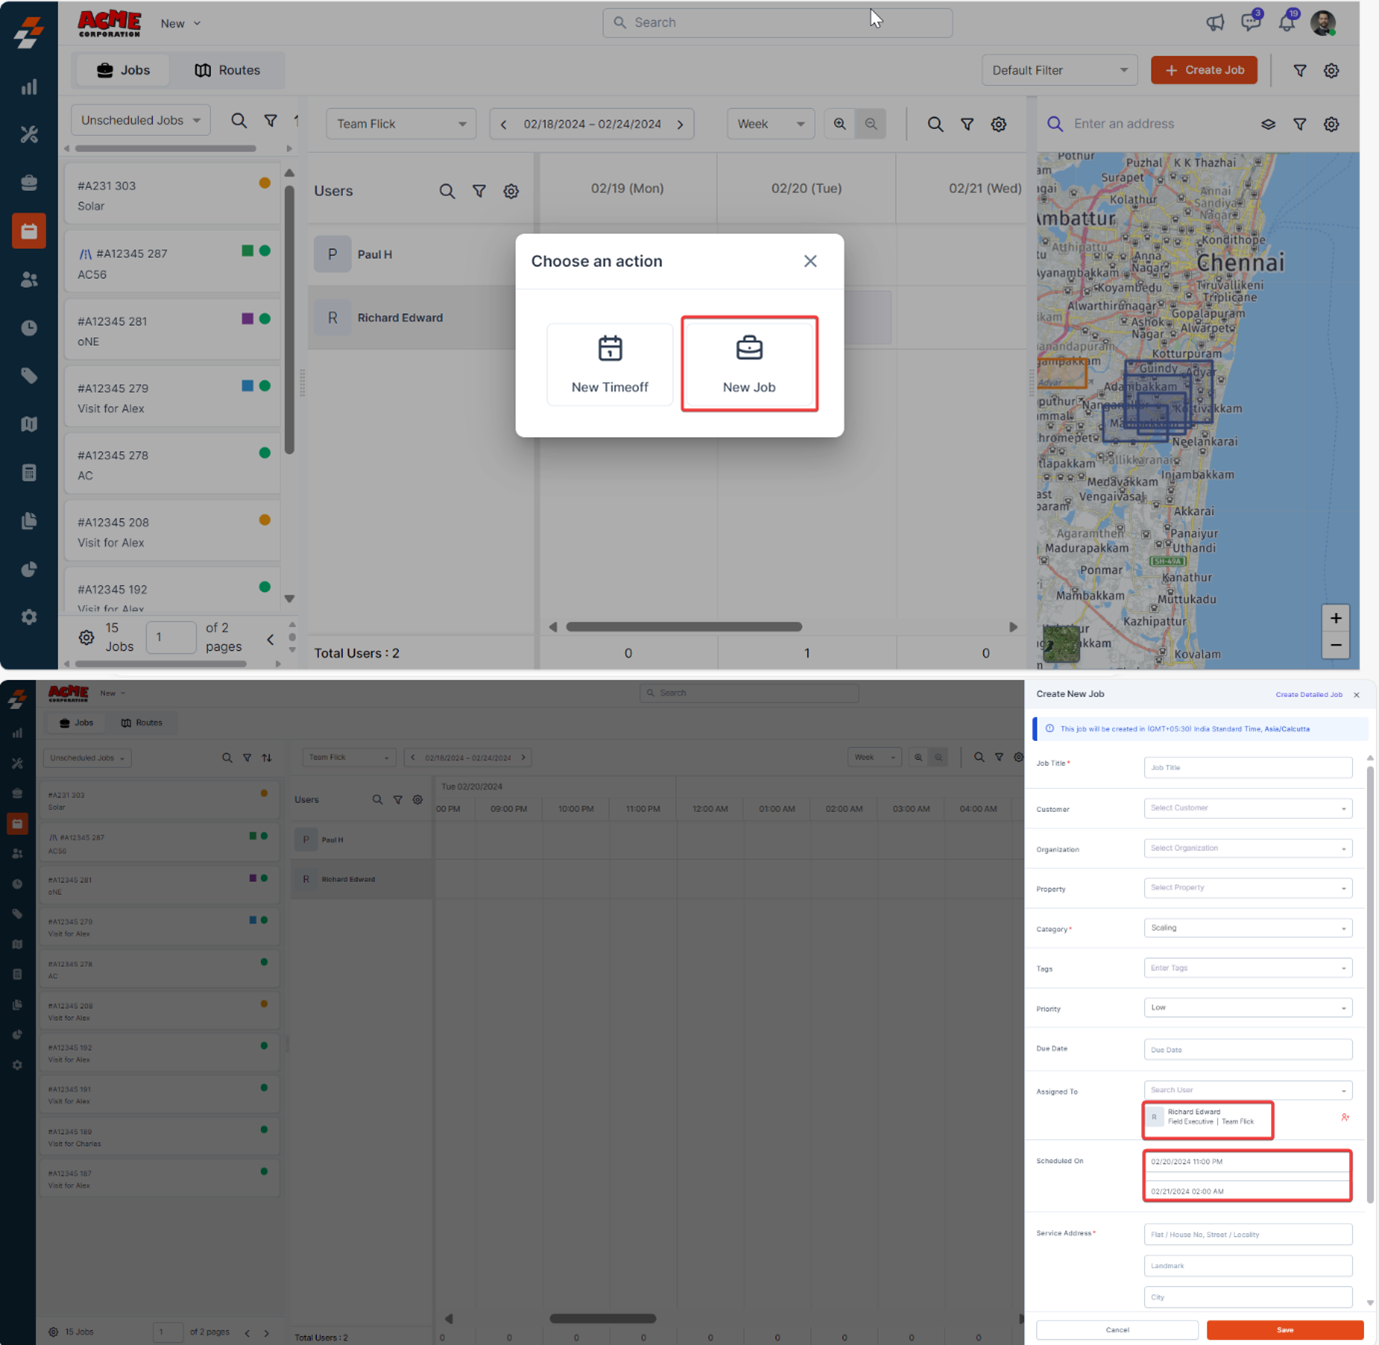
- Provide other job details such as Job title, org/customer name, property name, category, tags, priority, due date, and service/billing address, and click the “Save” button. A new job will be created and assigned to the user successfully on a specific date and time.
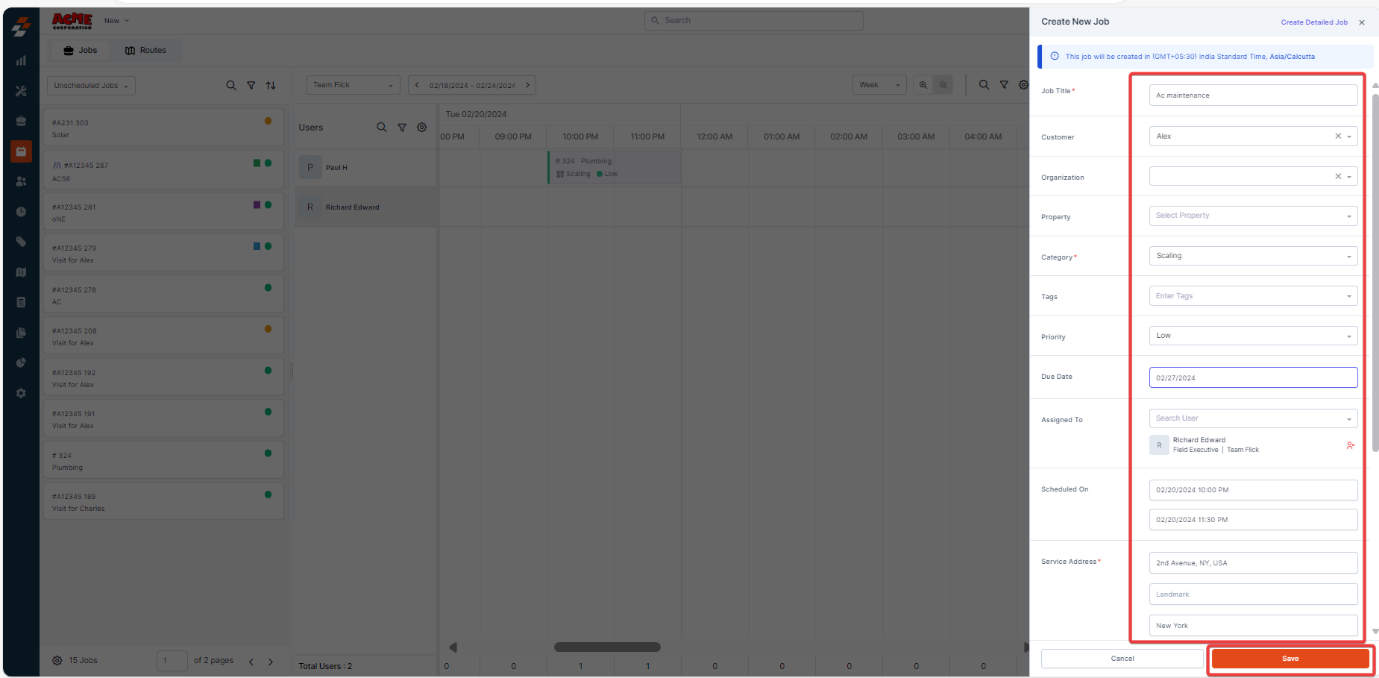
- If you want to add more details to the job, click “Create Detailed Job” at the top right corner of the new job creation sidebar. This will redirect you to the Job Creation page.
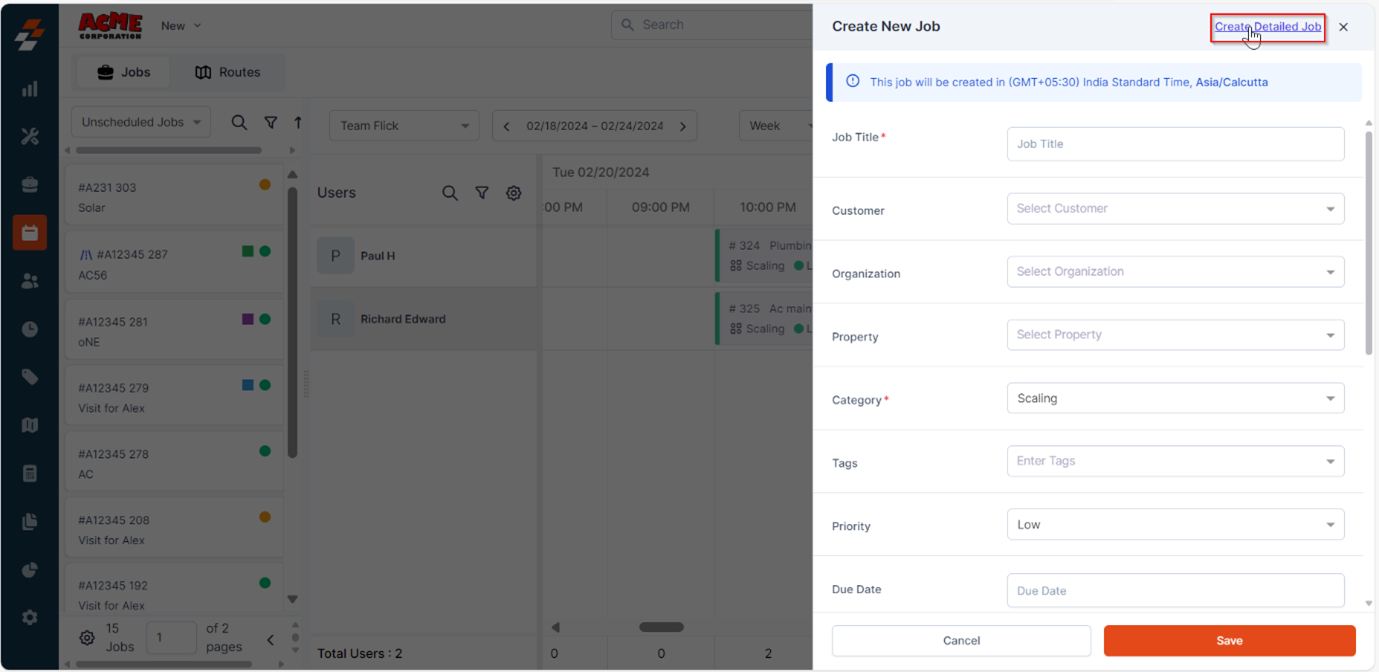
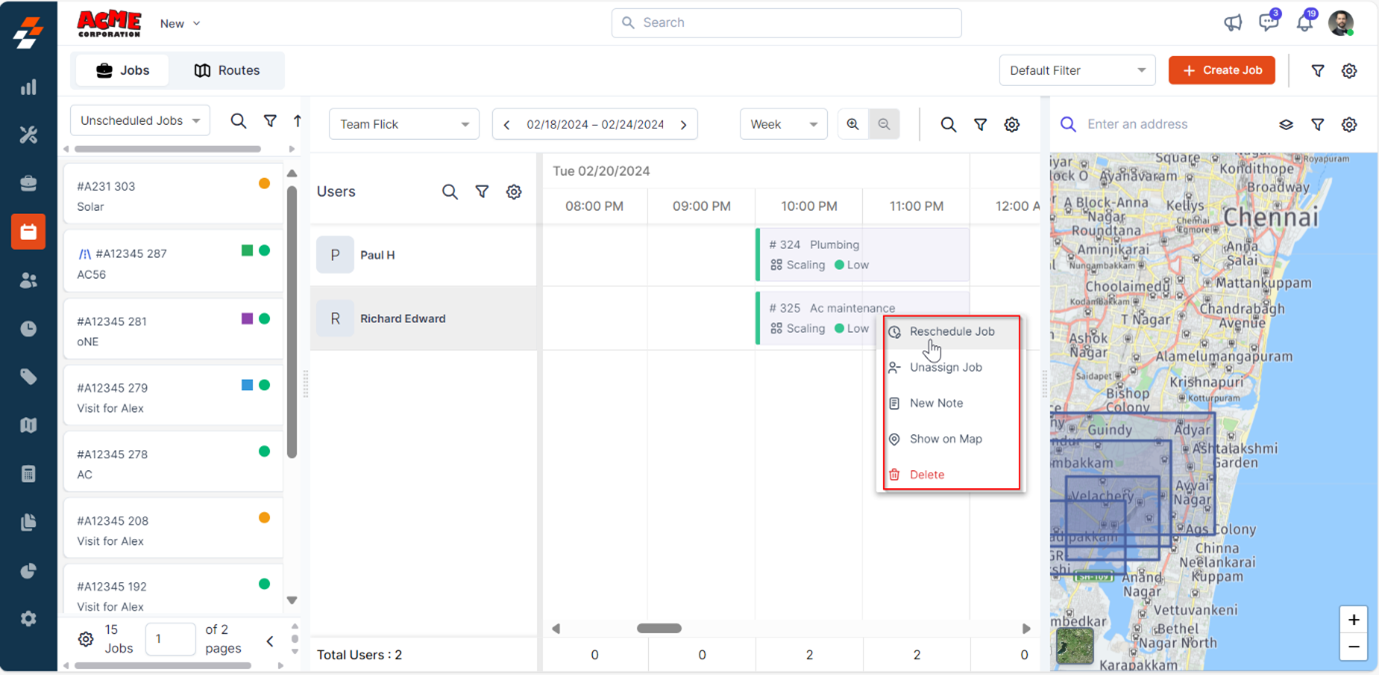
- On the Job page, add information, such as service tasks, parts/services, assets, contracts, and any attachments to the job, and click “Create Job”. The job will be created successfully. For detailed step-by-step instructions on how to create a job, click here 7. After creating the job, you can reschedule, unassign, add notes, view it on the map, or delete it by right-clicking the job on the scheduler.
Note: You can also create a new job by clicking the “+Create Job” button at the top right corner. You will then need to follow the same steps as mentioned above, but keep in mind that the details won’t be prefilled since you are creating a new job from scratch.
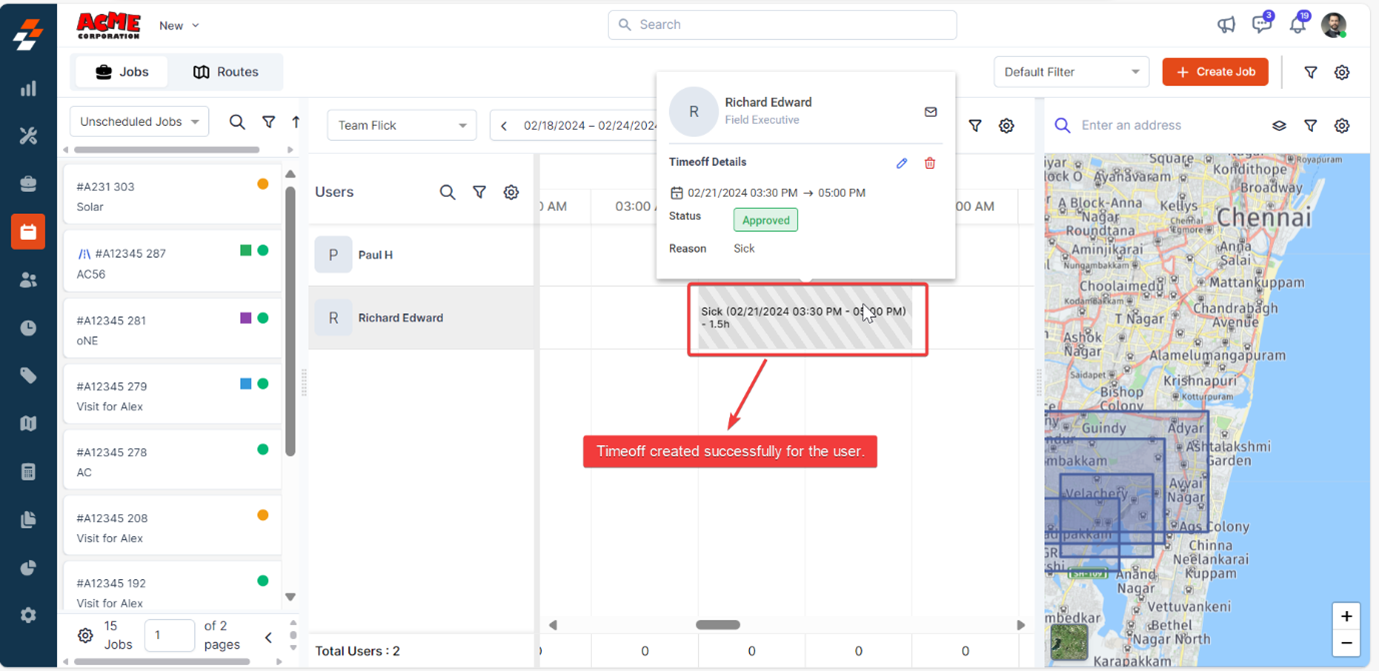
Scheduler – Create New Time-Off
To create a new time off from the scheduler, follow these steps:- In the pop-up, click “New Timeoff”, and a dialog appears with prefilled details such as date/time and the user.
- Choose ‘Reason” for the time off and click the “Submit” button.
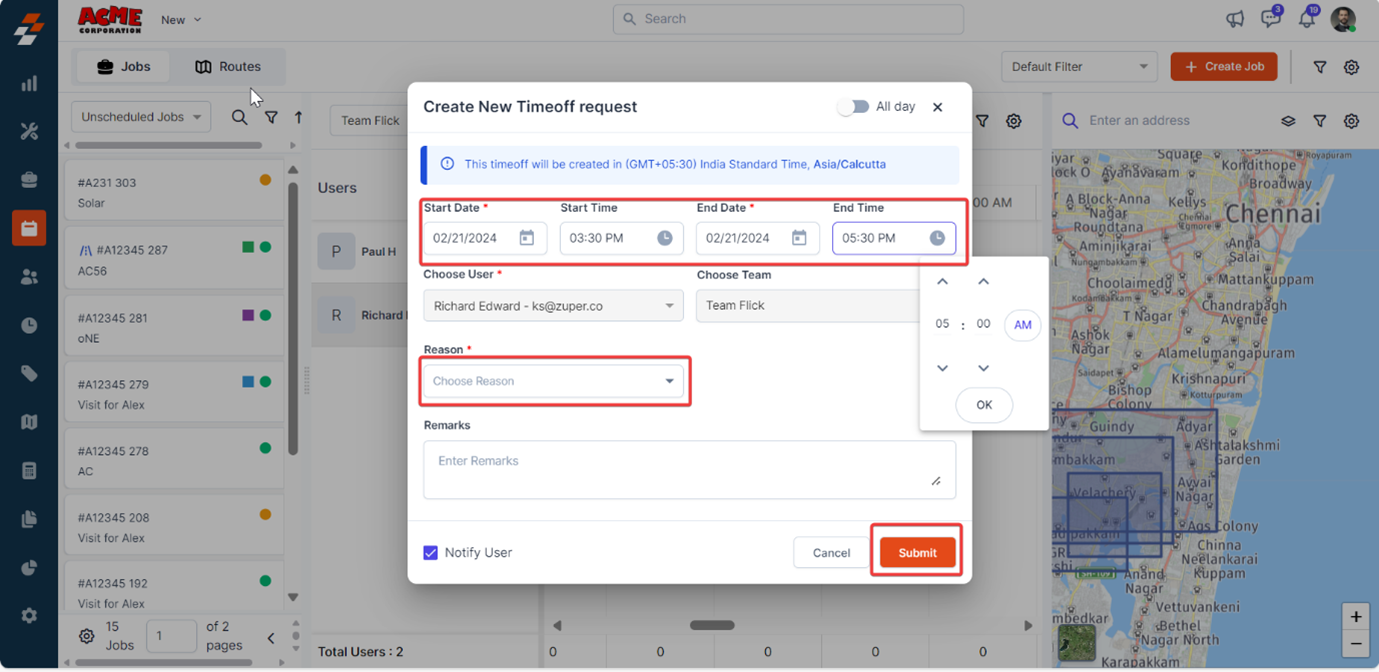
Note: You can also customize the time/dates from here.
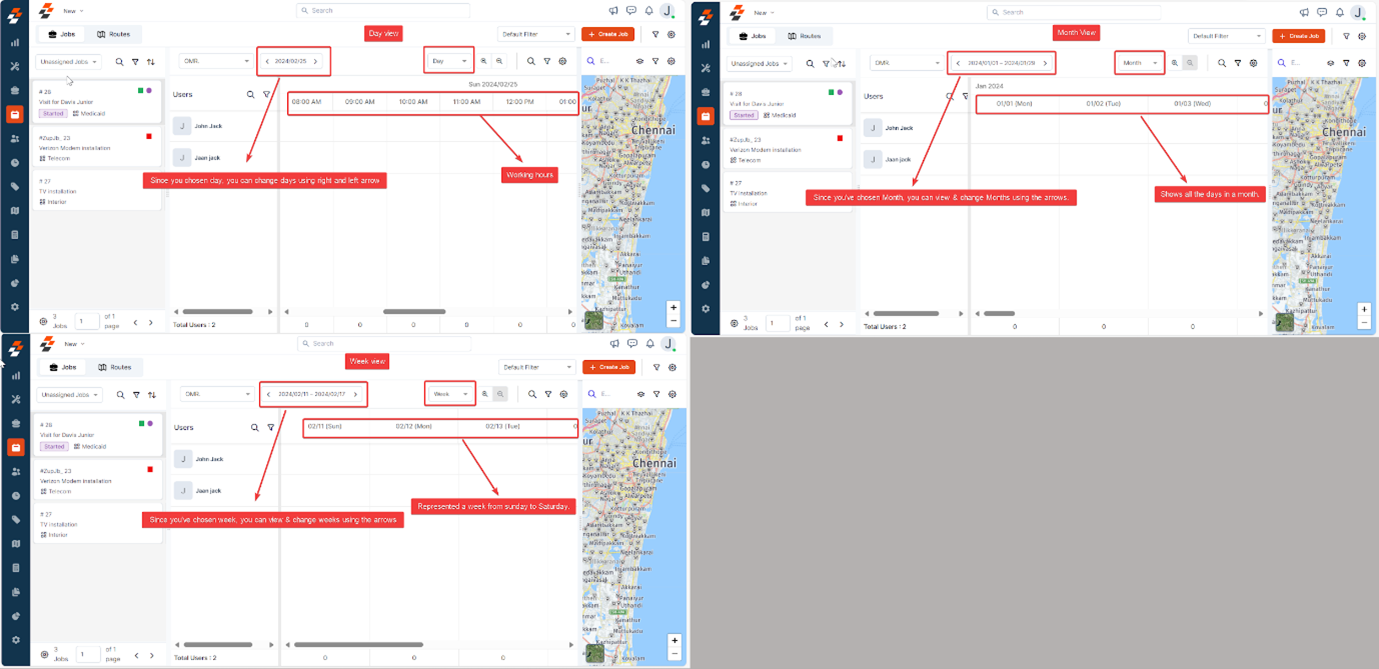
Scheduler Views
Based on your choice, you can view the scheduler on a daily, weekly, or monthly basis. To change the view, follow these steps:- Click the box above the scheduler and select either “Day,” “Week,” or “Month” from the drop-down menu.
- Based on your choice, you can view the day and timings in the scheduler. You can also change the date by clicking the date box on the left, shown below.
Map
Map is one of the critical layouts on the dispatch board, located on the right side, and it provides an overview of jobs, routes, users, customers, properties, assets, and service territory locations on the map. You can also choose which locations to display on the map by selecting a specific layer from the top of the map. Once chosen, click the “Apply” button. Based on the applied layer, you can view only the specific entities locations. For example, when you select both jobs and routes, you can view the locations of jobs and routes, as well as the jobs listed in the dispatcher queue and scheduler, all displayed on the map.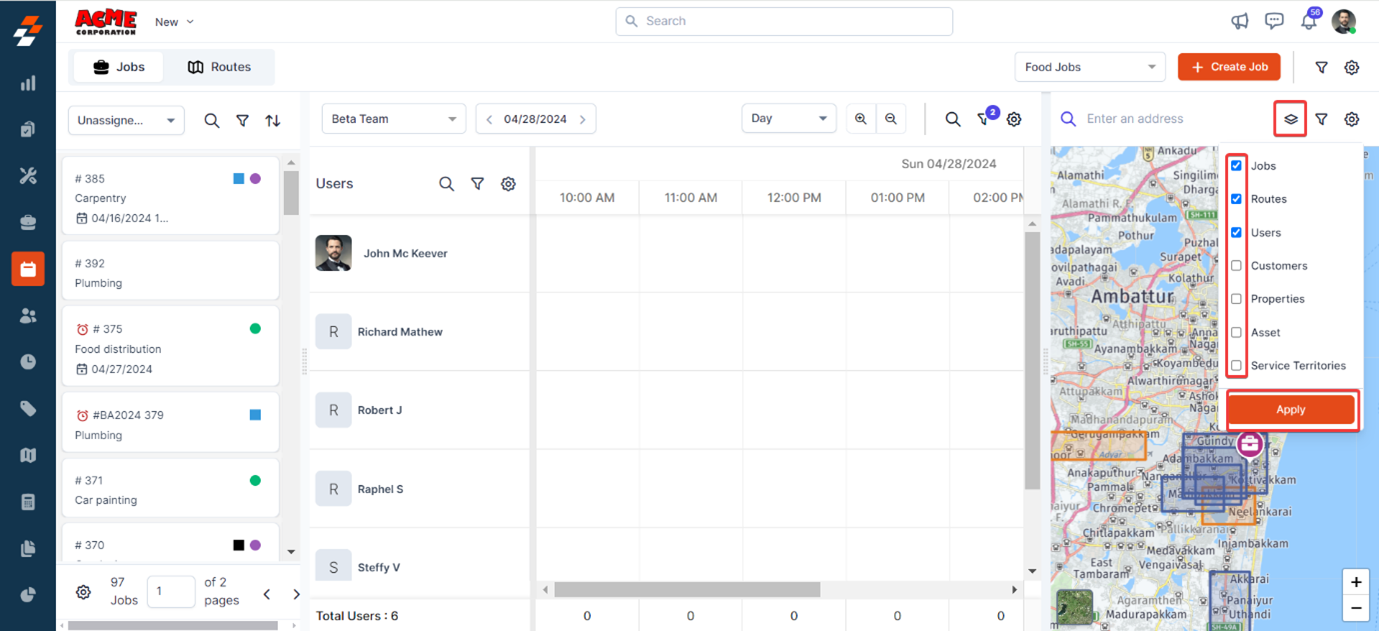
- Jobs: Use different colors/icons based on status (e.g., on-hold jobs in red, completed jobs in green, in-progress jobs in blue) or category (e.g., Installation job category in blue, Maintenance job category in Green, delivery job category in Red).
- Customers: Assign colors/icons by category (e.g., VIP customers in red, regular customers in blue, new customers in green) or by organization (e.g., customers under Organization A in orange, Organization B in purple, Organization C in red).
- Assets: Assign colors/icons by category (e.g., HVAC equipment in green, plumbing tools in purple) or status (e.g., functional assets in blue, under-maintenance in orange, decommissioned in black).
- Properties: Differentiate by organization (e.g., Organization A’s properties are orange, Organization B’s are red, and Organization C’s are blue).
Custom colors/icons
You can customize colors and icons in either of the following ways:- From the color profile icon on the map: Select the color profile icon located at the bottom of the map.

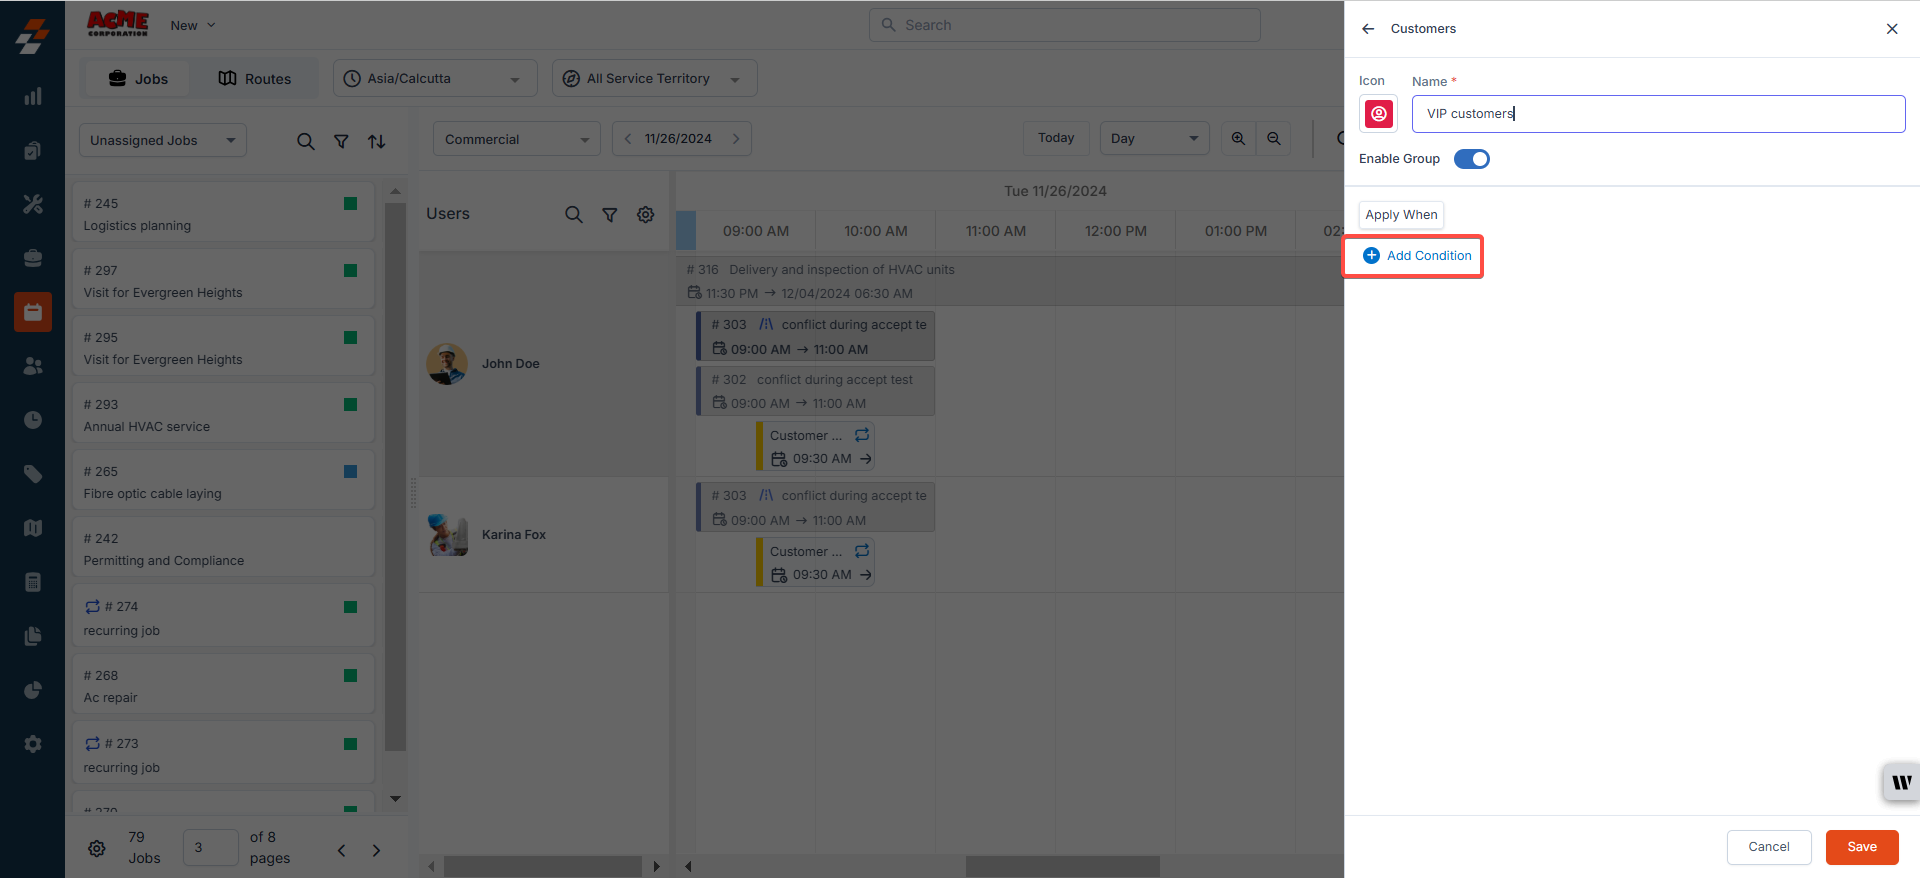
- From map settings: Click the settings icon at the top right of the map and select “Customise colours and icons” next to Enable Map View. A sidebar will appear for you to configure your preferences.
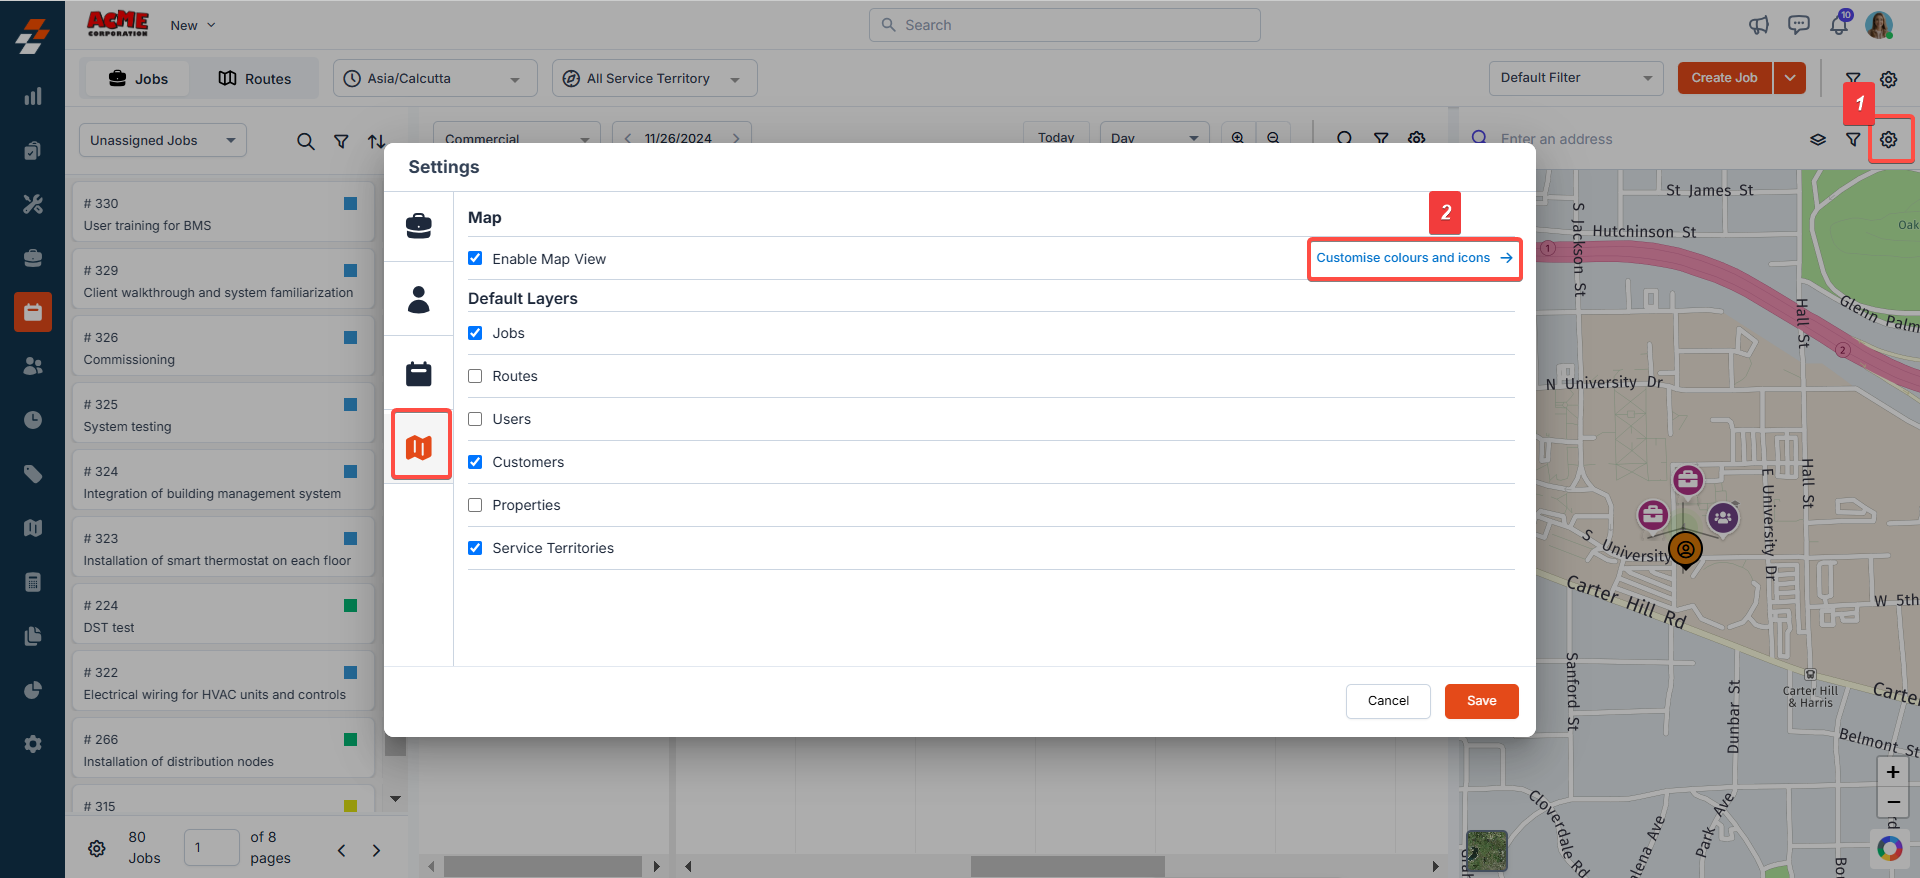
- Choose the entity/legend that you like to set custom color/icon from the dropdown.
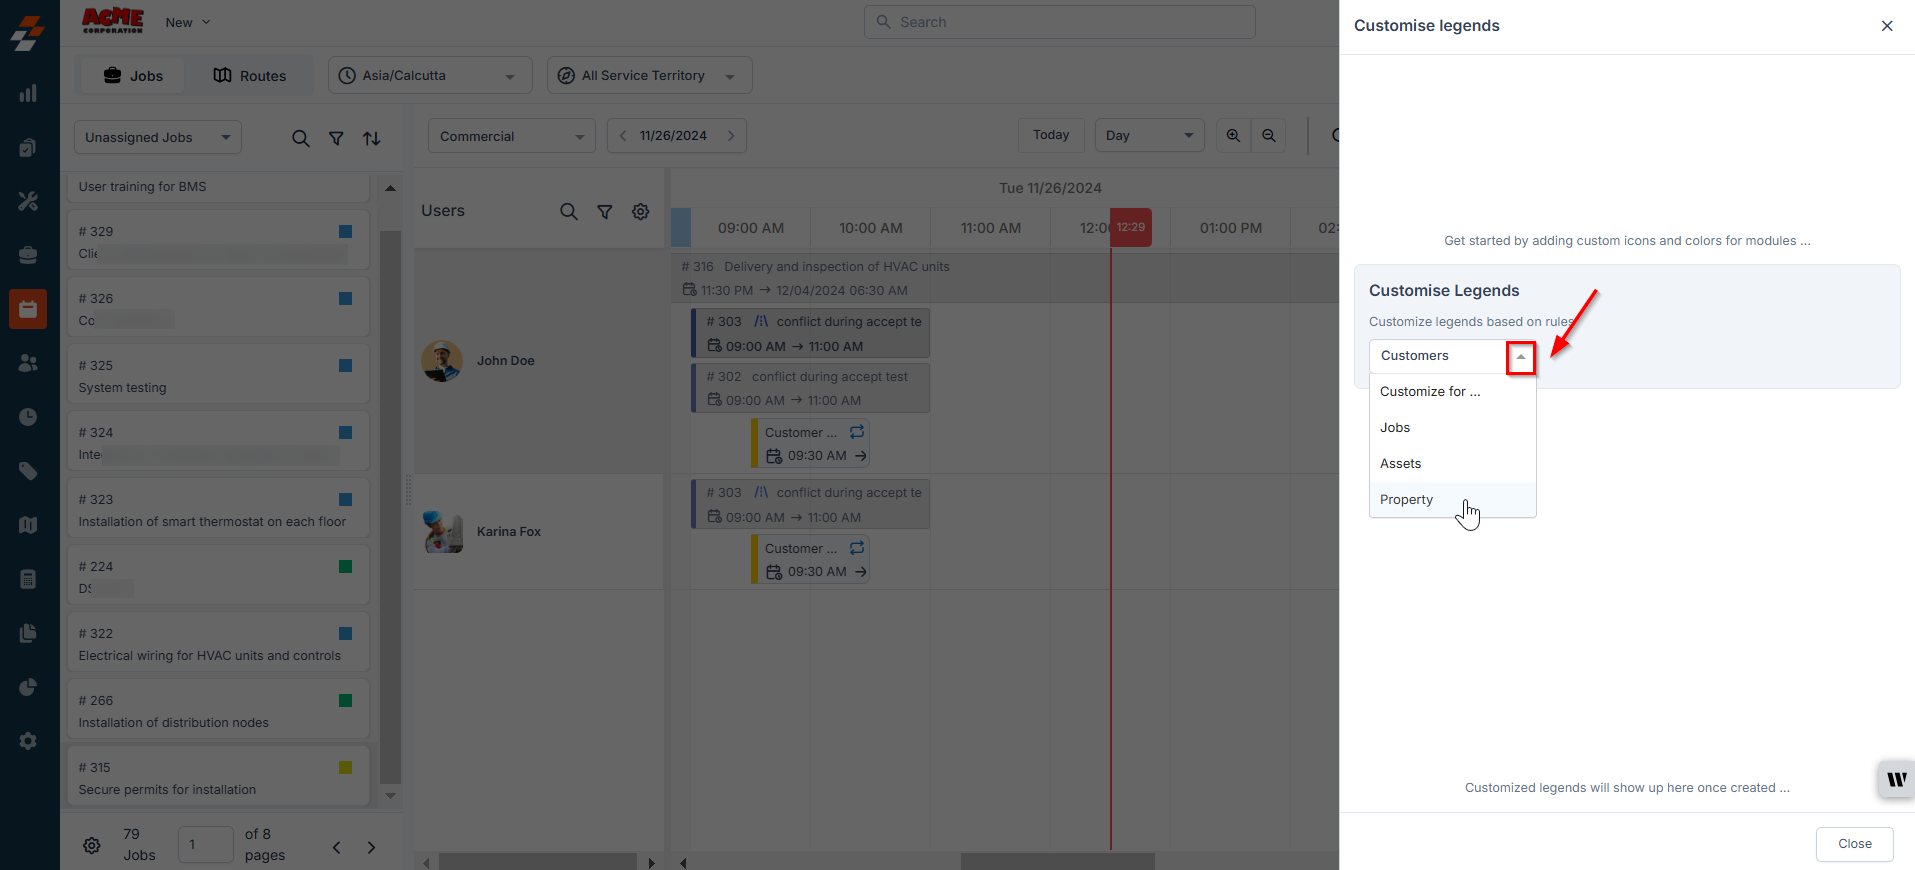
- Click the icon to select a custom color or icon from the predefined options.
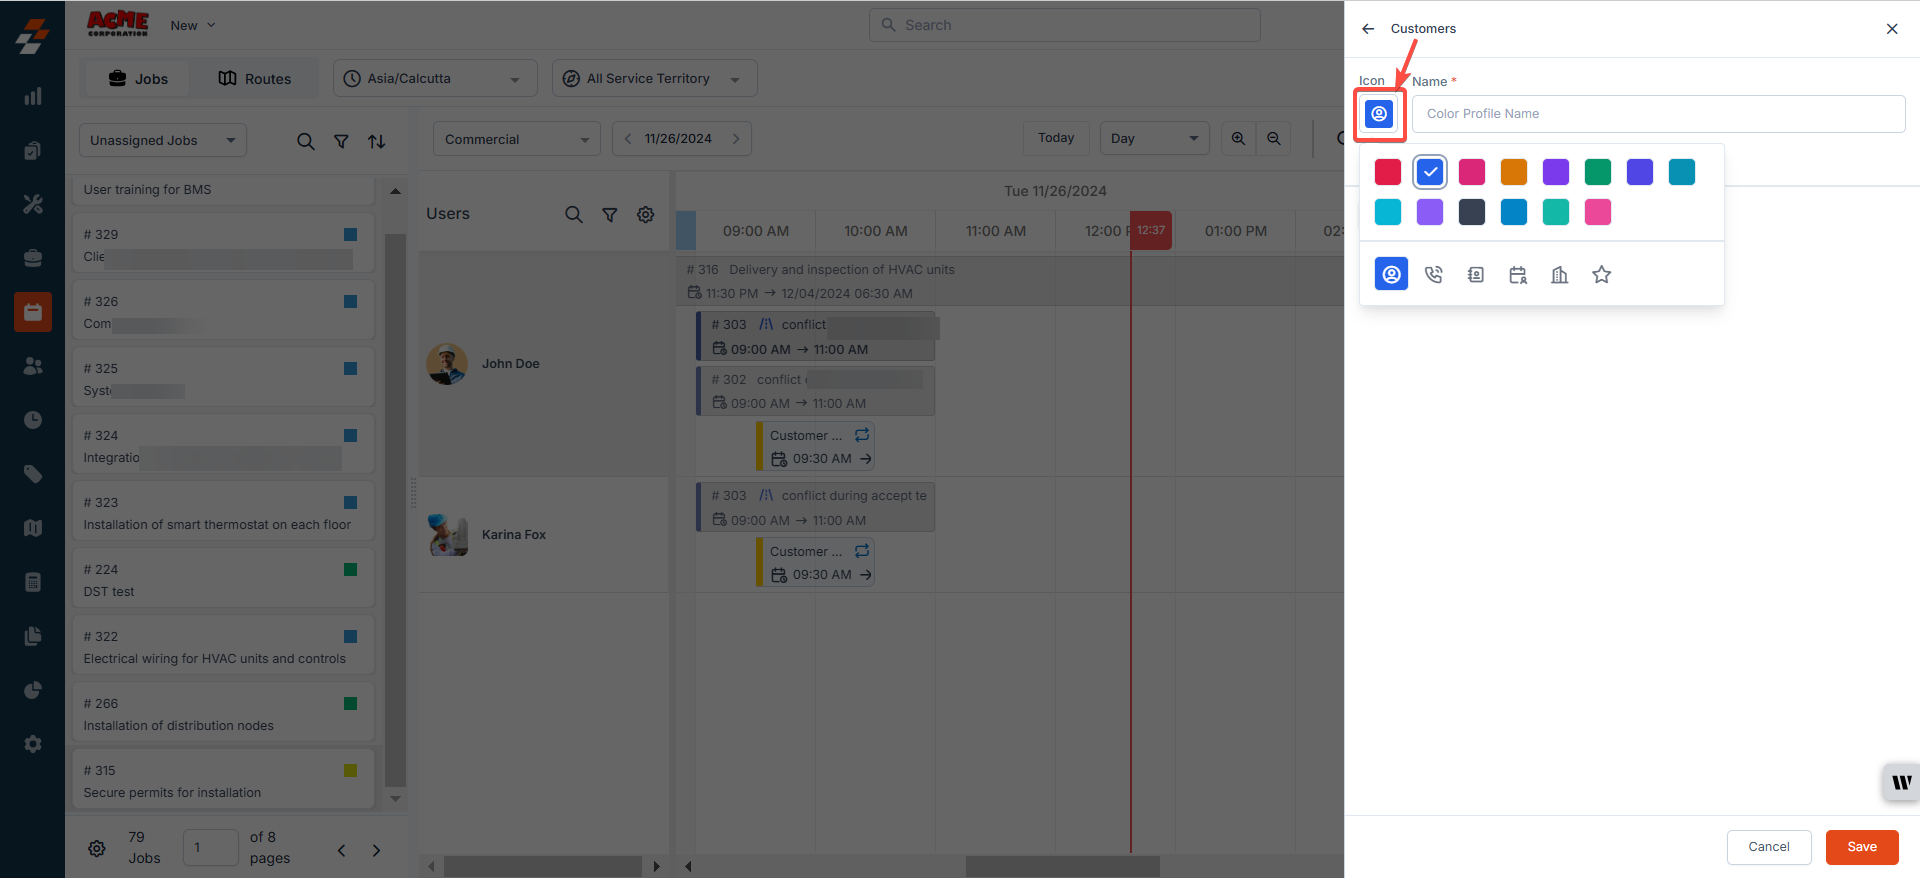
- Once set, provide a name for the rule under the Name column.
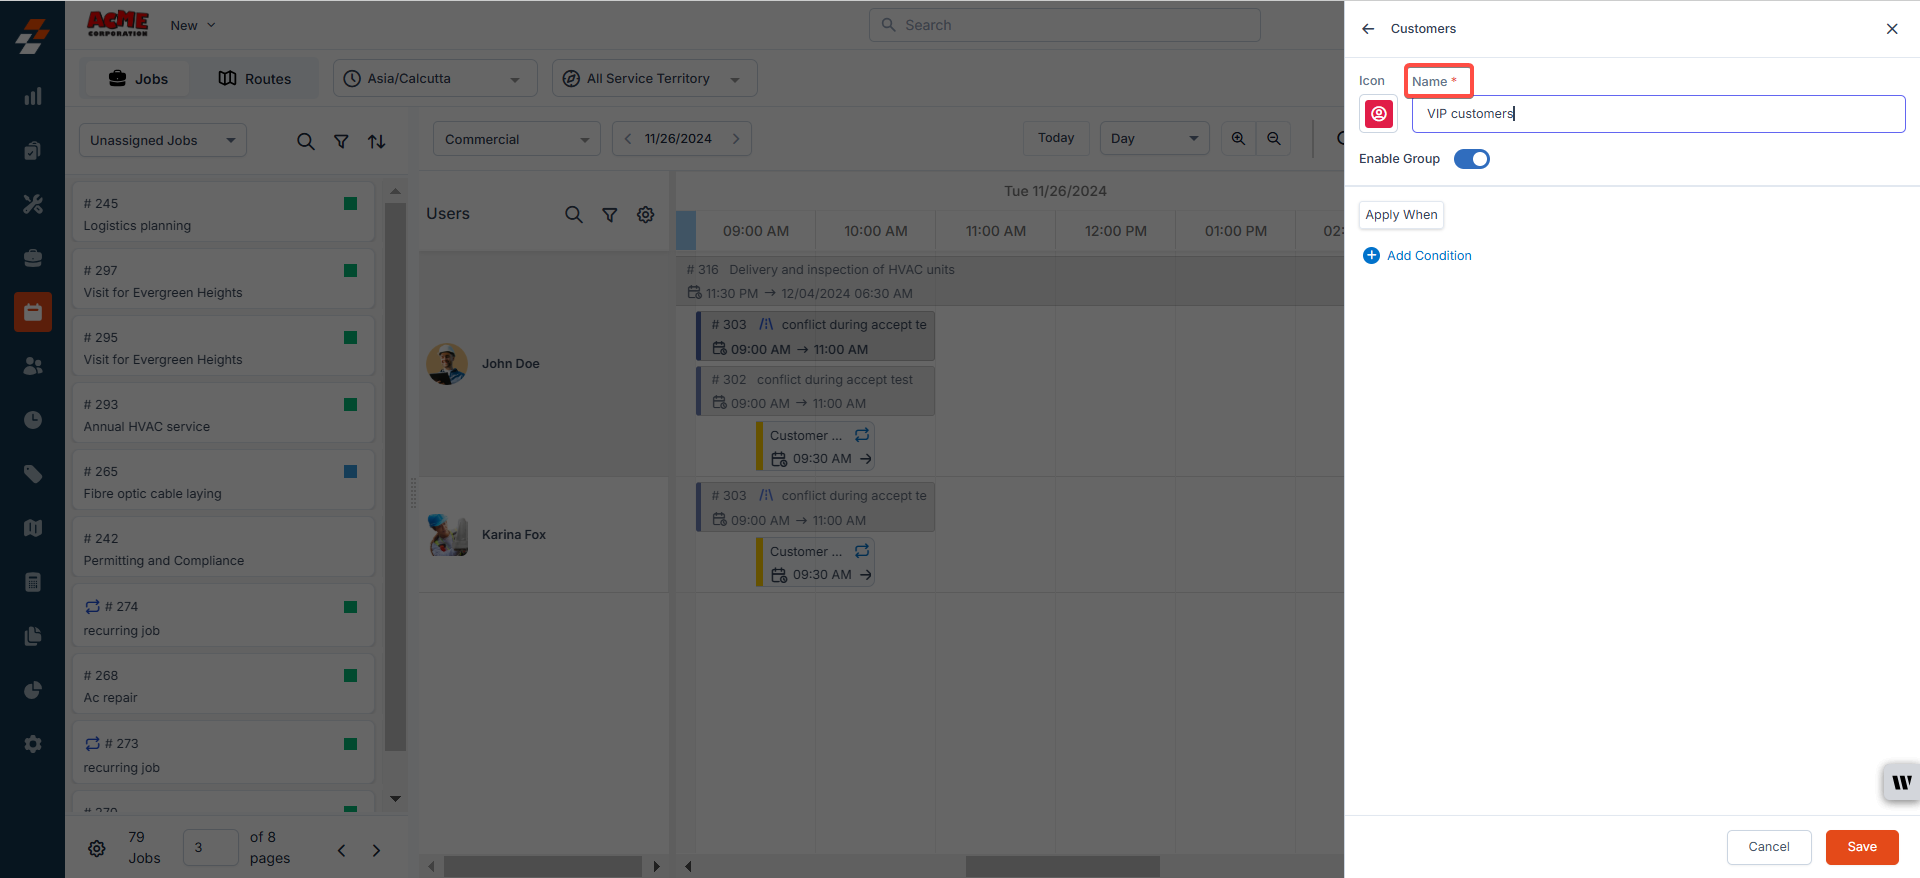
- Under the “Apply When” section, click “Add Condition”.
- Choose a filter from the available options and click the “Add” button to apply the condition.
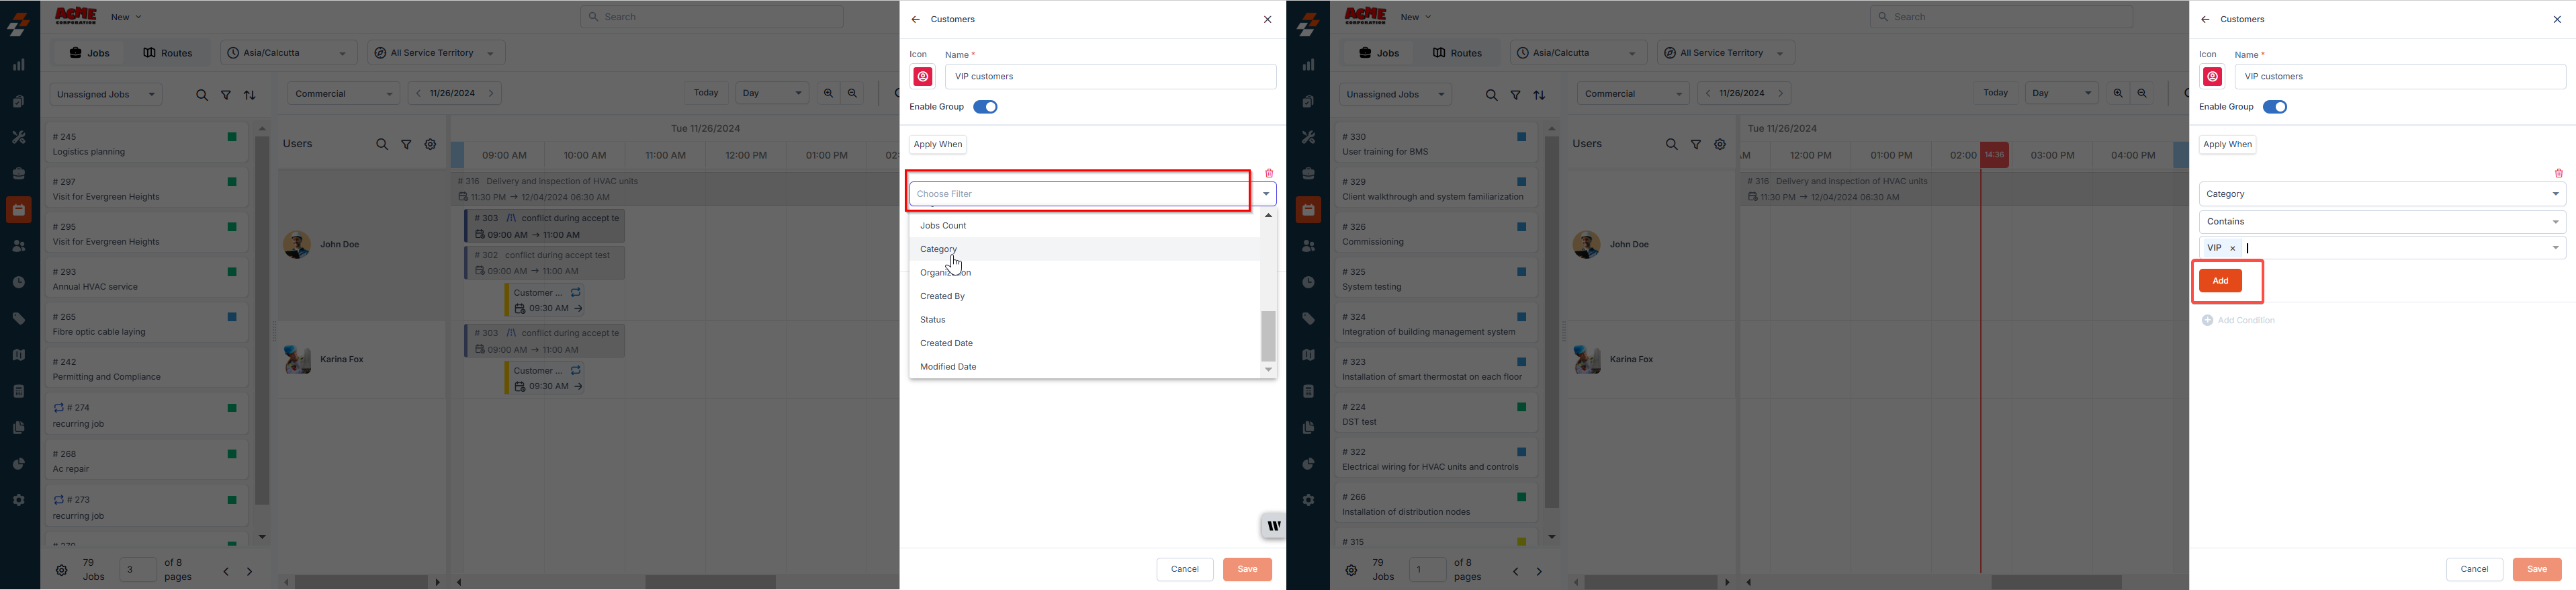
Note: The filters displayed will depend on the entity/legend selected, such as Jobs, Customer, Property or Assets.
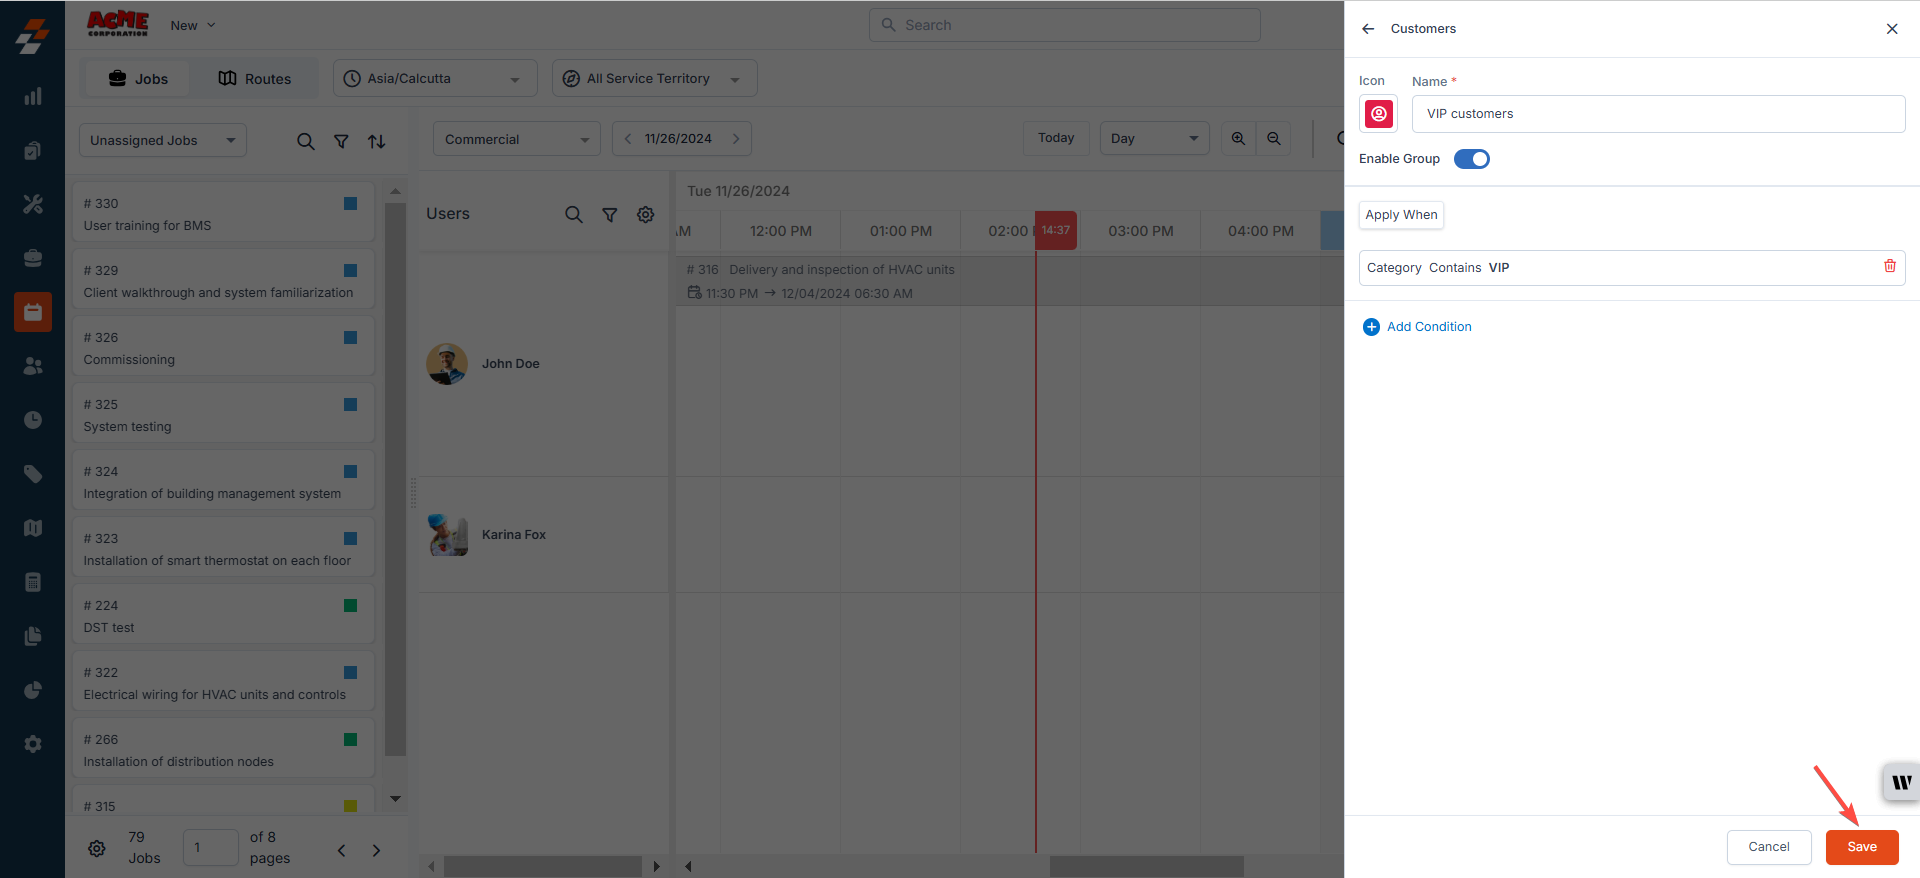
- Finally, click the “Save” button to save the custom color/icon for the selected entity.
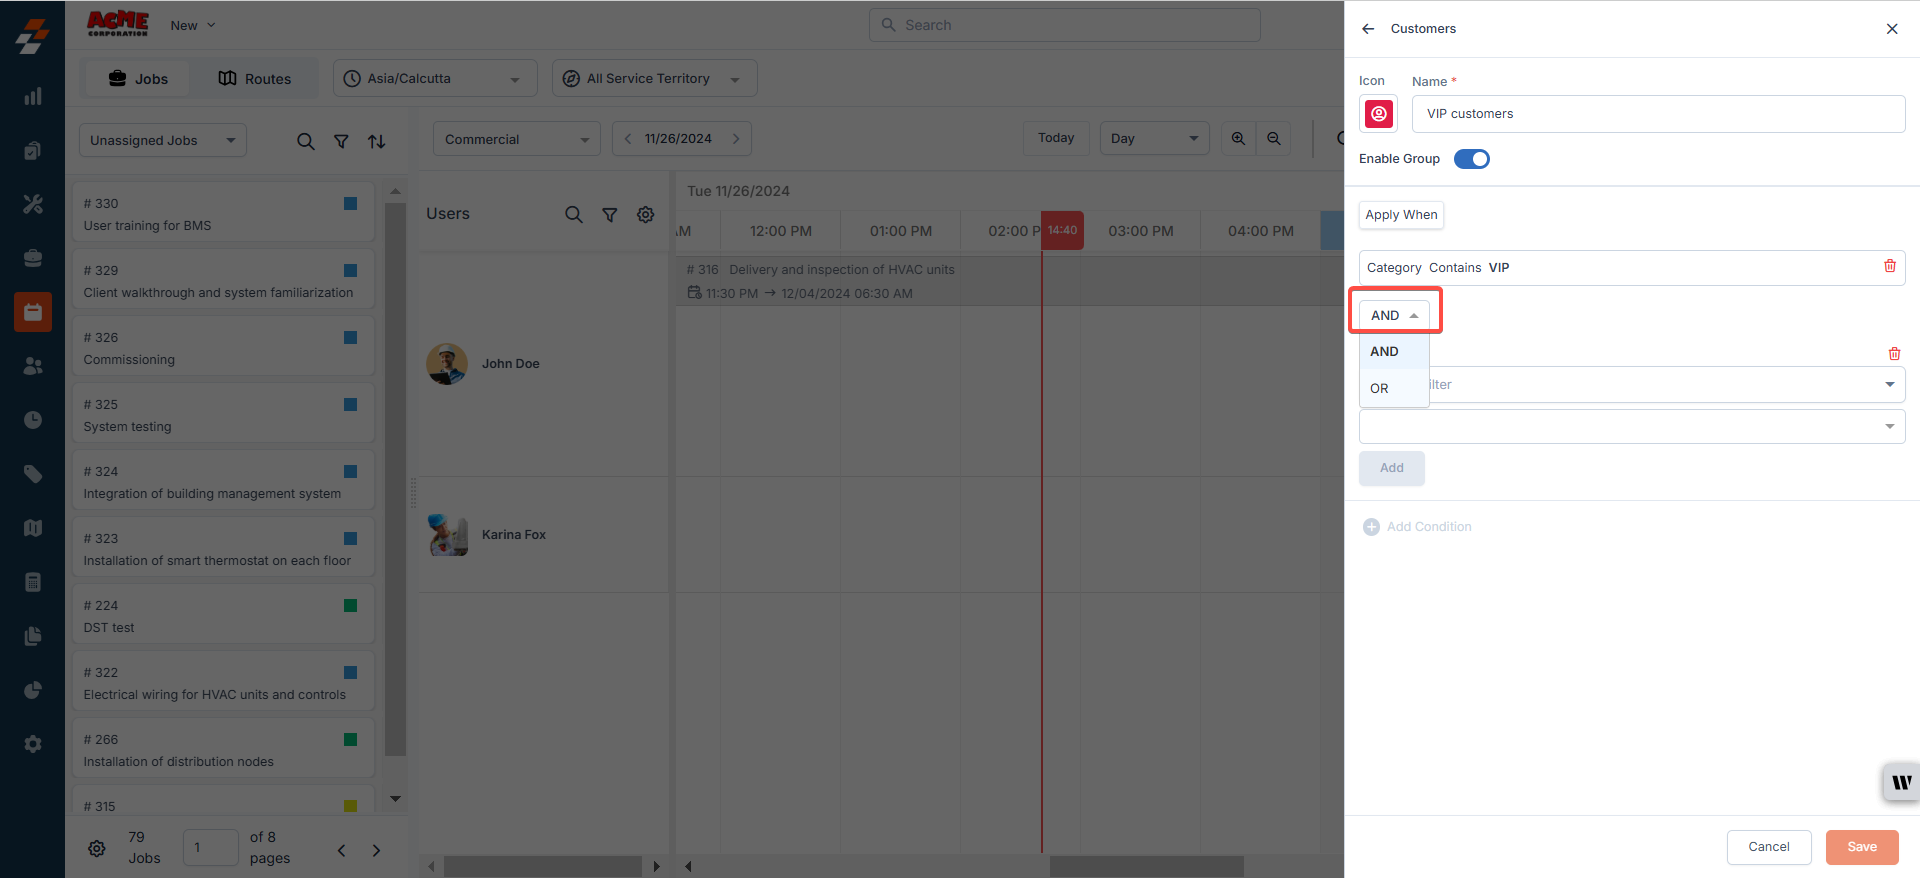
- Use AND: Apply rules when all selected conditions must be met.
- Use OR: Apply rules when any one of the selected conditions is met.
Understanding Key Rule Behavior in Zuper's Custom Color/Icon Logic
Understanding Key Rule Behavior in Zuper's Custom Color/Icon Logic
- Zuper evaluates rules sequentially, starting with Rule 1.
- If a rule’s conditions are not fully met, Zuper continues to check subsequent rules.
- Once the rule with the most conditions satisfied is identified, its associated custom color or icon is dynamically applied to the map.
Note: If there is more than one rule defined against an entity such as Job, Contacts, Property, etc., the rule satisfying the greatest number of conditions will be applied. When there is more than one rule with an equal number of conditions satisfied, the one at the top of the sequence will be applied on the map.
Note: These settings apply organization-wide and are not specific to individual users. You can apply up to 10 rules per entity/legend.
Color profiles
After creating color profiles for entity(s), you can:- Edit: Modify the existing conditions or criteria within the color profile.
- Delete: Permanently remove a color profile that is no longer needed.
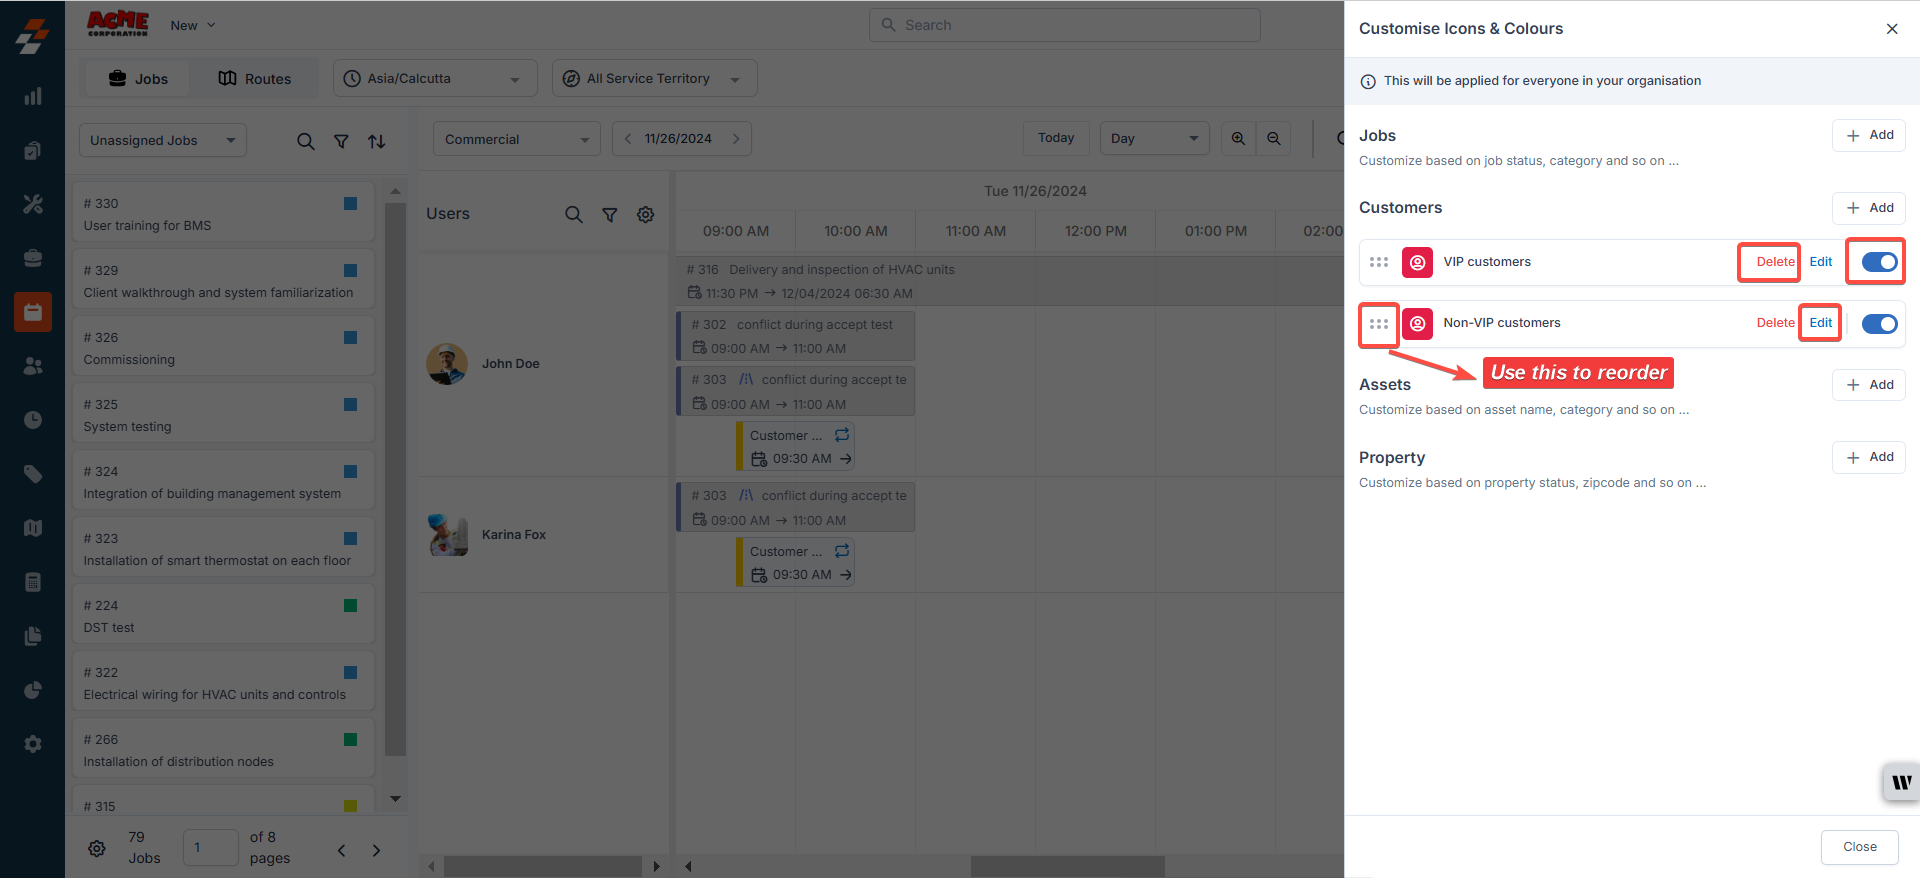
- Enable/Disable: Turn specific rules on or off without deleting them, allowing for flexible application as needed.
- Reorder: Change the order of the color profiles.
Note: Any changes made to color profiles will immediately reflect across the organization, ensuring consistency in visual representation.
- Routes with Assigned Jobs: If jobs are assigned to routes, the color profiles will not apply. Instead, the route color will take precedence, ensuring that route-based assignments remain visually distinct.
- Unassigned Jobs: For jobs that are not assigned to any route but meet the conditions of the color profile, the custom color will be applied. This ensures that unassigned jobs are still visually categorized based on the defined rules.
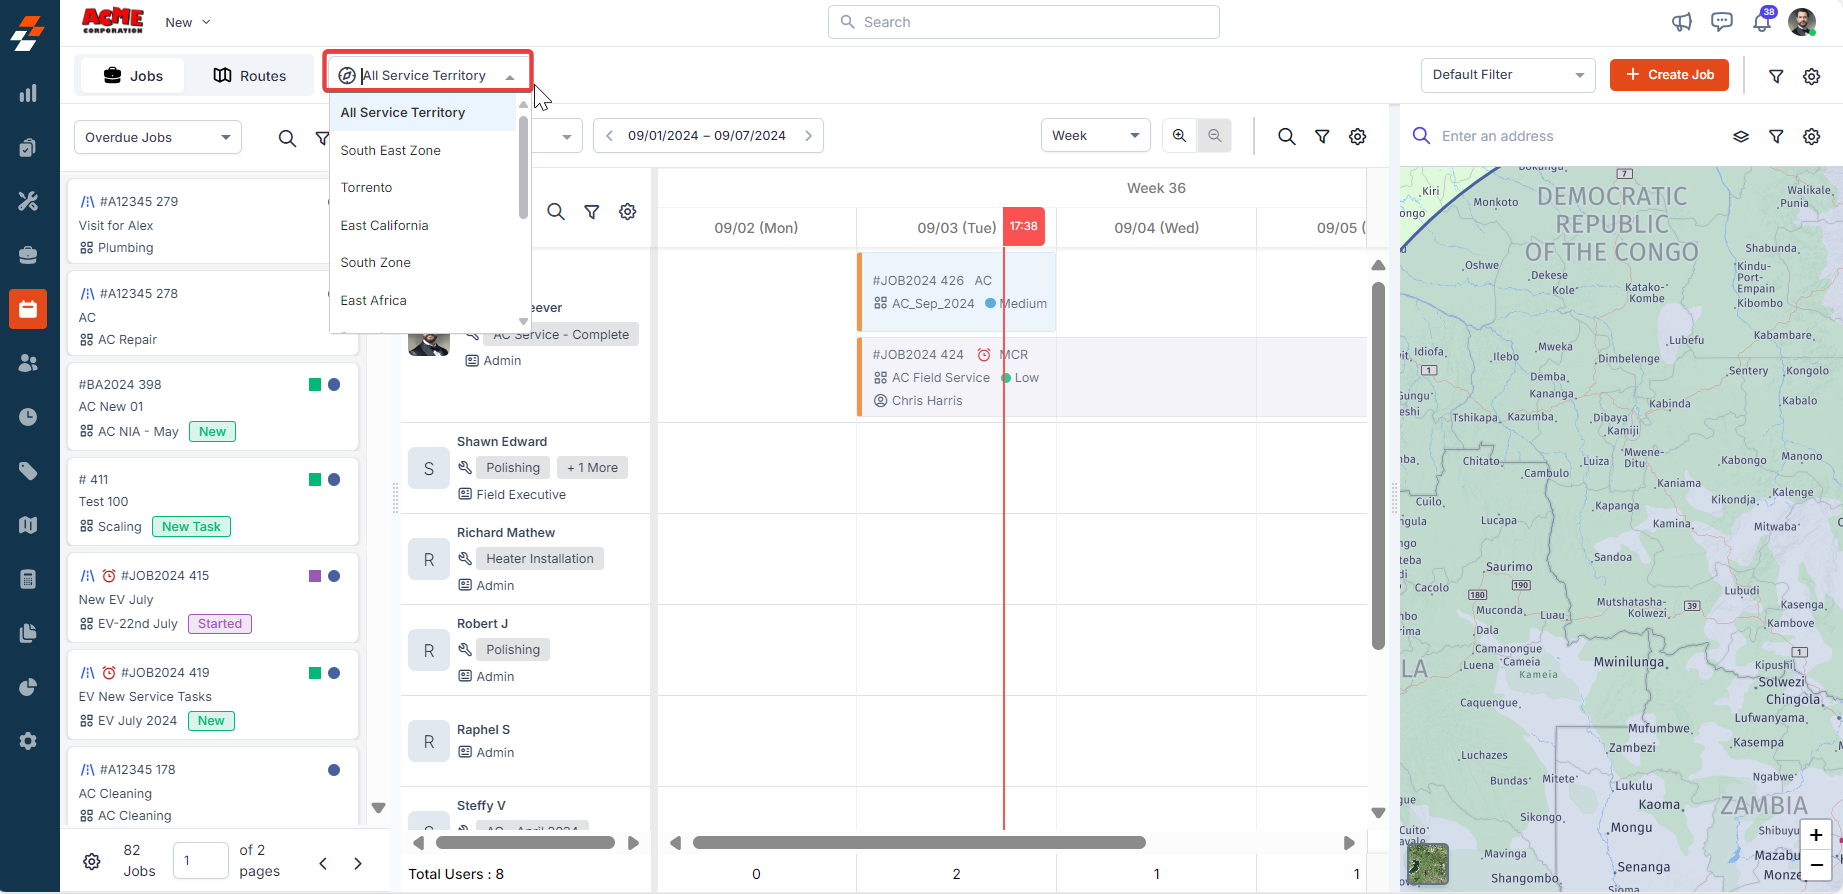
Service Territory filter
The Service Territory filter on the Dispatch Board allows you to refine job visibility based on specific territories. It enables Dispatchers (Team Leaders) to manage jobs and teams more effectively without needing to be part of a specific team.Note: The Service Territory filter will appear on the Dispatch Board once the “Enable Service Territory” option is activated in Settings > Organization Settings > Service Territory. The options available in the filter correspond to the ownership permissions configured in Settings > Service Territory.
- Dispatcher Queue: The Dispatcher Queue will filter jobs based on the selected Service Territory, such as Assigned, Unassigned, Unscheduled, or Overdue.
- Jobs: The Jobs layout will display only the jobs in the selected Service Territories.
- Users: Only teams assigned to the selected Service Territory will be available for selection from the drop-down. For more details on how the ‘Can Team Leader Access Jobs Based on Service Territory Ownership?’ setting and other configurations impact job visibility on the Dispatch Board, refer to the article Understanding Job Visibility on the Dispatch Board. This article will help you understand why specific jobs appear or do not appear on your Dispatch Board based on your selected Service Territories and organizational settings.
- Maps: The map will show jobs only from the selected Service Territories.
 With this comprehensive overview, you can effectively manage resources, plan schedules, and monitor operations, ensuring seamless and efficient task execution.