- Company-wide announcements and updates.
- Department-specific discussions (e.g., Service, Sales, Operations)
- Project coordination or recurring operational workflows
- Job-specific communication for seamless field-to-office alignment
Types of Channels
Zuper offers three primary types of channels to cater to various needs.1. The General Channel
Every organization in Zuper automatically has a #general channel. All users are added to this channel by default. You can use the #general channel for:- Organization-wide announcements
- All-hands updates
- Information everyone needs to stay aligned
Note: The General channel cannot be archived.
2. Job-Specific Channels
Job-specific channels are one of the most powerful features for field service teams. These channels are directly linked to a particular job in Zuper and make it easy to keep all job-related communication in one place.UI Update:
We’ve repositioned Job Channels into a dedicated section in the sidebar, separate from your other channels, for quicker access.
We’ve repositioned Job Channels into a dedicated section in the sidebar, separate from your other channels, for quicker access.
- Start a conversation instantly from the Job Details page → Chat section
- Share files, documents, and photos from the field
- Exchange real-time updates as the job progresses.
- Receive automated real-time job updates such as clock-in/out, quote acceptance/rejection status, invoice payments, status updates, and user assignment.

Note: Anyone who has permission to view the job can see and send messages in its channel. However, only users who are assigned to the job or manually added as channel members will receive notifications for new messages.
3. Custom Channels
Custom channels are spaces you can create for ongoing topics, specific teams, or projects. They let you organize conversations to match the way your team works and keep communication focused.Create and manage channels
Creating a Channel
You can create a channel to organize conversations around a team, project, operation, or topic. To start a custom channel:- Web
- Mobile
- Click the Work Order Management/Job module from the left navigation menu and select Chat.
- Click the + icon in the header.
- Select Create a Channel.
- Enter a channel name.
- Add members to the channel (optional—you can do this after the channel is created as well).
- Click Create. A new channel will be created successfully.
Note: Job-specific channels form automatically from the job page and keep their names fixed. However, you can edit names for custom channels if needed.
Adding Members to a Channel
- Web
- Mobile
- Open the channel you want to add people.
- Click the member avatars in the top right of the channel header. From there, add or remove members.
Note: Admins can include anyone. Team leads and field executives can add members from their own teams.
- Click Add Members.
- Select the members and click “Add.” The selected member(s) will be added to the channel successfully.
Note: The channel creator becomes the Channel Manager by default and can assign others. Channel Managers handle membership and moderation.
Set a Notification Preference
Updated You can control how you are notified for each channel. Zuper gives you two levels of control, a global preference for all channels, and a channel-level preference for individual channels.Global notification preference
Global notification preference
Your global preference sets the default notification behavior across all channels.
- Web
- Mobile
Web
- Click the Chat icon in the top-right corner of the Header bar.
- Click the icon. A Notification Preference panel opens.
- Choose one of the following:
- All: You receive a notification for every message in every channel. This is the default.
- Mentions and Direct Messages: You are only notified when someone mentions you or sends you a Direct Message.
- Your preference is saved immediately.
Note: This setting applies to all channels where no channel-level preference has been set.
Channel-level notification preference
Channel-level notification preference
You can override your global preference for any individual channel. Channel-level preferences always take precedence over your global settings.
Note: Once a channel-level preference is set, it cannot be overridden by the global preference.
- Web
- Mobile
- Open the channel and click More actions (⋮) in the channel header.
- Select Notification Preference.
- Choose one of the following:
- All: You receive a notification for every message in this channel.
- Mentions: You are only notified when someone mentions you in this channel.
- Mute: You receive no notifications from this channel.
Muting a channel
You can mute a channel when you want to reduce notifications but still read messages later.- Web
- Hover over the channel name in the sidebar.
- Click the More actions (⋮) icon.
- Select Mute Channel to stop receiving notifications.
- To unmute, repeat the same steps and select Unmute Channel.
Pinning a Channel
Pinning a channel keeps your most active or critical conversations at the top of your sidebar (on web) or chat home (on mobile) for quick access.- Web
- Mobile
- Hover over the channel name in the sidebar.
- Click the More Actions (⋮) icon and select Pin this channel.
- The pinned channel will now appear in the Pinned Conversations section for quick access
- To unpin, repeat the same steps and select Unpin this channel.
- Open the channel that you want to pin.
- Click the More actions (⋮) icon at the top right of the channel header.
- Select Pin Channel.
Archiving a Channel
When a topic or project is complete, archive it to make it read-only and clean up your active list (can be restored later if needed).Note: Archiving a channel archives it for everyone in the channel.
- Web
- Mobile
- Open the channel that you want to archive from the sidebar.
- Click the More actions (⋮) icon at the top right of the channel header and select Archive for everyone.
Note: The #general channel cannot be archived.
Leaving a Channel
Leaving a channel removes you completely from the channel if it’s no longer relevant to you (no more access or notifications).- Web
- Mobile
- Hover over the channel name in the sidebar.
- Click the More Actions (⋮) icon and select Leave this channel.
- From the channel details page, click the More actions (⋮) icon in the channel header and select Leave Channel.
Note: Once you leave a channel, you will no longer see messages or receive notifications from this channel.
Assigning a Channel Manager
The person who creates a channel automatically becomes its Channel Manager. Channel Managers can:- Add/remove members
- Delete messages
- Assign additional managers
- Web
- Mobile
- Open the channel where you want to assign a user as a channel manager.
- Click the member avatars in the top right of the channel header.
- Hover over a member and click the More actions (⋮) icon next to the member’s name.
- Select Make Channel Manager.

Note: The assigned member will now have channel manager privileges and can manage channel settings, add or remove members, and moderate content.
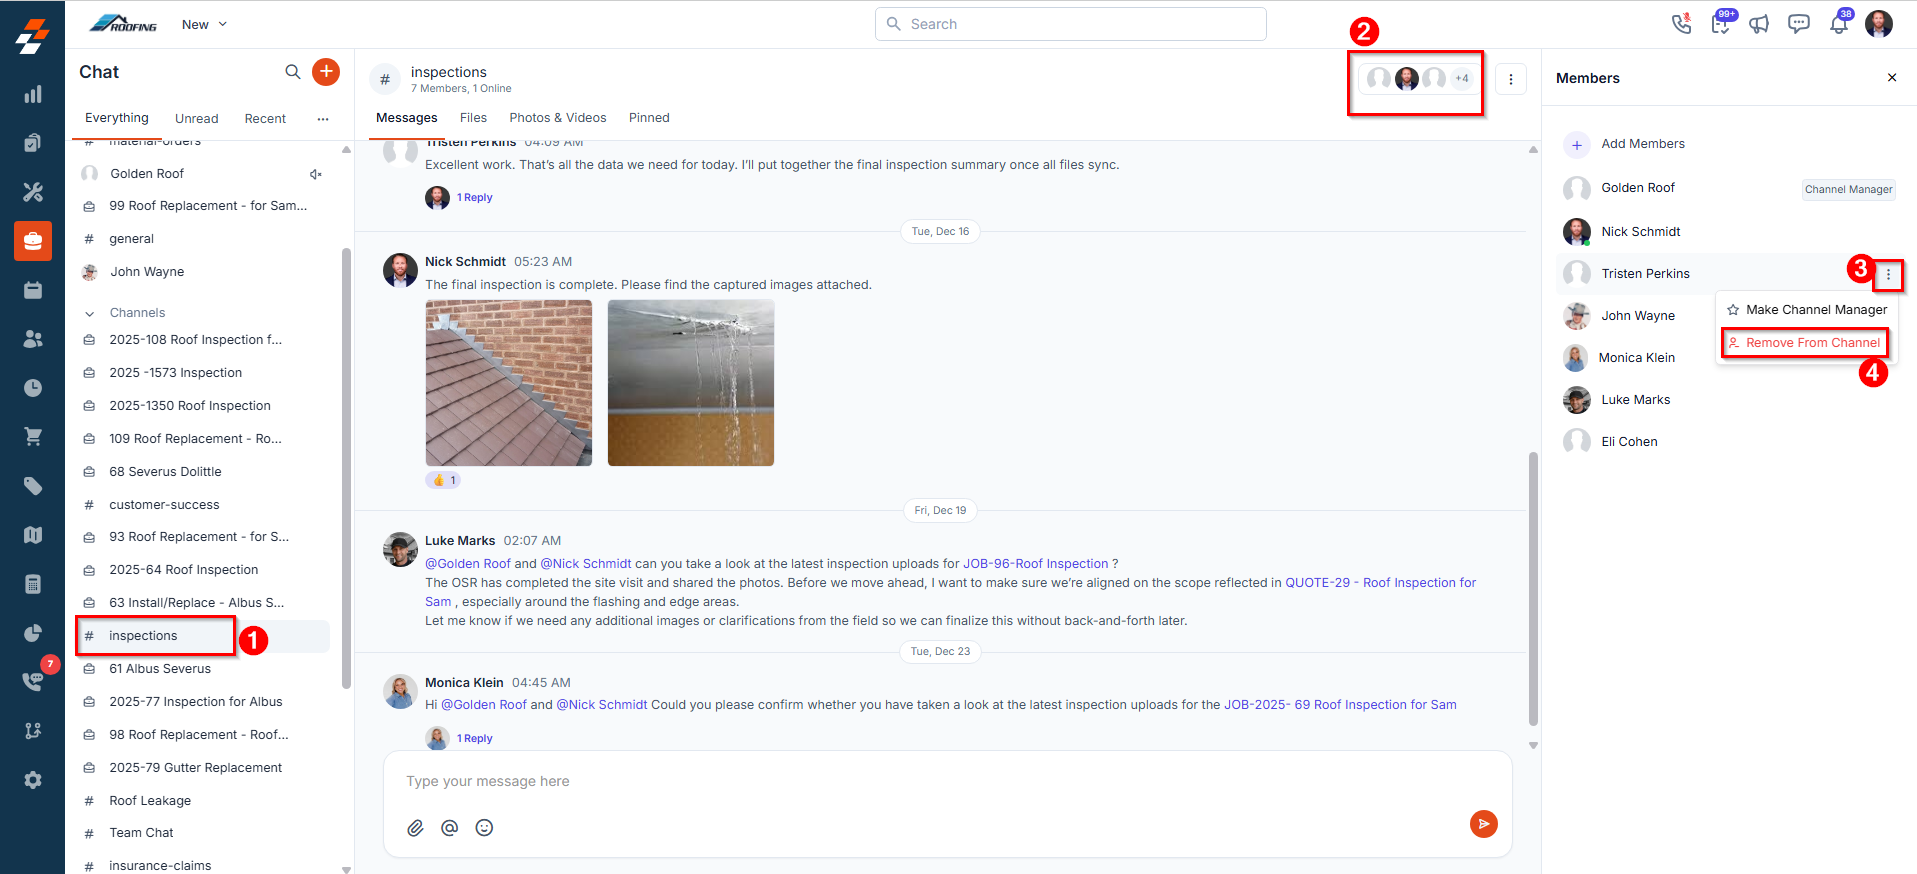
Removing a Member from a Channel
Removing a member from a channel restricts access for individuals who no longer need to participate in the conversation.- Web
- Mobile
- Open the channel from which you want to remove a member.
- Click the member avatars in the top-right of the channel header to view all members.
- Hover over the member’s name and click the More actions (⋮) icon.
- Select Remove from Channel.