SSO is not enabled by default. If the Single sign-on (SAML) option is not visible under Security settings, contact Zuper Support to have it enabled before you proceed.
Before you begin
Gather the following before you start. From Zuper (Settings → Security → Single sign-on):- ACS URL — the address your IdP sends the SAML response to after a user logs in
- SP Entity ID — Zuper’s unique identifier in the SAML exchange From your identity provider:
- Entity ID — the unique identifier for your IdP
- SAML SSO URL — the login endpoint your IdP uses to authenticate users
- X.509 certificate — the public key Zuper uses to verify responses from your IdP
- Logout URL (optional) — required only if you want single logout (SLO) enabled Access requirements:
- Admin access in Zuper
- Admin access in your identity provider
Step 1 — Configure SSO in Zuper
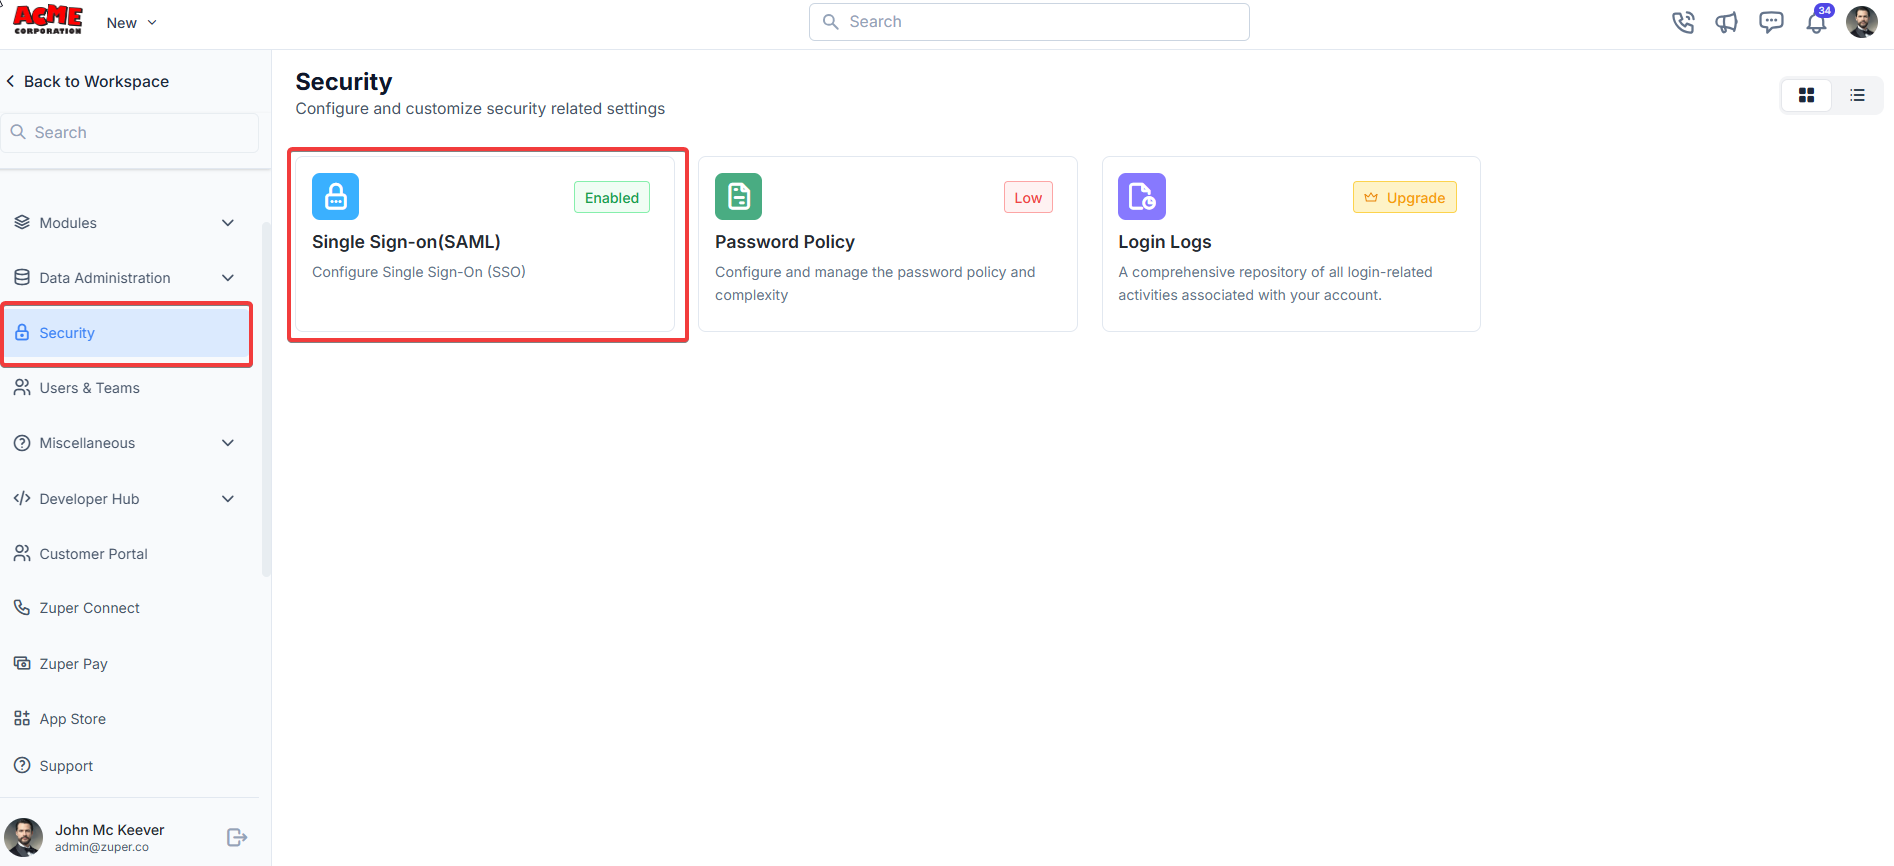
- Go to Settings from the left navigation menu.
- Select Security, then select Single sign-on (SAML).
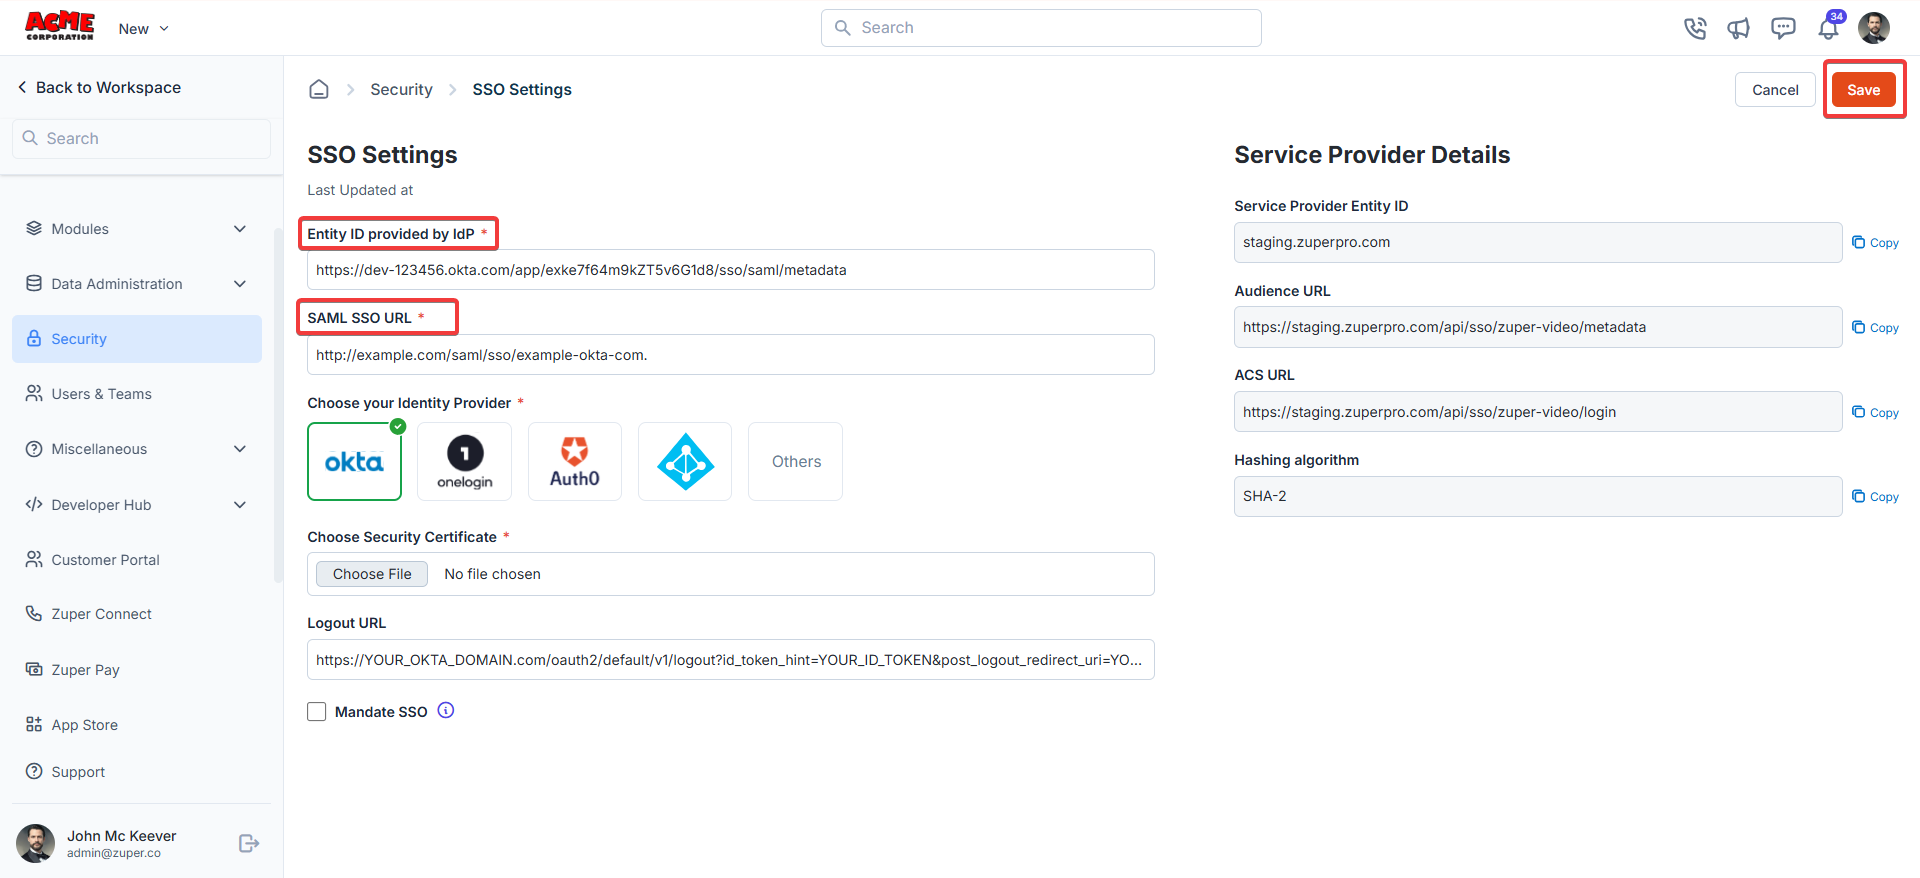
- Note the ACS URL and SP Entity ID on the page. You will enter these in your IdP in Step 2.
- Enter the following details from your IdP: a. Entity ID (mandatory)
- Azure AD: In the Microsoft Entra ID portal, go to Enterprise Applications → your Zuper app → Single sign-on → SAML. Copy the Microsoft Entra Identifier.
- Okta: In the Okta admin dashboard, find the Issuer URI under your SAML app settings (for example,
https://your-org.okta.com). - Other IdPs: Open the IdP’s SAML metadata XML and copy the
entityIDattribute from theEntityDescriptorelement. b. SAML SSO URL (mandatory) - Azure AD: Copy the Login URL from the same SAML settings page (for example,
https://login.microsoftonline.com/{tenant-id}/saml2). - Okta: Copy the Single sign-on URL from your SAML app settings.
- Other IdPs: In the SAML metadata XML, find the
SingleSignOnServiceelement and copy theLocationattribute value. c. Identity Provider (mandatory)
.cer file or within the X509Certificate tag in the metadata XML. Click Choose File and confirm it says “File chosen” after uploading.
e. Logout URL (optional)
If your IdP supports Single Logout (SLO), enter the logout URL here. In your IdP’s SAML metadata, look for the SingleLogoutService element and copy its Location value.
- Under SSO enforcement:
- Leave Enforce SSO for all users unchecked to allow both SSO and password login.
- Check it to require SSO for all users.
Do not enforce SSO before completing and testing Steps 2 and 3. Users — including admins — may lose access if enforcement is turned on too early.
- Select Save.
Step 2 — Configure Zuper in your identity provider
Step 1: Create a SAML application Sign in to your identity provider’s admin portal and create a new SAML application named Zuper.- Okta: Go to Applications → Create app integration → SAML 2.0 → Next. Step 2: Enter Zuper’s details
| Field in your IdP | Value to enter |
|---|---|
| Single sign-on URL (ACS URL) | Paste the ACS URL from Zuper |
| Audience URI (SP Entity ID) | Paste the SP Entity ID from Zuper |
| Default relay state | Leave blank |
| Name ID format | Email address |
| Application username | User’s email address |
The Name ID sent by your IdP must match the email address on the user’s Zuper account. A mismatch will cause login to fail.Step 3: Map user attributes (optional but recommended) In the Attribute statements section, map the following:
| Zuper attribute | IdP field |
|---|---|
email | User’s email address |
firstName | User’s first name |
lastName | User’s last name |
Step 3 — Test your SSO configuration
Test before you enforce SSO so that any issues affect only you, not your entire team.- Return to Settings → Security → Single sign-on (SAML) in Zuper and confirm your settings are saved.
- Open a private or incognito browser window.
- Go to the Zuper login page.
- Select the Sign in with SSO option.
- Enter your company name when prompted and select Continue. Zuper redirects you to your IdP’s login page.
- Enter your IdP credentials and complete any multi-factor authentication your IdP requires. After successful authentication, your IdP redirects you back to Zuper and you are logged in.
- Confirm that your name, email address, and role appear correctly inside Zuper.
Troubleshooting
”Invalid SAML response” error
Symptom: Zuper displays an “Invalid SAML response” error after you authenticate with your IdP. Cause: The Entity ID or SSO URL in Zuper does not match what your IdP is sending, or the certificate is incorrect or expired. Fix:- Go to Settings → Security → Single sign-on (SAML) in Zuper.
- Confirm the Entity ID exactly matches the value in your IdP’s SAML settings — including capitalization and trailing slashes.
- Confirm the SAML SSO URL matches the IdP’s login endpoint exactly.
- Check the X.509 certificate in Zuper. Compare it with the current certificate in your IdP to confirm they match.
- If your IdP’s certificate has expired, generate a new one in your IdP, update it in Zuper, and select Save.
Users are not redirected to the IdP
Symptom: Selecting Sign in with SSO on the Zuper login page does nothing, or the page reloads without redirecting. Cause: The ACS URL in your IdP does not match the one Zuper provided. Fix:- Go to your IdP’s SAML application settings for Zuper.
- Find the Single sign-on URL or ACS URL field.
- Go to Settings → Security → Single sign-on (SAML) in Zuper and copy the ACS URL.
- Paste it into your IdP and save the change.
- Attempt login again using a private browser window.
Login fails after the IdP redirect
Symptom: Your IdP authenticates you successfully, but Zuper shows an error or returns to the login page. Cause: The email address your IdP sends does not match the email address on the user’s Zuper account, or the attribute mapping is missing. Fix:- Go to your IdP’s SAML application settings for Zuper.
- Open the Attribute statements section.
- Confirm the
emailattribute is mapped and that it sends the user’s correct email address. - Go to Settings → Users in Zuper and confirm the user’s email address matches exactly — including domain — what the IdP sends.
- Save any changes in your IdP and test again using a private browser window.
Frequently asked questions
Is SSO available on all Zuper plans?
Is SSO available on all Zuper plans?
SSO is not enabled by default on any plan. Contact Zuper Support to confirm availability for your account and to have the feature enabled.
Which identity providers does Zuper support?
Which identity providers does Zuper support?
Zuper supports any SAML 2.0-compliant identity provider. Common providers include Okta, Azure AD (Microsoft Entra ID), OneLogin, Auth0, and Google Workspace. The configuration steps are the same across all providers — only the field names and locations differ.
What happens to users who do not have an IdP account?
What happens to users who do not have an IdP account?
If Enforce SSO for all users is enabled, users without an IdP account cannot log in to Zuper. Create their accounts in your IdP and assign them to the Zuper application before enforcing SSO.
Can I let some users log in with a Zuper password while others use SSO?
Can I let some users log in with a Zuper password while others use SSO?
Yes. Leave the Enforce SSO for all users checkbox unchecked. Users can then choose to log in with either SSO or their Zuper credentials.
What should I do if I get locked out after enabling SSO?
What should I do if I get locked out after enabling SSO?
Contact Zuper Support immediately. The support team can disable SSO enforcement on your account so you can regain access.