Navigation: Settings -> Data Administration -> Data Import
Step 1: Import Type Selection
We must choose how to import data in this initial step. You can select one of the following options: Option 1: Import using the file or Option 2: Use Saved Template Select “Import using file” to upload a new file from your device, as shown in this example.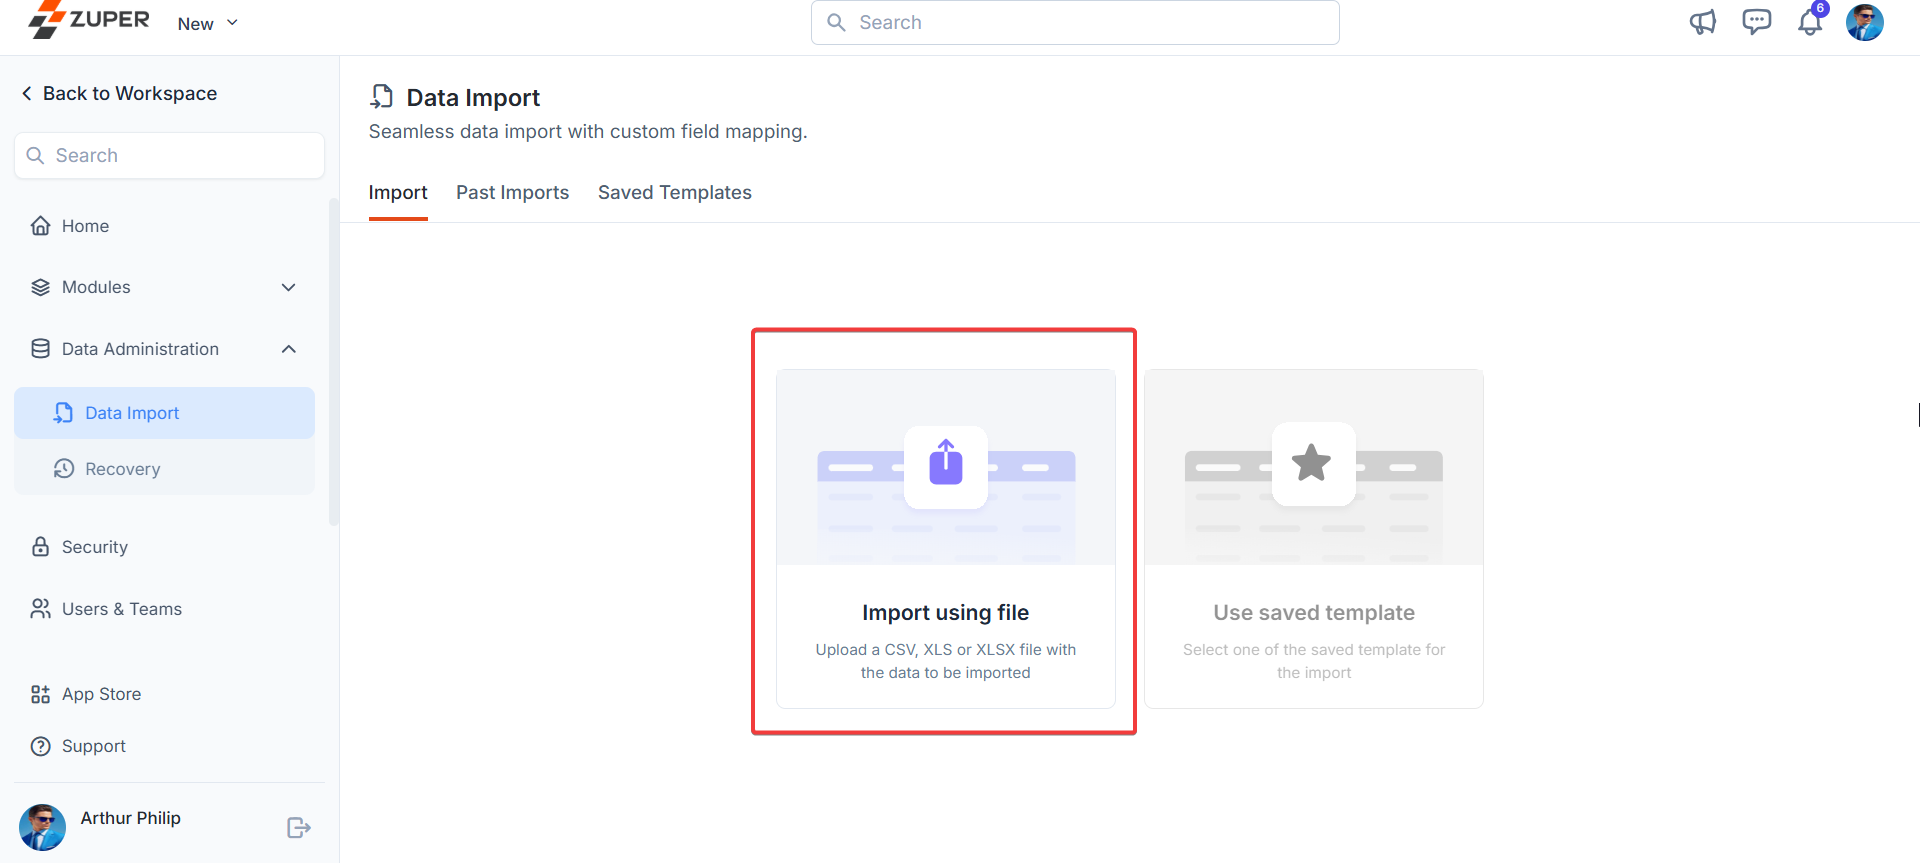
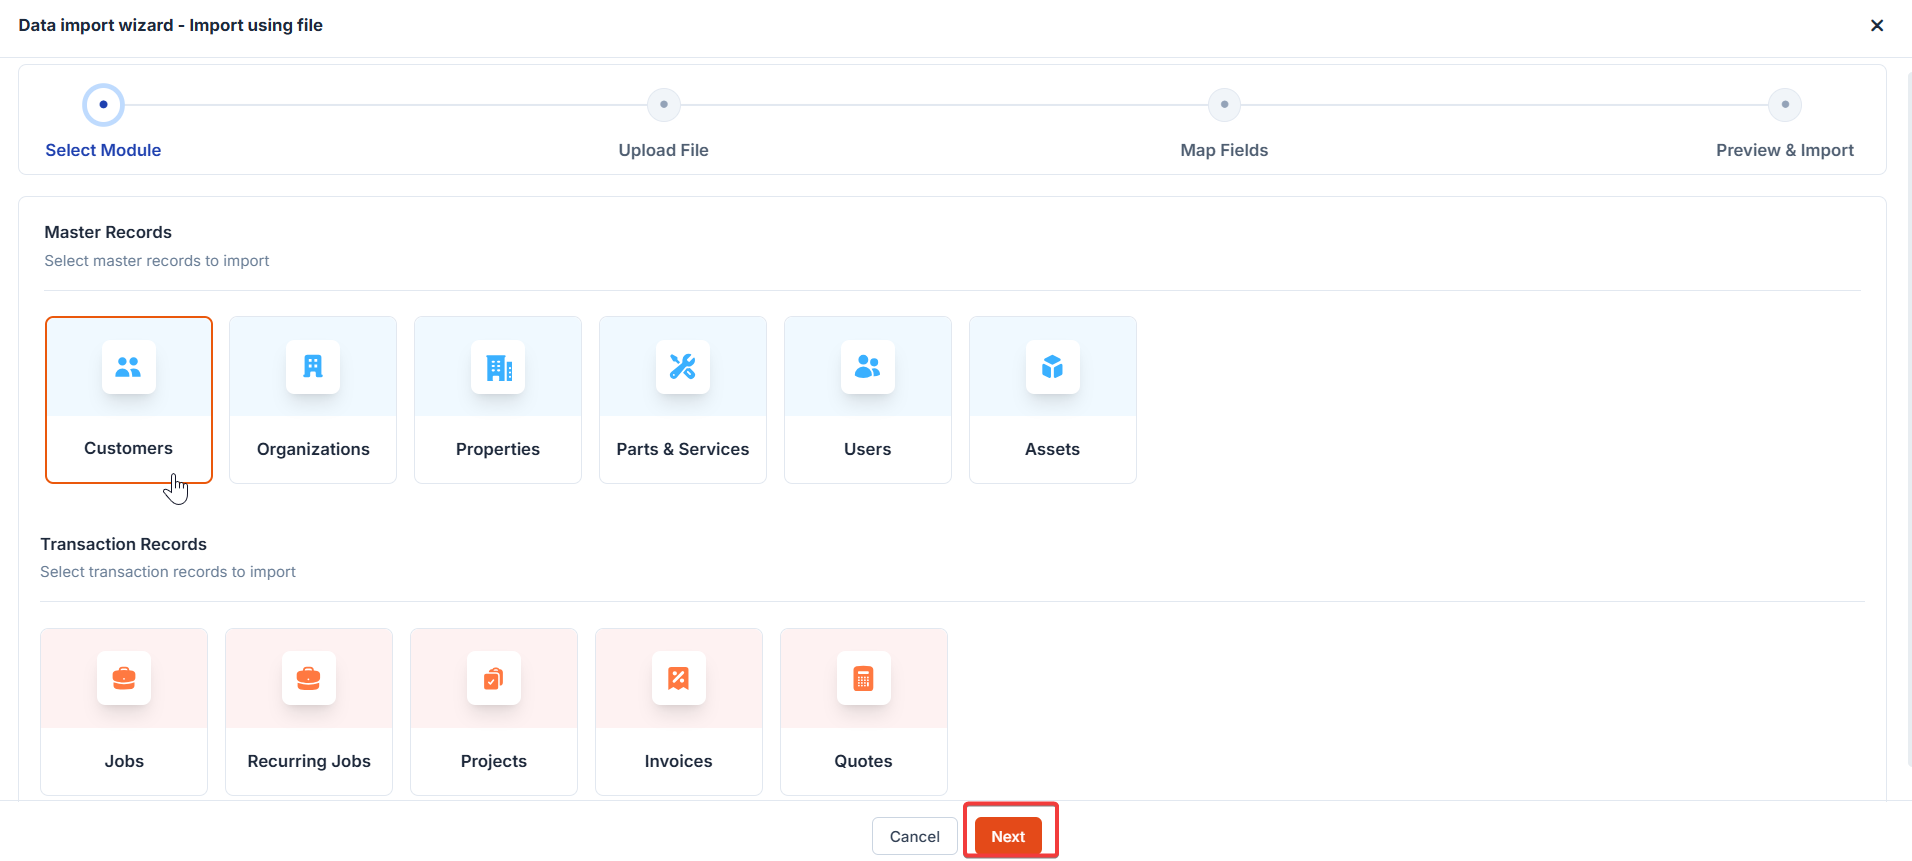
Step 2: Module Selection
This step lets you choose the module(s) for your data import. Modules are categorized into Master Data and Transaction Data, with specific associations and requirements.Master Data Modules
Master data modules can be imported independently and associated with other modules. Below is a table of available master data modules and their associations:| Primary module | Can be selected with (Associated) |
|---|---|
| Customers | Organizations |
| Organizations | NA |
| Properties, Customers | Organizations |
| Products, Parts & Services | None |
| Users | None |
| Assets | Customers, Products, Properties, Organizations |
Note: There are no mandatory associations for master data imports. Each module can be created independently.
First-Time Setup Tip: If setting up an account for the first time, consider importing customers, organizations, and properties before importing transaction data like jobs or projects.
Transaction Data Modules
Transaction data modules often require associated modules and mandatory selections. Below is a table of transaction data modules:| Primary module | Can be selected with (Associated) | Required Selection |
|---|---|---|
| Jobs | Customers, Organizations, Assets, Line Items, Properties | Customers |
| Recurring Jobs | Customers, Organizations, Line Items, Properties | Organizations |
| Projects | Customers, Organizations, Properties, Assets, Contracts | Properties, Customers |
| Requests | Customers, Organizations | Products, Parts & Services |
| Invoices | Customers, Organizations, Line Items, Properties | Users |
| Quotes | Customers, Organizations, Line Items | Assets |
- Key Requirement: When importing transaction data (e.g., Jobs), mandatory fields from required associated modules (e.g., Customer Email for Customers) must be included in the mapping to create or merge records.
- When importing multiple associated modules (e.g., Properties and Customers), please ensure that the unique field for the associated modules are mapped.
- Zuper supports one-to-many and many-to-many associations: o Example: One Customer can be linked to multiple Properties. If a Customer Email appears in two rows of Property data, that Customer will be associated with both Properties upon import.
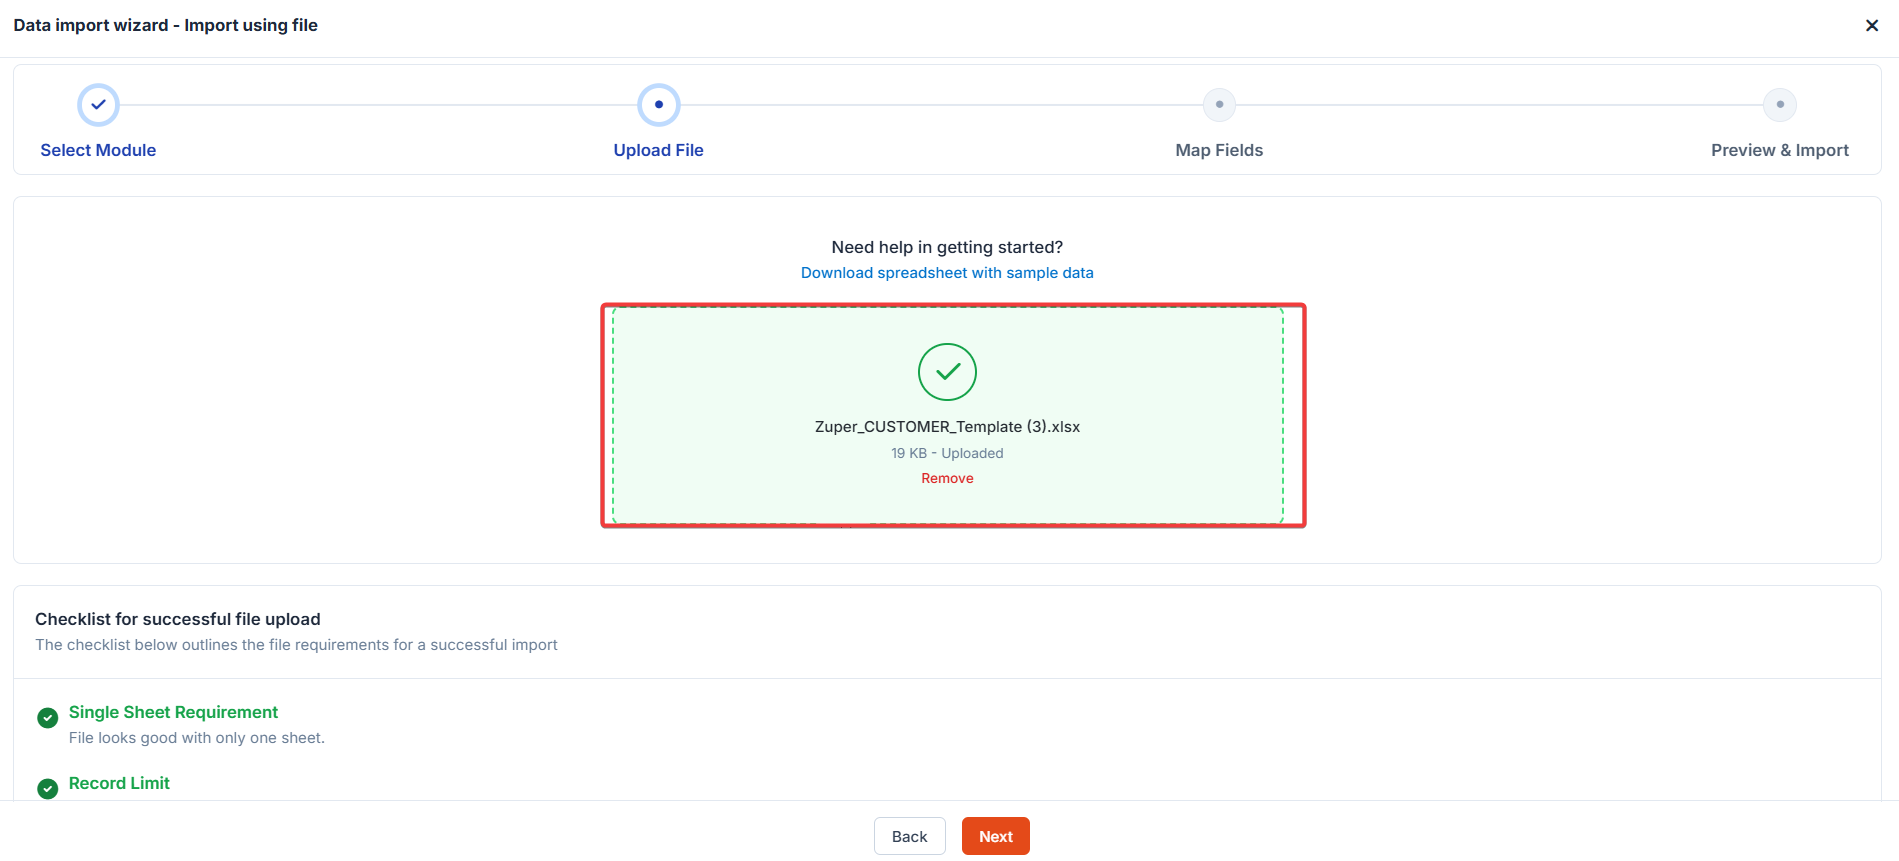
Step 3: Upload File
Upload your data file with the following requirements:- File Type: CSV only.
- Size Limit: Maximum 25 MB.
- Row Limit: Maximum 20,000 rows.
- Structure: Single sheet (no sub-sheets).
- Note: These limits are displayed on the upload page.
- Not in the required format.
- Exceeds file size or row limit.
- Missing column headers.
- Incorrect structure.
- Blank rows within data.
- Locked/password-protected file. You’ll be alerted to correct issues before proceeding if problems are detected.
- If your data isn’t formatted, download a template for the selected module (single-module imports only).
- After uploading the formatted file, skip mapping and submit directly in Step 4.
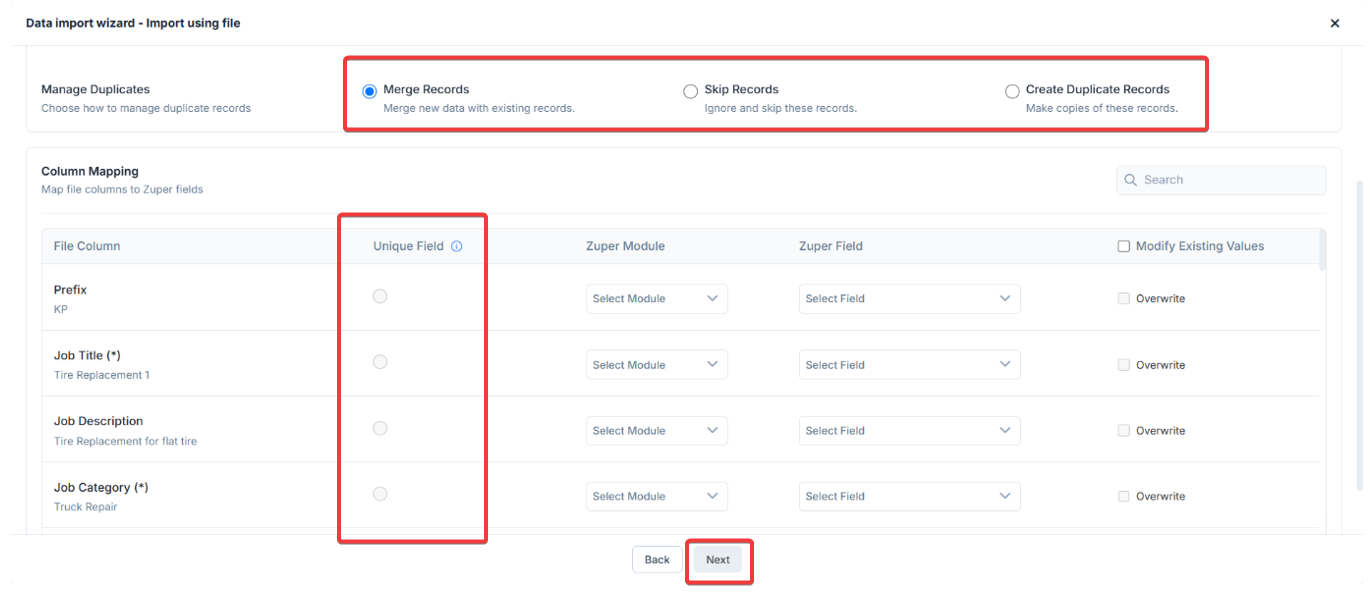
Step 4: Configurations
Configure how your data will be imported, including primary key selection and conflict resolution.Primary Key
- Use the “Unique field” column to choose a primary key during mapping to identify unique records and prevent duplicates. Note: This only applies to Transaction Modules.
- The primary key validates incoming records against existing data in the system and within the uploaded file.
Conflict Resolution Options
Select how Zuper handles records with matching primary keys:- Skip: When a record has the same unique ID as one existing in the system, it skips the record.
- Merge: When a record has the same unique ID as one existing in the system, it updates that record.
- Create Duplicates: When a record has the same unique ID as one existing in the system, it creates a duplicate record.
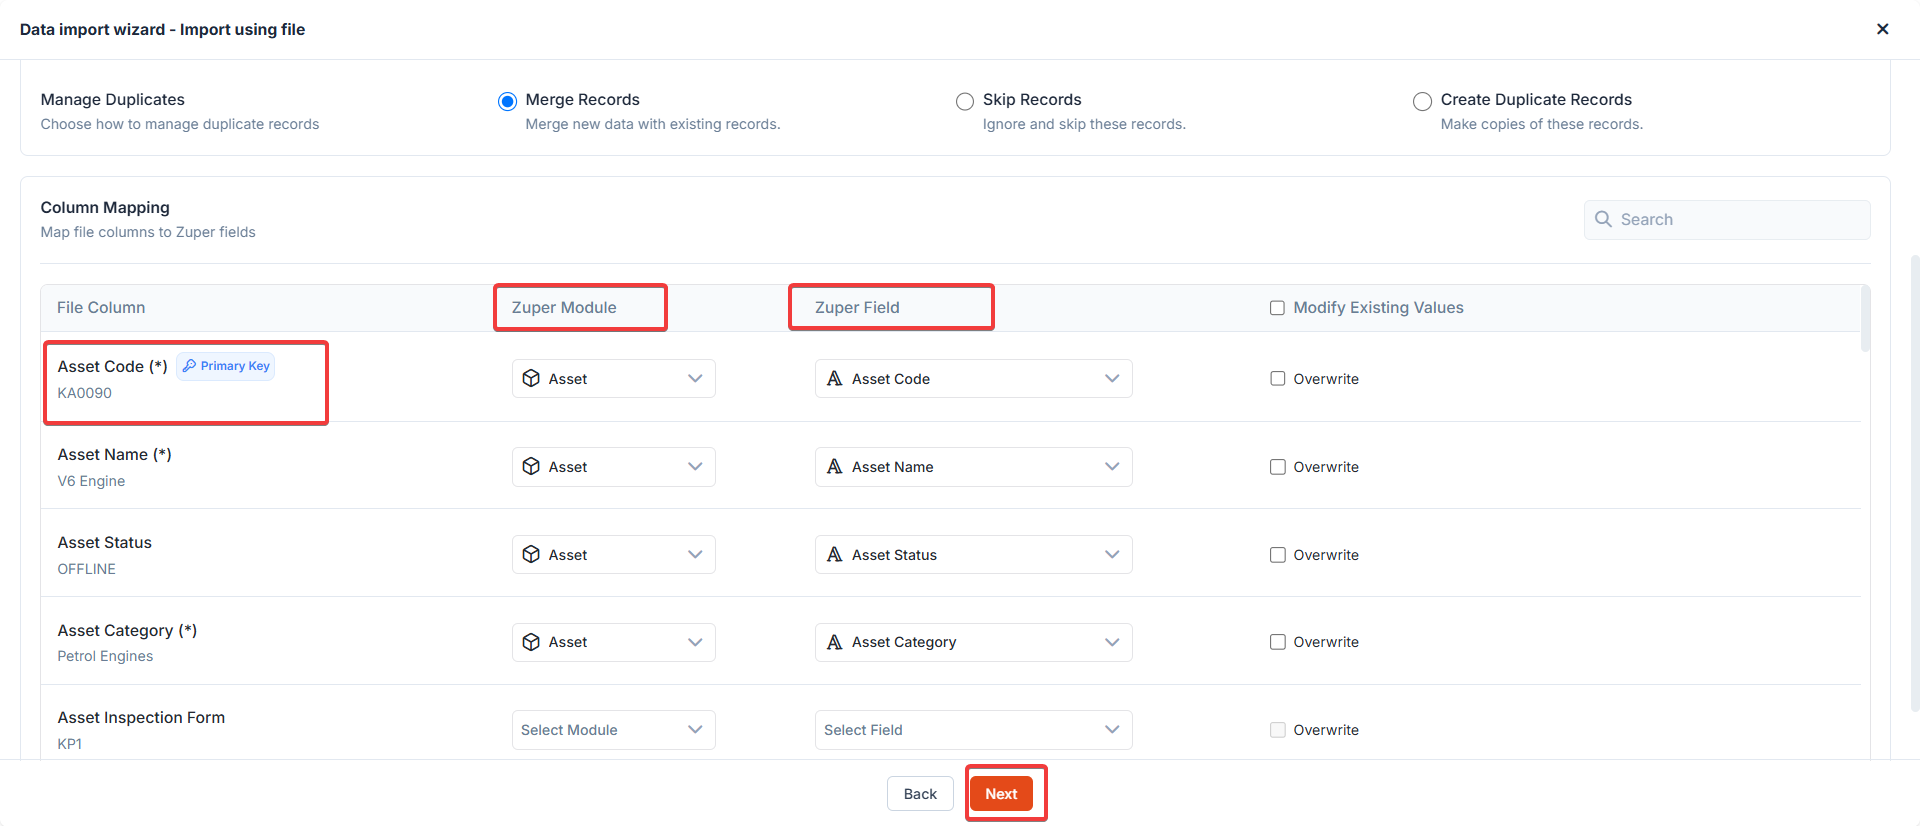
Step 5: Data Import – Mapping Table
Map your uploaded file’s columns to Zuper fields using the mapping table.- Multi-Module Uploads: All fields from selected modules appear in the table. Map each “File Column Header” to an “Import to Field” after choosing the “Import in Module.”
- Mandatory Fields: Must be mapped for the import to proceed. Unmapped mandatory fields will block the import and notify the user.
- Unmapped Columns: If some columns remain unmapped, confirm whether to proceed with partial mapping.
Saving Import Templates
- Save your mapping as a template (e.g., “HubSpot Contacts to Customers”) for reuse.
- Specify a name and save it after validation.
Data Validation
- Mandatory Fields: Ensures all required fields for record creation are mapped.
- Field Values: Validates against acceptable values (e.g., dropdown options).
- Duplicates: Highlights duplicate primary keys in the file.
- Blank Fields: Skips blank values during import.
Import Process
Once the mapping is complete, click Import. The process runs asynchronously, and you’ll be notified of the status. Choose “Allow subsequent triggers” to activate existing workflows and webhooks, keeping your data flow dynamic and integrated. Select “Disable subsequent triggers” to prevent unwanted module interactions, ensuring a smooth and focused import process.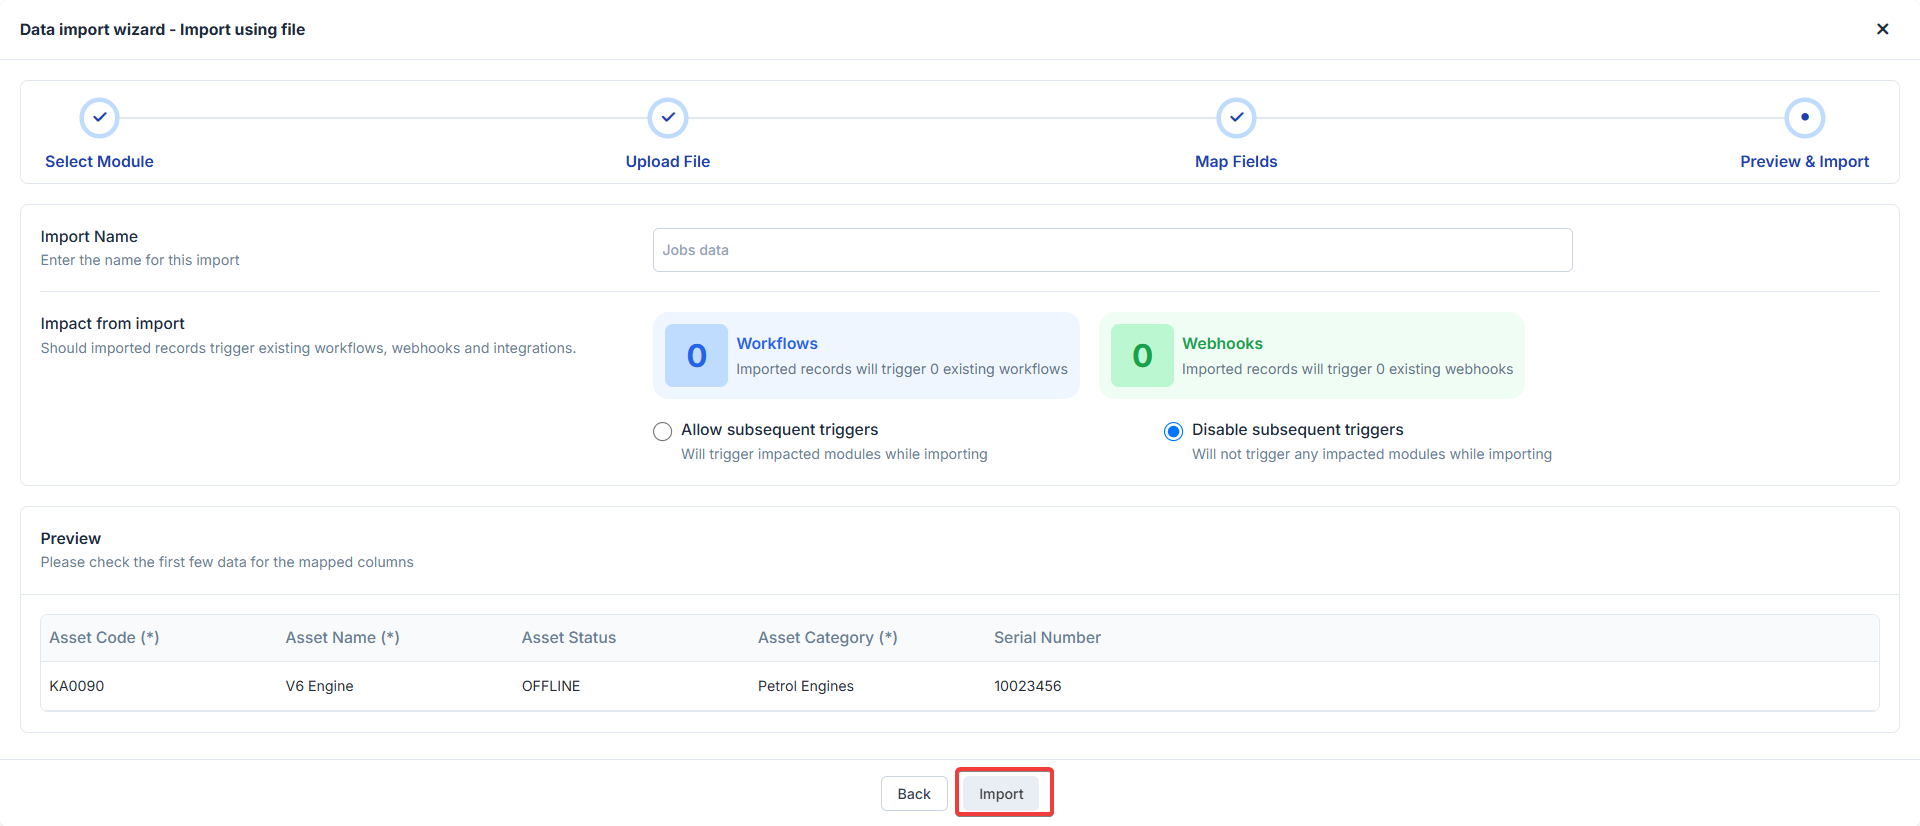
Tips for Success
- Ensure your file meets size and row limits.
- Include mandatory fields for primary and associated modules.
- Use templates for repetitive imports to save time.
- Validate data formats (e.g., dropdown values) before uploading.
Select Module:
In Module Selection, your choice will be recorded. Option 2: Use a Saved Template- Action: Select “Use a Saved Template” to leverage a previously saved import template.
- Details: A dialog box will display a list of saved templates with the following columns: o Template Name: The name you assigned to the template. o Module Name/s: The module(s) associated with the template. o Actions: Click “Use Import Template” to proceed.
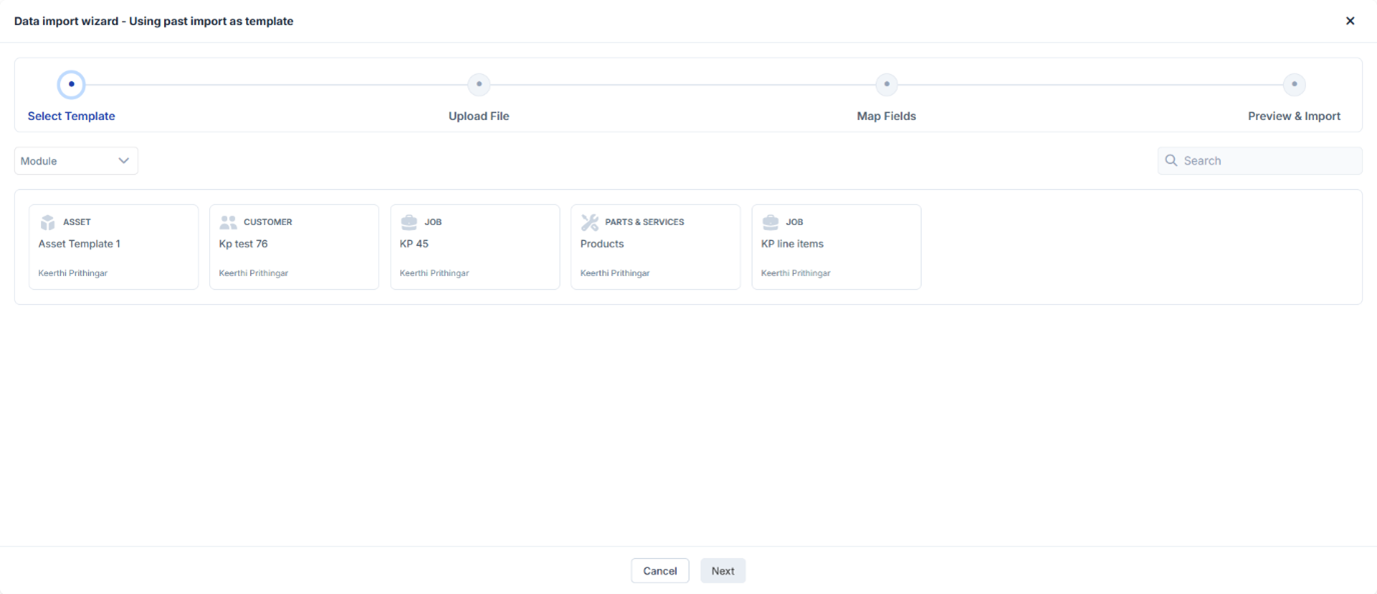
- Next Step: Skips Step 2 and takes you directly to Step 3 Configurations. o If the uploaded file matches the template’s required format, the mapping in Step 5 will be pre-filled. Otherwise, you’ll be prompted to map fields and proceed manually.
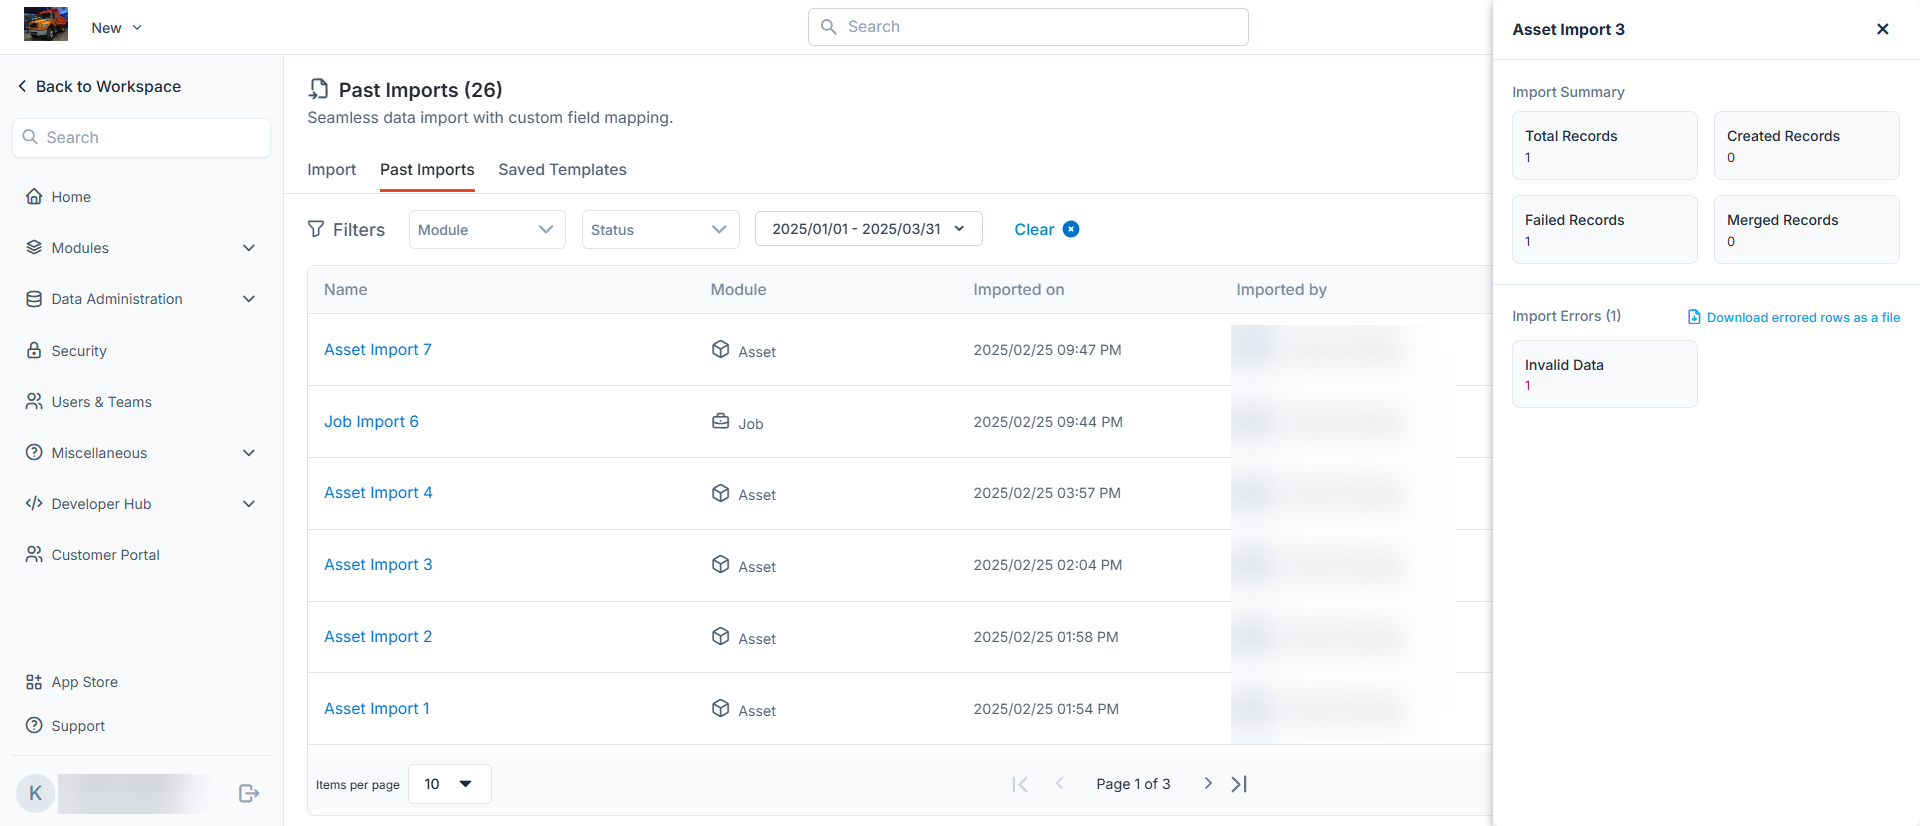
Past Imports
Zuper Data Import enables you to import data into your workspace effortlessly, utilizing custom field mapping. The “Past Imports” section provides a history of your import activities, while the “Import Summary” and “Import Errors” sections help you track the success and troubleshoot issues with your imports. This article guides you through managing past imports and resolving data import errors.Accessing Past Imports
- Navigate to the Import Section: o From your Zuper workspace, click on the “Past Imports” tab located under the “Import” section. o You’ll see a list of all previous imports with details such as name, module, import date, and the user who performed the import.
- Name: The name of the import (e.g., “Asset Import 3”).
- Module: The module associated with the import (e.g.,“Asset”).
- Imported On: The date and time of the import (e.g., 2025/02/25 02:04 PM).
- Imported By: The user who initiated the import (e.g., John Wick).
- Total Records: The total number of records attempted to be imported (e.g., 1 record).
- Created Records: The number of new records successfully created (e.g., 0 records).
- Failed Records: The number of records that failed to import (e.g., 1 record).
- Merged Records: The number of existing records updated or merged (e.g., 0 records).
- Identifying Errors: o Check the “Failed Records” count in the Import Summary. o The “Import Errors” panel will list the number of errors (e.g., 1 error) and the reason (e.g., “Invalid Data”).
- Downloading Error Details: o Click the “Download errored rows as a file” link to export a file containing the failed records and error messages. o Review the file to identify specific issues, such as missing fields, incorrect data formats, or validation errors.
- Common Error Causes and Solutions: o Invalid Data: Ensure all data fields match the required format and contain valid values. For example, check for empty mandatory fields or incorrect date formats. o Mapping Issues: Verify that the custom field mapping aligns with the imported data structure. o Duplicate Entries: Resolve duplicates by ensuring unique identifiers are correctly set.
- Retrying the Import: o Correct the errors in your data file based on the downloaded error report. o Re-upload the corrected file using the “New” import option and monitor the results in the “Past Imports” section.
Best Practices
- Regularly review the “Past Imports” list to track import history and identify recurring issues.
- Save templates for frequently used imports to streamline the process.
- Clear filters when not in use to ensure you see the full import history.