

Creating a Material Order
A Material Order (MO) is a formal document issued to a supplier specifying the parts or products you intend to buy, including quantities and agreed prices. It serves as a crucial step in ensuring efficient procurement, cost control, and timely service delivery. In Zuper, you can create an MO from the following areas to request Parts & Products:- Material Order listing page
- Material Request details page
- Jobs > Parts and Services
- Quotes
Note: This feature is available only on select Zuper plans. To enable it for your account, please contact your account administrator or email us at support@zuper.co
- Material Order Module: The Material Order module must be enabled for your account.
- Suppliers: Suppliers should be added with complete contact and address details.
- Parts & Products: Items must be added to the supplier catalog.
- Custom Line Items: If the job includes a custom line item, ensure it has a unique ID, as this will be used as the SKU during MO creation.
Note: Receiving free or $0 itemsZuper does not currently support receiving products with a unit purchase cost of $0 on a material order. If a supplier is supplying items at no charge, enter a nominal cost to complete the receiving process. If you need assistance, contact Support.
Creating a New Material Order
To create a new material order from the purchasing module, follow these steps:- Select the Production module from the left navigation menu and select Material Orders.
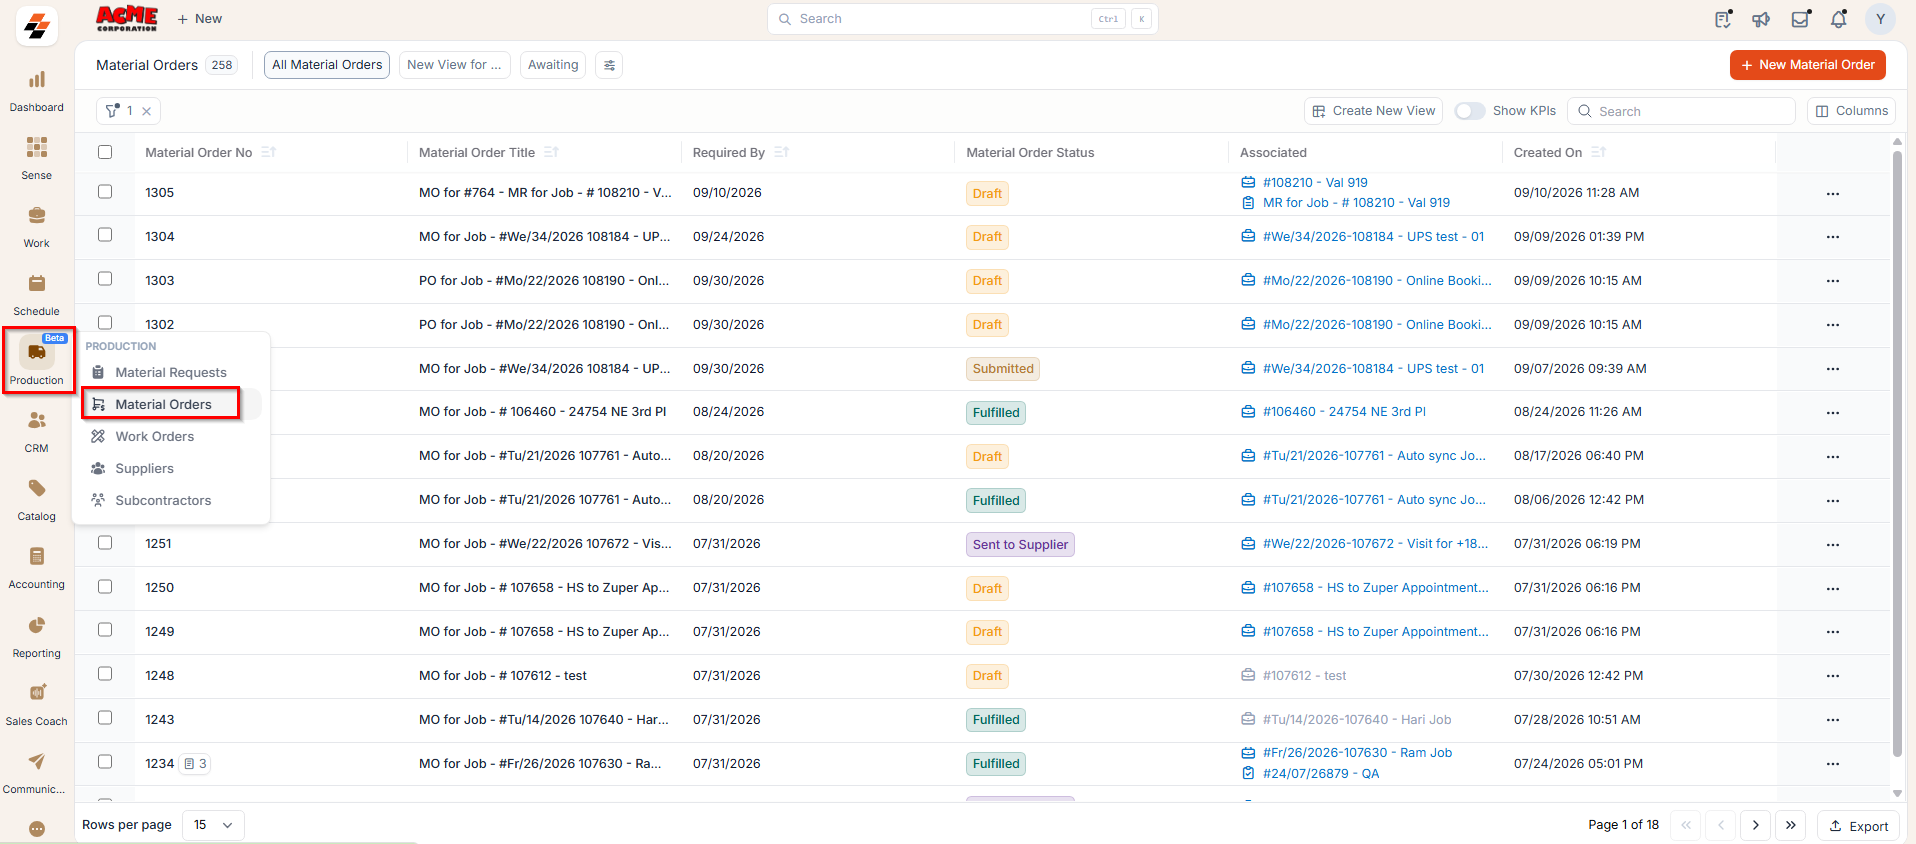
- You will view a list of existing material orders with details such as: Material Order No, Material Order Title, Required by date, Status, Supplier name, Total MO amount, and more.
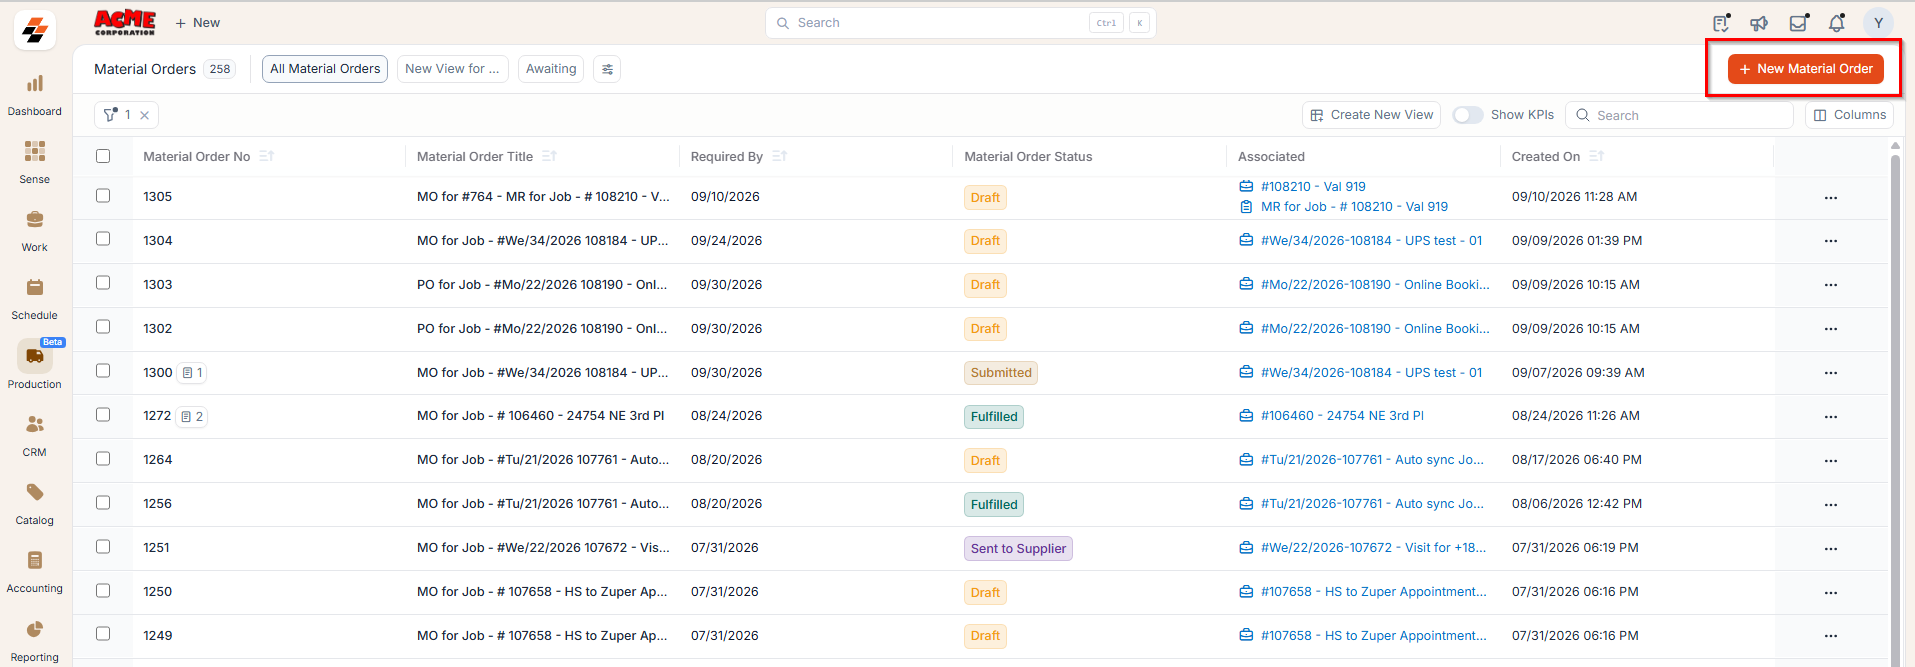
- Select the + New Material Order button in the top right corner to create a new material order. A New Material Order creation page will open.
- Fill in the following sections to create a new material order.
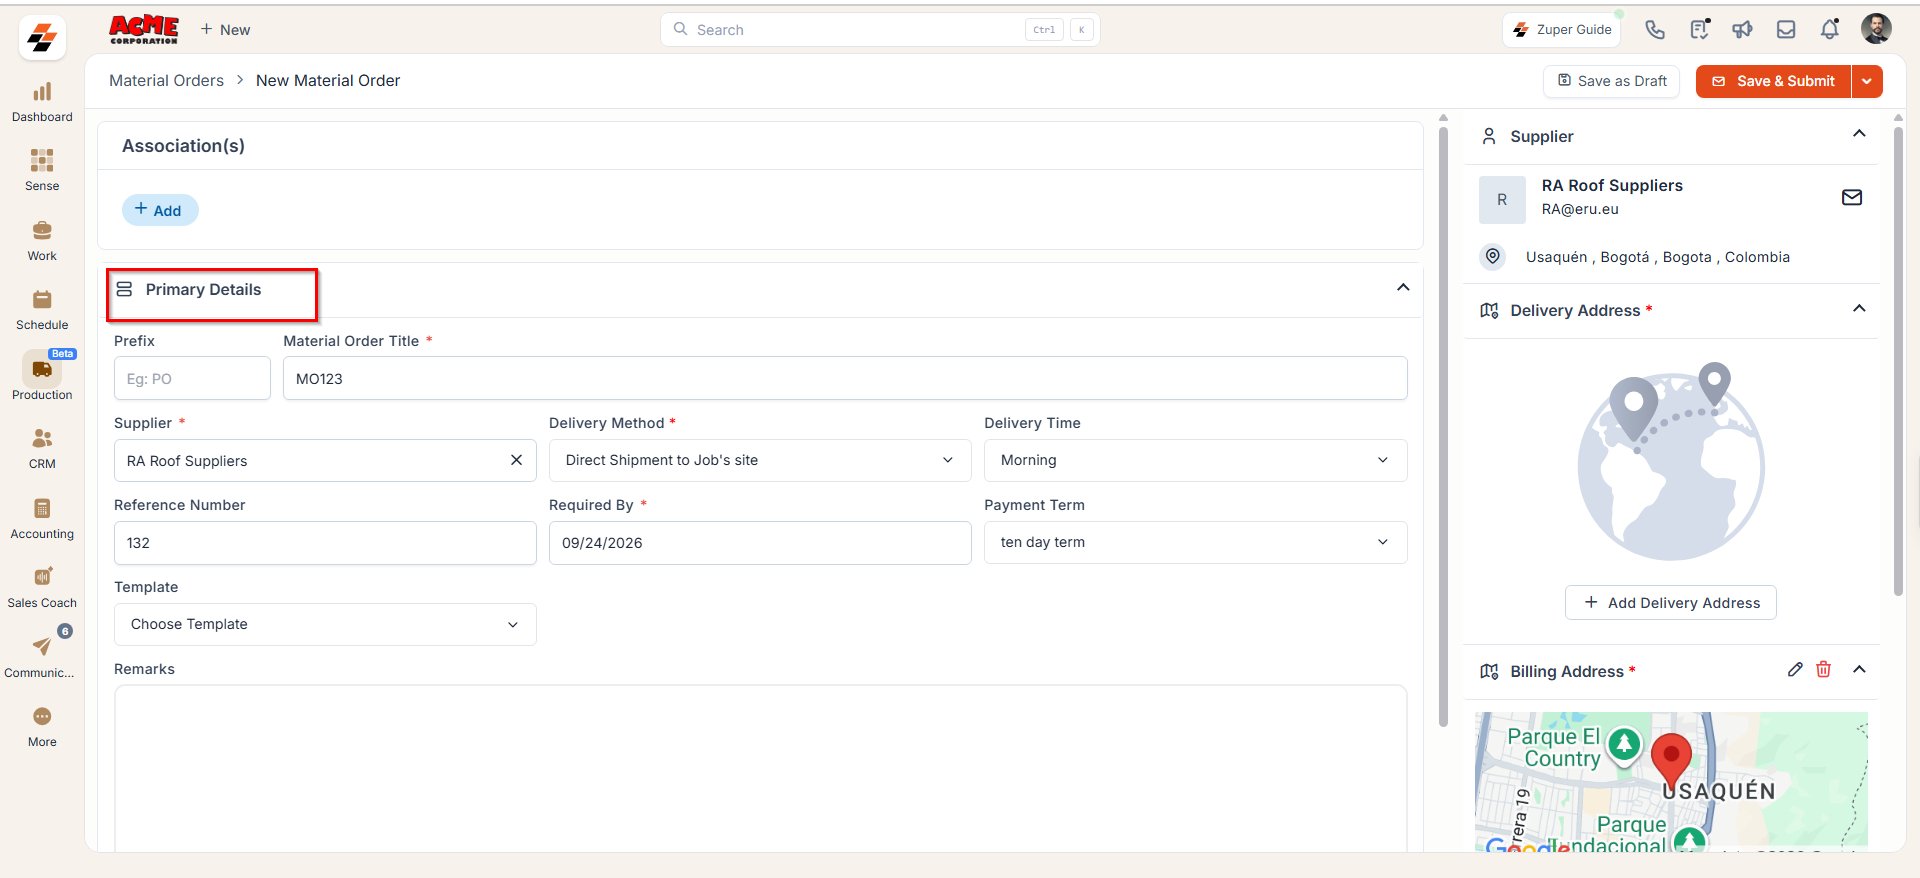
Primary Details
This section captures all essential information related to the material order.- MO Title: Enter a unique title for the material order.
- Supplier: Select a supplier from the existing supplier list. Only active suppliers will be available for selection. Once selected, the following details will automatically populate (all of which are editable if needed):
- Billing Address: The supplier’s registered billing address is populated by default.
- Delivery Address: The destination where the goods should be delivered. This is determined by the selected delivery method:
- If Direct shipment to Job’s site is selected, the job’s service address will be used.
- If Pickup from Supplier is selected, the supplier’s pickup address will be shown.
- If Deliver to Warehouse is selected, the selected warehouse address will be used.
- Delivery Method: Specifies how the goods will be delivered. This typically includes:
- Direct shipment to Job’s site
- Pickup from Supplier
- Deliver to Warehouse
- Payment Term: Indicates the payment agreement between your organization and the supplier.
Note: For more information on how to set up your suppliers, see the Suppliers article.
- Delivery Method: This defines how the items in the material order will be delivered. Choose one of the following delivery methods based on your logistics or supplier arrangement:
- Direct Shipment to Job’s site When this option is selected, the ordered items will be shipped directly to the job location.
Note: If this method is selected, the delivery address will be automatically populated with the service address linked to the associated job.- Deliver to Warehouse
When this option is selected, the ordered items will be delivered to the selected warehouse within your organization for storage or future dispatch.
Note: If this method is selected, ensure that the correct warehouse is chosen from the Delivery To dropdown list and that the delivery address for the selected warehouse is added in the Delivery Address field.- Pickup from Supplier
When this option is selected, your team will collect the ordered items directly from the supplier’s location and transport them to one of your organization’s warehouses.
Note: If this method is selected, the delivery address will be auto-filled with the supplier’s pickup address. - Delivery Time: Select the preferred time window for receiving the item. This helps the supplier plan the delivery more accurately. The available options include:
- Anytime – No specific delivery window is required.
- Morning – Delivery is expected during morning hours.
- Afternoon – Delivery is expected during afternoon hours.
- Special Request – Select this option if you need the delivery at a specific time or under special conditions.
- Reference Number: Enter an optional internal or supplier-specific reference ID.
- Required By: Select the date by which the items are required.
Note: This date must be today or a future date.
- Payment Term: Automatically filled based on the selected supplier’s default payment terms. You may update it if required. Template: A default template is pre-selected. If required, you can choose a different template for the material order from the drop-down menu.
- Remarks: Add any additional notes or instructions related to the material order.
Options
When creating an MO, select options for procurement alignment.Associations
You can associate a Material Order (MO) with either a Job or a Quote. To do this:- Select ”+ Add” in the Associations section.
- Select the appropriate Job or Quote from the list.
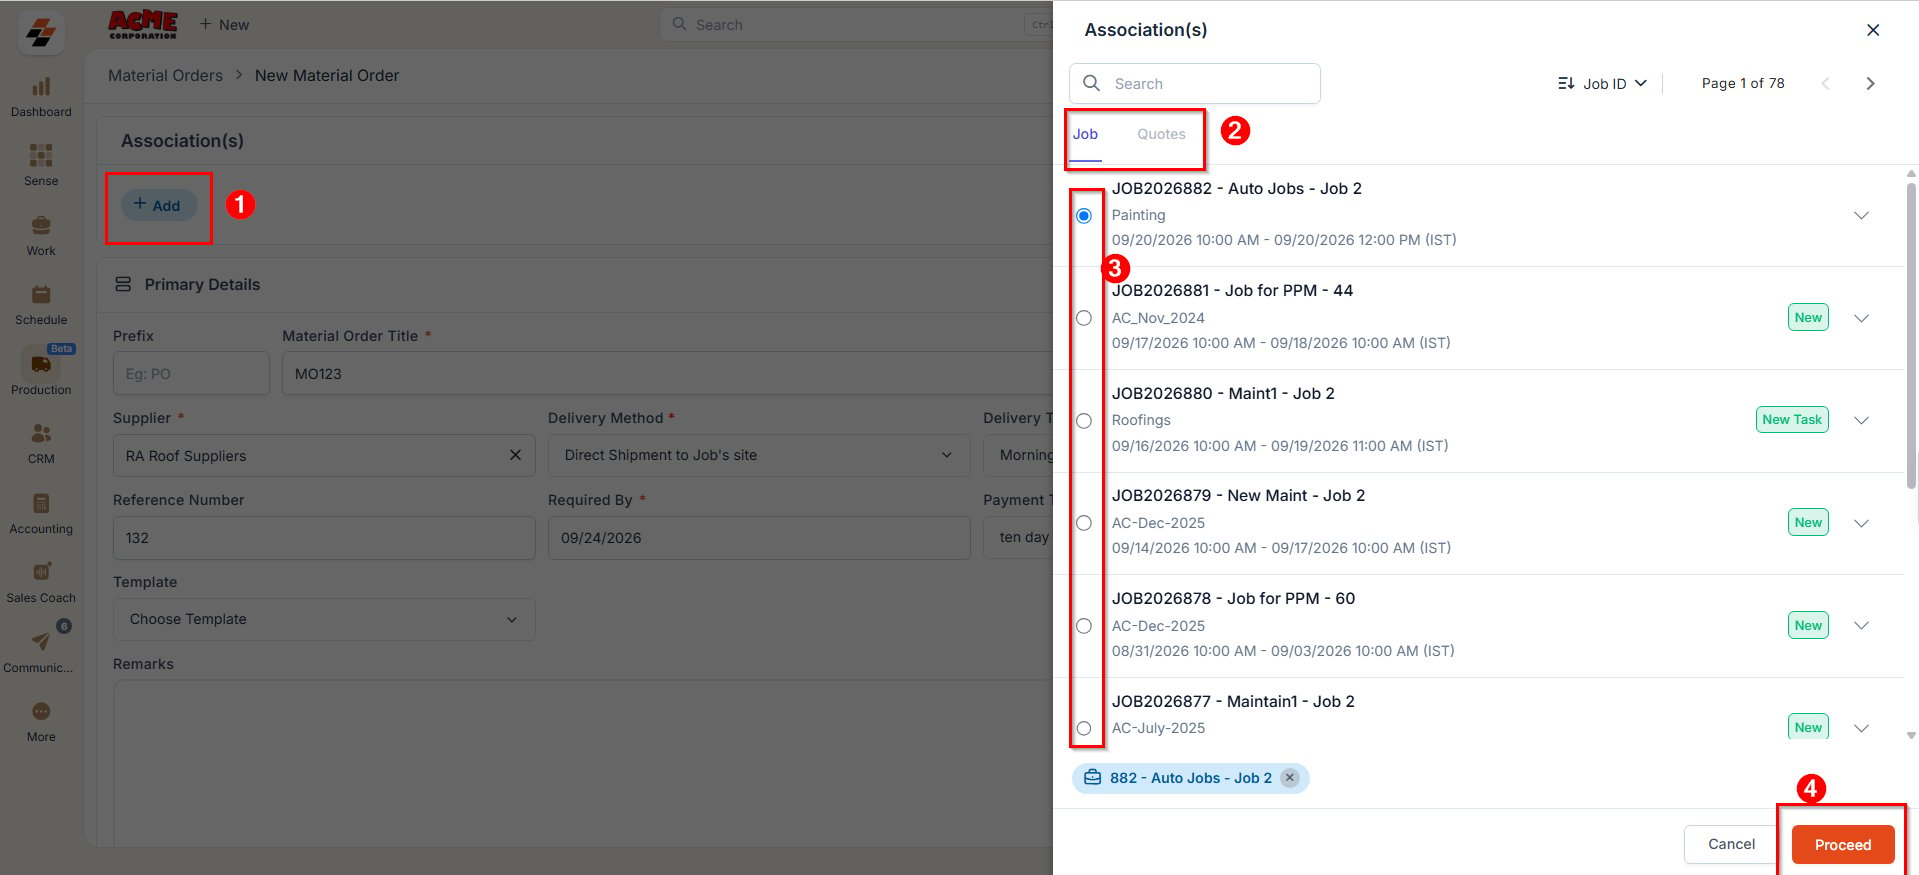
- Once the association is made, a modal will appear displaying the list of products from the selected Job or Quote. Choose the relevant items, and they will automatically populate in the MO Items section.
Note: Associating an MO with a Job or Quote helps track the purpose of the purchase and streamlines your workflow by linking related records and products.
MO items
This section allows you to add parts and products that you wish to purchase from the selected supplier. You can:- Choose items from the Supplier Catalog, or
- Add Custom Line Items that are specific to this MO.
To add parts/products from the Supplier Catalog:
To add parts/products from the Supplier Catalog:
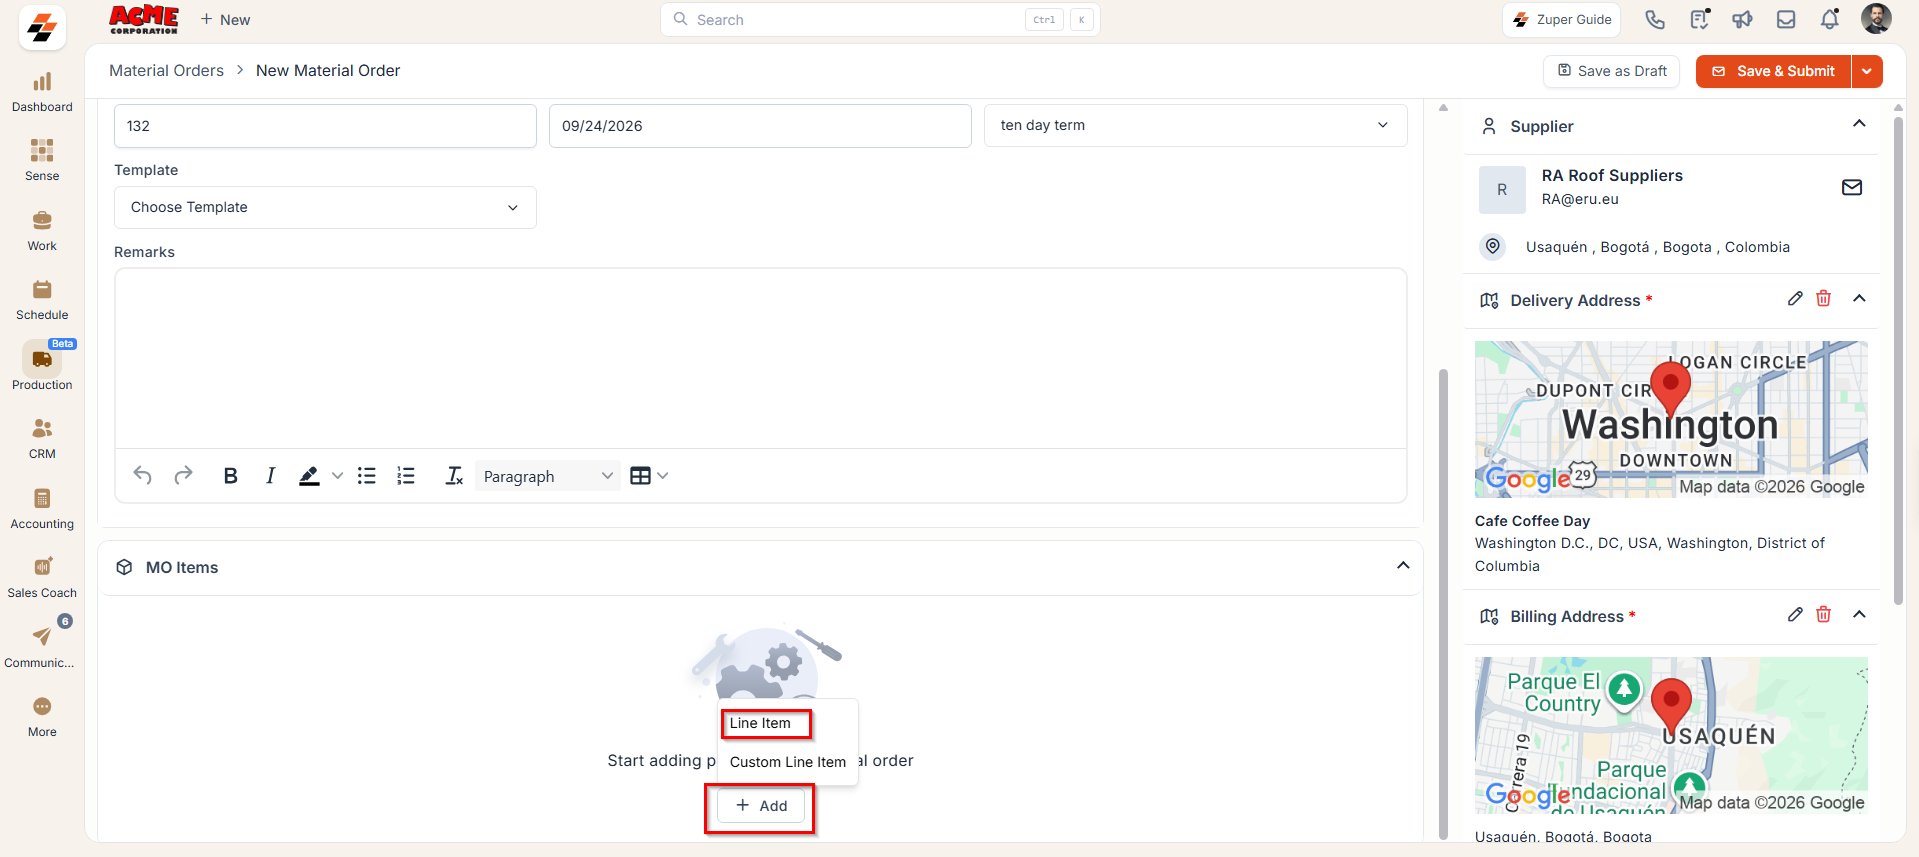
- In the MO Items section, select ”+ Add” and select “Line Item.”
- The Supplier Catalog will open.
- Browse or search to find desired parts/products.
- Select the Supplier SKU/ID.
- Enter the quantity in the Required Qty field.
- Click “Add Item” to include it in the MO.
To add a custom line item:
To add a custom line item:
Use this option to add items that are not listed in the Supplier Catalog.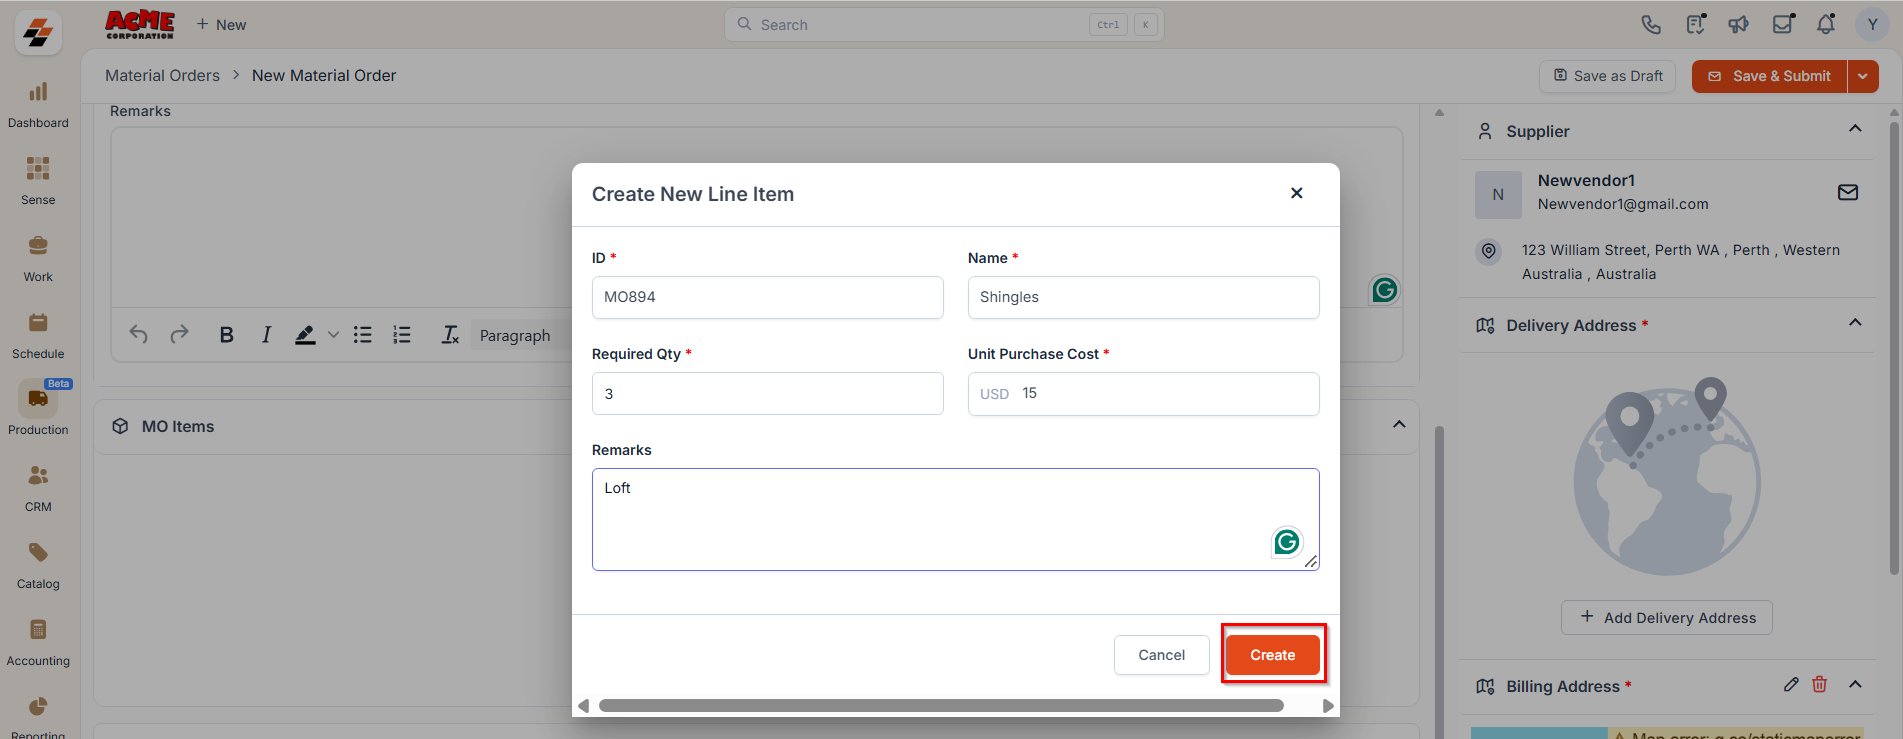
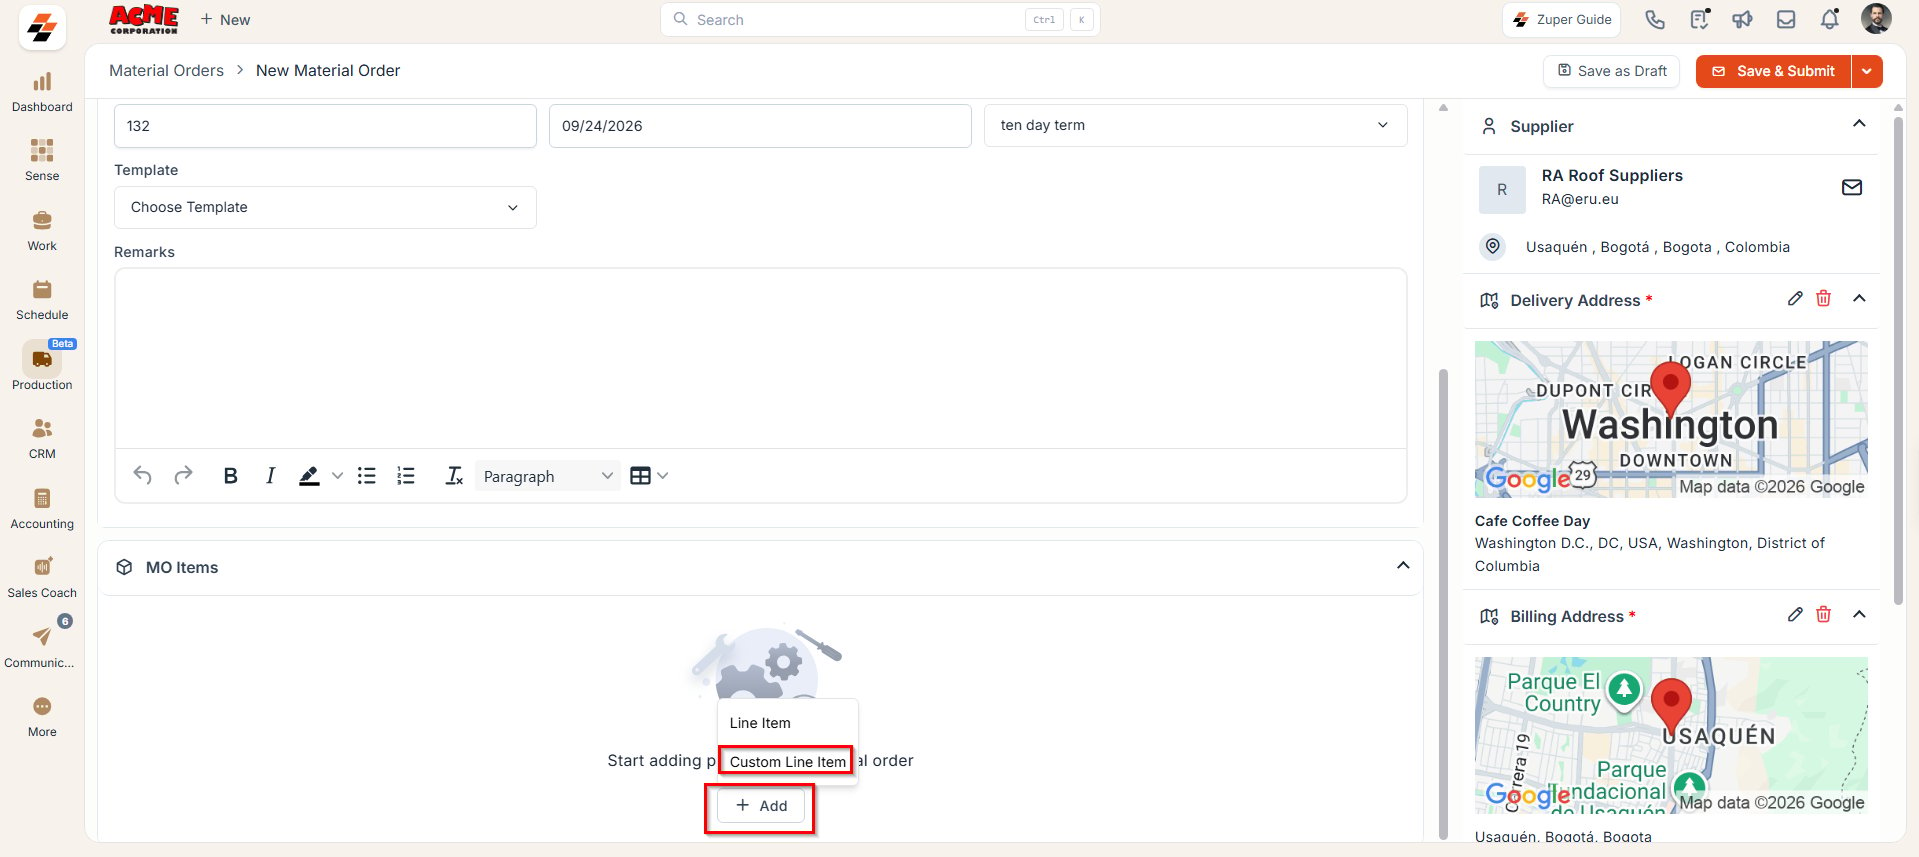
- In the MO Items section, select ”+ Add” and select “Custom Line Item.”
- The Create New Line Item dialog box will open.
- Enter the following details:
- ID – A unique identifier for the material order item.
- Name – The name or description of the product.
- Unit Purchase Cost – The cost per unit of the item (in USD).
- Required Quantity – The number of items needed.
- Remarks (if any) – Optional notes or instructions related to the item.
- Select “Create” to add the item to the MO.
Note: Custom line items are specific to this MO only. They are not added to the Supplier Catalog or inventory.
Viewing and Managing Selected Parts/Products
Viewing and Managing Selected Parts/Products
Once added, all MO items will be displayed in a table with the following columns:To modify the required quantity or remove an item:
- Item shows the name of the part or product you want to purchase.
- Supplier SKU/ID shows the unique product identifier from the supplier.
- Unit Purchase Cost shows the per-unit cost charged by the supplier.
- Required Quantity shows the number of units to order.
- Total shows the line item total, calculated as Required Quantity × Unit Purchase Cost. This column appears across all MO statuses, from Draft through Paid.
- Remarks shows any notes or special instructions added to the MO.
Note: The Total column shows the calculated amount for each line item. The overall MO total shown at the bottom of the table is the sum of all line item totals.
- Click the ellipsis (⋯) icon under the Actions column next to the item.
- Select the desired action: Edit or Remove.
Other Details
This section displays any custom fields that have been configured by your organization. These fields may capture additional MO-specific data, such as department codes, project references, and approval notes.Attachments
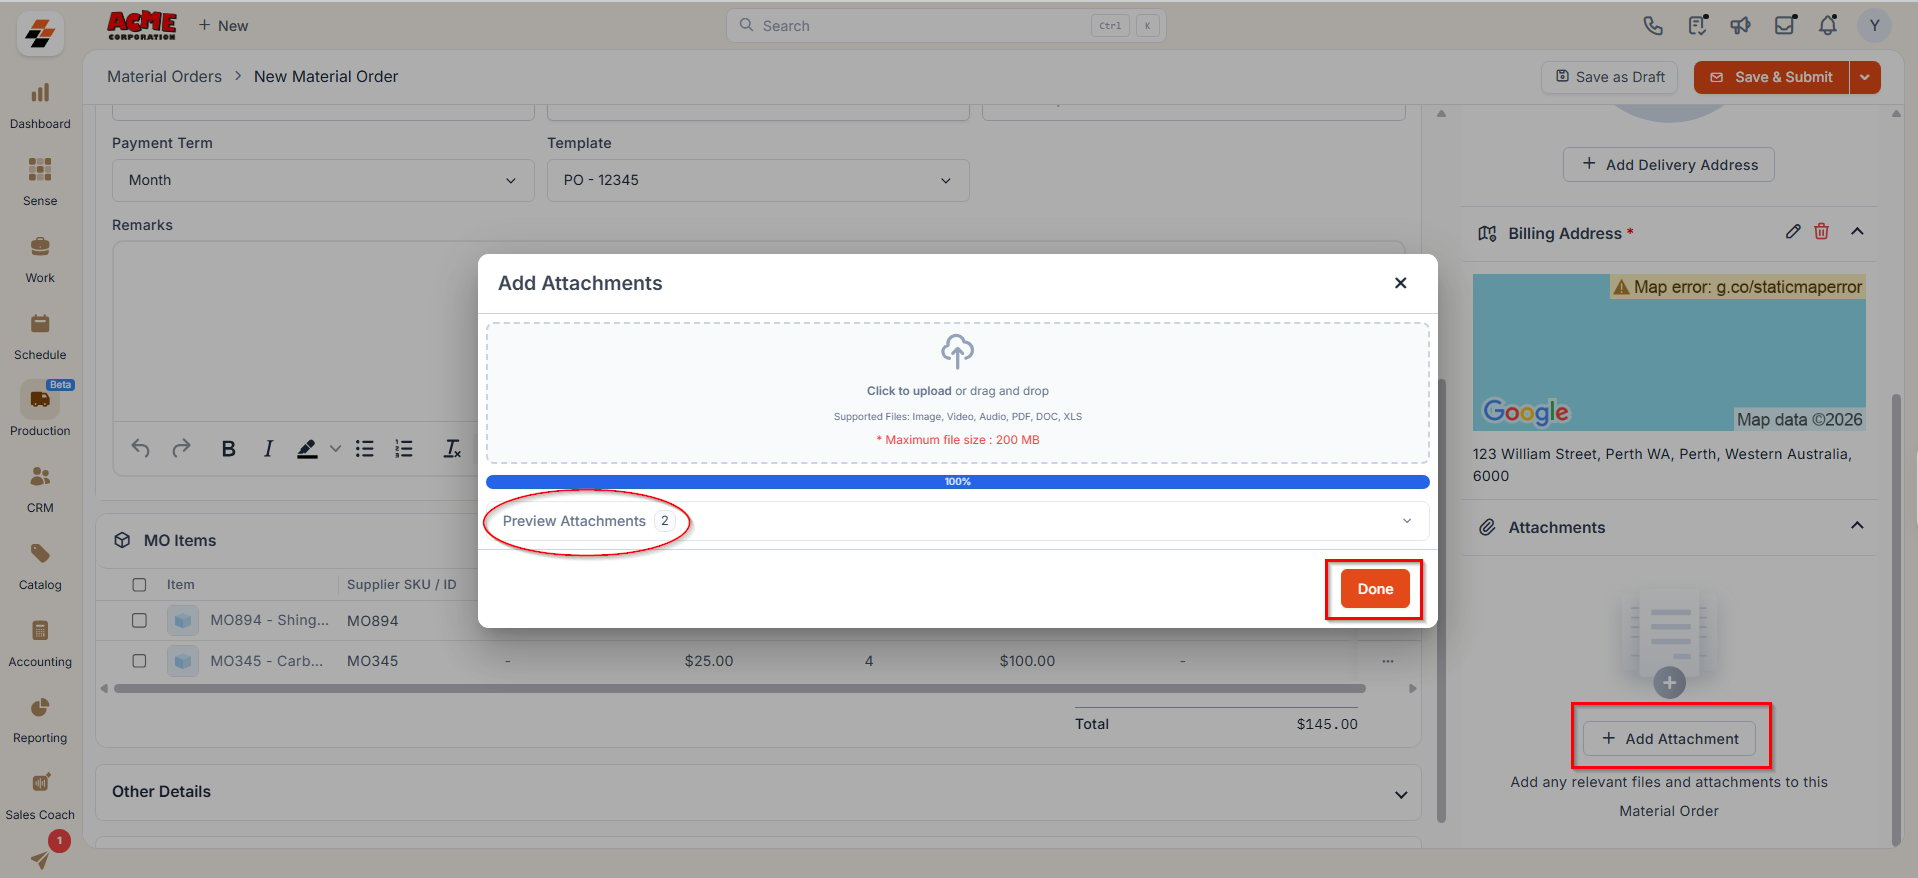
The Attachments section allows you to upload supporting documents such as images, videos, specifications, or invoices related to the material order. To upload an attachment:- Select ”+ Add Attachment.”
- Choose and upload the file from your computer.
-
Once the file is uploaded, select “Done.”
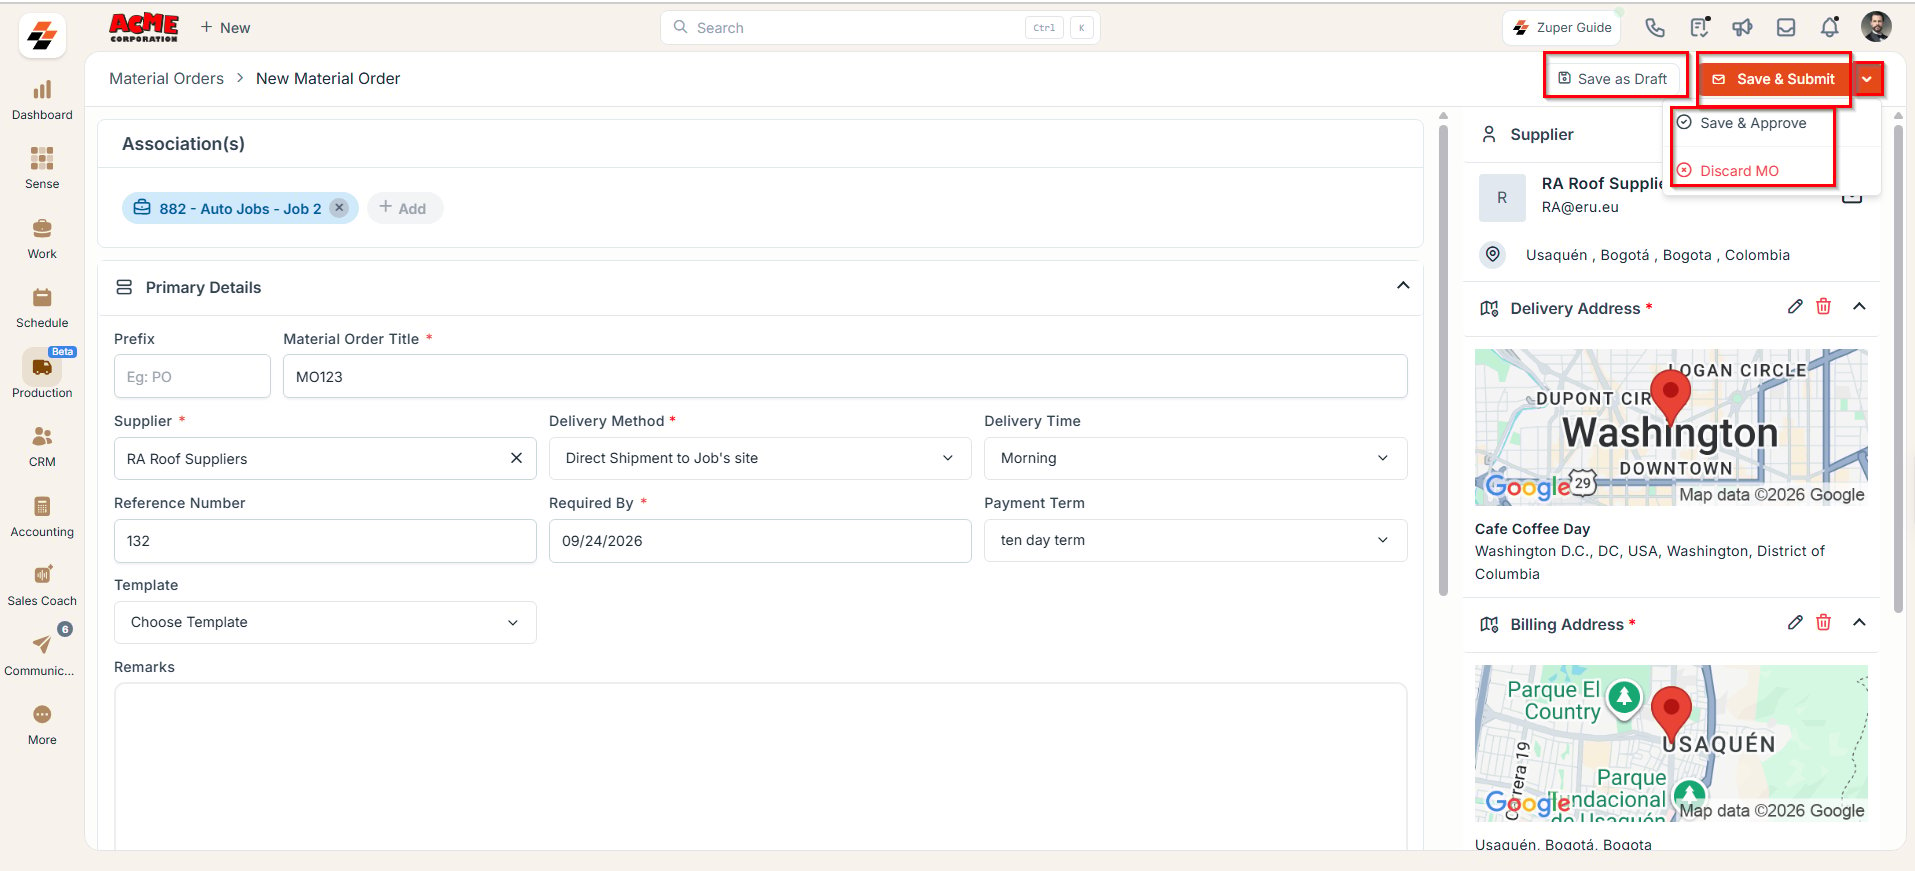
- Save as Draft: Save the MO without submitting. Useful if you need to review or complete it later.
- Save & Submit: This option allows you to submit the Material Order (MO) for approval. Based on the configured workflow, the MO will then move to the next stage in the approval hierarchy for review.
- Discard MO: Cancel and permanently delete the draft MO.
Creating a Material Order from Other Areas
As mentioned above, you can also create a Material Order (MO) directly from other modules where material needs arise, such as Jobs or Quotes. This association streamlines the procurement process by linking the MO to its source, auto-filling relevant details, and ensuring accurate tracking.Material Request details page
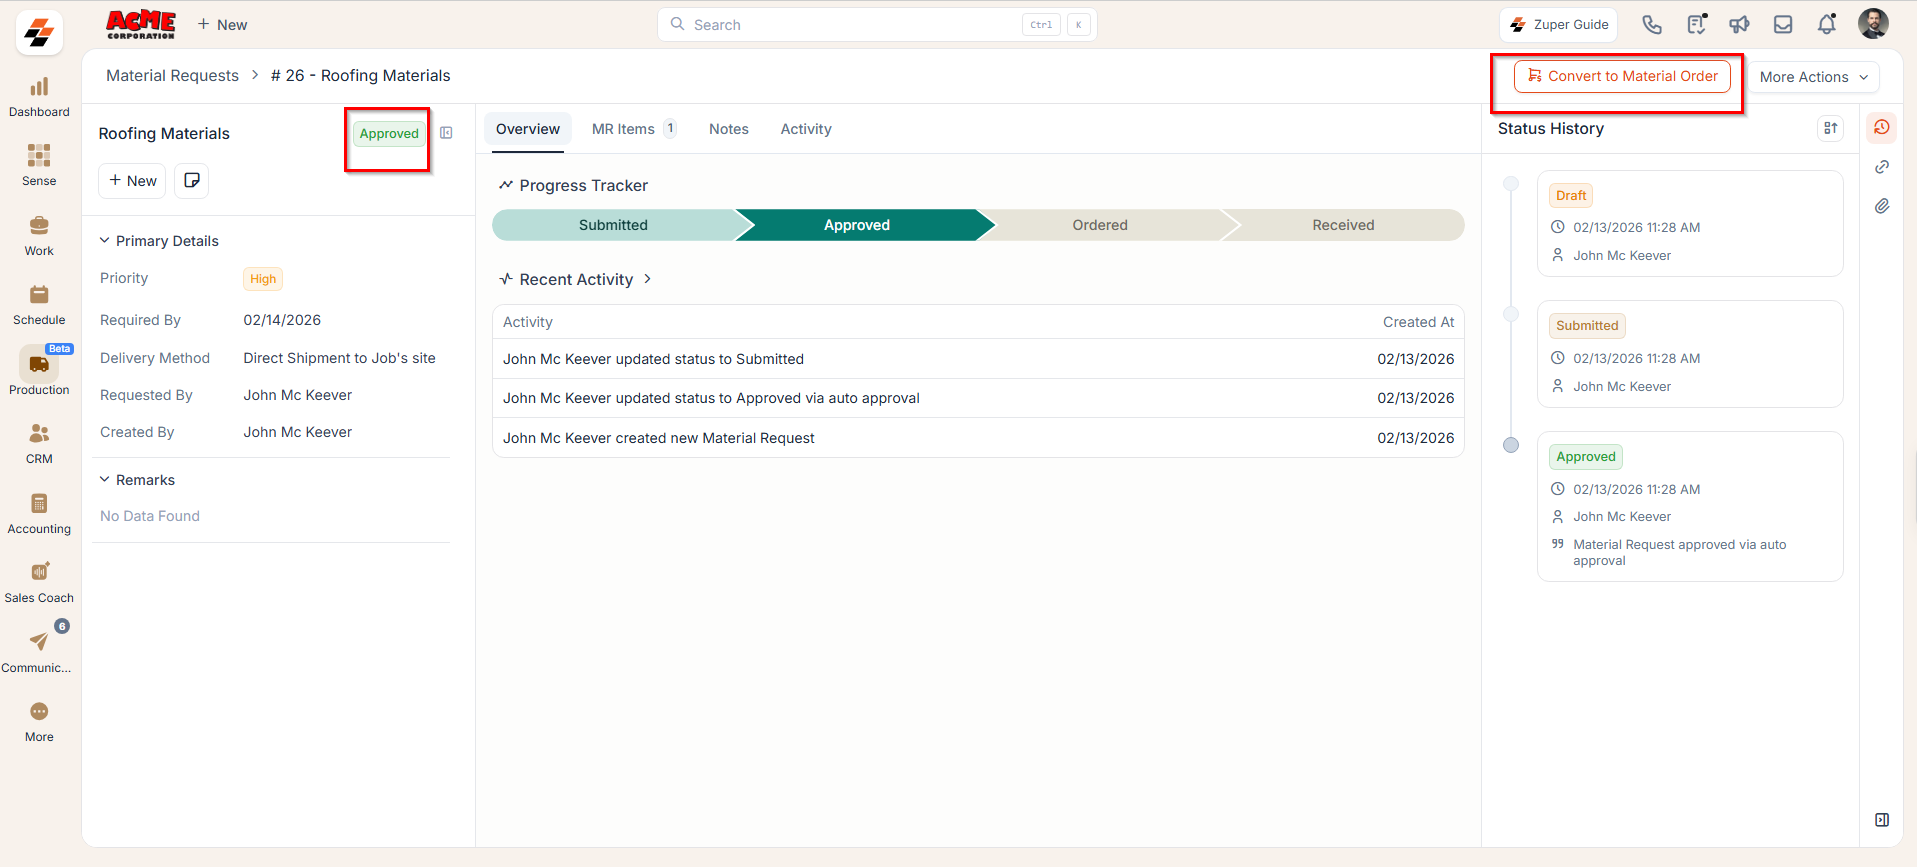
You can initiate a material order from the Material Request Details page when the requested materials are unavailable in inventory and need to be sourced externally.Note: If your organization has enabled the Approval Hierarchy setting, the material request must first be internally approved before a material order can be created. This approval step ensures that procurement is based on validated needs, helping prevent unnecessary or duplicate purchases.
Navigation*: Material Requests Listing Page → Select a Material Request → Material Request Details Page → Select “Material Orders” (available after approval)*
Creating the Material Order
- Select “Convert to Material Order” at the top-right.
- The Parts & Products dialog appears with all requested items.
Note: Supplier mapping must be configured for the items before they can be converted into a Material Order. If supplier mapping is missing, you cannot create a Material Order for the MR items.
- Select the required items to be purchased and choose the Supplier from the drop-down menu.
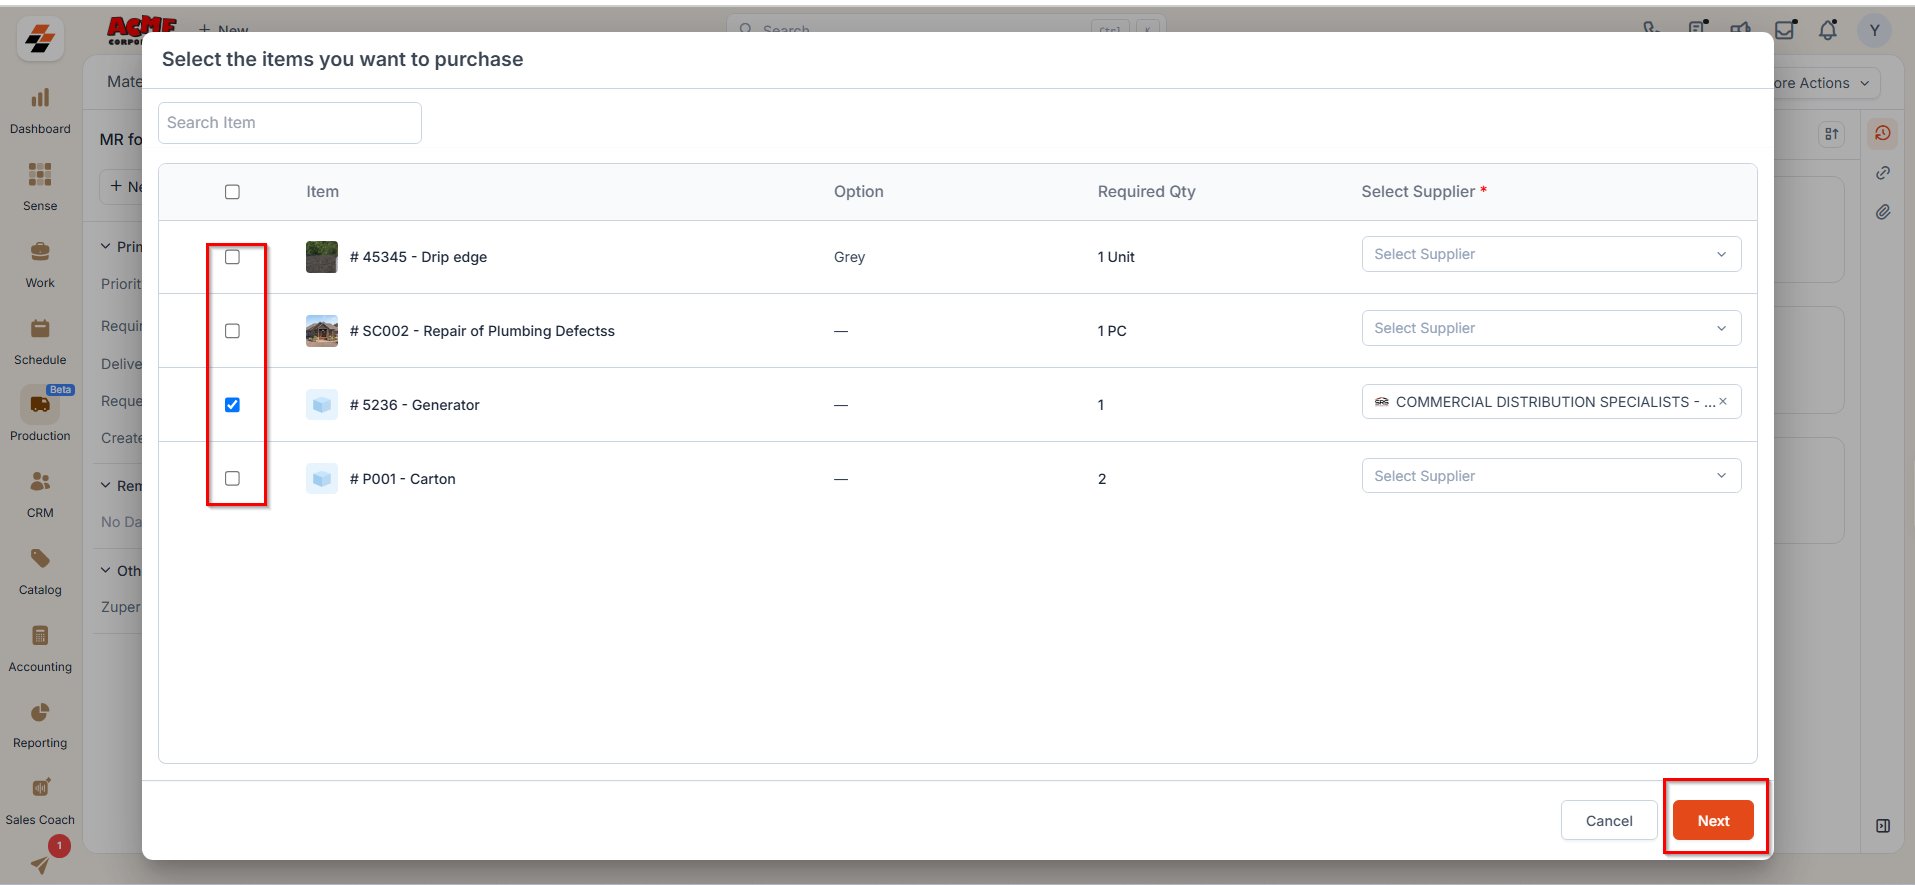
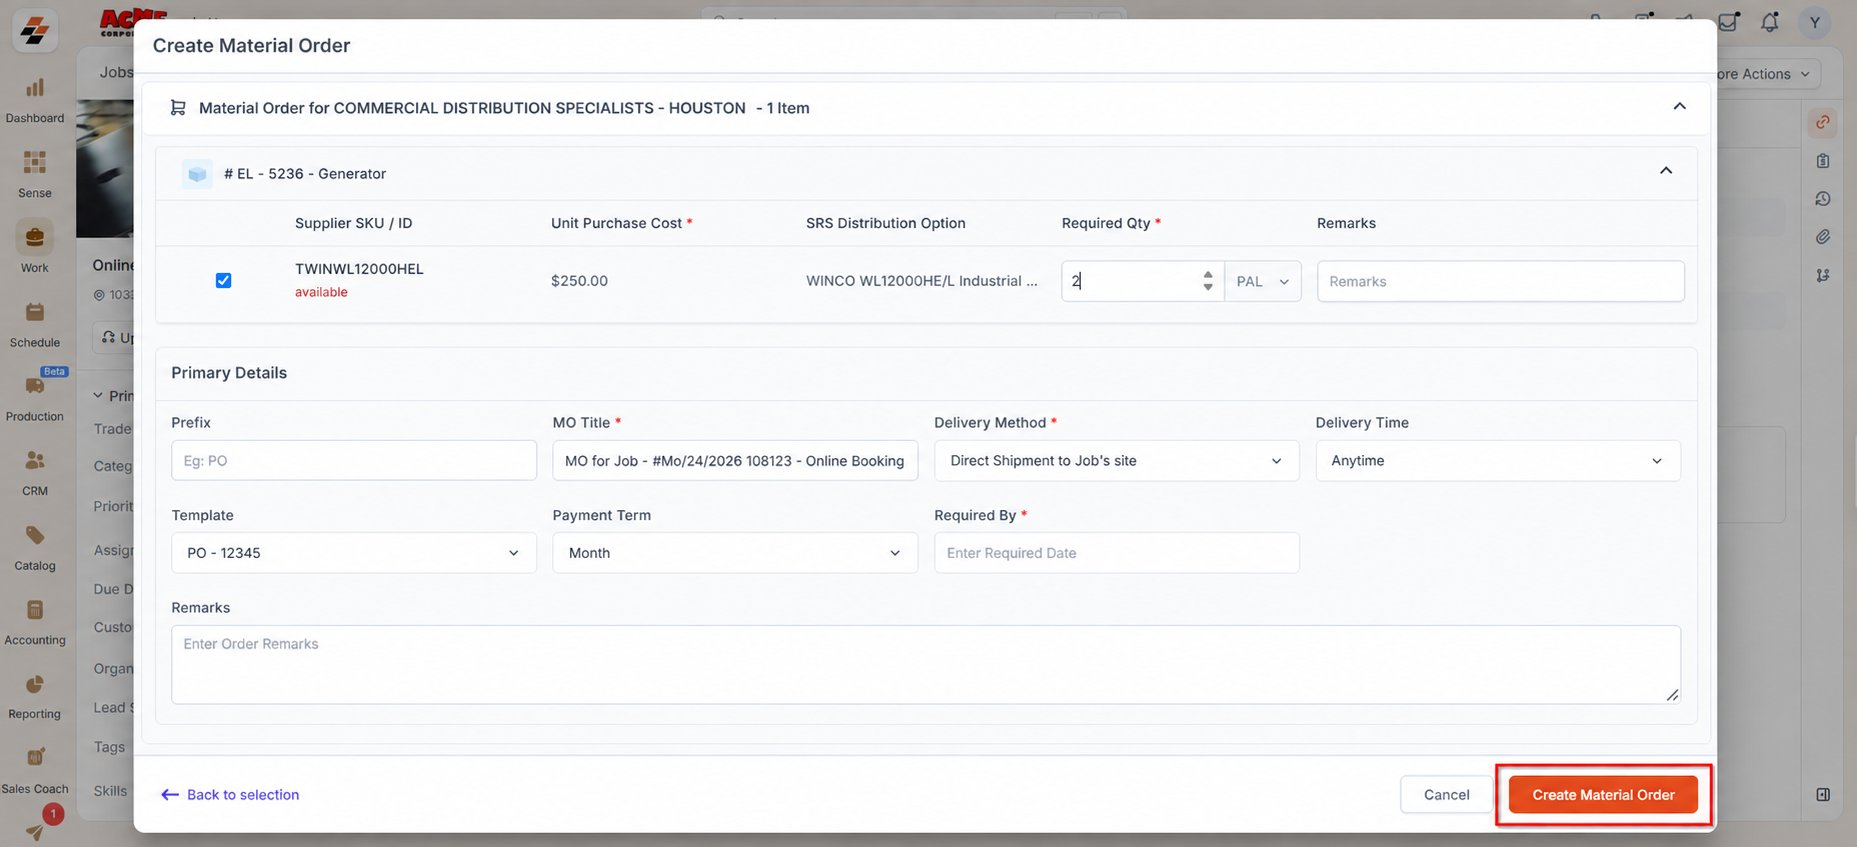
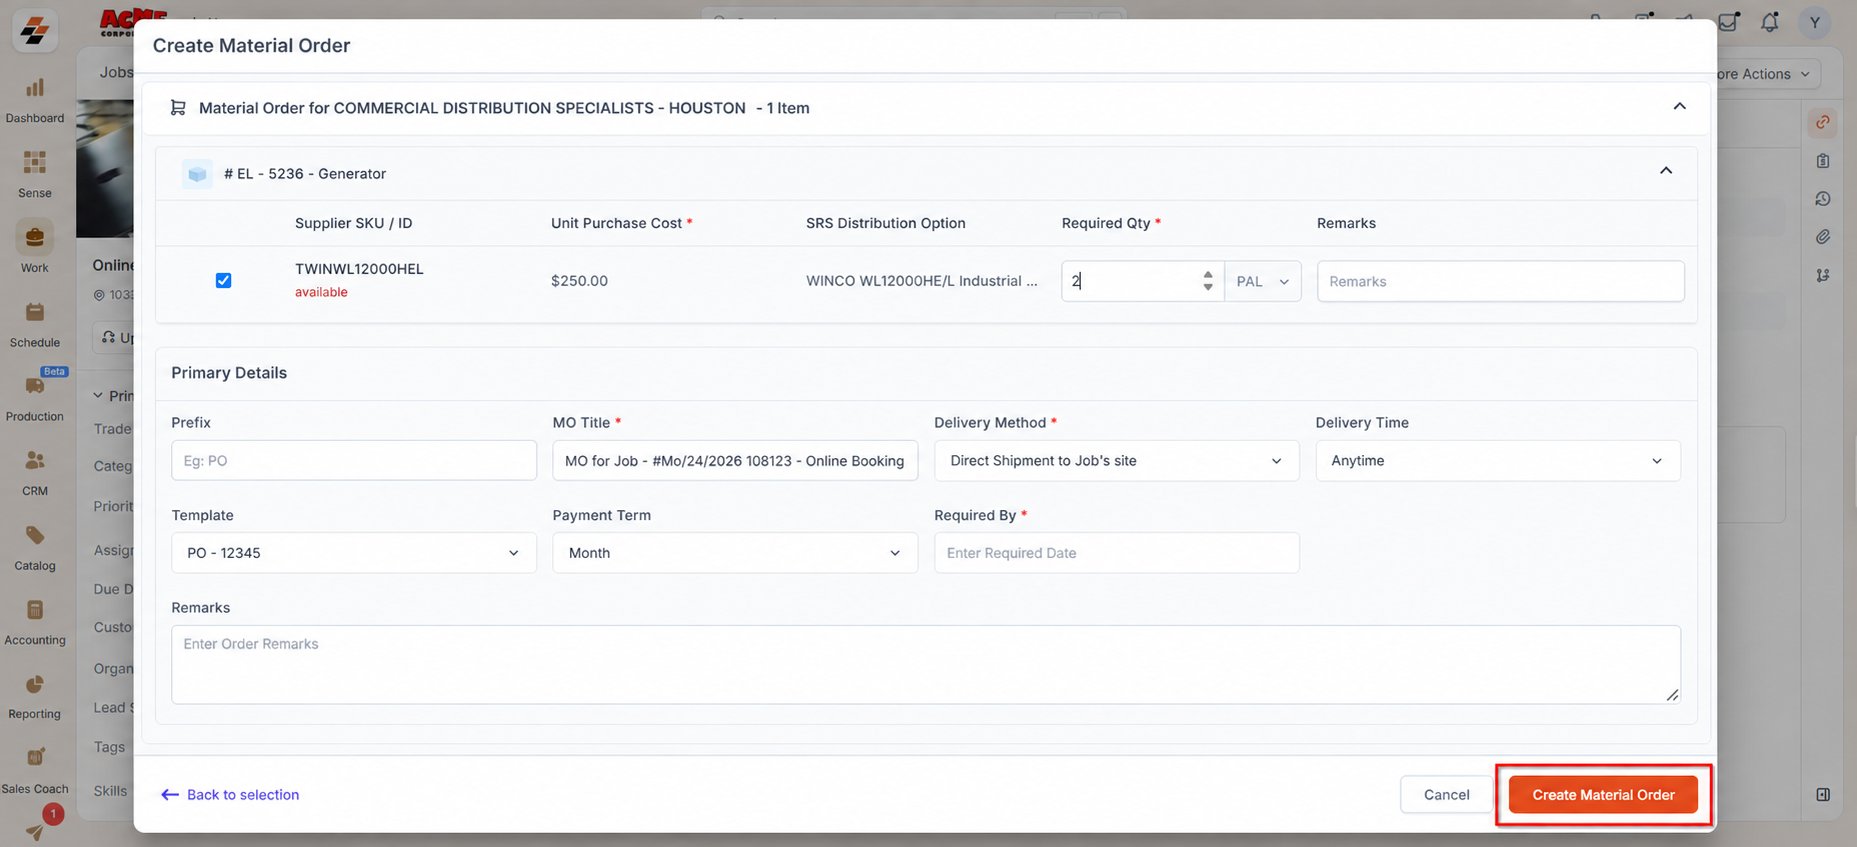
- Once chosen, select Next. The Create Material Order screen appears.
- Fill in the necessary details and select Create Material Order to finalize.
Jobs
When a technician identifies missing or additional parts during a job, you can raise a material order directly from the Job Details page. This helps ensure that materials needed to complete the job are procured without delay.Note: A material order can be created only if the associated job has an item added under the Line Items>> Part/Service Details section and the required quantity is not available in stock.
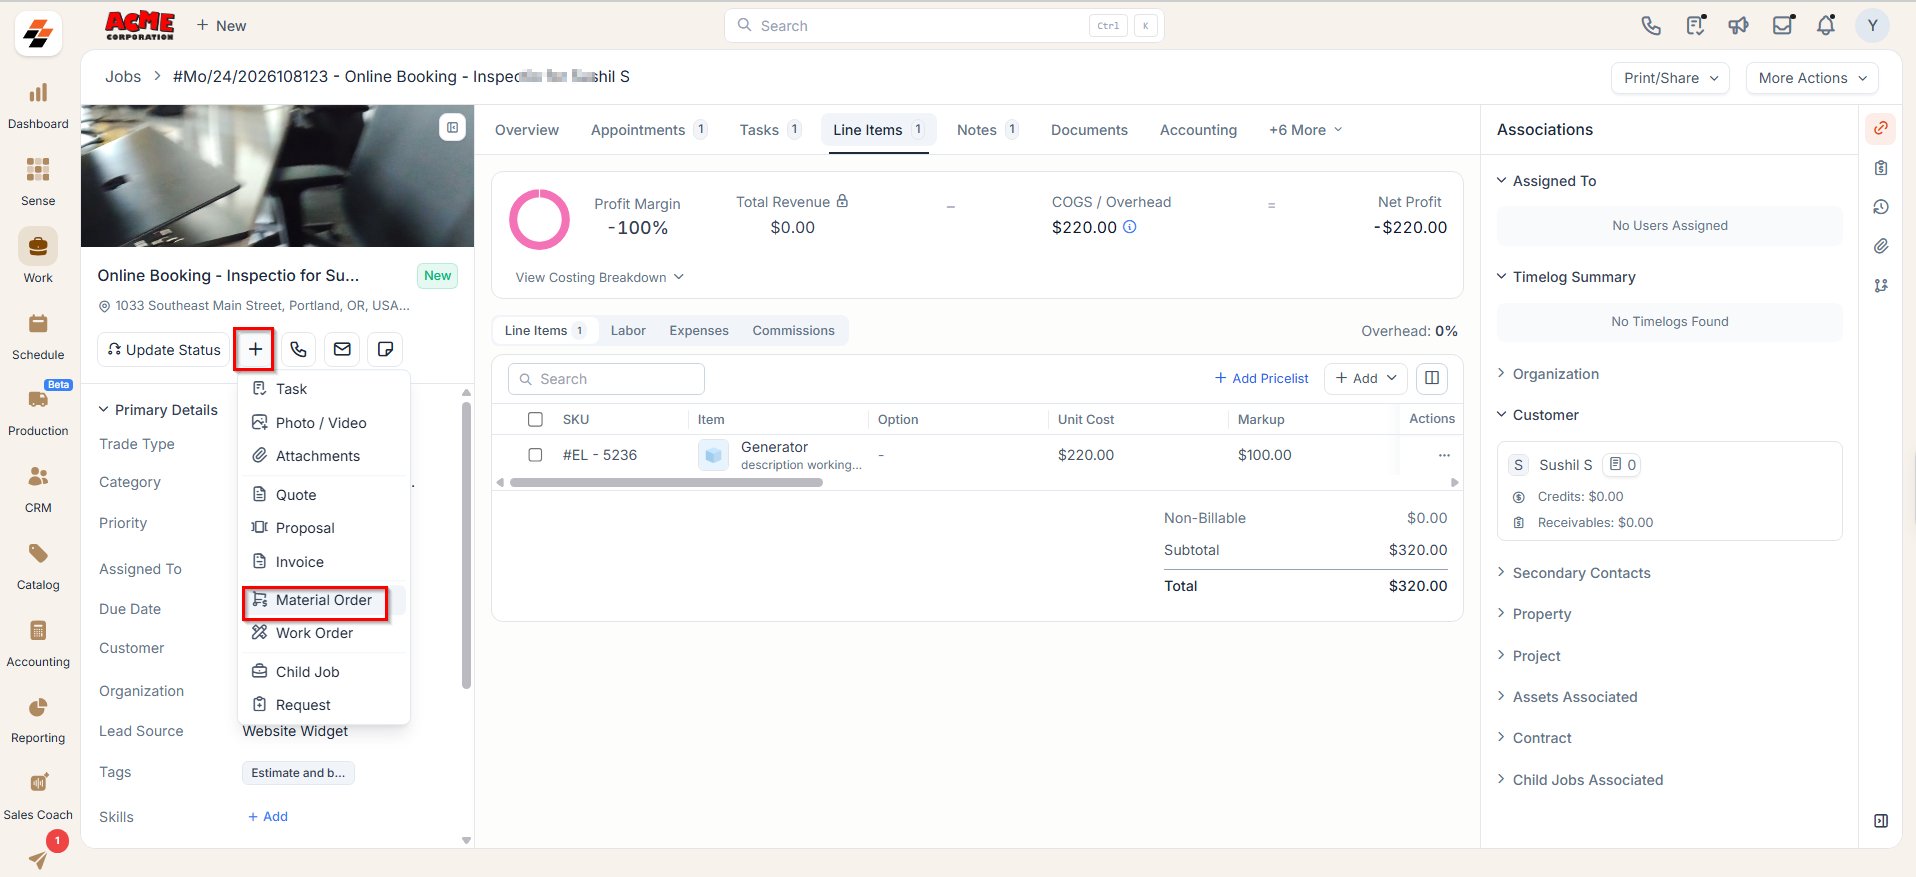
Navigation:Jobs Listing Page -> Select a Job -> Job Details Page -> +> -> Select Material Order
Creating the Material Order
- On the job details page, click the + icon at the top of the side panel, and then select Material Order from the actions.
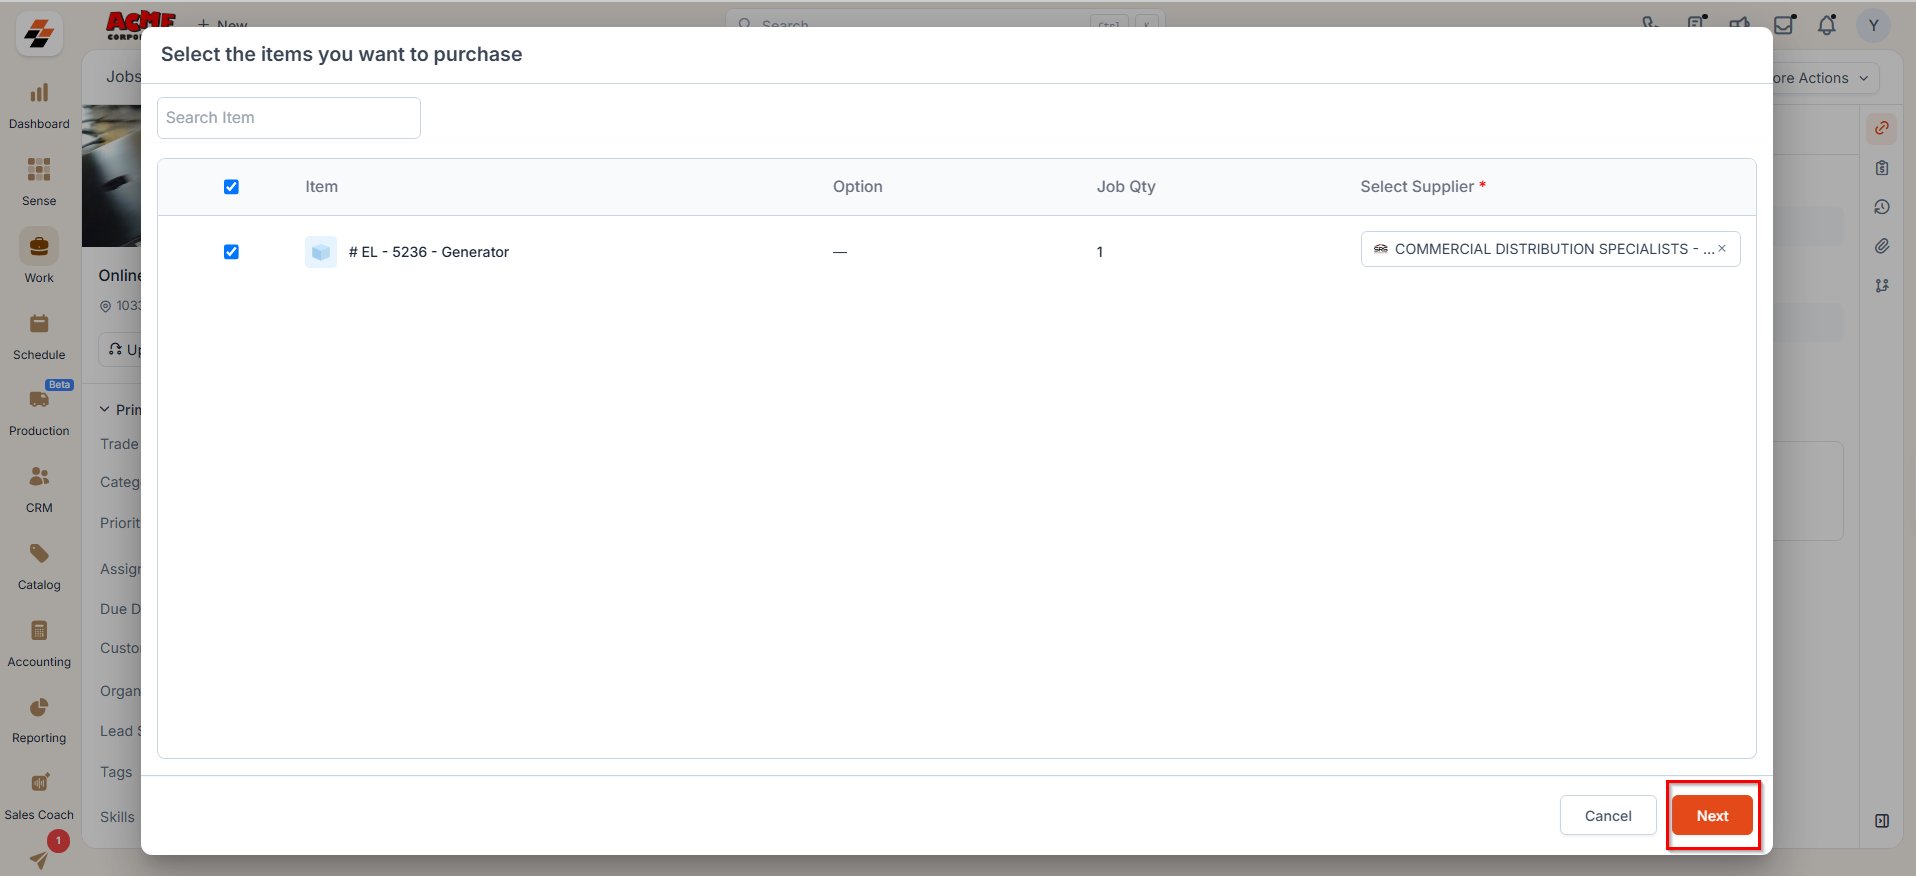
- A modal window will appear with the list of items.
- Select the item(s) you want to purchase and choose the supplier from the drop-down menu.
If an item has a preferred supplier configured, that supplier will be pre-filled during supplier selection
- Once selected, select “Next.” The Create Material Order screen will appear.
- Fill in the necessary details and select Create Material Order to finalize.
- The newly created material order will then appear in the Material Orders listing page with a status of Draft.

Note: A job associated with a material order cannot be closed unless the material order status is Draft, Cancelled, Closed, or Fulfilled.
Quotes
You can create a material order directly from the Quote Details page when the quoted items need to be sourced externally.Note: A material order can be created only if the quote includes line items that are not currently available in inventory. This helps streamline procurement and avoid discrepancies during fulfillment.
Navigation:
You can create a material order from the Quote Details page in two ways:
You can create a material order from the Quote Details page in two ways:
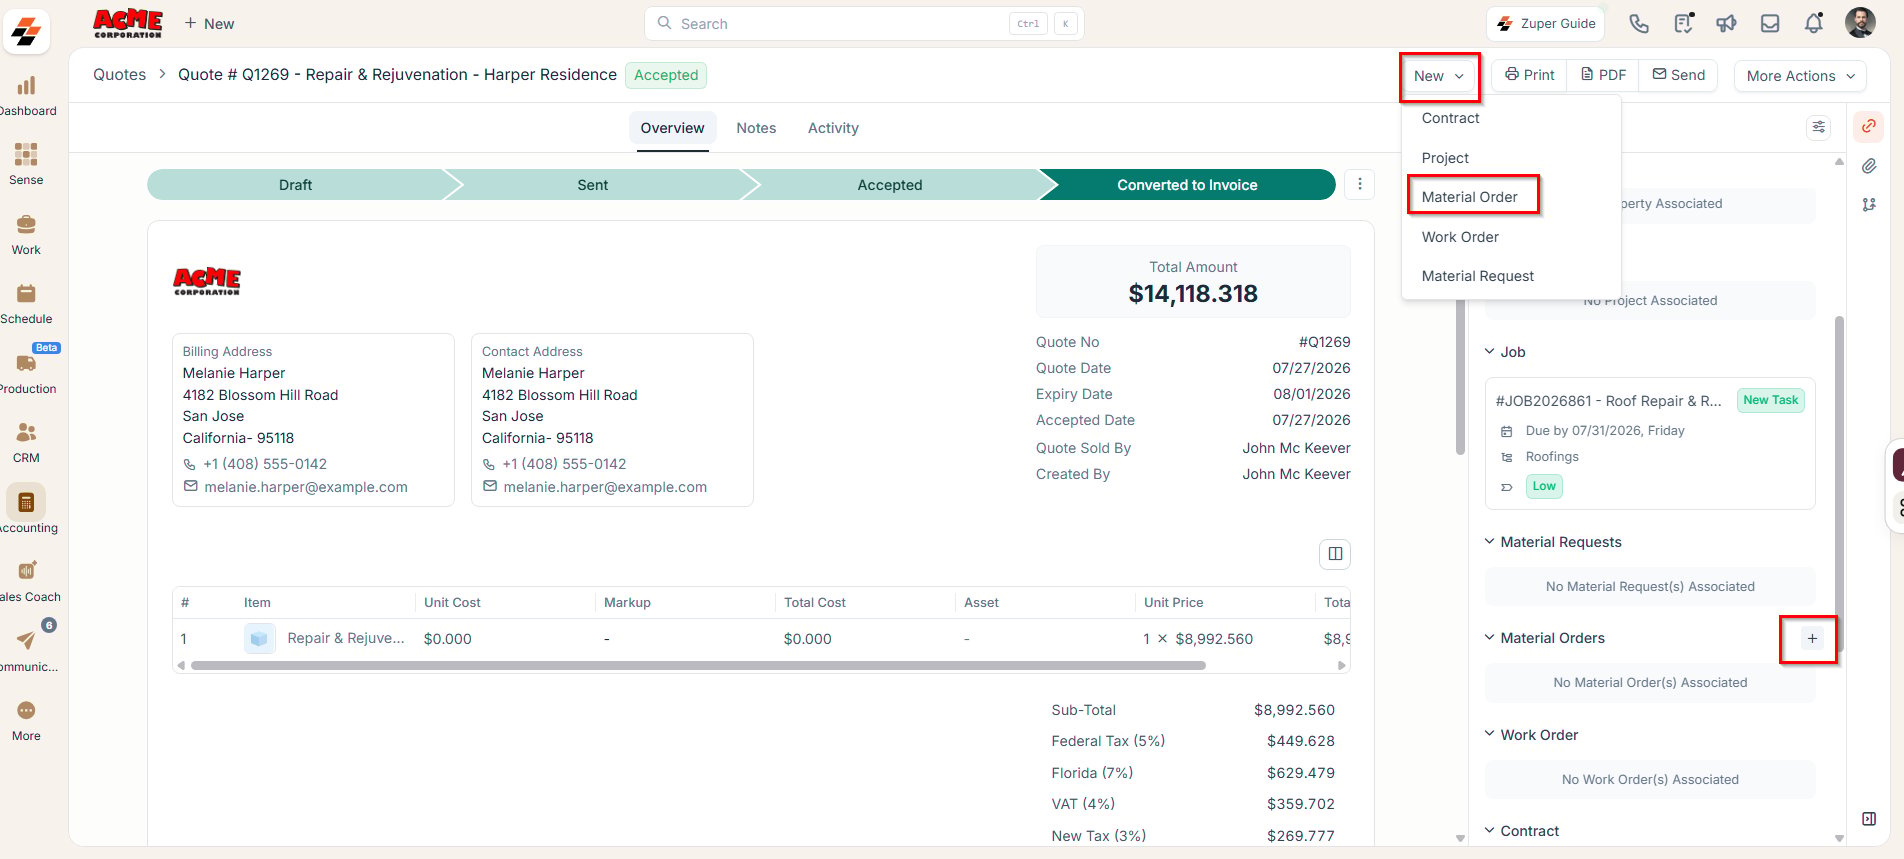
- 1. Quotes Listing Page -> Select a Quote -> Quote Details Page -> On the right pane, locate the Material Orders module -> Select ”+” to create a new material order.
- 2. Quote Details Page -> In the top-right corner of the page, select New -> Select Material Order to create a new material order.
Creating the Material Order
- You can create a material order from the Quote Details page in two ways:
- Directly from the top-right corner:
- Navigate to the Quotes Listing Page.
- Select the desired quote to open the Quote Details Page.
- In the top-right corner of the page, select New.
- Select Material Order to create a new material order.
- From the right panel:
- In the right pane of the quote details page, locate the Material Orders module.
- Select the ”+” icon to create a new material order.
- Directly from the top-right corner:
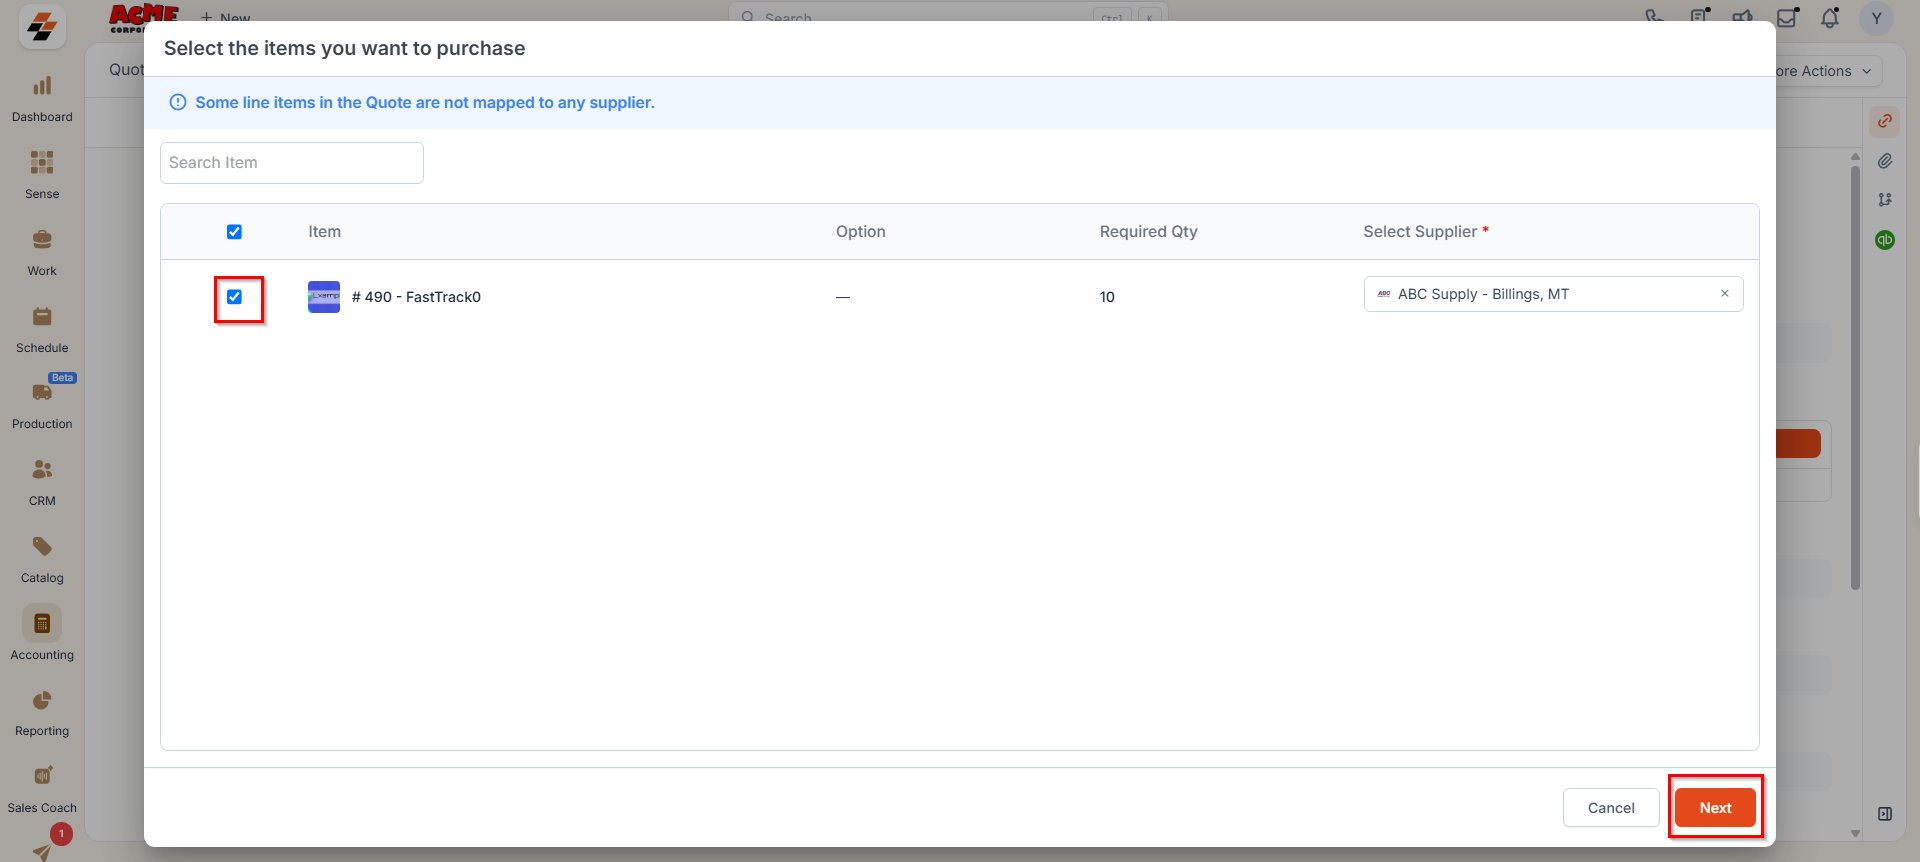
- A modal window will appear with the list of quoted items.
- Select the item(s) you want to purchase and choose the supplier from the dropdown menu.
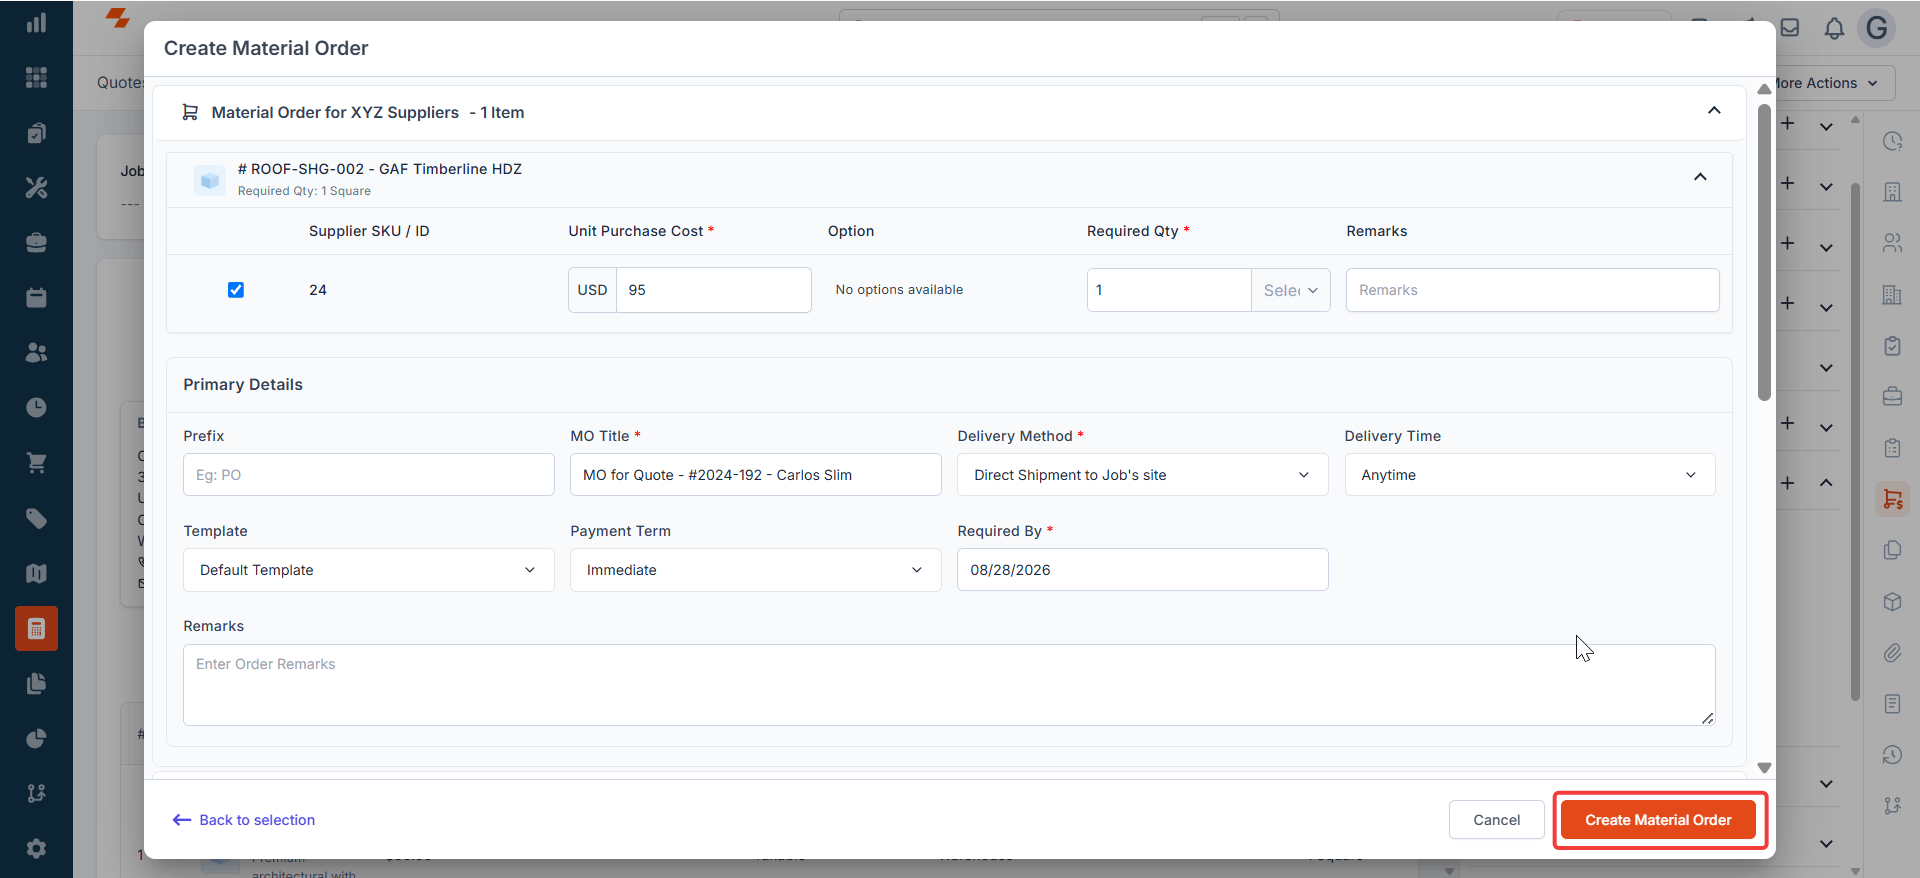
- Once selected, select Next. The Create Material Order screen will appear.
- Fill in the required details and select Create Material Order to finalize.
Editing a material order inline
Once a material order is saved, you can update key fields directly on the details page — without reopening the creation form. This lets you correct details quickly and keeps the MO moving without interruption. Fields that support inline editing- MO Title
- Required By date
- Reference Number
- Payment Terms
- Delivery Time
- Remarks
- Any configured Custom Fields
Note: Inline editing is available to MO initiators and administrators only. Inline editing is not available when an MO is in Cancelled or Closed status. All fields are locked in those states.
Edit a field inline
- Open the material order from the Material Orders listing page.
- Select the field you want to update. When you hover over the field, you will get the Pencil icon to edit. A dialog box appears, and you can update the latest information.
- Enter the new value.
- Select “Update” to save the latest changes.
Note: Check the Activity section after editing to confirm your changes were captured.
Troubleshooting
Not all active suppliers are appearing in the supplier dropdown
Not all active suppliers are appearing in the supplier dropdown
The supplier selection dropdown should show all suppliers with Active status.If only a subset of your active suppliers appears:
- Confirm that the missing suppliers are set to Active status in the Suppliers module (Purchasing > Suppliers).
- Verify that the missing suppliers have complete contact and address details configured — incomplete supplier profiles may prevent them from appearing.
- If all suppliers appear correctly in the Suppliers module but not in the MO dropdown, this may be an instance-specific issue. Contact Zuper Support with the names of the affected suppliers and a screenshot of the dropdown.
FAQs
Can I associate one MO with multiple jobs?
Can I associate one MO with multiple jobs?
A Material Order can only be linked to one job or one quote at a time. If parts are needed across multiple jobs or locations, you need to create a separate MO for each job.If the jobs are related — for example, the same customer requiring parts across different site locations — consider using Child Jobs to group them under a single Parent Job. This keeps your work organized in one place while still allowing each job to have its own MO.