Navigation: Settings → Quotes & Invoices → Zuper IQ – Intelligent Quoting → Proposal Templates
Multi-trade groups are available on CPQ-based templates only. Standard templates do not support this feature.
Before you begin
Before you configure trade groups, confirm the following:- CPQ-based template required. Select CPQ Based Template when creating your template. Standard templates do not support the Enable Multi Trade toggle or the Trade Groups section.
- Primary group. The first group you create is automatically marked as Primary. Taxes, fees, and deposits are configured in the primary group’s option and apply to all other groups in the proposal.
- Financing. Financing is configured at the option level within the primary group. The financing terms for the selected option in the primary group apply to all selected options across the proposal, including those chosen from other groups.
Create or open a CPQ template
To use trade groups, you must work with a CPQ-based template.- If you have not yet created one, see Create a CPQ proposal template for setup steps.
- To edit an existing CPQ template, select the edit icon next to it in the Proposal Templates list, then continue below.
Enable multi-trade and add groups
The Trade Groups section appears below the Trigger Configuration on Step 1 of the template.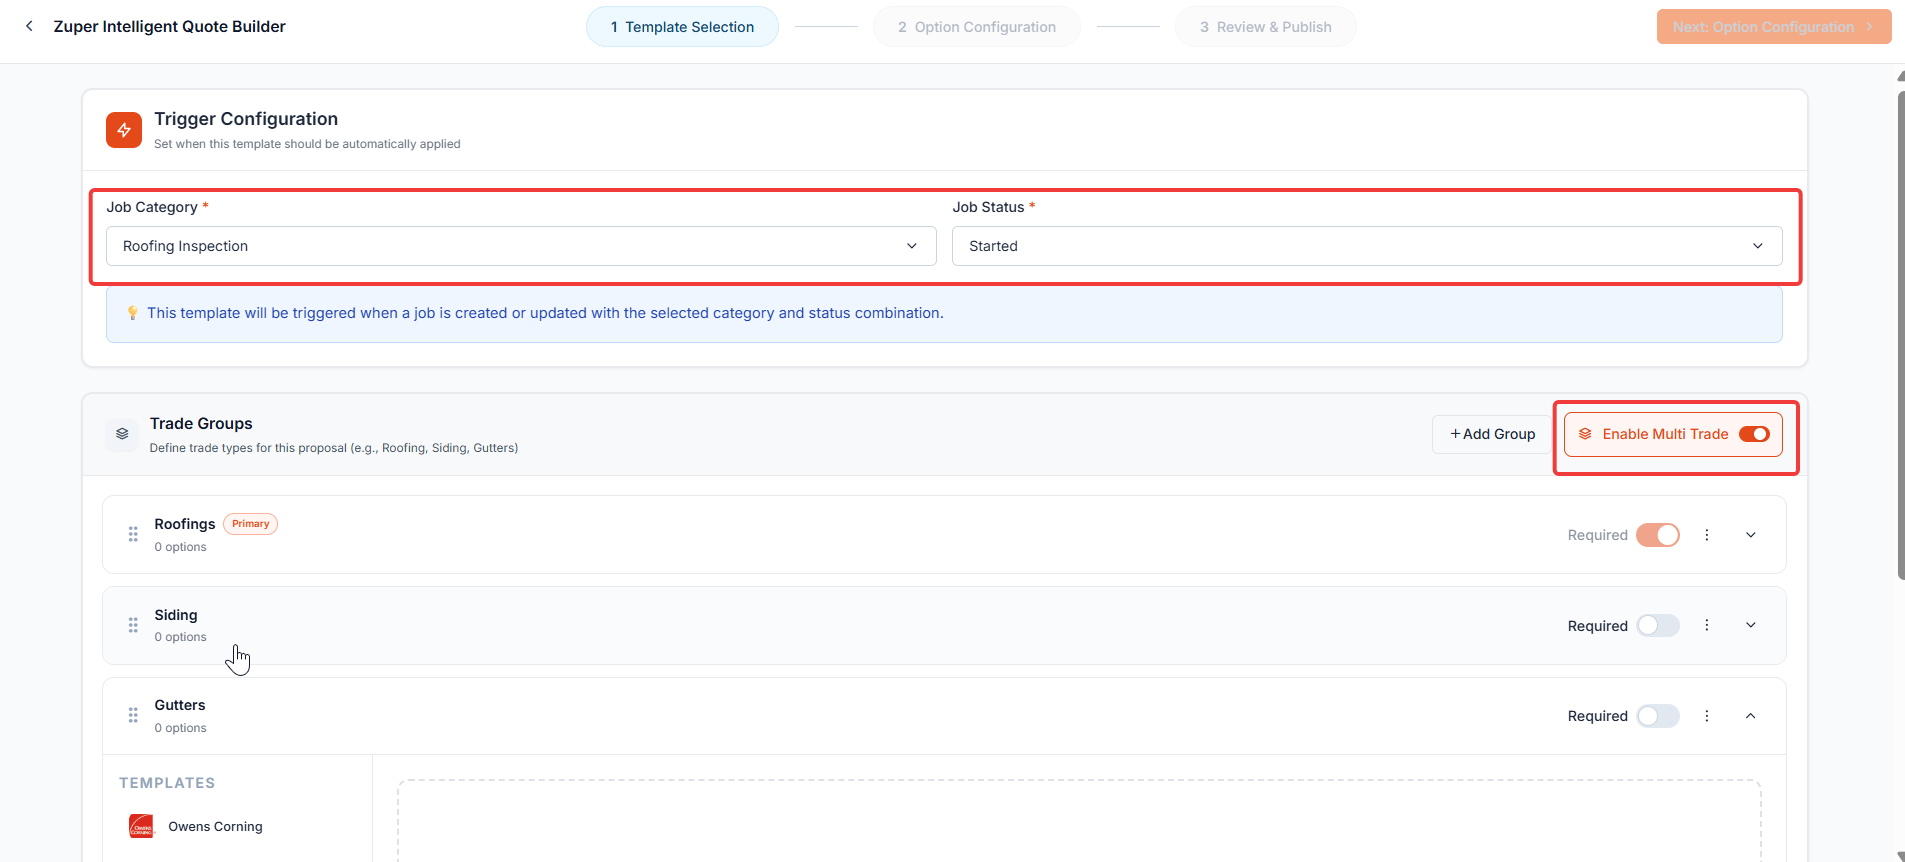
- Select the Enable Multi Trade toggle. The toggle turns orange when active.
- Select + Add Group. A new row appears with an Enter group name field.
- Enter a name for the group — for example, Roofing or Gutters.
- Repeat steps 2 and 3 for each additional trade you want to include.
Mark a group as required
When a group is marked Required, the customer must select one option from that group before they can accept the proposal. This ensures that the primary trade your company is responsible for is always selected at acceptance.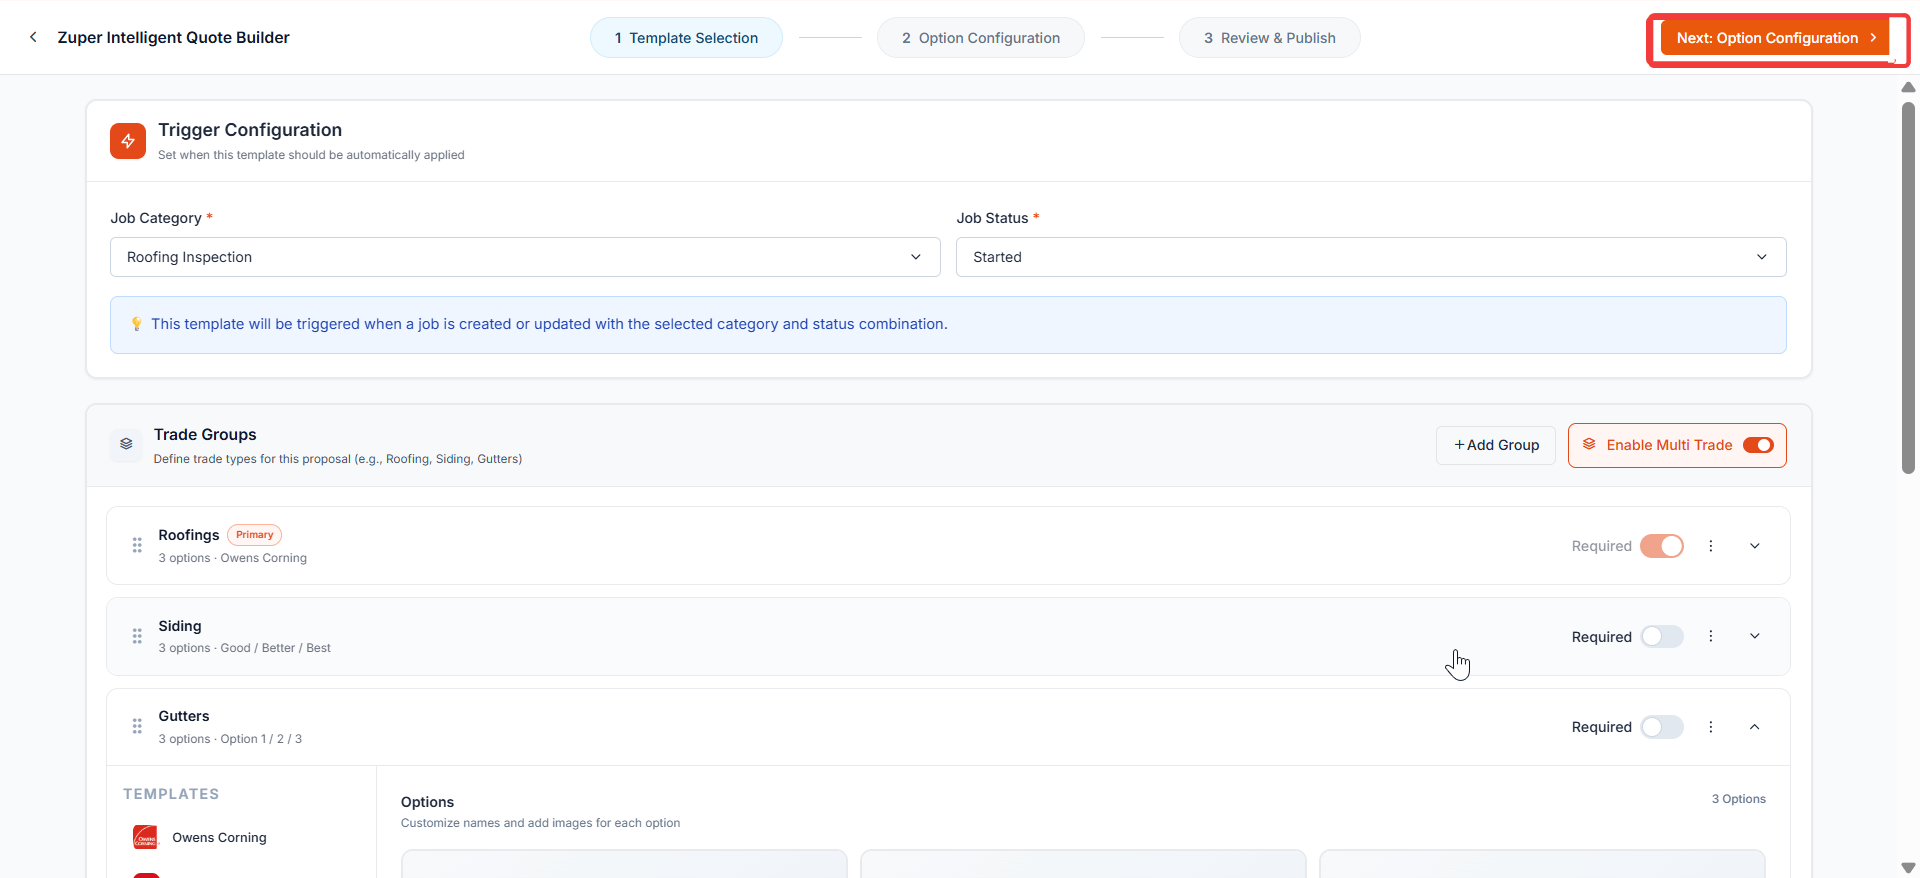
- Locate the Required toggle on the right side of the group row.
- Select the toggle to turn it on. It turns orange when active.
The primary group is set to Required by default. You can independently turn the Required toggle on or off for any additional group.
Add options to each group
Select a group first, then choose a template or preset from the left panel to populate its options.- Select the group you want to configure.
- In the Templates panel on the left, select a manufacturer template. The group populates with that template’s options.
- Alternatively, select a Preset from the panel to build options without a manufacturer template.
- Repeat for each group in your proposal.
Configure line items and financing per option
Select Next: Option Configuration at the top right to move to Step 2. Here, you add line items to each option within each group.- Select a group from the Group dropdown on the left.
- Select an option tab to open its line item menu.
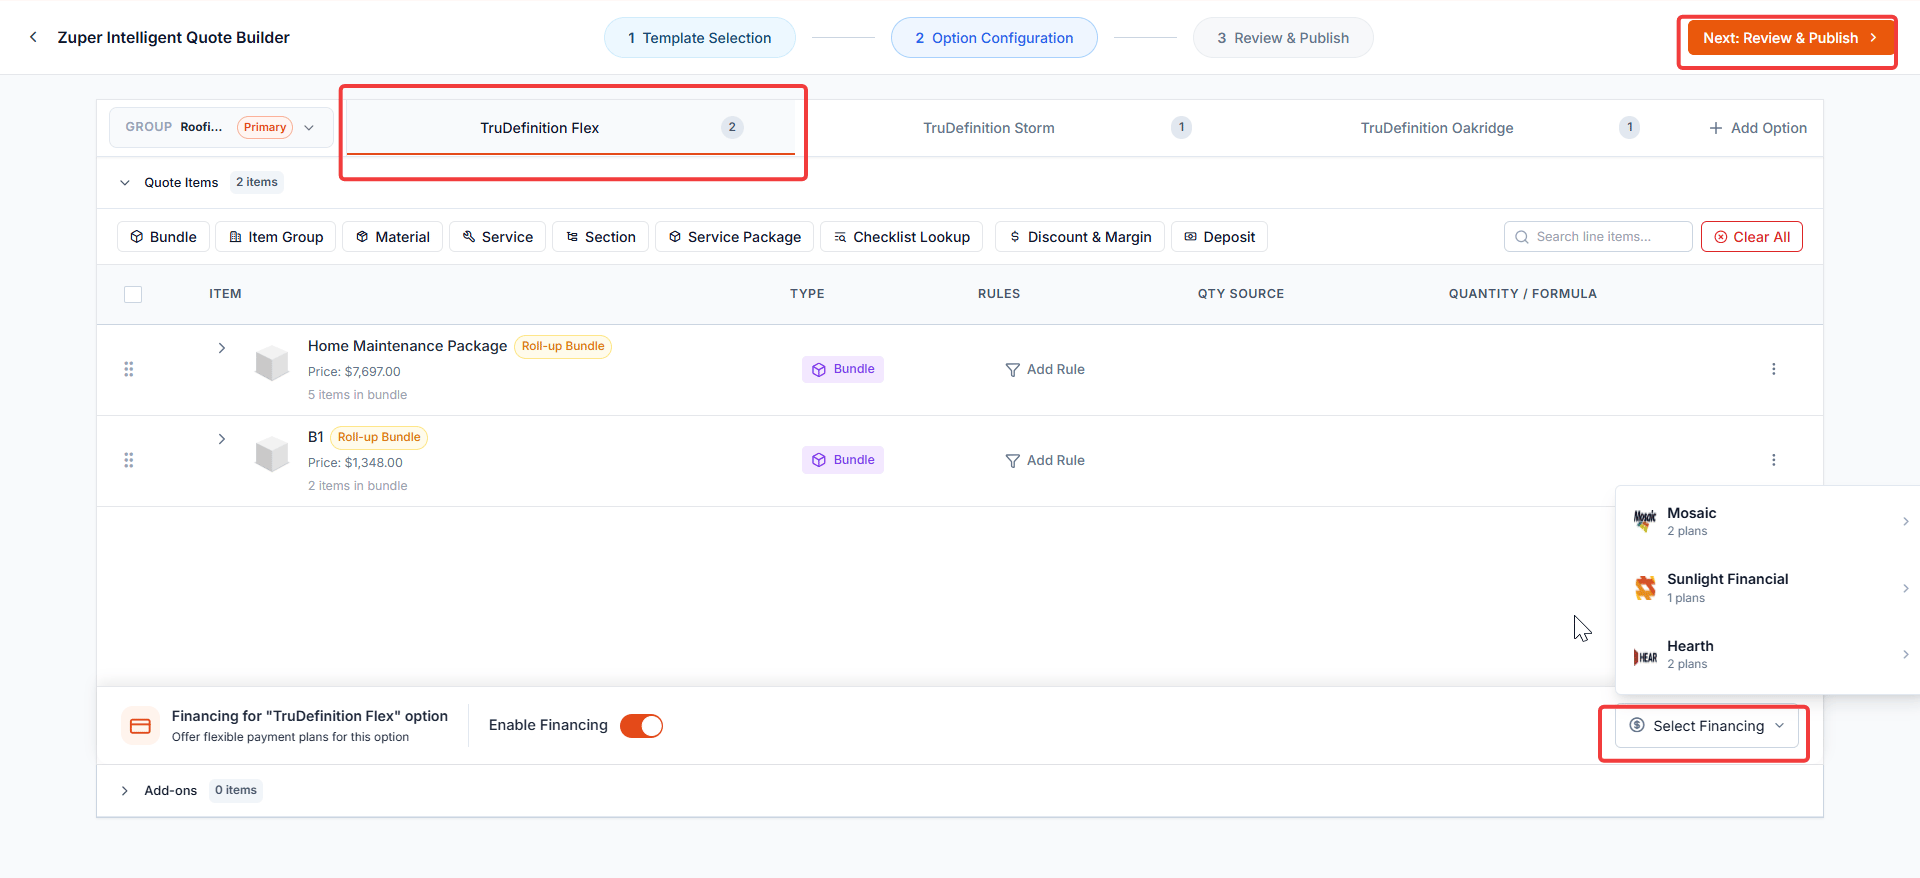
- Add line items using the available item types: Bundle, Item Group, Material, Service, Section, Service Package, Checklist Lookup, Discount & Margin, or Deposit.
- Repeat for each option across all groups.
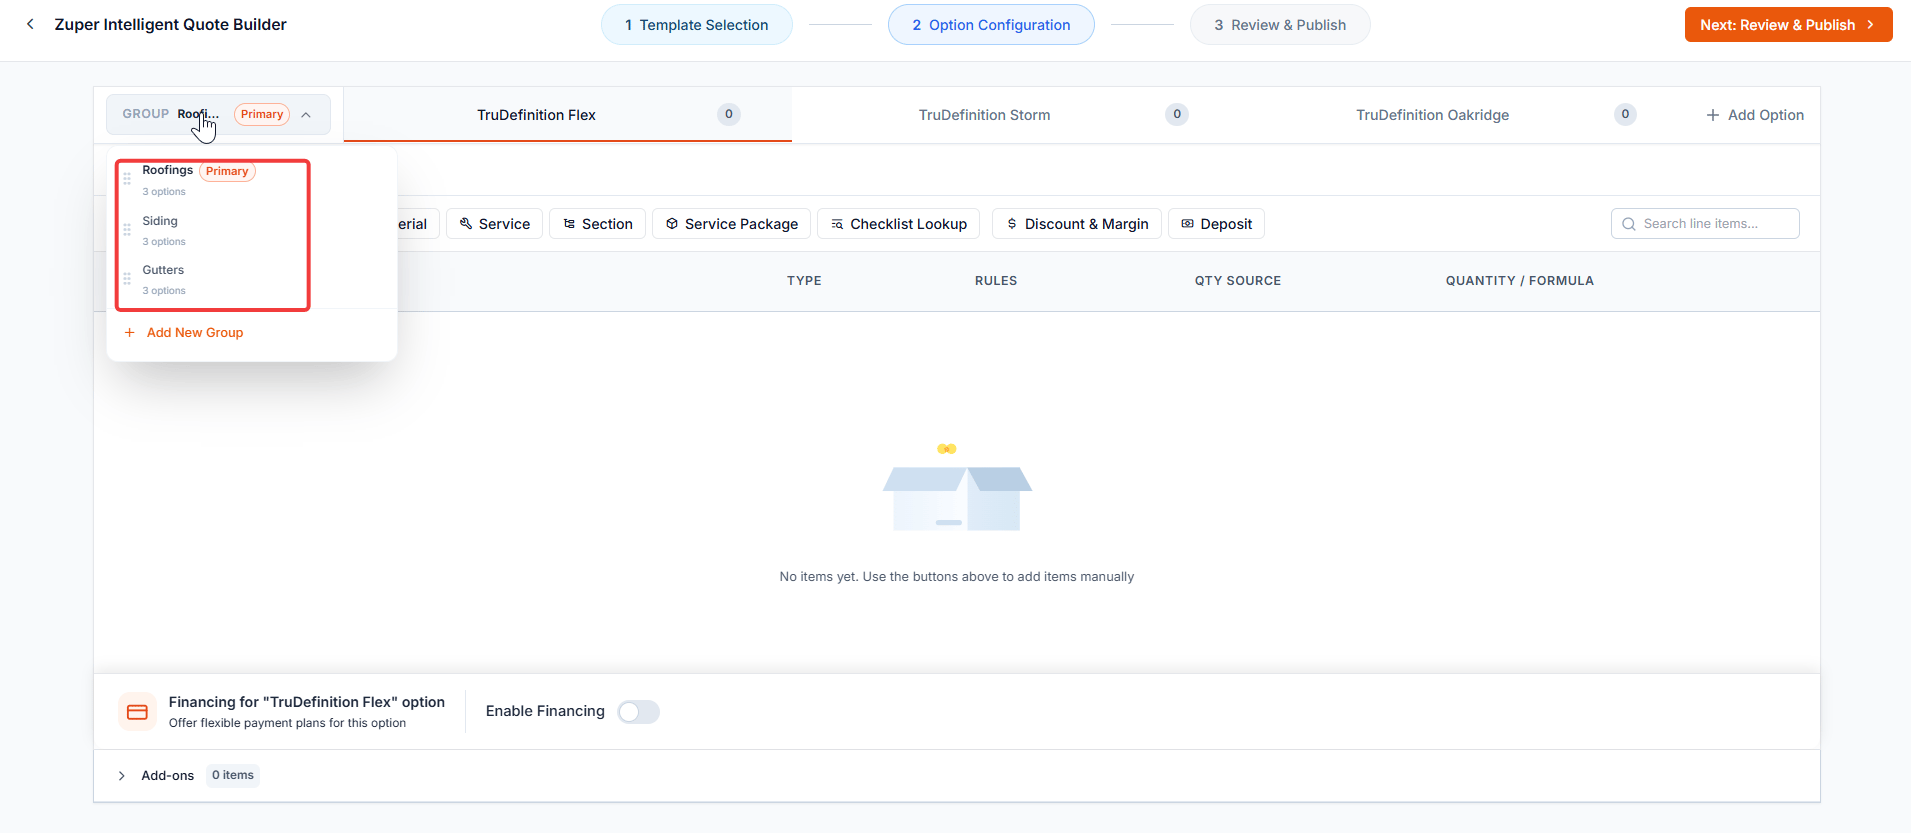
Enable financing for an option
If you want to offer a financing plan for a specific option, enable it at the bottom of that option’s line-item area.- Scroll to the bottom of the option’s line-item area.
- Locate the Financing for “[Option Name]” section.
- Select the Enable Financing toggle to turn it on.
- Select Select Financing to choose a financing provider.
Financing is configured at the option level within the primary group. When a customer selects options across multiple groups and chooses to finance, the financing calculation applies at the proposal level using the primary group’s settings.
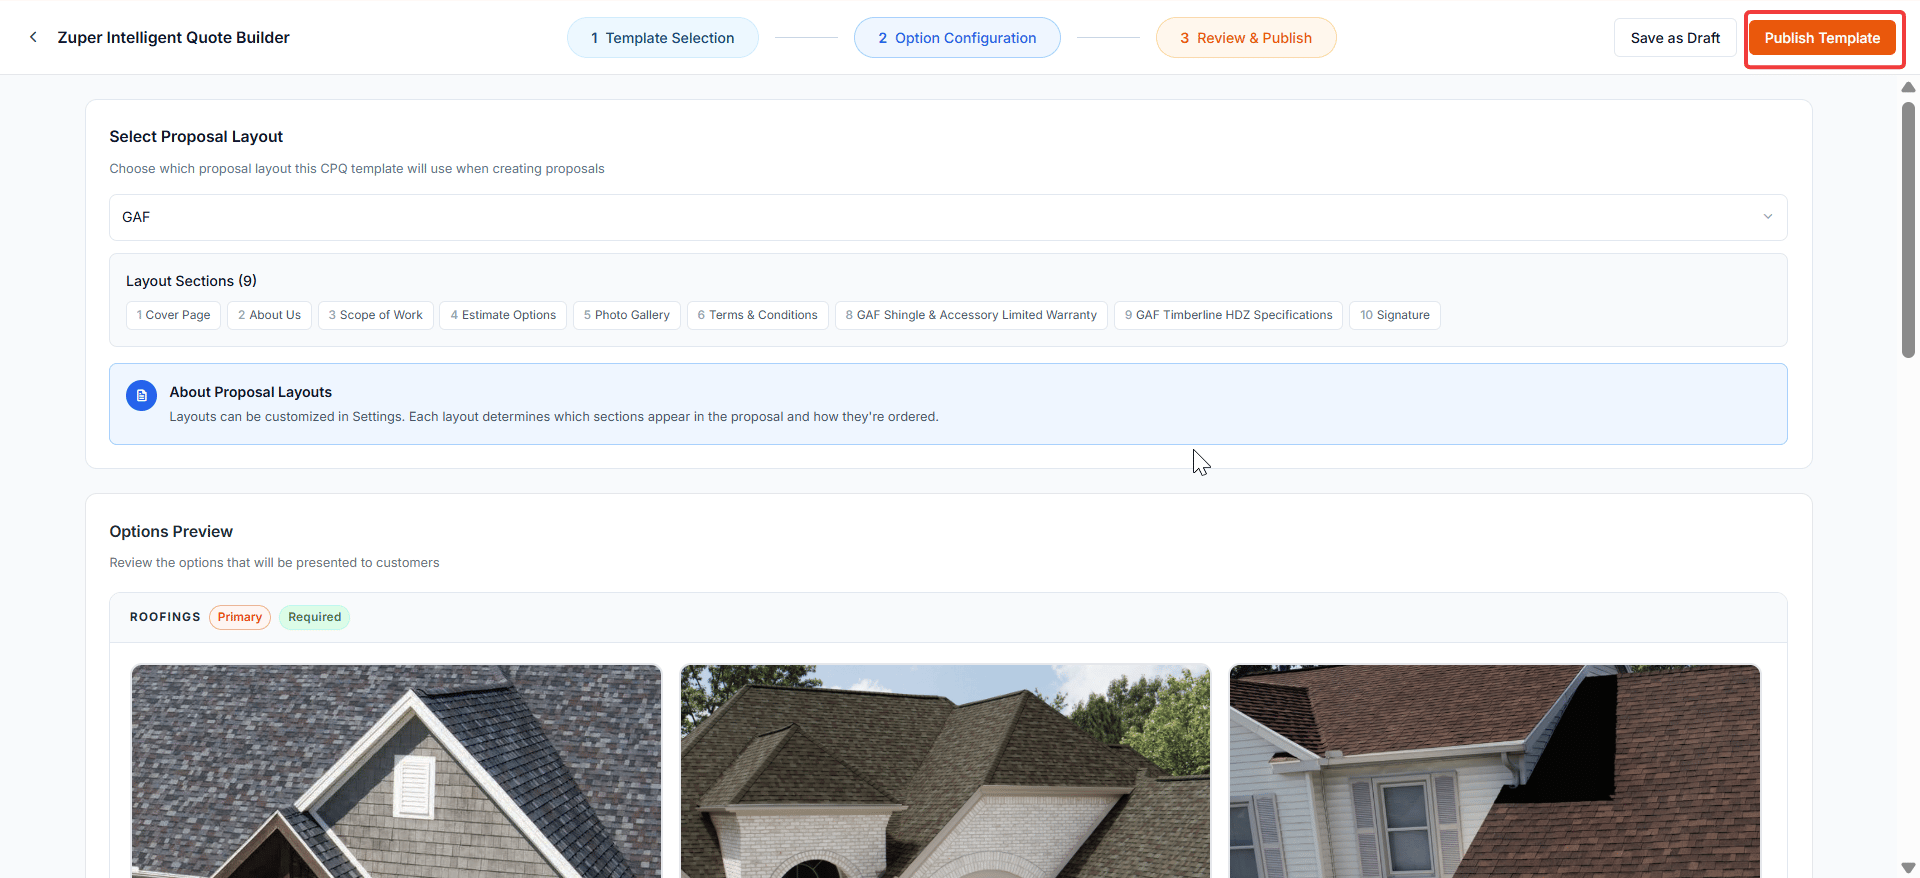
Review and publish the template
- Select Next: Review & Publish at the top right.
- Select a Proposal Layout from the dropdown. The layout determines which sections appear in the proposal and how they are ordered.
- In the Options Preview section, confirm that all groups display correctly — each with the Primary and Required badges where applicable and the correct set of options.
- Select Publish Template to make the template available for proposal creation. Select Save as Draft if you want to continue editing later.
Create a proposal from a multi-trade CPQ template
Once your template is published, you can create a proposal in two ways: automatically via the trigger, or manually from the Quotes list.Automatic creation via trigger
When a job is created or updated with a matching category and status, Zuper automatically starts a CPQ proposal using your template. After you confirm the auto-creation, the proposal opens with the job already associated, and all formulas, pricing, and conditions are calculated based on the job data.Manual creation
- Go to Accounting and select Quotes.
- Select + New at the top right, then select Proposal from the dropdown.
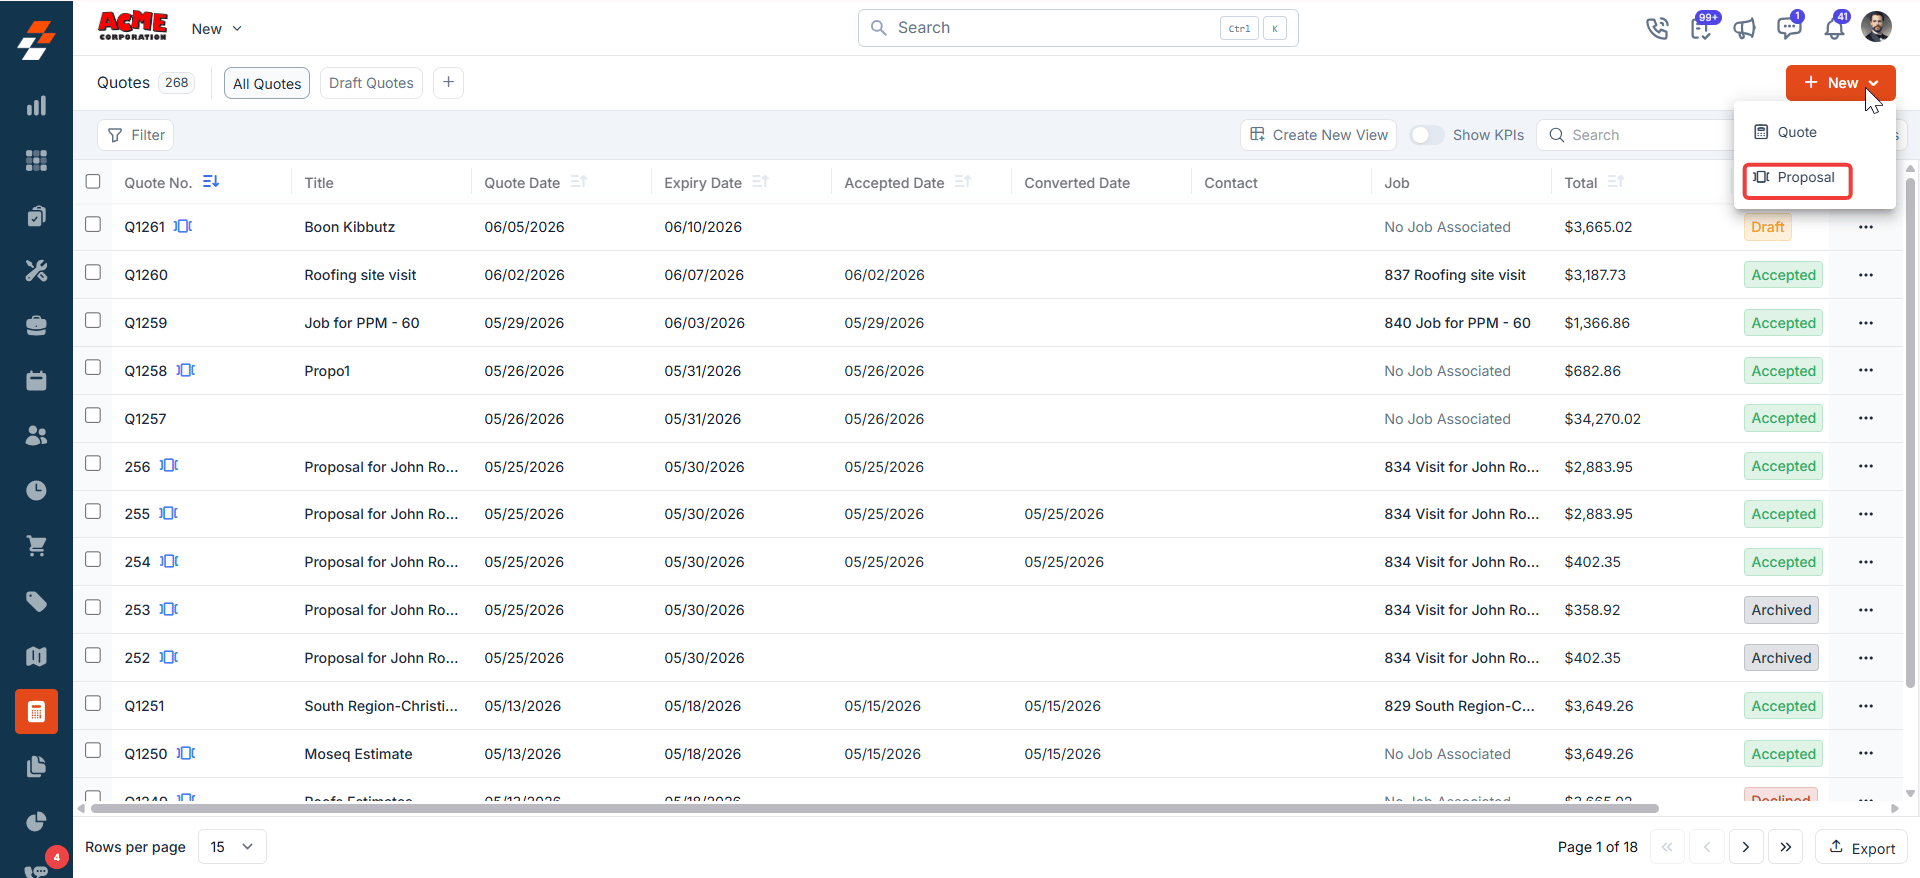
- On the Select Proposal Template panel, select the CPQ tab.
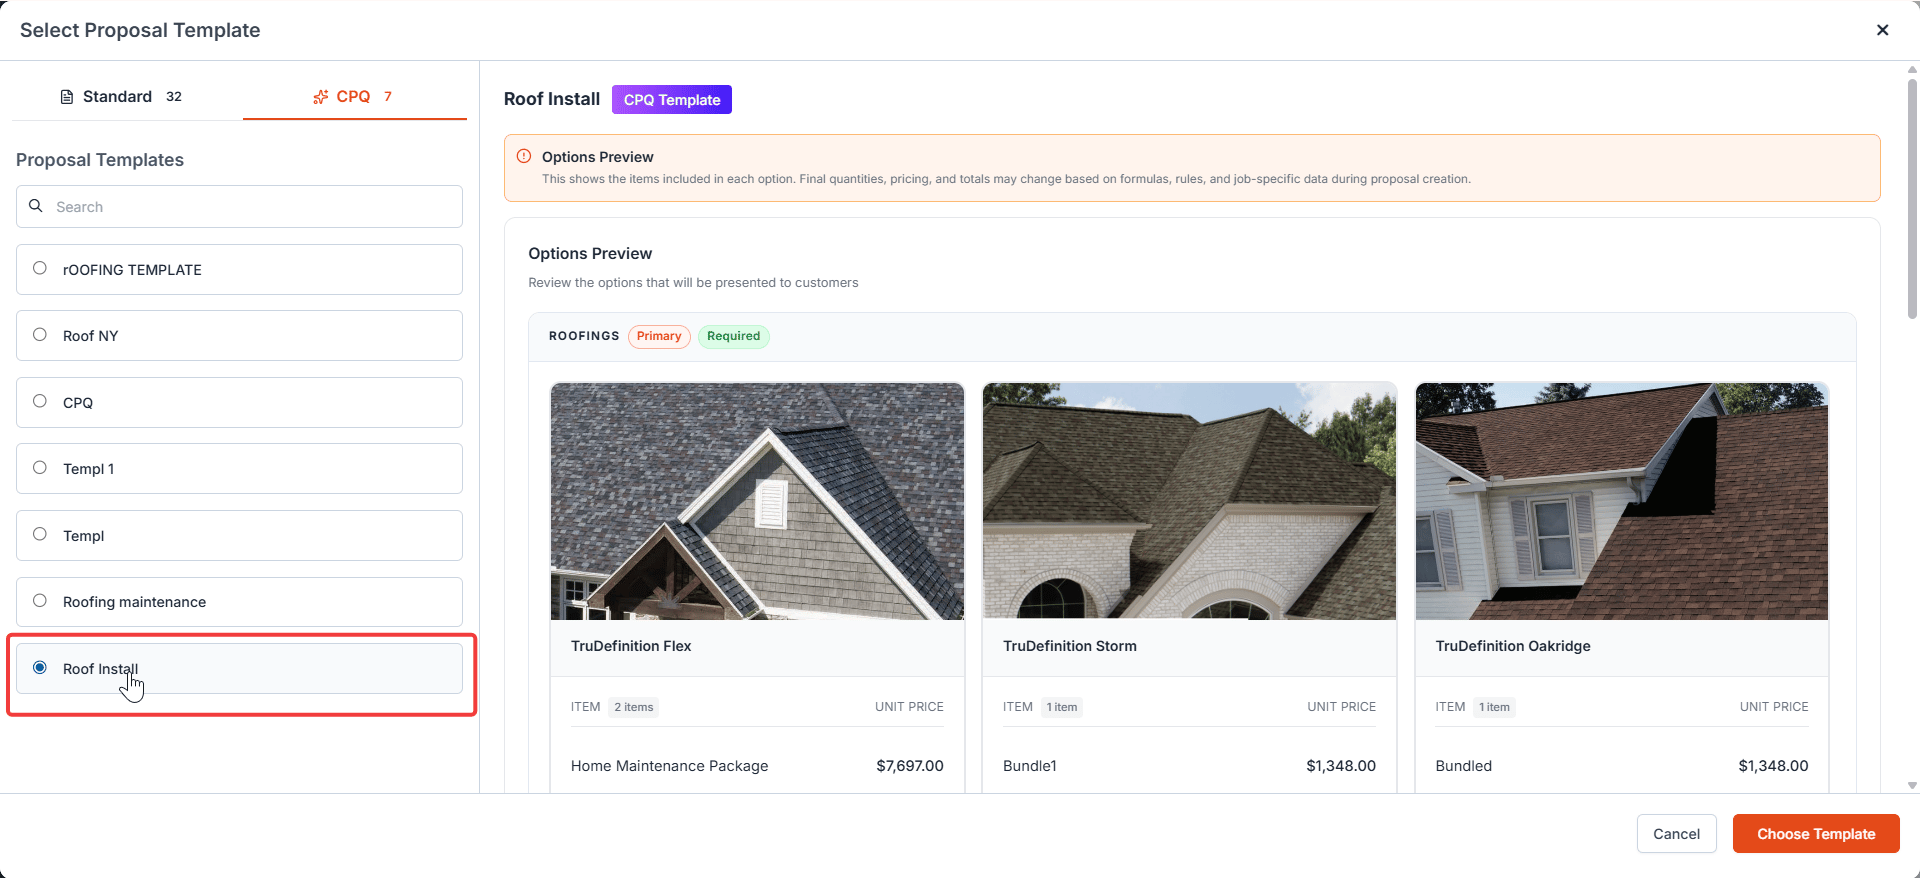
- Select your multi-trade CPQ template from the list. The preview on the right shows all trade groups, badges, and options.
- Select Choose Template.
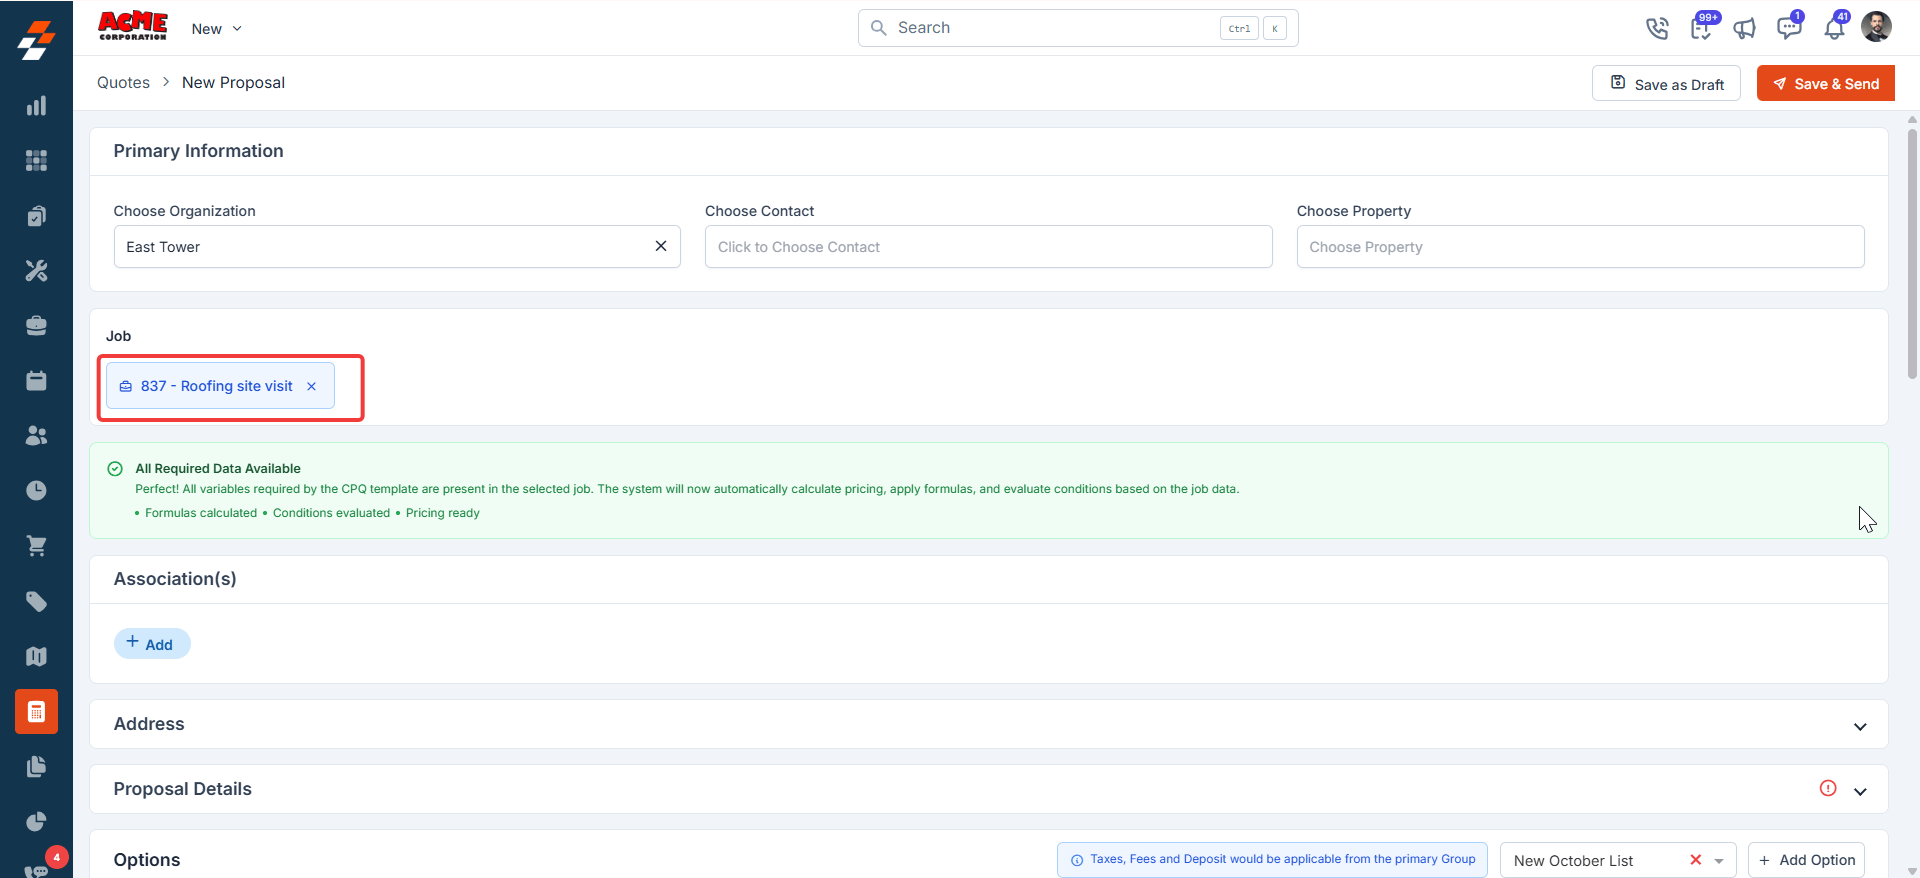
- On the proposal creation screen, fill in Primary Information — organization, contact, and property.
- Associate a job by selecting it in the Job field. When all required job data is present, a green All Required Data Available banner confirms that pricing, formulas, and conditions are ready.
Edit options in the proposal
The Options section displays a tab for each trade group. Select a group tab to view and edit its options.- Select a group tab.
- For each option card, you can update the name, description, image, and line items.
- Repeat for each group tab.
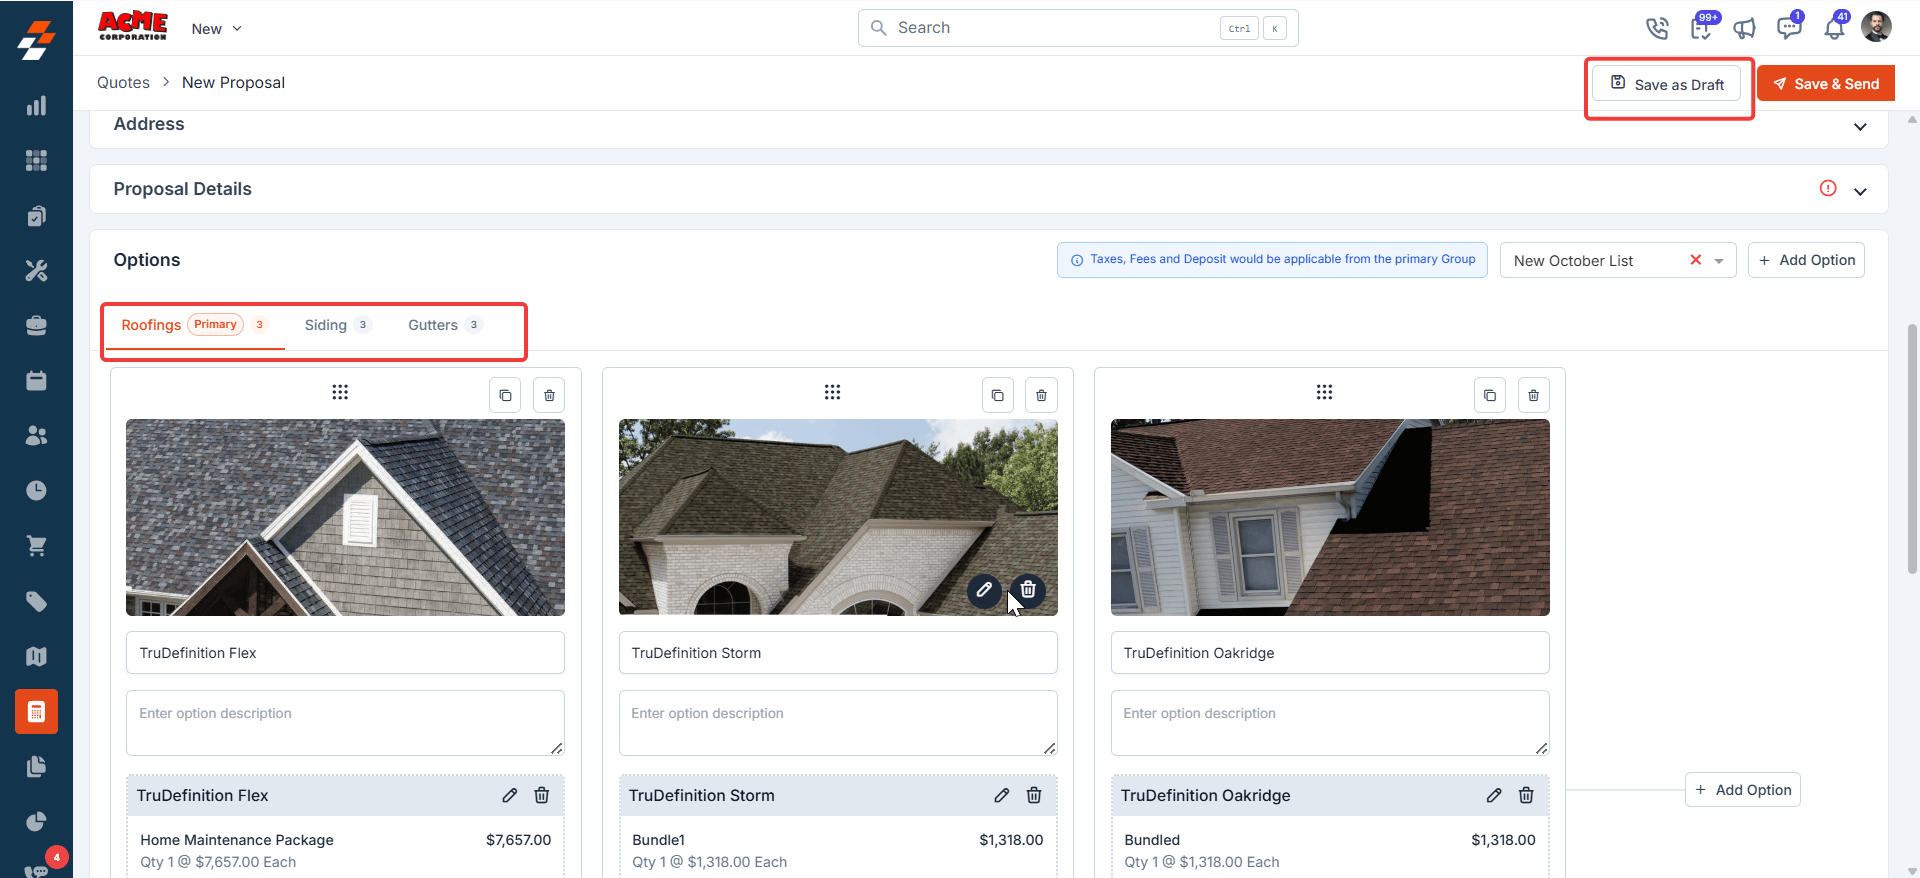
All taxes, fees, and deposits configured in the primary group apply across all groups in the proposal.
What the customer sees
The customer receives an email with a PDF attachment and a link to view and approve the proposal.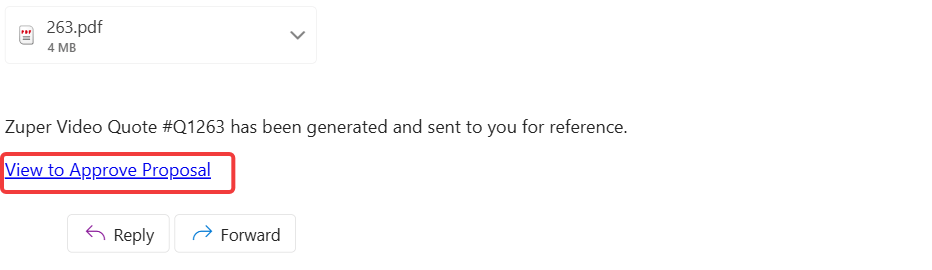
Review
The customer reviews the proposal cover page and selects Continue to proceed.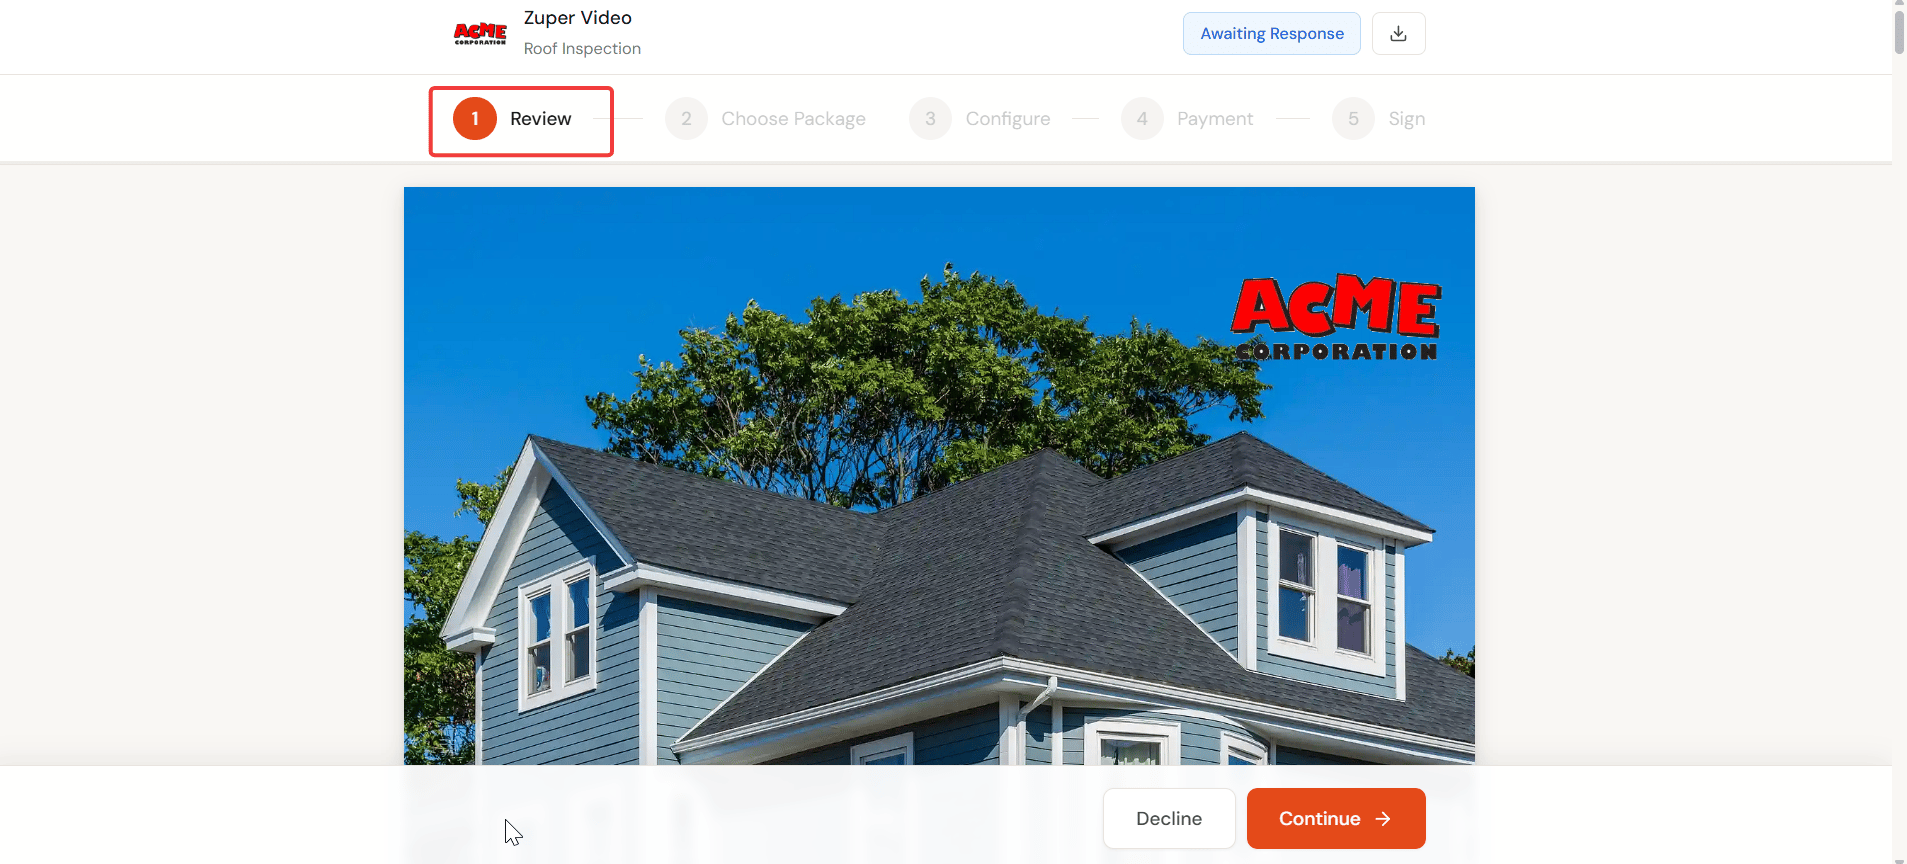
Choose package and configure
All trade groups appear in sequence. A summary bar at the top of the page shows all groups and their current selection state. Groups marked Required must have an option selected before the customer can continue.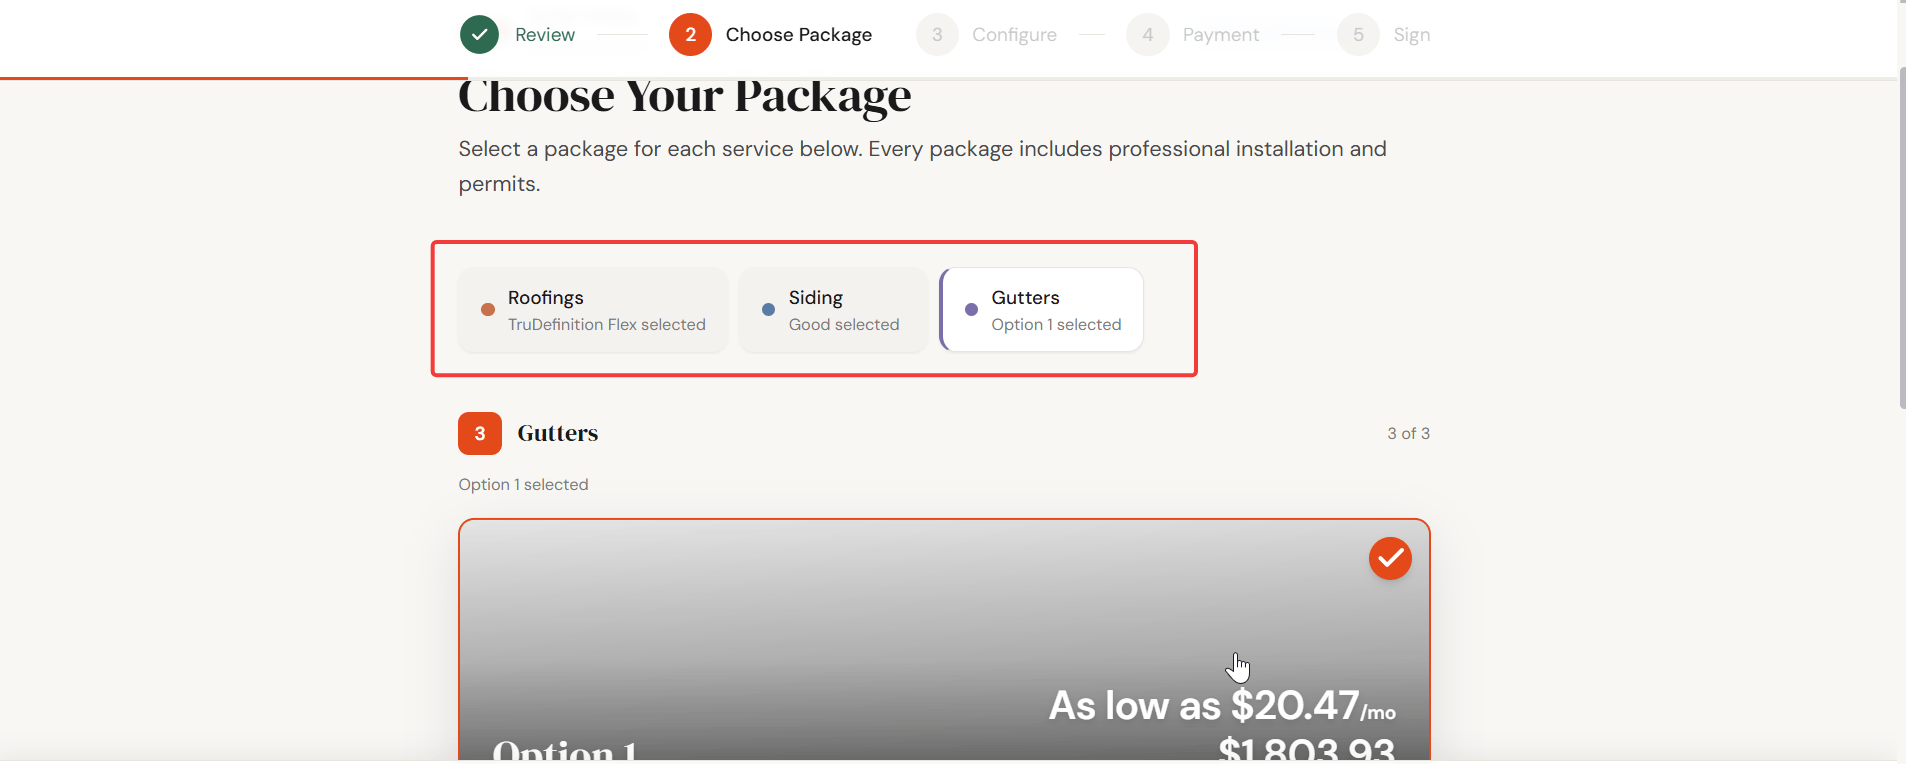
If the customer changes their selection in the primary group after selecting options in other groups, all other group selections are automatically reset. This happens because taxes, fees, deposits, and financing all originate from the primary group. A change to the primary selection requires the other groups to recalculate from the beginning.
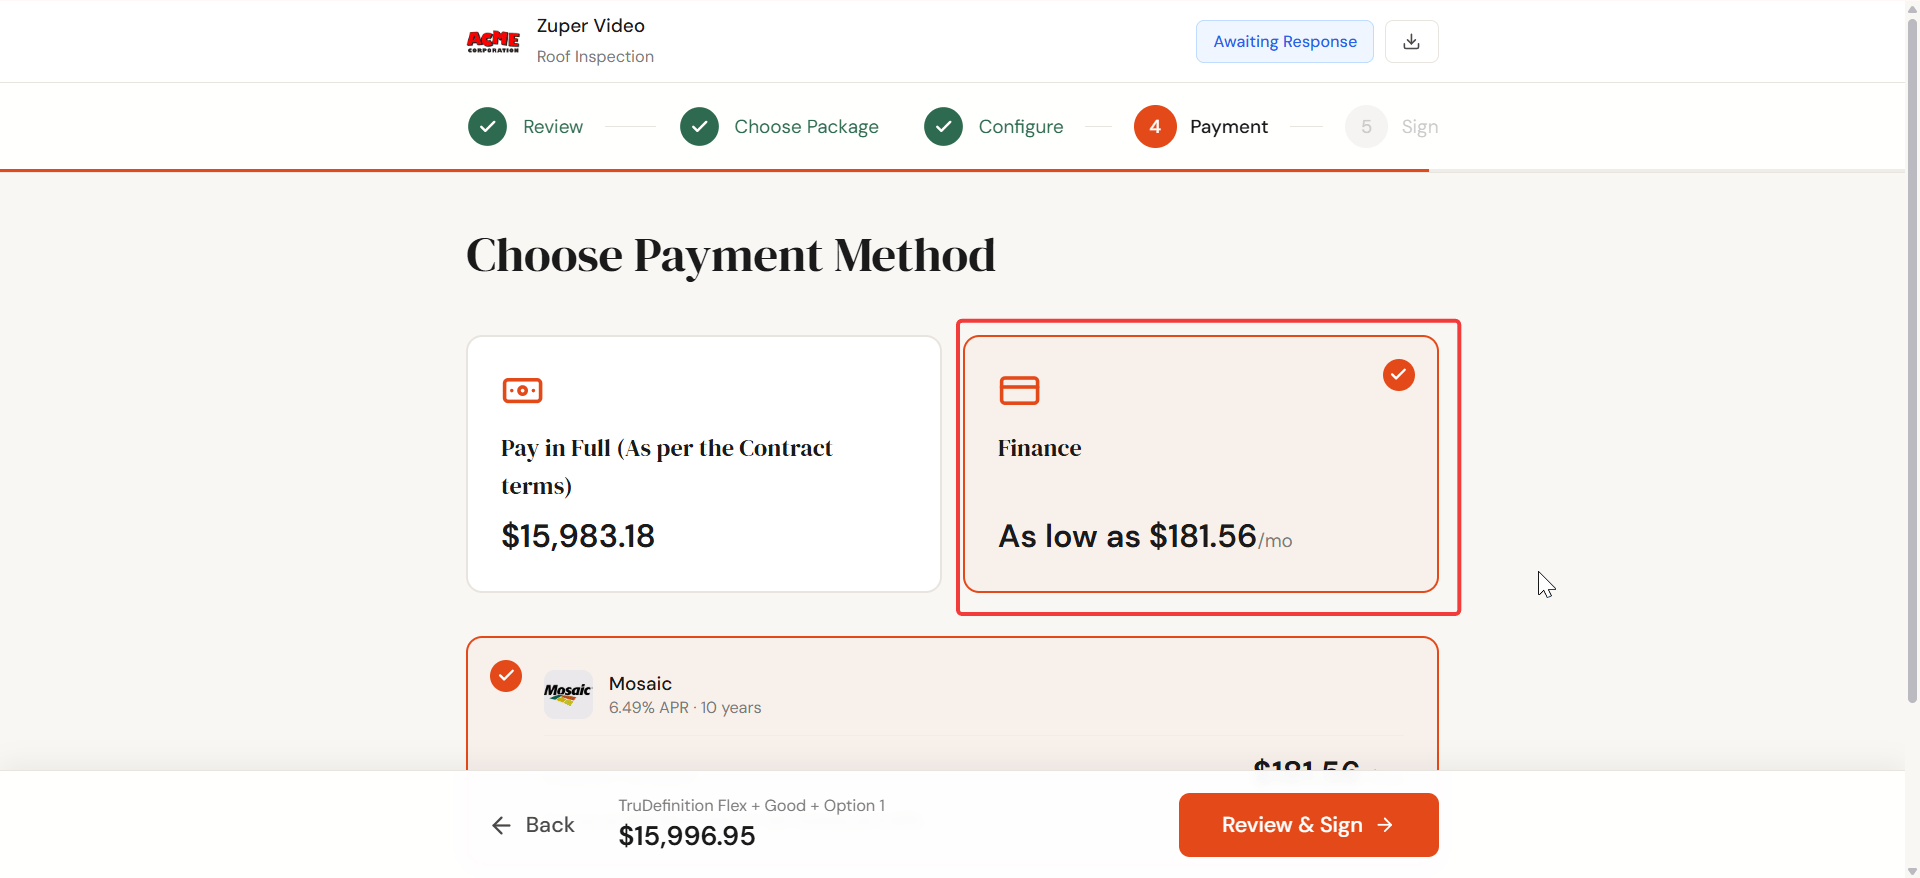
Payment
On the Choose Payment Method step, the customer sees:- Pay in Full — the combined total for all selected options across all groups.
- Finance — a monthly payment plan from the financing provider configured in the primary group’s options.
Sign and accept
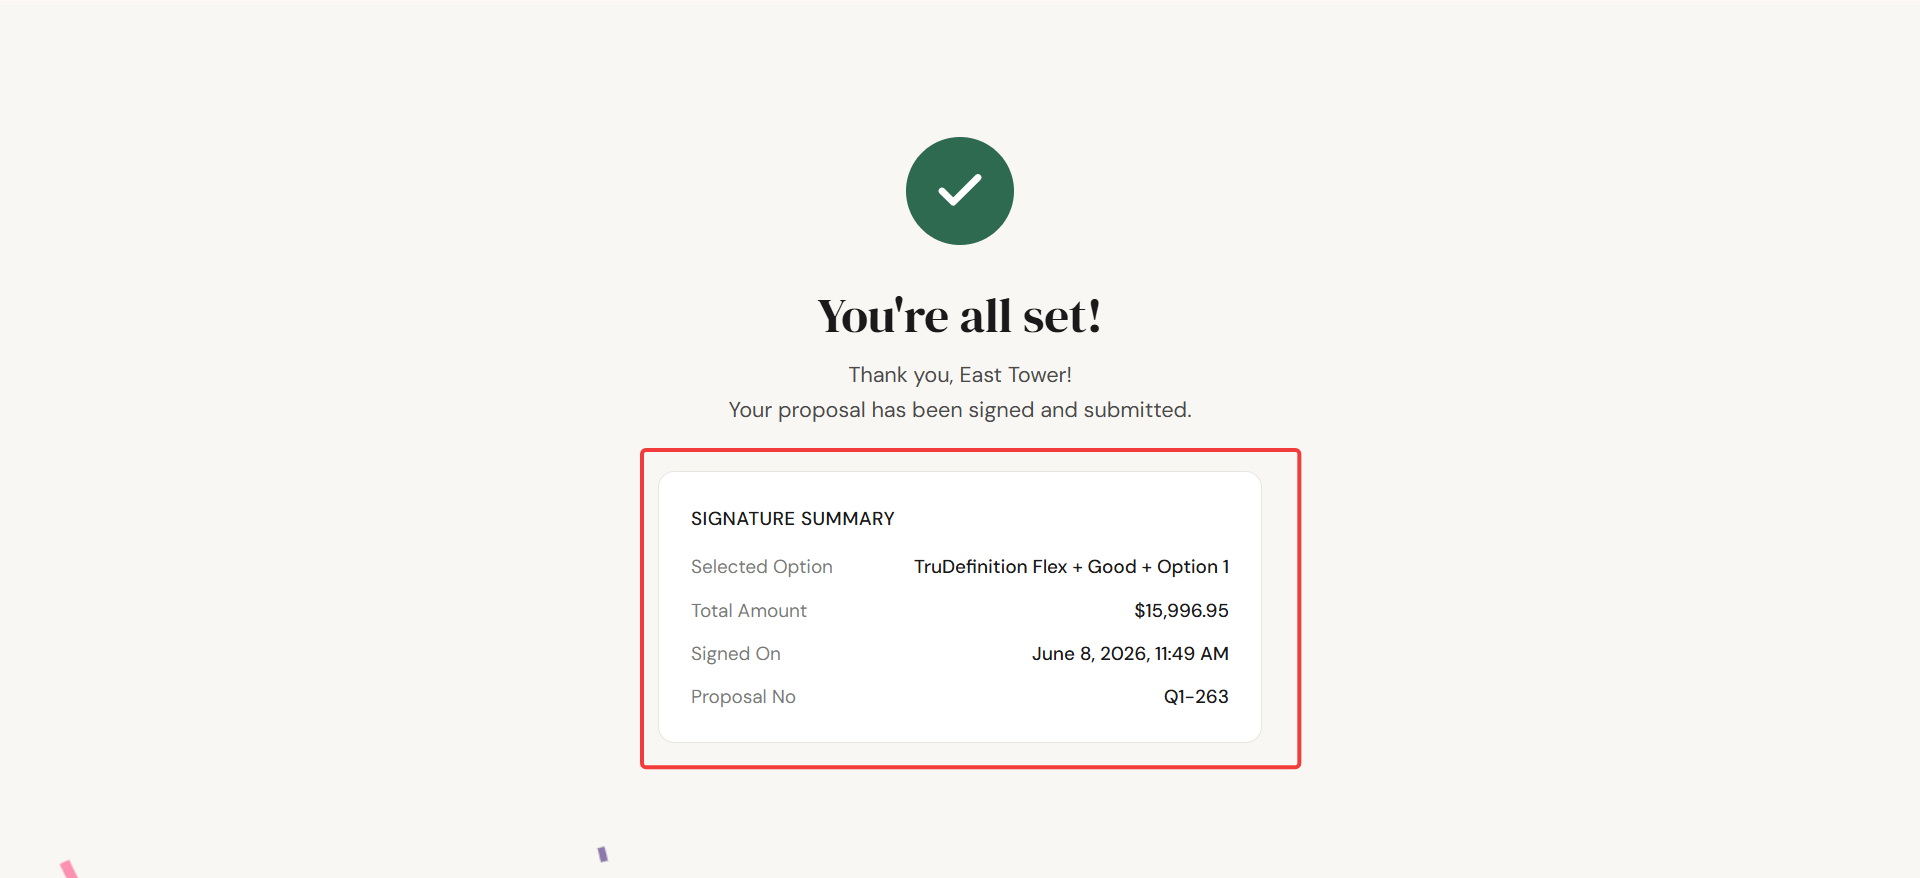
The customer signs and selects Accept Proposal to complete the acceptance.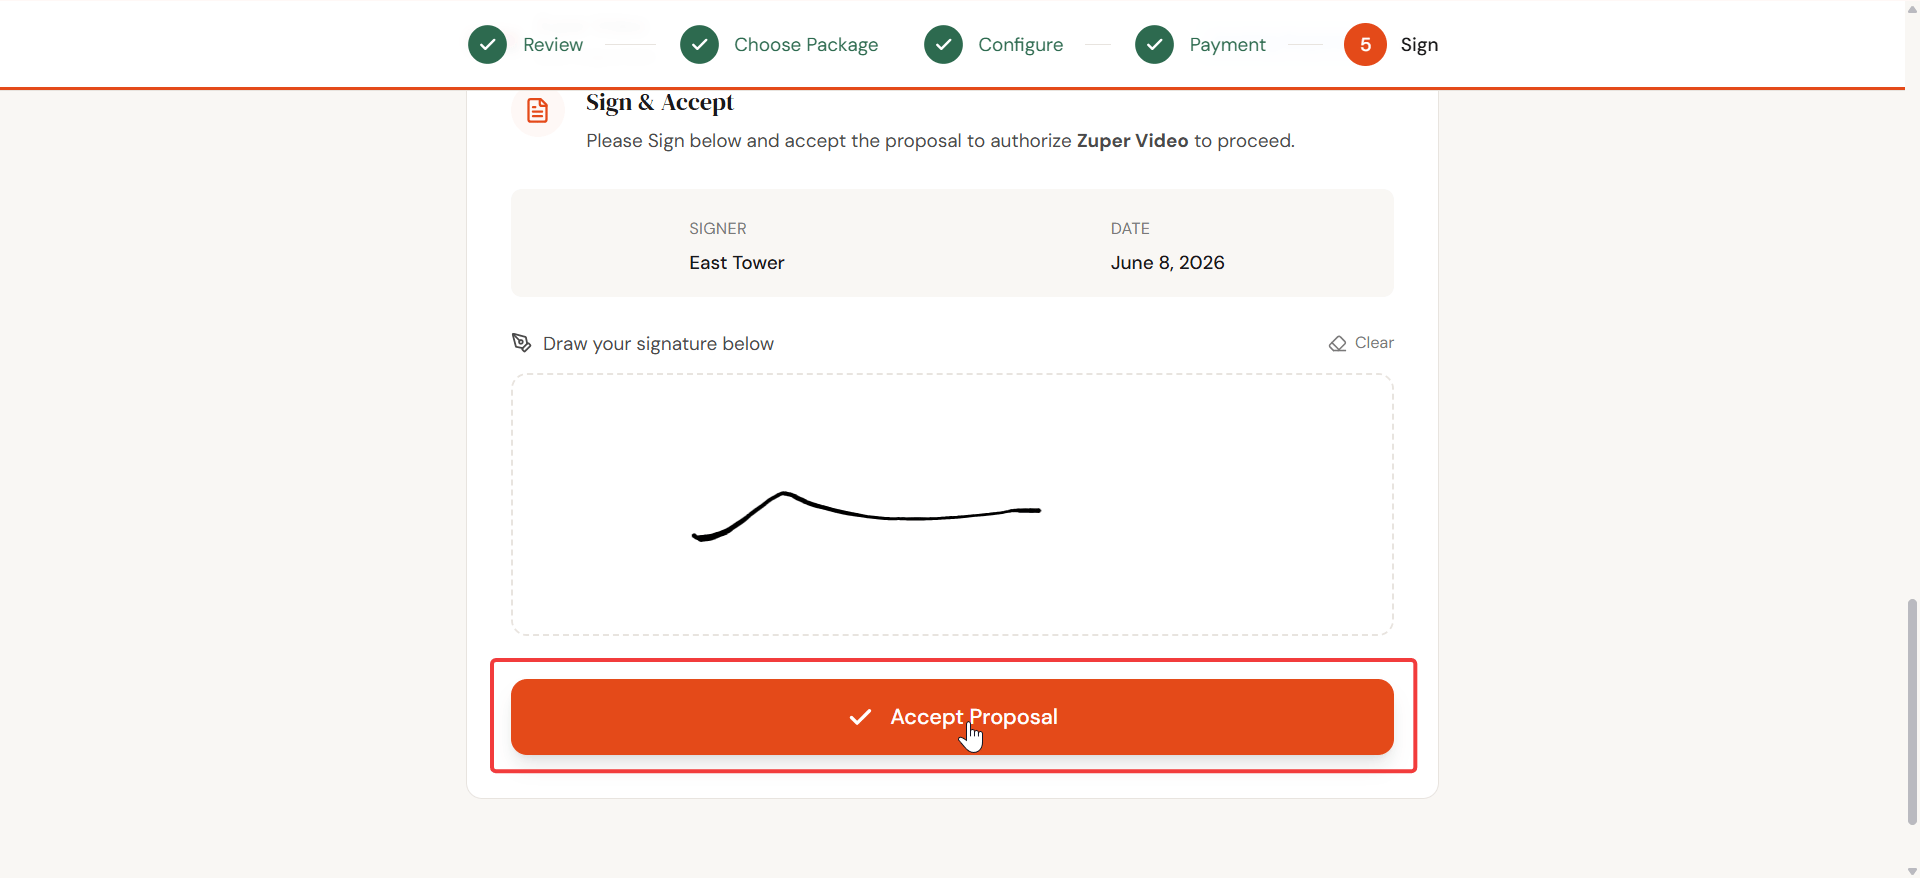
What happens after acceptance
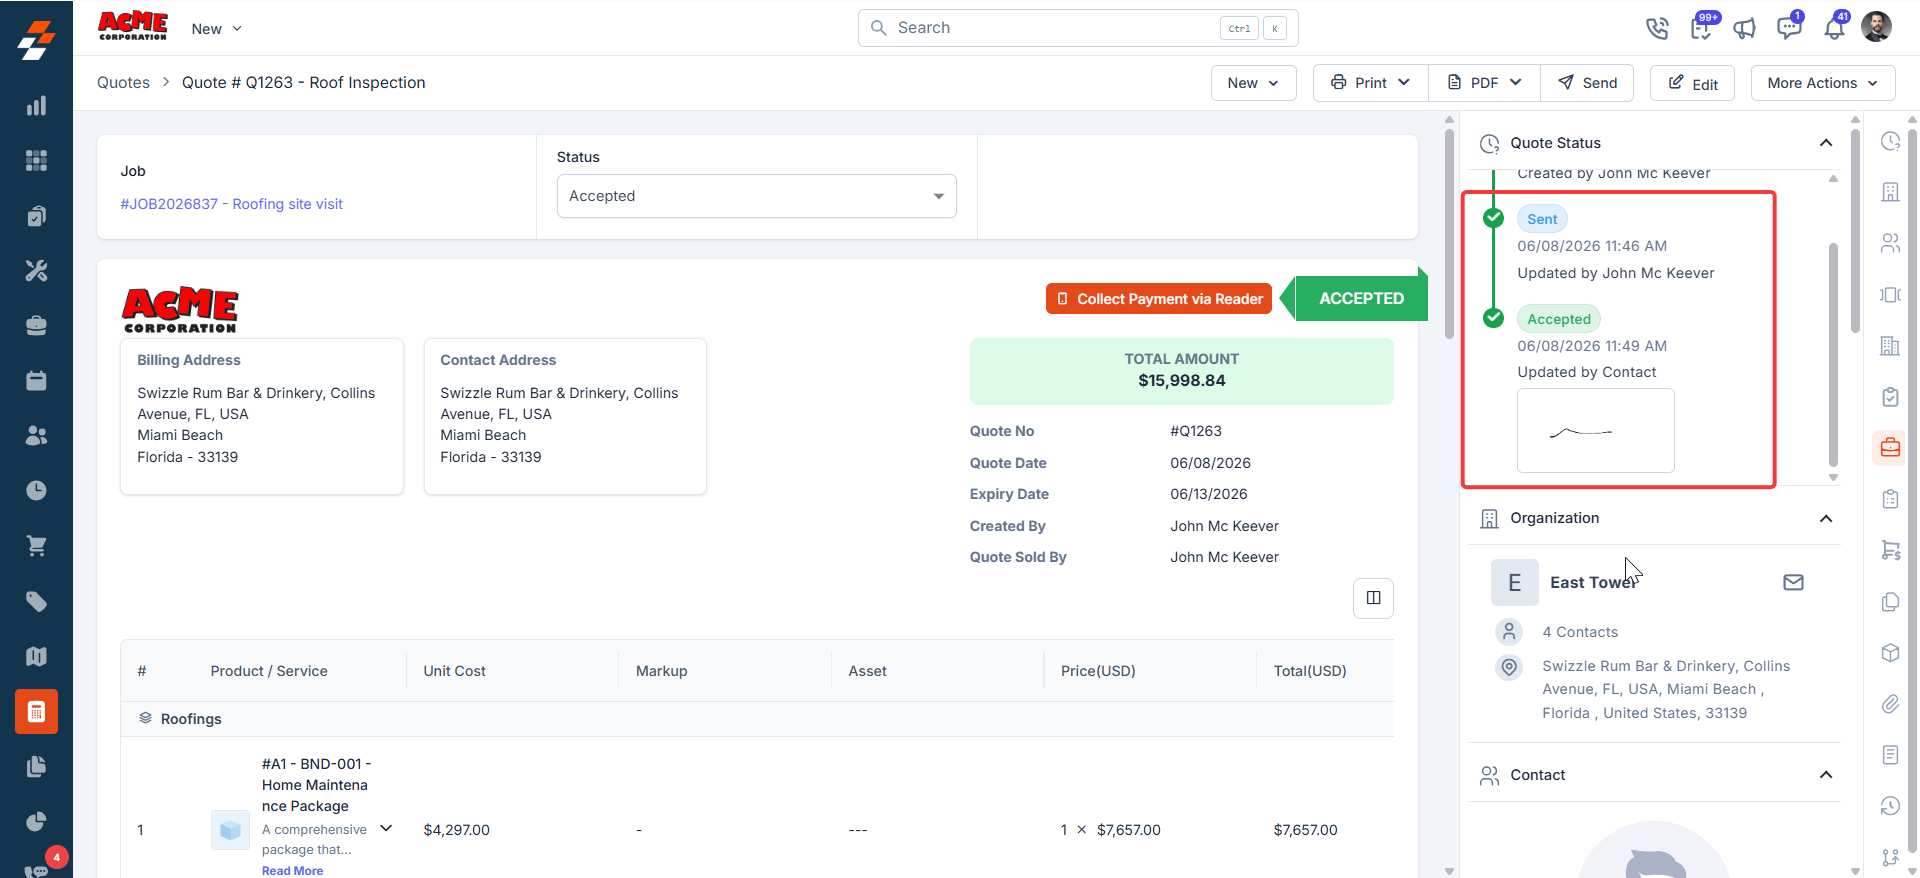
When the customer accepts the proposal, Zuper automatically converts it to an accepted quote. You do not need to convert the proposal manually. If your settings require a deposit before acceptance, Zuper redirects the customer to the payment page after they sign. The customer can close the payment page without completing the payment, and the proposal still converts to an accepted quote.- The quote record shows the Accepted status and a Quote Status timeline with the Sent and Accepted timestamps, including the customer’s signature thumbnail.
- The quote line items are grouped by trade group, so each group’s selected option appears as a labeled section.
- All applicable taxes and fees are calculated across all selected options and displayed in the quote totals.
The quote is created automatically based on the customer’s accepted selections. Manual conversion is not required for multi-trade proposals.
Frequently asked questions
Can I use trade groups with a standard proposal template?
Can I use trade groups with a standard proposal template?
No. Trade groups are available on CPQ-based templates only. Standard templates do not support the Enable Multi Trade toggle or the Trade Groups section.To use trade groups, select CPQ Based Template when creating your template.
What happens if a customer does not select an option from a required group?
What happens if a customer does not select an option from a required group?
The customer cannot proceed past the Choose Package step without selecting an option from each Required group. The acceptance flow blocks the next step until the required selection is made.
How does financing work when a customer picks options from multiple groups?
How does financing work when a customer picks options from multiple groups?
Financing is configured at the option level within the primary group. When the customer selects options across multiple groups and chooses to finance, the financing plan applies at the proposal level.The monthly payment is calculated on the combined total of all selected options across all groups, using the financing provider and rate configured in the primary group’s option.
Can I reorder or rename trade groups after creating the template?
Can I reorder or rename trade groups after creating the template?
Yes. You can rename any group by editing the group name field in the Template Selection step. You can reorder groups using the drag handle on the left side of each group row.The primary group designation stays with the first group you created. You cannot reassign the Primary status to a different group.