> ## Documentation Index
> Fetch the complete documentation index at: https://docs.zuper.co/llms.txt
> Use this file to discover all available pages before exploring further.
# Setting up a Lead Capture widget
Give homeowners an easy way to raise their hand - even when your team isn't available.
A **Lead Capture** widget lets homeowners tell you what they need, leave their contact details, and get into your pipeline without calling or waiting for a response form to be processed manually.
Keep it simple for quick inquiries, or add a few questions to understand the project before your team follows up.
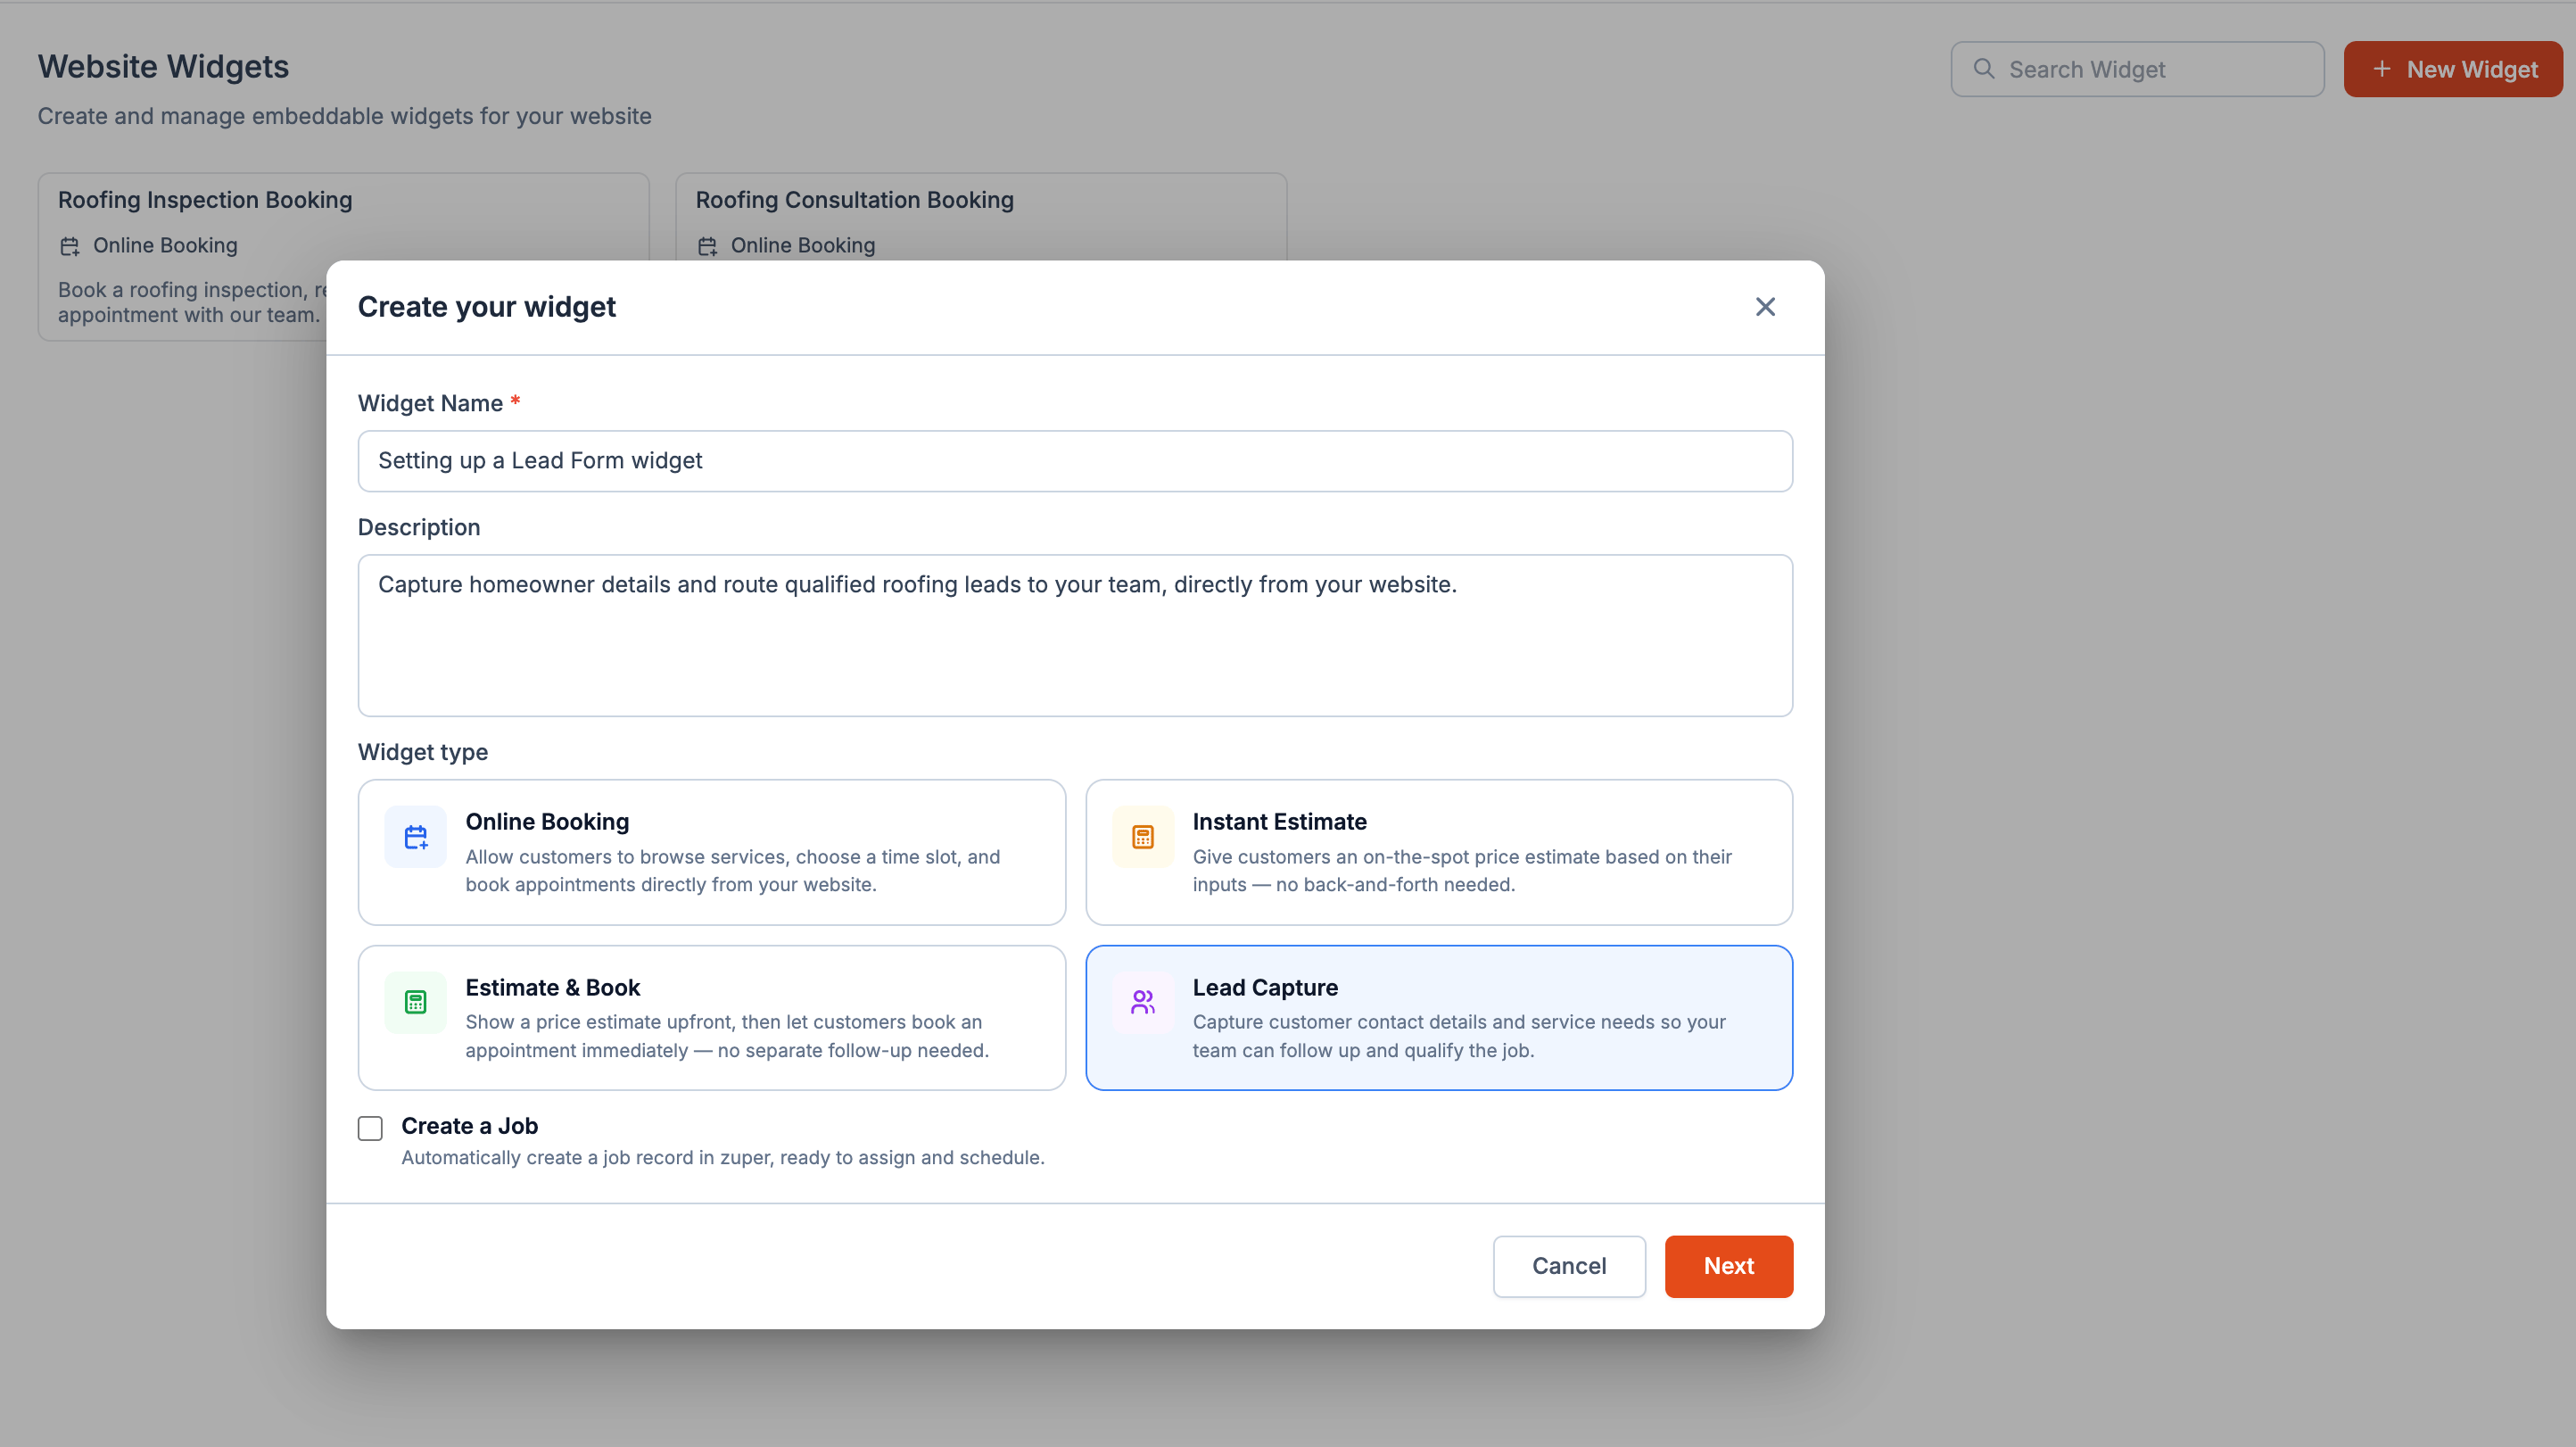 This article walks you through the three setup steps: **Appearance**, **Manage Questions**, and **Advanced Settings**.
## Step-1: Design the homeowner experience
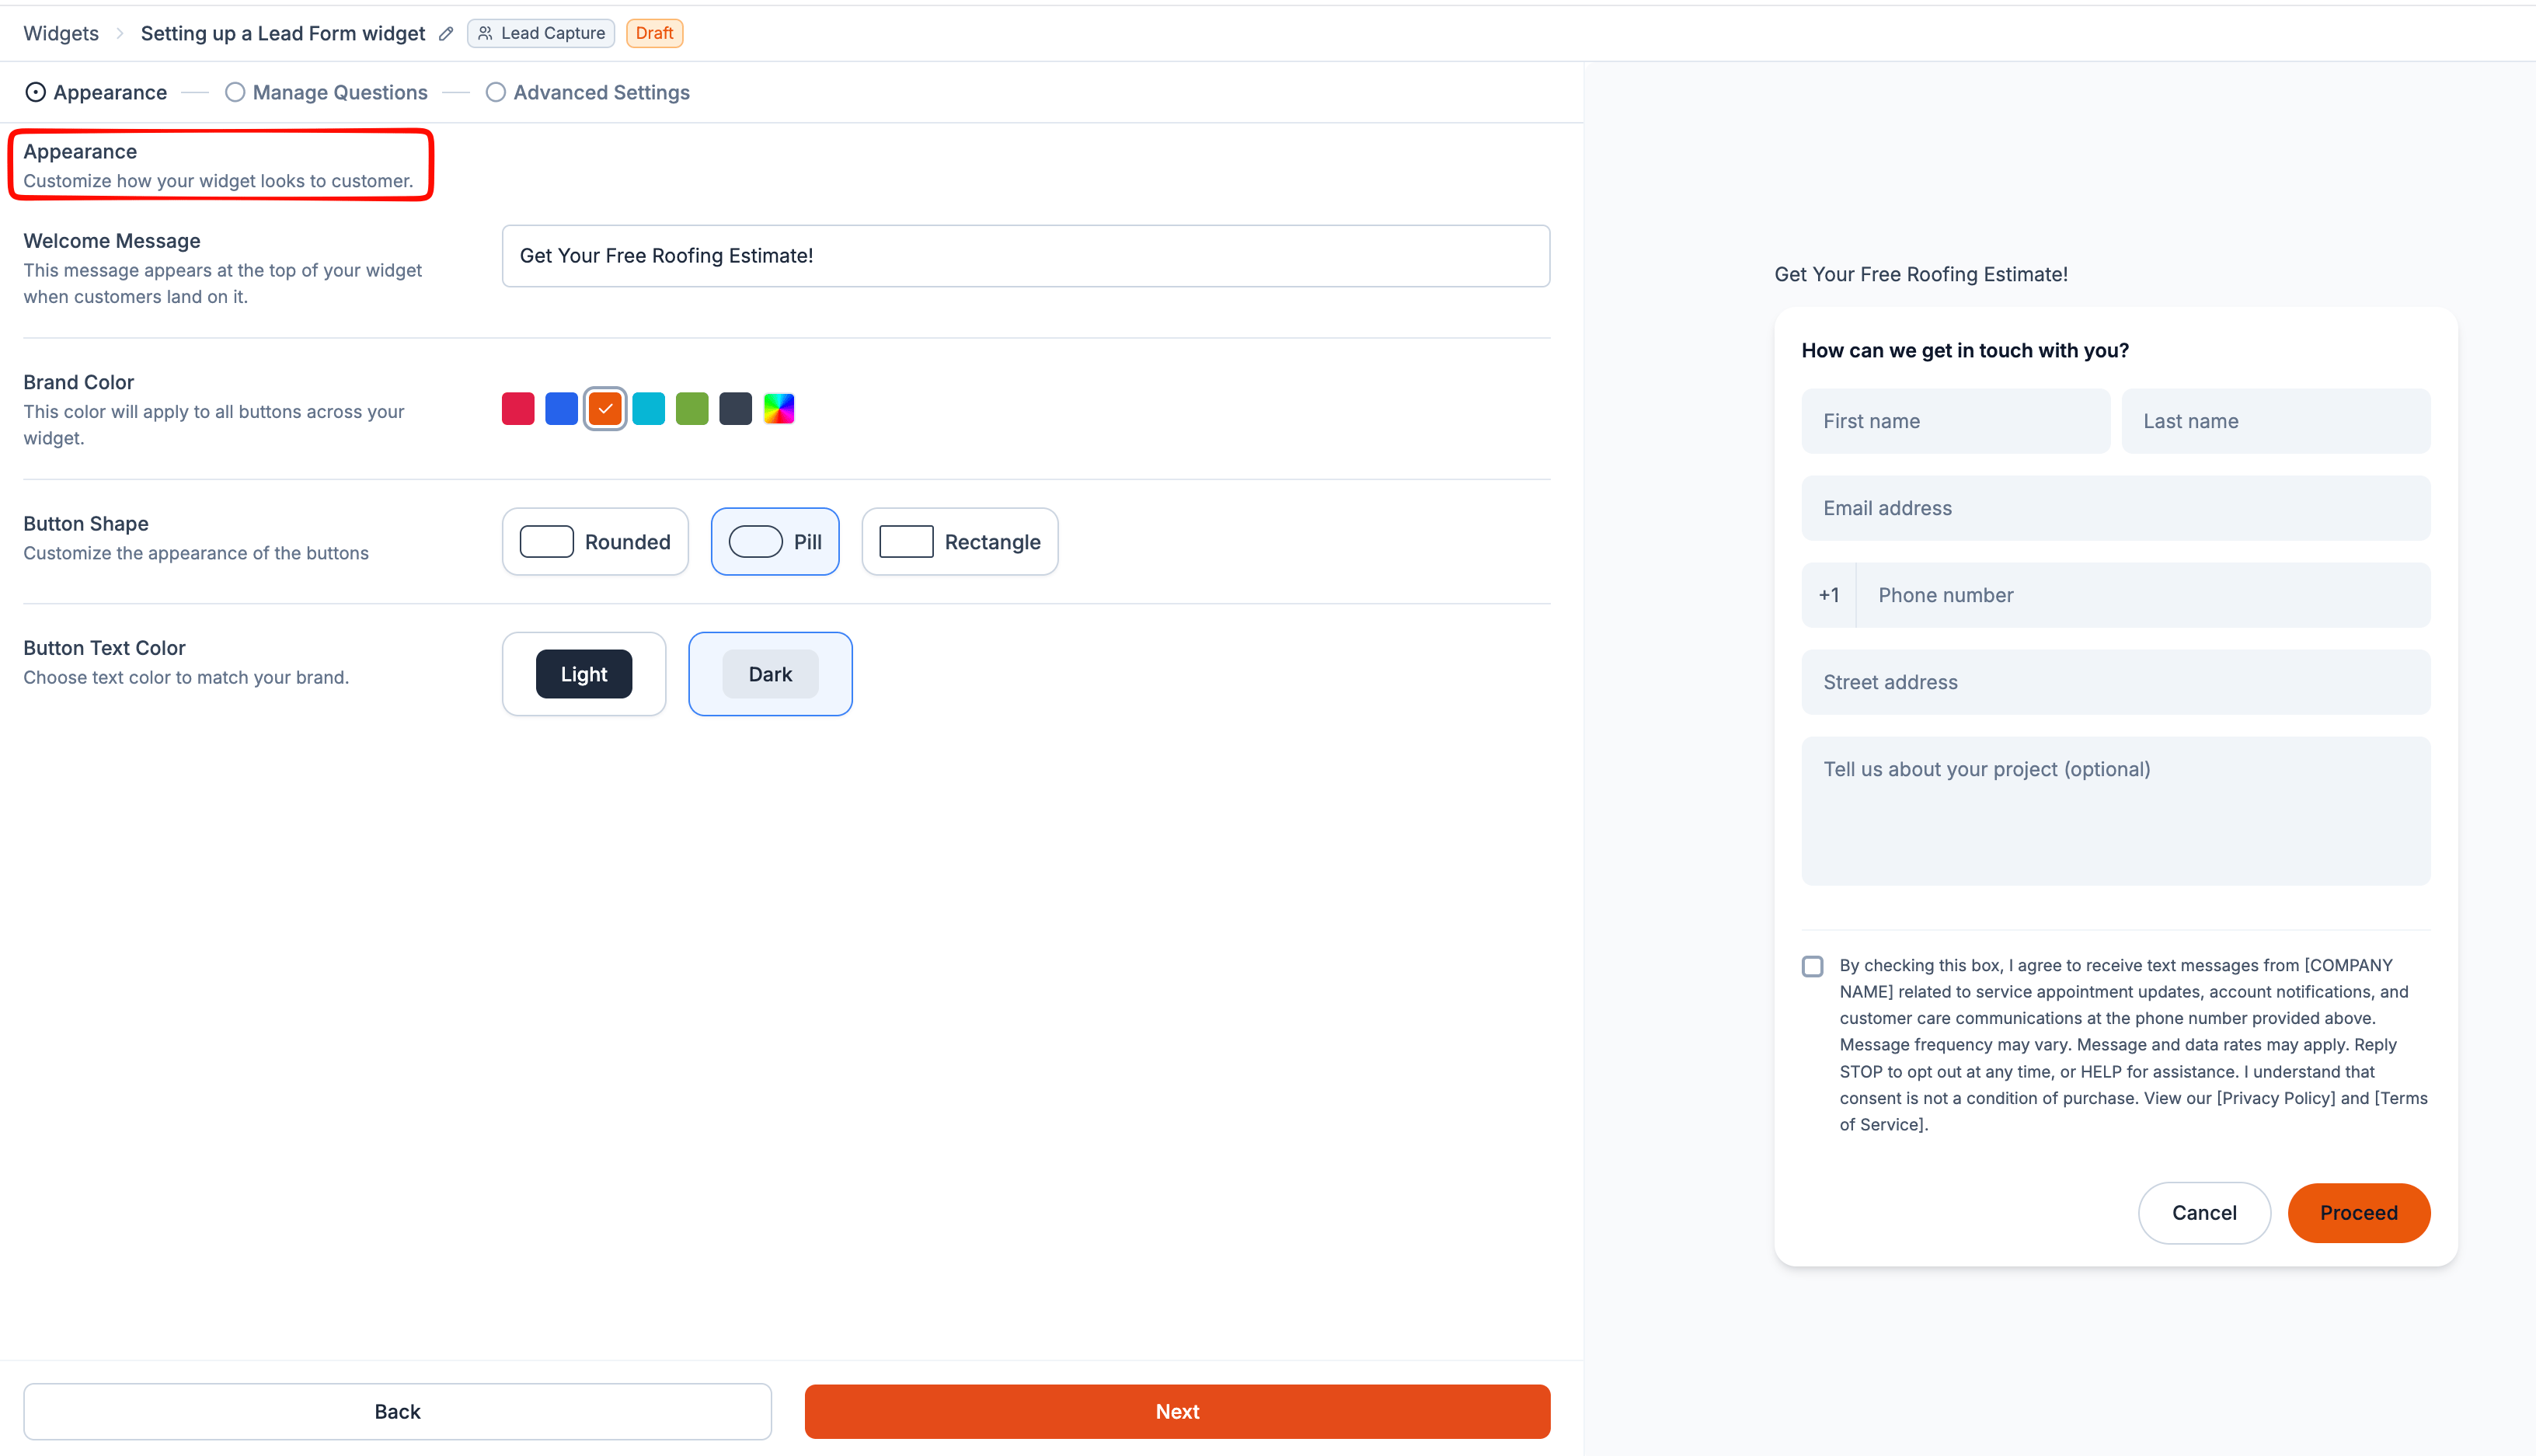
The Appearance step controls how the widget looks on your website. The preview updates as you make changes, so you can see the experience homeowners will have.
1. Enter a **Welcome Message**. This appears at the top of the widget. Use a message that tells homeowners what they can do, such as *Get Started With Your Roofing Project!*.
2. Choose a **Brand Color**. This color is applied to the widget's buttons. Select a preset color or use the multicolor swatch to choose a custom color.
3. Choose a **Button Shape**: **Rounded**, **Pill**, or **Rectangle**.
4. Choose a **Button Text Color**: **Light** or **Dark**. Select the option that provides enough contrast with your brand color.
5. Select **Next** to continue to **Manage Questions**.
This article walks you through the three setup steps: **Appearance**, **Manage Questions**, and **Advanced Settings**.
## Step-1: Design the homeowner experience
The Appearance step controls how the widget looks on your website. The preview updates as you make changes, so you can see the experience homeowners will have.
1. Enter a **Welcome Message**. This appears at the top of the widget. Use a message that tells homeowners what they can do, such as *Get Started With Your Roofing Project!*.
2. Choose a **Brand Color**. This color is applied to the widget's buttons. Select a preset color or use the multicolor swatch to choose a custom color.
3. Choose a **Button Shape**: **Rounded**, **Pill**, or **Rectangle**.
4. Choose a **Button Text Color**: **Light** or **Dark**. Select the option that provides enough contrast with your brand color.
5. Select **Next** to continue to **Manage Questions**.
 ## Step-2: Decide what information to collect
Lead Capture widgets include one default question card, **How can we get in touch with you?**, including:
* First name
* Last name
* Email address
* Phone number
* Street address
* Tell us about your project (optional)
Unlike the other widget types, this is a single combined card rather than separate default questions, and it's the entire form unless you add more. You can rename the card label by selecting the pencil icon, but you can't delete it or remove its individual fields.
## Step-2: Decide what information to collect
Lead Capture widgets include one default question card, **How can we get in touch with you?**, including:
* First name
* Last name
* Email address
* Phone number
* Street address
* Tell us about your project (optional)
Unlike the other widget types, this is a single combined card rather than separate default questions, and it's the entire form unless you add more. You can rename the card label by selecting the pencil icon, but you can't delete it or remove its individual fields.
 ### **Add custom questions**
Add questions when you need more information to qualify a lead before your team calls them back.
1. Select **+ Add custom question**.
2. Select a question type:
* Short Answer
* Long Answer
* Single Choice
* Multiple Choice
* Dropdown
### **Add custom questions**
Add questions when you need more information to qualify a lead before your team calls them back.
1. Select **+ Add custom question**.
2. Select a question type:
* Short Answer
* Long Answer
* Single Choice
* Multiple Choice
* Dropdown
 3. Select the pencil icon next to **Untitled question** and enter your question.
 4. For **Single Choice**, **Multiple Choice**, and **Dropdown**, add at least two answer options.
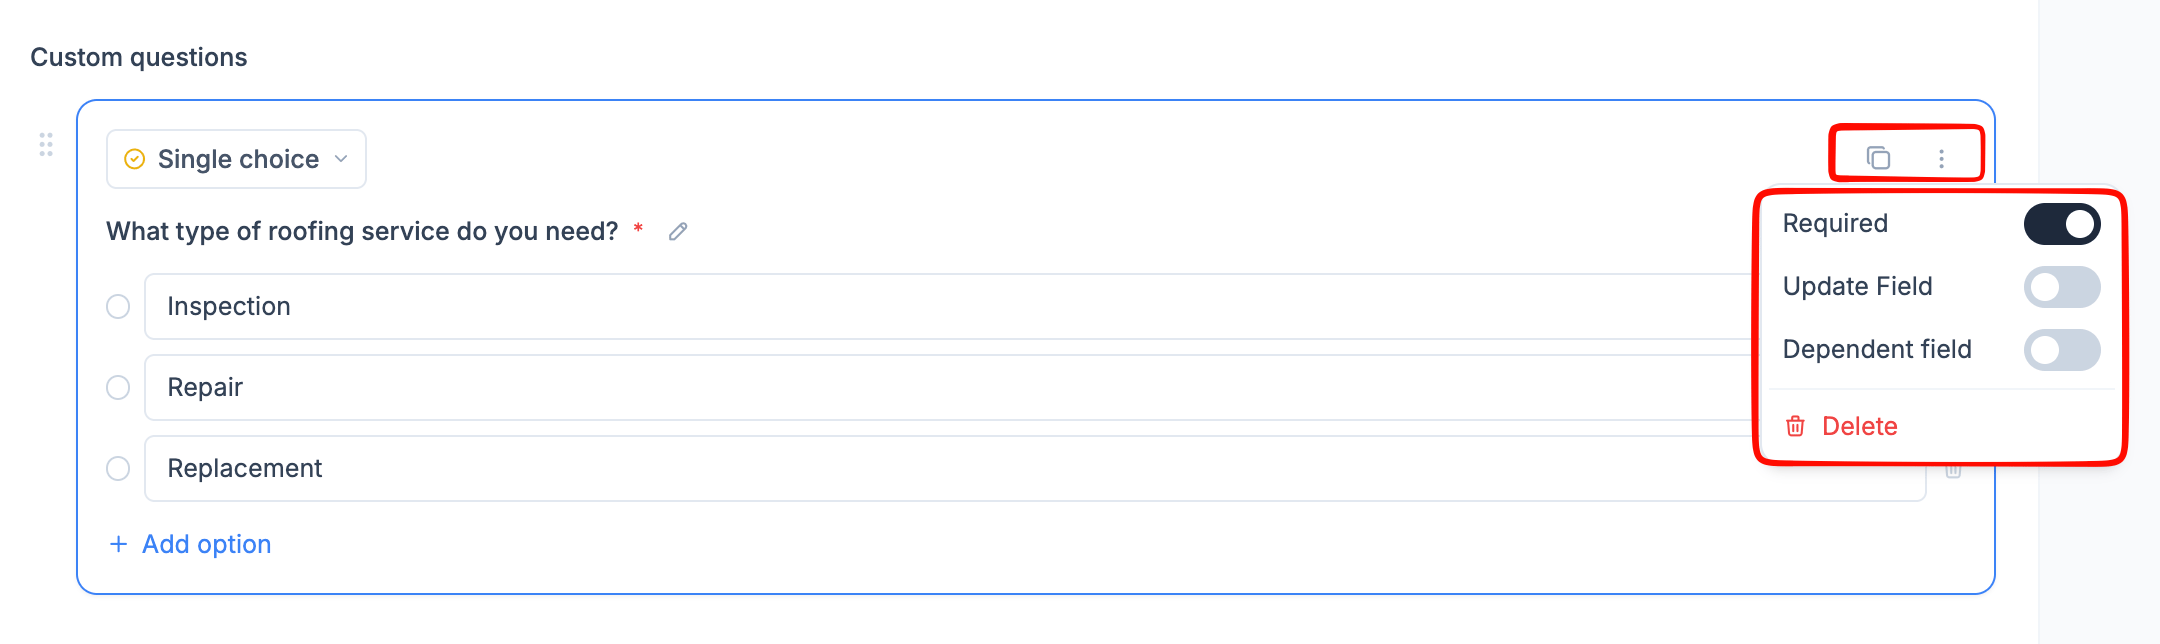
You can manage each question using the controls on its question card:
* **Change type**: Switch the question to another question type.
* **Duplicate**: Create a copy of the question, including its answer options.
* **Required**: Require homeowners to answer the question before they can continue.
* **Update Field**: Save the homeowner's response to a Contact or Job custom field.
* **Dependent Field**: Show the question only when a homeowner selects a specific answer to another Single Choice, Multiple Choice, or Dropdown question.
* **Delete**: Remove a custom question.
4. For **Single Choice**, **Multiple Choice**, and **Dropdown**, add at least two answer options.
You can manage each question using the controls on its question card:
* **Change type**: Switch the question to another question type.
* **Duplicate**: Create a copy of the question, including its answer options.
* **Required**: Require homeowners to answer the question before they can continue.
* **Update Field**: Save the homeowner's response to a Contact or Job custom field.
* **Dependent Field**: Show the question only when a homeowner selects a specific answer to another Single Choice, Multiple Choice, or Dropdown question.
* **Delete**: Remove a custom question.
 Tip: Drag a question using its handle to change the order in which homeowners see it.
Select **Next** to continue to **Advanced Settings**.
## Step-3: Decide what happens around a submission
Use **Advanced Settings to** control customer consent, notifications, and the contact information homeowners see.
Tip: Drag a question using its handle to change the order in which homeowners see it.
Select **Next** to continue to **Advanced Settings**.
## Step-3: Decide what happens around a submission
Use **Advanced Settings to** control customer consent, notifications, and the contact information homeowners see.
 **Text Message Opt-In** adds a consent checkbox to the contact step. Enter the message you want homeowners to see with the checkbox.Selecting the checkbox isn't required to complete a booking. It records whether the homeowner has opted in to receive text m essages.
The text editor supports **bold**, *italic*, and underline formatting, as well as link, so you can link your privacy policy and terms of service directly in the message.
**Out of Service Territory Message** lets you display a custom message when a homeowner enters an address outside your service area.
Turn on **Booking Policy** to display your booking policy during the booking process. You can use this for cancellation terms, deposit requirements, arrival windows, or other booking conditions.
Choose how homeowners receive confirmation after they book:
* **Text Message**: Sends a booking confirmation by SMS.
* **Email**: Sends booking information by email.
Turn on **Show contact details on estimate** to select a team member and display their name, phone number, and email address to homeowners, so they have a direct line for questions.
### **Activate your widget**
Once you've configured the form, review it from the live preview before making it available to homeowners.
1. Review your settings across all three steps.
2. Check the live preview to make sure the form looks and works as expected.
3. Select **Activate**.
**Text Message Opt-In** adds a consent checkbox to the contact step. Enter the message you want homeowners to see with the checkbox.Selecting the checkbox isn't required to complete a booking. It records whether the homeowner has opted in to receive text m essages.
The text editor supports **bold**, *italic*, and underline formatting, as well as link, so you can link your privacy policy and terms of service directly in the message.
**Out of Service Territory Message** lets you display a custom message when a homeowner enters an address outside your service area.
Turn on **Booking Policy** to display your booking policy during the booking process. You can use this for cancellation terms, deposit requirements, arrival windows, or other booking conditions.
Choose how homeowners receive confirmation after they book:
* **Text Message**: Sends a booking confirmation by SMS.
* **Email**: Sends booking information by email.
Turn on **Show contact details on estimate** to select a team member and display their name, phone number, and email address to homeowners, so they have a direct line for questions.
### **Activate your widget**
Once you've configured the form, review it from the live preview before making it available to homeowners.
1. Review your settings across all three steps.
2. Check the live preview to make sure the form looks and works as expected.
3. Select **Activate**.
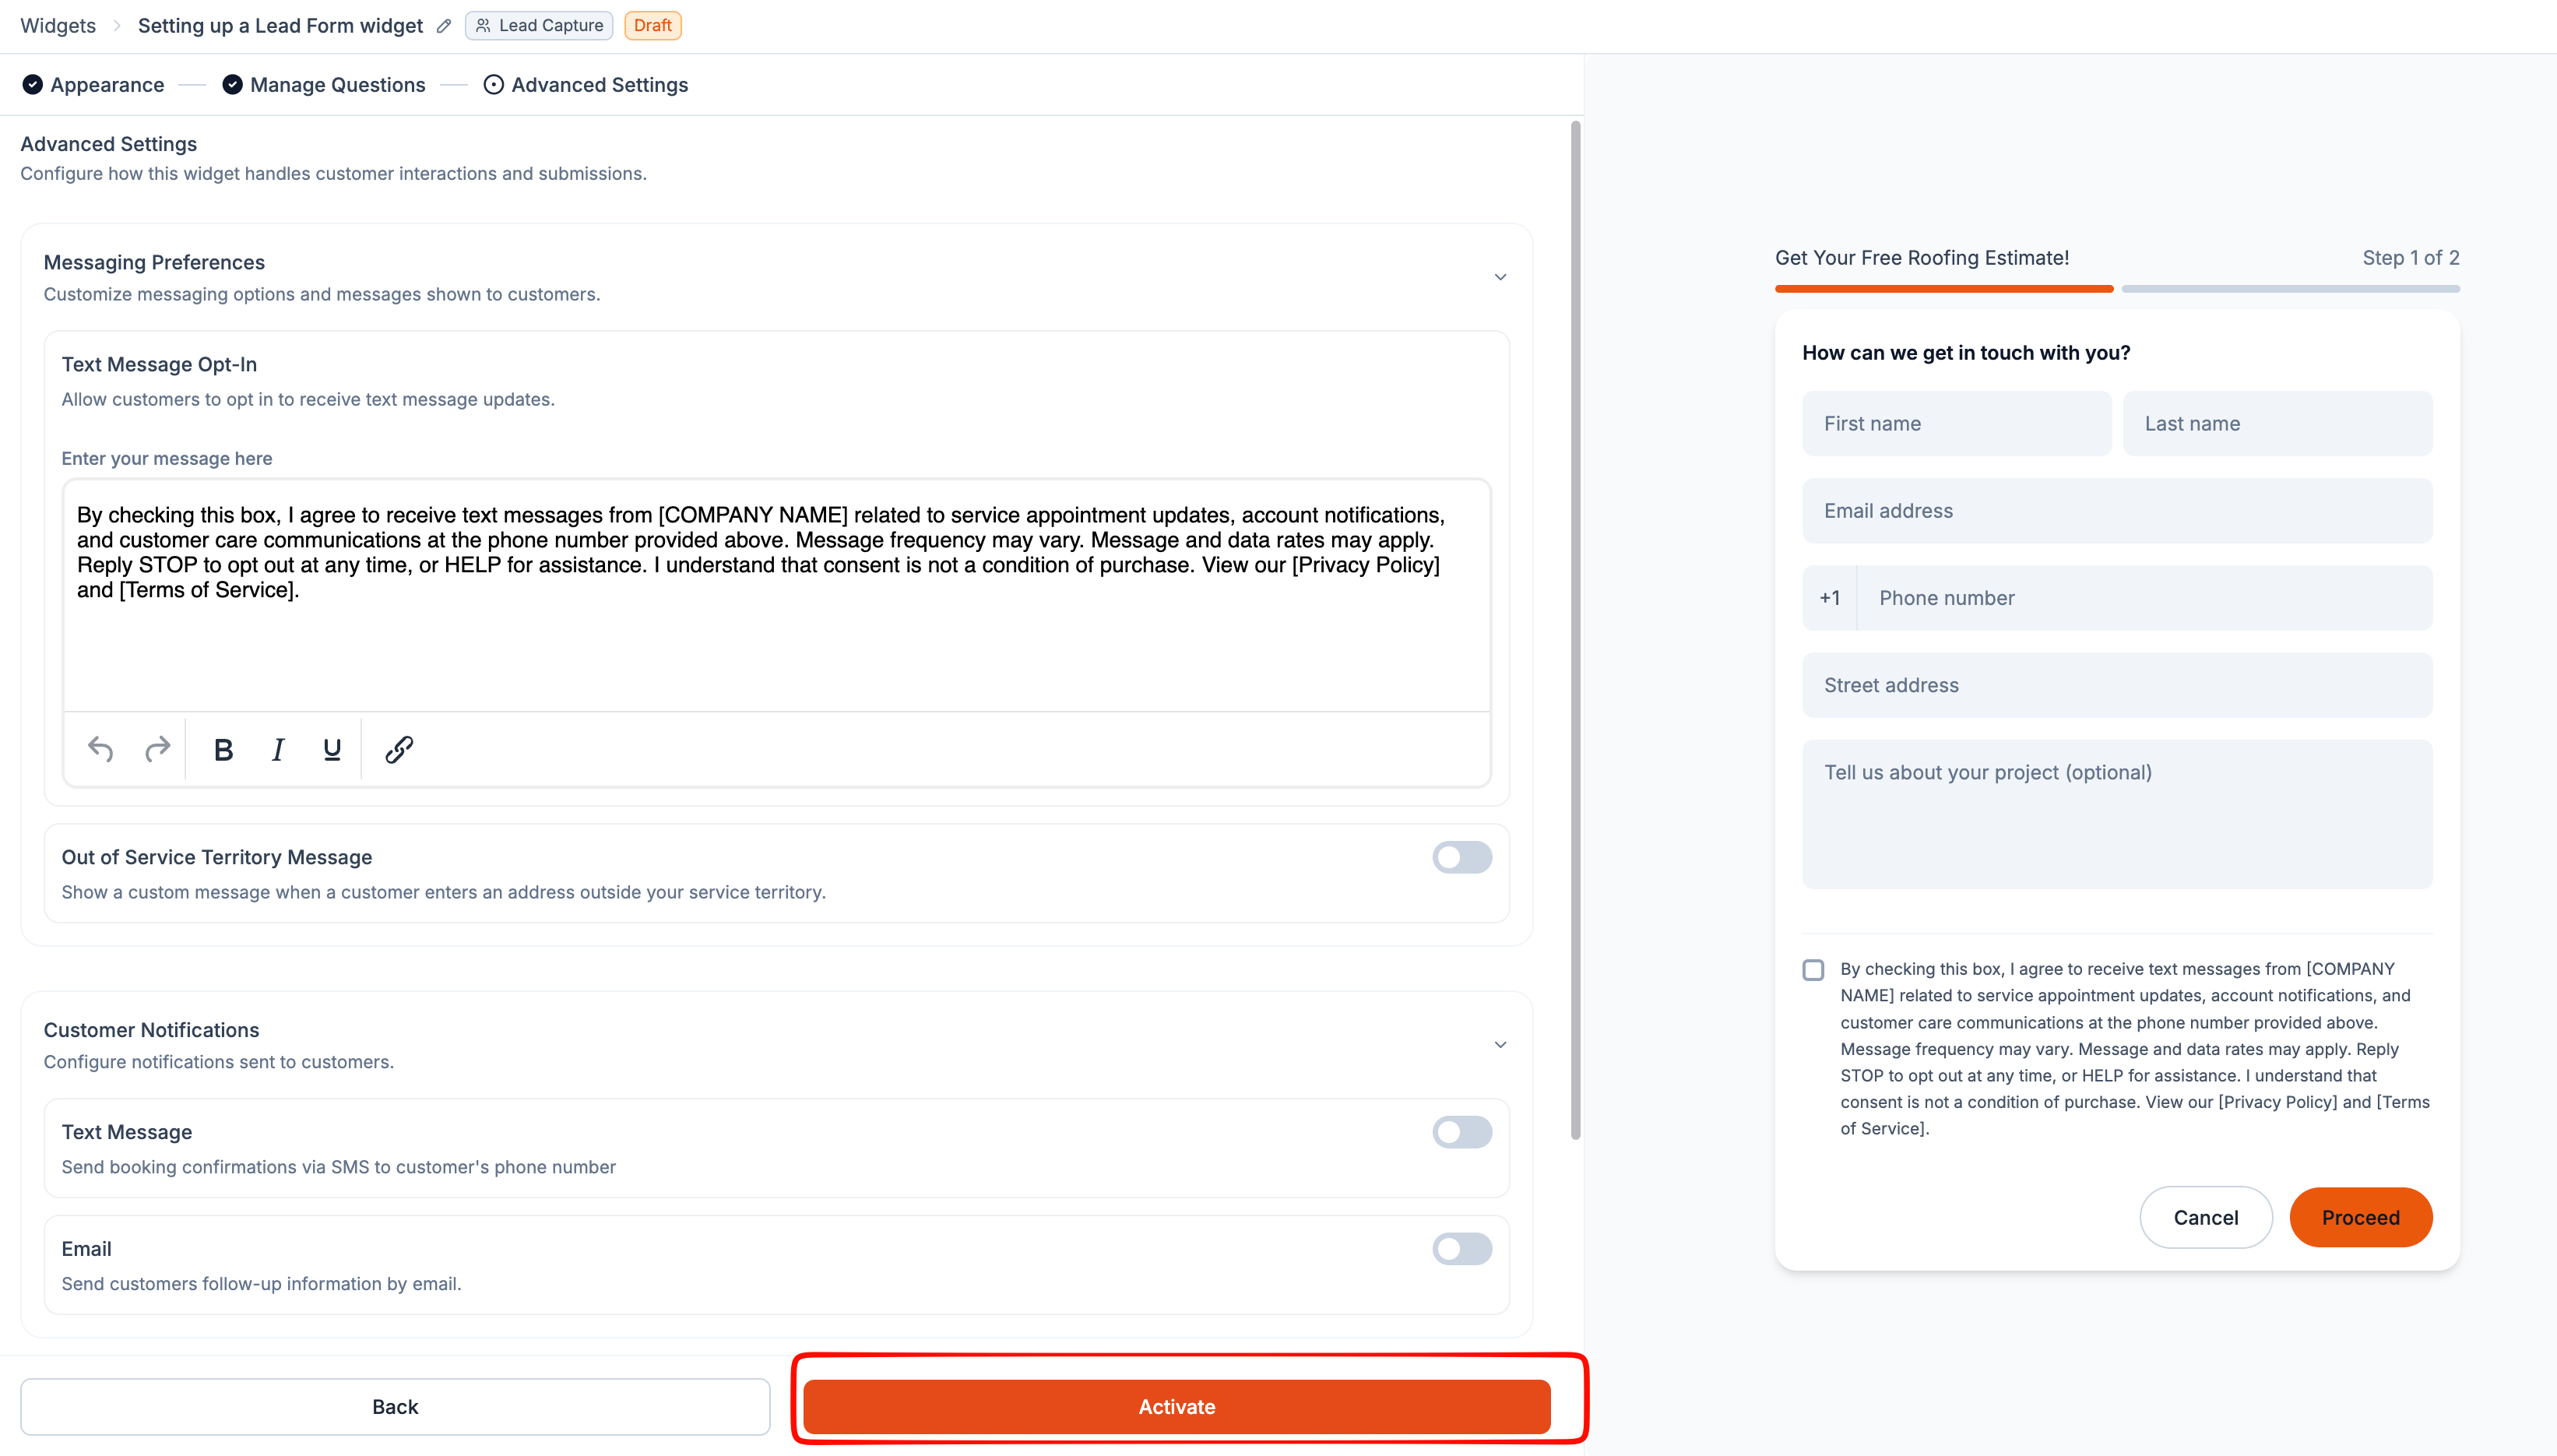 After activation, Zuper generates a public link, QR code, and embed code. You can use these to add the form to your website or share it directly with homeowners. See \[Sharing and embedding your widget]