> ## Documentation Index
> Fetch the complete documentation index at: https://docs.zuper.co/llms.txt
> Use this file to discover all available pages before exploring further.
# SRS Setup
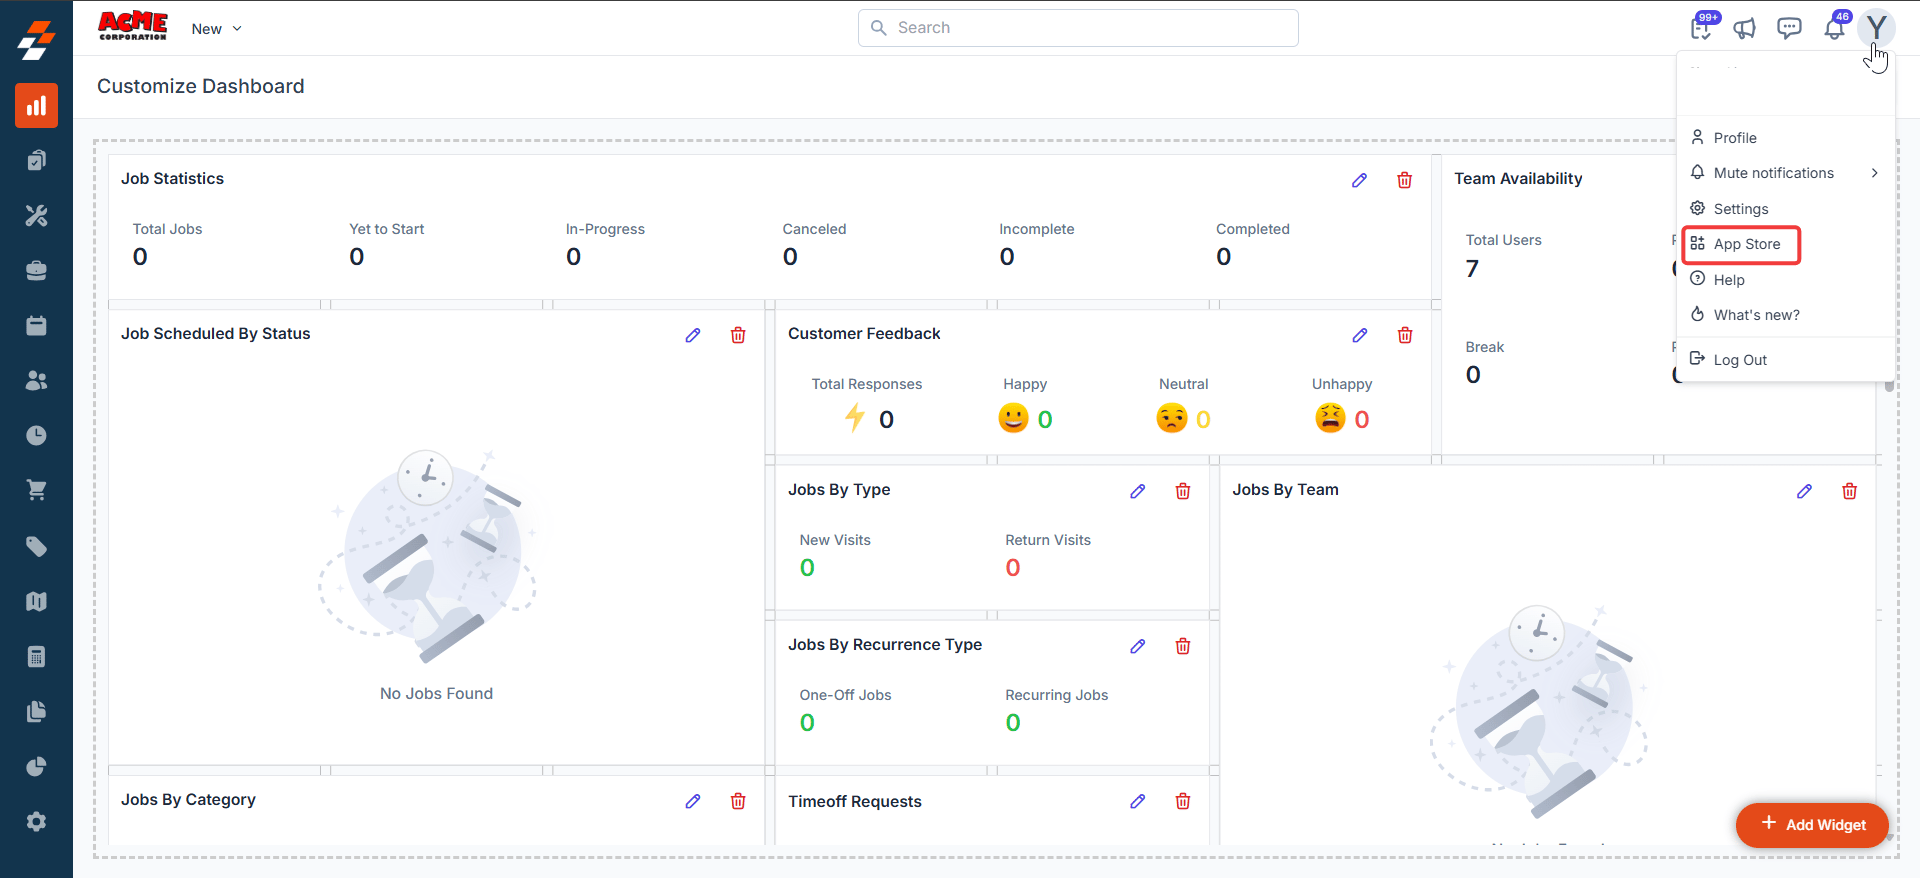
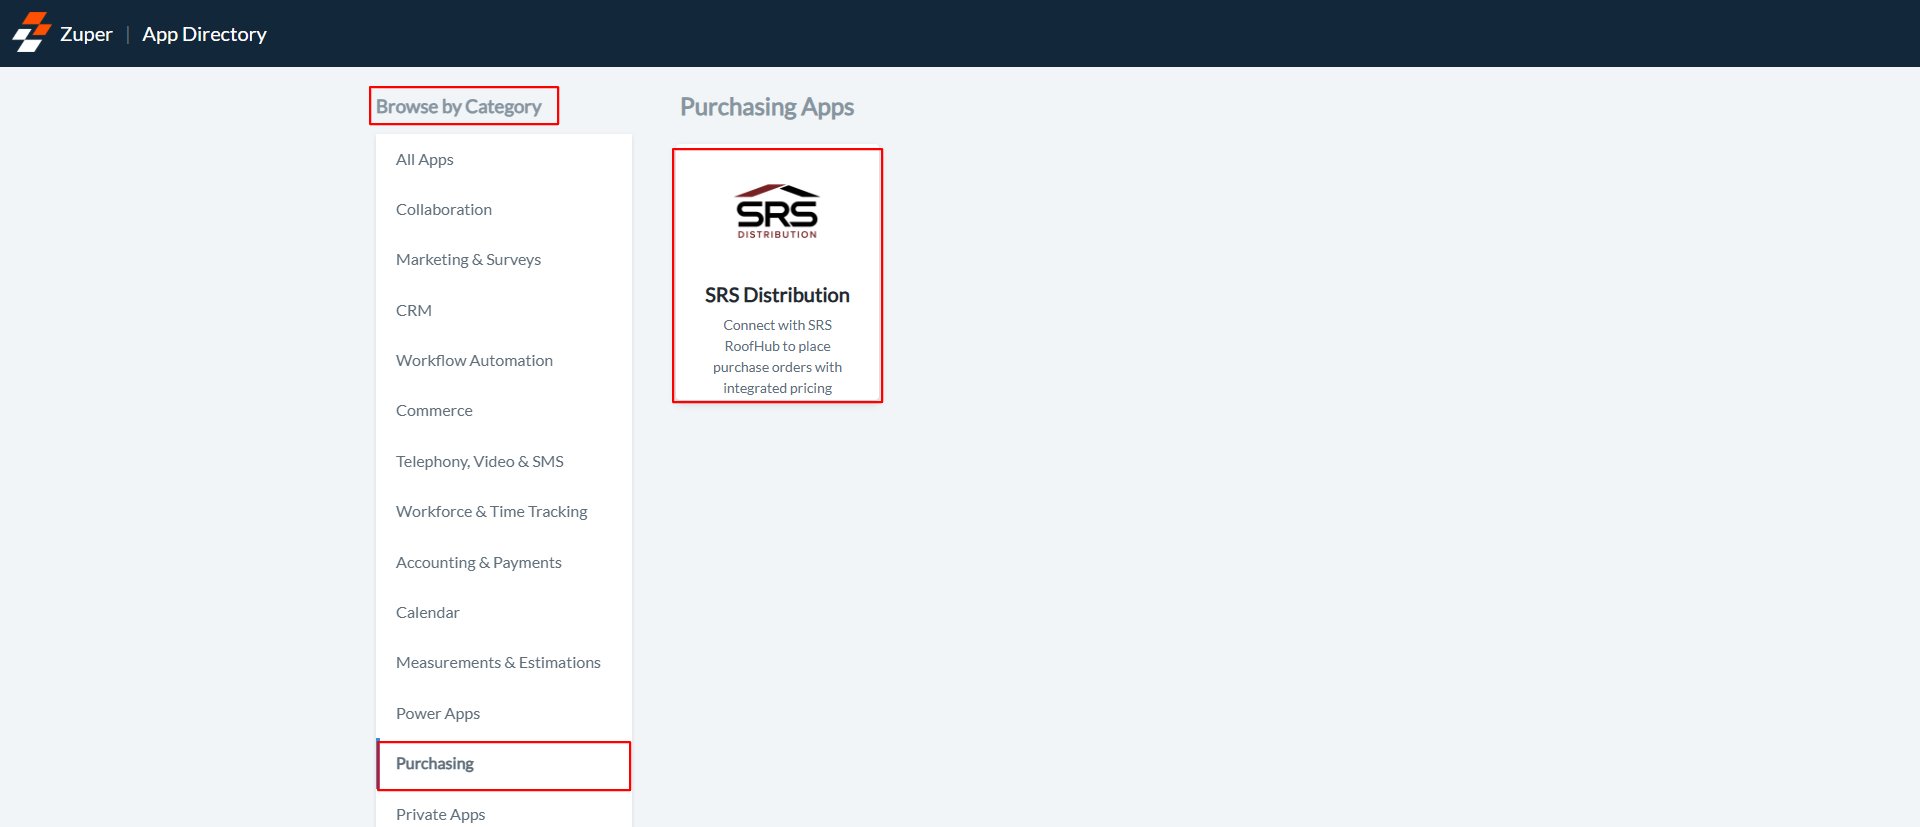
**Navigation**: *Profile menu → App Store → Purchasing → SRS Distribution*
## Overview
The SRS Distribution integration connects Zuper directly to your SRS RoofHub account, so your team can order roofing materials without switching between systems. Once connected, Zuper pulls live branch pricing into every estimate and purchase order you create, refreshing prices automatically every day. When an order ships, delivery updates, proof of delivery, and the supplier invoice appear directly on the purchase order in Zuper — giving everyone on your team a single place to track materials from quote to delivery.
To get started, you install the app, verify your SRS account, and choose the branches you order from. Each branch connects to a job account, and you set one branch as your preferred branch for daily pricing updates. The sections below walk you through each step in order.
***
## Before you begin
Have the following ready before you install the integration. Gathering these in advance prevents interruptions during the setup steps:
* Your **SRS Customer Code** (also called your account number). You will find it in the account details section of any SRS invoice.
* A recent SRS invoice issued more than two days ago. You will need the **Invoice Number** and **Invoice Date** to verify your account.
* Alternatively, your **SRS Integration Key**. Go to **Integrations → Integration Key** in your RoofHub account to find it.
* Your **Zuper API Key**. Your Zuper administrator can provide this.
***
## Install the SRS Distribution app
1. Select your profile icon at the top right of the Zuper dashboard. From the dropdown menu, select **App Store**.
 2. In the **Browse by Category** panel on the left, select **Purchasing**. Select the **SRS Distribution** app card.
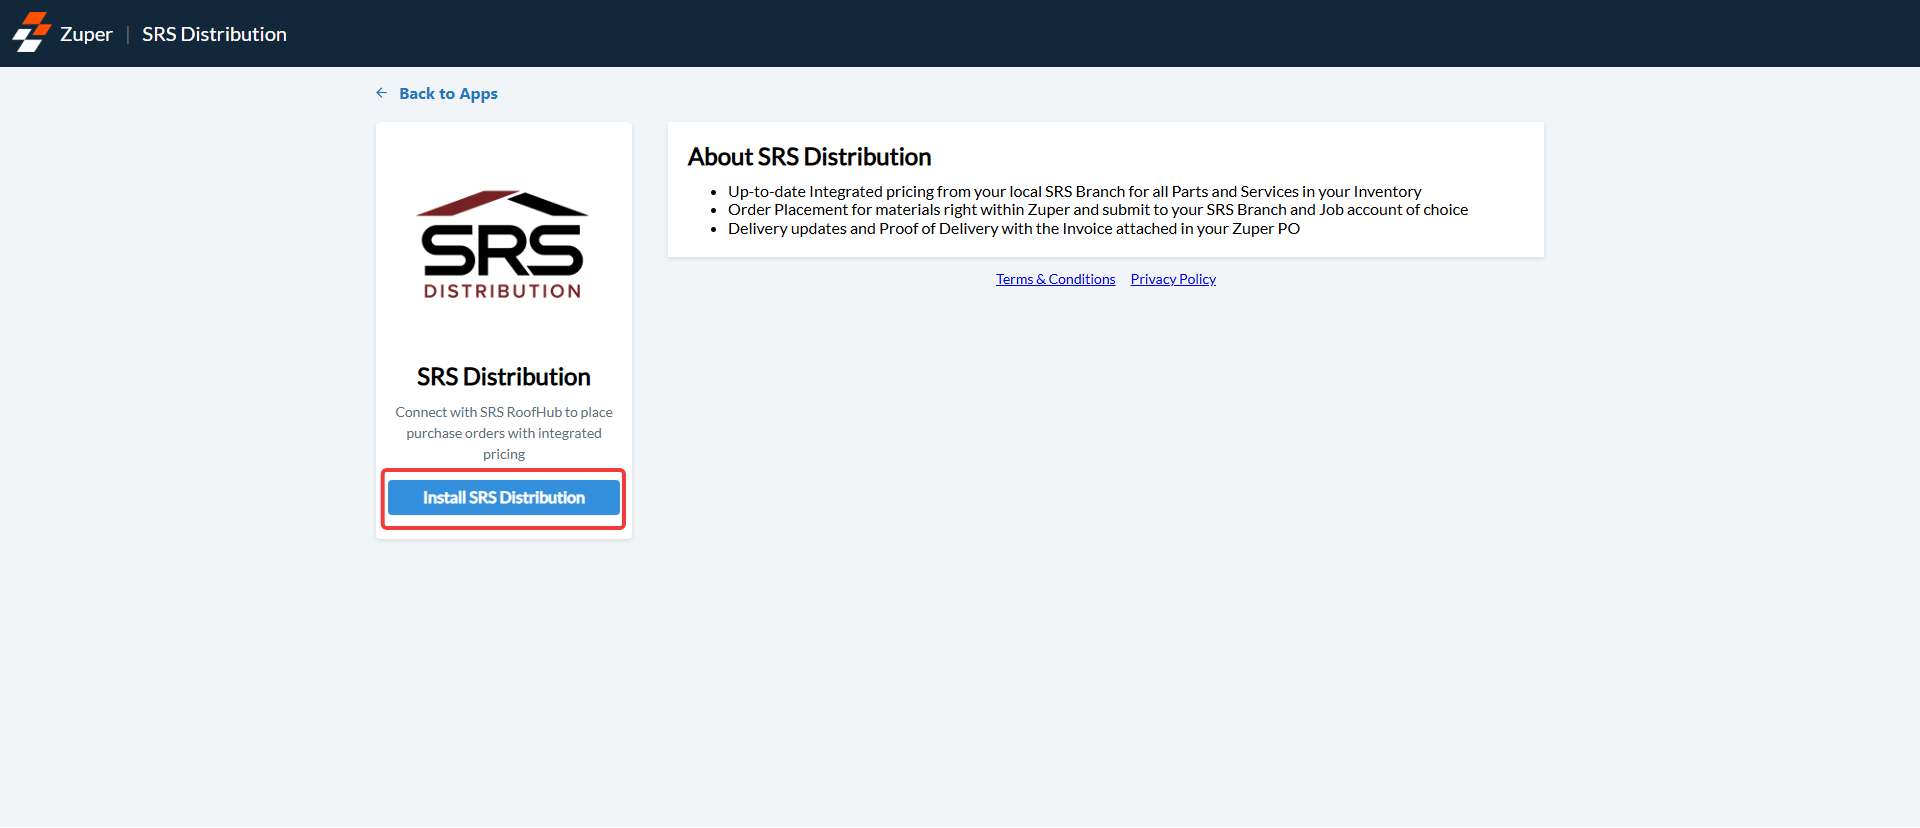
 3. On the app detail page, select **Install App**.
 The **Account Validation** screen opens. Continue to the next section to verify your account.
***
## Validate your SRS account
Zuper offers two ways to verify your account. Use whichever method you have credentials for.
### Method 1: Verify with invoice details
Use this method if you have a recent SRS invoice that is more than two days old.
1. In the **Customer Code** field, enter your SRS account number.
2. In the **Invoice Number** field, enter the invoice number from your SRS invoice.
3. In the **Invoice Date** field, enter the invoice date.
4. In the **Zuper API Key** field, enter your Zuper API key.
5. Select **Update**.
The **Account Validation** screen opens. Continue to the next section to verify your account.
***
## Validate your SRS account
Zuper offers two ways to verify your account. Use whichever method you have credentials for.
### Method 1: Verify with invoice details
Use this method if you have a recent SRS invoice that is more than two days old.
1. In the **Customer Code** field, enter your SRS account number.
2. In the **Invoice Number** field, enter the invoice number from your SRS invoice.
3. In the **Invoice Date** field, enter the invoice date.
4. In the **Zuper API Key** field, enter your Zuper API key.
5. Select **Update**.
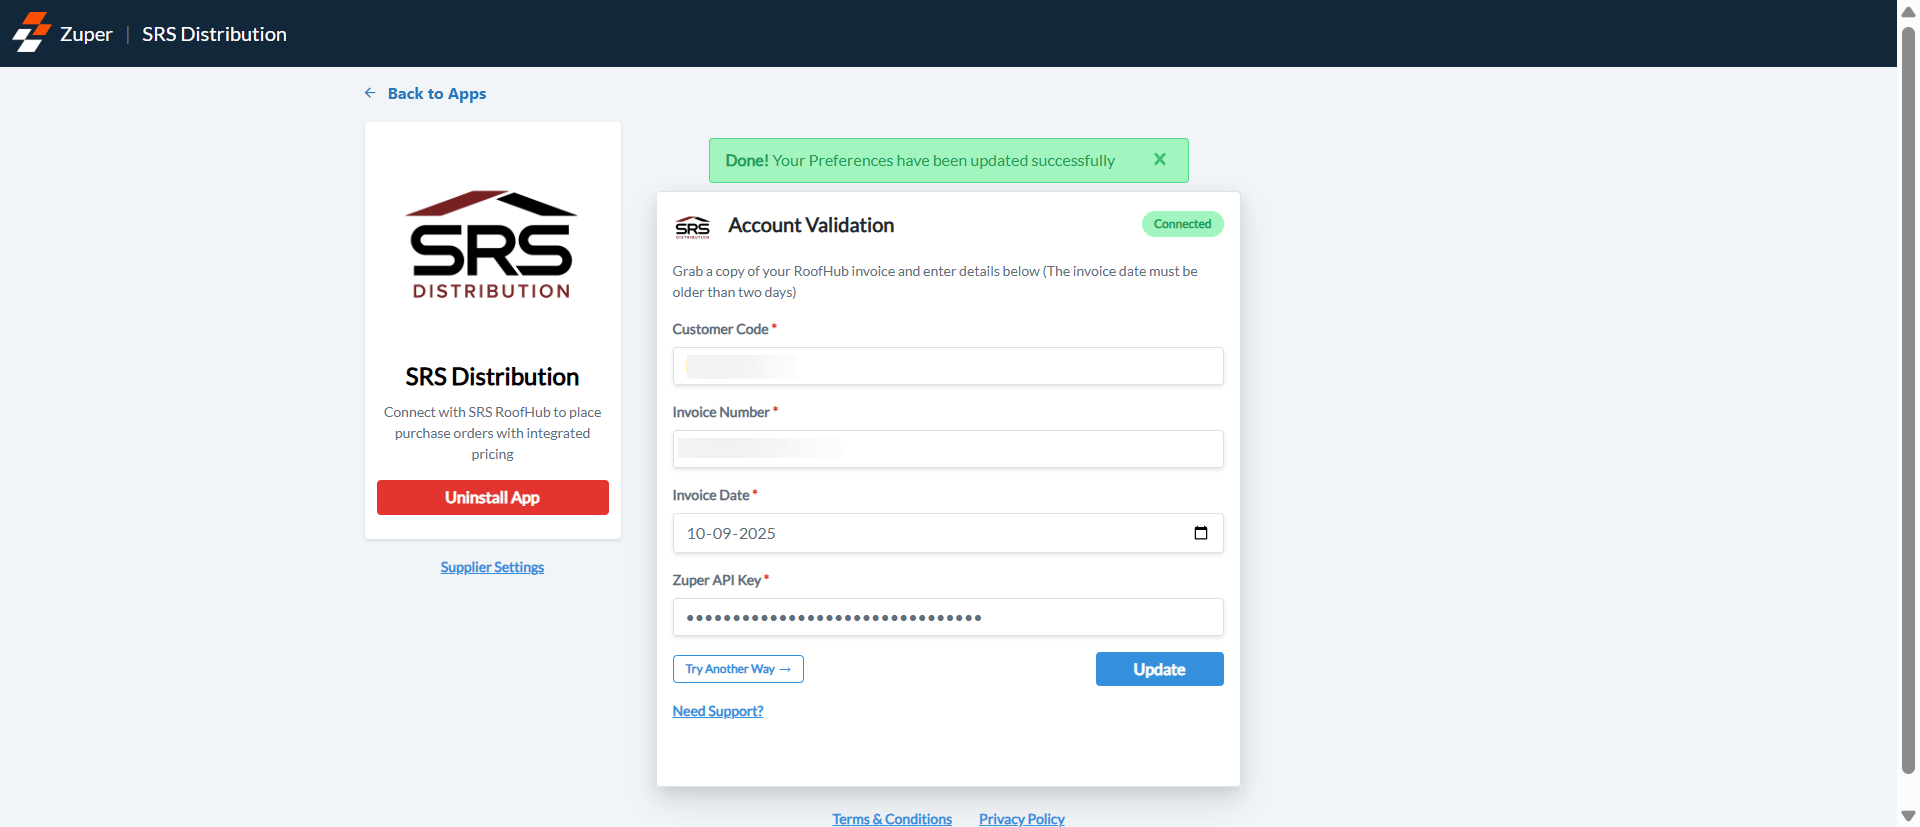 Zuper verifies your credentials with SRS. When the connection succeeds, the status badge changes to **Connected**.
The invoice date must be more than two days in the past. A same-day or next-day invoice will cause validation to fail.
### Method 2: Verify with an integration key
Use this method if you do not have a recent invoice available.
1. Select **Try Another Way** on the **Account Validation** screen.
2. In the **Customer Code** field, enter your SRS account number.
3. In the **Integration Key** field, enter the key from your RoofHub account. To find it, go to **Integrations → Integration Key** in RoofHub.
4. In the **Zuper API Key** field, enter your Zuper API key.
5. Select **Update**.
Zuper verifies your credentials with SRS. When the connection succeeds, the status badge changes to **Connected**.
The invoice date must be more than two days in the past. A same-day or next-day invoice will cause validation to fail.
### Method 2: Verify with an integration key
Use this method if you do not have a recent invoice available.
1. Select **Try Another Way** on the **Account Validation** screen.
2. In the **Customer Code** field, enter your SRS account number.
3. In the **Integration Key** field, enter the key from your RoofHub account. To find it, go to **Integrations → Integration Key** in RoofHub.
4. In the **Zuper API Key** field, enter your Zuper API key.
5. Select **Update**.
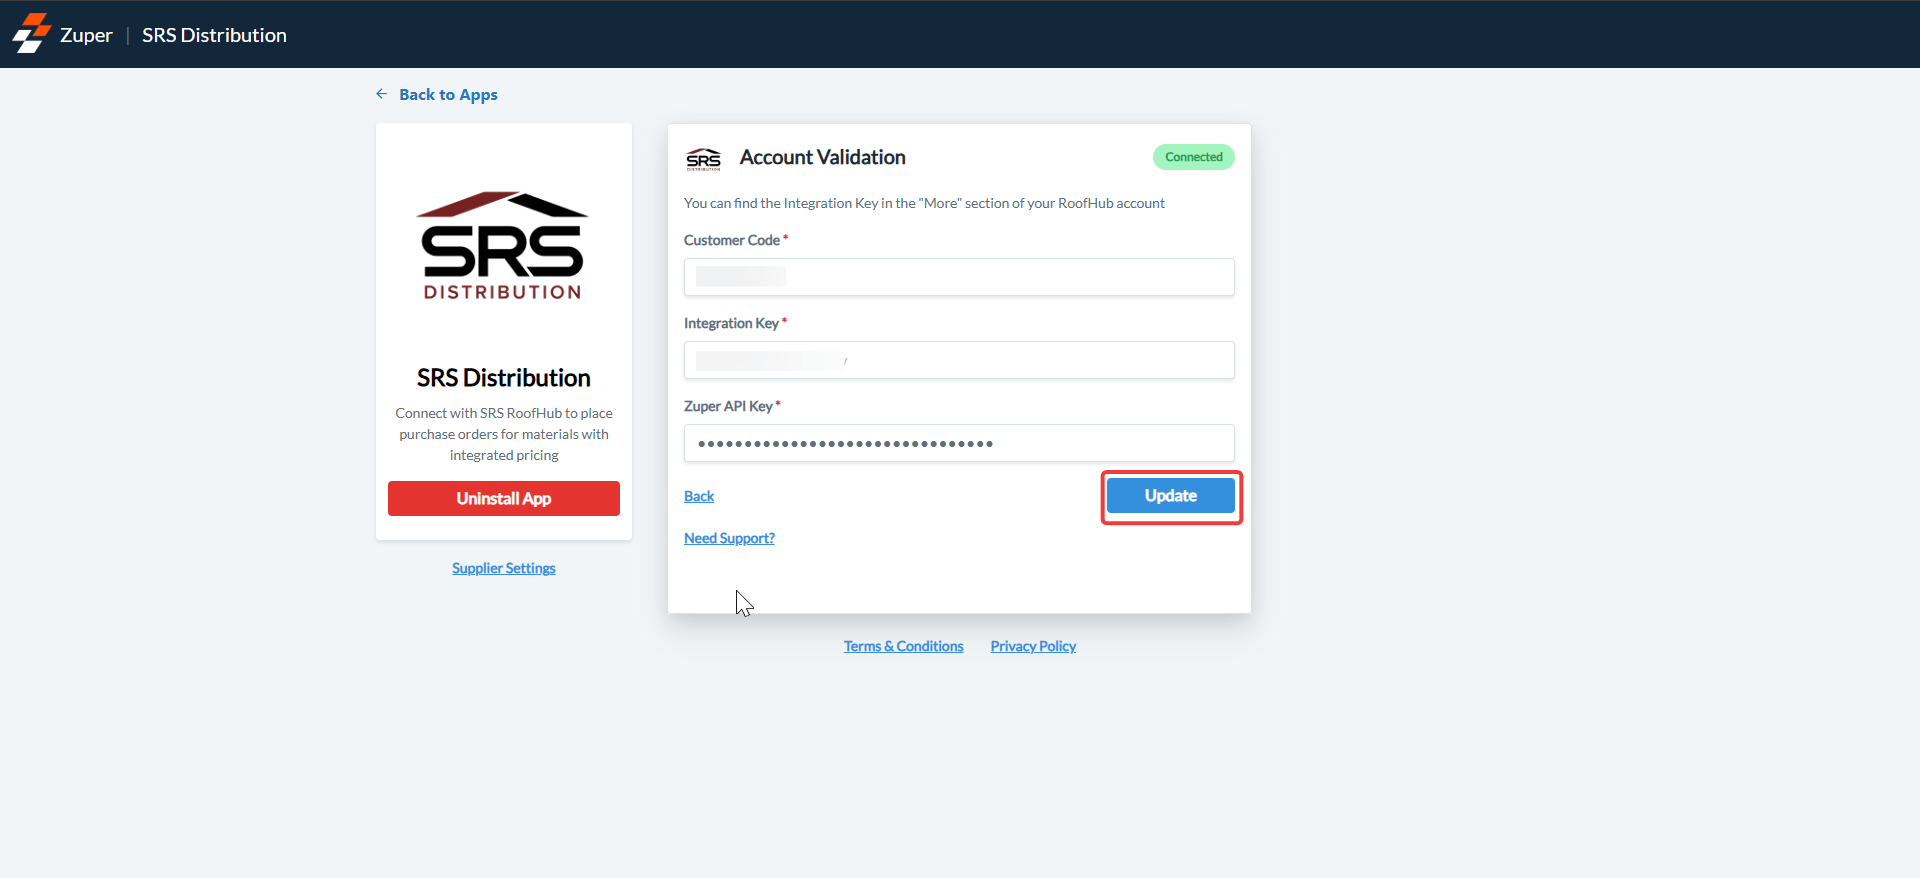 When the connection succeeds, the status badge changes to **Connected**.
If validation fails, confirm that your **Customer Code** is correct and that your invoice details match your SRS account exactly. Select **Update** again after correcting your details. If the issue continues, contact [support@zuper.co](mailto:support@zuper.co).
***
## Choose your branches
After your account is validated, Zuper loads the SRS branches linked to your account. You select the branches you order from and assign a job account to each one.
1. From the app detail page, select **Supplier Settings**. The branch setup screen opens.
2. On the **Choose Branches** step, review the list of SRS branches near your location. A map shows their positions alongside the list.
3. Select the checkbox next to each branch you want to use in Zuper.
4. For each selected branch, open the **Select Job Account** dropdown and select the job account to use for orders at that branch.
5. To set one branch as your preferred branch, select the star icon next to it. Zuper uses the preferred branch for daily pricing updates across your catalog.
You must assign a job account to every branch you select. Zuper uses this account when placing orders at that branch. You can change job accounts and update your preferred branch at any time from **Supplier Settings**.
***
## Import product templates from SRS
Zuper imports your product catalog from the order templates you have already built in SRS RoofHub. Each template groups products you order regularly — for example, by manufacturer or shingle type. Importing from templates rather than the full SRS catalog keeps your Zuper product list focused on what you actually use.
1. On the **Import Template** step, review the list of templates available in your RoofHub account. Each row shows the **Template ID**, **Template Name**, **Description**, and number of products.
2. Select the checkbox next to each template you want to import.
3. Select **Finish Setup** to begin the import. Zuper imports the selected templates in the background. Each product becomes a part in your **Parts and Services** catalog. Pricing updates automatically every day at 6:30 AM UTC.
Each template can only be imported once. If you add new products to a template in RoofHub after importing, those additions will not sync automatically. To bring in new templates created in RoofHub after the initial setup, use the **Import Templates** tab in **Supplier Settings** at any time.
If no templates appear, your RoofHub account does not have any order templates set up. Create templates of your frequently ordered products in RoofHub first, then return to Zuper to import them.
When the connection succeeds, the status badge changes to **Connected**.
If validation fails, confirm that your **Customer Code** is correct and that your invoice details match your SRS account exactly. Select **Update** again after correcting your details. If the issue continues, contact [support@zuper.co](mailto:support@zuper.co).
***
## Choose your branches
After your account is validated, Zuper loads the SRS branches linked to your account. You select the branches you order from and assign a job account to each one.
1. From the app detail page, select **Supplier Settings**. The branch setup screen opens.
2. On the **Choose Branches** step, review the list of SRS branches near your location. A map shows their positions alongside the list.
3. Select the checkbox next to each branch you want to use in Zuper.
4. For each selected branch, open the **Select Job Account** dropdown and select the job account to use for orders at that branch.
5. To set one branch as your preferred branch, select the star icon next to it. Zuper uses the preferred branch for daily pricing updates across your catalog.
You must assign a job account to every branch you select. Zuper uses this account when placing orders at that branch. You can change job accounts and update your preferred branch at any time from **Supplier Settings**.
***
## Import product templates from SRS
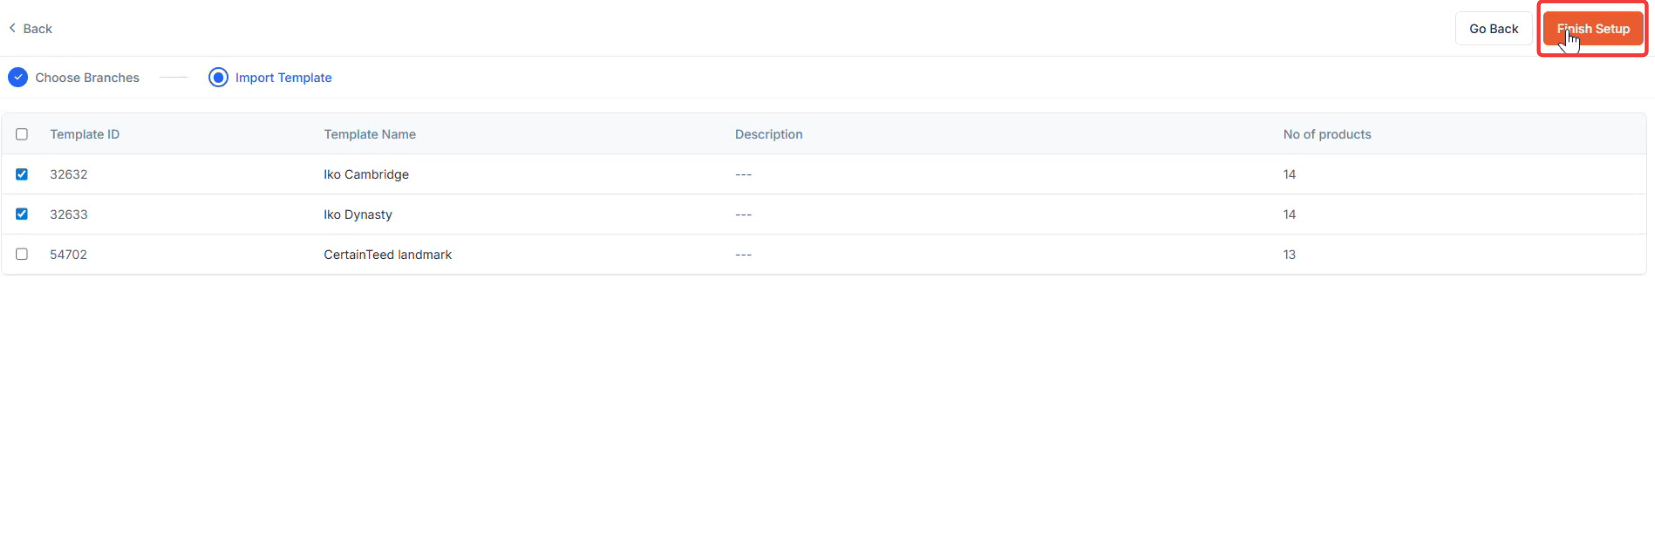
Zuper imports your product catalog from the order templates you have already built in SRS RoofHub. Each template groups products you order regularly — for example, by manufacturer or shingle type. Importing from templates rather than the full SRS catalog keeps your Zuper product list focused on what you actually use.
1. On the **Import Template** step, review the list of templates available in your RoofHub account. Each row shows the **Template ID**, **Template Name**, **Description**, and number of products.
2. Select the checkbox next to each template you want to import.
3. Select **Finish Setup** to begin the import. Zuper imports the selected templates in the background. Each product becomes a part in your **Parts and Services** catalog. Pricing updates automatically every day at 6:30 AM UTC.
Each template can only be imported once. If you add new products to a template in RoofHub after importing, those additions will not sync automatically. To bring in new templates created in RoofHub after the initial setup, use the **Import Templates** tab in **Supplier Settings** at any time.
If no templates appear, your RoofHub account does not have any order templates set up. Create templates of your frequently ordered products in RoofHub first, then return to Zuper to import them.
.png?fit=max&auto=format&n=F0kOJn5OlyUbOjIs&q=85&s=97dcc353f20435402adde6886ce2ea34) # Manage your branches
After setup, you can view and manage all connected SRS branches from the Branches listing page.
**Navigation**: *Settings → Parts and Services Settings → Supplier Integrations → SRS Distribution*
The **Branches** listing page shows each branch name, address, assigned SRS job account, and status.
### Add a branch
1. Go to **Settings → Parts and Services Settings → Supplier Integrations → SRS Distribution**.
2. Select **+ Add Branch** at the top right.
3. Select the new branch from the list and assign a job account to it.
4. Select **Save**.
Branches you have already added appear pre-selected and cannot be removed from this screen.
### Edit a branch
1. On the **Branches** listing page, hover over the branch you want to update.
2. Select the pencil icon that appears on the right.
3. Update the job account details.
4. Select **Save**.
### Set a preferred branch
1. On the **Branches** listing page, locate the branch you want to set as your preferred branch.
2. Select the star icon next to it. A filled star indicates the preferred branch.
Zuper uses the preferred branch for daily catalog pricing updates.
Only one branch can be set as preferred at a time. Selecting a new preferred branch removes the designation from the previous one.
### Deactivate a branch
1. On the **Branches** listing page, hover over the branch you want to deactivate.
2. Select the deactivate icon that appears on the right.
3. In the confirmation dialog, select **Deactivate** to confirm.
Deactivated branches remain in your account and continue to receive pricing updates. However, they are not available for selection when creating estimates or purchase orders.
***
## Disconnect the SRS Distribution integration
If you need to remove the SRS integration from your Zuper account, you can uninstall it from the App Store.
1. Go to your profile icon → **App Store → Purchasing → SRS Distribution**.
2. Select **Uninstall App** on the left panel.
3. In the confirmation dialog, select **Uninstall App** to confirm.
Uninstalling removes your account connection and branch configuration. Your existing parts and vendor records in Zuper are not deleted, but they may no longer receive SRS pricing updates.
***
## FAQs
You need your SRS Customer Code and either a recent invoice (more than two days old) or your SRS RoofHub Integration Key. You also need your Zuper API key, which your Zuper administrator can provide.
Yes. You can connect as many branches as your SRS account supports. Each branch requires a job account assignment before it can be used for orders.
Zuper uses the preferred branch as a fallback when no branch is selected during pricing. The preferred vendor is also pre-filled in Quotes and Proposals.
A deactivated branch remains in your account and continues to receive daily pricing updates. It is not available for selection when creating estimates or purchase orders. You can reactivate it at any time.
No. Your existing parts and vendor records in Zuper are not deleted when you uninstall the app. However, those records will no longer receive SRS pricing updates.
Confirm that your Customer Code matches your SRS account exactly and that the invoice you are using is more than two days old. If you are using an Integration Key, verify that you copied the key correctly from your RoofHub account. If the issue continues, contact [support@zuper.co](mailto:support@zuper.co).
***
## Related articles
* [Linking SRS products to your Parts and Services catalog](/parts-and-services/srs-catalog-linking)
* [Creating a CPQ proposal with SRS pricing](/accounting/proposals/srs-cpq-proposal)
* [Parts and Services overview](/parts-and-services/overview)
* [Managing vendors in Parts and Services](/parts-and-services/vendors)
* [Supplier integrations settings](/settings/supplier-integrations)
# Manage your branches
After setup, you can view and manage all connected SRS branches from the Branches listing page.
**Navigation**: *Settings → Parts and Services Settings → Supplier Integrations → SRS Distribution*
The **Branches** listing page shows each branch name, address, assigned SRS job account, and status.
### Add a branch
1. Go to **Settings → Parts and Services Settings → Supplier Integrations → SRS Distribution**.
2. Select **+ Add Branch** at the top right.
3. Select the new branch from the list and assign a job account to it.
4. Select **Save**.
Branches you have already added appear pre-selected and cannot be removed from this screen.
### Edit a branch
1. On the **Branches** listing page, hover over the branch you want to update.
2. Select the pencil icon that appears on the right.
3. Update the job account details.
4. Select **Save**.
### Set a preferred branch
1. On the **Branches** listing page, locate the branch you want to set as your preferred branch.
2. Select the star icon next to it. A filled star indicates the preferred branch.
Zuper uses the preferred branch for daily catalog pricing updates.
Only one branch can be set as preferred at a time. Selecting a new preferred branch removes the designation from the previous one.
### Deactivate a branch
1. On the **Branches** listing page, hover over the branch you want to deactivate.
2. Select the deactivate icon that appears on the right.
3. In the confirmation dialog, select **Deactivate** to confirm.
Deactivated branches remain in your account and continue to receive pricing updates. However, they are not available for selection when creating estimates or purchase orders.
***
## Disconnect the SRS Distribution integration
If you need to remove the SRS integration from your Zuper account, you can uninstall it from the App Store.
1. Go to your profile icon → **App Store → Purchasing → SRS Distribution**.
2. Select **Uninstall App** on the left panel.
3. In the confirmation dialog, select **Uninstall App** to confirm.
Uninstalling removes your account connection and branch configuration. Your existing parts and vendor records in Zuper are not deleted, but they may no longer receive SRS pricing updates.
***
## FAQs
You need your SRS Customer Code and either a recent invoice (more than two days old) or your SRS RoofHub Integration Key. You also need your Zuper API key, which your Zuper administrator can provide.
Yes. You can connect as many branches as your SRS account supports. Each branch requires a job account assignment before it can be used for orders.
Zuper uses the preferred branch as a fallback when no branch is selected during pricing. The preferred vendor is also pre-filled in Quotes and Proposals.
A deactivated branch remains in your account and continues to receive daily pricing updates. It is not available for selection when creating estimates or purchase orders. You can reactivate it at any time.
No. Your existing parts and vendor records in Zuper are not deleted when you uninstall the app. However, those records will no longer receive SRS pricing updates.
Confirm that your Customer Code matches your SRS account exactly and that the invoice you are using is more than two days old. If you are using an Integration Key, verify that you copied the key correctly from your RoofHub account. If the issue continues, contact [support@zuper.co](mailto:support@zuper.co).
***
## Related articles
* [Linking SRS products to your Parts and Services catalog](/parts-and-services/srs-catalog-linking)
* [Creating a CPQ proposal with SRS pricing](/accounting/proposals/srs-cpq-proposal)
* [Parts and Services overview](/parts-and-services/overview)
* [Managing vendors in Parts and Services](/parts-and-services/vendors)
* [Supplier integrations settings](/settings/supplier-integrations)