> ## Documentation Index
> Fetch the complete documentation index at: https://docs.zuper.co/llms.txt
> Use this file to discover all available pages before exploring further.
# Setup the integration
QuickBooks Desktop integration helps us push data from Zuper, such as Customers, Parts and services, Quotes, Invoices, and Payments, to QuickBooks Desktop.
The records pushed from Zuper will be reflected in the web connector. and if you have enabled auto sync, the records will be synced automatically; if not, you should update them manually.
## Install QuickBooks Desktop
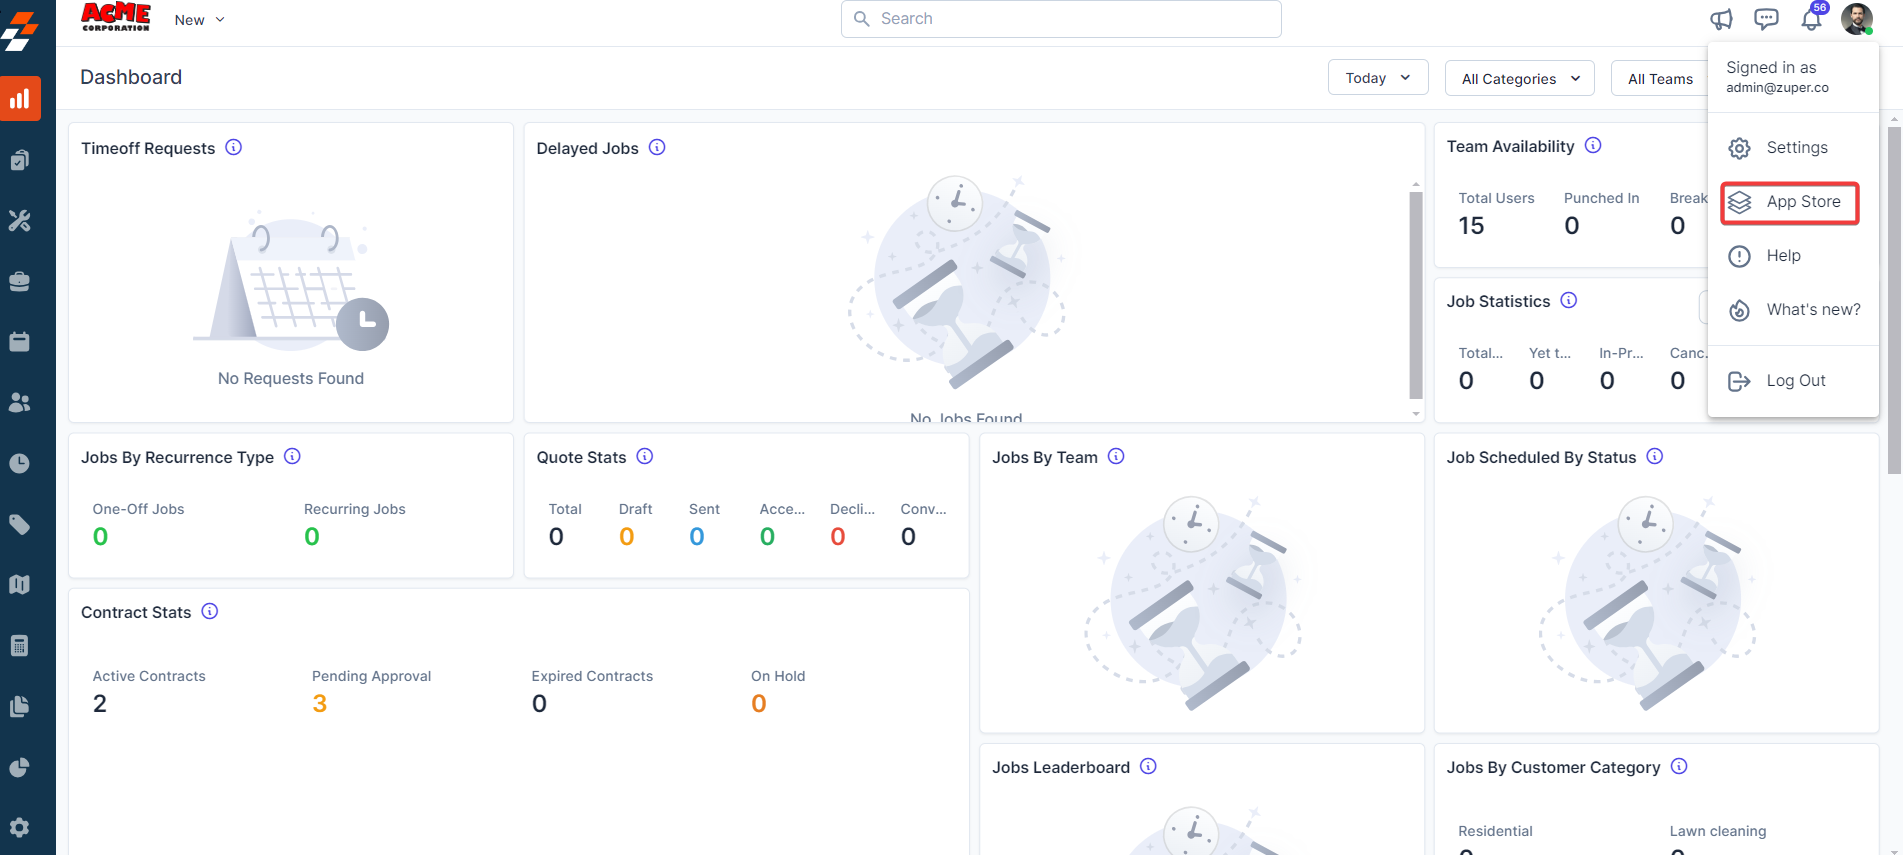
1. Once logged in to your Zuper account, open a new tab in your browser. Click on your Profile Picture at the top right corner of the screen and select the "**App Store**."
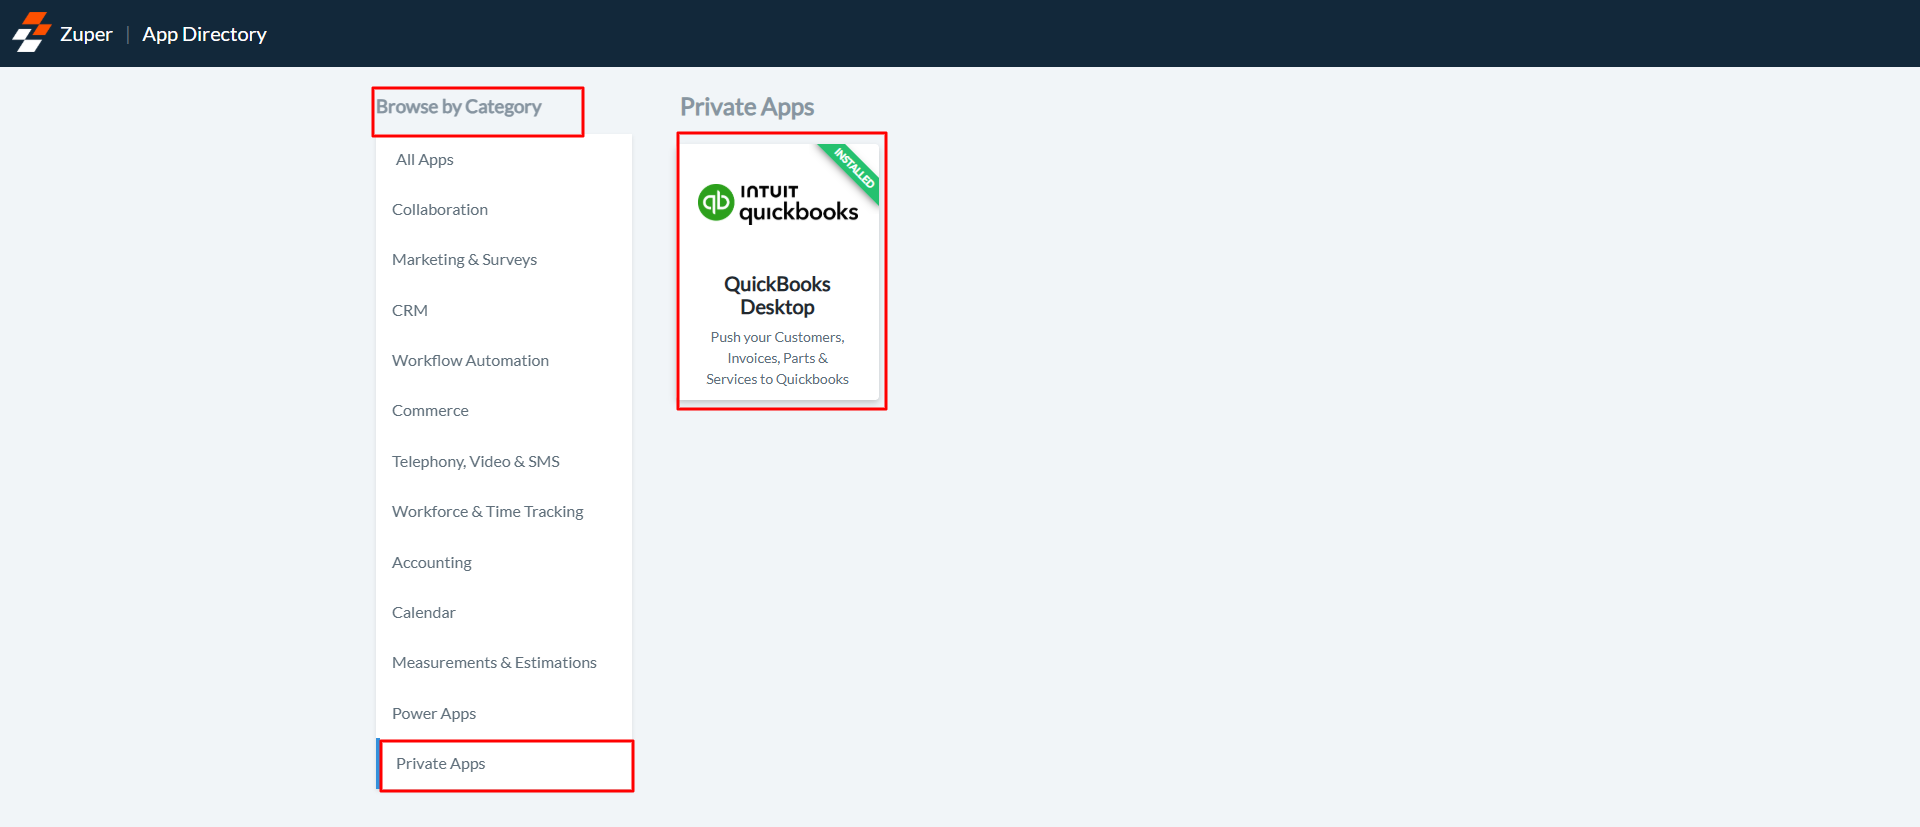
 2. Under the "**Browse by Category**," select the "**Private Apps**" option and choose "**QuickBooks Desktop**."
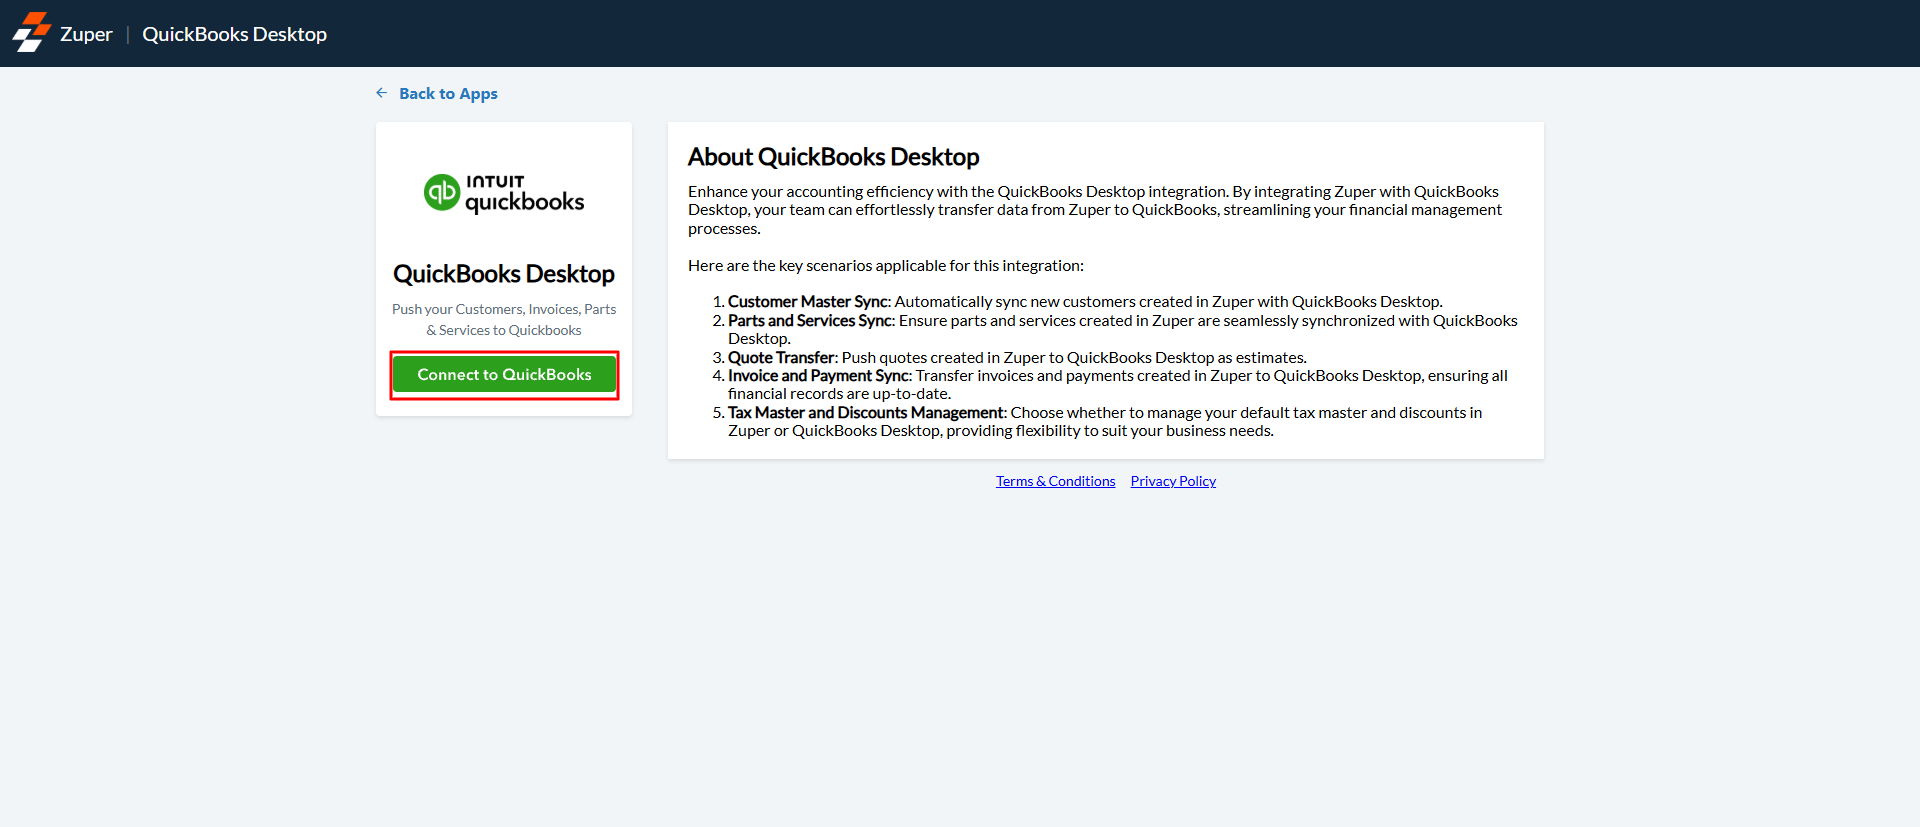
 3. Click on the "**Connect to QuickBooks**" button.
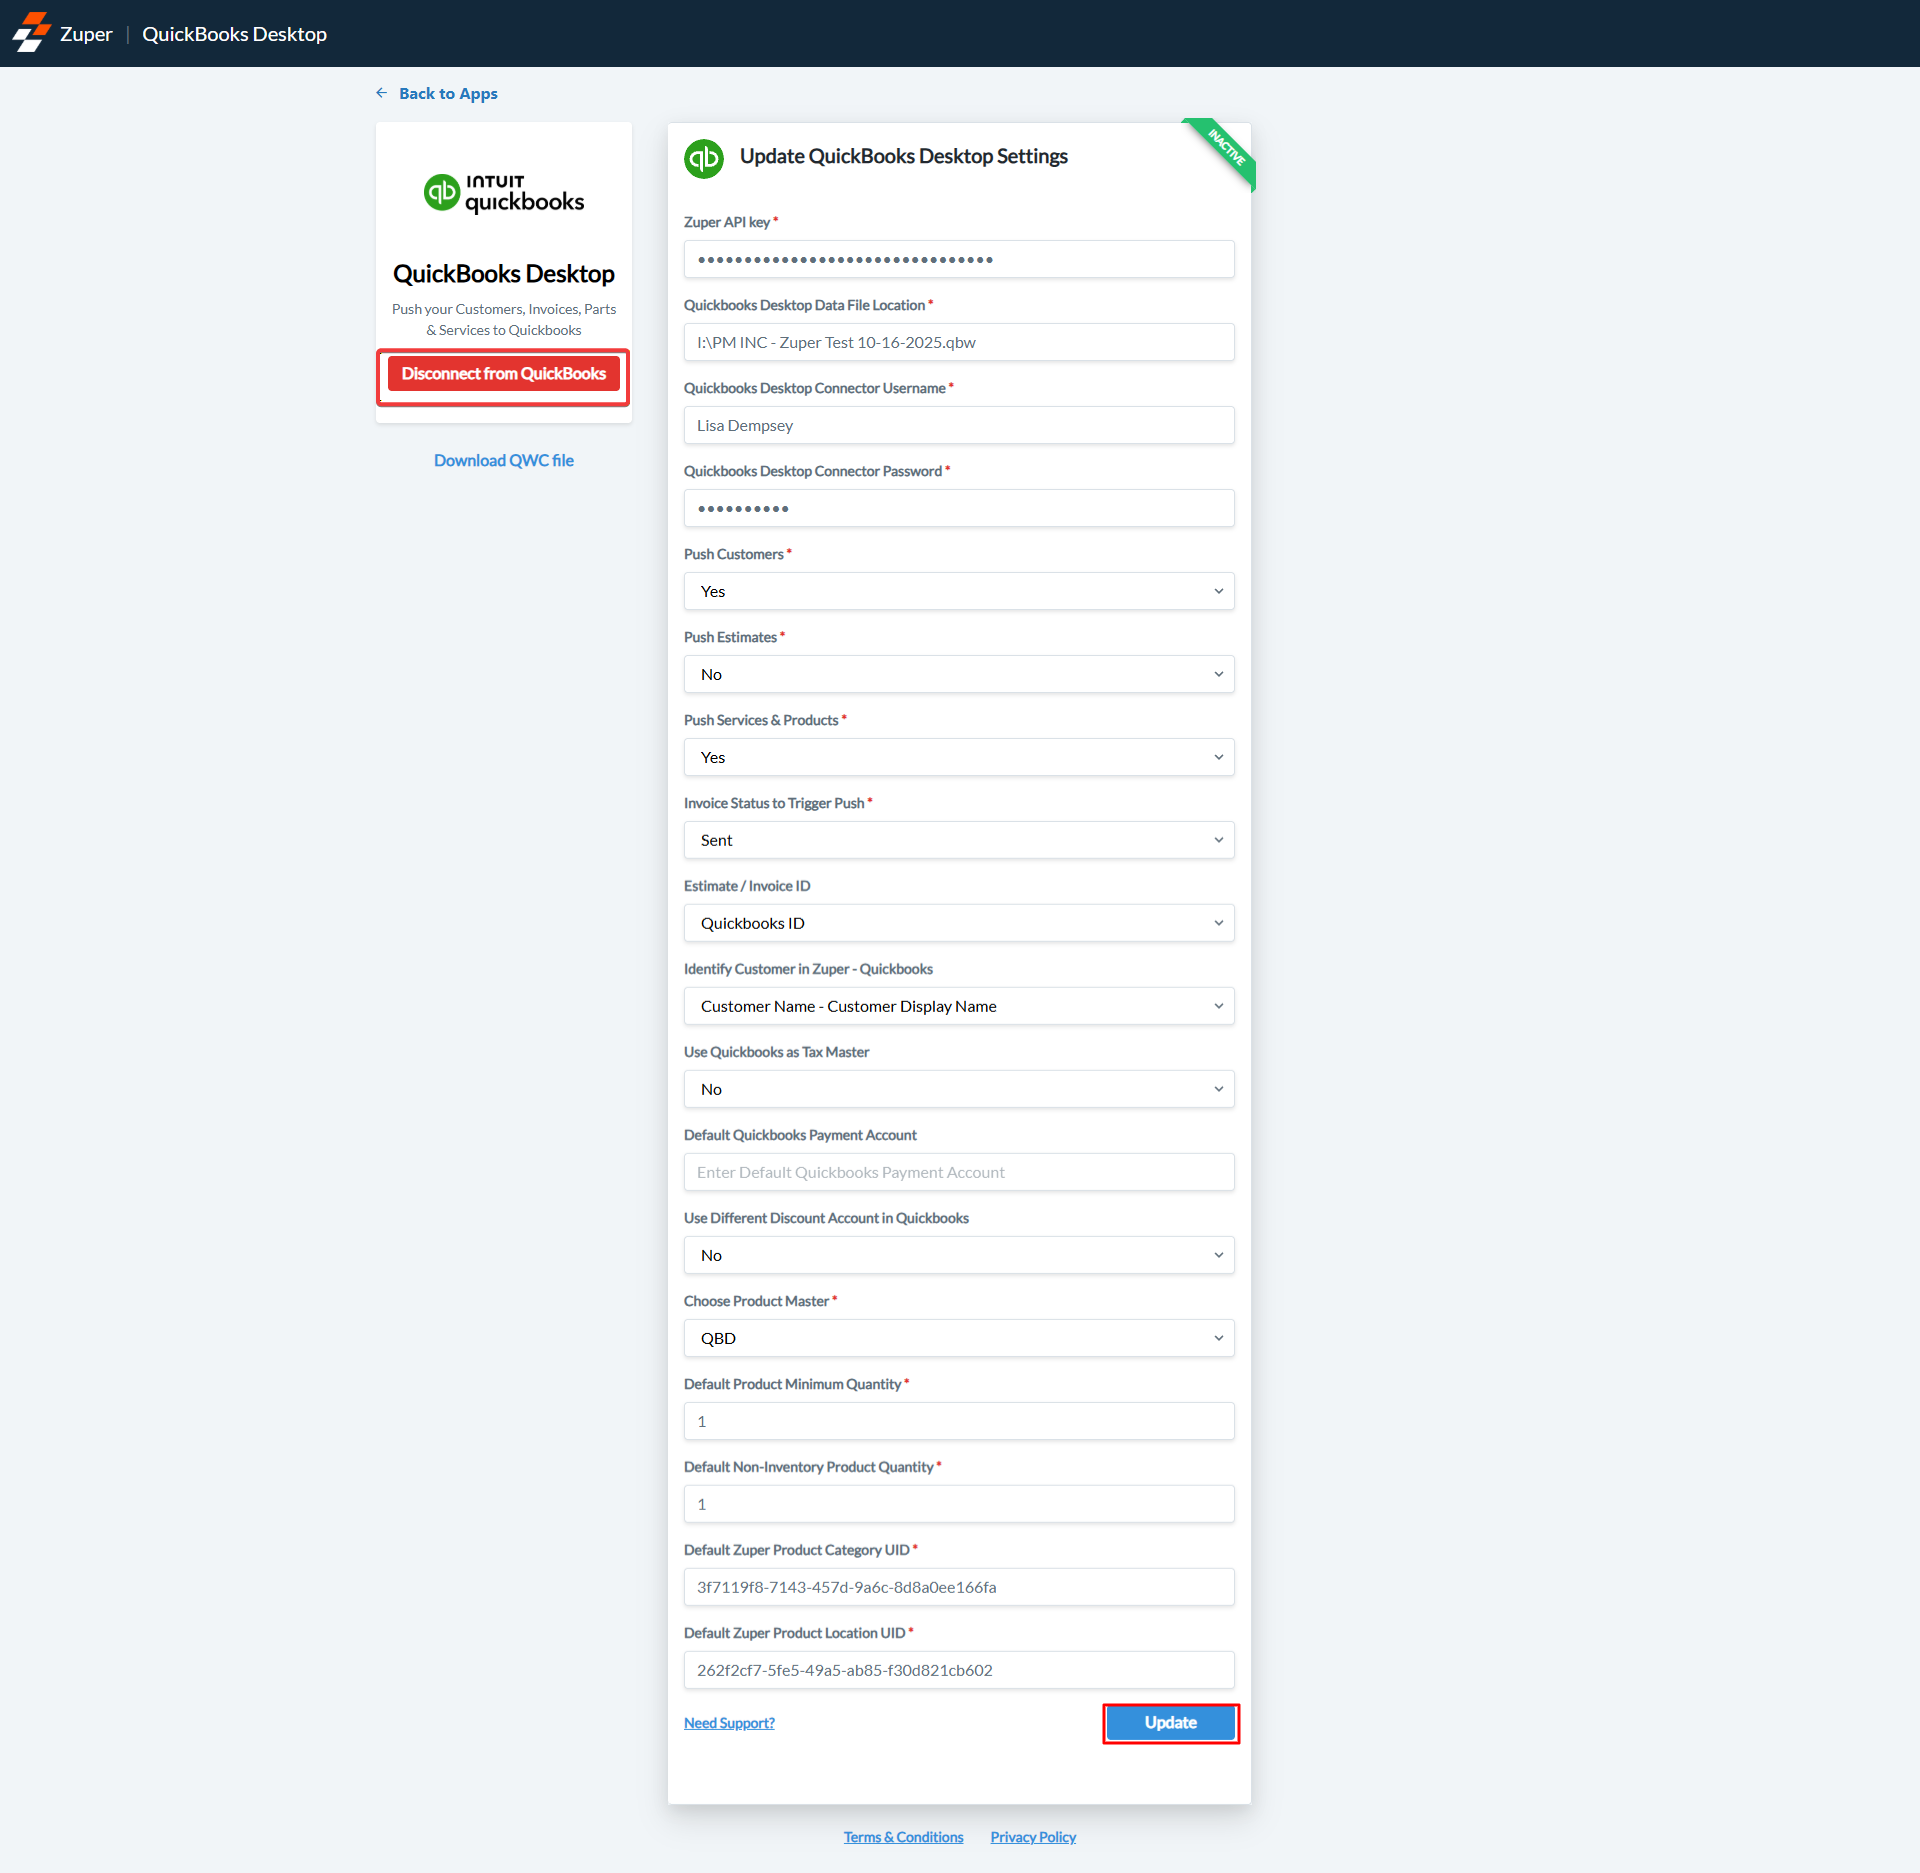
 4. Update Zuper Settings by configuring the following fields:
a. Zuper API Key (**Mandatory**) – Refer to the steps below to create the Zuper API. To create the Zuper API, refer to the below steps:
If you are trying to integrate Zuper with any external systems, you will need an API key to access the Zuper APIs. To generate API (Application Programming Interface) Key, please follow the below steps.
1. Log in to Zuper with an admin account.
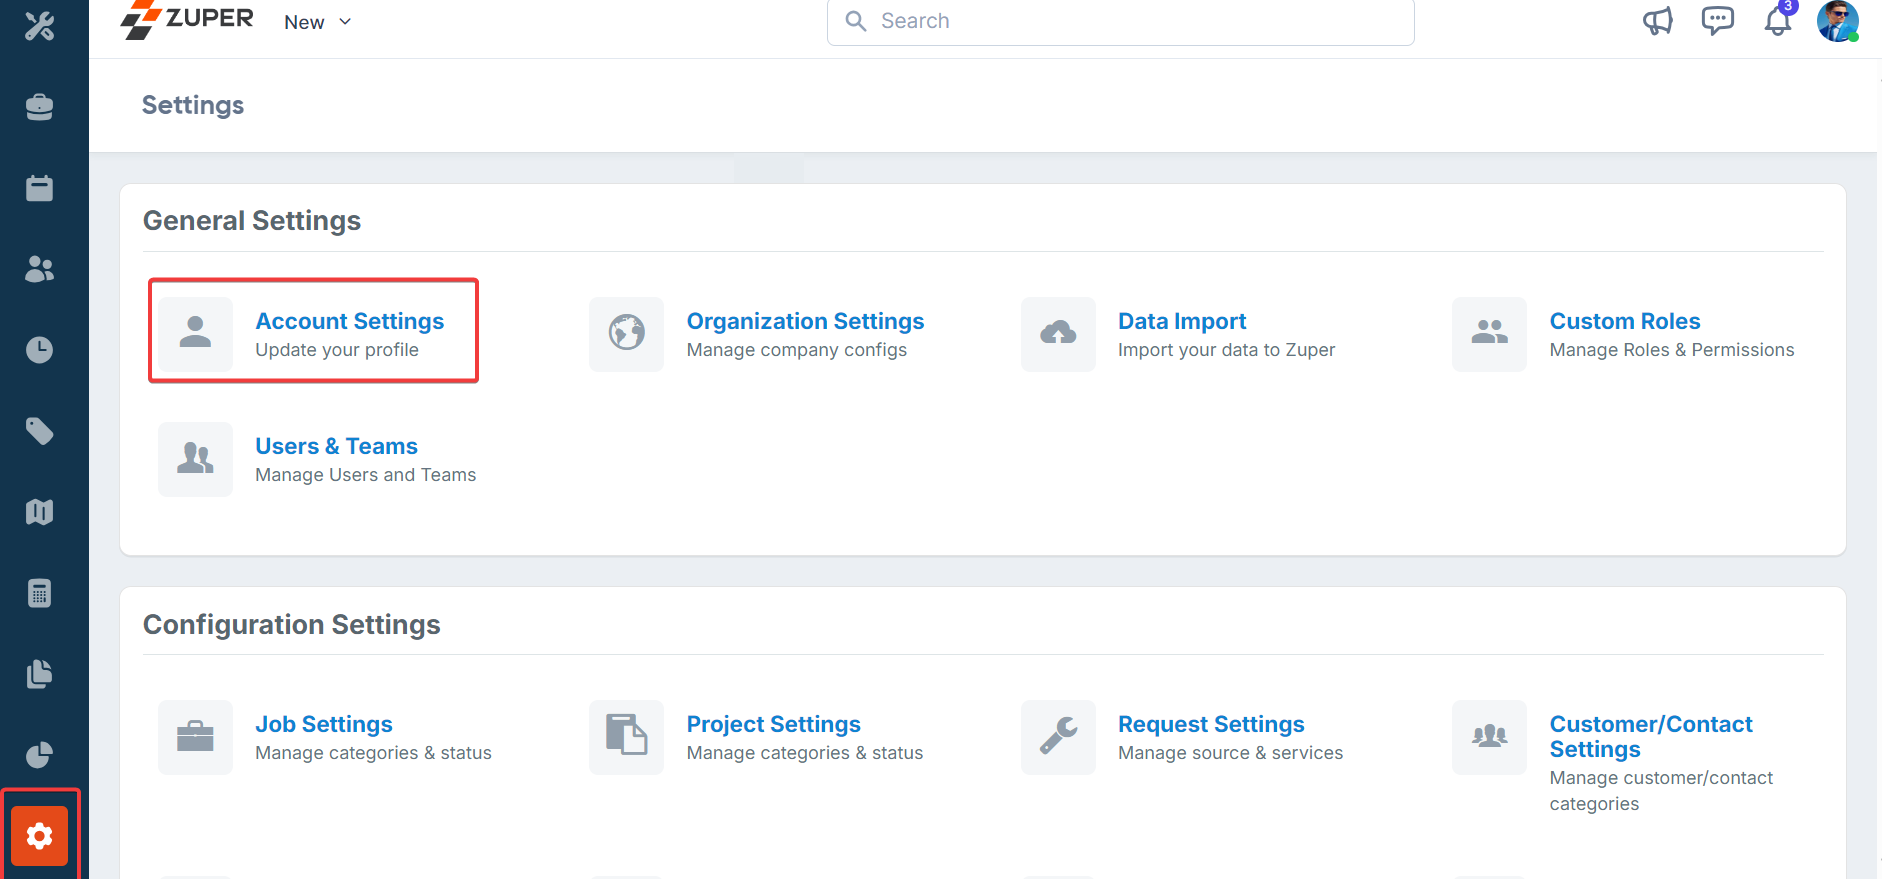
2. Scroll down the menu bar on the left and select the "**Settings**" icon key.
3. Under the "**General Settings**" category, select "**Account Settings.**"
4. Update Zuper Settings by configuring the following fields:
a. Zuper API Key (**Mandatory**) – Refer to the steps below to create the Zuper API. To create the Zuper API, refer to the below steps:
If you are trying to integrate Zuper with any external systems, you will need an API key to access the Zuper APIs. To generate API (Application Programming Interface) Key, please follow the below steps.
1. Log in to Zuper with an admin account.
2. Scroll down the menu bar on the left and select the "**Settings**" icon key.
3. Under the "**General Settings**" category, select "**Account Settings.**"
 4. On the account settings page, select **"API Keys."**
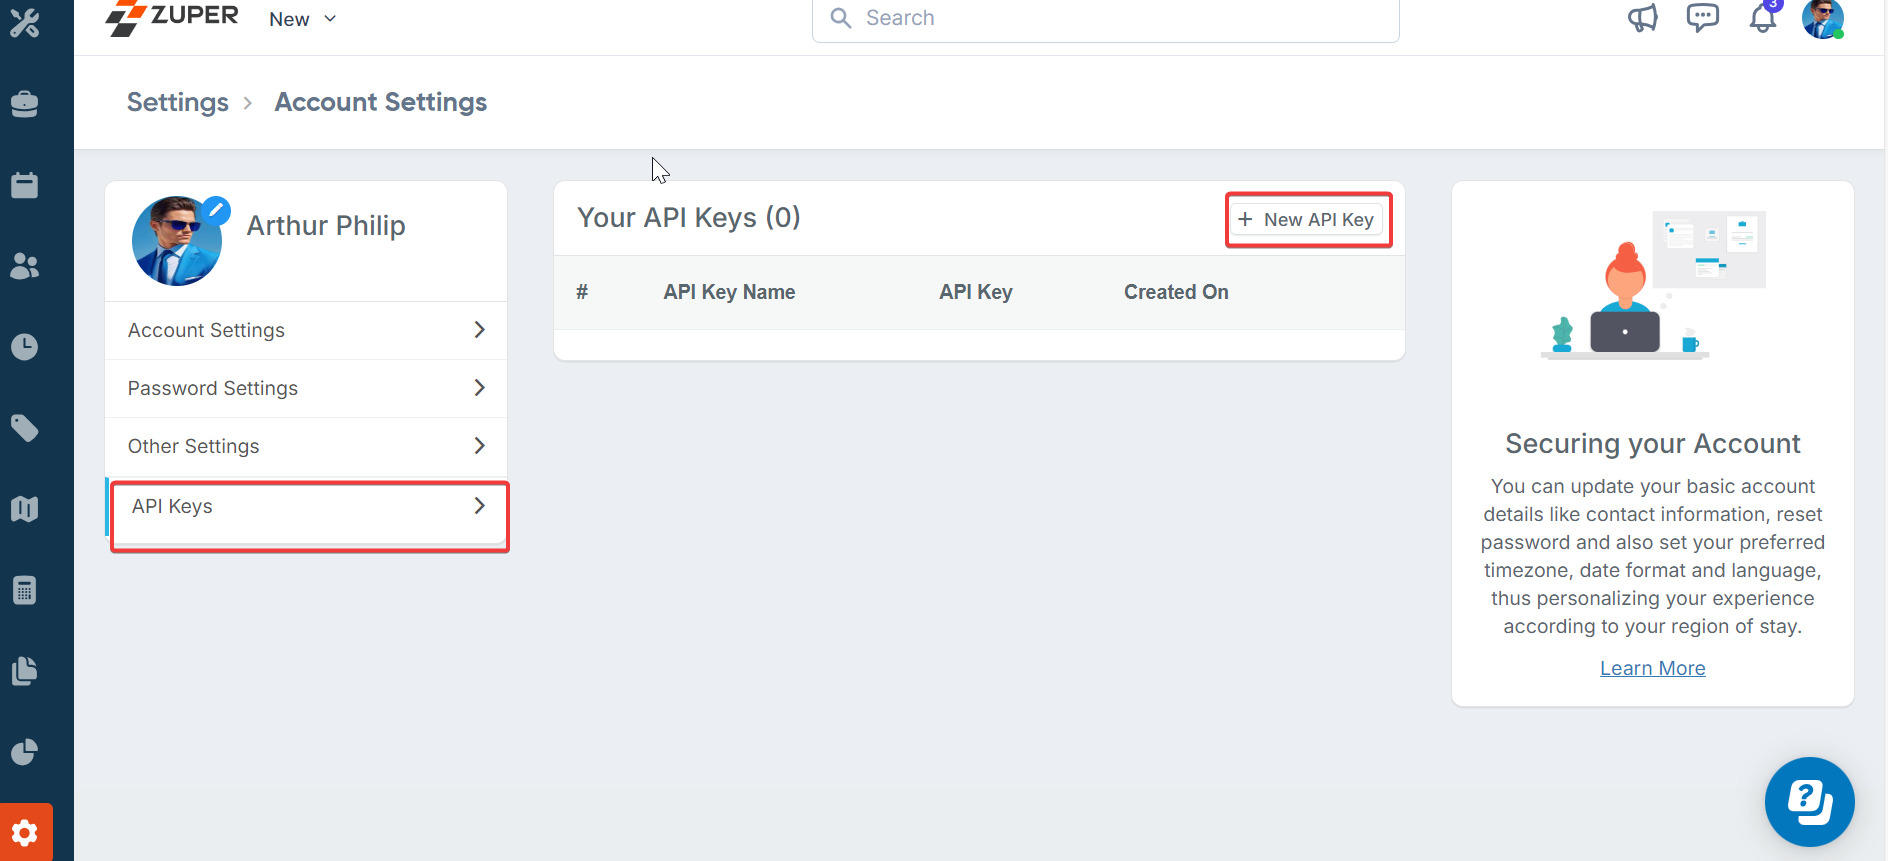 5. Click on "**New API Key**" and enter the name of the API key in the pop-up windows.
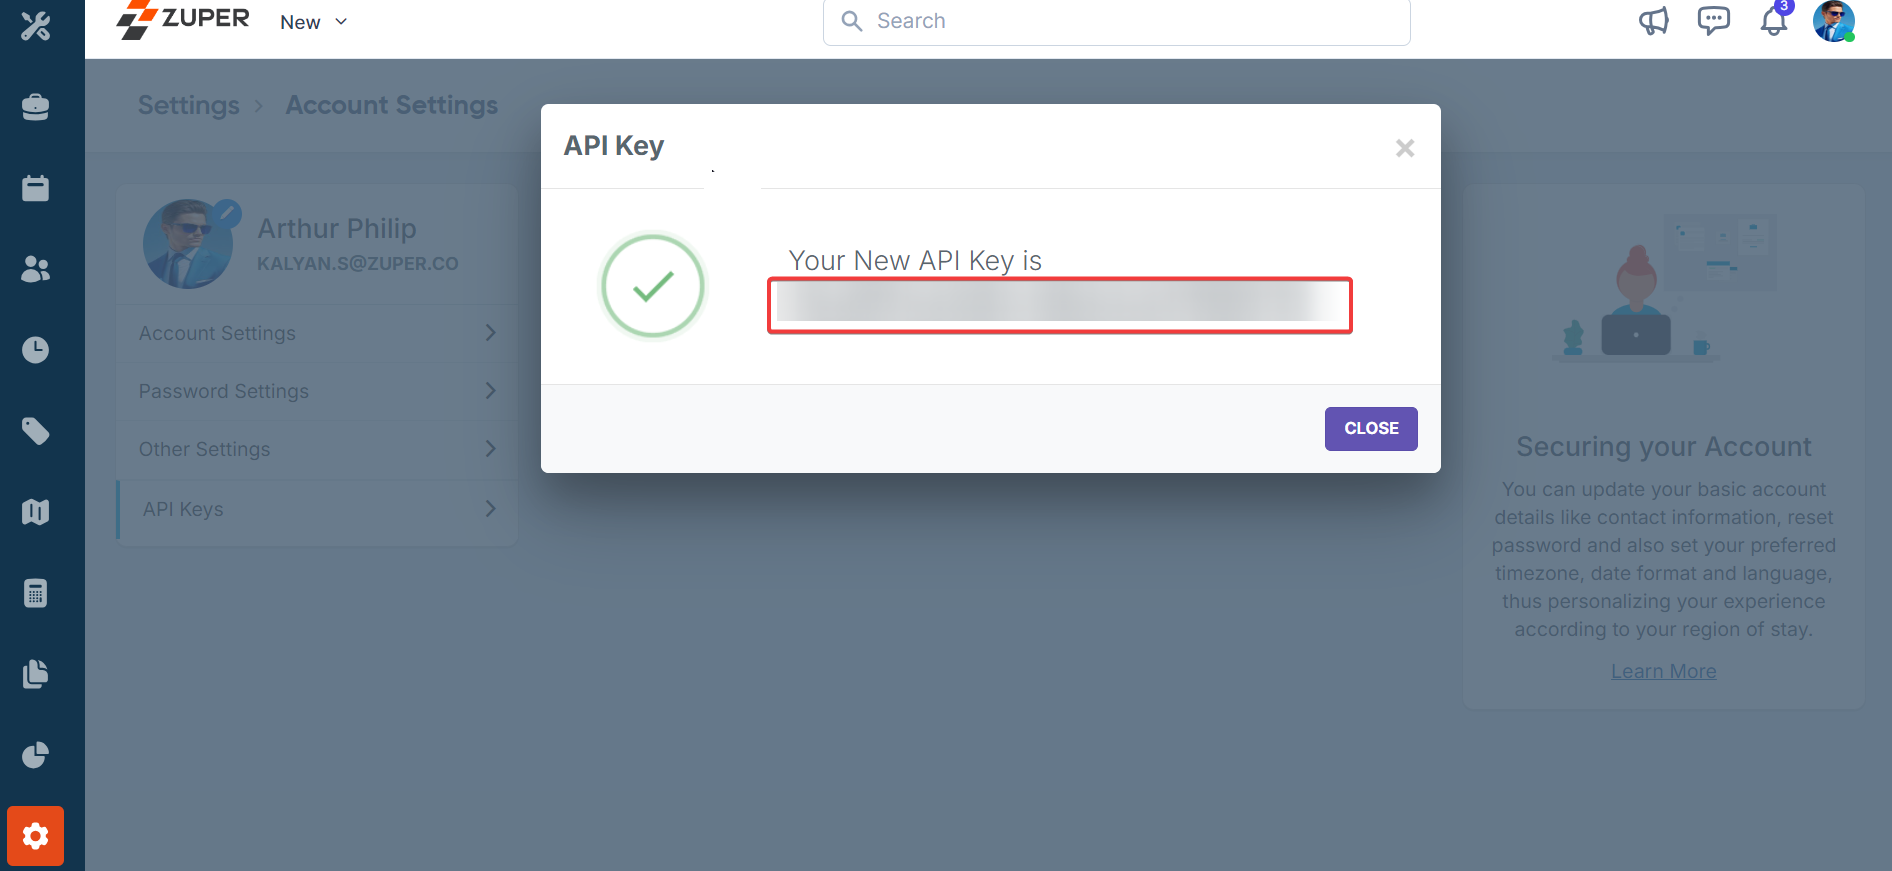
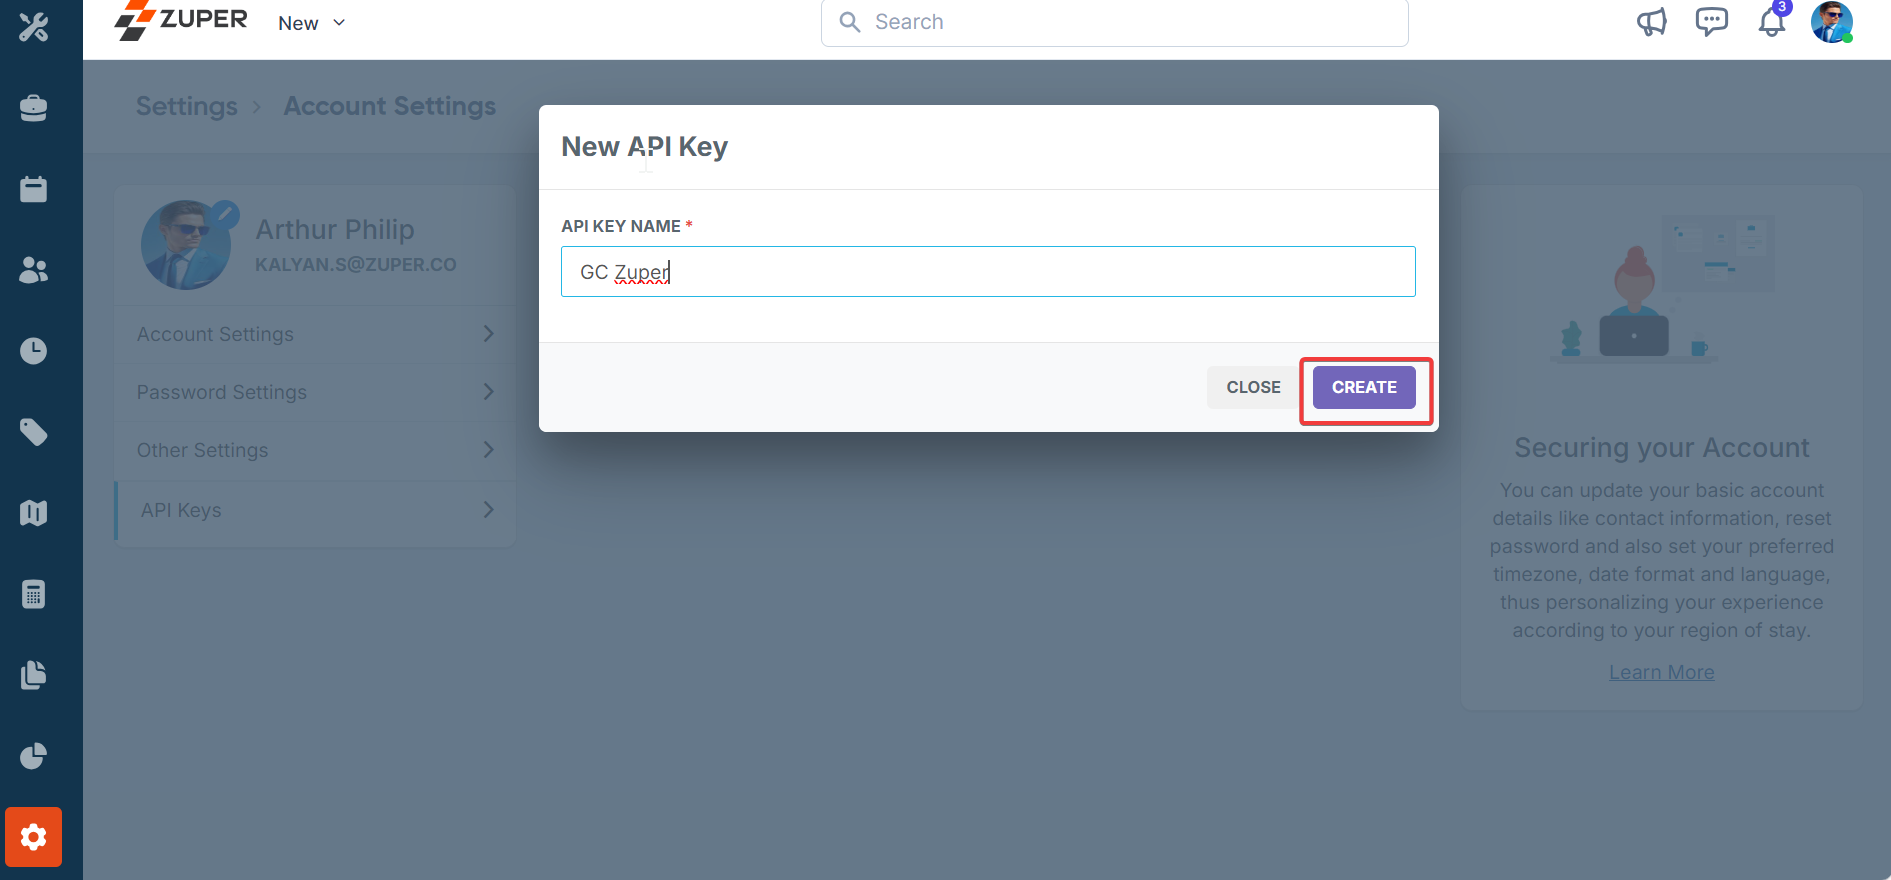 6. Click on "**Create**" to generate the API key. (Once created, the API key can be viewed by clicking on the "**View API Key**" hyperlink.)
 5. To delete/deactivate an existing API, click on the "**Delete API Key**" (x) next to the respective API.
 Note: The API key generated will provide full permission & access to the user who
created this key. Please ensure to store this key securely.
**Note:** It is mandatory to enter the Zuper API Key for Integration to perform smoothly.
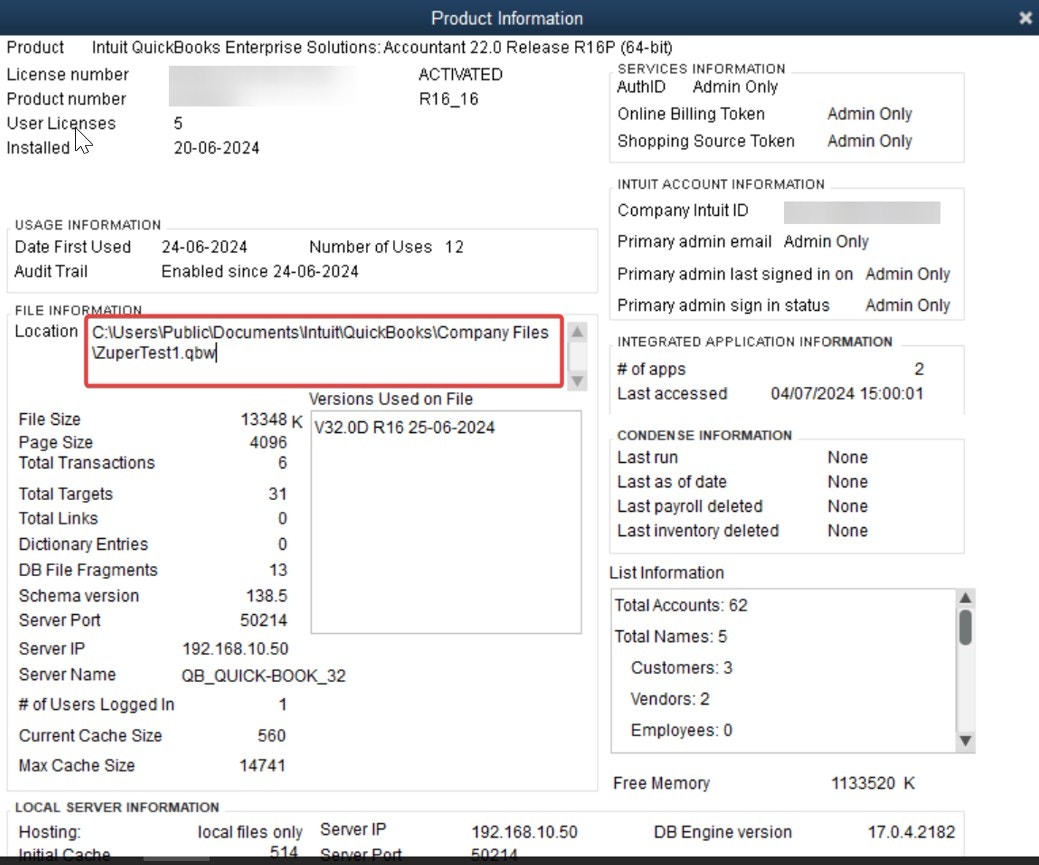
b. QuickBooks Desktop Data File Location (**Mandatory**) – Enter the exact QuickBooks Desktop Data file location. The data file should be taken from QuickBooks. In QuickBooks Desktop, Press **Fn+F2** to get the data file location.
Note: The API key generated will provide full permission & access to the user who
created this key. Please ensure to store this key securely.
**Note:** It is mandatory to enter the Zuper API Key for Integration to perform smoothly.
b. QuickBooks Desktop Data File Location (**Mandatory**) – Enter the exact QuickBooks Desktop Data file location. The data file should be taken from QuickBooks. In QuickBooks Desktop, Press **Fn+F2** to get the data file location.
 c. QuickBooks Desktop Connector Username (**Mandatory**) - Enter the QuickBooks Desktop Connector Username.
d. QuickBooks Desktop Connector Password (**Mandatory**) - Enter the QuickBooks Desktop Connector Password.
e. Push Customers (**Mandatory**)- If you select the option "**Yes**," the customer will be pushed one way from Zuper to QuickBooks Desktop. If you choose "**Yes**," we will sync the creation from the master itself. If you choose "**No**," the customer will be created only while pushing an invoice, quote, or any other transaction.
f. Push Estimates (**Mandatory**)- If you select "**Yes**," estimates will be pushed one way from Zuper to QuickBooks Desktop. If you choose "**No**," Estimates items won't be pushed from Zuper to QuickBooks Desktop.
g. Push Services & Products (**Mandatory**)- If you select "**Yes**," services and products will be pushed one way from Zuper to QuickBooks Desktop. If you choose "**No**," services and products will be pushed when we push Invoice/Quote to the Quick Books Desktop.
h. Invoice Status to Trigger Push (**Mandatory**) - You must choose the invoice's status from the drop-down menu. Based on the invoice status selected here, the push will happen.
i. Estimate / Invoice ID (**Mandatory**) - If you select Zuper ID, Zuper Estimate / Invoice ID will appear on QuickBooks Desktop. If you select QuickBooks Desktop ID, whatever sequence you have in QuickBooks Desktop will be taken as an Invoice ID.
j. Identify the customer in Zuper-QuickBooks (**Mandatory**) - You must choose the applicable customer format displayed on QuickBooks Desktop.
k. Use QuickBooks as Tax Master (**Mandatory**) – Upon selecting "**Yes**," QuickBooks Desktop will be the primary source for tax-related information such as tax rates and codes. If "**No**" is selected, Zuper will be the primary source for tax.
l. Default QuickBooks Payment Account (**Mandatory**) - You must enter the default QuickBooks Payment chart of accounts for which the default account will be impacted.
m. Use Different Discount Accounts in QuickBooks (**Mandatory**)- If you select "**Yes**," the different discount accounts will be used in QuickBooks Desktop. The discount account is specified in the Discount Name. If you select "**No**," we will create a default discount account in QuickBooks Desktop. Select the "**Update**" button to connect QuickBooks Desktop with Zuper.
c. QuickBooks Desktop Connector Username (**Mandatory**) - Enter the QuickBooks Desktop Connector Username.
d. QuickBooks Desktop Connector Password (**Mandatory**) - Enter the QuickBooks Desktop Connector Password.
e. Push Customers (**Mandatory**)- If you select the option "**Yes**," the customer will be pushed one way from Zuper to QuickBooks Desktop. If you choose "**Yes**," we will sync the creation from the master itself. If you choose "**No**," the customer will be created only while pushing an invoice, quote, or any other transaction.
f. Push Estimates (**Mandatory**)- If you select "**Yes**," estimates will be pushed one way from Zuper to QuickBooks Desktop. If you choose "**No**," Estimates items won't be pushed from Zuper to QuickBooks Desktop.
g. Push Services & Products (**Mandatory**)- If you select "**Yes**," services and products will be pushed one way from Zuper to QuickBooks Desktop. If you choose "**No**," services and products will be pushed when we push Invoice/Quote to the Quick Books Desktop.
h. Invoice Status to Trigger Push (**Mandatory**) - You must choose the invoice's status from the drop-down menu. Based on the invoice status selected here, the push will happen.
i. Estimate / Invoice ID (**Mandatory**) - If you select Zuper ID, Zuper Estimate / Invoice ID will appear on QuickBooks Desktop. If you select QuickBooks Desktop ID, whatever sequence you have in QuickBooks Desktop will be taken as an Invoice ID.
j. Identify the customer in Zuper-QuickBooks (**Mandatory**) - You must choose the applicable customer format displayed on QuickBooks Desktop.
k. Use QuickBooks as Tax Master (**Mandatory**) – Upon selecting "**Yes**," QuickBooks Desktop will be the primary source for tax-related information such as tax rates and codes. If "**No**" is selected, Zuper will be the primary source for tax.
l. Default QuickBooks Payment Account (**Mandatory**) - You must enter the default QuickBooks Payment chart of accounts for which the default account will be impacted.
m. Use Different Discount Accounts in QuickBooks (**Mandatory**)- If you select "**Yes**," the different discount accounts will be used in QuickBooks Desktop. The discount account is specified in the Discount Name. If you select "**No**," we will create a default discount account in QuickBooks Desktop. Select the "**Update**" button to connect QuickBooks Desktop with Zuper.
 ## Link QuickBooks Desktop with Zuper
1. Once you have completed the configuration settings in Zuper, as shown above, click the "**Install QuickBooks Desktop**" button. Once you have done the configuration settings in Zuper.
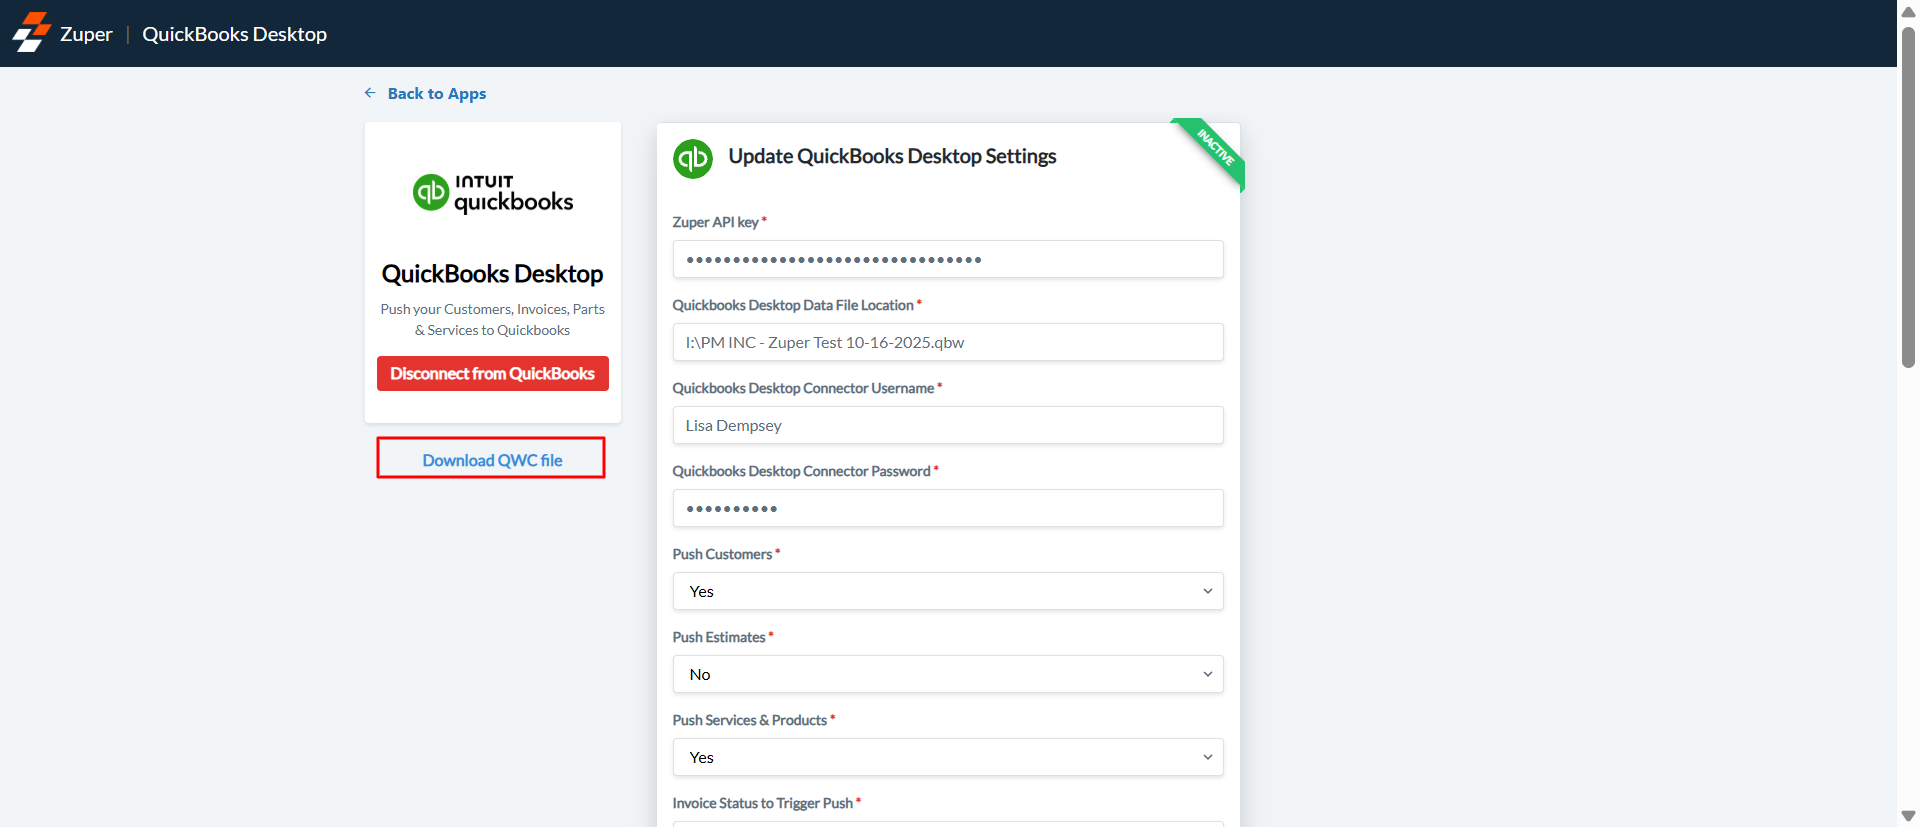
2. Zuper provides the option to Download the QWC authentication file. Click "**Download QWC File**."
## Link QuickBooks Desktop with Zuper
1. Once you have completed the configuration settings in Zuper, as shown above, click the "**Install QuickBooks Desktop**" button. Once you have done the configuration settings in Zuper.
2. Zuper provides the option to Download the QWC authentication file. Click "**Download QWC File**."
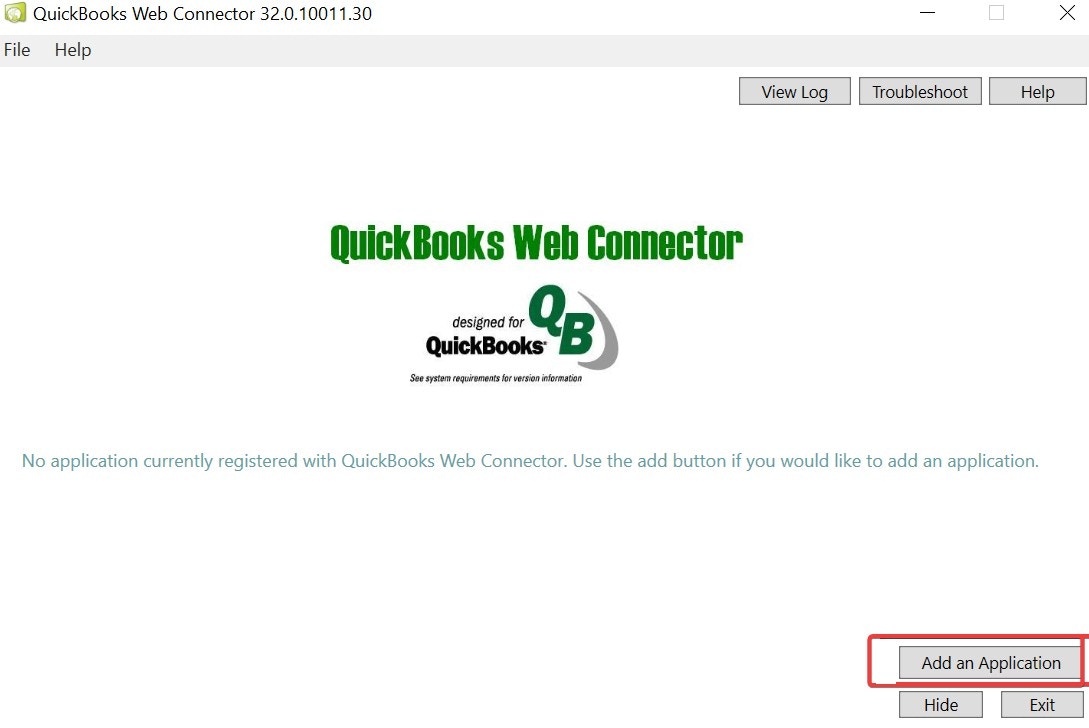
 3. Open QuickBooks web connector, click "**File**," and then "**Update Web Services**." You will see the following dialog box: Click "**Add an Application**."
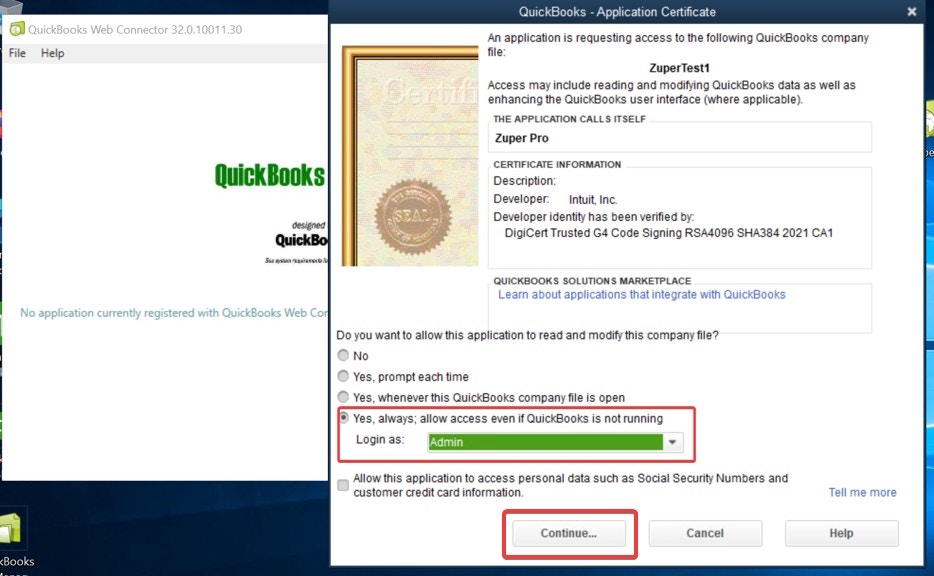
 4. You will then be asked to select whether you want to allow the application to read and modify this company file. Select "**Yes, always; allow access even if QuickBooks is not running**." Login as "**Admin** ." Click "**Continue**" to set up the web connector.
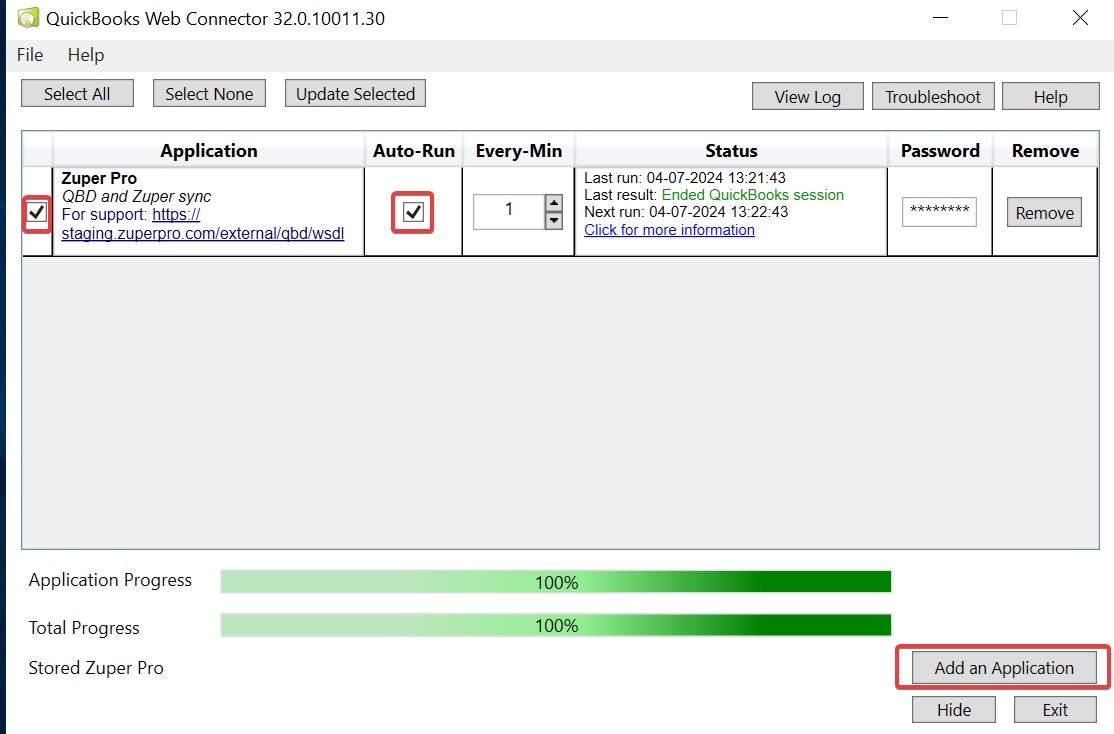
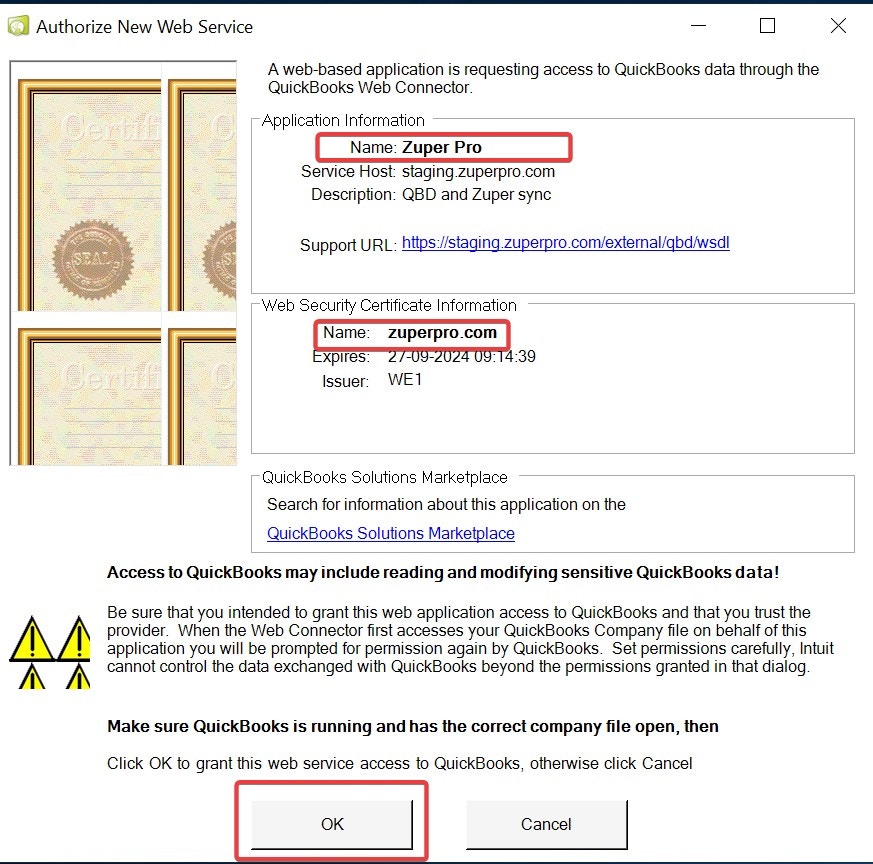 5. Open Web Connector and click the checkbox next to Zuper Pro at the far left of your screen. Click the "**Auto-Run**" checkbox.
 6. Enter your Zuper Pro password and press "**Ok**." Then, it will ask if you want to save the password; select yes to save your web connector password.
When both progress bars reach 100%, we have successfully downloaded your data from QuickBooks Desktop. Next, we'll upload it to our servers and then put it into your account.
This process can take some time, depending on how much data you have. You must maintain a stable internet connection until this process is complete.
6. Enter your Zuper Pro password and press "**Ok**." Then, it will ask if you want to save the password; select yes to save your web connector password.
When both progress bars reach 100%, we have successfully downloaded your data from QuickBooks Desktop. Next, we'll upload it to our servers and then put it into your account.
This process can take some time, depending on how much data you have. You must maintain a stable internet connection until this process is complete.
 QuickBooks Desktop– Zuper integration is completed.
## Uninstall QuickBooks Desktop
1. Once logged in to your Zuper account, open a new tab in your browser. Click on your Profile Picture at the top right corner of the screen and select the "**App Store.**"
2. Under the "**Browse by Category**," select the "**Private Apps**" option and choose "**QuickBooks** **Desktop**."
QuickBooks Desktop– Zuper integration is completed.
## Uninstall QuickBooks Desktop
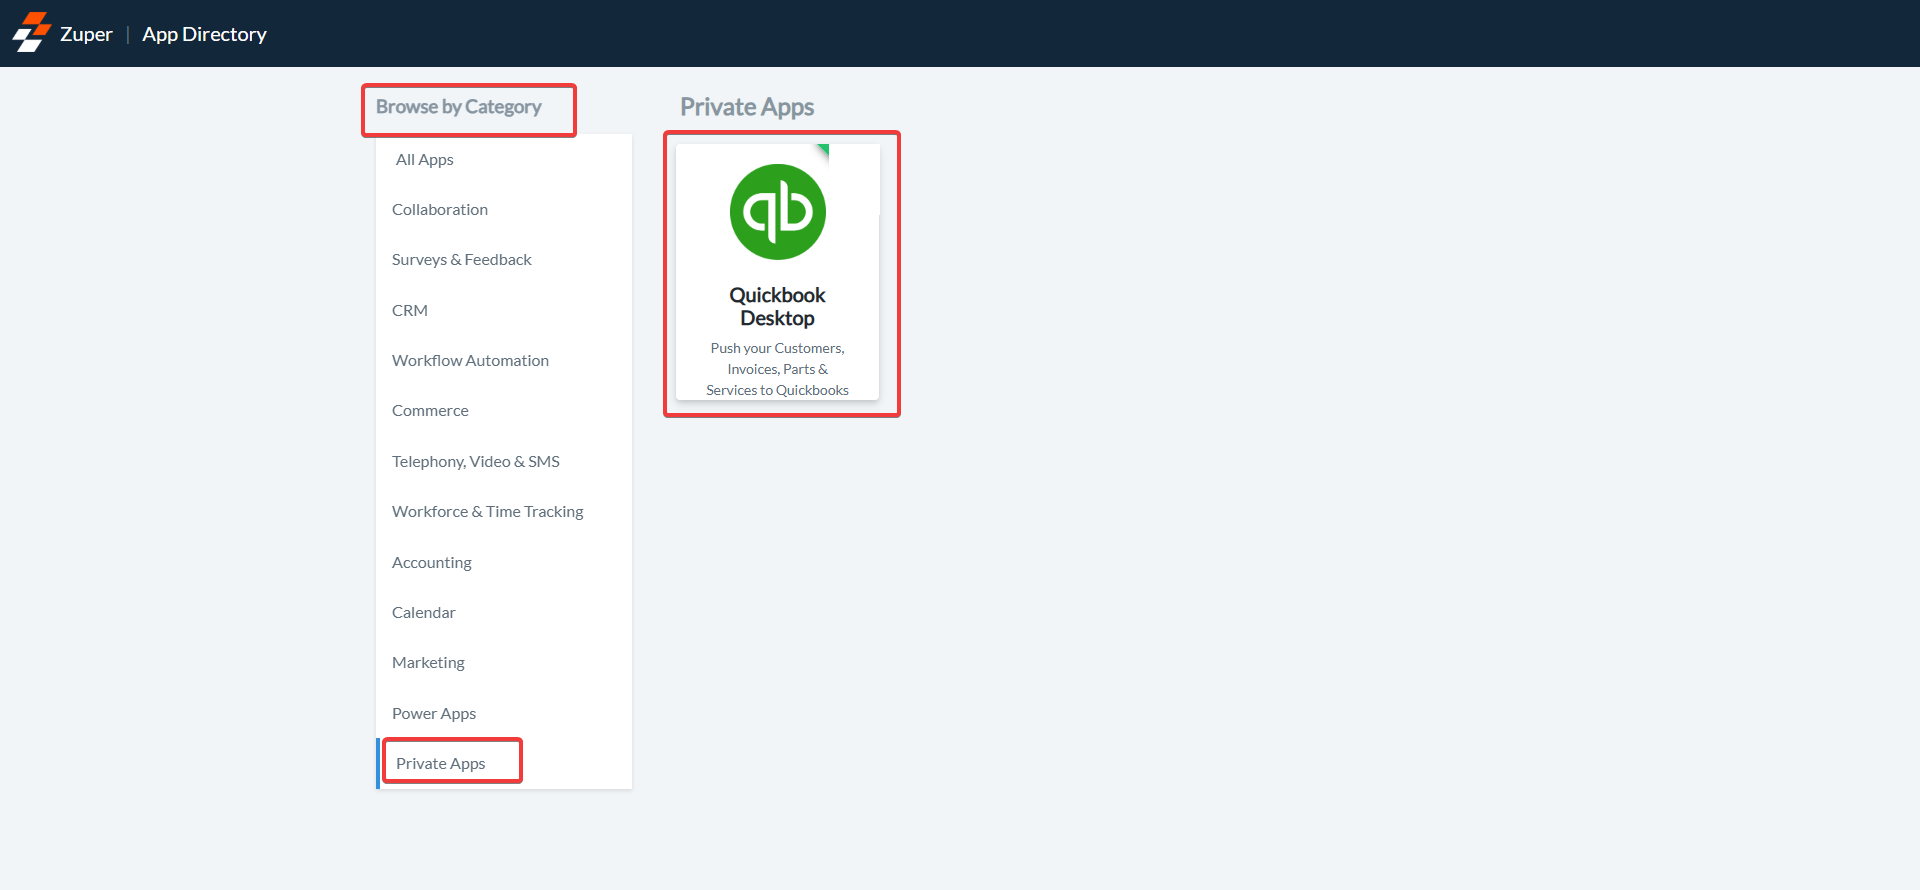
1. Once logged in to your Zuper account, open a new tab in your browser. Click on your Profile Picture at the top right corner of the screen and select the "**App Store.**"
2. Under the "**Browse by Category**," select the "**Private Apps**" option and choose "**QuickBooks** **Desktop**."
 3. Click the "**Disconnect from QuickBooks**" button.
3. QuickBooks Desktop App is uninstalled successfully.
3. Click the "**Disconnect from QuickBooks**" button.
3. QuickBooks Desktop App is uninstalled successfully.
 Integrating QuickBooks Desktop with Zuper can enrich and enhance operations by ensuring seamless data transfer between your accounting software and field service management system.
## Frequently Asked Questions
No. Mapping product descriptions to product names or SKUs automatically via QuickBooks Desktop is not supported. The integration does not perform this mapping, and descriptions will not auto-populate based on SKU changes made in the accounting system.
The QuickBooks Desktop integration pushes Zuper records (such as invoices and customer data) to the accounting system. This is a **one-way sync** for most record types. Changes made in QuickBooks Desktop do not automatically reflect back into Zuper's Parts & Services catalog or line item descriptions.
No. SKU or product name changes made in QuickBooks Desktop are not pushed back into Zuper. You will need to manually update the relevant items in Zuper's **Parts & Services** master list, or contact your onboarding team or support team for bulk update assistance.
Yes. The **Description field** on each line item in the Quote/Invoice screen remains fully editable within Zuper at the transaction level. The integration sync does not overwrite this field. You can manually update the description for each line item as needed directly on the quote or invoice.
For bulk updates to product names, SKUs, or descriptions in Zuper, contact [Zuper Support](mailto:support@zuper.co) or reach out to your onboarding team for assistance with a bulk import or catalog update.
The Zuper–QBO integration pushes records from Zuper (customers, products, estimates, invoices, and payments) to QuickBooks Online. This is a one-way sync for most record types. Invoice payment status syncs bidirectionally. Invoices or estimates created in QBO do not sync back into Zuper — all records must originate in Zuper to appear in both systems.
Integrating QuickBooks Desktop with Zuper can enrich and enhance operations by ensuring seamless data transfer between your accounting software and field service management system.
## Frequently Asked Questions
No. Mapping product descriptions to product names or SKUs automatically via QuickBooks Desktop is not supported. The integration does not perform this mapping, and descriptions will not auto-populate based on SKU changes made in the accounting system.
The QuickBooks Desktop integration pushes Zuper records (such as invoices and customer data) to the accounting system. This is a **one-way sync** for most record types. Changes made in QuickBooks Desktop do not automatically reflect back into Zuper's Parts & Services catalog or line item descriptions.
No. SKU or product name changes made in QuickBooks Desktop are not pushed back into Zuper. You will need to manually update the relevant items in Zuper's **Parts & Services** master list, or contact your onboarding team or support team for bulk update assistance.
Yes. The **Description field** on each line item in the Quote/Invoice screen remains fully editable within Zuper at the transaction level. The integration sync does not overwrite this field. You can manually update the description for each line item as needed directly on the quote or invoice.
For bulk updates to product names, SKUs, or descriptions in Zuper, contact [Zuper Support](mailto:support@zuper.co) or reach out to your onboarding team for assistance with a bulk import or catalog update.
The Zuper–QBO integration pushes records from Zuper (customers, products, estimates, invoices, and payments) to QuickBooks Online. This is a one-way sync for most record types. Invoice payment status syncs bidirectionally. Invoices or estimates created in QBO do not sync back into Zuper — all records must originate in Zuper to appear in both systems.