> ## Documentation Index
> Fetch the complete documentation index at: https://docs.zuper.co/llms.txt
> Use this file to discover all available pages before exploring further.
# Accessing the Maps
The maps module in Zuper provides a panoramic view that helps you track the exact location of users, jobs, routes, assets, properties, customers, and organizations on the map. Additionally, you can perform various actions such as creating routes, adding jobs, assigning users, optimizing routes, and more directly from within this module.
## Users
To track the exact location of users on the map, follow these steps:
1. Click the "**Maps**" icon at the left navigation menu. You will land on the maps page.
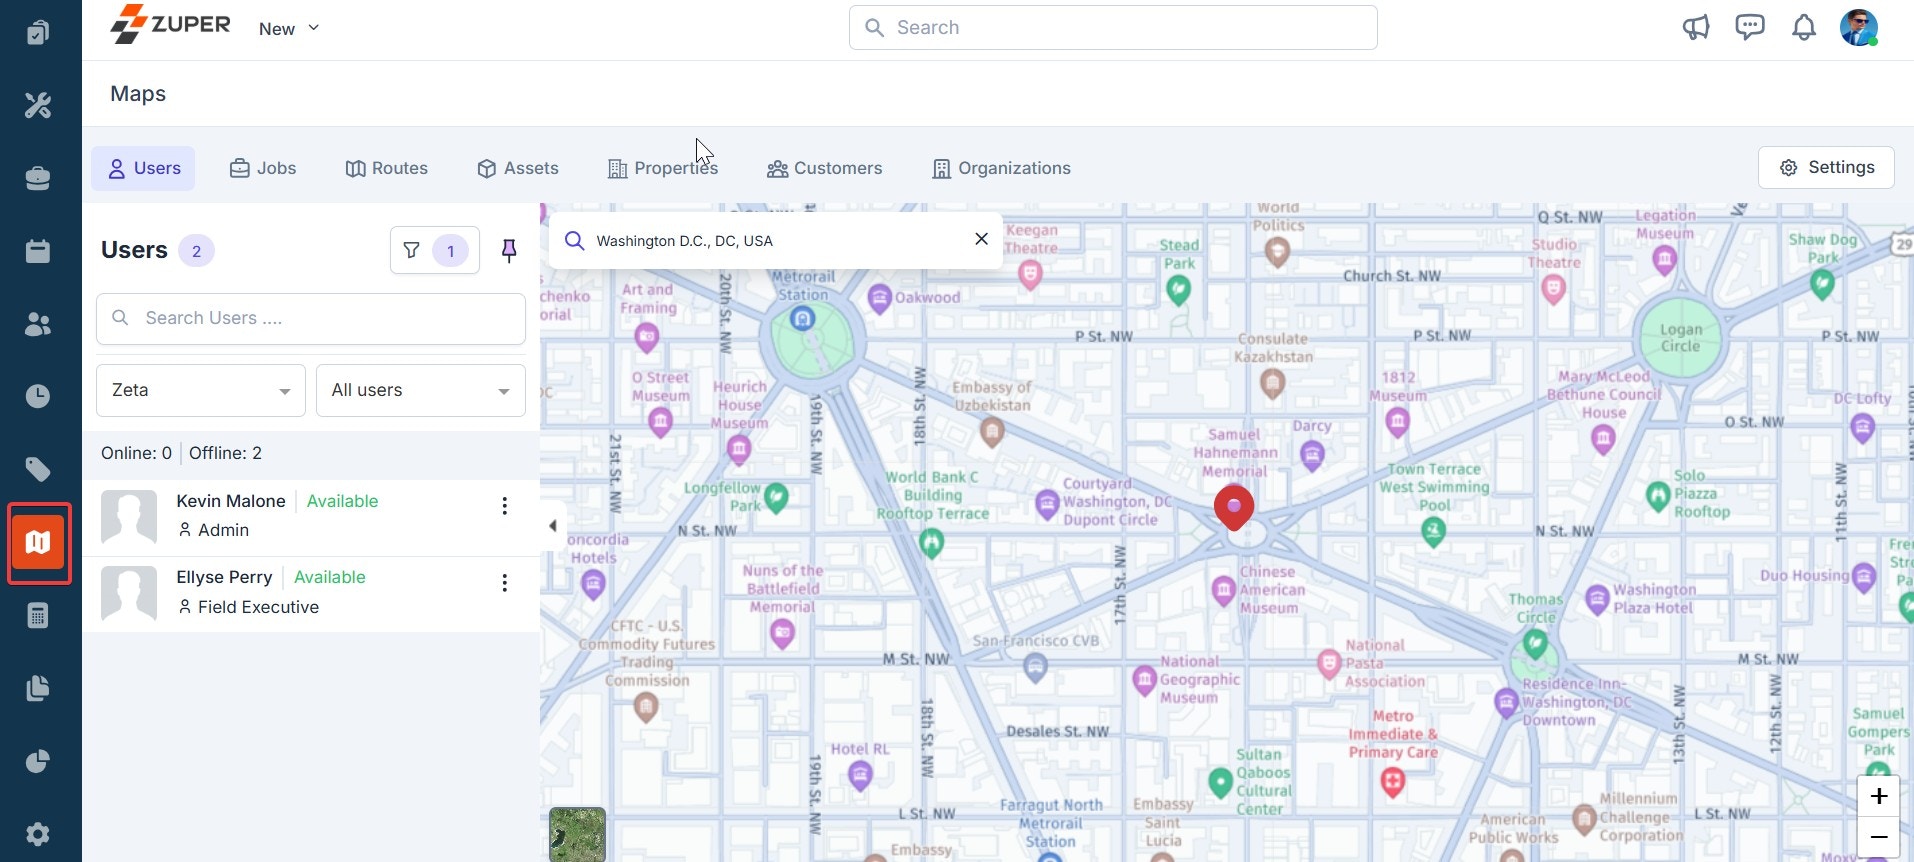 2. On the maps page, click "**Users**" at the top, which lists all the users in the team (the team will be set by default).
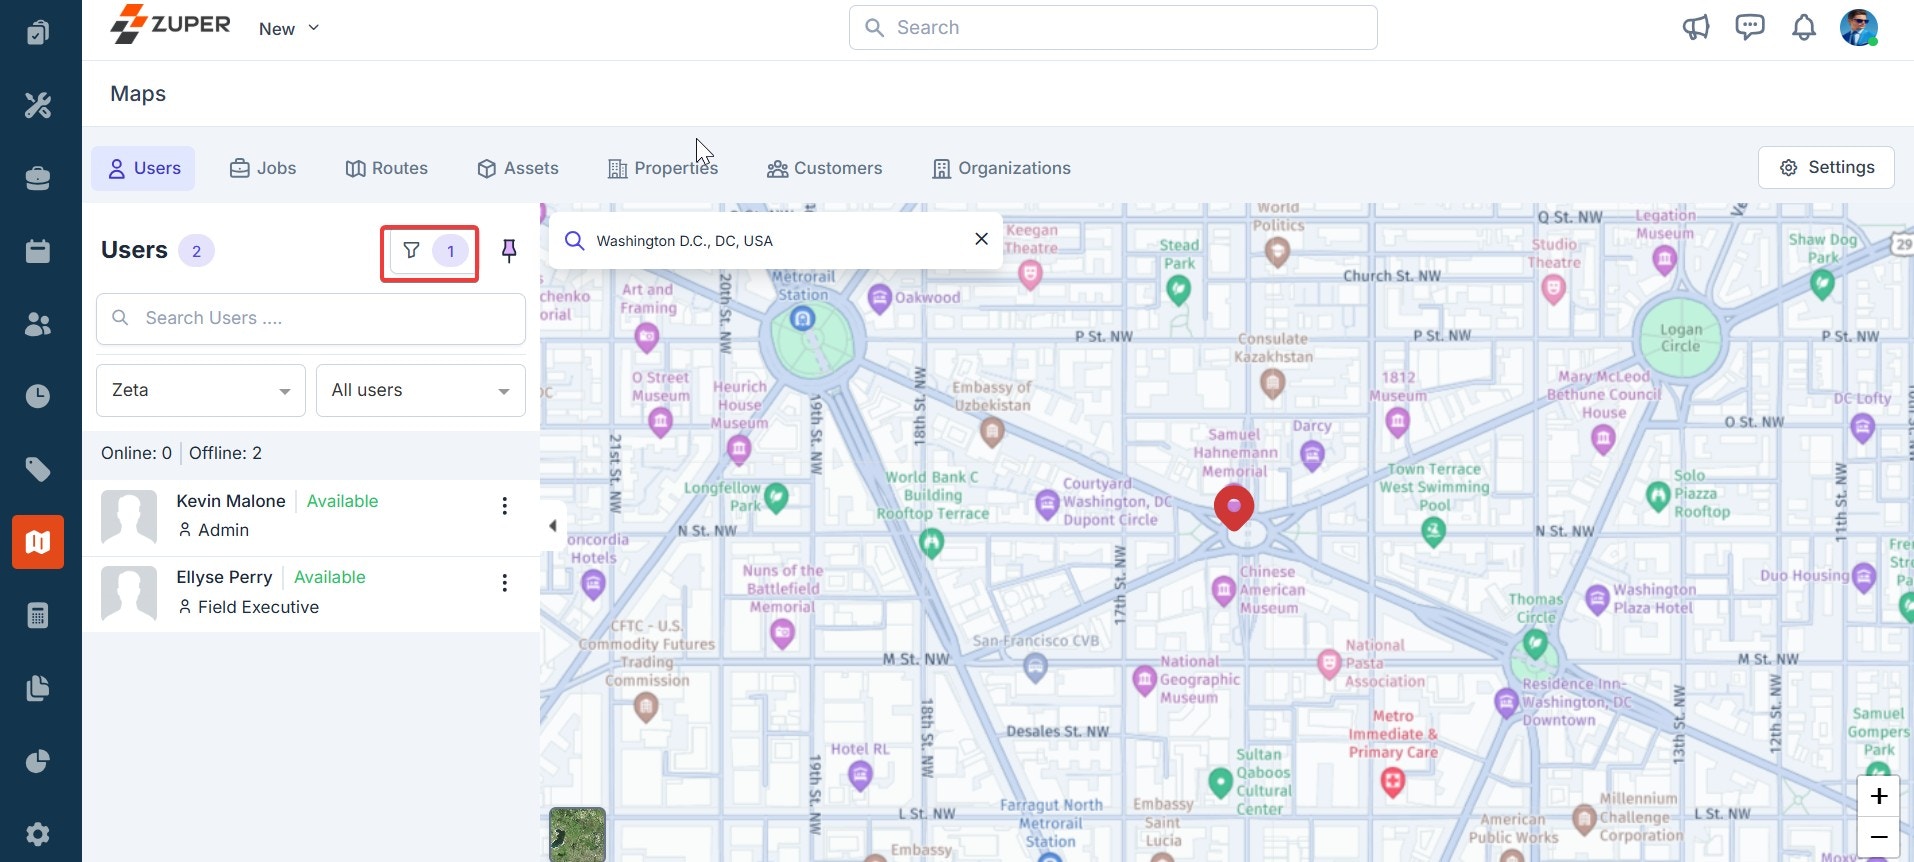
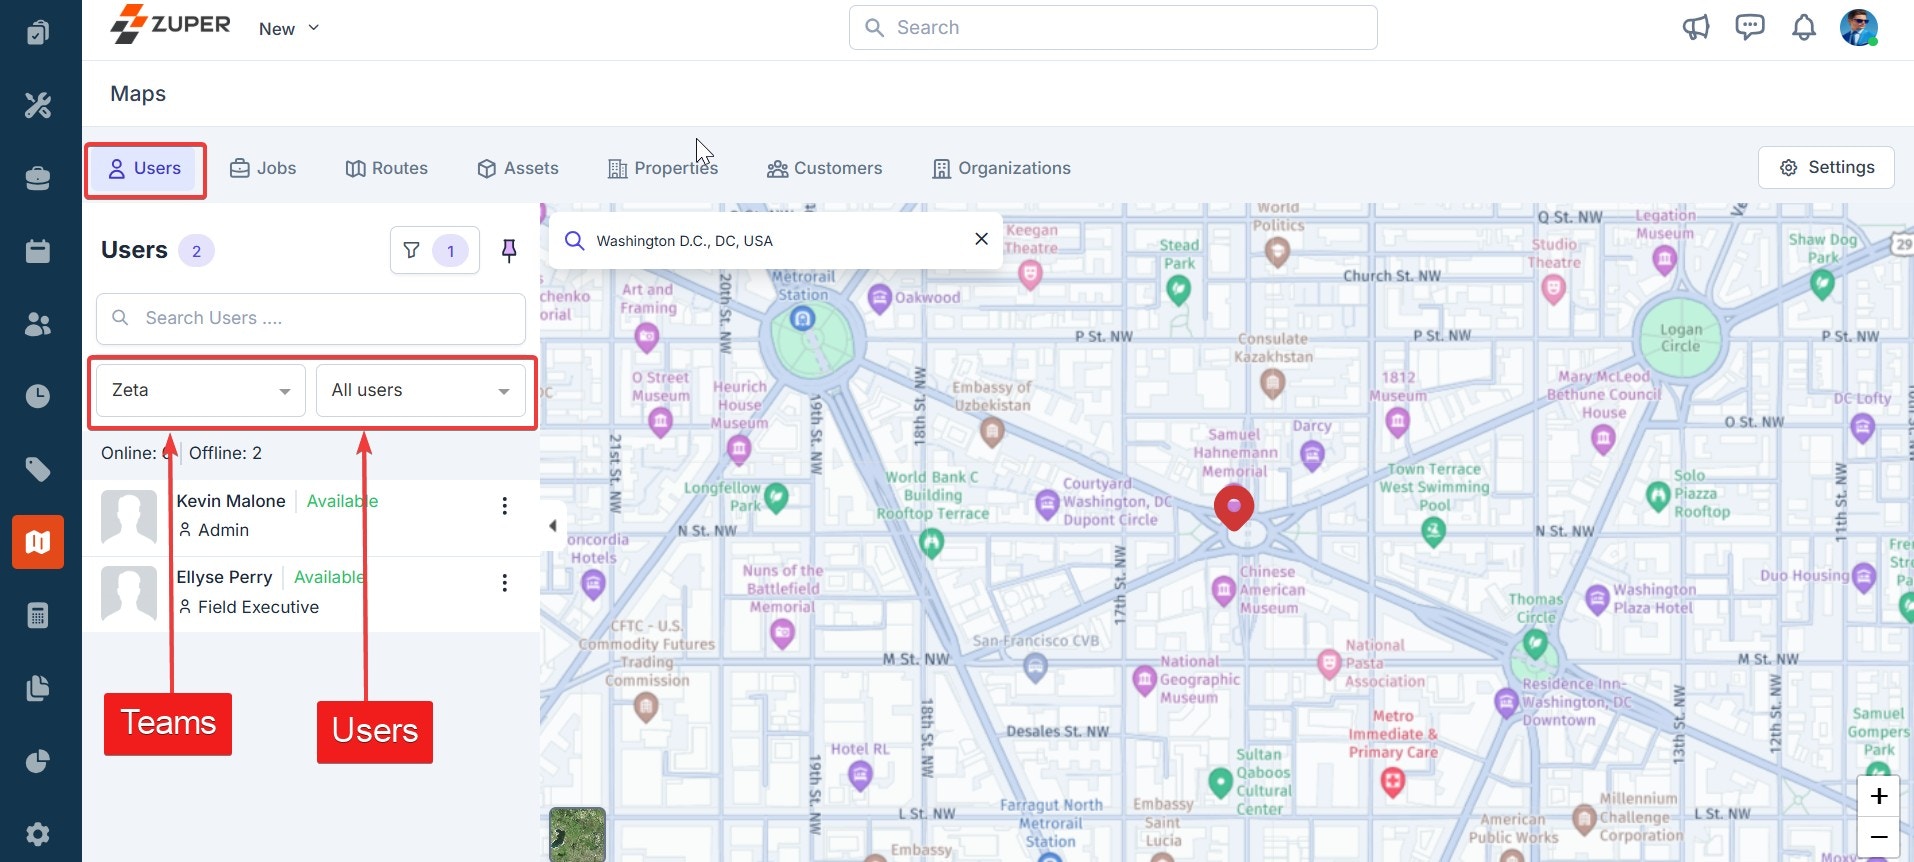 3. Click any user to view their exact location on the map. You can also search for and view specific users on a team. Click the filter icon to search for a user based on the chosen team and user type (online and offline).
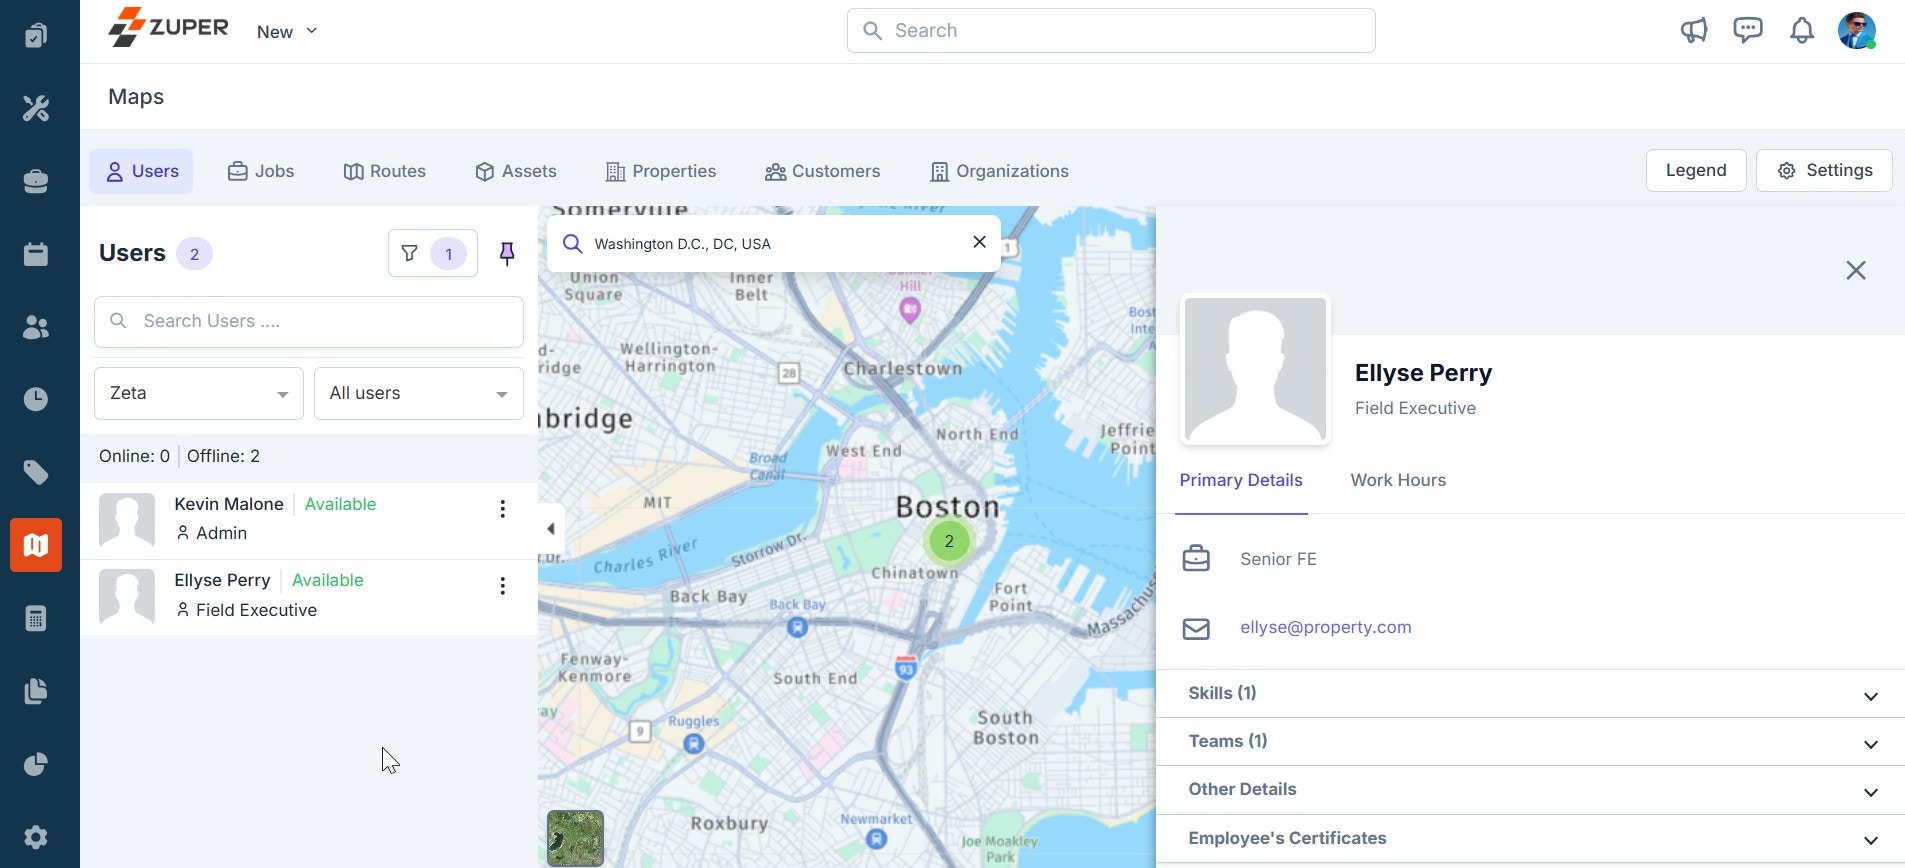
 5. To view any user details and location history, click the "**Kebab**" icon next to the user and select "**Show Details**." You can view the user details such as their role, email ID, phone number, skill set, team, work hours, and so on data on the right.
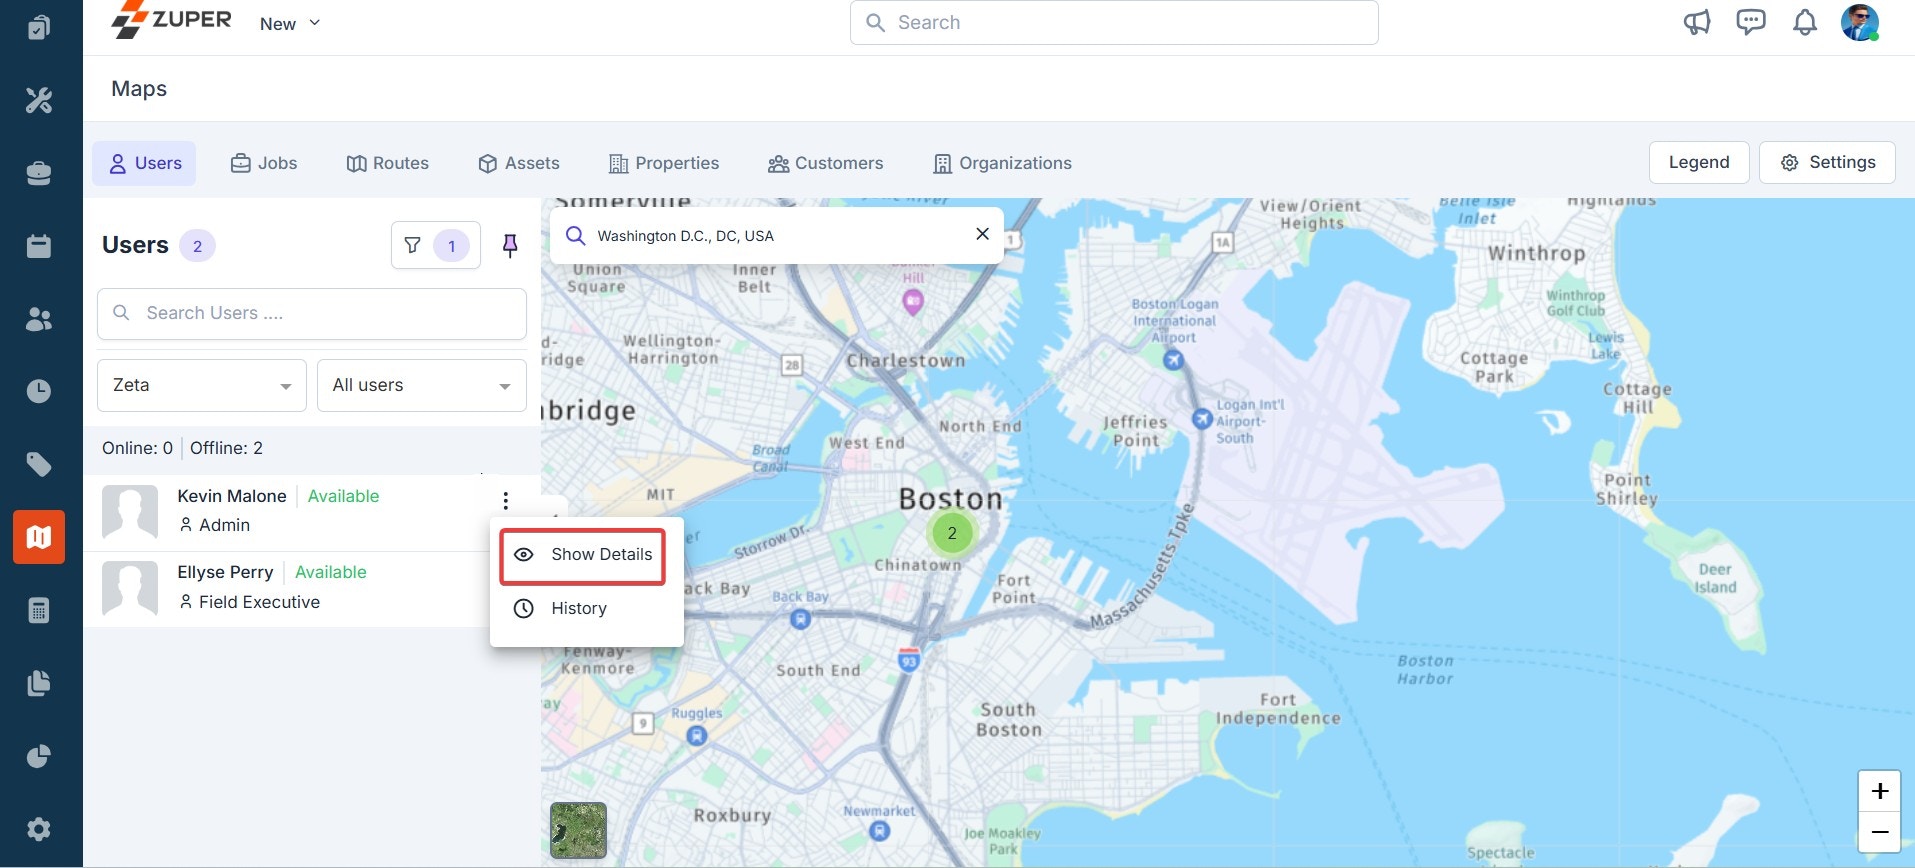
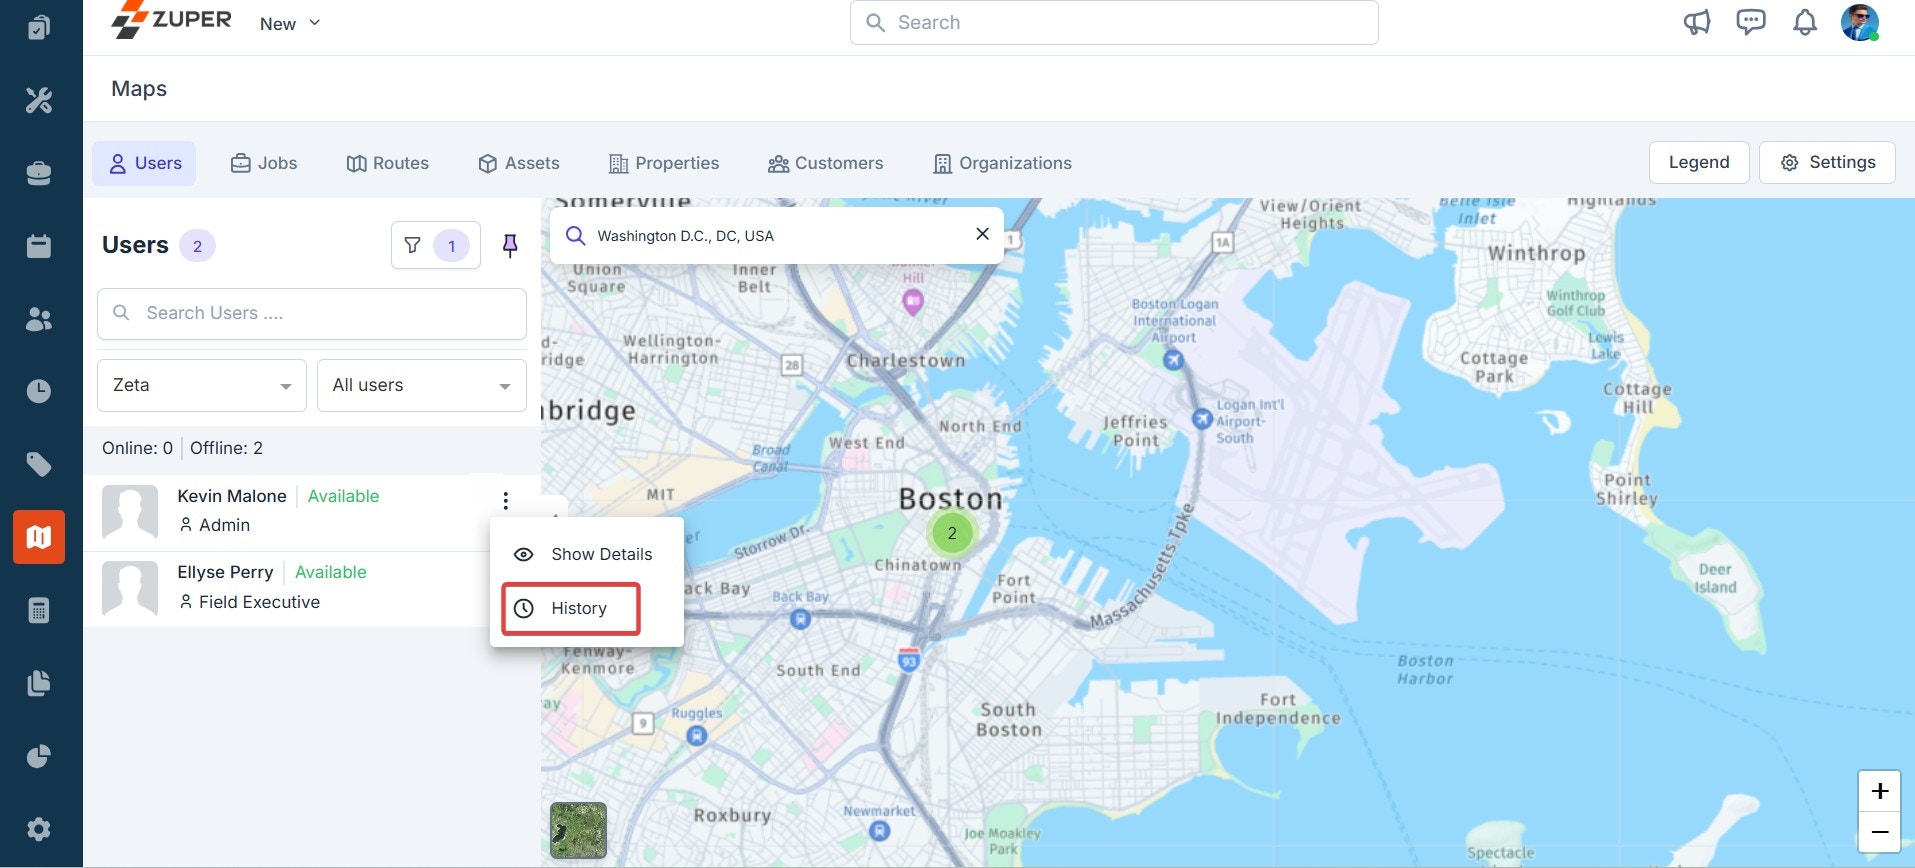
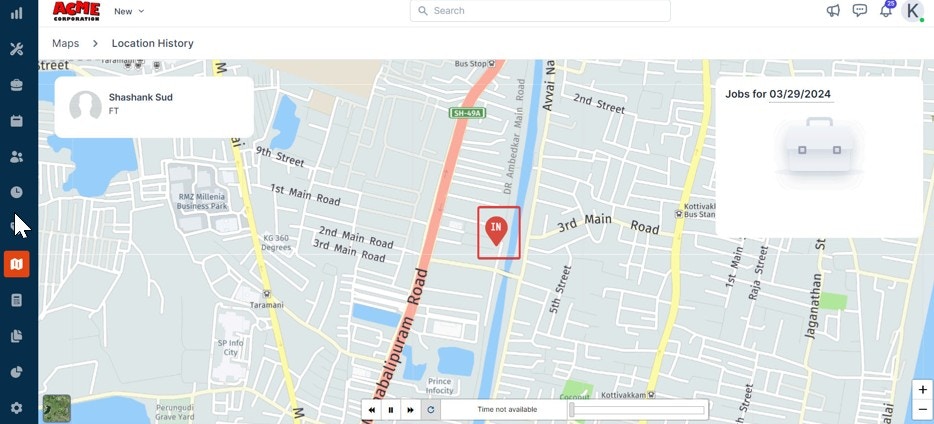
 However, if you select "**History**," you can view the user's location history on the map for the selected date.
 6. You can also pin/unpin users. Click the "**Pin**" icon next to the filters.
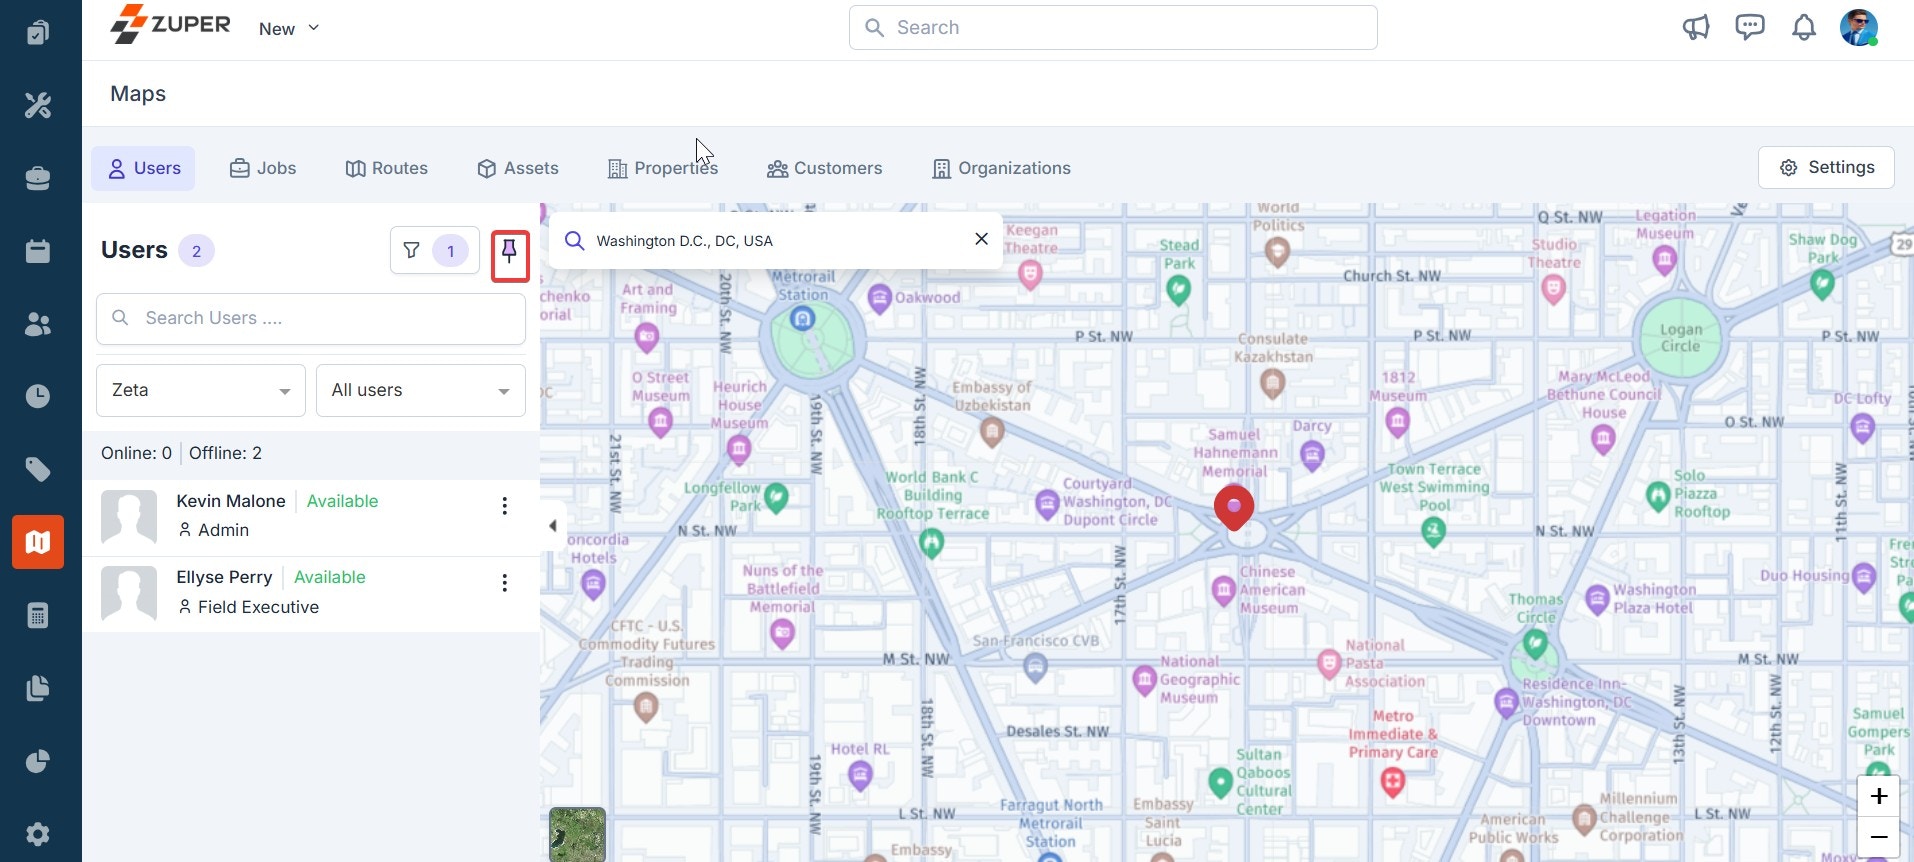 **Note:** When a user module is pinned, the user location will appear in all other selected modules on the map. When unpinned, it will not appear in other modules.
## Jobs
To track the exact location of the jobs on the map, follow these steps:
1. Click "**Jobs**" at the top of the maps page. This will list all the jobs with information such as user assigned, job status, priority, and so on.
**Note:** When a user module is pinned, the user location will appear in all other selected modules on the map. When unpinned, it will not appear in other modules.
## Jobs
To track the exact location of the jobs on the map, follow these steps:
1. Click "**Jobs**" at the top of the maps page. This will list all the jobs with information such as user assigned, job status, priority, and so on.
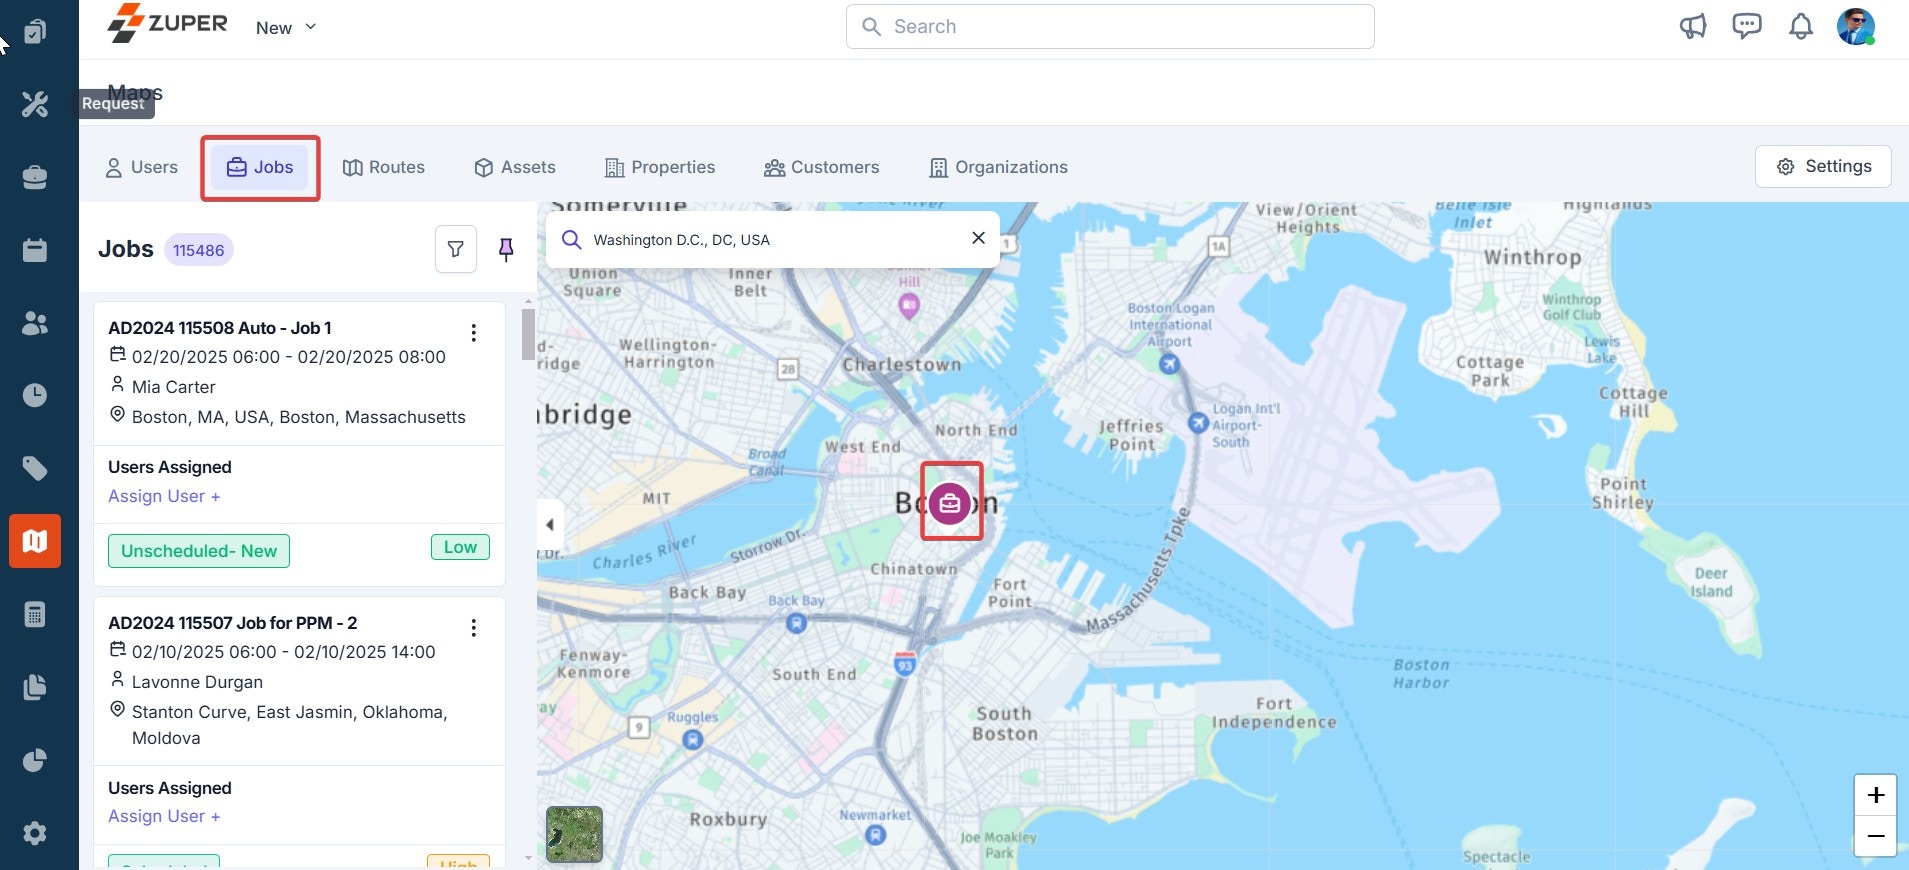 2. Click any of the jobs to view the exact job location on the map. You can use the zoom-in and zoom-out icons to adjust the map view.
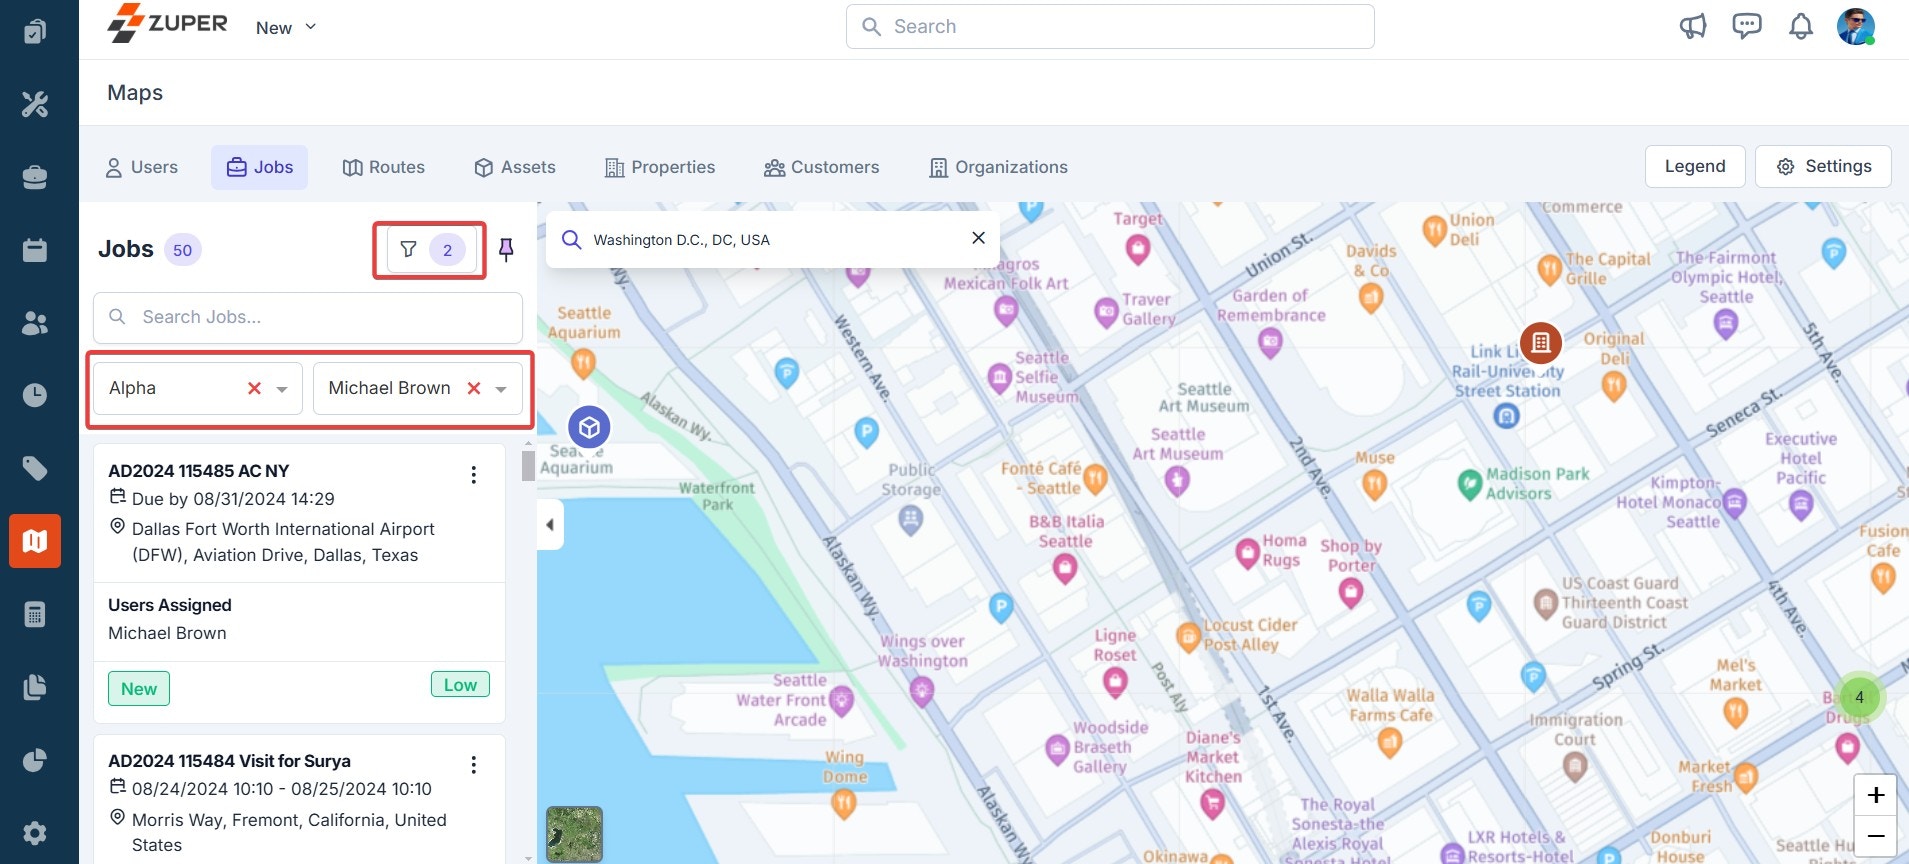
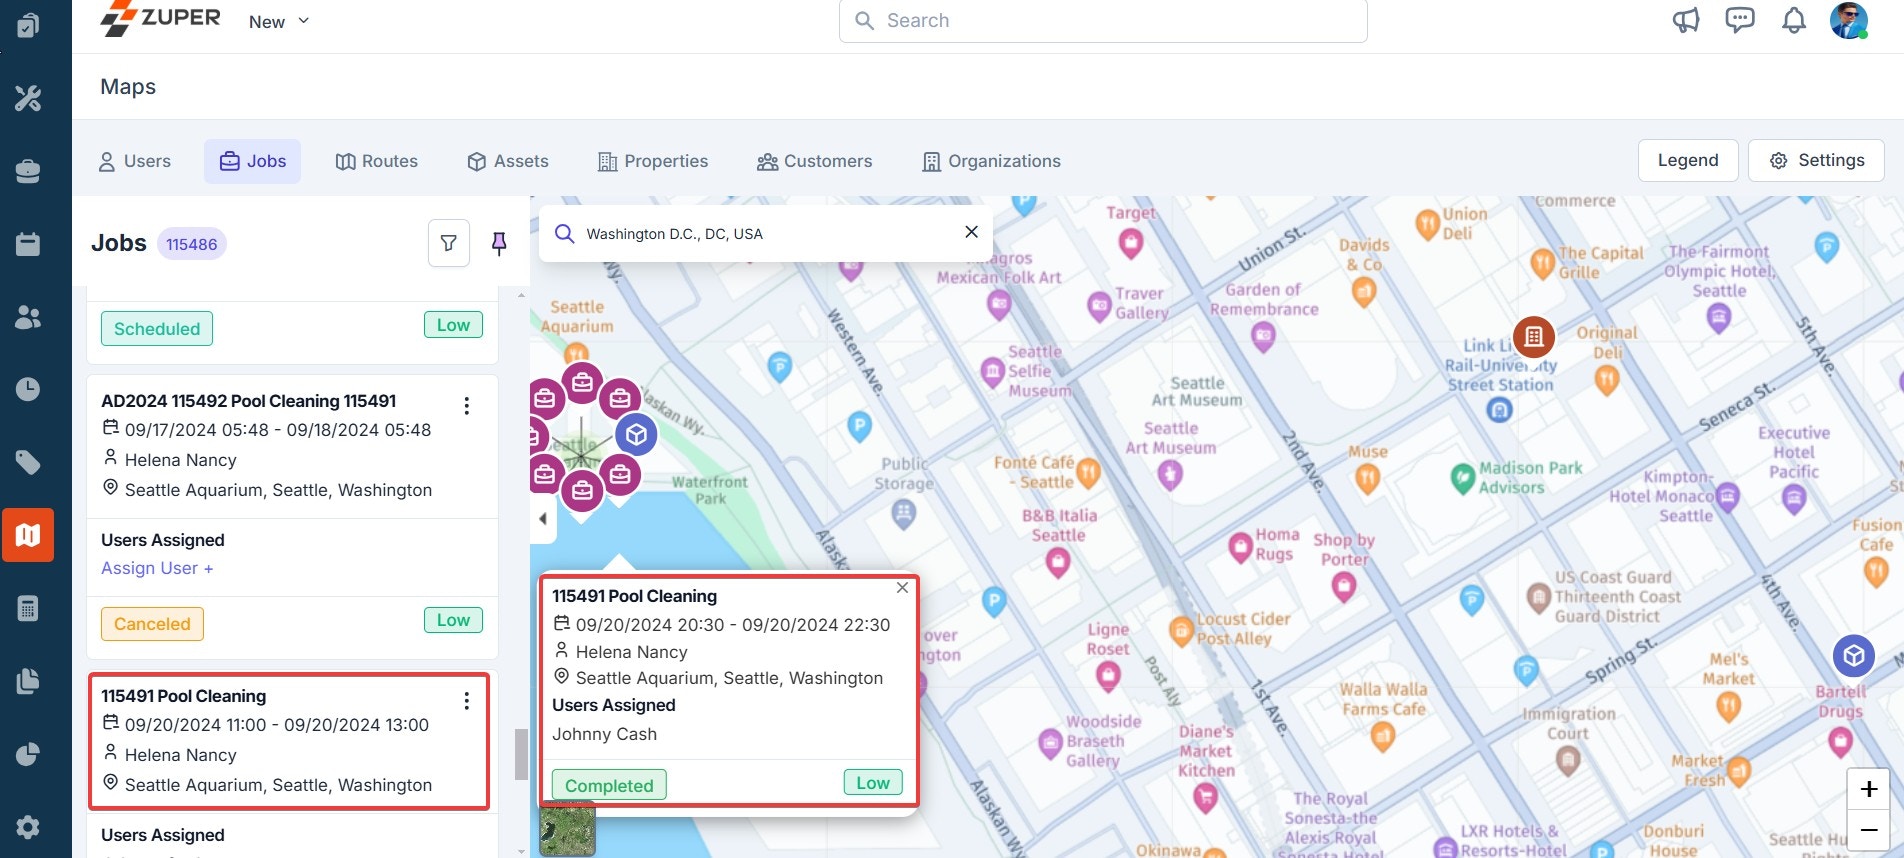 3. You can also search and view job locations on the map. To do so, click the "**Filter**" icon to search for a job based on the team and user.
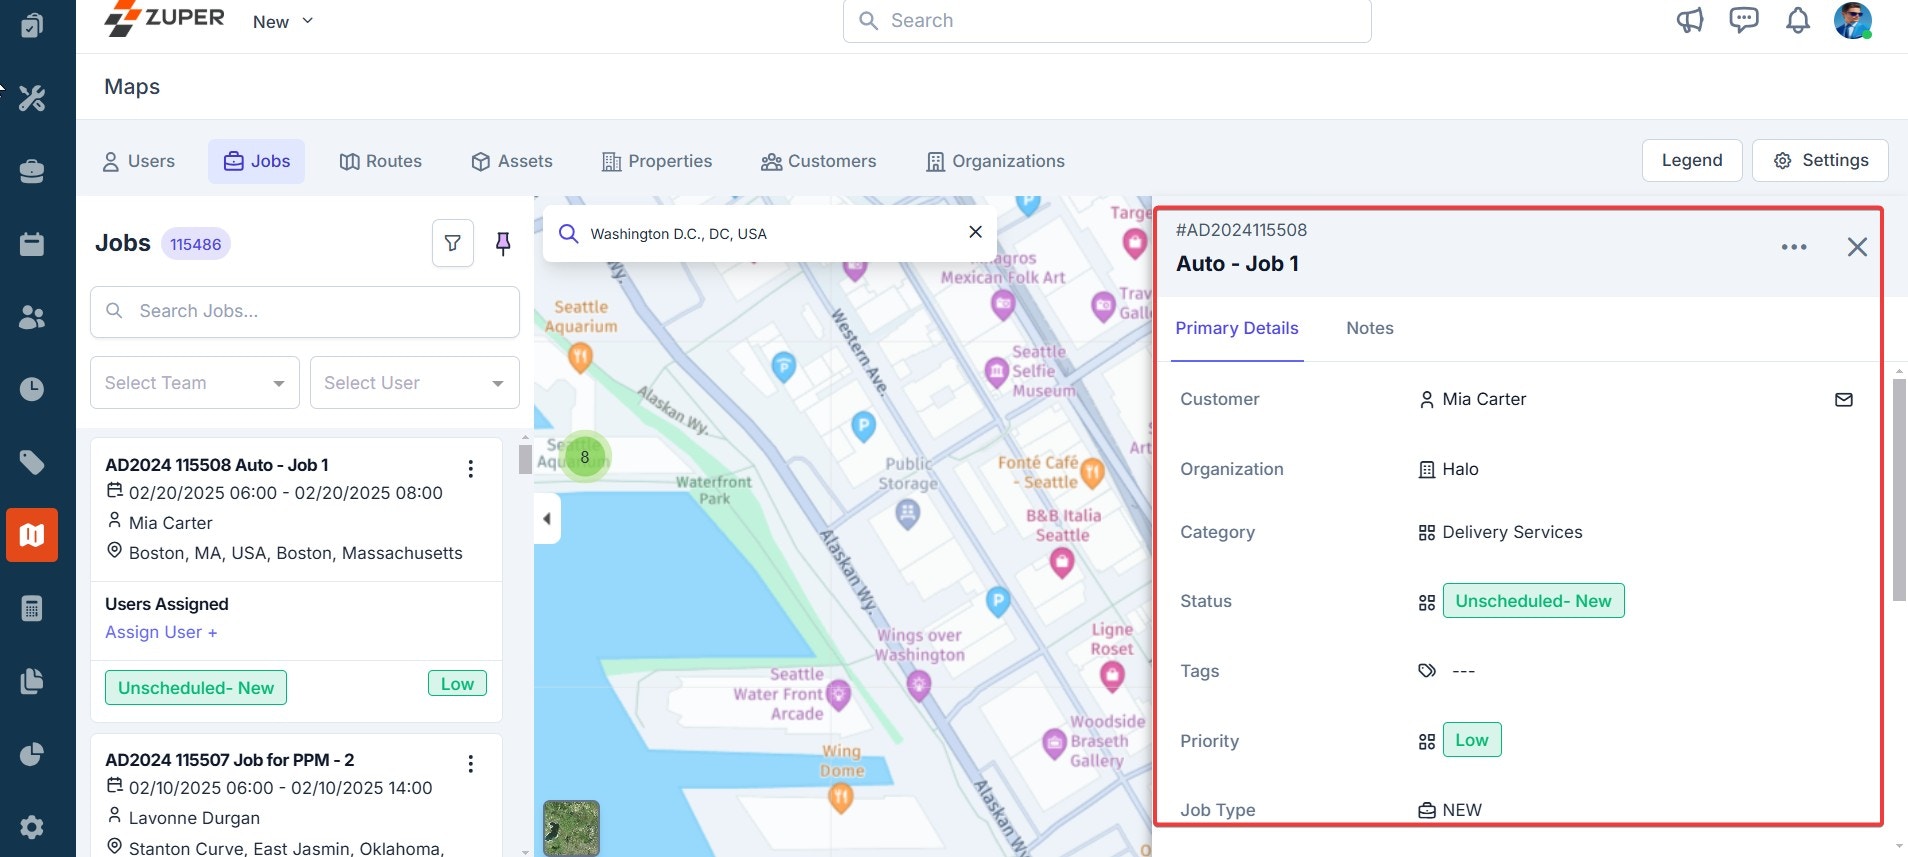
 4. To view any job details, click the "**Kebab**" icon next to the job and select "**Show Details**." This displays the job's primary information and notes associated with it.
 5. You can also pin/unpin the job module. Click the "**Pin**" icon next to the filters
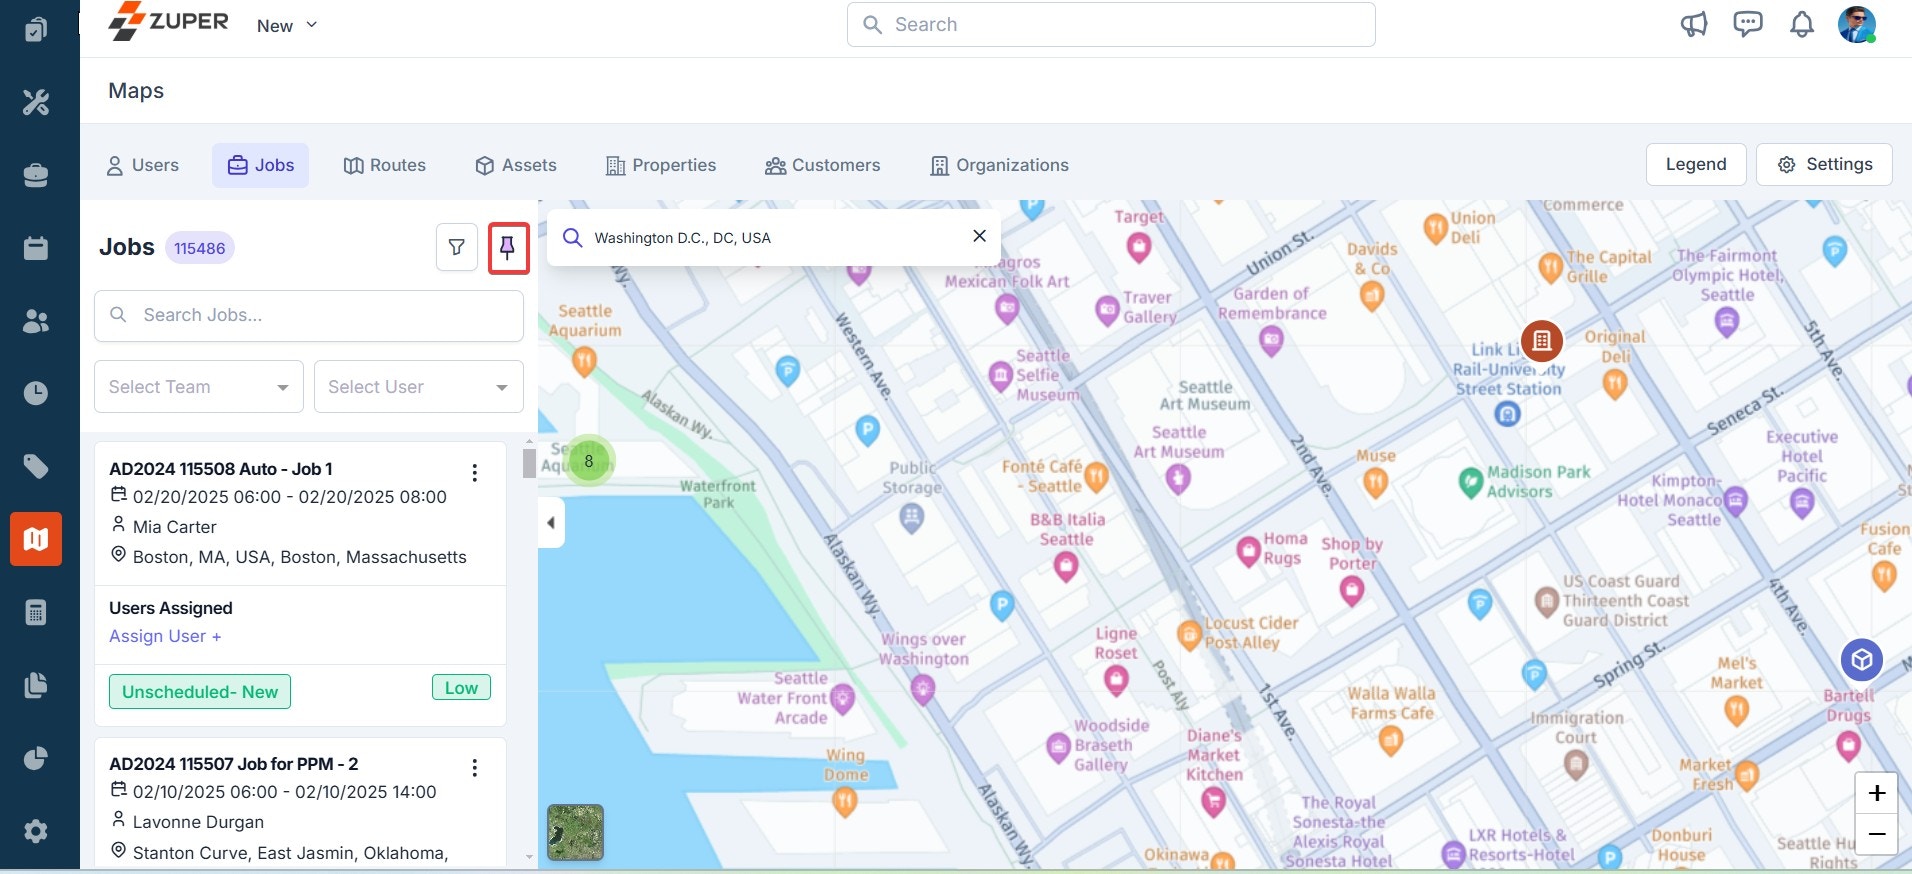 **Note:** When a job module is pinned, its location will appear on the map for all other
selected modules. When unpinned, it will not appear in other modules.
## Routes
1. On the maps page, click "**Routes**" at the top, which lists all the routes created. Click any of the routes to view the exact location on the map. You can use the zoom-in and zoom-out icons to adjust the map view.
**Note:** When a job module is pinned, its location will appear on the map for all other
selected modules. When unpinned, it will not appear in other modules.
## Routes
1. On the maps page, click "**Routes**" at the top, which lists all the routes created. Click any of the routes to view the exact location on the map. You can use the zoom-in and zoom-out icons to adjust the map view.
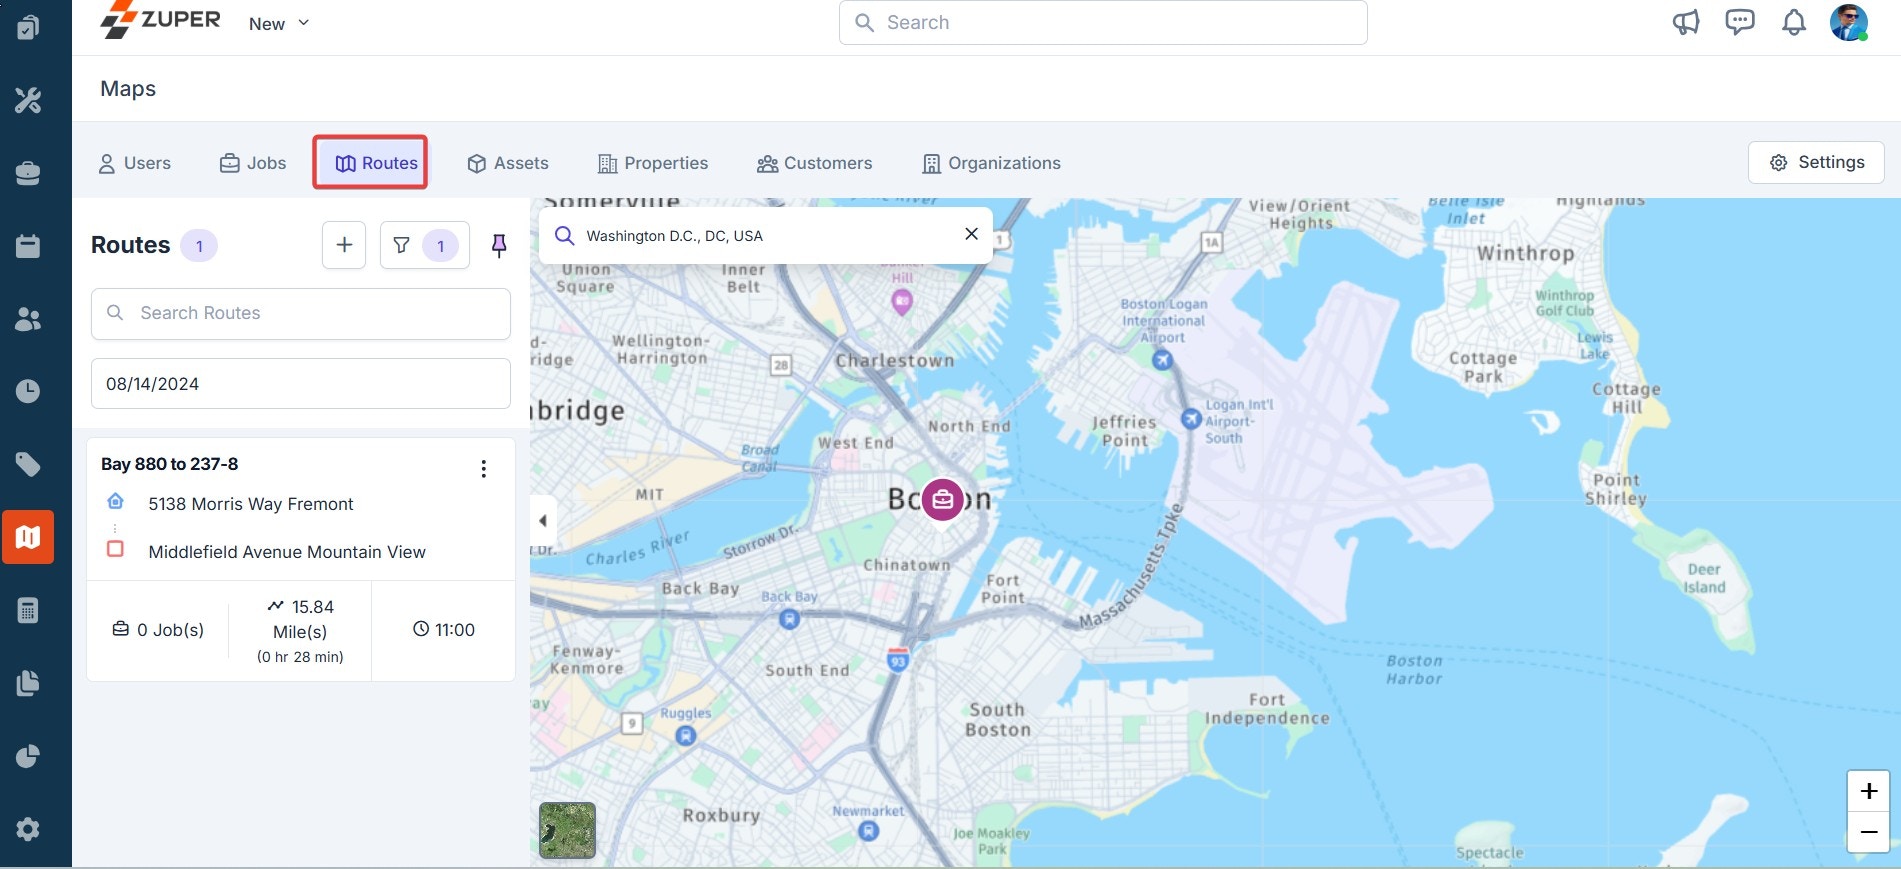 2. You can also search and view specific routes on the map. Click the "**Filter**" icon to search for a route based on the date the picker selects.
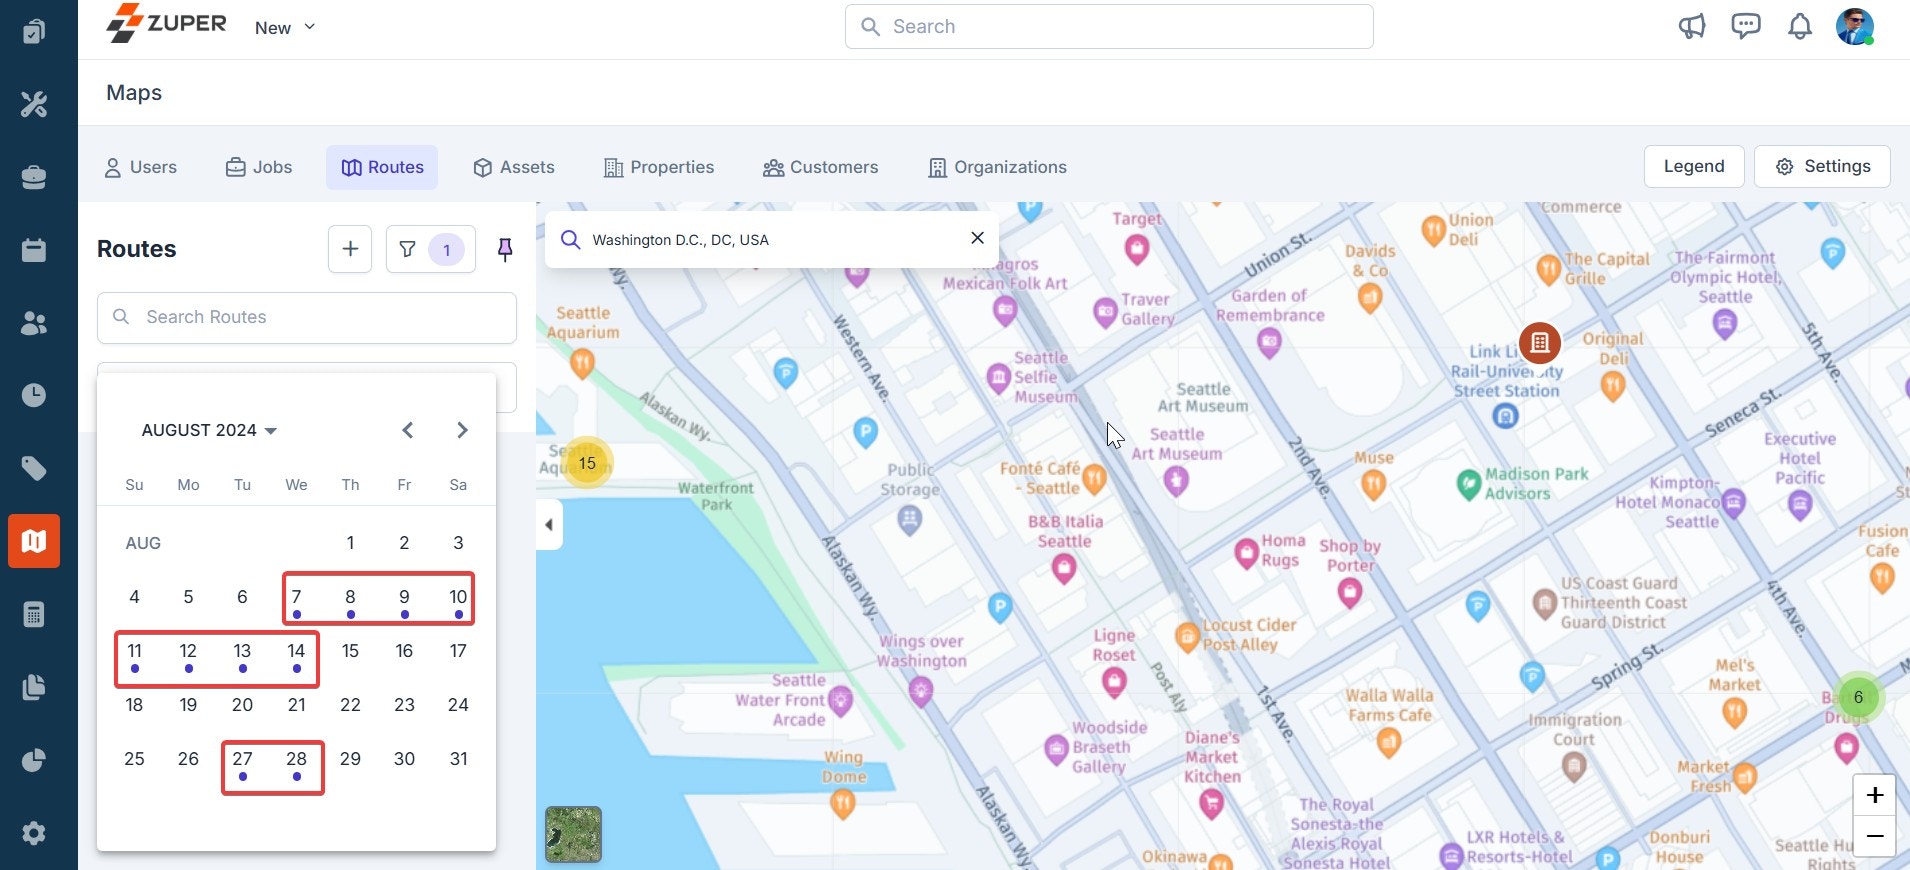 The blue dot represents the route present for the day.
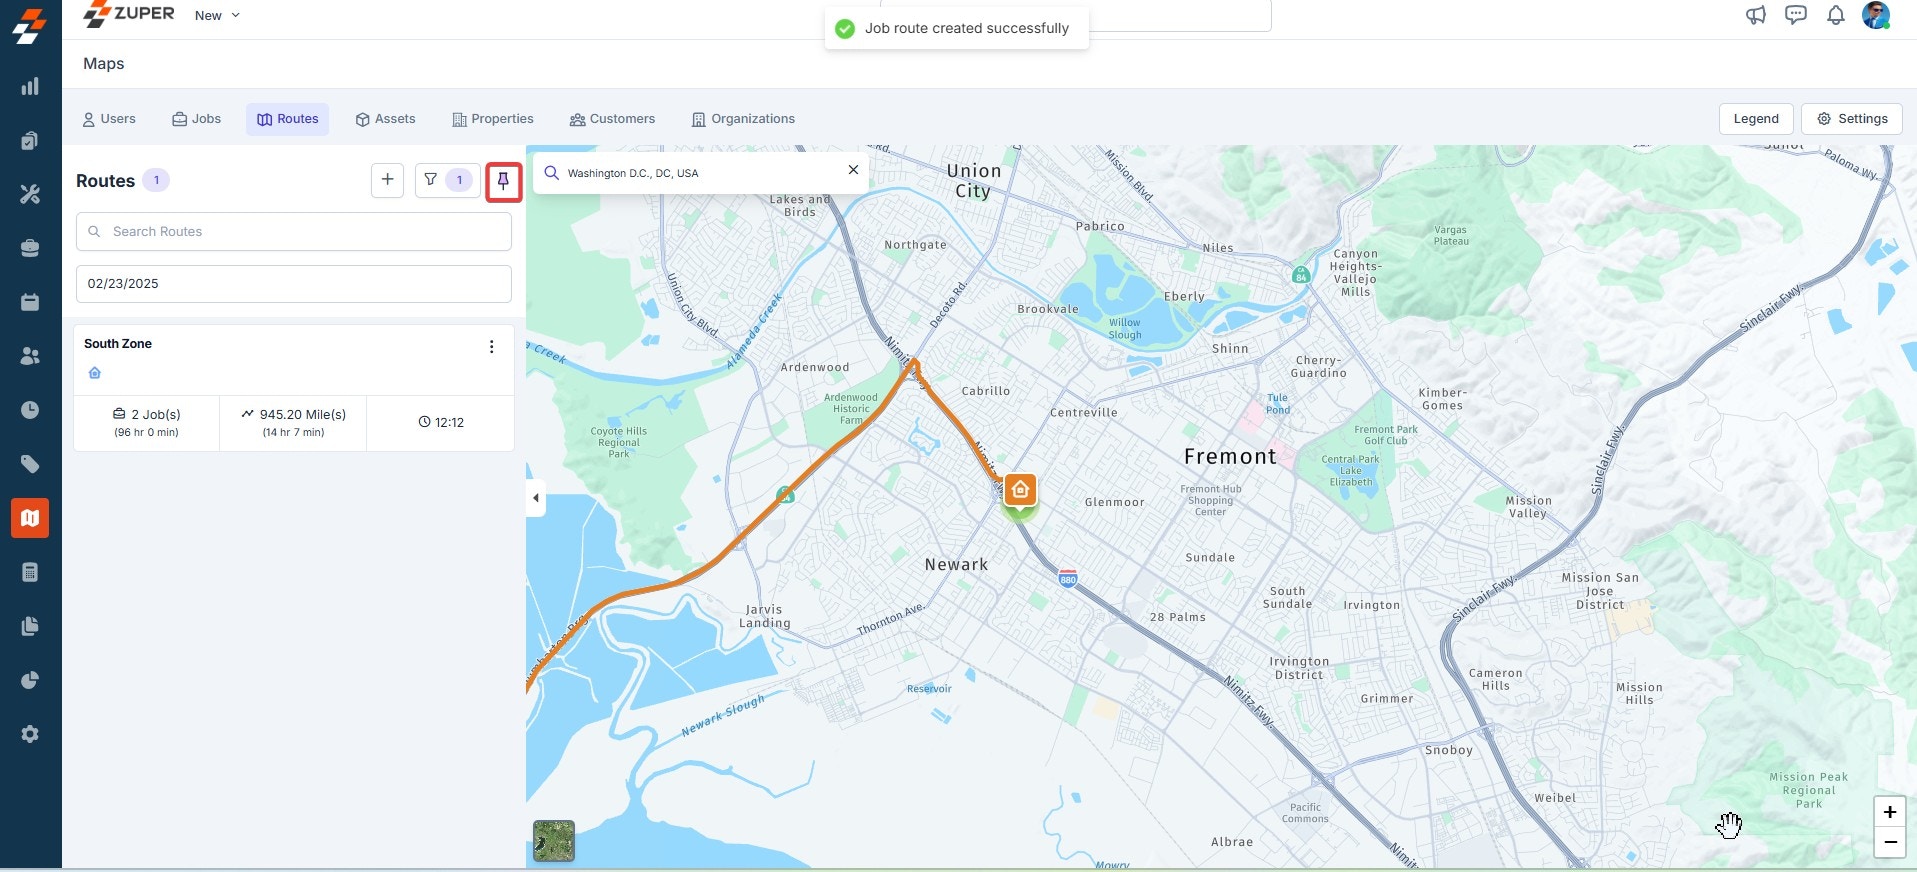
3. You can also pin/unpin a route. Click the "**Pin**" icon next to the filters.
**Note:** When a route is pinned, its location will appear in all other selected modules on the map. When unpinned, it will not appear in other modules.
The blue dot represents the route present for the day.
3. You can also pin/unpin a route. Click the "**Pin**" icon next to the filters.
**Note:** When a route is pinned, its location will appear in all other selected modules on the map. When unpinned, it will not appear in other modules.
 ### Create New Route
In addition to viewing the route on the map, you can create a new route from here.
1. Click the "+" icon next to Routes.
### Create New Route
In addition to viewing the route on the map, you can create a new route from here.
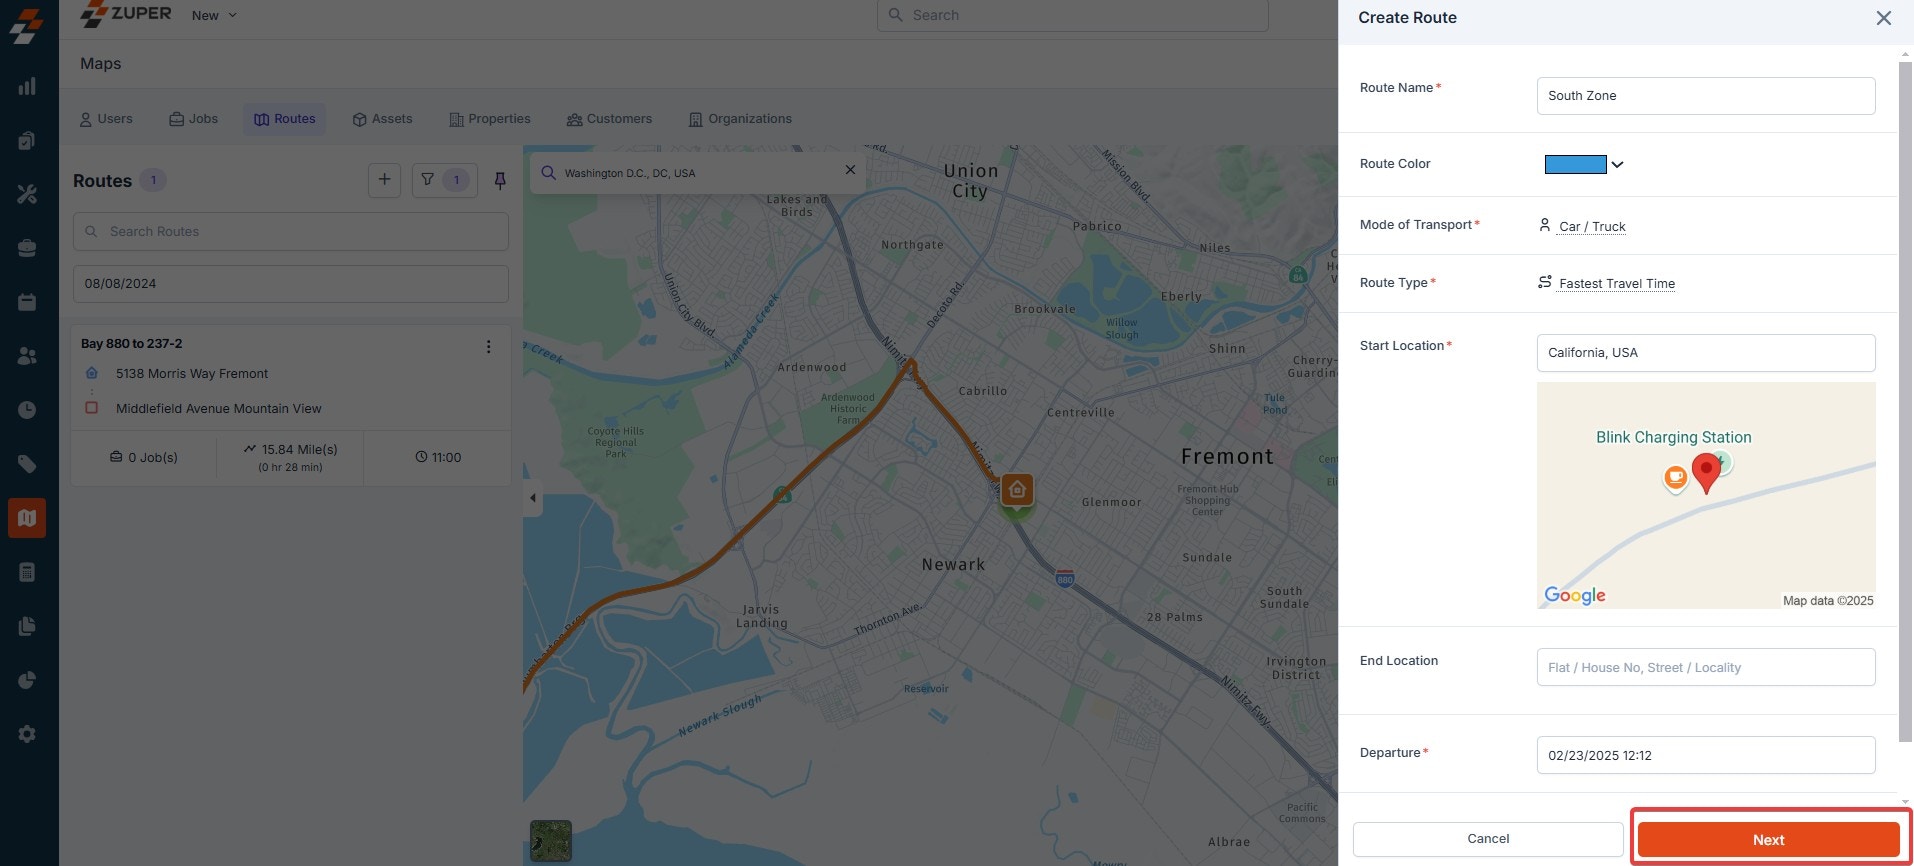
1. Click the "+" icon next to Routes. 2. A sidebar appears on the right to create a route. Enter the following details on the page and click the "**Next**" button.
* Route Name- Provide a name for the route.
* Route Color - Choose the route color from the drop-down menu to be marked on the map.
* Mode of Transport- Choose the transport mode (Car/semi-truck, truck, pedestrian) used on the route.
* Route type - Choose the route type (Fastest travel time or shortest distance) that the technician needs to follow.
Start Location- Pick the location from where the route would start.
End Location- Pick the location where the route ends.
* Departure- Select the date and Time of departure.
* Duration- Enter the estimated time (in hours) that will be taken for the route to complete.
2. A sidebar appears on the right to create a route. Enter the following details on the page and click the "**Next**" button.
* Route Name- Provide a name for the route.
* Route Color - Choose the route color from the drop-down menu to be marked on the map.
* Mode of Transport- Choose the transport mode (Car/semi-truck, truck, pedestrian) used on the route.
* Route type - Choose the route type (Fastest travel time or shortest distance) that the technician needs to follow.
Start Location- Pick the location from where the route would start.
End Location- Pick the location where the route ends.
* Departure- Select the date and Time of departure.
* Duration- Enter the estimated time (in hours) that will be taken for the route to complete.
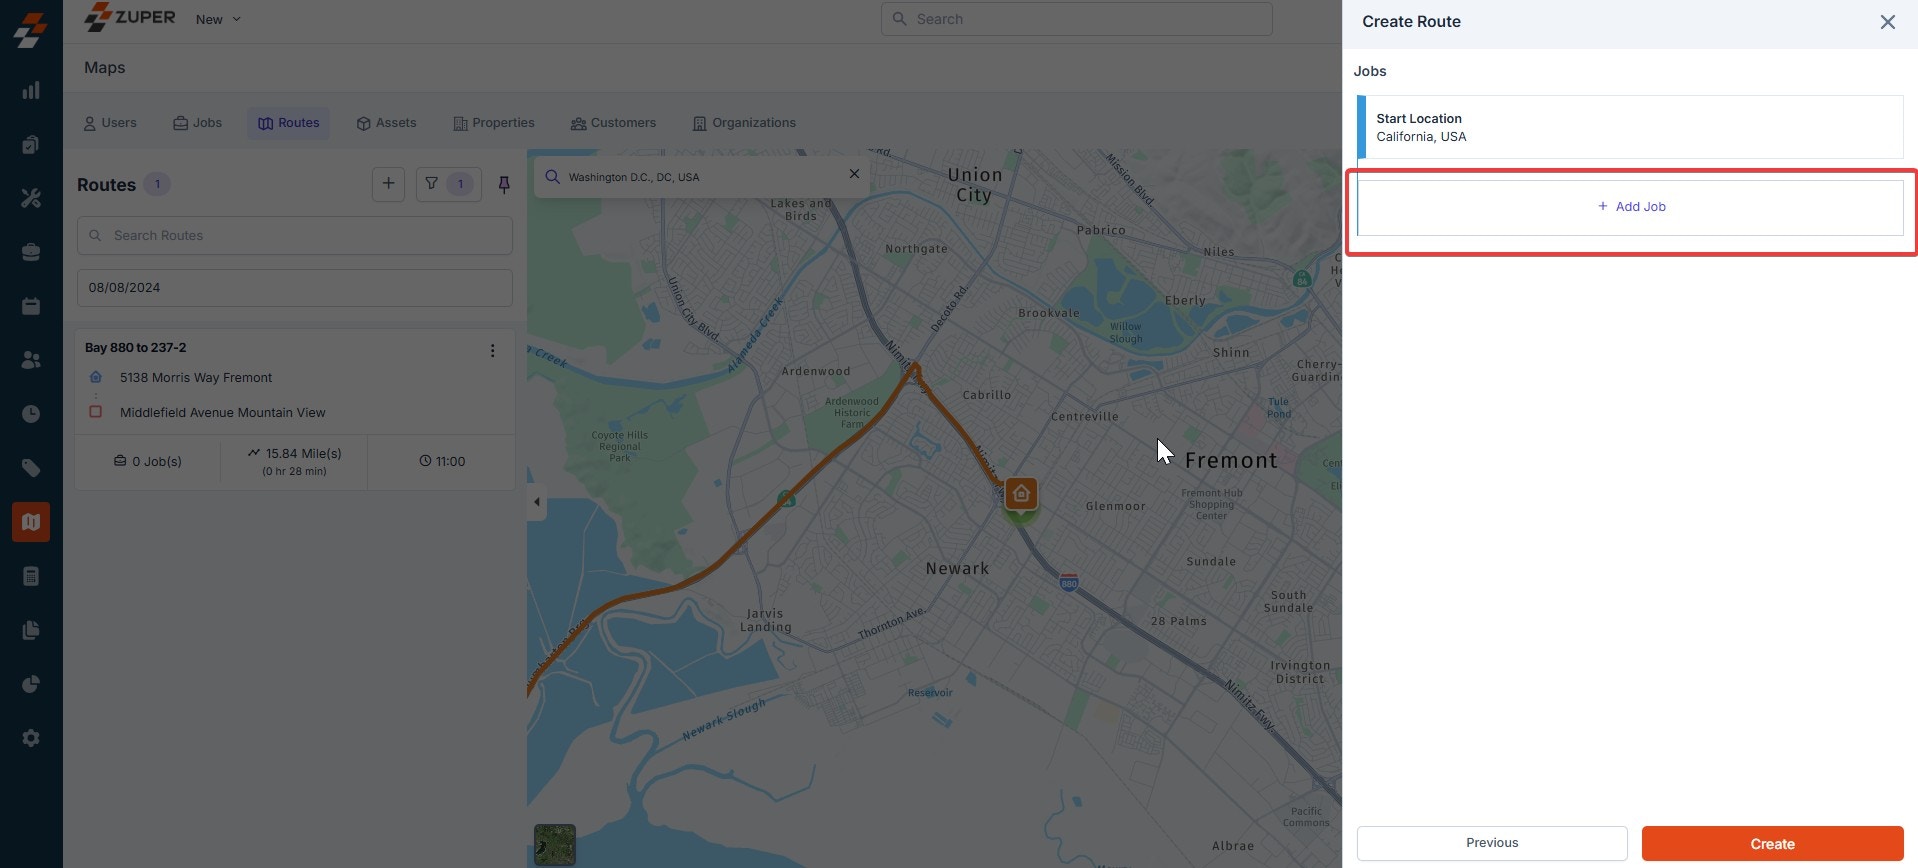
 3. Once the route has been created, you can add a job on the following page. To do so, click "**+ Add Job**."
 4. Select the Jobs to be added and click the "**Choose Job**" button to add them to the route.
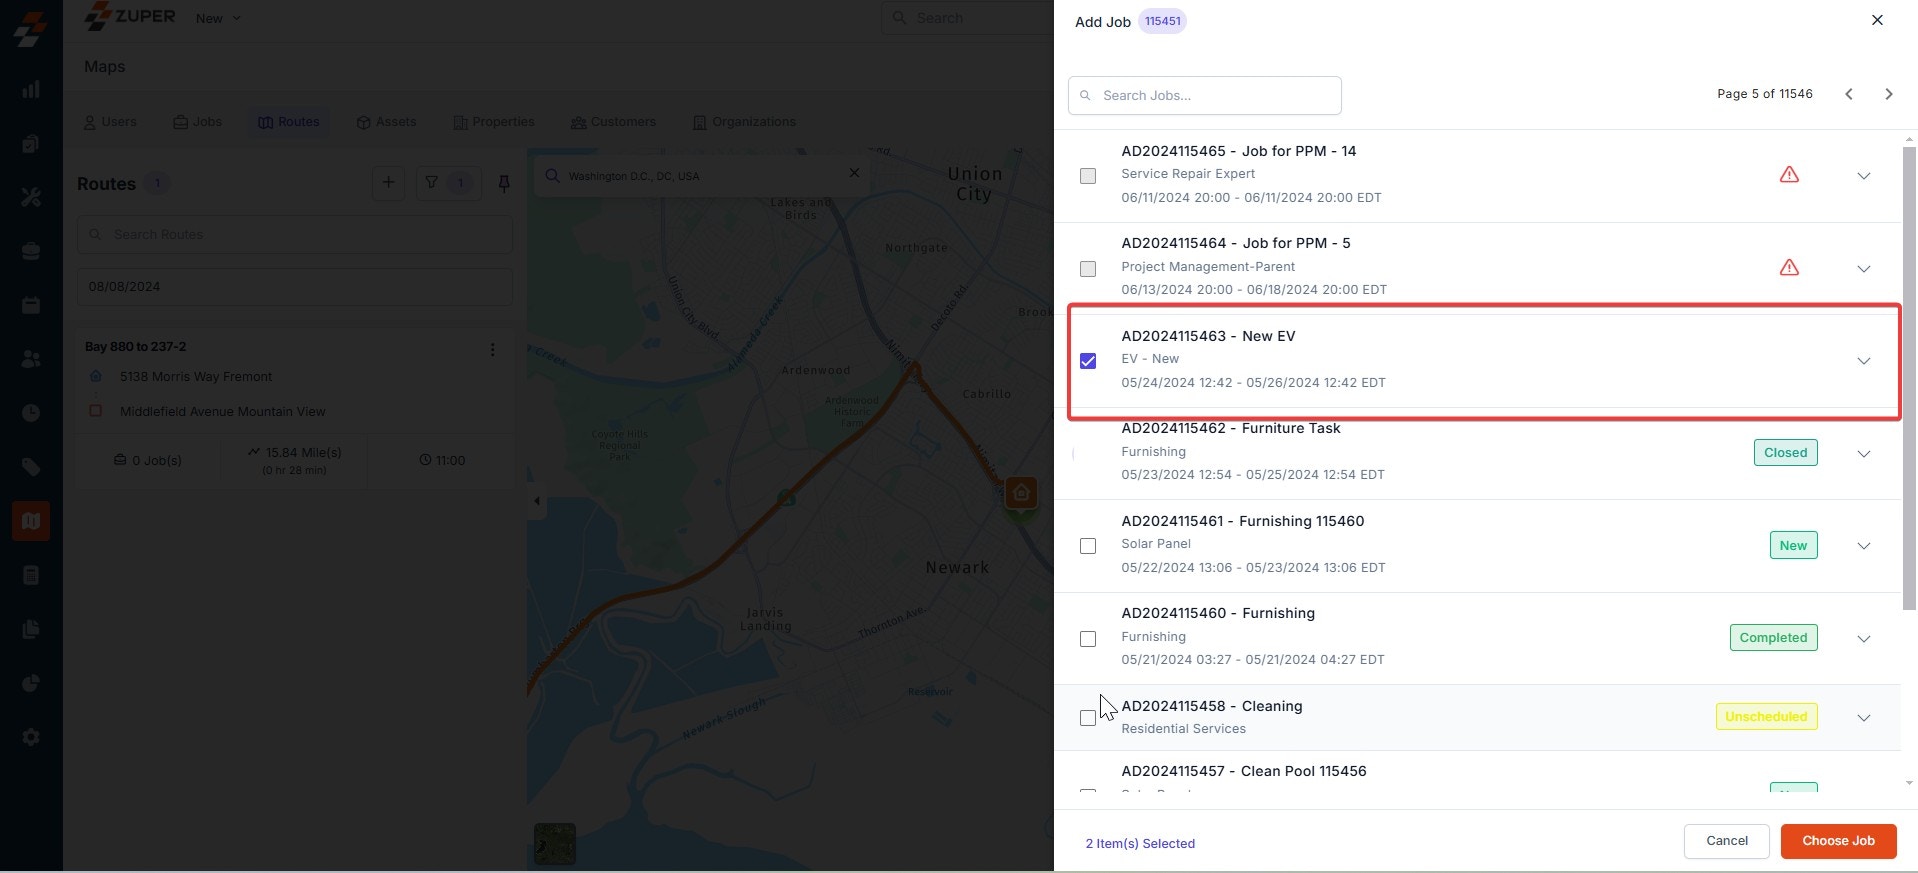 **Note:** The jobs with an exclamation mark cannot be selected as they do not have any geo-coordinates in their route.
5. After adding, click the "**Create**" button. The route will be created successfully.
**Note:** The jobs with an exclamation mark cannot be selected as they do not have any geo-coordinates in their route.
5. After adding, click the "**Create**" button. The route will be created successfully.
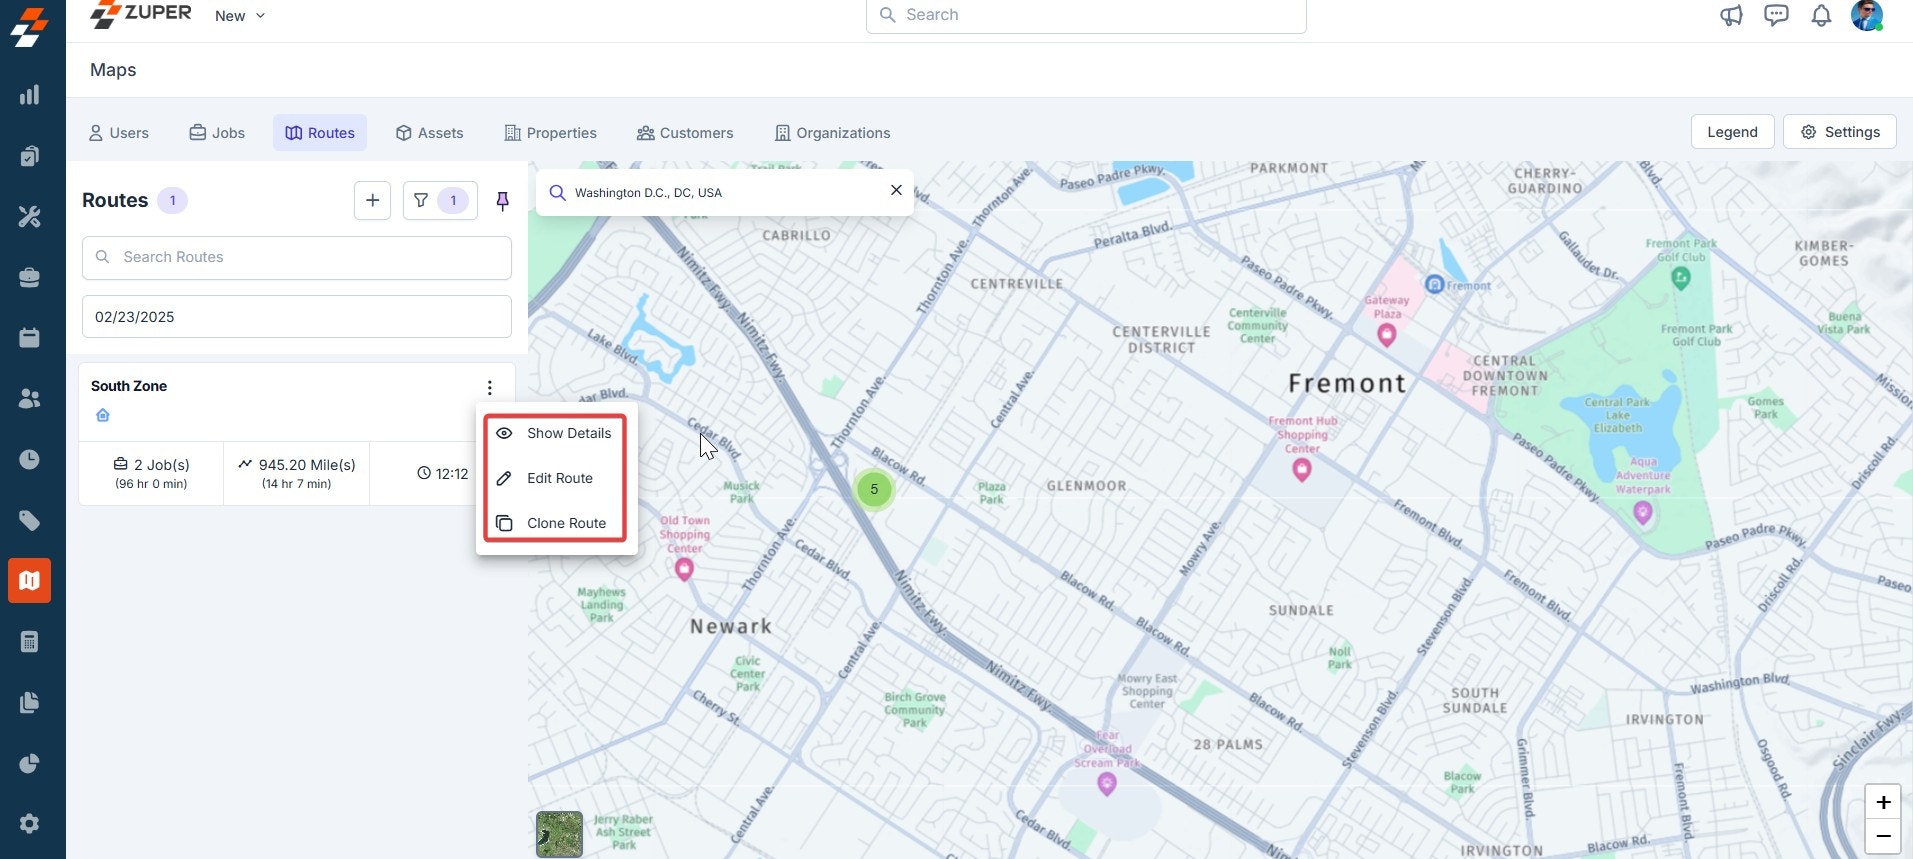
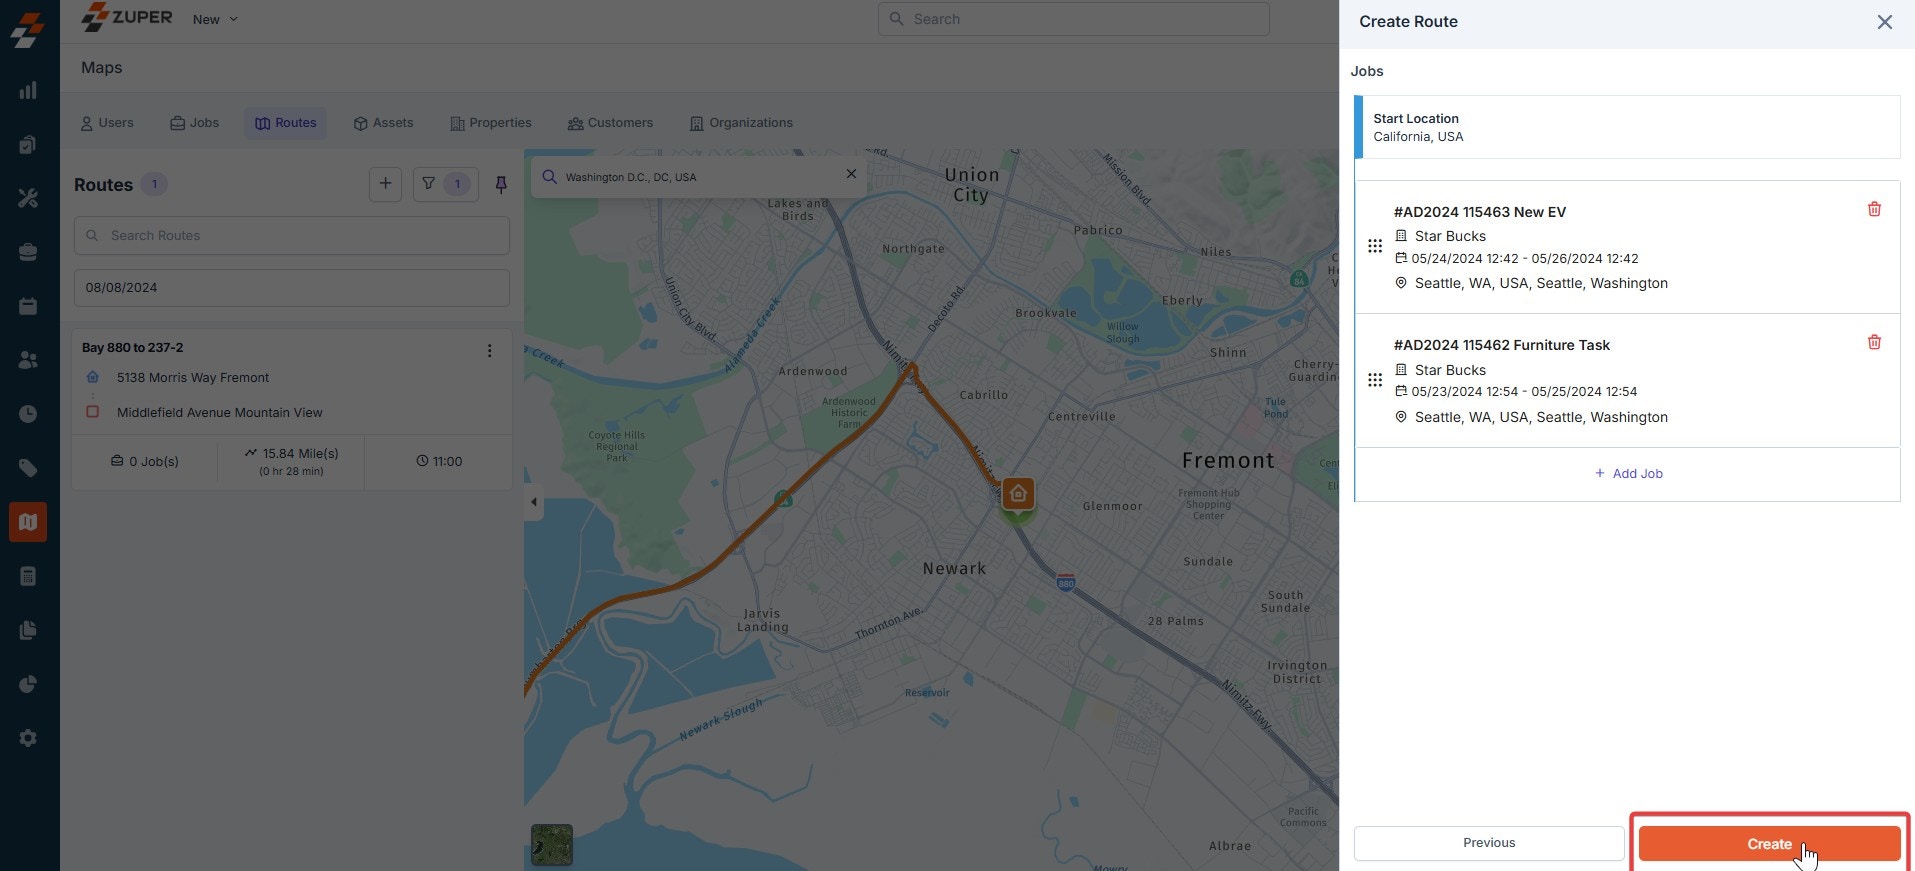 6. Once the route has been created, you can view details and edit or clone the route by clicking the "**Kebab**" icon.
When you click "**Edit Route**," you can make necessary changes to the previously created route. Once done, click the "**Update**" button to save the changes.
When you click "**Clone Route**," The same route with the same details will be cloned and added as a new route. You can also make changes if needed.
6. Once the route has been created, you can view details and edit or clone the route by clicking the "**Kebab**" icon.
When you click "**Edit Route**," you can make necessary changes to the previously created route. Once done, click the "**Update**" button to save the changes.
When you click "**Clone Route**," The same route with the same details will be cloned and added as a new route. You can also make changes if needed.
 **Show Details**
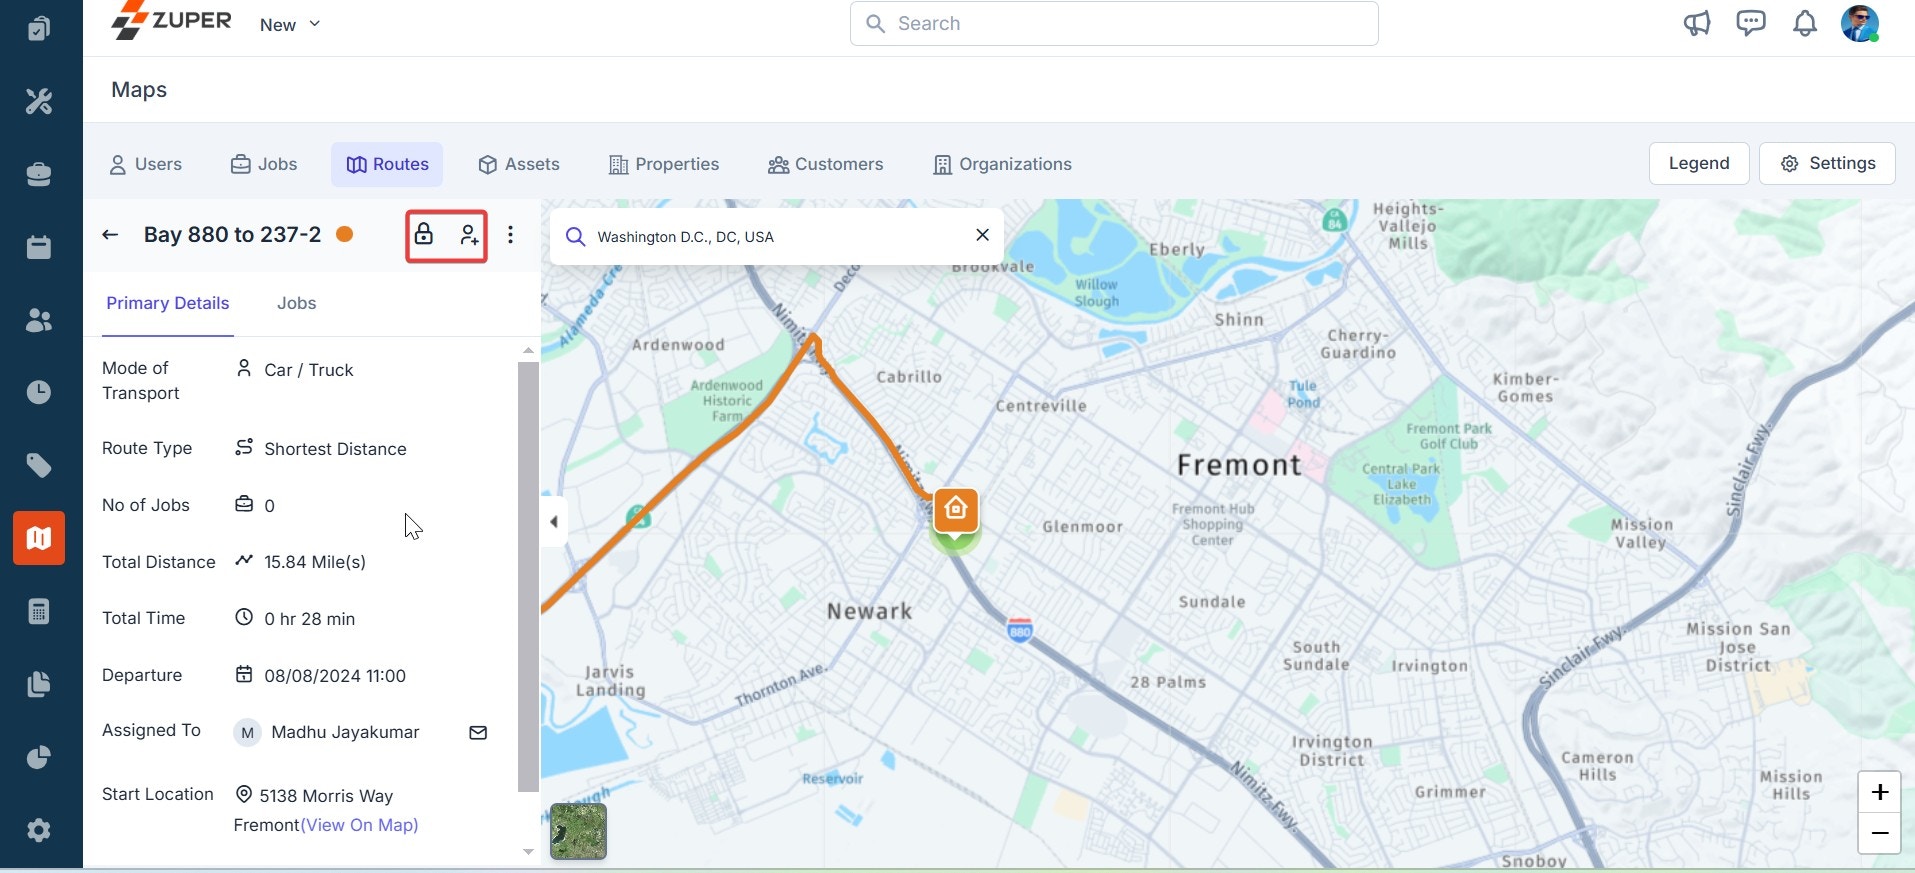
Using the actions icons at the top left, you can lock the route, assign a user, optimize the route, and edit route/reorder jobs/clone route/delete the route by clicking the "**Kebab**" menu.
**Note:** When you lock the route, you won't be able to update it. This means you can't change the route location, reschedule, add more jobs to the route, or reorder them.
**Show Details**
Using the actions icons at the top left, you can lock the route, assign a user, optimize the route, and edit route/reorder jobs/clone route/delete the route by clicking the "**Kebab**" menu.
**Note:** When you lock the route, you won't be able to update it. This means you can't change the route location, reschedule, add more jobs to the route, or reorder them.
 ## Assets
To track the exact location of the assets on the map, follow these steps:
1. On the maps page, click "**Assets**" at the top, which lists all the assets created.
## Assets
To track the exact location of the assets on the map, follow these steps:
1. On the maps page, click "**Assets**" at the top, which lists all the assets created.
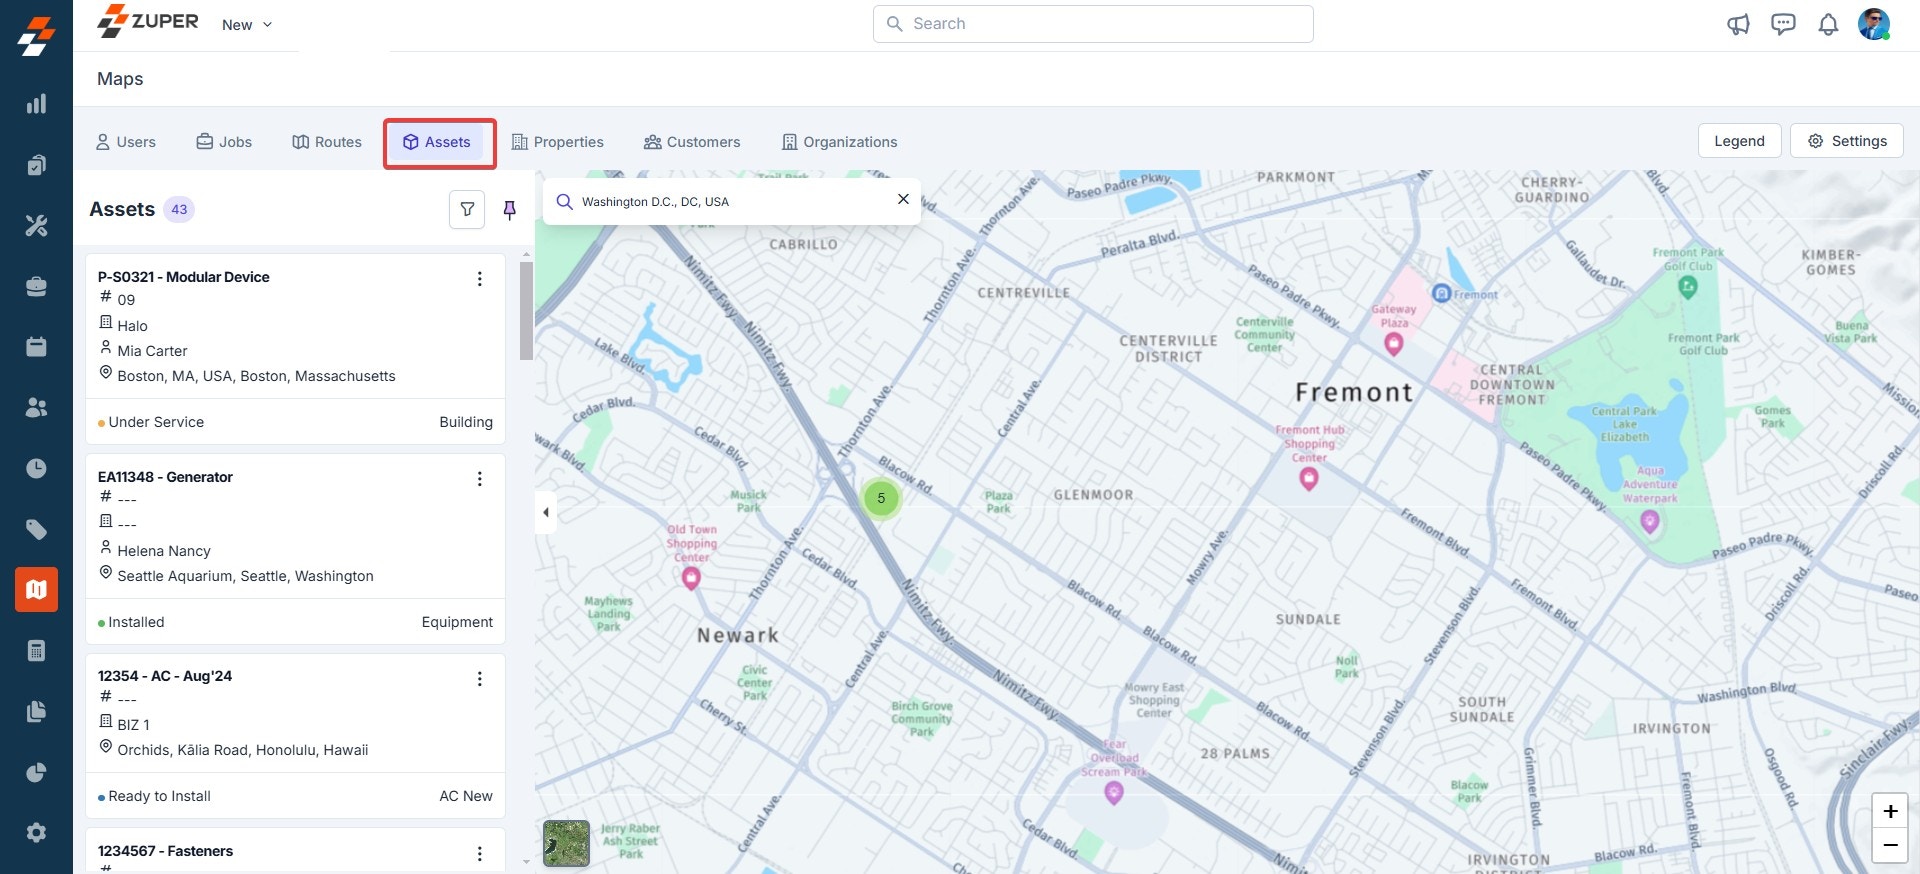 2. Click any asset to view its location on the map. You can use the zoom-in and zoom-out icons to adjust the map view.
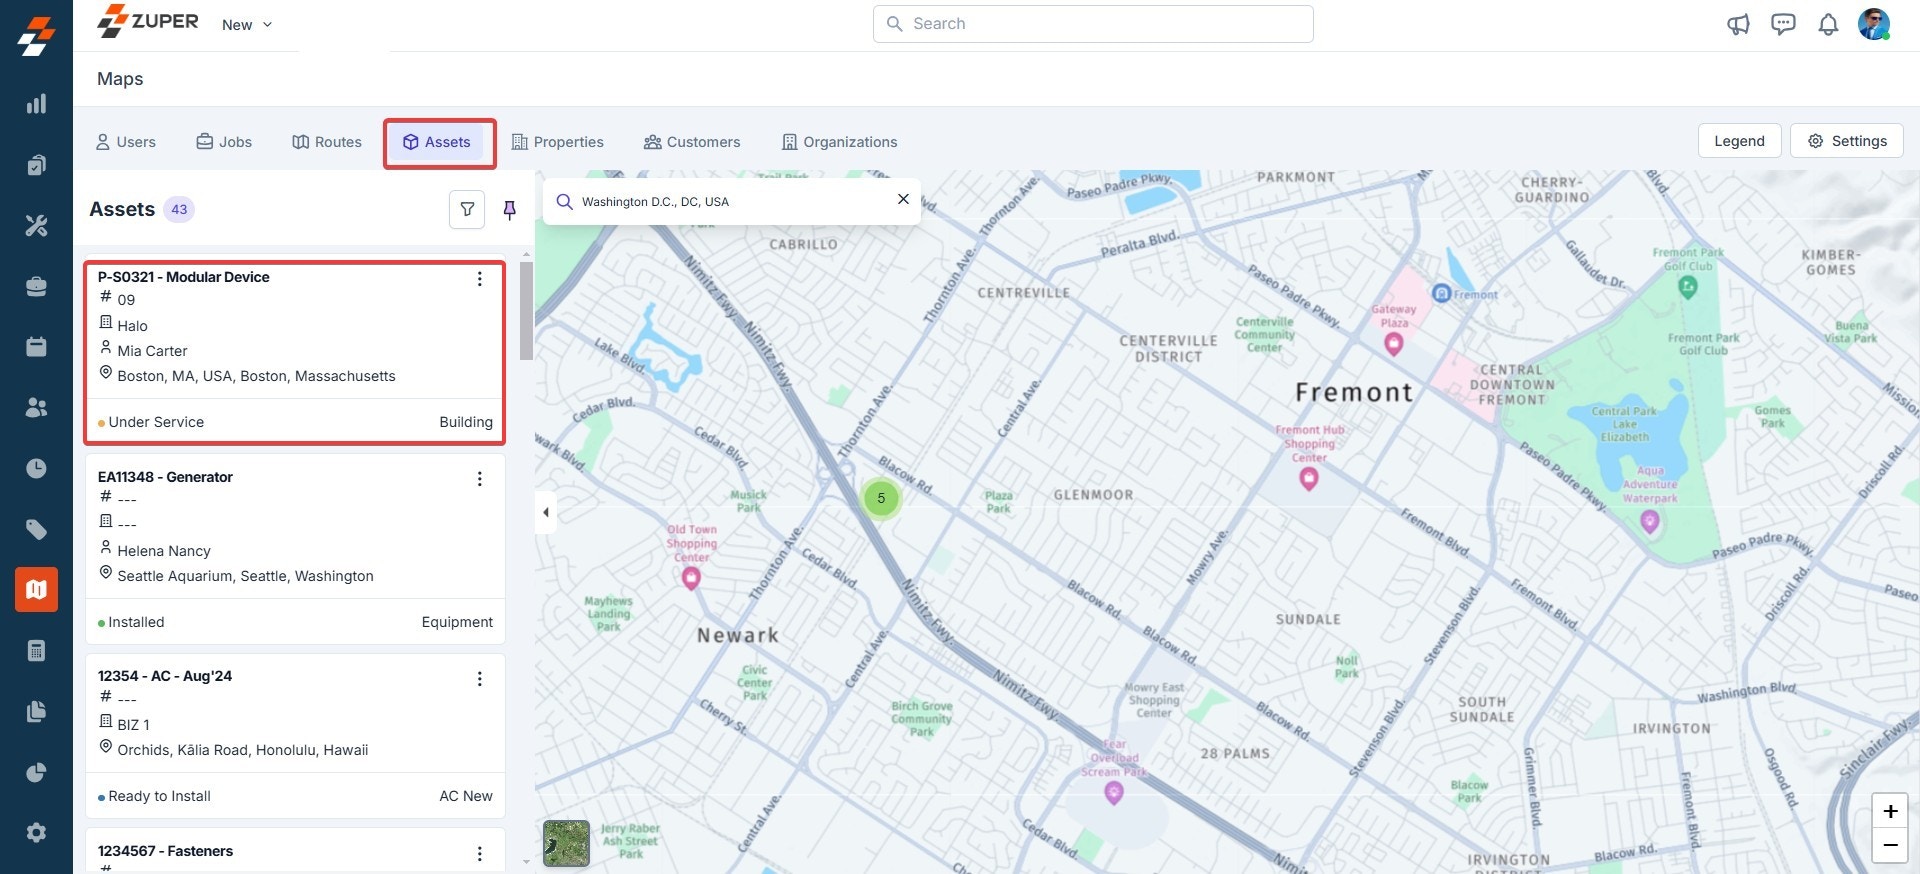 3. You can also search and view specific assets. To do so, click the "**Filter**" icon to search for an asset based on the selected category.
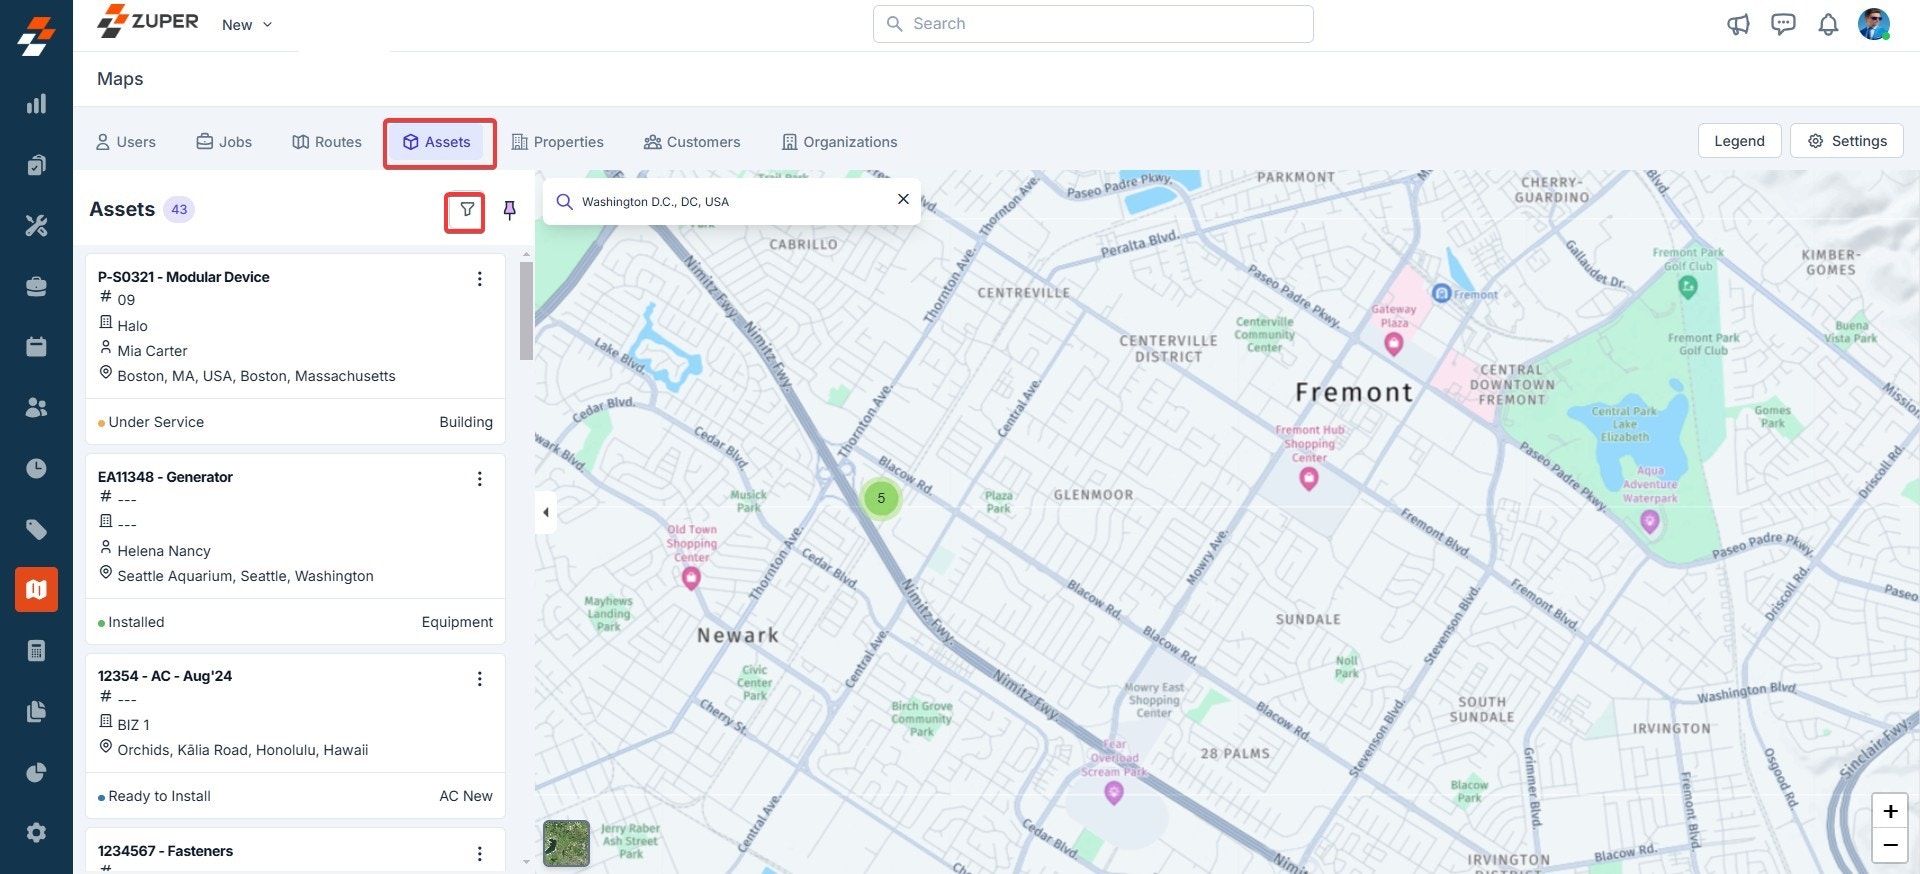 4. To view asset details, click the "**Kebab**" icon next to the asset and select "**Show Details**." You can view details such as the asset code, ownership, parts, and so on.
 5. You can also pin/unpin an asset. Click the "**Pin**" icon next to the filters.
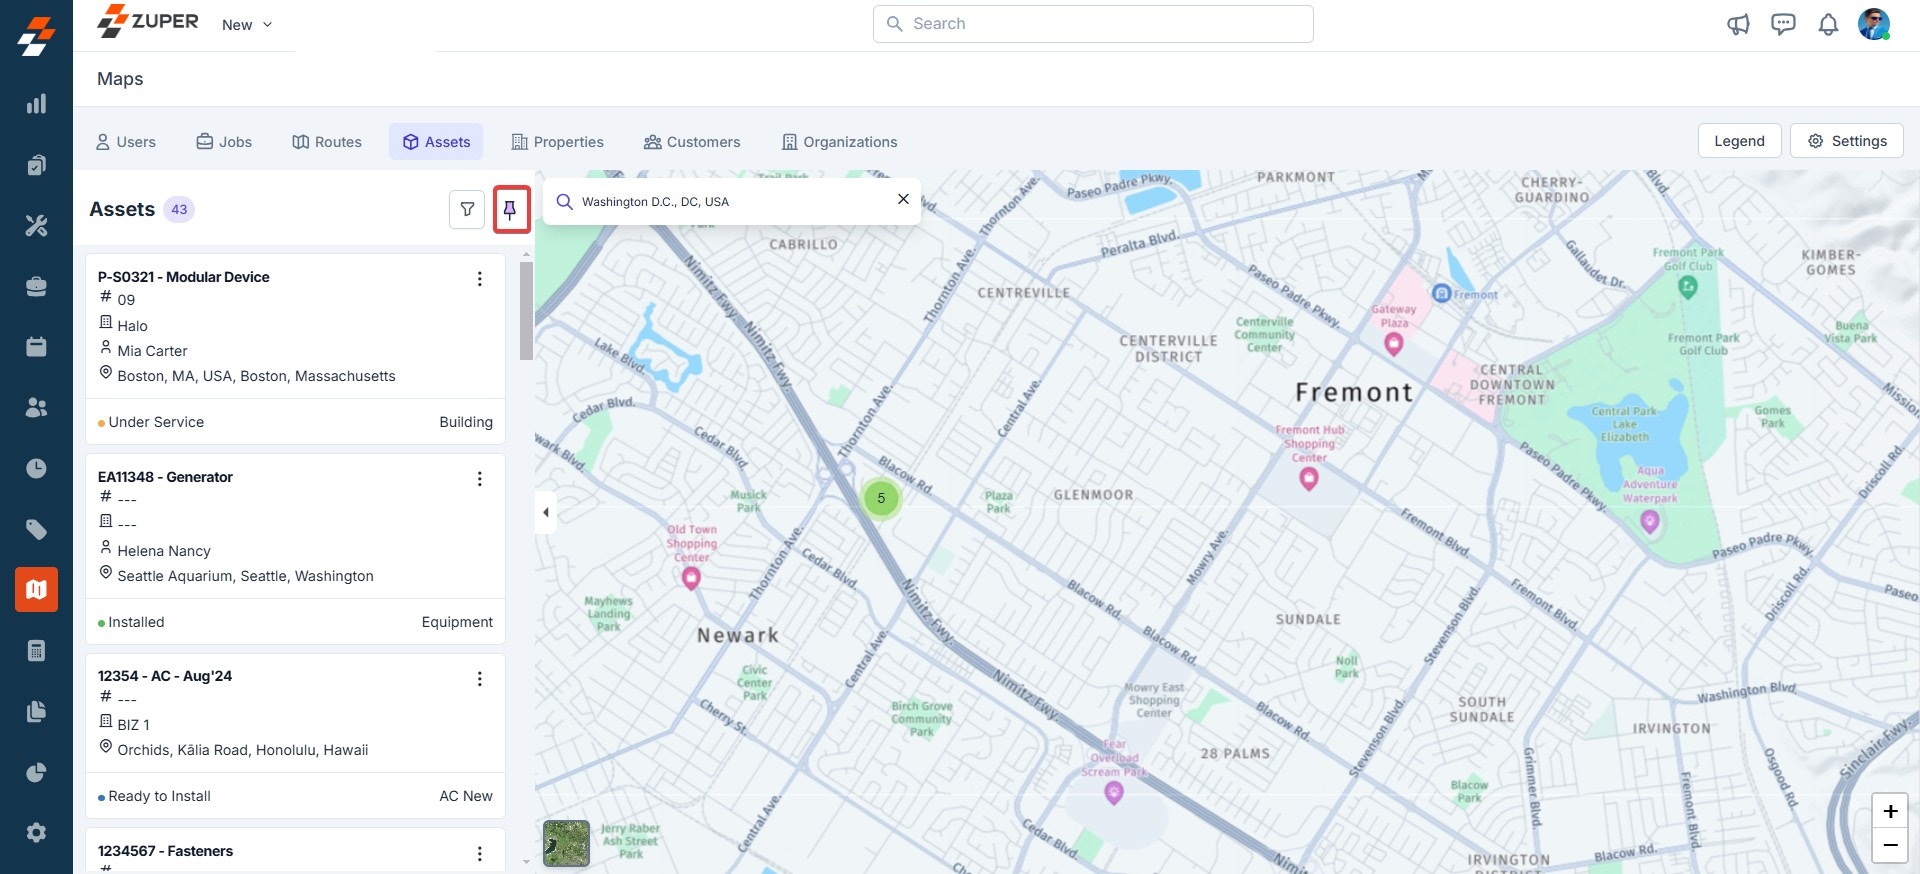 **Note:** When an asset module is pinned, its location appears in all other selected modules on the map. When unpinned, it does not appear in different modules.
## Properties
To track the exact location of the property on the map, follow these steps:
1. On the maps page, click "**Properties**" at the top, which lists all the properties created.
**Note:** When an asset module is pinned, its location appears in all other selected modules on the map. When unpinned, it does not appear in different modules.
## Properties
To track the exact location of the property on the map, follow these steps:
1. On the maps page, click "**Properties**" at the top, which lists all the properties created.
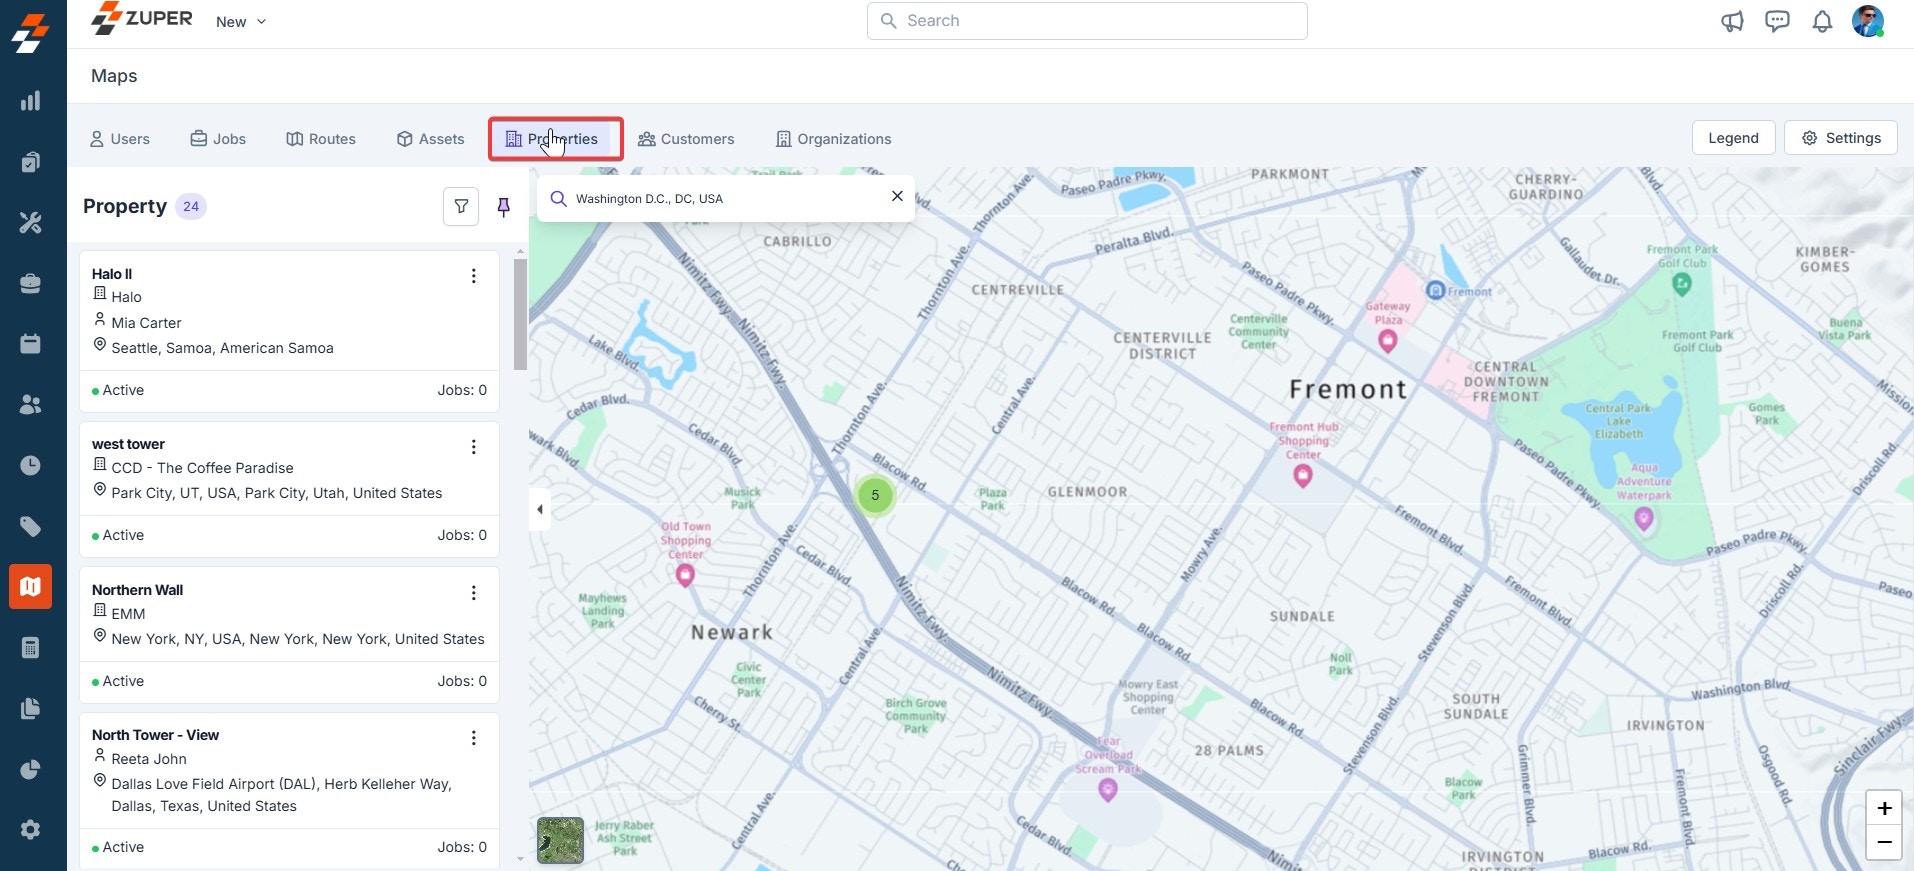 2. Click any properties to view their location on the map. You can use the zoom-in and zoom-out icons to adjust the map view.
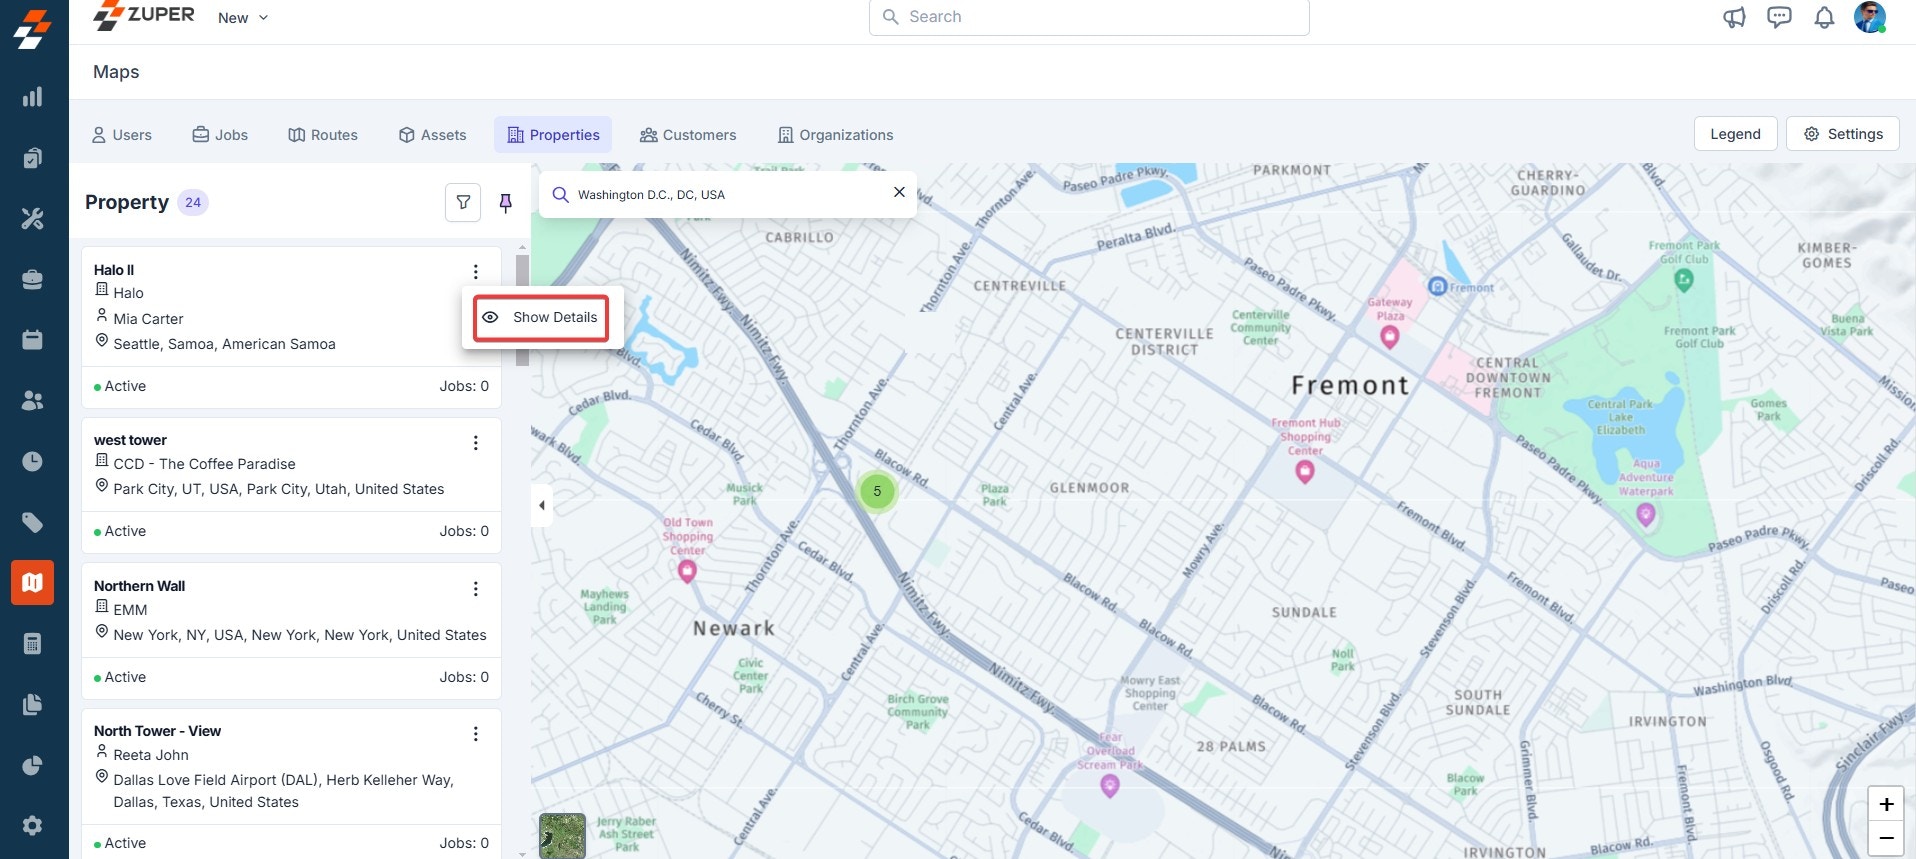
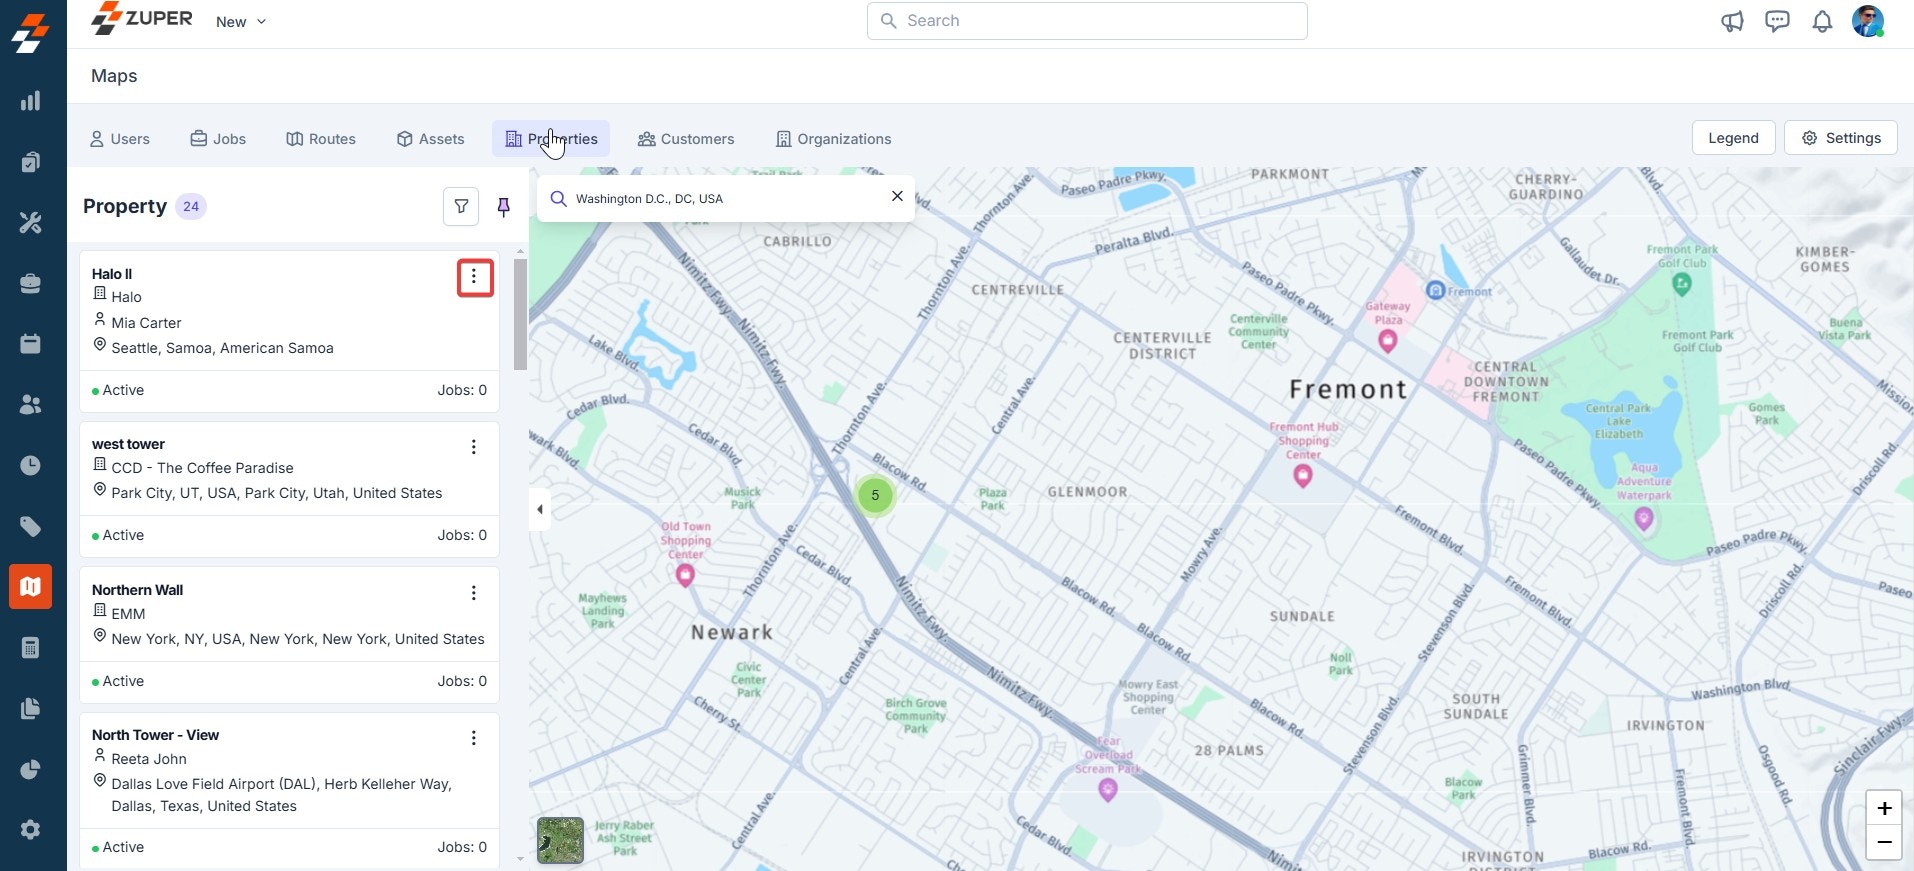 3. You can also search and view specific properties. To search for a property, click the "**Filter**" icon. To view the property's details, click the "**Kebab**" icon next to the property and select "**Show Details**." You can view the property details such as property location, the number of jobs associated with the property, and so on.
 ## Customers
To track the exact location of the customer on the map, follow these steps:
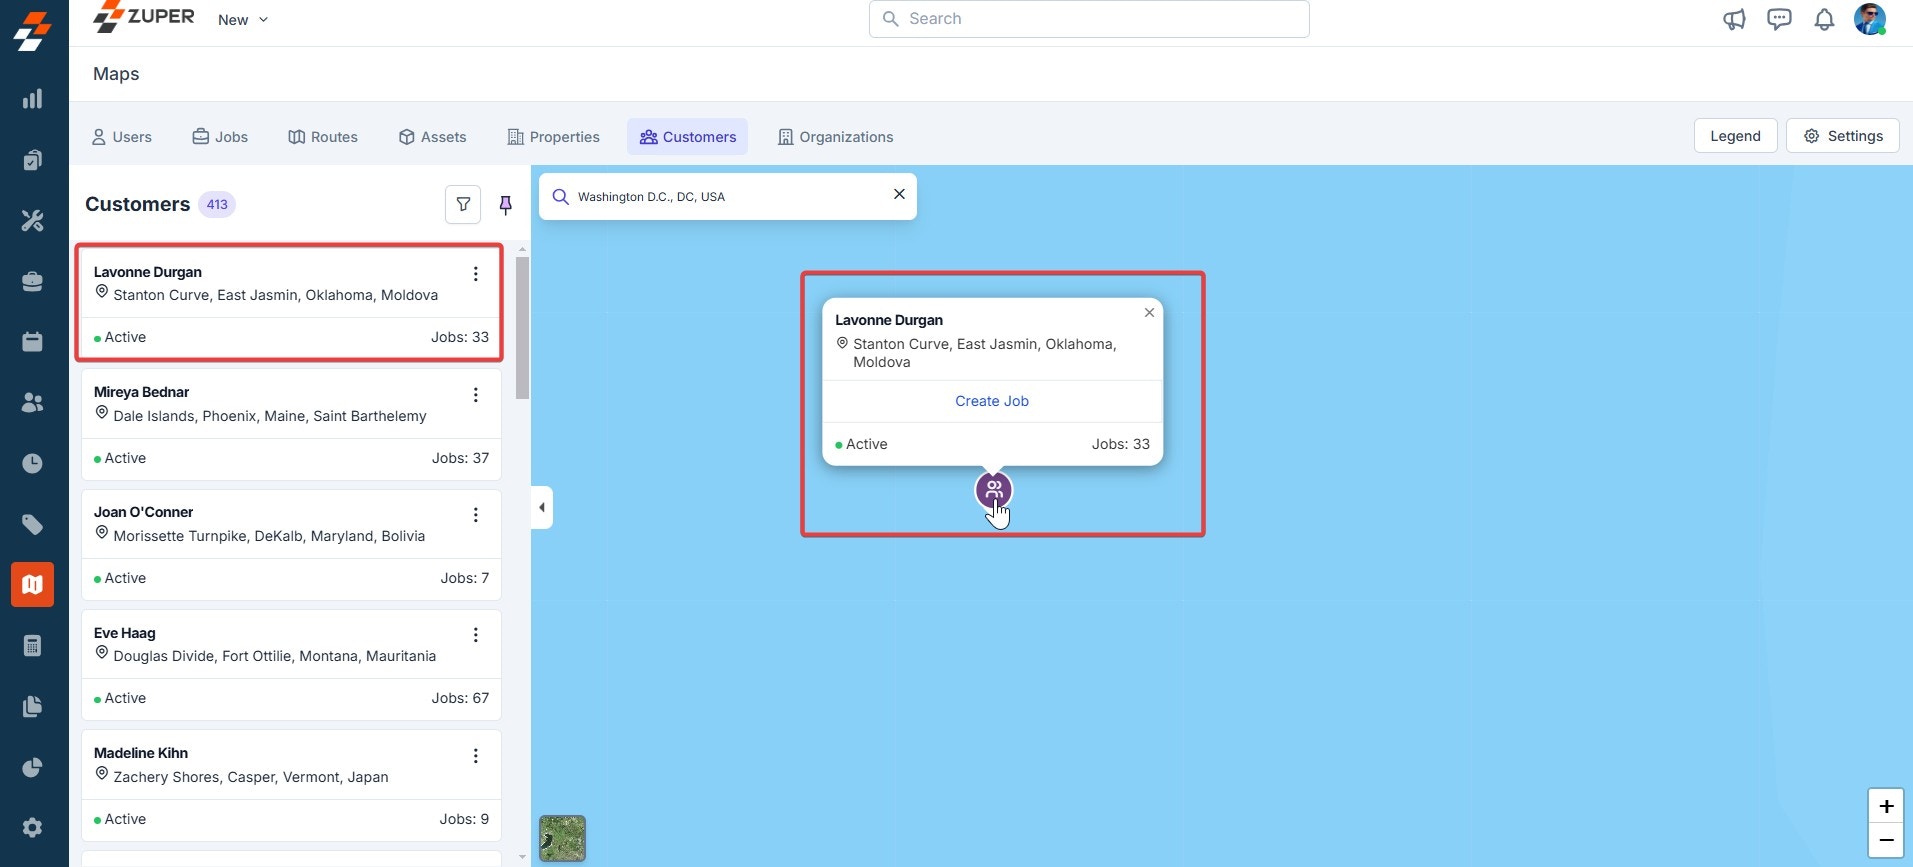
1. On the maps page, click "**Customers**" at the top, which lists all the customers created. Click any customers to view their exact location on the map. You can use the zoom-in and zoom-out icons to adjust the map view.
## Customers
To track the exact location of the customer on the map, follow these steps:
1. On the maps page, click "**Customers**" at the top, which lists all the customers created. Click any customers to view their exact location on the map. You can use the zoom-in and zoom-out icons to adjust the map view.
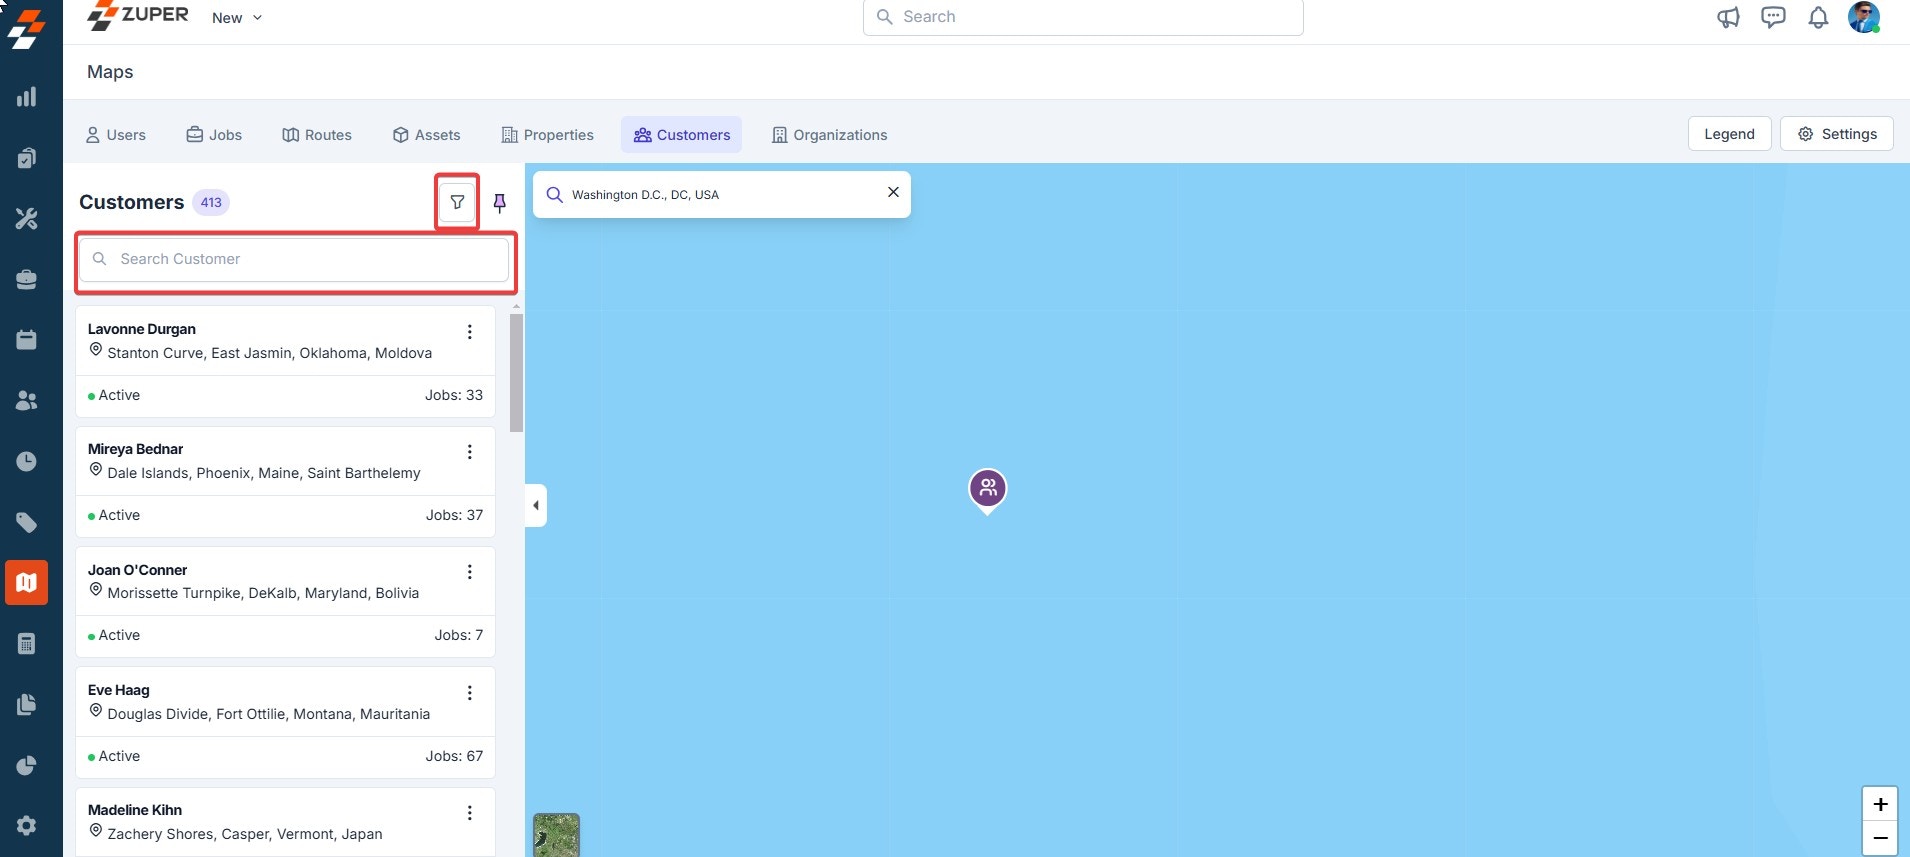
 2. You can also search and view specific customer locations on the map. To search for a particular customer, click the "**Filter**" icon.
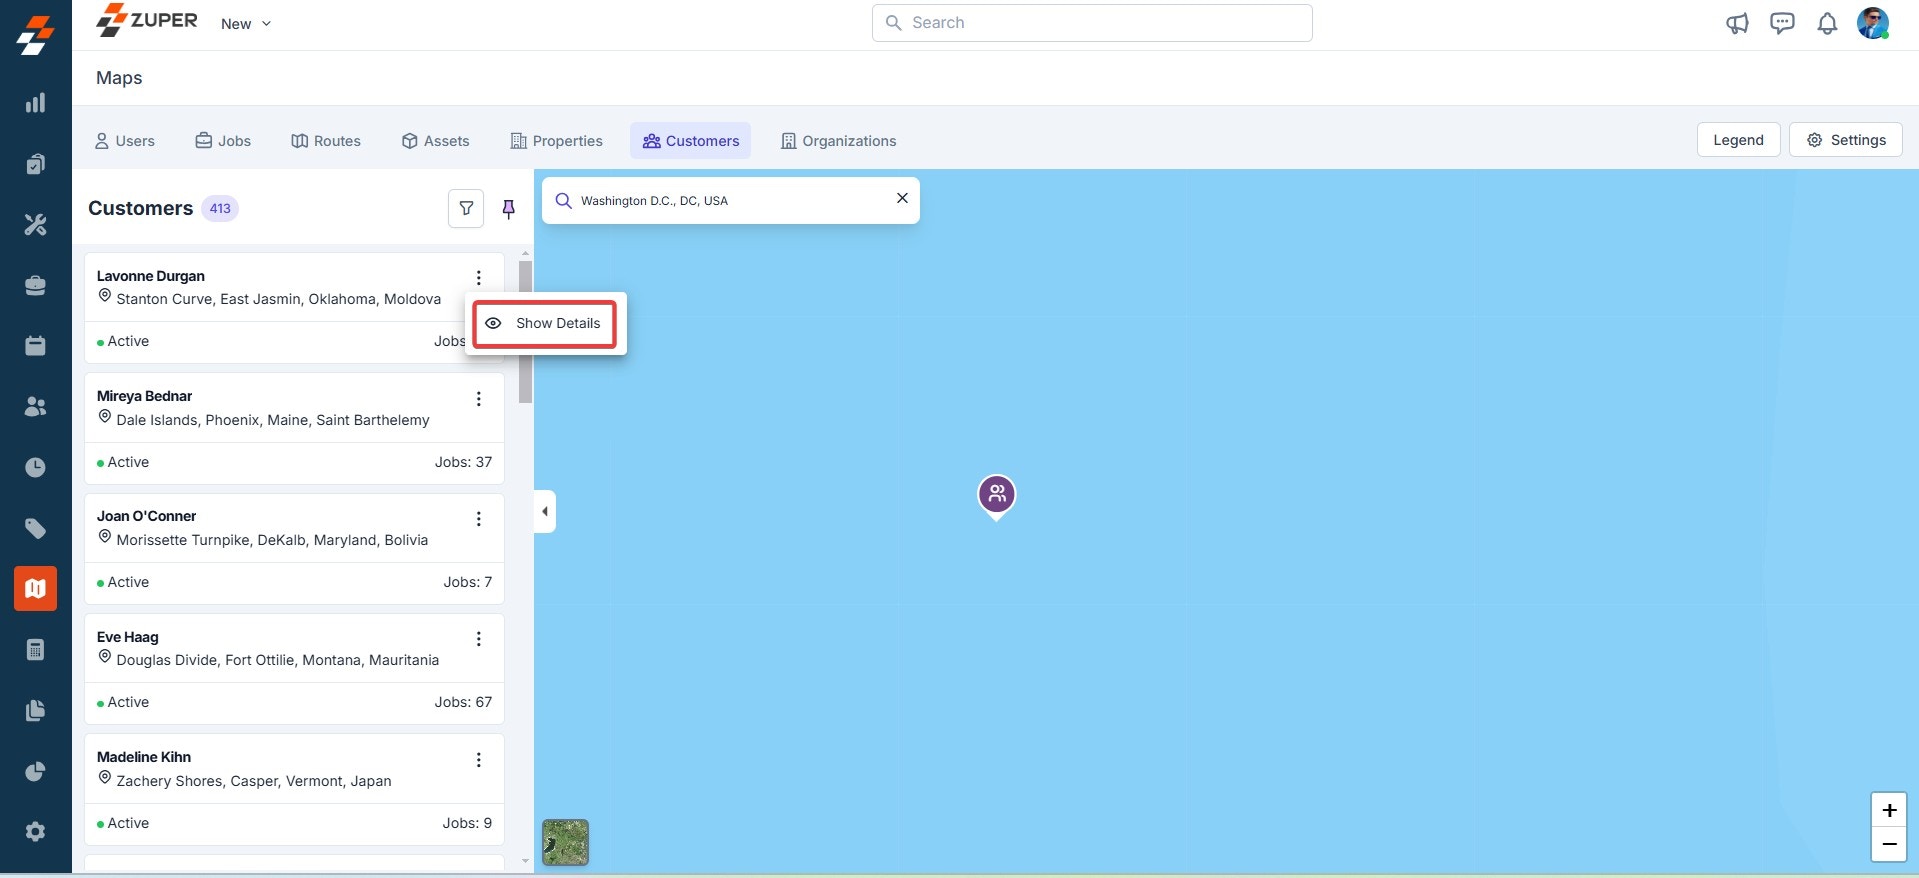
 3. To view any customer details, click the "**Kebab**" icon next to the customer and select "**Show Details**." You can view the customer's primary information and notes associated with them.
 ## Organization
To track the exact location of the organization on the map, follow these steps:
1. On the maps page, click "**Organization**" at the top, which lists all created organizations. Click any organizations to view their exact location on the map. You can use the zoom-in and zoom-out icons to adjust the map view.
## Organization
To track the exact location of the organization on the map, follow these steps:
1. On the maps page, click "**Organization**" at the top, which lists all created organizations. Click any organizations to view their exact location on the map. You can use the zoom-in and zoom-out icons to adjust the map view.
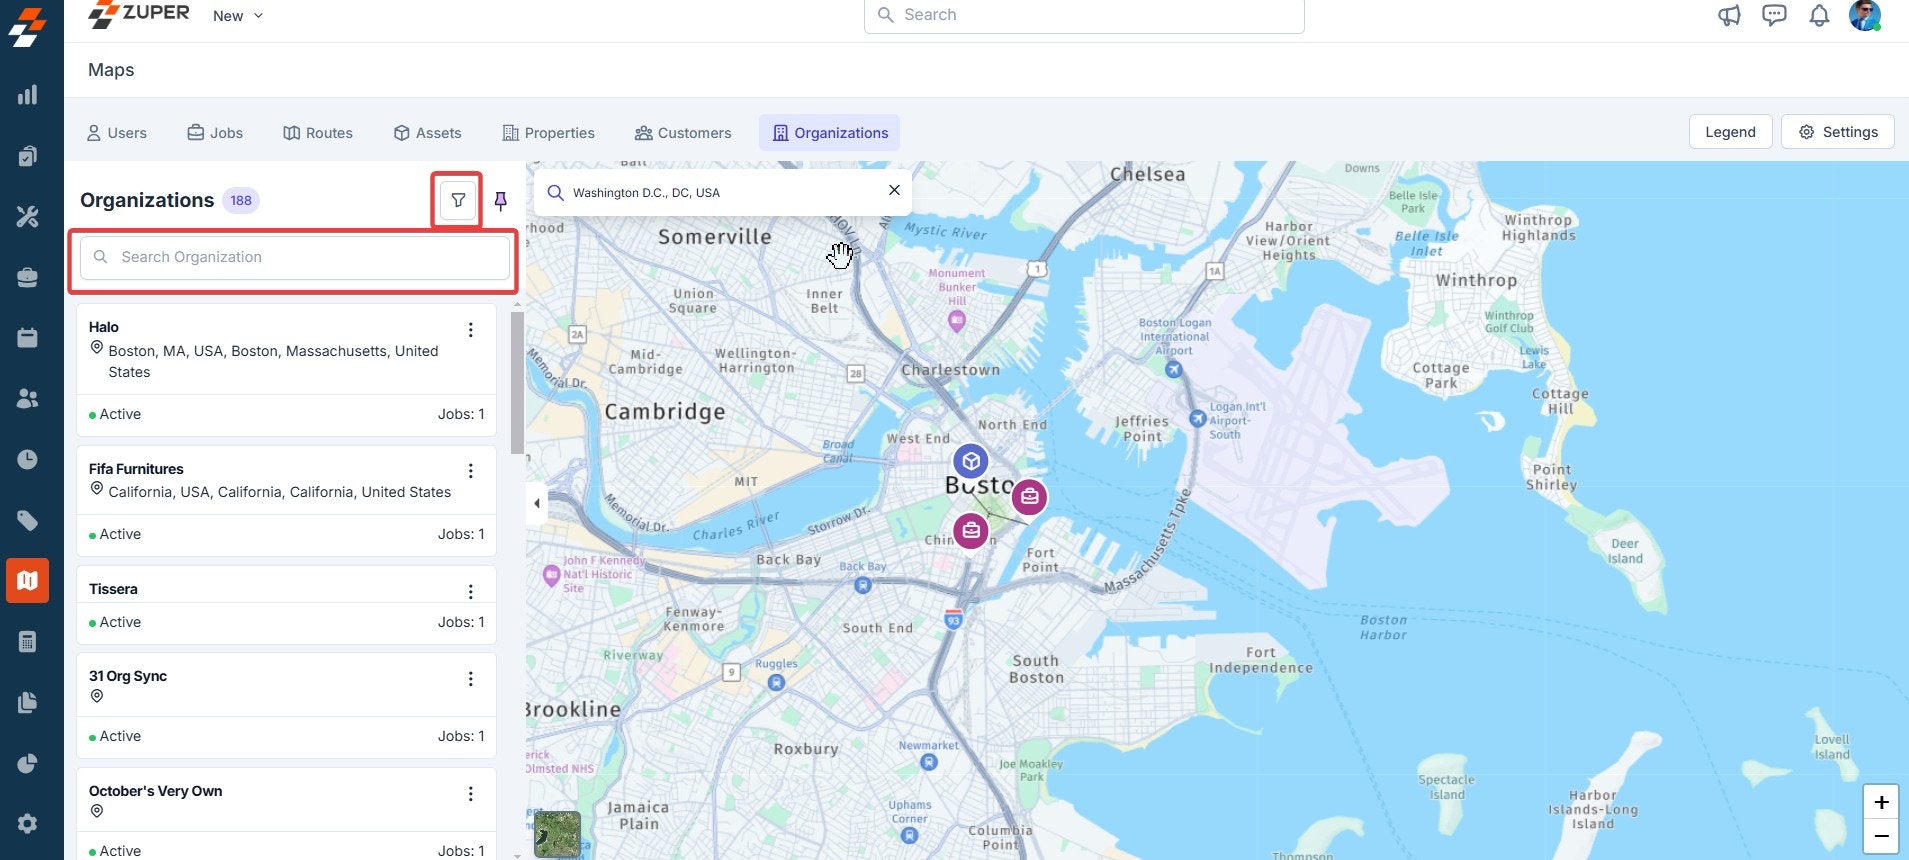
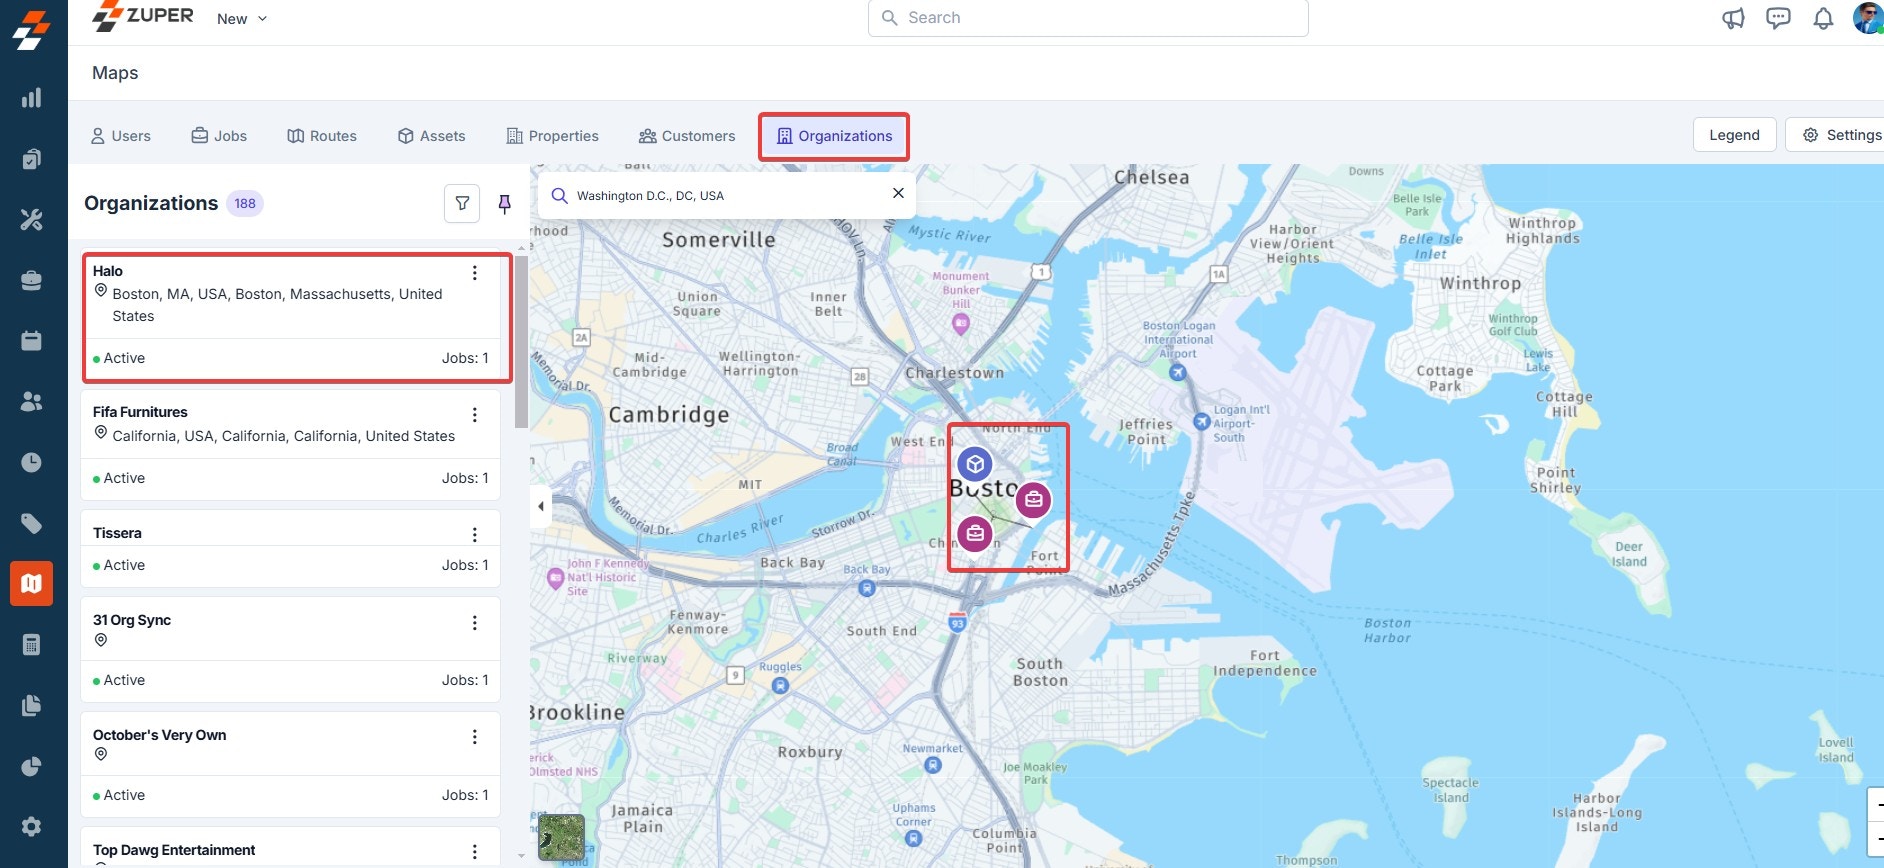 2. You can also search and view specific organization locations on the map. To search a particular organization, click the "**Filter**" icon.
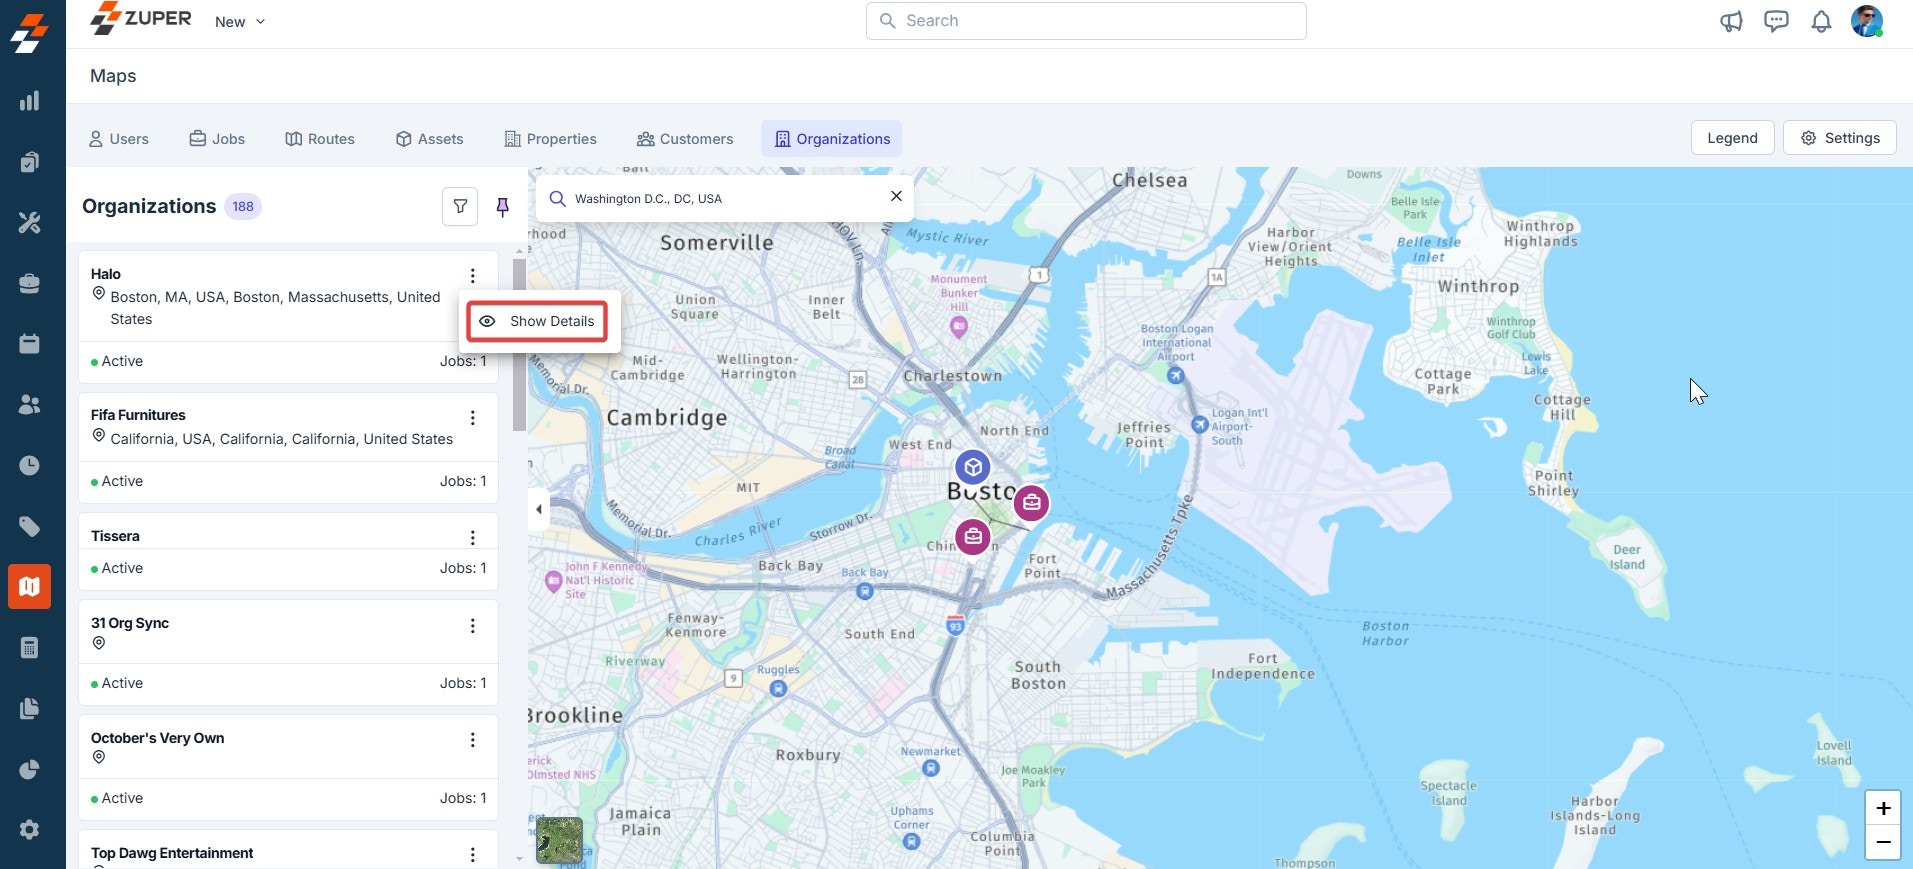
 3. To view any organization details, click the "**Kebab**" icon next to the organization and select "**Show Details**." The organization details, such as address, associated customers, jobs, and other data, are displayed on the right.
 ## Maps Settings
Two major settings can be applied to maps:
* **Overlay all routes on the map.**
* **Overlay service territories.**
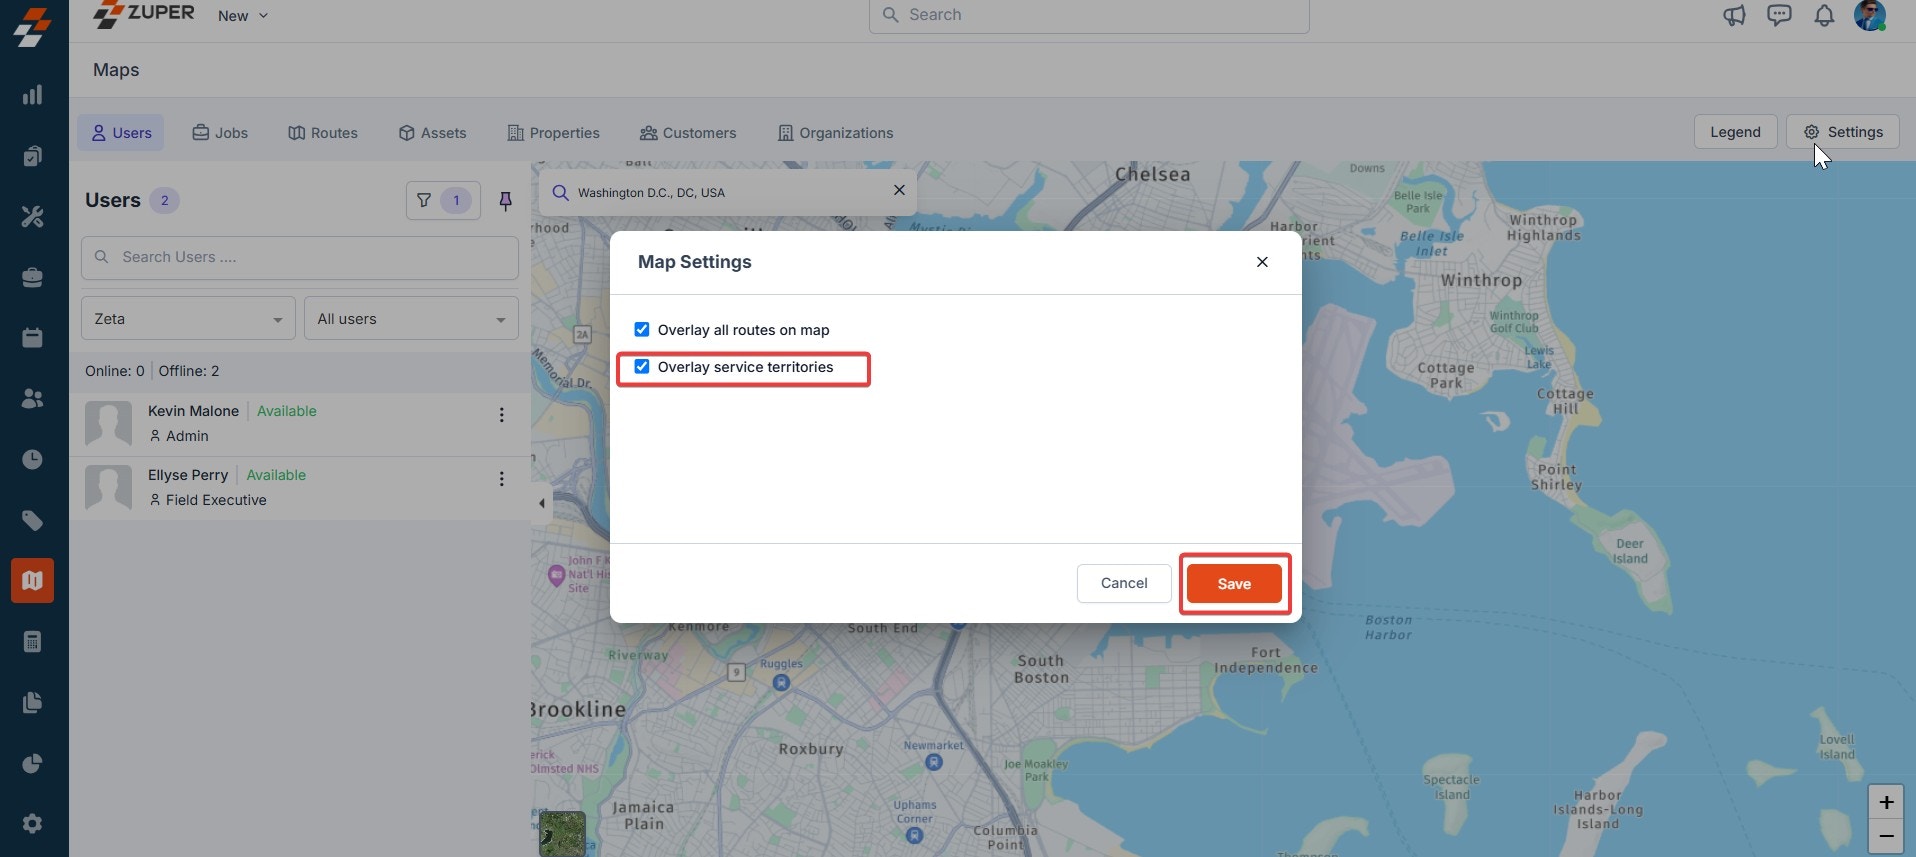
1. Click the "**Settings**" icon at the top right corner of the map and select the following.
* **Overlay all routes on the map**- When selected, you can view all the routes on the map.
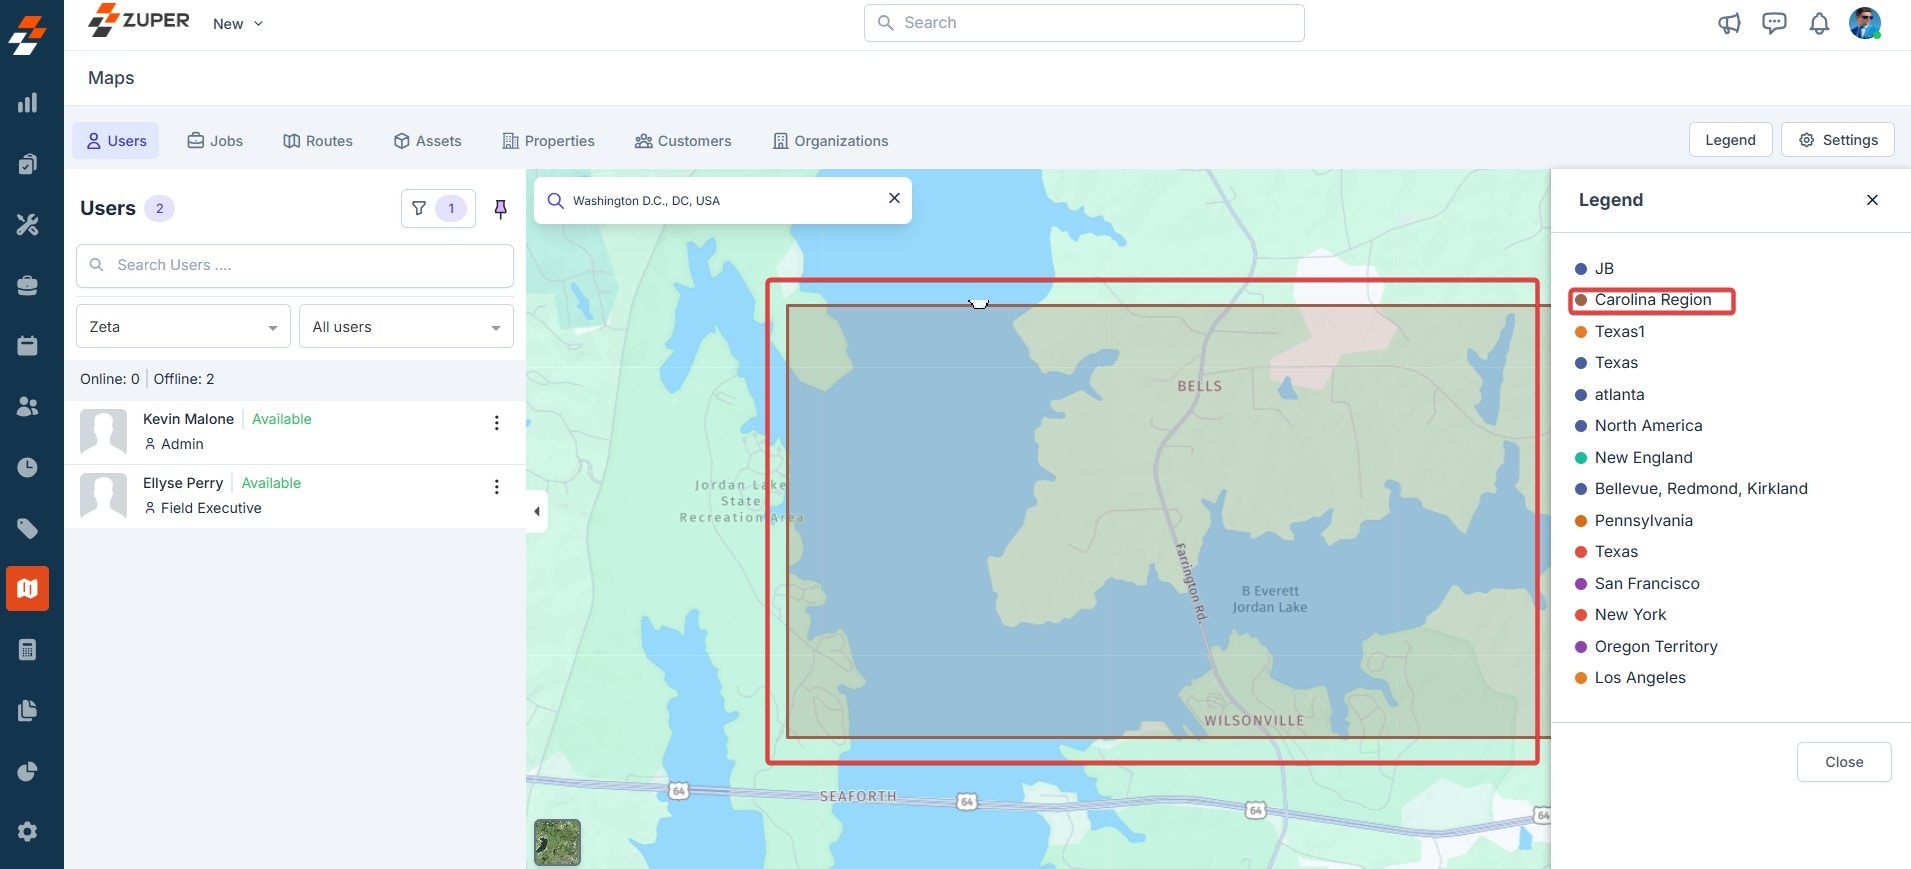
* Overlay service territories- When this is selected, you can view the territories where the routes and jobs are carried out efficiently on the map. Once selected, click the "**Save**" button to confirm.
## Maps Settings
Two major settings can be applied to maps:
* **Overlay all routes on the map.**
* **Overlay service territories.**
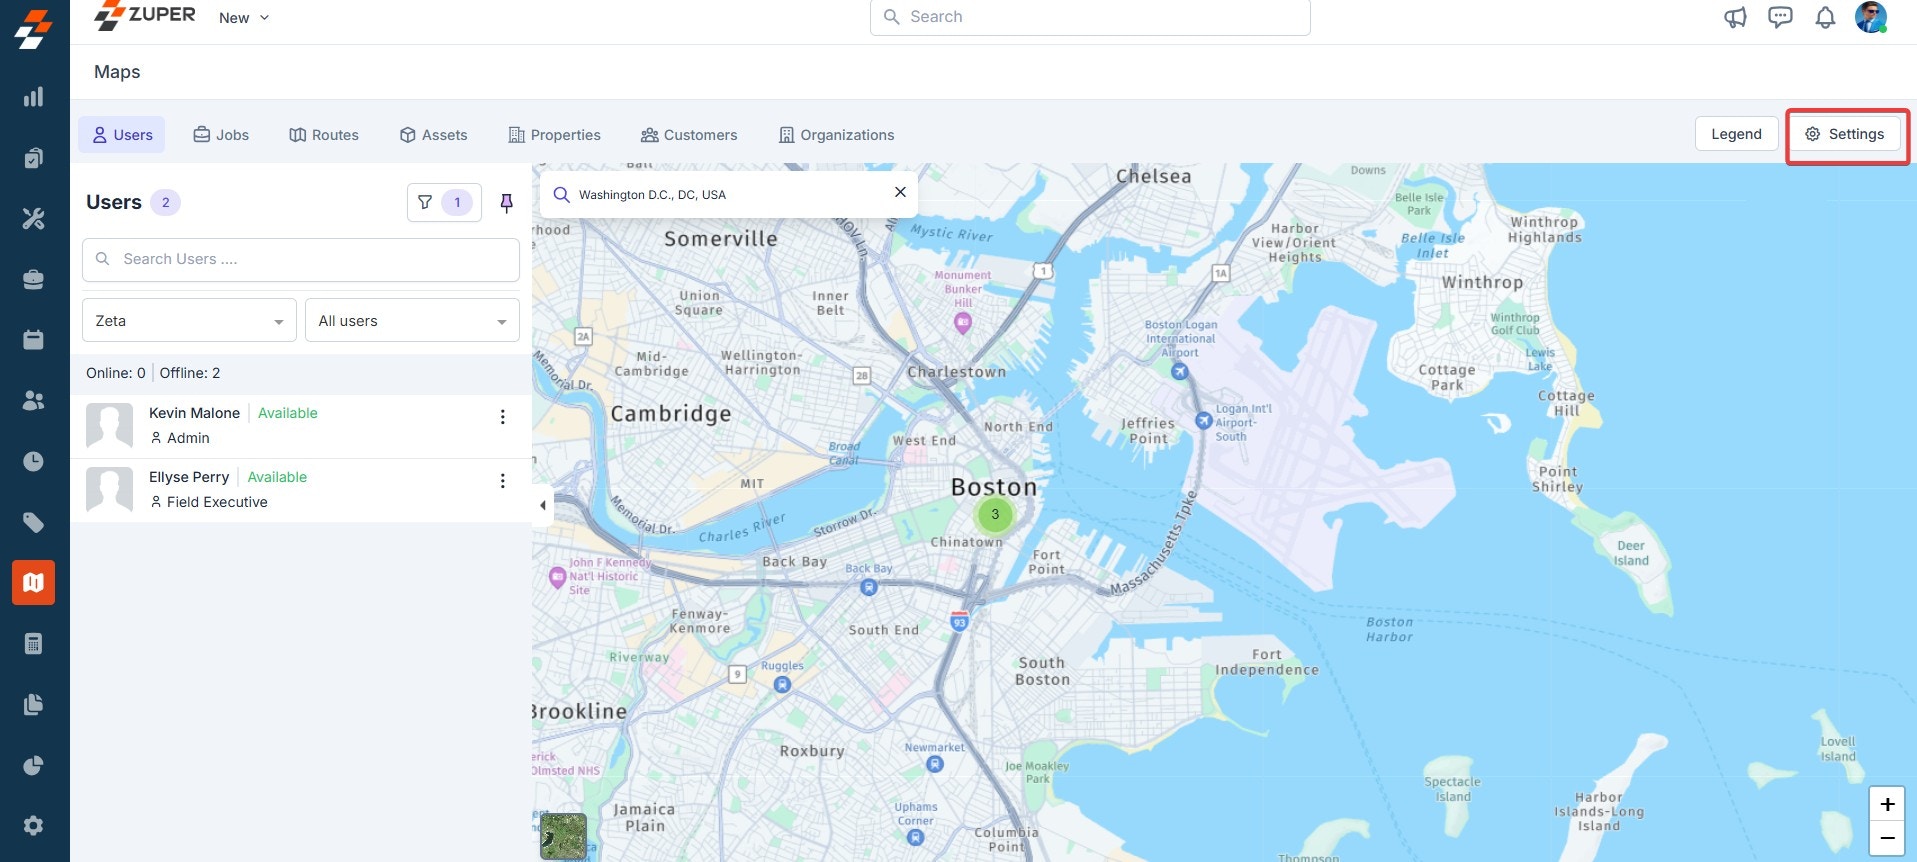
1. Click the "**Settings**" icon at the top right corner of the map and select the following.
* **Overlay all routes on the map**- When selected, you can view all the routes on the map.
* Overlay service territories- When this is selected, you can view the territories where the routes and jobs are carried out efficiently on the map. Once selected, click the "**Save**" button to confirm.
 * To create new service territories, navigate to Settings and select Service Territory. You can create a new service territory by choosing the "**New Service Territory**" option. Additionally, it is possible to edit or deactivate existing service territories by selecting "**Edit Service Territory**" and "**Deactivate Territory**," respectively.
 **Note:** Once a service territory is created, new jobs will automatically be assigned to the technicians who belong there.
So, what's next? Now it's time to explore the Maps module in Zuper with these step-by-step instructions. With this guidance, you can track various modules on the map, including users, jobs, routes, assets, properties, customers, and organizational locations. You can also seamlessly perform additional tasks such as viewing, creating routes, adding jobs, and optimizing routes directly within the module, enhancing operational efficiency and management capabilities.
**Note:** Once a service territory is created, new jobs will automatically be assigned to the technicians who belong there.
So, what's next? Now it's time to explore the Maps module in Zuper with these step-by-step instructions. With this guidance, you can track various modules on the map, including users, jobs, routes, assets, properties, customers, and organizational locations. You can also seamlessly perform additional tasks such as viewing, creating routes, adding jobs, and optimizing routes directly within the module, enhancing operational efficiency and management capabilities.