> ## Documentation Index
> Fetch the complete documentation index at: https://docs.zuper.co/llms.txt
> Use this file to discover all available pages before exploring further.
# Appointments
Not all roofing work happens in a single visit. A job might need an inspection, an adjuster walkthrough, a pre-production check, and the installation itself. These often fall on different days, involve different people, and sometimes span trades such as roofing, gutters, and siding.
Appointments in Zuper let you manage all of that in one job. An appointment represents a scheduled visit. When you create a job, Zuper automatically creates an initial appointment. When a technician needs to return to the site, you can add additional appointments to the same job rather than creating separate jobs or rescheduling existing ones.
Every appointment on a job shares the same invoice, job notes, and job history. This keeps multi-day and multi-visit work on a single record, reduces duplicate data entry, and gives your team a clear view of each visit while managers and dispatchers maintain visibility into the full job.
## Things to Know
* A single appointment is automatically created when you create a new job under a dispatchable job category. If the job category is marked **Non-Dispatchable** (for example, Inspection), the job is created, but no appointment is added.
* You cannot add appointments to a job in a terminated job status, such as Closed or completed.
Prerequisite: Account configuration is required to use this feature. Please contact the Support team for details.
### Add Appointments
1. Open the job you want to add an appointment to.
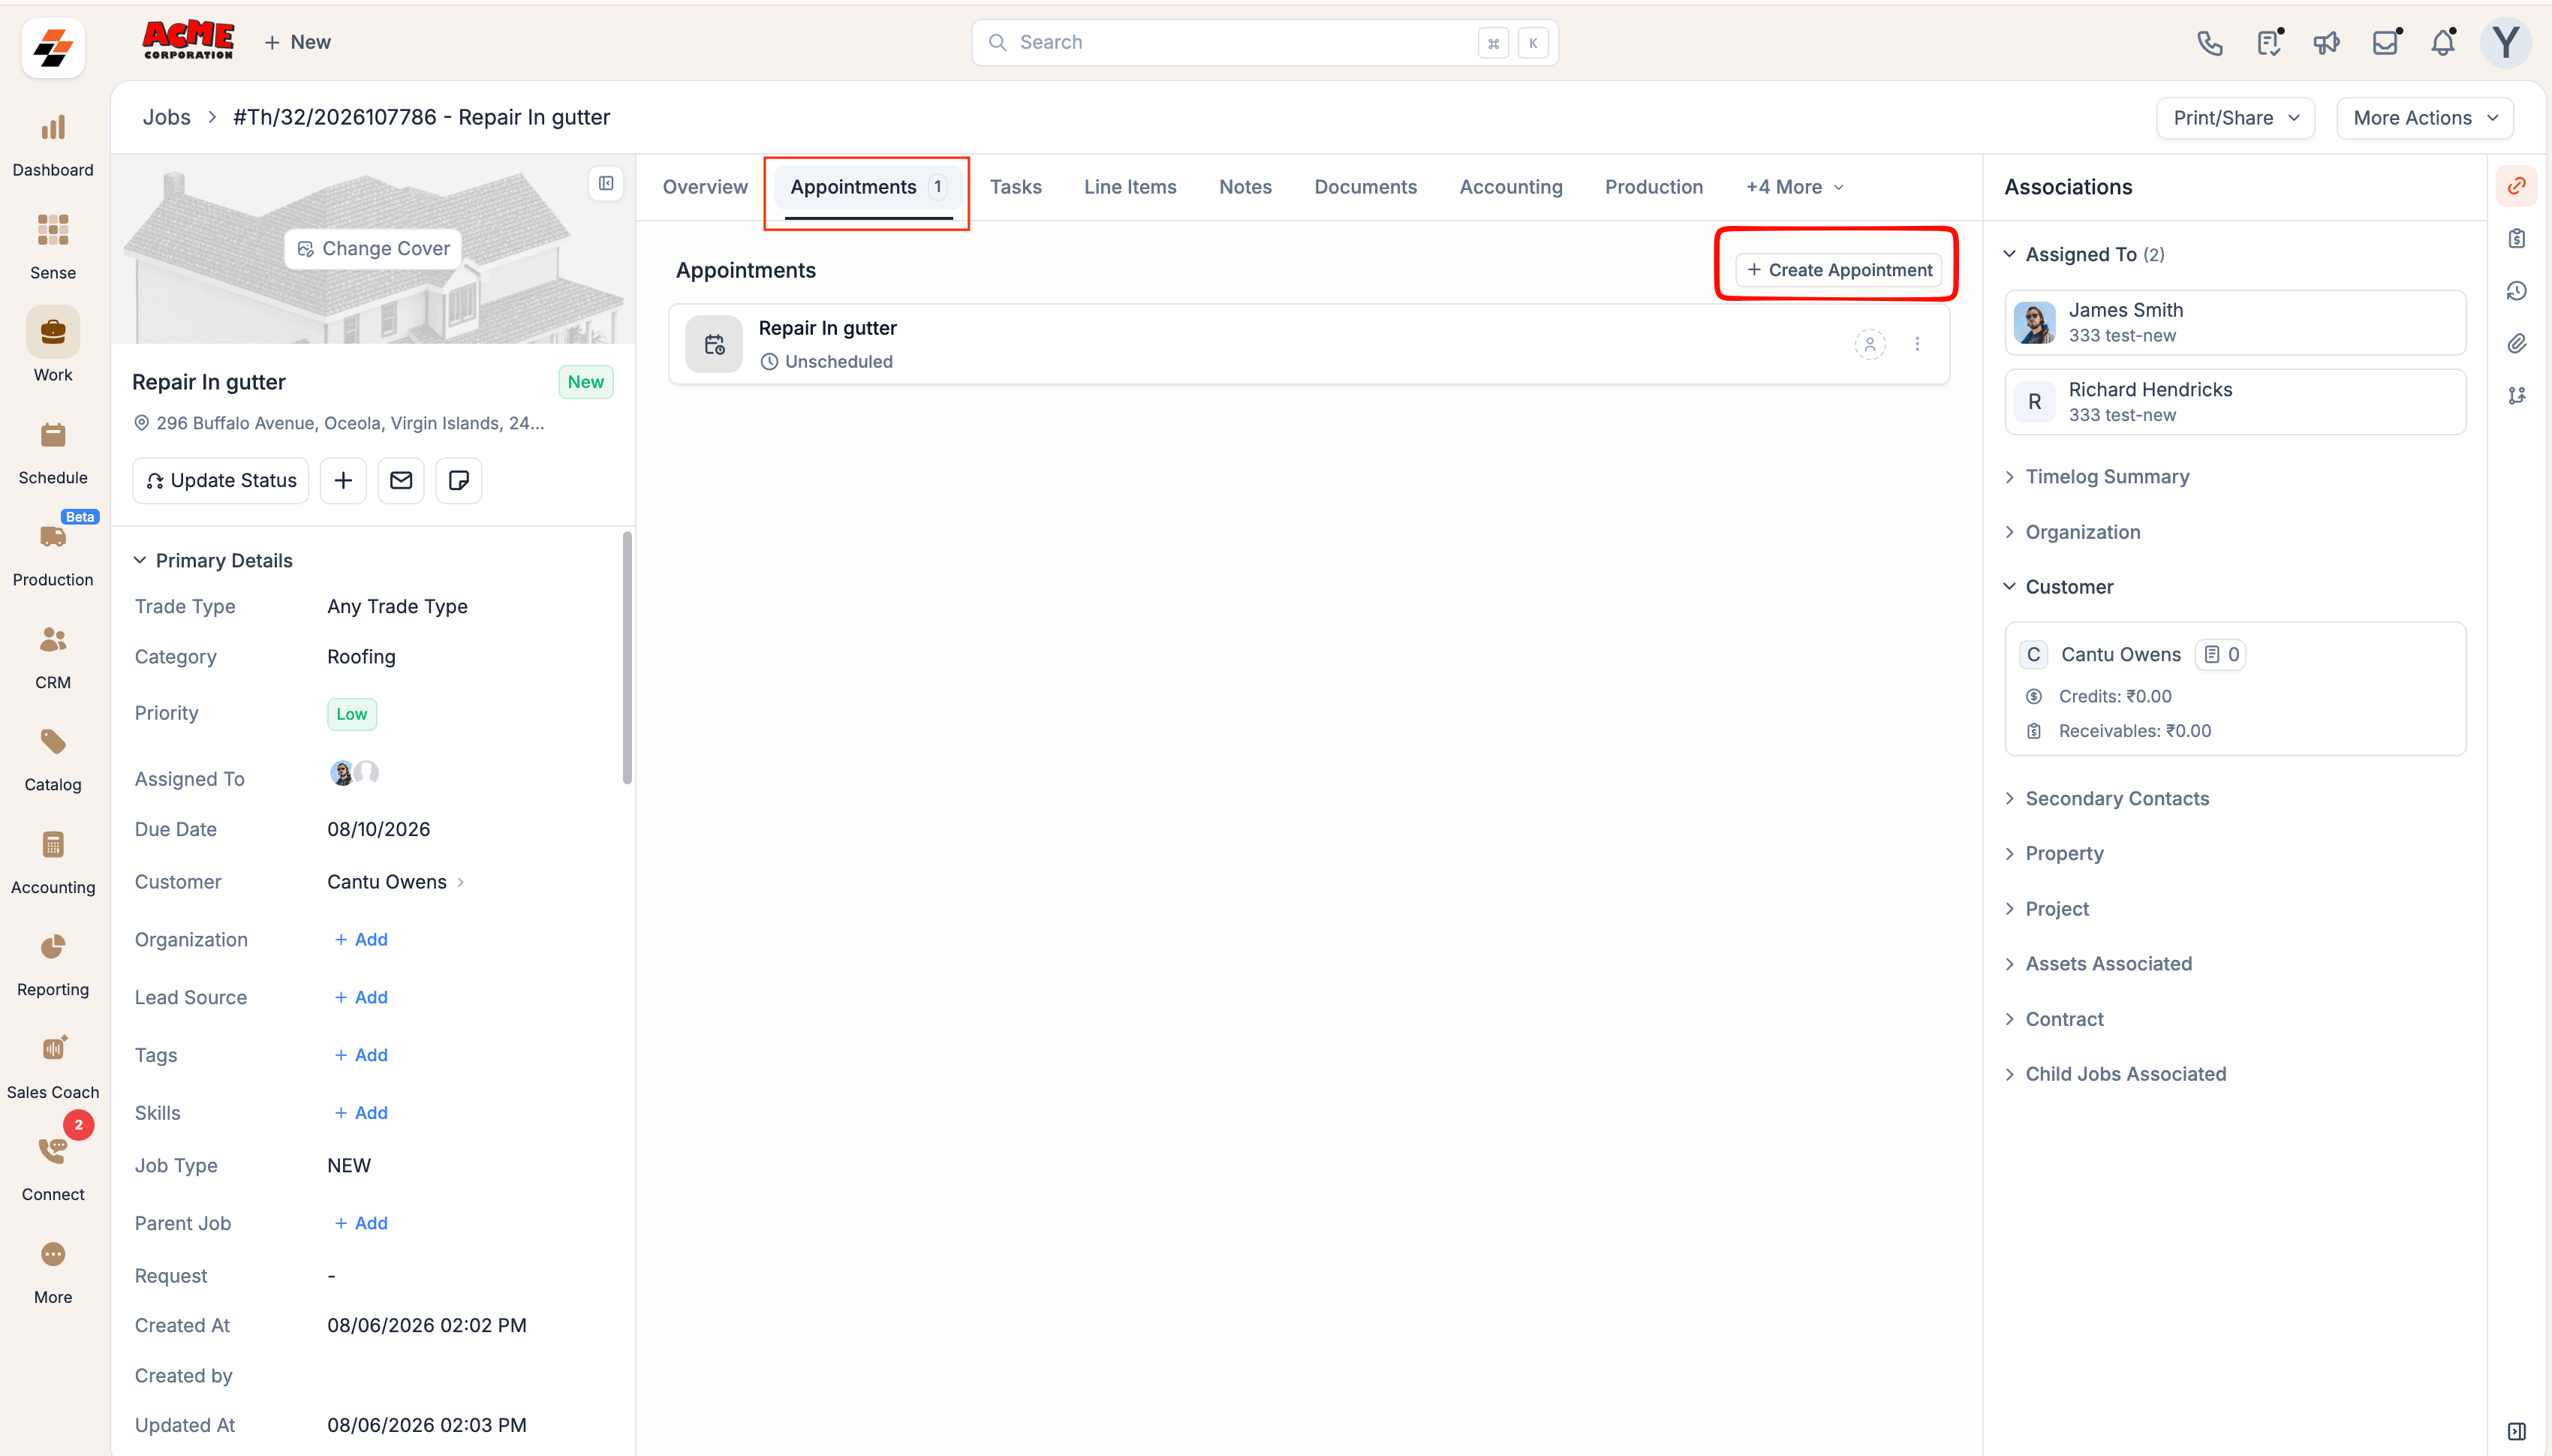
2. Navigate to the **Appointments** tab and click **Create Appointment**.
 3. Fill out the appointment details:
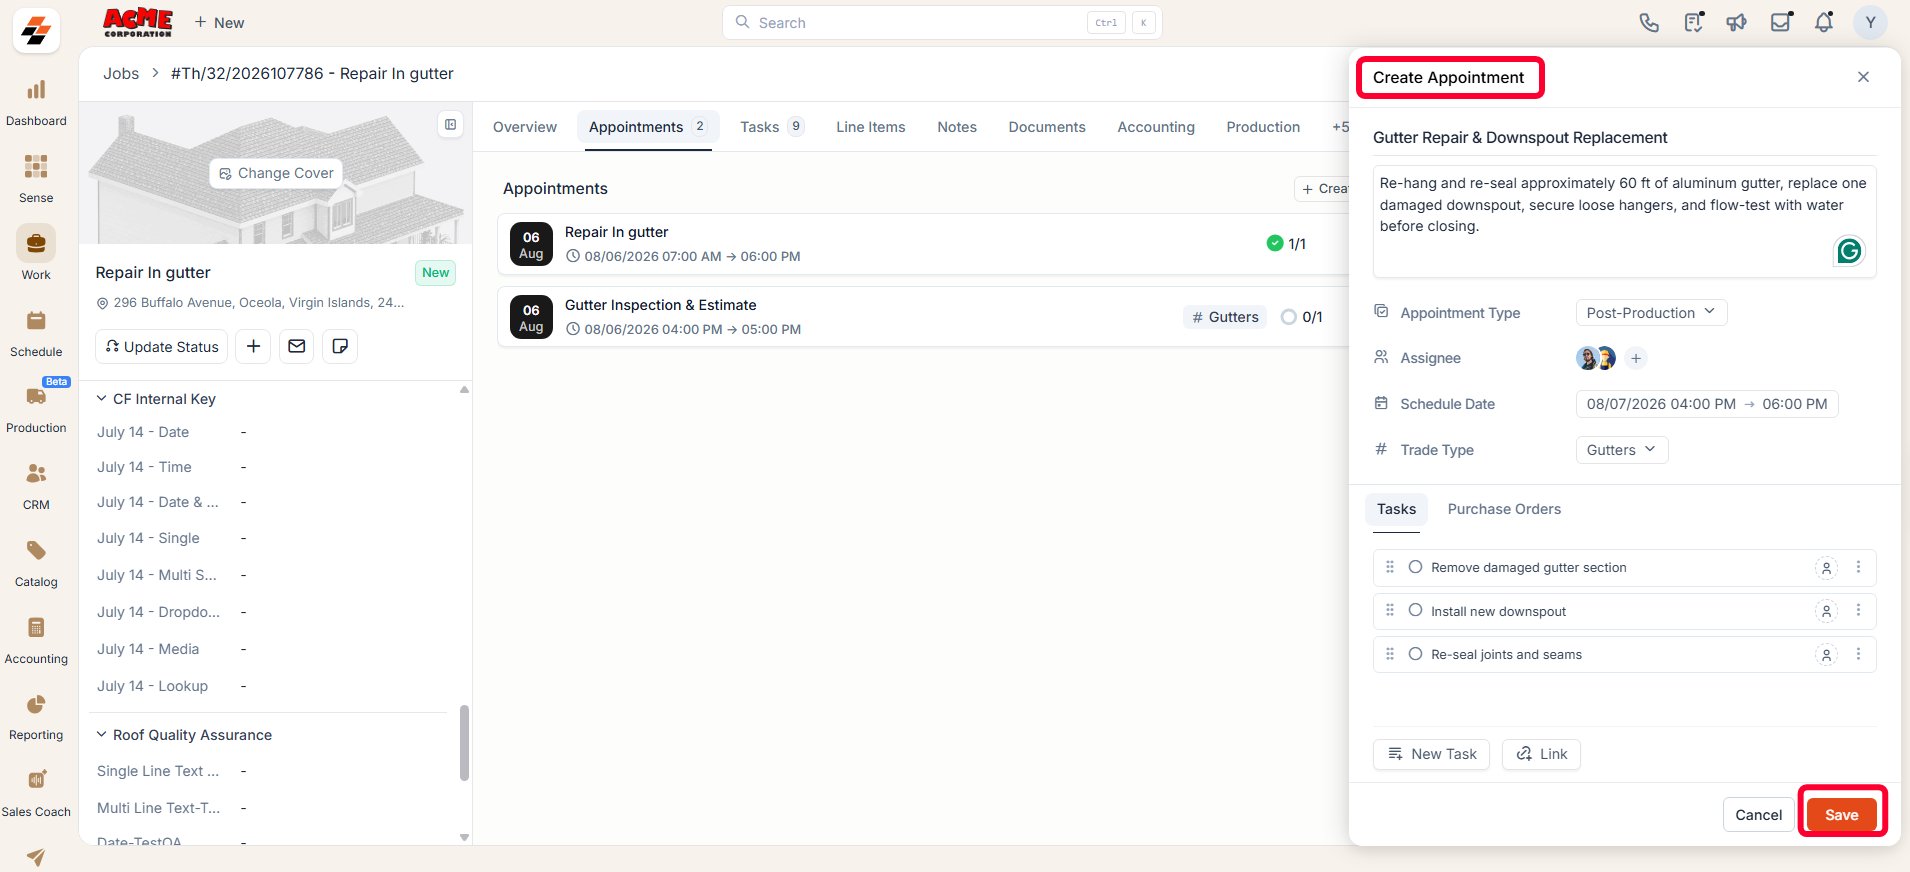
1. Add a title and, if needed, a description.
2. Select the appropriate **Appointment Type** from the dropdown based on the purpose of the appointment.
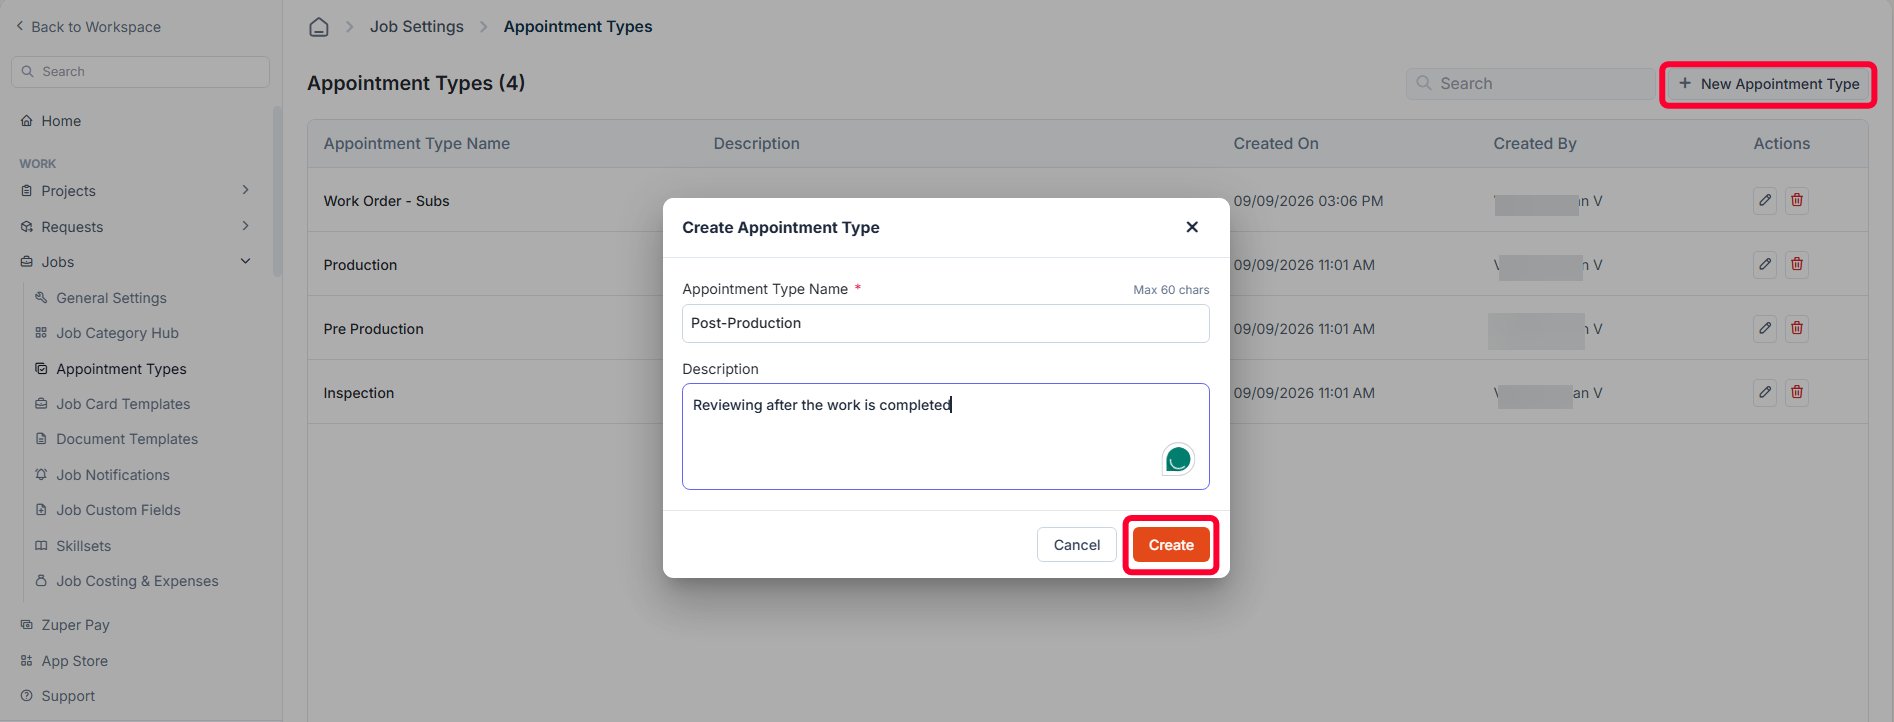
You can configure the appointment types from **Settings > Job Settings > Appointment Types**. Once configured, these types appear in the **Appointment Type** dropdown when you create an appointment.
3. Fill out the appointment details:
1. Add a title and, if needed, a description.
2. Select the appropriate **Appointment Type** from the dropdown based on the purpose of the appointment.
You can configure the appointment types from **Settings > Job Settings > Appointment Types**. Once configured, these types appear in the **Appointment Type** dropdown when you create an appointment.
 3. Assign technicians under **Assignee**.
4. Set the **Schedule Date** either *manually* or using [Assisted Scheduling](Work_Order_Management/Jobs/Assisted_Scheduling#assisted-scheduling).
5. Choose the **trade type** if this appointment is tied to a specific trade.
6. Switch to the **Tasks** tab if you want to attach a task to this appointment, either by creating a new one or by linking to an existing one.
7. Switch to **Purchase Orders** if you want to associate a *Purchase Order* or *Material Order* with the appointment.
**Notes**:
* Appointments work on Zuper's new [task](/Zuper_Dashboard/Tasks) experience feature, so if your organization is still on the older service task setup, reach out to [support@zuper.co](mailto:support@zuper.co) to get that switched.
* When a technician is assigned to a task linked to an appointment, the user will be automatically added to a Job as well.
4. Click **Save**.
3. Assign technicians under **Assignee**.
4. Set the **Schedule Date** either *manually* or using [Assisted Scheduling](Work_Order_Management/Jobs/Assisted_Scheduling#assisted-scheduling).
5. Choose the **trade type** if this appointment is tied to a specific trade.
6. Switch to the **Tasks** tab if you want to attach a task to this appointment, either by creating a new one or by linking to an existing one.
7. Switch to **Purchase Orders** if you want to associate a *Purchase Order* or *Material Order* with the appointment.
**Notes**:
* Appointments work on Zuper's new [task](/Zuper_Dashboard/Tasks) experience feature, so if your organization is still on the older service task setup, reach out to [support@zuper.co](mailto:support@zuper.co) to get that switched.
* When a technician is assigned to a task linked to an appointment, the user will be automatically added to a Job as well.
4. Click **Save**.
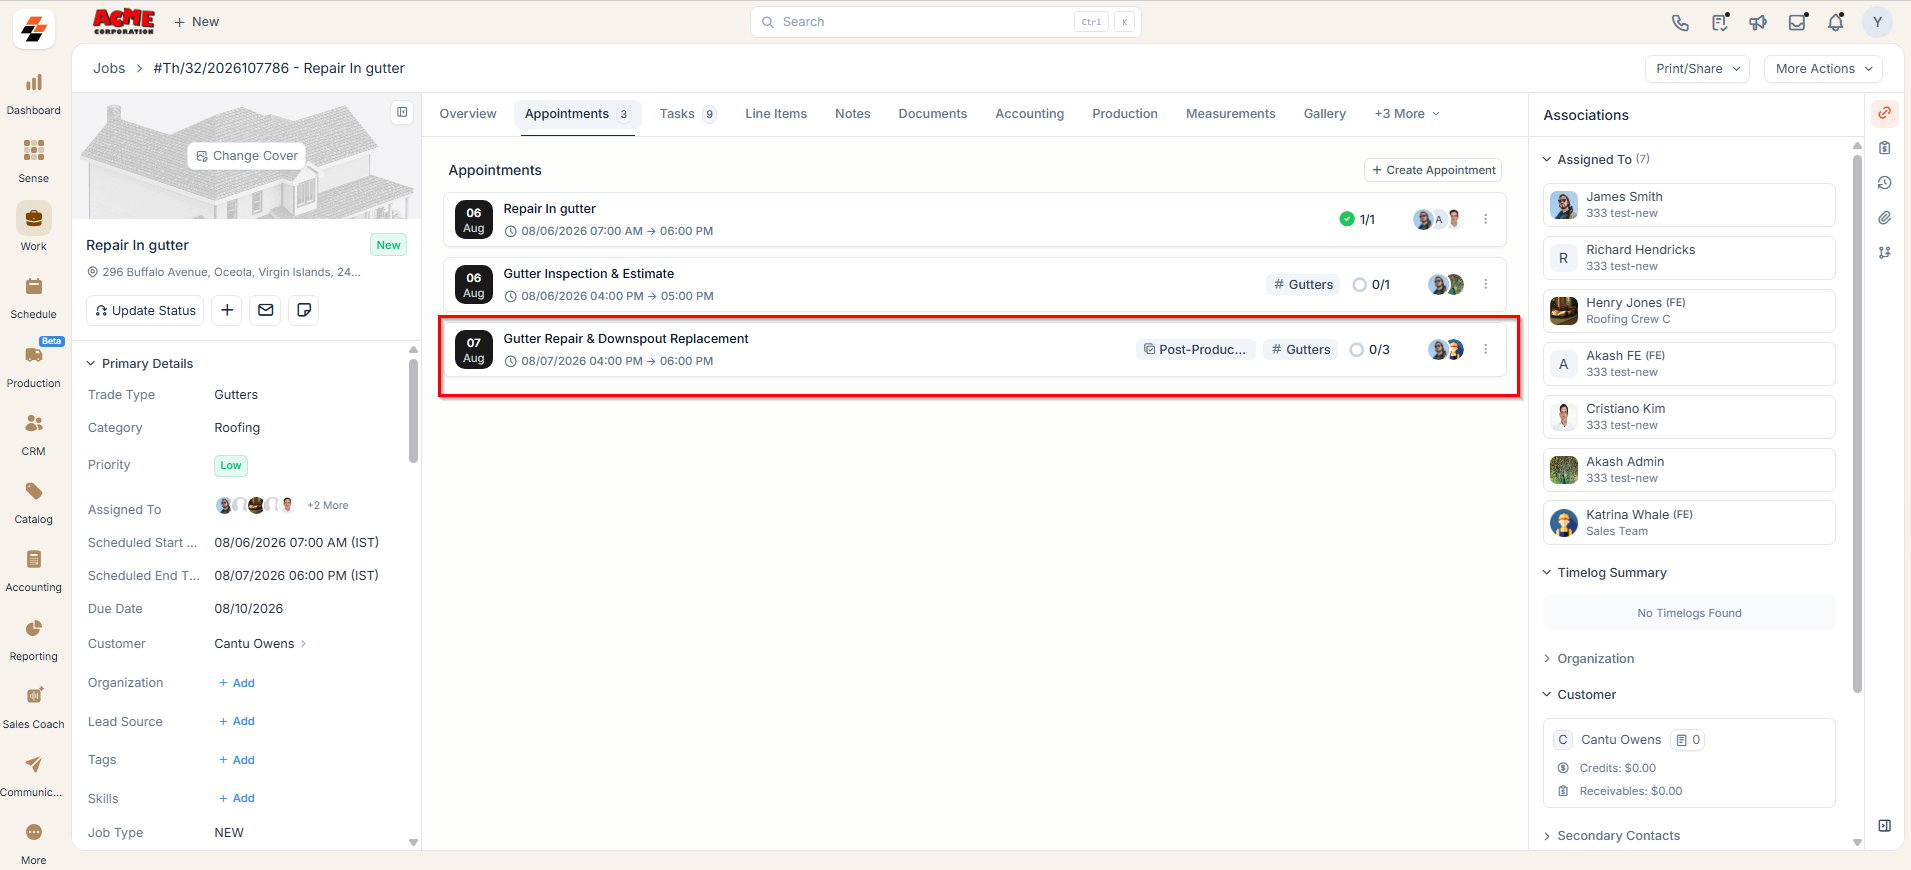
 The appointment is added to the job with the configured **Schedule Date**, **Assignee**, **Appointment Type**, and **Trade Type**. The selected tasks and associated orders are also linked to the appointment, if applicable.
 ### Managing an appointment
* **Edit**: Click the appointment's name to open and modify its details.
* **Delete**: Click the context menu and choose Remove.
* **Clone**: Click the context menu and choose Clone to create a copy of it.
### Managing an appointment
* **Edit**: Click the appointment's name to open and modify its details.
* **Delete**: Click the context menu and choose Remove.
* **Clone**: Click the context menu and choose Clone to create a copy of it.
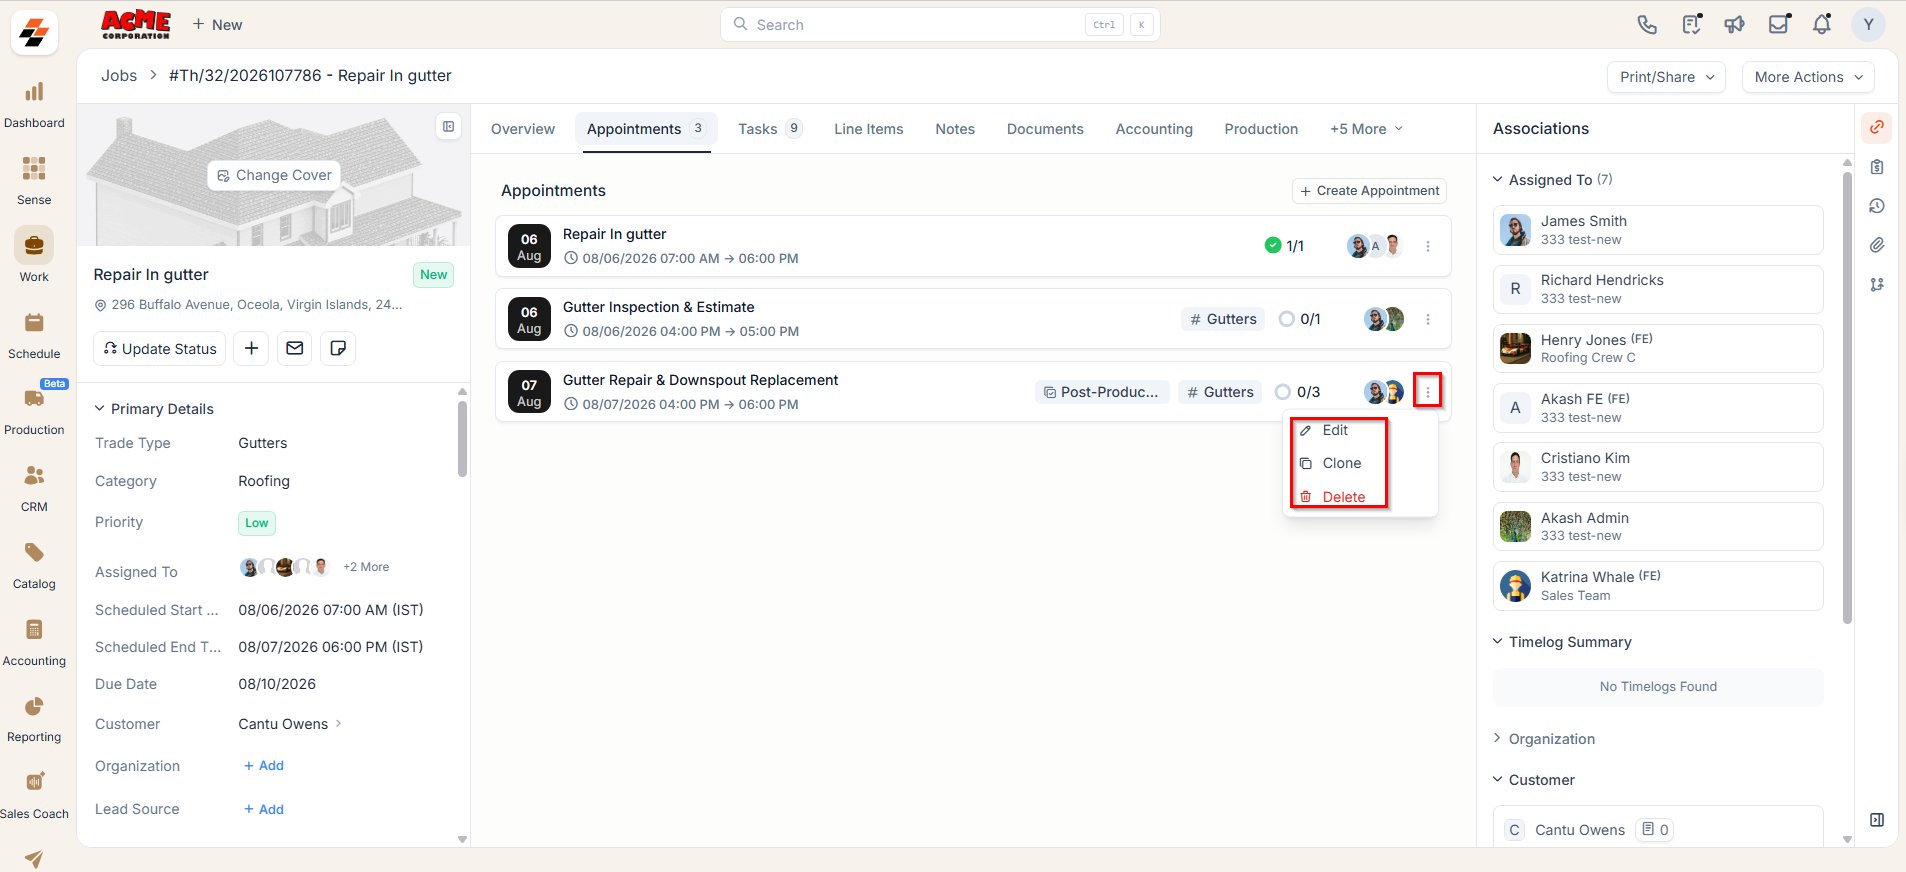 * **Schedule**: Click the ***Unscheduled*** icon and choose either Manual or Assisted scheduling.
* **Assign**: Click the ***Assignee*** icon and select the user you want to assign to the appointment.
### Appointment status on the Jobs list
The Jobs list shows the status of each job’s appointments in the Scheduled Date column. Use the colored status bar to identify appointments that need scheduling or follow-up without opening the job.
* **Grey**: The appointment is unscheduled.
* **Blue**: The appointment is scheduled.
* **Green**: The appointment is completed.
* **Schedule**: Click the ***Unscheduled*** icon and choose either Manual or Assisted scheduling.
* **Assign**: Click the ***Assignee*** icon and select the user you want to assign to the appointment.
### Appointment status on the Jobs list
The Jobs list shows the status of each job’s appointments in the Scheduled Date column. Use the colored status bar to identify appointments that need scheduling or follow-up without opening the job.
* **Grey**: The appointment is unscheduled.
* **Blue**: The appointment is scheduled.
* **Green**: The appointment is completed.
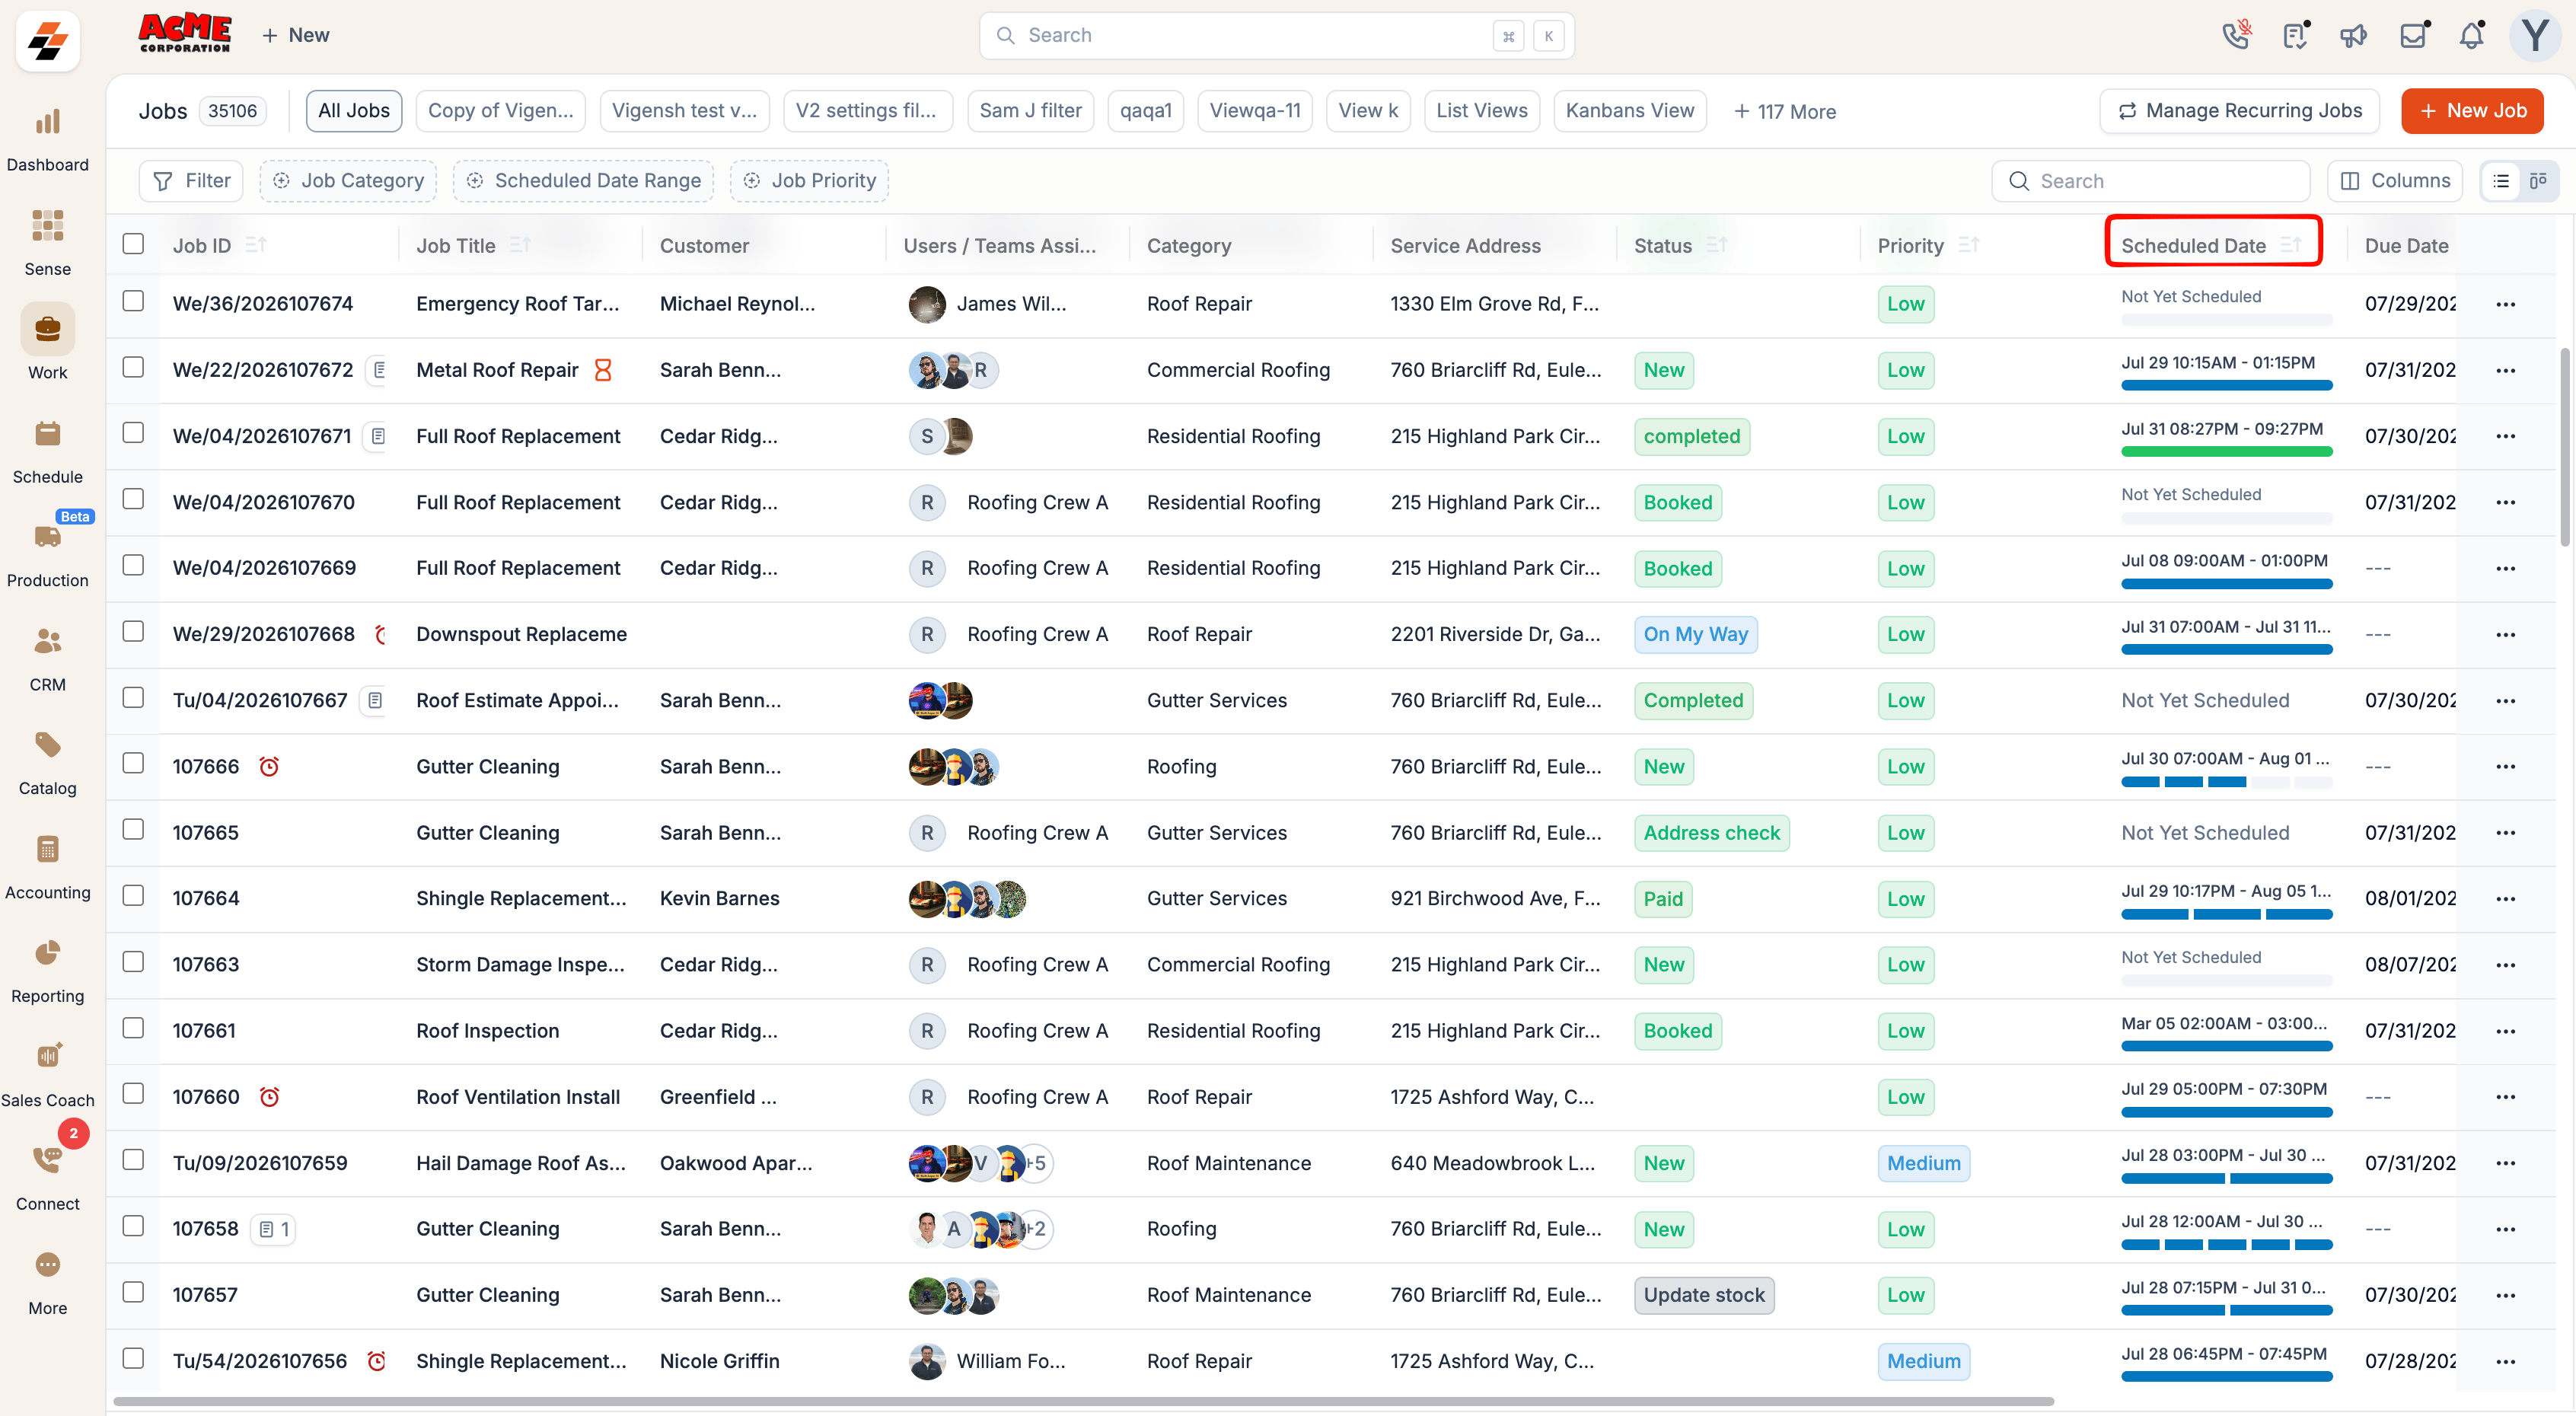 When a job has multiple appointments, the bar is divided into one segment for each appointment. Each segment shows the status of its corresponding visit, so you can review all appointment statuses from a single job row.
### Frequently Asked Questions
* Use Appointments when a single job needs multiple visits to the customer site with no fixed schedule. For example, a repair or replacement that spans several days, where each visit happens as the work requires rather than on a set cadence.
* Use a Recurring Job when you need to visit the customer site at a regular frequency, such as monthly or yearly maintenance. A recurring job carries only one appointment, since appointments are meant for irregular, as-needed visits rather than fixed intervals.
No. Scheduling affects only the selected appointment. Other appointments associated with the same job keep their existing schedules.
Yes. Each appointment can be assigned to different users or teams.
The technician is assigned to the task and will also be added to the associated appointment and parent job.
No. A task can be linked to only one appointment.
Yes. A purchase order can be linked to multiple appointments when the same materials are needed across visits.
No. A purchase order linked to an appointment remains visible on the appointment card as long as it hasn’t been fulfilled. Once it's fulfilled, it no longer shows on the card. Either way, it doesn't block you from working on or completing the appointment.
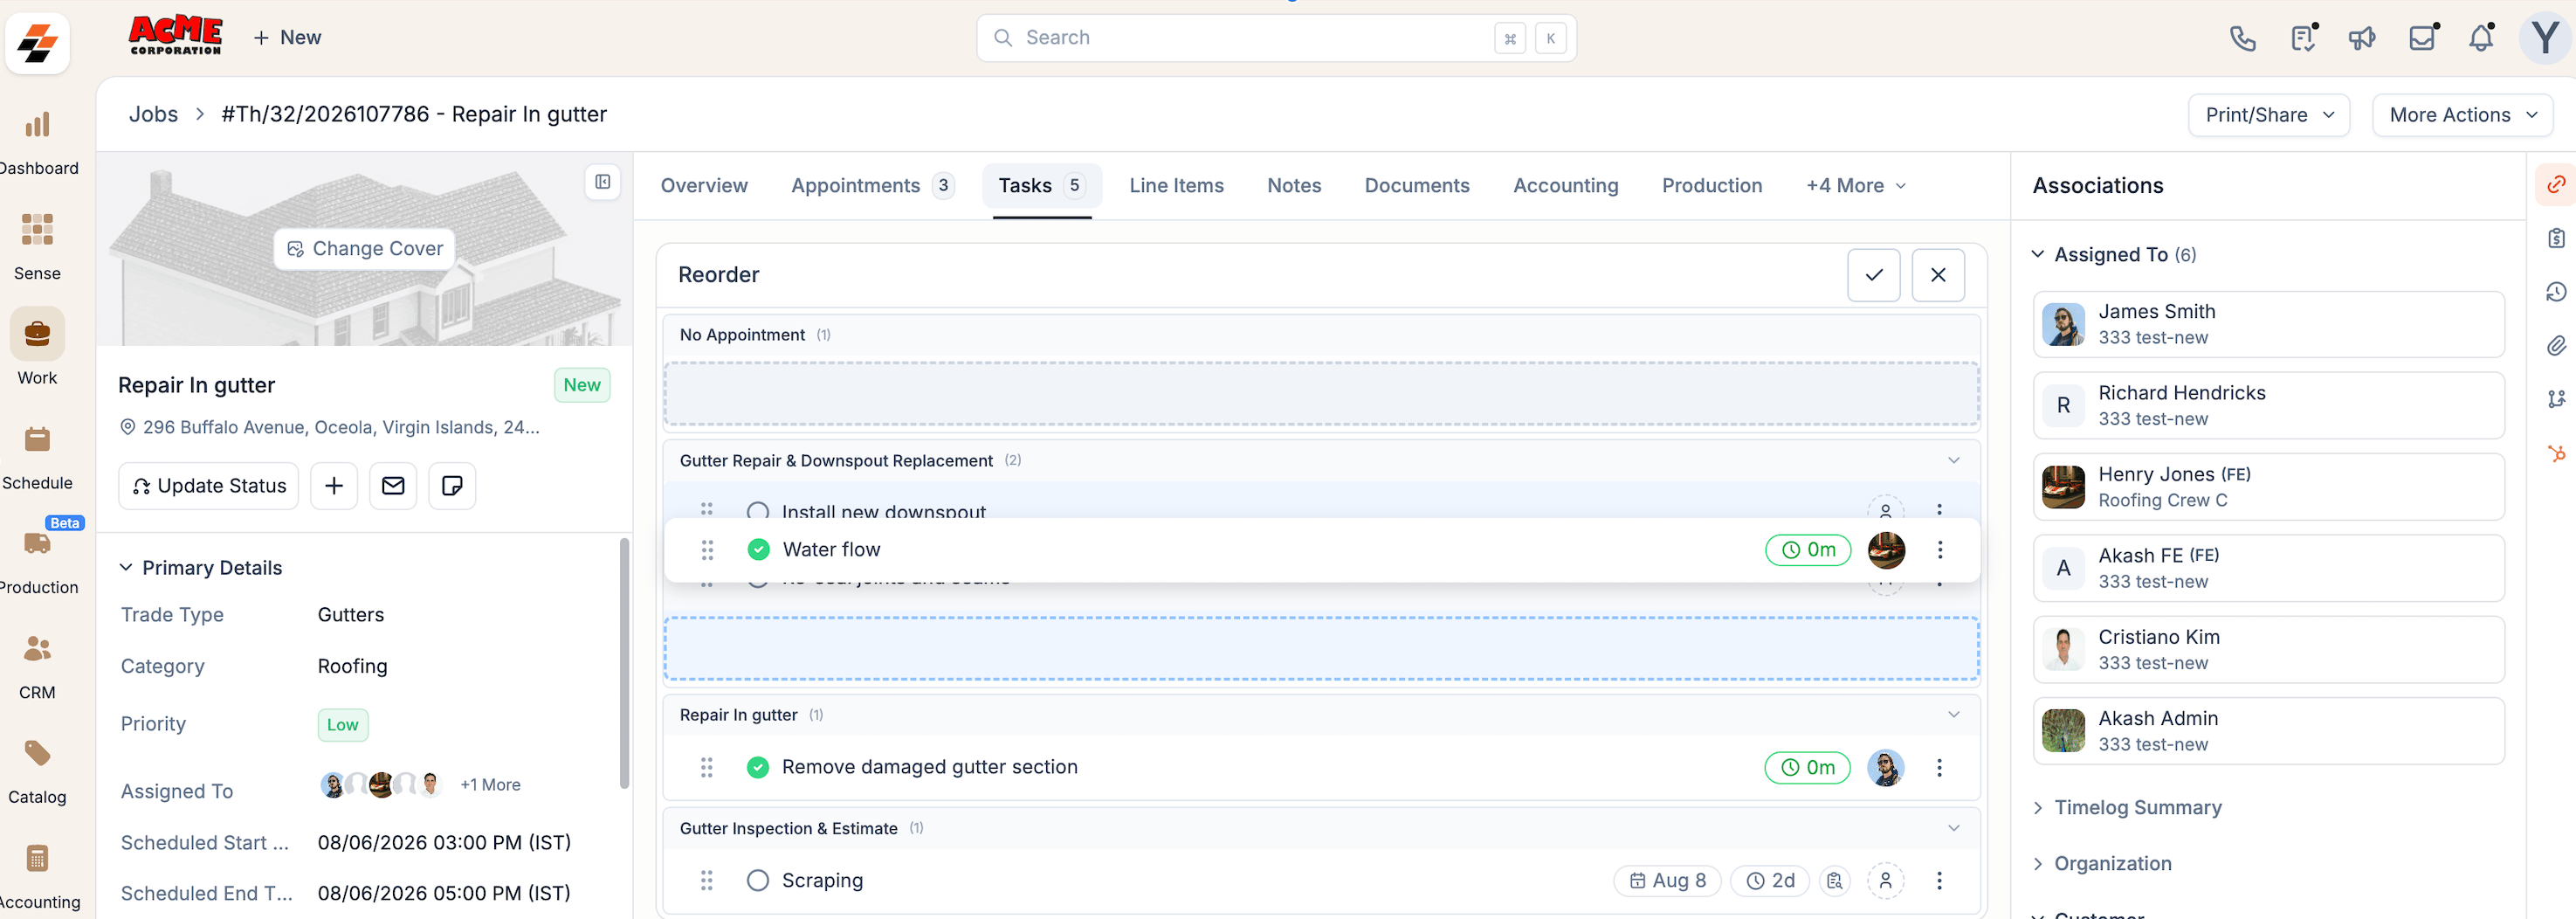
Yes. On the **Tasks** tab, tasks are grouped by the appointment they belong to. In reorder mode, dragging a task into another group re-links it to that appointment. Reorder carefully so each task stays with the correct appointment.
When a job has multiple appointments, the bar is divided into one segment for each appointment. Each segment shows the status of its corresponding visit, so you can review all appointment statuses from a single job row.
### Frequently Asked Questions
* Use Appointments when a single job needs multiple visits to the customer site with no fixed schedule. For example, a repair or replacement that spans several days, where each visit happens as the work requires rather than on a set cadence.
* Use a Recurring Job when you need to visit the customer site at a regular frequency, such as monthly or yearly maintenance. A recurring job carries only one appointment, since appointments are meant for irregular, as-needed visits rather than fixed intervals.
No. Scheduling affects only the selected appointment. Other appointments associated with the same job keep their existing schedules.
Yes. Each appointment can be assigned to different users or teams.
The technician is assigned to the task and will also be added to the associated appointment and parent job.
No. A task can be linked to only one appointment.
Yes. A purchase order can be linked to multiple appointments when the same materials are needed across visits.
No. A purchase order linked to an appointment remains visible on the appointment card as long as it hasn’t been fulfilled. Once it's fulfilled, it no longer shows on the card. Either way, it doesn't block you from working on or completing the appointment.
Yes. On the **Tasks** tab, tasks are grouped by the appointment they belong to. In reorder mode, dragging a task into another group re-links it to that appointment. Reorder carefully so each task stays with the correct appointment.
 Your existing [job notifications](/Settings/Modules/Jobs/configuring_job_notifications) continue to work when a job has appointments. Each one is based on a different trigger:
* **Job Reminder** is based on the appointment start date and time. Customers can be reminded ahead of each scheduled visit.
* **Job Delay Alert** is based on the job start time, end time, due date, or status.
* **Job Status Alert** is based on the job status.
Delay alerts and status alerts apply to the whole job, not to a single appointment. For example, an admin links a Job Status Alert to the On My Way status. When a technician sets the job to On My Way before a visit, the customer is notified. On a multi-visit job, the technician can set On My Way again, and the customer will be notified.
No. They serve different purposes on a job.
An appointment is the schedule for a visit. It defines when the visit happens and who is going, with its own schedule, assignees, and trade type. A task is the work itself, such as an inspection or a repair step to be completed during the visit. You can link tasks to an appointment to show which work belongs to which visit, or leave them unlinked.
No. Time logs are tracked at the job level. Work and travel time recorded by technicians roll up to the job as a whole, not to individual appointments.
You can configure appointment types from **Settings > Job Settings > Appointment Types**. Once configured, the appointment types are available in the **Appointment Type** dropdown when creating an appointment from the **job creation page**, **Job Details page**, or the **job creation side sheet** accessed from the **Dispatch Board, Calendar, and Projects** modules.
After an appointment type is selected, it is associated with the appointment and can be viewed on the **appointment card** in Job Details. You can also enable the **Appointment Type** attribute in the **Dispatch Board** and **Calendar** settings to display the appointment type on appointment cards in those views.
Your existing [job notifications](/Settings/Modules/Jobs/configuring_job_notifications) continue to work when a job has appointments. Each one is based on a different trigger:
* **Job Reminder** is based on the appointment start date and time. Customers can be reminded ahead of each scheduled visit.
* **Job Delay Alert** is based on the job start time, end time, due date, or status.
* **Job Status Alert** is based on the job status.
Delay alerts and status alerts apply to the whole job, not to a single appointment. For example, an admin links a Job Status Alert to the On My Way status. When a technician sets the job to On My Way before a visit, the customer is notified. On a multi-visit job, the technician can set On My Way again, and the customer will be notified.
No. They serve different purposes on a job.
An appointment is the schedule for a visit. It defines when the visit happens and who is going, with its own schedule, assignees, and trade type. A task is the work itself, such as an inspection or a repair step to be completed during the visit. You can link tasks to an appointment to show which work belongs to which visit, or leave them unlinked.
No. Time logs are tracked at the job level. Work and travel time recorded by technicians roll up to the job as a whole, not to individual appointments.
You can configure appointment types from **Settings > Job Settings > Appointment Types**. Once configured, the appointment types are available in the **Appointment Type** dropdown when creating an appointment from the **job creation page**, **Job Details page**, or the **job creation side sheet** accessed from the **Dispatch Board, Calendar, and Projects** modules.
After an appointment type is selected, it is associated with the appointment and can be viewed on the **appointment card** in Job Details. You can also enable the **Appointment Type** attribute in the **Dispatch Board** and **Calendar** settings to display the appointment type on appointment cards in those views.